30 Fun & Easy 3D Prints to Level Up Your Skills After the Benchy

Level up your 3D printing game without the headaches. These 30 easy projects teach you new skills while keeping it fun.
So, you’ve got your shiny new 3D printer set up on your work bench, you’ve ready up on the basics, even printed a benchy or two. Now what?
Sorting through the bewildering amount of models on sites like Printable or MakerWorld, to help build your skills, but that are not so complex that they demotivate you, can be overwhelming.
We’re here to help.
We’ve chosen models that are fun and easy, but at the same time explore a variety of techniques and challenges to help you grow as a Maker. We all have to start somewhere, so the first group of projects are for total newbies in the world of 3D printing. If you’re somewhat confident in your expertise, skip to one of the next sections where we found more ambitious projects – those with moving and flexible parts, those with multiple components, and those that help build specific new skills.
And as always, if you see something amazing but you’re not quite ready for the demands of printing it yourself, you could always try a printing service like Craftcloud. Nothing like having an amazing print of a complex object sitting on your desk to help motivate you to work on your own skills.
But if you’re ready to test your skills on some low-risk, high-reward projects, look through our curated list below and let’s get printing!
First Steps
Here are some straightforward projects that result in useful objects as soon as you remove them from your printer’s build plate. In each case, we’ll also highlight ideas to follow up with as your experience develops.
Cali Cat
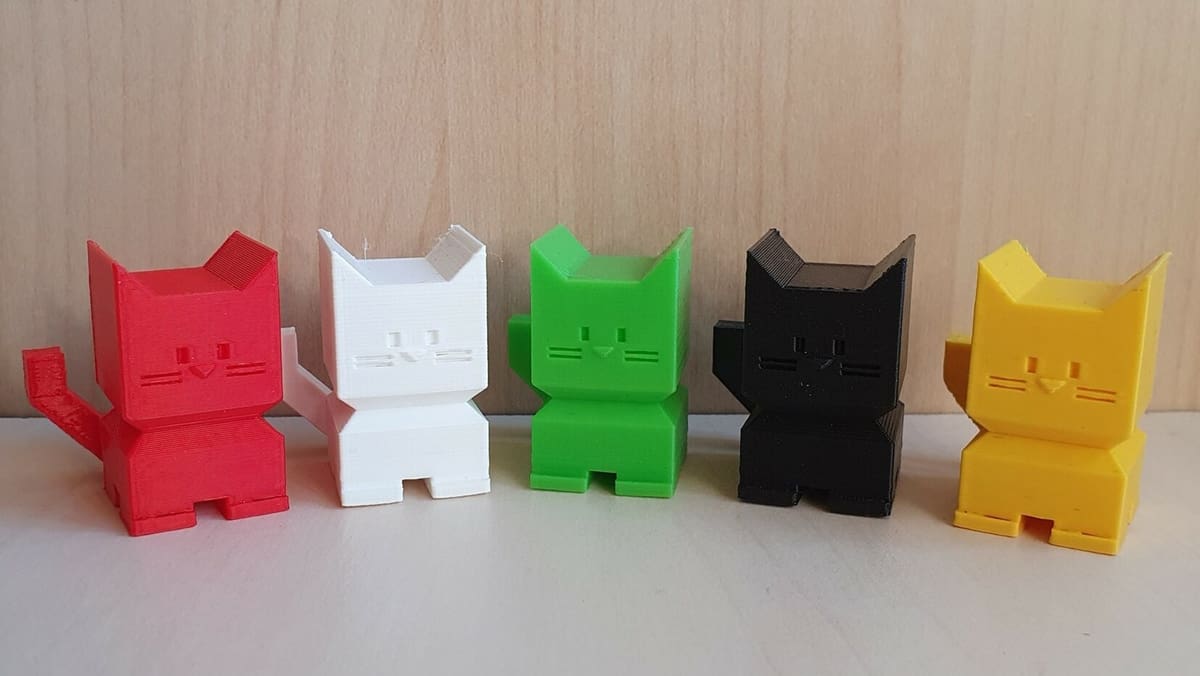
Having a simple benchmark model is important to check how your printer is performing with various materials and settings and how it changes over time.
Calibration and benchmark models are a topic of their own, but most are quite serious and, frankly, a bit boring for many beginners.
This project is different as it doubles as a desk mascot, toy, or gift. Cali Cat is a simple and adorable model that tests your printer’s accuracy, overhangs, detail, bridging, extrusion, and more in under an hour.
- Who designed it? Dezign
- Why make it? Having a go-to benchmark model is important – and Cali Cat doubles are cute, too!
- Where to find it? Thingiverse
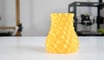
Tall Vase
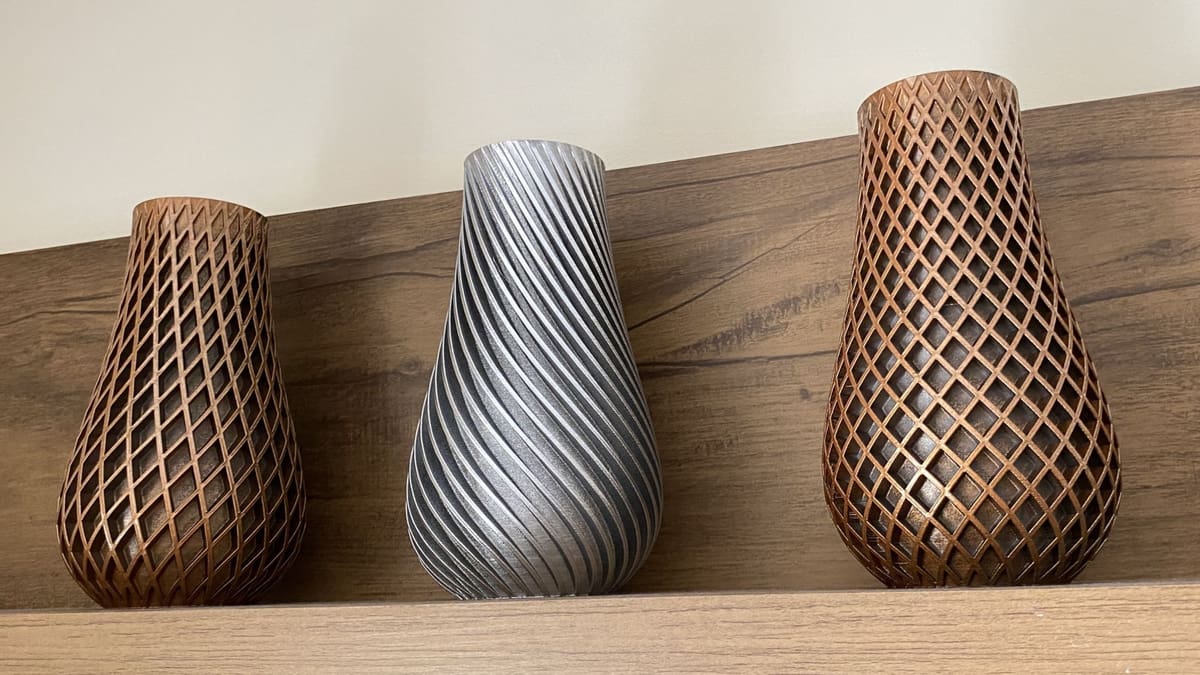
The vast majority of 3D prints use only a fraction of the possible print volume available on a typical printer. It’s worth reaching, if not the sky, then toward the top of your printer’s Z-axis range.
These vases are a great way to do that, and they allow you to experiment with different modes of printing (see the comments section on the Thingiverse design page). They’re also, simply put, beautiful designs, although possibly more suited for dry flowers than for filling with water.
And if you want more ideas on vases, well, there are plenty of great picks.
- Who designed it? BigBadBison
- Why make it? These are tall objects and take many hours to print. You can scale up to 200% to fill an Ender 3 workspace. They look great and are also ideal for trying different filament types and, as seen above, painting. Check out all the makes for inspiration!
- Where to find it? Thingiverse
Spiral Ornament
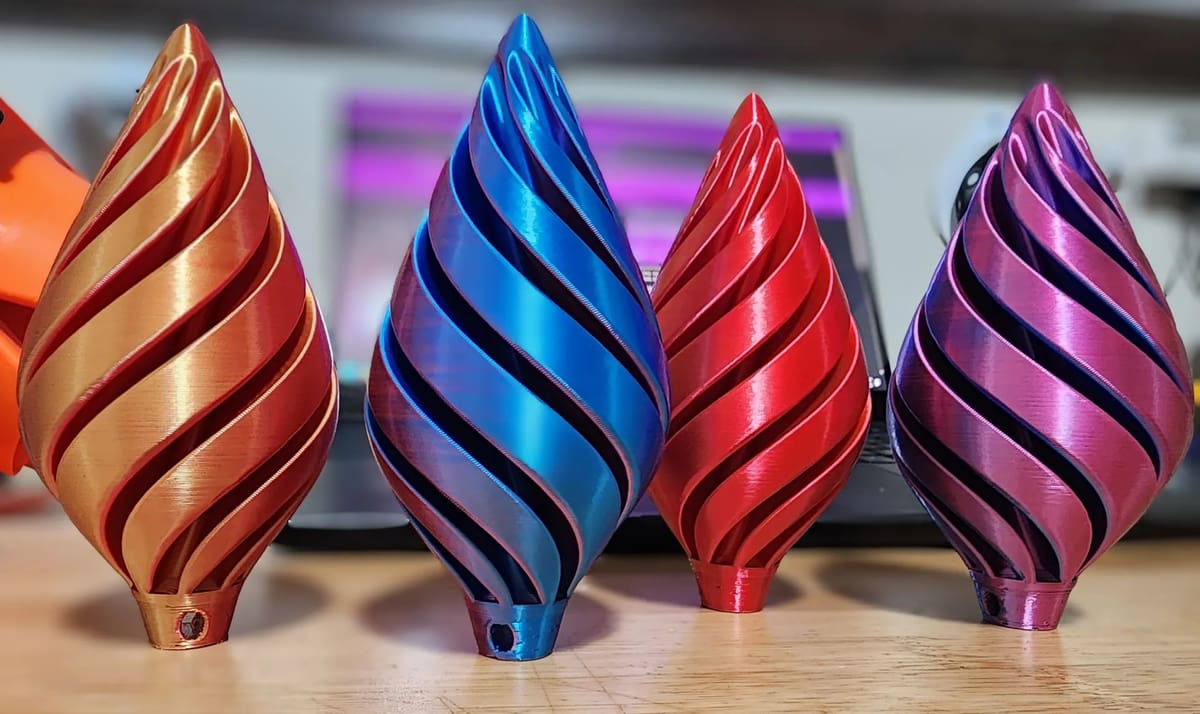
This enchanting design serves as a beautiful decoration to hang on your tree. Printed in “vase mode”, this ornament takes on a unique charm. This method of printing allows for seamless and continuous layers, resulting in a smooth and elegant appearance. The delicate and thin shell has the thickness of just one wall.
This setting is known as “vase mode” because it allows you to print big vase shapes very fast when compared to traditional horizontal layer printing, but you’ll find it as “Spiralize Outer Contour” in Cura or different names depending on your slicer.
Simply select this mode in your slicer settings and watch as the layers gracefully build up, creating a stunning ornament that adds a touch of magic to any holiday setting.
- Who designed it? PRNTR3D
- Why make it? Try out the vase mode (Spiralize Outer Contour) setting. This setup prints a seamless thin shell of your model.
- Where to find it? Printables
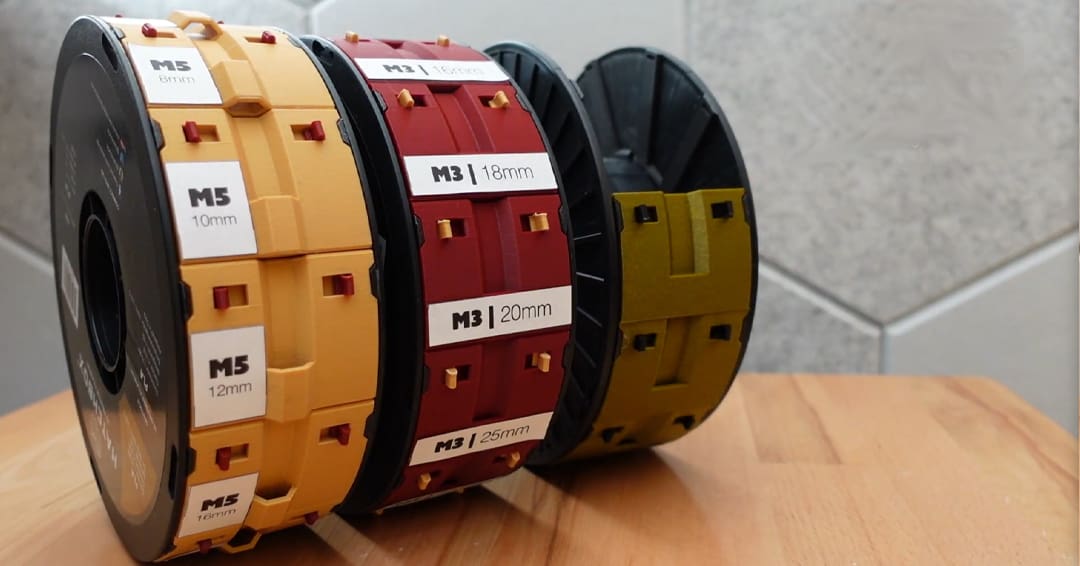
Customizable Dice
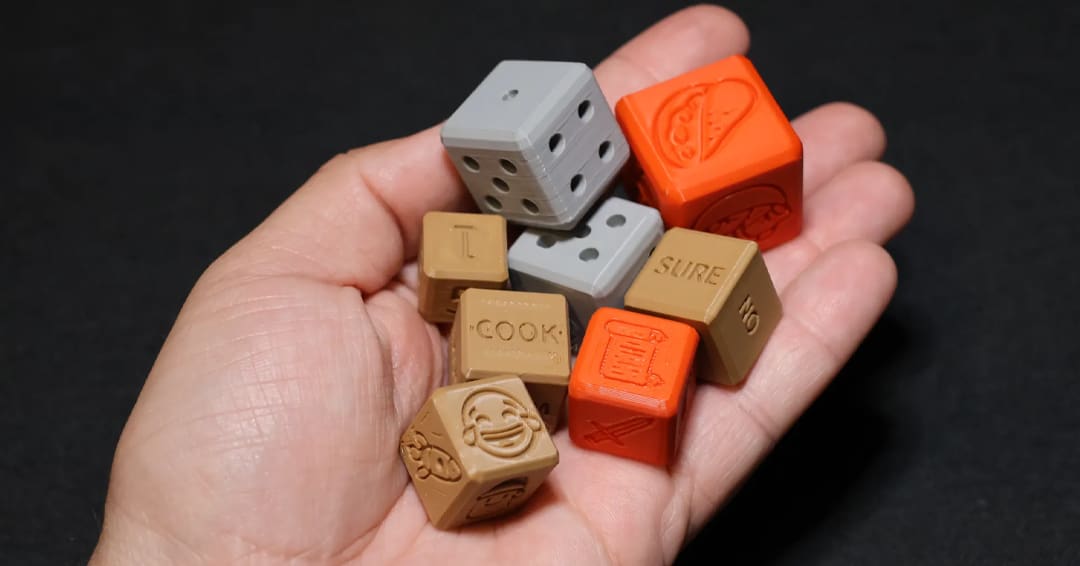
If you’re looking for a functional yet simple and instructive print, this dice is perfect for you. Its design is customizable using MakerWorld’s “Parametric Model Maker“, which allows you to dip your toes into OpenSCAD personalization options very easily.
You can choose between a wide variety of options, such as classic numbered, text, or symbol dice. You just need to click on “Customize” on the model page to access the personalization options.
The print itself takes only a few grams of filament and a little time to complete, so it’s perfect to finish spools as well.
- Who designed it? ozarkexpeditions
- Why make it? It’s a fantastic way to start experimenting with customization, particularly with OpenSCAD.
- Where to find it? MakerWorld
Smartphone Standby Dock

This model is incredibly famous. The iPhone Standby Mode Dock by Scott Yu-Jan has been really popular ever since it was released – MakerWorld reports over 12,000 makes! As the name suggests, this design does a very simple thing: placing your phone on the charger while enabling standby mode.
Originally designed for the iPhone 15 Pro, it’s now available for an extensive list of smartphone models thanks to the community. This is the perfect model to discover the power of remixes.
Remixes are modified versions of the original model that provide some adjustments to the features of the original design. For instance, the remixes for this model unlock compatibility with other devices. Remixes are extremely useful, especially if you need to adapt a part in a hurry and someone’s already done the work.
- Who designed it? Scott Yu-Jan
- Why make it? If you haven’t explored remixes yet, this is one of the best examples of their power.
- Where to find it? MakerWorld

Cable Guards
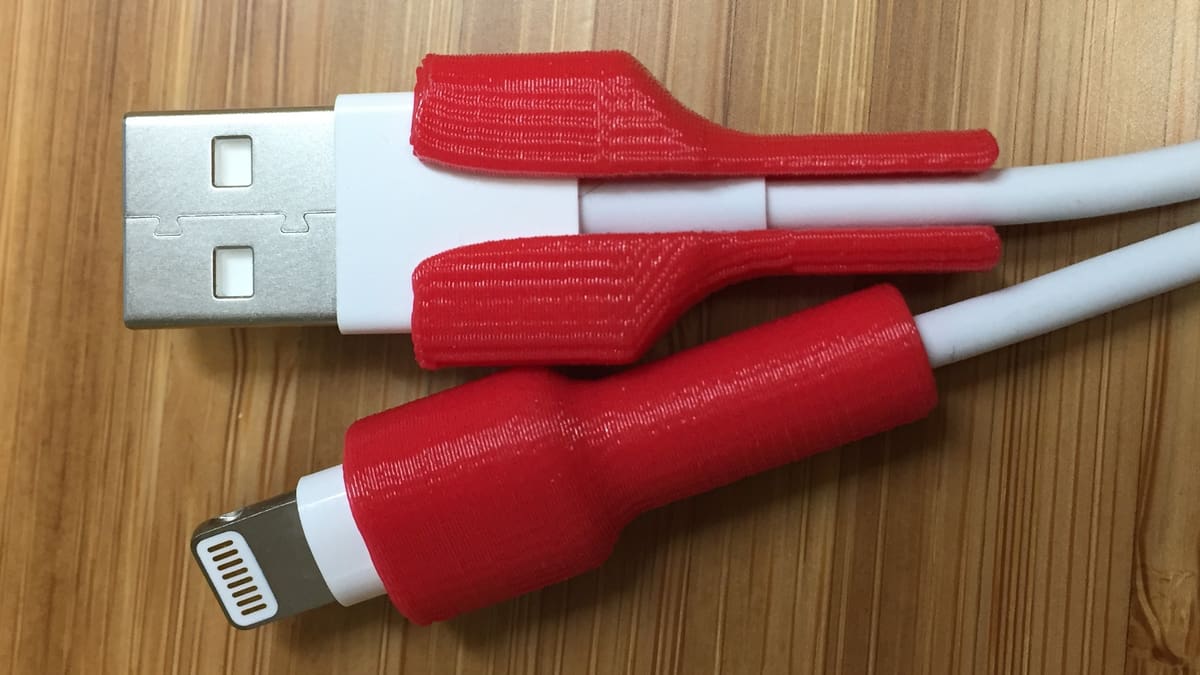
We all seem to break our phone charging cables faster and faster these days. What if you could print a quick fix? That is exactly what these little guards do. Not only can these prevent those bends, kinks, and breaks in your charging cable, but they may help a cable casing that has worn out and is falling apart. While they’re designed for iPhone lightning plugs, many users have reported scaling this guard up or down to fit third-party options as well.
This design could be an opportunity to try printing in a flexible filament like TPU, as some flexibility in the parts will make them easier to use.
- Who designed it? Serge Romero
- Why make it? This simple gadget saves your Apple lighting cables from getting ragged and bent and gives a bit of extra life to your broken cables.
- Where to find it? MyMiniFactory
Stepping Up
One of the brilliant things about 3D printing is its ability to produce objects that have built-in mechanisms for movement and flexibility that might otherwise require detailed manufacturing and casting. Or maybe there’s a special trick to make them look more complex to recreate than they really are.
In this section, we’ll highlight some clever designs to show what your printer is capable of.
Millennium Falcon Kit Card
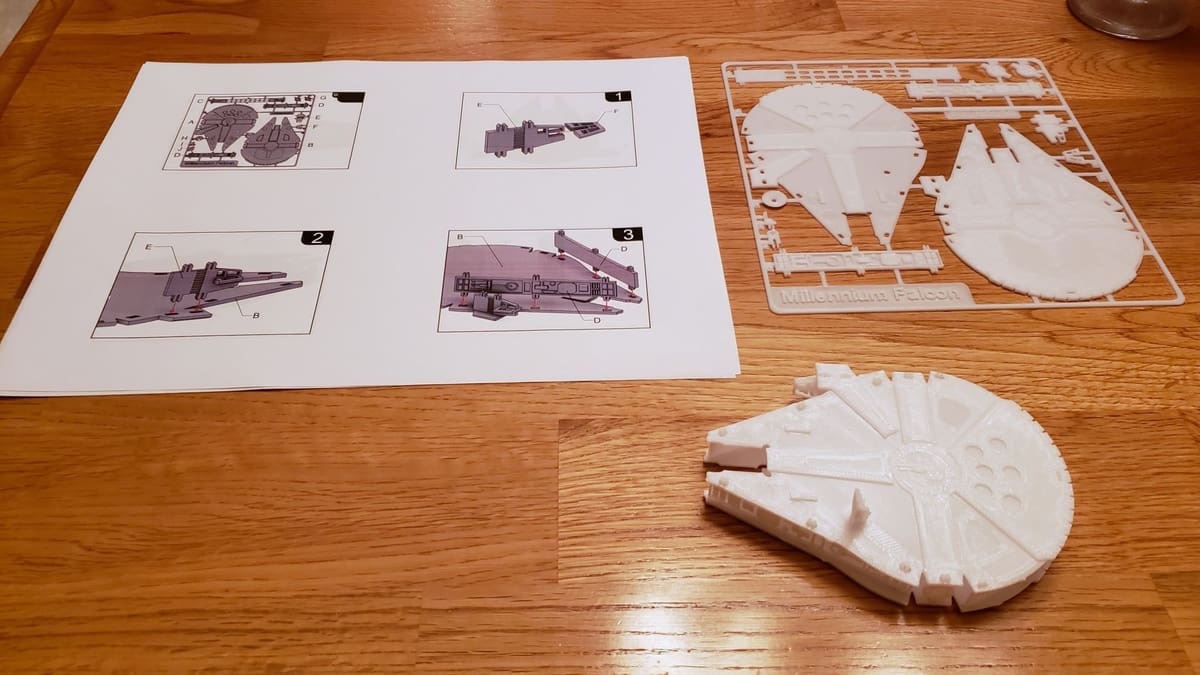
Kit cards are a great way to explore the complex models that can be assembled from basic prints, and this design will be a hit with just about any Star Wars fan.
Kit cards are easy to print because they’re essentially flat parts, so no supports or other additions are needed. Simply print the one-piece design, then snap the parts from the card to assemble. There are endless card kits out there ranging from easy to complex. The maker of this one has even linked to other popular Star Wars kits so you can complete your collection!
- Who designed it? fixumdude
- Why make it? Learn about kit cards and build a model of the Millennium Falcon!
- Where to find it? Thingiverse

Flexi Rex
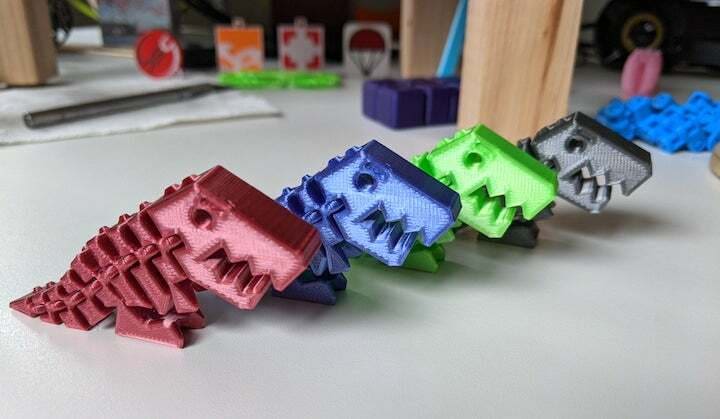
This cute flexible T-Rex is one of the most popular models on Thingiverse and has been made thousands of times.
This project is a fascinating example of how 3D printing can be used to create flexible hinges as a single printed item, with no need for assembly. They’re fascinating, fun, and strangely addictive to print!
- Who designed it? DrLex
- Why make it? This iconic design is a great example of “print-in-place” flexible hinges. They’re a lot of fun and make great gifts, too.
- Where to find it? Thingiverse
Eiffel Tower
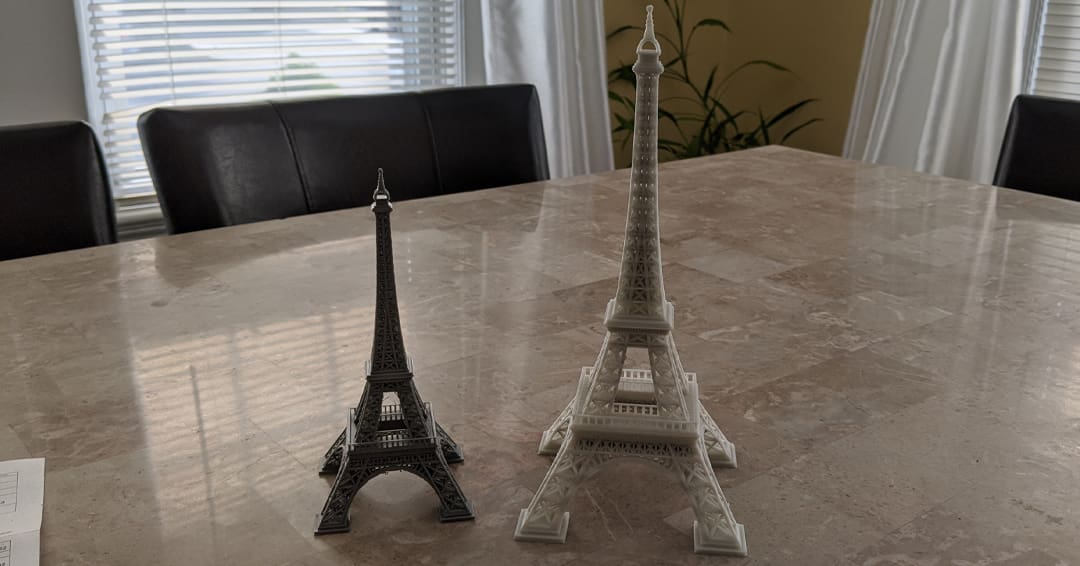
We can safely say that the Eiffel Tower is one of the most famous monuments in the world, and while the real thing is impressive, the 3D printed version is also quite notable. If you’re looking for a gift for a Francophile friend or are after a piece of decor for your home, this is the perfect model to start practicing detailed prints.
The particulars of this design will allow you to test your machine’s resolution and will help you learn more about the best settings for detailed prints. You can also take advantage of the premade “detail” profiles found on slicers that are often provided when you select certain 3D printer models.
The key settings to achieve crisp details are layer height, acceleration, and speed: In a nutshell, the lower is usually the better. For a great print, especially if there’s stringing on your Eiffel Tower, you might need to tweak the retraction parameters as well.
- Who designed it? CheeseJam
- Why make it? This model is perfect for testing the level of detail that your printer is capable of and checking your retraction settings.
- Where to find it? Thingiverse
Annoying Gift
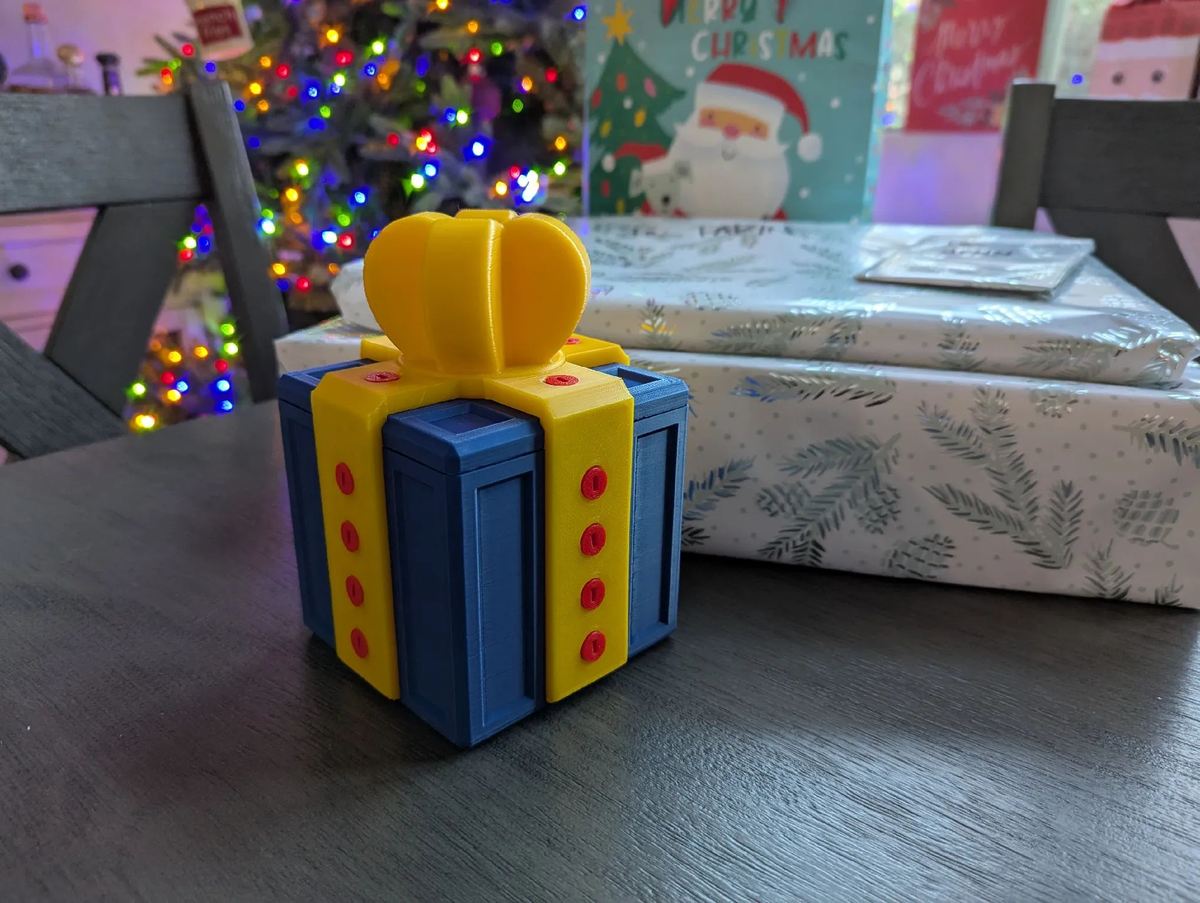
Here’s a fun print to annoy your friends and siblings with, while learning how to practice printing threads. Perfect for Christmas, birthdays, or any honestly any occasion, this threaded gift box adds a bit of fun to any celebration.
For optimal results, a layer height of 0.2 mm and screws with a layer height of 1.2. Let the gift box with threads weave its spell and leave a lasting impression.
- Who designed it? DAKUE1999
- Why make it? Optimize your thread printing skills.
- Where to find it? Printables
Mareep Pokemon

Fuzzy skin is an awesome and somewhat magical slicer setting that allows you to create a unique texture on your prints. There are designs that are best suited for this slicing mode, such as this cute Mareep Pokemon.
The original model itself is smooth, but you can create this realistic fur effect thanks to fuzzy skin. You can experiment with the settings or follow what this maker did to avoid the entire object coming out fuzzy. 3dfux uploaded pieces of the model separately to overwrite the fuzzy skin for everything except the body, and then merged objects.
- Who designed it? 3dfux
- Why make it? If you’re looking to discover more advanced slicing settings, this project allows you to achieve that while creating stunning results.
- Where to find it? Thingiverse
Hairy Lion
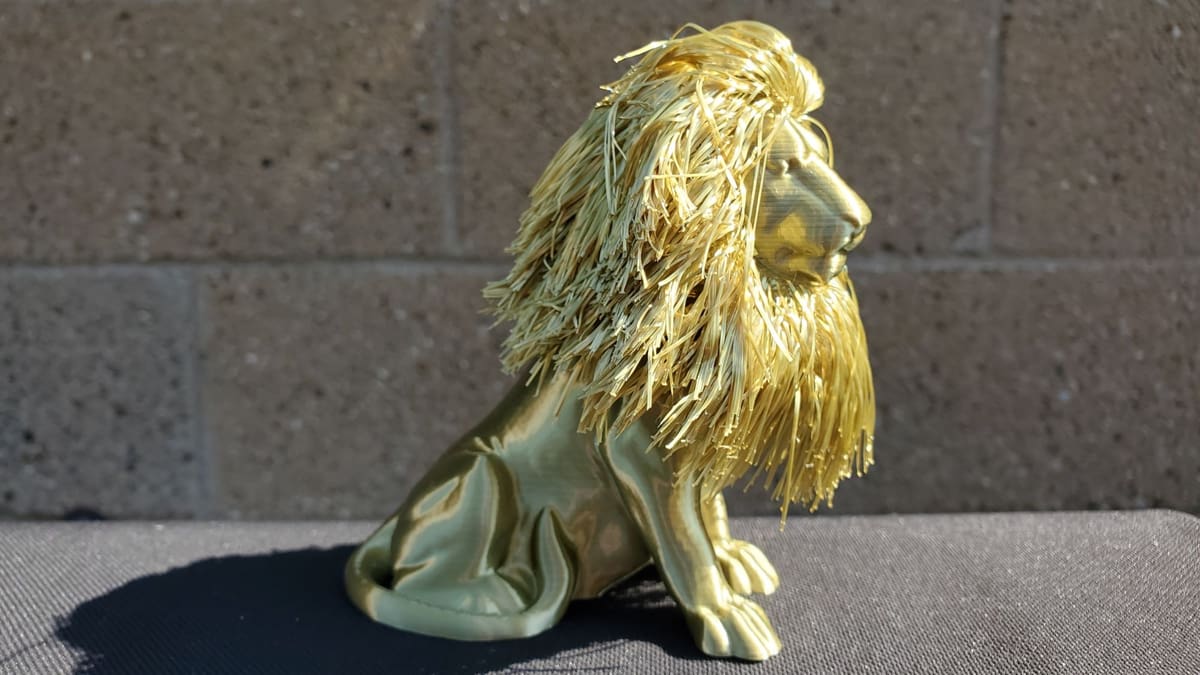
What sets this model apart is its intricate details and an awe-inspiring mane. The unique technique used to form the mane involves printing several horizontal lines connected to a sacrificial wall, which can be easily removed later.
For a more polished appearance, a heat gun can be used to carefully melt and shape the hair, giving it a well-groomed look. Immerse yourself in the art of 3D printing and bring this majestic Hairy Lion to life, showcasing its magnificent mane like never before. Simply follow the provided instructions and explore different settings to create the lion’s mane.
- Who designed it? _primoz_
- Why make it? Learn all about using sacrificial walls in your designs to pull off fabulous effects.
- Where to find it? Thingiverse, MyMiniFactory
Spring Loaded Box

Made by SunShine, a well-known designer of 3D printed models with moving parts, this box features a latching, spring-loaded lid and is entirely printed as a single object, so there’s no assembly required. It’s another fantastic example of a print-in-place design and a great talking point.
Drippy Bucket
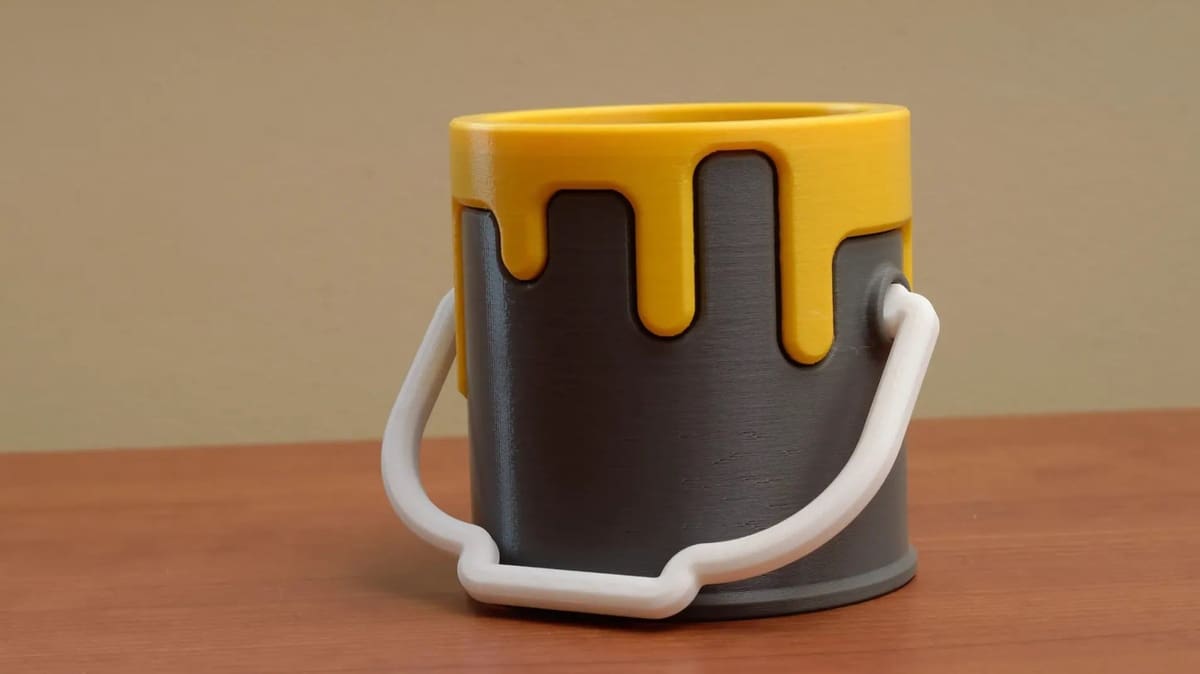
With its Pop Art looks and multicolor design, this bucket may intimidate some beginners, but its great looks hide a simplicity that any beginner can tackle.
This container is actually three separate pieces printed in three different colors for a great effect. Each part prints with no support, so you can create a functional and colorful object with no issues. Assembly is as simple as snapping the parts together; no glue is required!
- Who designed it? davemoneysign
- Why make it? This drippy paint bucket shows the power of clever design to combine parts printed in different colors for an impressive result!
- Where to find it? Printables
Trimmable Bonsai

This model is an extraordinary innovation in the art of bonsai cultivation. This groundbreaking new technique presented here offers a new approach to shaping and sculpting the tiny trees. The Trimmable Bonsai features a canopy constructed entirely of infill, eliminating the need for walls or a top and bottom layer.
This ingenious design allows for endless possibilities as you explore different infill types and settings to create unique and personalized canopies. With this design, the art of gardening takes on a whole new dimension, offering enthusiasts the freedom to shape and mold their trees like never before. Unleash your creativity and discover the boundless potential of the Trimmable Bonsai.
- Who designed it? TheJollyRedBe
- Why make it? This is an innovative approach to 3D printed form finding. Print just the infill without walls or top and bottom layers.
- Where to find it? Printables
Wrench
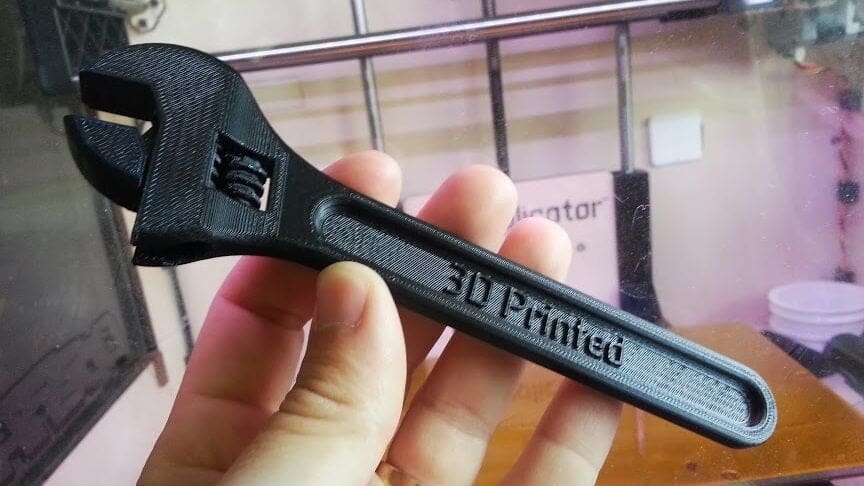
No exploration of print-in-place design is complete until you’ve printed a tool that can go directly into use from the print bed. This adjustable wrench may be an oldie, but it’s definitely a goodie.
With more than 300,000 downloads, this is a fantastic design for a beginner and also one that will give you a useful tool to utilize in later projects. With multiple detailed videos, several updates, and nearly three dozen remixes, this is one print you cannot miss creating.
- Who designed it? barspin
- Why make it? Make something that will actually be fully functional straight off the printer.
- Where to find it? Thingiverse

Moon Lamp
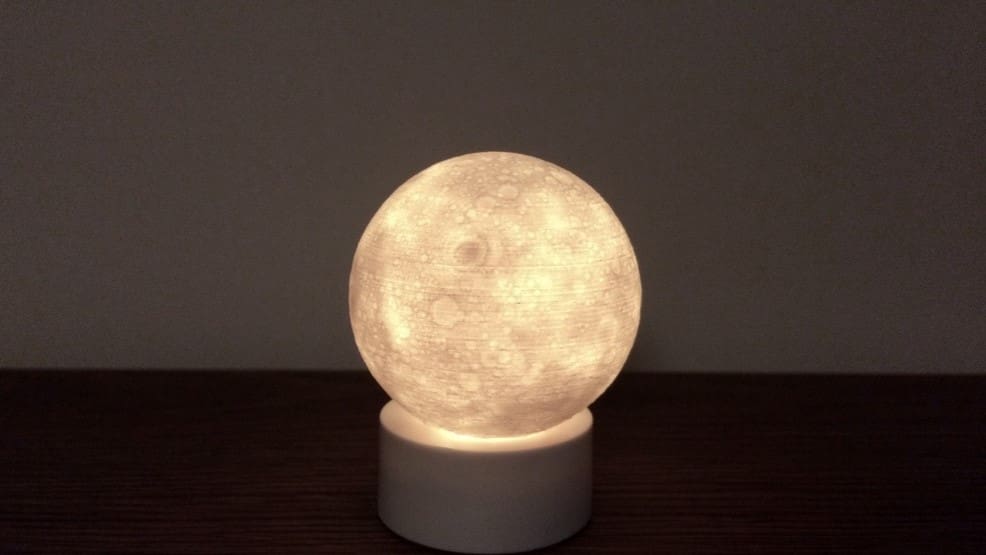
This captivating model features a hollow shell design that perfectly captures the celestial allure of our lunar companion. Crafted with meticulous attention to detail, the Moon Lamp is printed with 100% infill, ensuring a solid and substantial structure.
When illuminated from within, it emanates a soft, enchanting glow, creating an ambiance reminiscent of moonlit nights. Immerse yourself in the celestial magic with this moon lamp, a stunning centerpiece that adds a touch of celestial wonder to any room.
Print it with supports only touching the build plate, so you won’t have supports inside the shell. Doing some prior testing of support printing to calibrate your printer is recommended, because of the surface finishing to the bottom of the sphere. With this kind of printing where the model is almost completely laying on supports, using a raft for bed adhesion usually makes it safer to remove the whole print off the build plate without damaging it.
- Who designed it? moononournation
- Why make it? Learn all about shells and how to make a simple but really cool lamp.
- Where to find it? Thingiverse, MyMiniFactory
Builds
Next, we’ll look at models that quickly cross a barrier that many new to 3D printing hesitate to tackle. We’ve chosen example projects that show how building finished items from multiple 3D printed (and other) components need not be difficult.
Once you start building projects like these, there’ll be no stopping you!
Clicky Rotating Counter
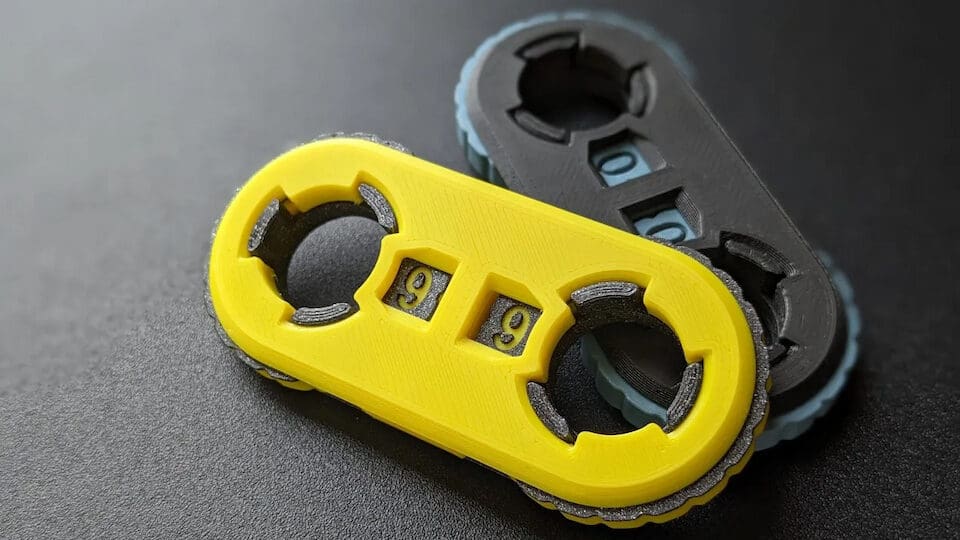
Too many times have we been in the middle of counting something only to forget where we were and have to restart. This rotating counter can keep track of any number from 0 to 99, and it does so with a satisfying click every time.
This five-part print features a snap-in-place design that requires no hardware, only printed parts. The entire process (three easy steps) can be found in the description of the model, so while the model looks complex, it’s fairly easy to put together.
This is also a print that benefits from multicolor printing to give your numbers a bit more contrast from the spinning counters. You can achieve the same results with a filament swap as well if your setup doesn’t allow for multicolor printing.
- Who designed it? BaGooN
- Why make it? This is a great multi-functional print that teaches how to print snap-in-place designs and possibly filament swapping.
- Where to find it? Printables
Infinity Calendar
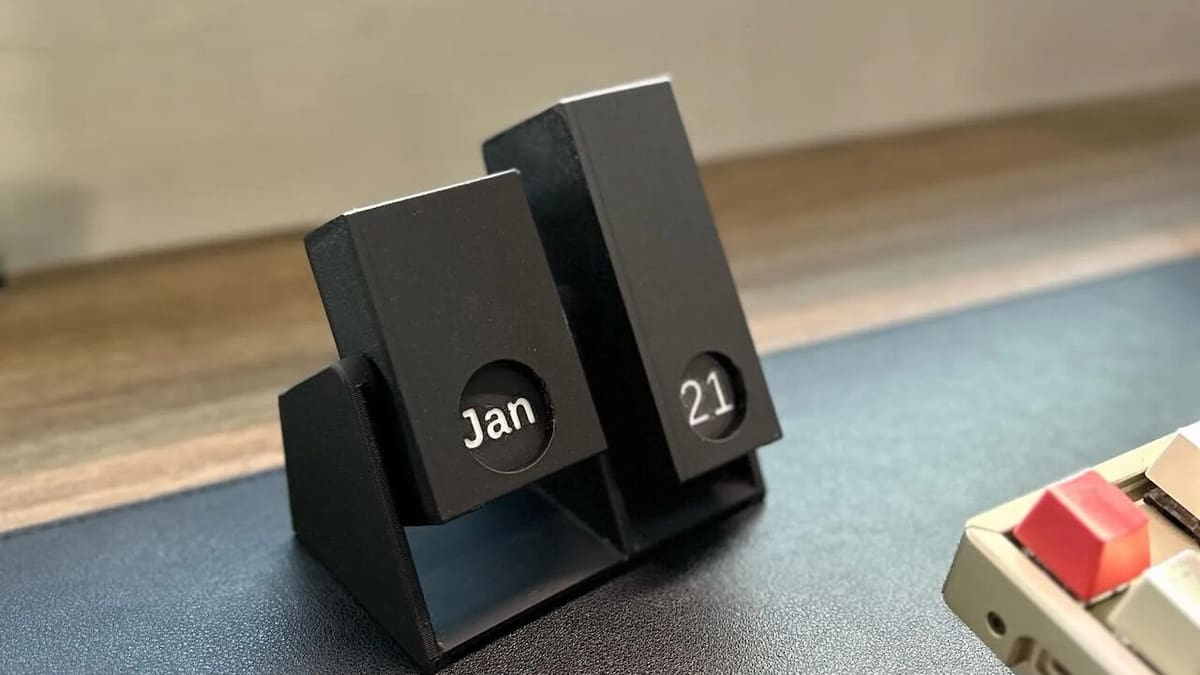
3D printing can make just about anything fun again, including calendars. This infinity calendar model takes a unique approach to keeping the date, with a box and some little tiles. Once assembled, all you have to do is flip the box and the date will move forward. Like other projects on this list, this easily replicable idea is made better with a filament swap to get a crisp month and date on your tiles. Do this, and everyone who sees the print will be impressed!
The most difficult part of this project is printing the tiles. You’ll need to make your your print bed is completely level to avoid any of the tiles coming loose mid-print and ruining the rest of them. You’ll also want to get your printer’s tolerances dialed in to make sure the lid can snap into place so your tiles don’t spill out once the calendar’s assembled.
- Who designed it? bcegatien
- Why make it? It’s an interesting design that’s worth making for the novelty alone, and it also teaches good bed adhesion and color swapping.
- Where to find it? Printables
Under Desk Drawers
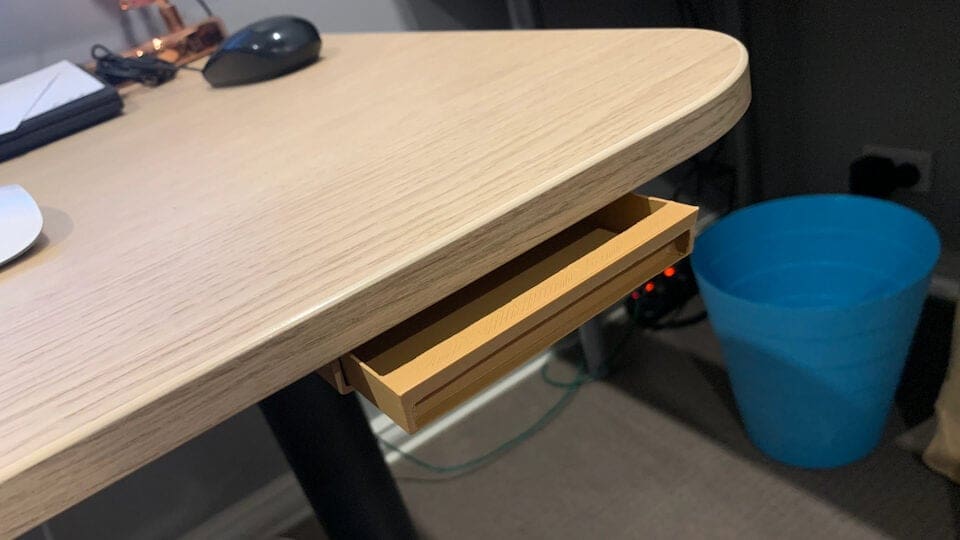
Sometimes, practical ideas are what motivate people to keep working on new projects. These drawers may be the perfect next step as you’re acquiring and developing 3D printing skills. Each drawer is sized and shaped to fit under a desk, giving you more useable storage space for cables, pencils, and or whatever else you need without having to get up.
This build will put your printer tolerances and surface finish to the test, as a rough surface can lead to drawers not fitting properly or getting stuck. Scaling is another issue to keep in mind. If you choose to scale any of the drawers up or down, be sure to use the same scaling percentage on all of your parts to keep them consistent.
Once you do get your settings dialed in, all you’ll need is a drill then you’re ready to install your new drawers!
- Who designed it? GodardScientific
- Why make it? It’s a good test for print tolerances, as the drawers need to fit snugly while sliding in and out without too much resistance.
- Where to find it? Thingiverse
Air-Powered Toy Car
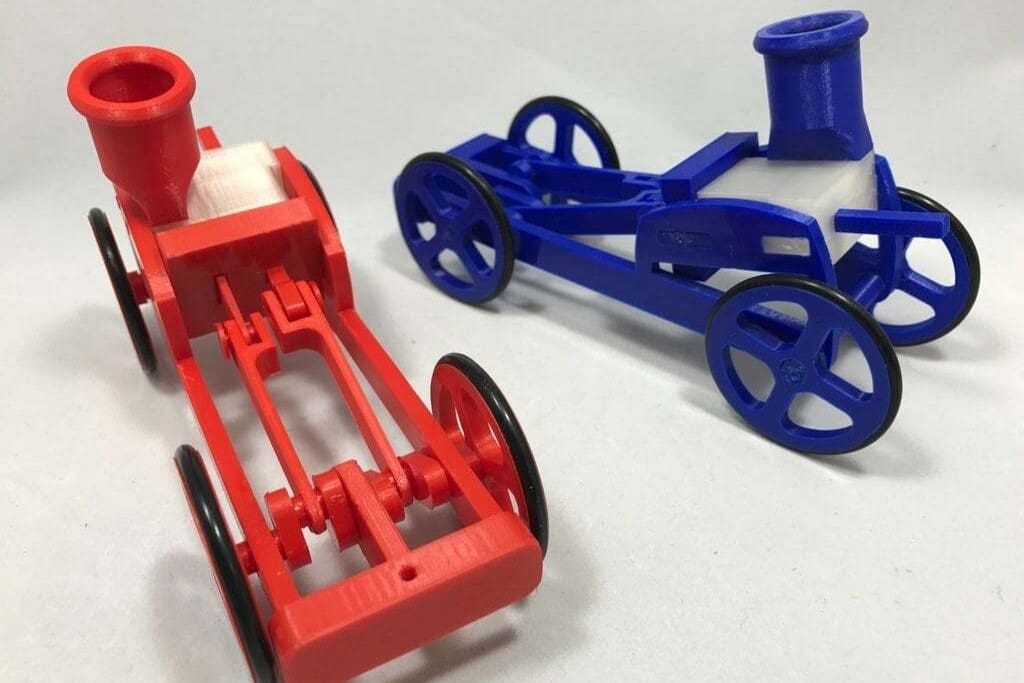
This is a fascinating moving vehicle and an interesting and educational build, too.
Created by one of the internet’s masters of mechanical 3D printed designs, Greg Zumwalt, the instructions are clear and super easy to follow. The end product is a working toy “car” with its own 3D printed balloon-powered “engine” that can travel up to 40 feet on a smooth surface.
- Who designed it? gzumwalt
- Why make it? This is an impressive example of an apparently very complicated design that can actually be built from just a few 3D printed components. With clear and easy-to-follow instructions, it’s a great introduction to hundreds of other designs featuring moving parts.
- Where to find it? Instructables
Spool Drawers
You’ve printed a bunch of models to test your machine and now you’ve finished a couple of spools, which you’re ready to throw in the bin. Don’t do this! Instead, try this super cool project that allows you to transform an empty spool into an array of drawers.
This project is perfect for starting to combine existing objects with 3D printed parts, plus you won’t lose screws anymore! It’s a fun design to try out when you’re bored and want to build something. Plus, it’s a creative and useful way of repurposing a spool instead of generating more waste – that’s pretty cool, if you ask us.
On the Printables page you can download the OpenSCAD files for both the drawers and the stand. This is another project that lets you accumulate experience with the customization process, as you can adapt the dimensions of the model to fit whatever spool you have at hand.
- Who designed it? 3D Printy
- Why make it? This is a great model to repurpose an element that would end up in the trash, while having some fun with assembly and organization.
- Where to find it? Printables
Squeeze Fan Ruggedized
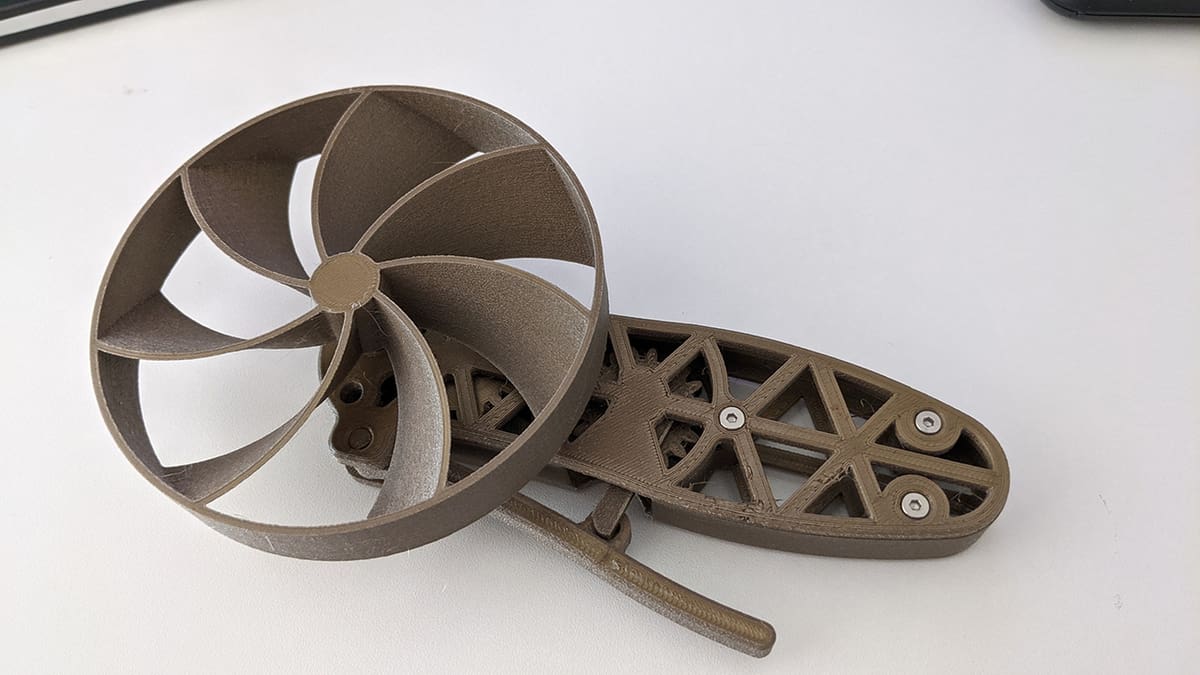
Many makers attempt to print and build a multi-part object once they get the hang of the basics. But to justify the effort and plastic consumption, some people prefer to limit their prints to functional objects.
This remix takes the popular squeeze fan design from the realm of toys and turns it into a fully usable device. The larger size and tighter tolerances allow this to become a practical gadget used to beat the heat!
- Who designed it? GeorgeZSL
- Why make it? If you’re going to print it, you want it to be useful, so this is an upgraded larger version that you can actually use to cool down!
- Where to find it? Thingiverse
Cat Clock
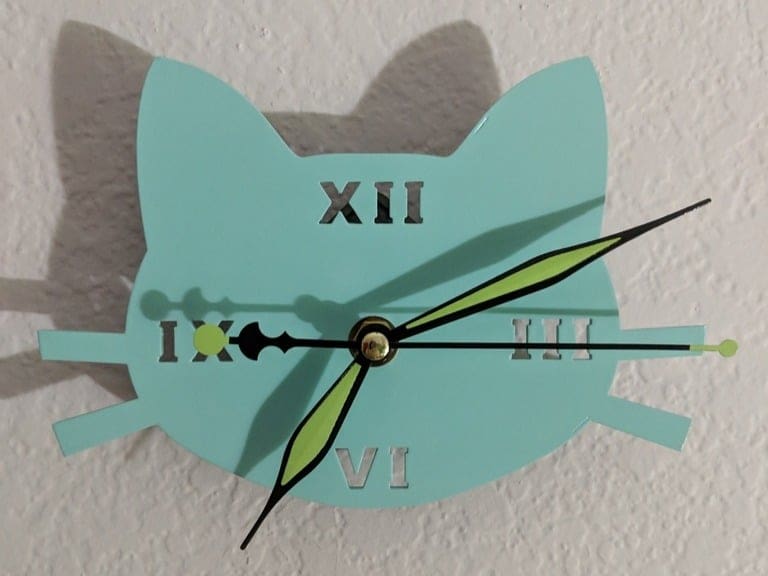
This cat shaped clock model is not only fun and easy to print, it’s a great addition to any cat lover’s room.
This is a great, simple project that doesn’t take much to complete. The only hardware needed for this build is a clock mechanism. You may need to scale the parts to fit your specific movement as well, which is a great learning opportunity.
- Who designed it? neotherack
- Why make it? It’s an easy entry to using simple hardware for a 3D printed build!
- Where to find it? Thingiverse
AXO Action Figure
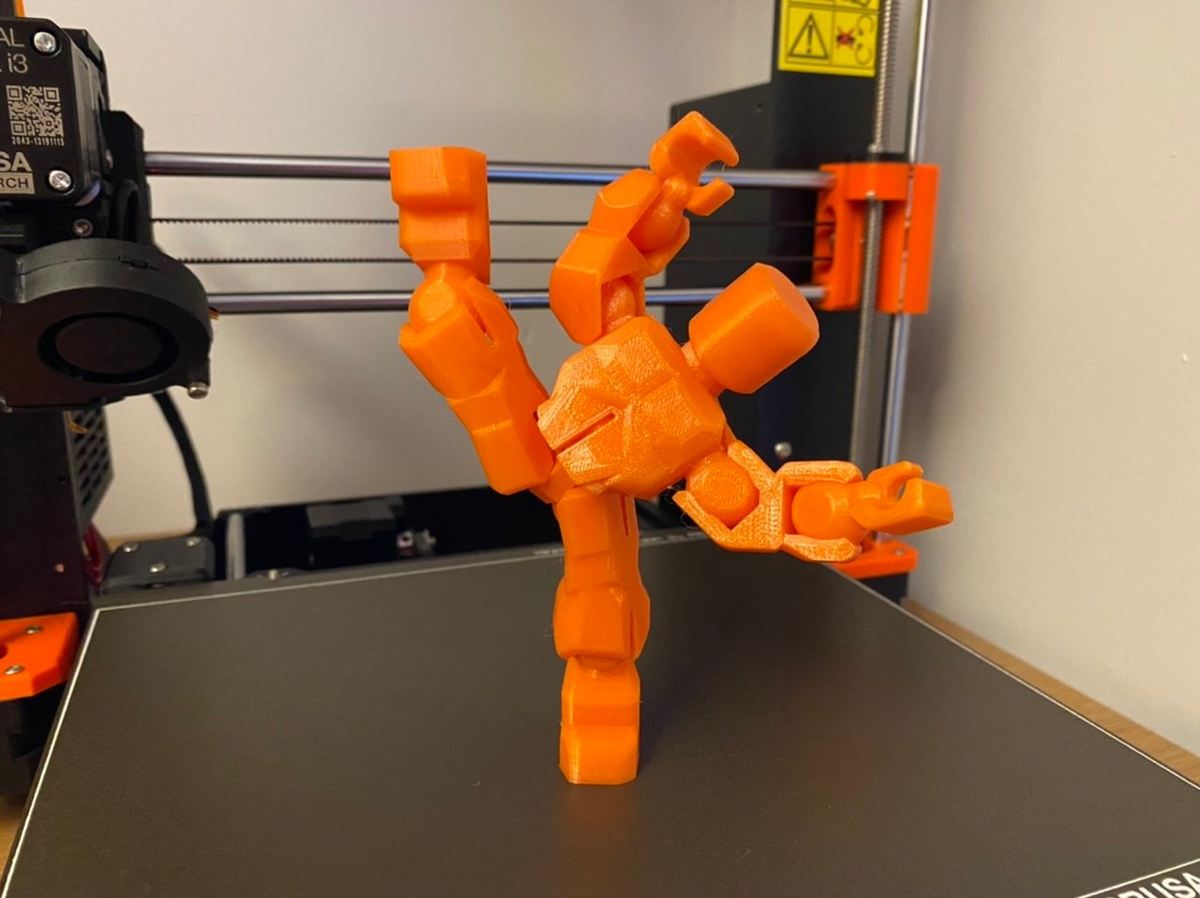
Our next project is super easy to build and put together. It comes out with clearly marked arms and legs so you can easily recognize the right side from the left. One maker commented that some of the joints were a tight fit, but added that this helped when posing the figure.
The fun design allows you to piece together basic components to create a fun figurine to pose all over your home or office.
- Who designed it? Tony_D
- Why make it? A fun but easy way to test out the sweet spot for rigid materials like PLA – how tight can you get a joint without breaking the pritn?
- Where to find it? Thingiverse
Skills
In many cases, downloading a design, printing it, and using it exactly as it comes off your printer is good enough. However, you can take your printing to a whole new level by mastering a few important skills. These range from creating your own designs, to transforming the look and feel of your prints with various post-processing techniques. And we couldn’t leave out learning about entirely different skills that can complement 3D printed projects.
We’ve chosen five paths that are worth following.
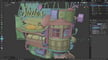
Design Your Own 3D Object

3D printing takes on a whole new dimension when you design your own 3D models. It’s much easier than many think and well worth committing a couple of hours to give it a go.
Even if we do say so ourselves, our Tinkercad tutorial for beginners is a great place to start. In no time, you’ll have designed your own wrench! That may not sound like the most exciting object, but the steps involved will introduce you to the basic knowledge you’ll need to go on and tackle your own design.
Perhaps this should even come with a warning… after you find out how easy it is, it can become addictive!
- Why learn this? There may be a wide choice of ready-made designs on the internet, but there’s always going to be a time when you can’t find what you’d like. Or perhaps you’d like to change and customize an existing design to better suit your needs!
- Where to find out more? Our introductory article is a good starting point. You can find many more advanced articles on our site, too. On YouTube, several 3D printing gurus have also explored the topic. We especially like Teaching Tech’s advice on what to consider when making your first designs.
Change Filament Mid-Print
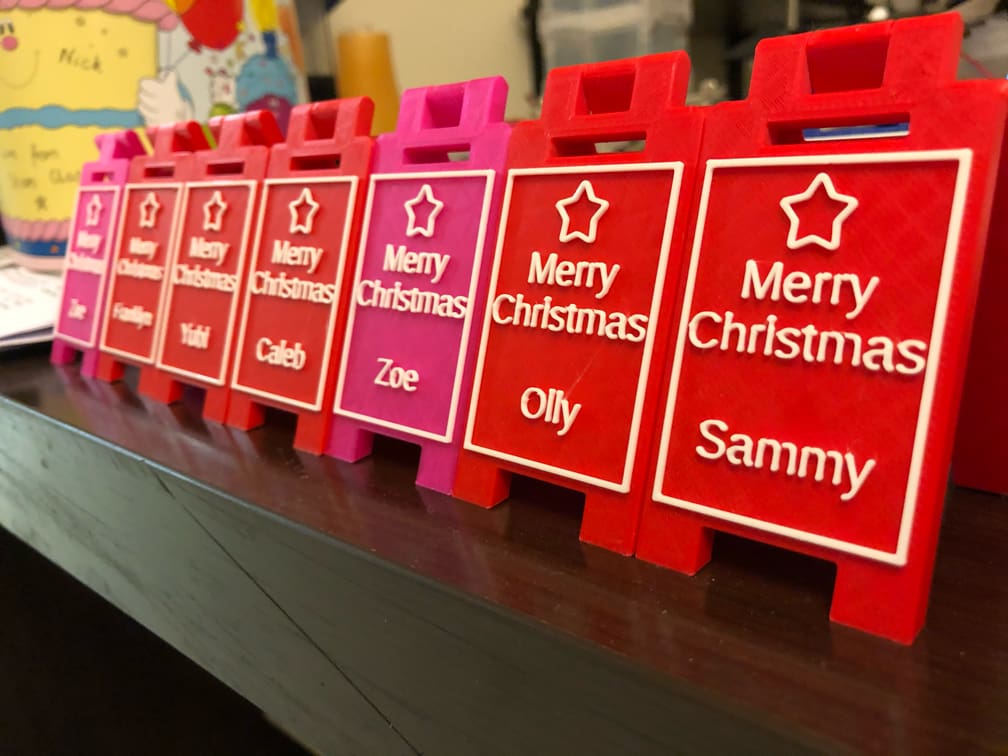
Newcomers to 3D printing are often apprehensive about changing filament part way through a print. With practice, however, not only does this remove the common stress of “will I run out of filament before the end?” – it also opens the door to creating multicolored prints.
We’ve included a few projects above that benefit from filament swapping but where it’s not really a necessity. In case you were hesitant then, here you can do a deeper dive to get your bearings (and then go back to print the Clicky Rotating Counter or Infinity Calendar!).
The procedure may vary a little from printer to printer. Often it’s as simple as pressing “pause print”, making the change, and pressing “restart print”.
If you synchronize filament color changes with level changes in your print, you can finish an item with two, three, or even more color changes.
But if waiting patiently by your printer for the right moment doesn’t sound like fun, several slicers offer plug-ins or scripts to allow you to say exactly when you’d like a print to pause automatically.
- Why learn this? Learning how to do this increases confidence in how to handle running out of filament and will also allow you to take advantage of hundreds of designs that benefit from color changes mid-print.
- Where to find out more? We suggest trying one of these simple color-change designs first: impressive coasters, lab-style warning signs, funny toilet signs, spoof license plates, or customizable floor stands. If you use Cura as your slicer, you can automate the process.
Post-Processing
By the nature of how filament is extruded, 3D printing will leave layer lines on the finished object, and these will often distract from the effect you want – whether a glossy metallic finish or an aged vintage look. You might also want to add or emphasize details using additional colors and surface finishes.
Understanding the pros and cons of various ways to smooth and then how best to paint all or part of your prints might seem bewildering at first. A simple way to start is to choose any model (although it’s best to choose one that isn’t too small or detailed) and start with simple smoothing using fine sandpaper, spraying with primer, and then hand-painting a few details.
- Why learn this? Post-processing and painting add an entirely new dimension to 3D prints, often elevating them from cool-looking models to truly outstanding objects.
- Where to find out more? To make a start, check out our beginners’ guides to sanding and painting. But basically, just practice and have fun!
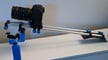
Work with Electronics
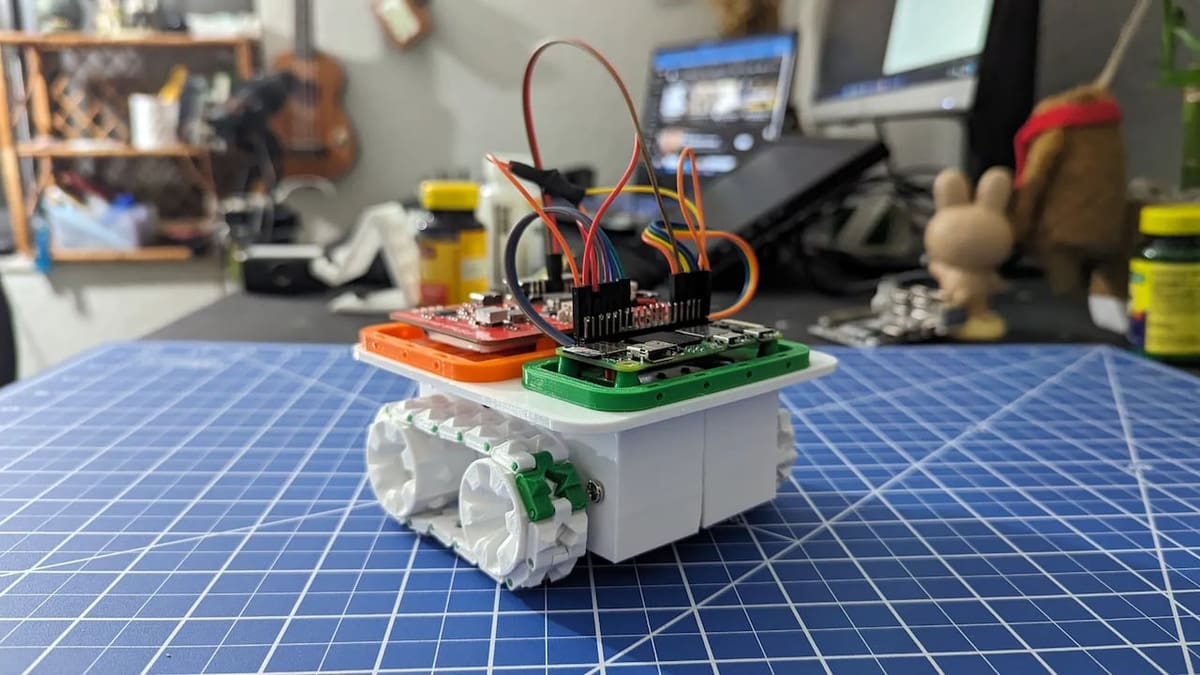
There are a lot of hobbies that overlap with 3D printing. One of the most prominent is electronics. You’ll find plenty of 3D printed projects that use motors, servos, Arduino kits, and Raspberry Pi boards as the basis for controlling 3D printed parts. Some projects simply use 3D printed cases to keep their electronics safe, such as Arduino microcontrollers or Raspberry Pi boards.
Learning how to use these electronic components, even on a basic level, will open up a whole new world for you with your 3D printer. Electronics will allow you to add lights to your projects, automate your 3D printing process with OctoPrint, and create completely customized remote-control robots and vehicles. It doesn’t take a lot of electronic knowledge to create something amazing!
- Why learn this? Electronics allows you to add life to your 3D prints and create projects that would otherwise be impossible.
- Where to find out more? You can check out our guides on simple Arduino projects to get started with, as well as some Raspberry Pi projects for beginners. Once you’ve gotten your bearings and are ready for challenges, look into the best Arduino 3D printing projects and Raspberry Pi 3D printing projects.
Printer Modifications

After acquiring a new printer, the first thing many think of is what changes or modifications they need to make. This doesn’t mean there’s anything wrong with their purchase, but there are always useful additions that can be made.
Usually, these are “cosmetic” mods, for example adding a useful, dedicated tool holder or a fitting for a camera or light. In addition, there’s value in starting to develop an understanding of how other changes might benefit the quality of printing.
Clearly, these depend on the make and model of your printer, among other factors. We’d recommend reading through a couple of introductory articles to see if anything resonates.
A plus point is that many of the modifications can, themselves, be 3D printed.
- Why learn this? Apart from being able to add useful accessories to make printing easier, this is a good exercise to improve your understanding of how your printer works and what affects the quality of prints.
- Where to find out more? Make a start by checking out our article on the best mods and upgrades, and search through our other articles on the subject, too.
License: The text of "30 Fun & Easy 3D Prints to Level Up Your Skills After the Benchy" by All3DP is licensed under a Creative Commons Attribution 4.0 International License.