3D Printed Toys: 25 Great 3D Prints for Kids

3D printing can be fun for the whole family – the process and the results! Check out these great 3D printed toys for kids (and grown-ups).
3D printing is an invaluable tool for prototyping designs and manufacturing end-use parts. However, a 3D printer is much more than just a tool. It can also be thought of as a toy (to be carefully played with). A toy for making other toys! Using 3D printing to make toys gives you control over the material, color, size, and other details, so the resulting prints will be unique!
If you don’t have a 3D printer, you can still create some amazing 3D printed toys with Craftcloud. With suppliers around the world printing to your specifications, the kids (or adults) in your life will be delighted while someone else does all the work!
With thousands and thousands of 3D printable toy designs, it’s difficult to choose just a few. With that in mind, here are some super fun toys that fit into three main categories: Print & Play, Some Assembly Required, and Batteries Not Included.
Now, let’s stop playing around and get to the list!
Print & Play
These models can be printed and ready in one go! Here are some toys that will get the fun rolling in no time.
Catapult
Here’s something you can do with that leftover filament at the end of your spool to make something really cool. With just 13 g of filament, you’ll have a powerful yet tiny catapult capable of launching projectiles up to 10 meters away! You can shoot all sorts of small objects, but the majority of suggestions for ammunition on MakerWorld are “printer poop“, and it’s easy to see why. Not only does the small amount of colorful filament have nice flight possibilities, it’s also unlikely to hurt anyone.
The designer’s shared a printing profile that includes a layer height of 0.2 mm and 15% infill, while they also recommend enabling supports, with the “Support only on printing plate” setting.
In just 20 minutes, you’ll have your siege weapon ready for battle.
It may seem like a stretch to imagine that something so small can shoot far, but several users, like pbgran and Terbo confirmed that they were surprised by its power. Print it and get ready for some colorful action!
- Who designed it? sdaendi
- How printable/popular is it? An incredible 6,500 prints and 9,200 downloads of this print-in-place model show that the battle is just beginning.
- Where to find it? MakerWorld
Print-in-Place Marble Run
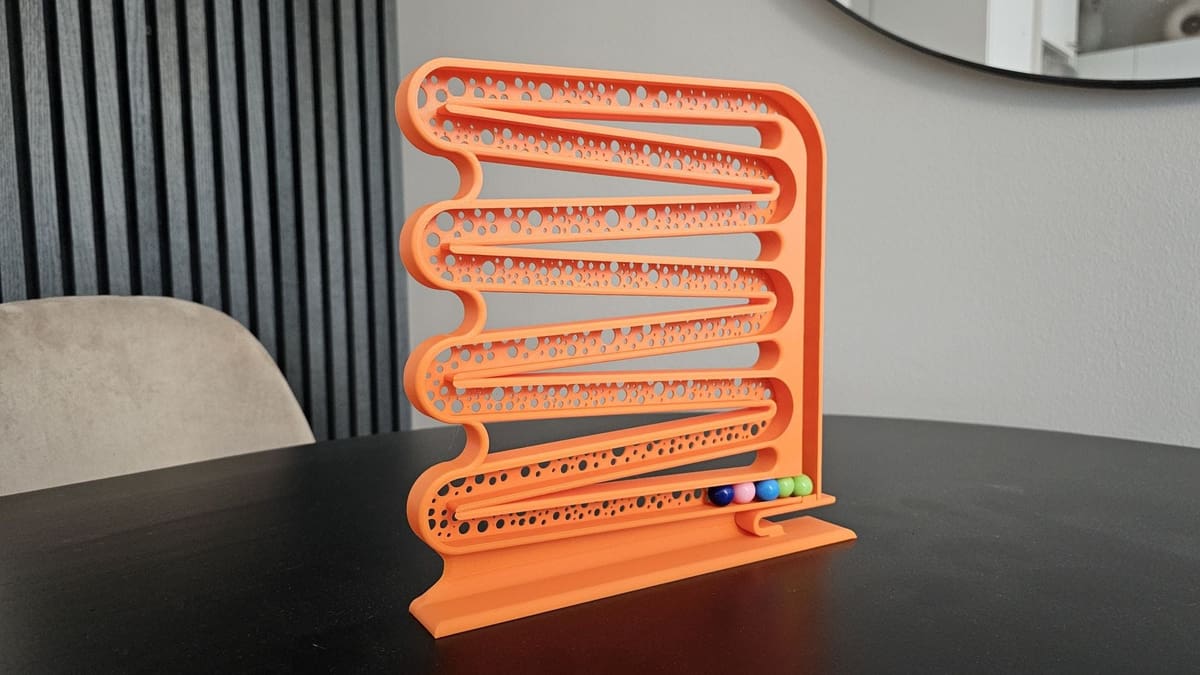
This model as print-and-play as it gets. No supports are required – so, no post-processing – and PLA should do the trick nicely, as the creator and other makers show. You can either buy the plastic balls or, since you’ve already got a 3D printer going, you can take advantage of the profiles shared by other makers and create them in the most colorful filament you can find that will contrast nicely with the actual toy.
If this design looks interesting but you’re not quite sold on it, check out the creator’s other models – there are plenty more loops and different paths to send the marbles through.
- Who designed it? Binrux3D
- How printable/popular is it? This smooth design that’s guaranteed to entrance more than one has been downloaded over 6,700 time and MakerWorld reports over 2,400 makes – clearly, it’s popular.
- Where to find it? MakerWorld
Tetris Balance
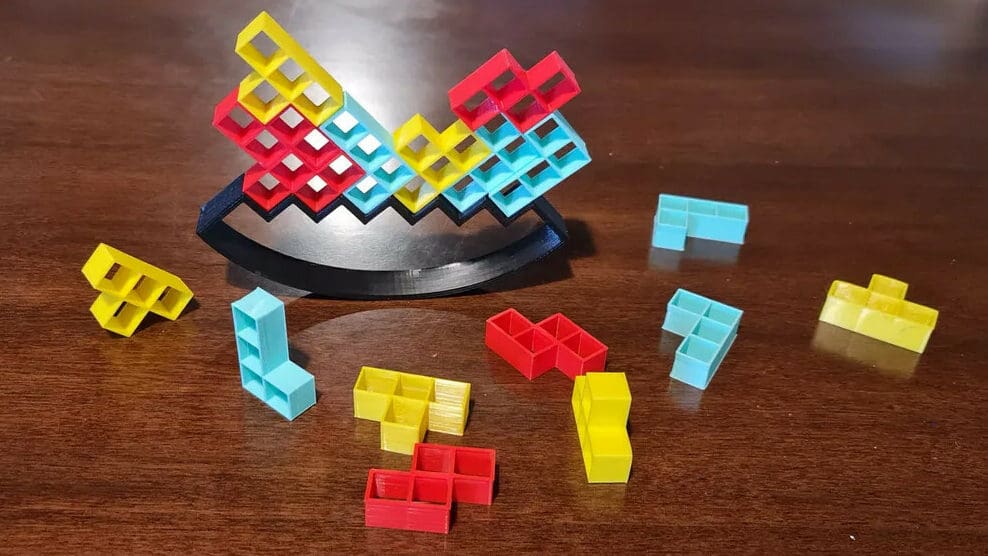
Just like the original, this game is simple and yet so much fun! Players take turns placing Tetris pieces, trying not to make the whole thing collapse. You can even choose the difficulty by using taller or shorter bases.
It’s another”end-of-spool” models where you can use leftover filament. If you’re looking for a box or some alternative pieces, check out the remixes.
- Who designed it? Bhorian
- How printable/popular is it? It’s easy to print, as is evidenced by the almost 160 colorful makes posted on Printables.
- Where to find it? Printables
Garbage Truck
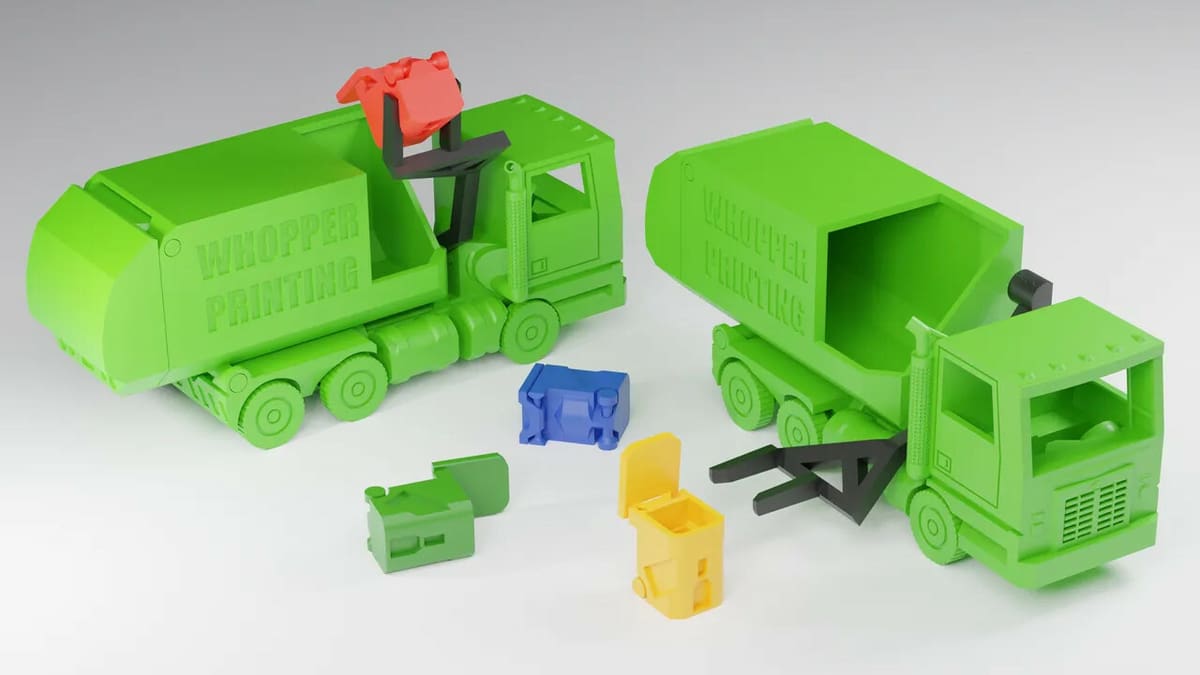
This print offers plenty of fun! It includes moving wheels, working levers for picking up trash, and a trash can (or more!) with a working lid and wheels. Everything is cleverly designed to just print in place and play.
Plenty of makers posted comments noting how much their kids love playing with the truck. If you like this one, you might want to check out some other print-in-place designs by WhopperPrinting.
- Who designed it? WhopperPrinting
- How printable/popular is it? There are around 185 fun makes on Printables, where it won the “Toy Cars” contest.
- Where to find it? Printables
Minecraft Steve's Scooter
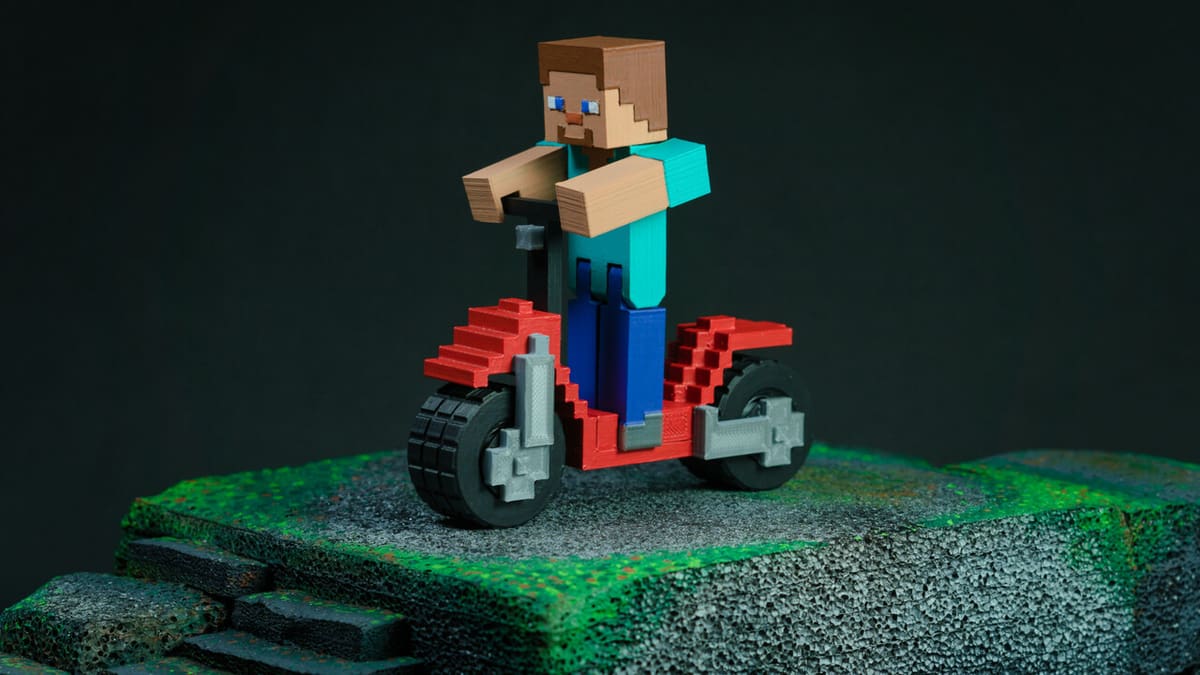
Minecraft Steve is the best Steve. Do you know any other Steve who is also print-in-place? Doesn’t matter, even if you do, this one comes with their own scooter – which is also print-in-place. Take that, other Steves.
Of course, this is a great gift for any Minecraft kid, but you’ll have to paint it before gifting it. Or, and this is totally not a cop-out, make it a weekend project with them. Seriously though, if your kid has the skills, painting it should be loads of fun.
- Who designed it? RodMuzac
- How printable/popular is it? It’s very printable, as attested by the nine documented makes.
- Where to find it? Cults
Tic-Tac-Toad
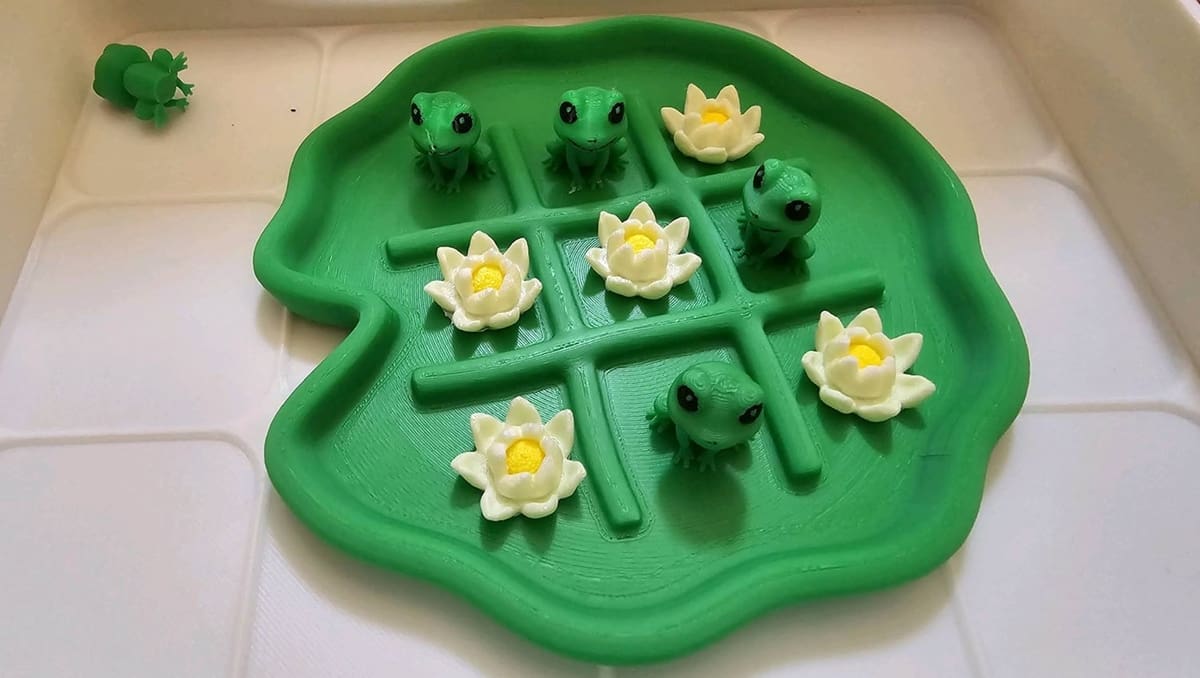
How cute is this version of a very popular game that barely needs any explaining?
The different parts print individually – Lilypad, flowers, and frogs – and you can paint them later, opt for multicolor slicing if it’s in your setup, or create whatever unique combinations that inspire you! A maker who encountered a challenge when printing the frogs took a creative approach: they 3D printed a second set of flowers in a different color combination, and now it’s a game of Tic-Tac-Lilies! (Clearly we can’t figure out a pun for this option.)
- Who designed it? Mochi Makes
- How printable/popular is it? This cute version of Tic-Tac-Toe has over 2,300 makes reported by MakerWorld!
- Where to find it? MakerWorld
Flexi Sea Creatures
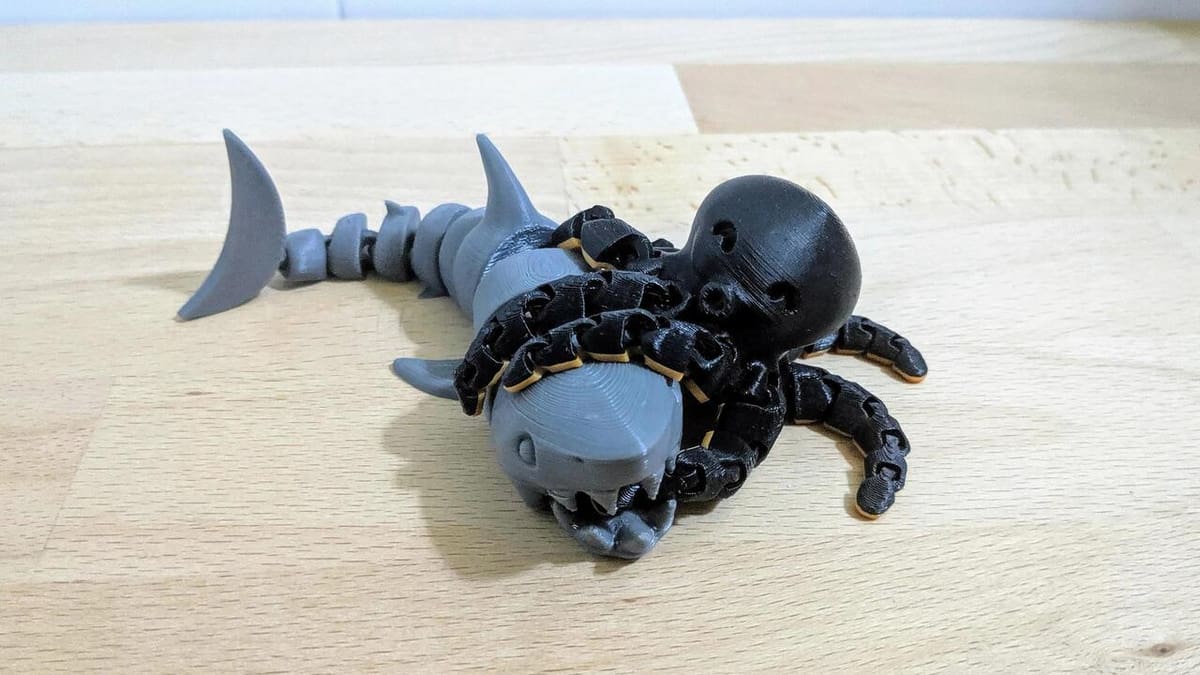
With a wide variety of filaments available, flexible parts are absolutely feasible. But you don’t have to use TPE or TPU to create flexible parts.
Making use of some awesome print-in-place hinges, you can make flexible toys with filaments such as PLA, PETG, and ABS. You don’t even need special settings! A standard 0.2 mm layer height and at least 15% infill will work just fine.
The shark and octopus we’ve included here are always popular examples, but there are countless flexi animals on platforms such as Thingiverse.
- Who designed them? McGybeer
- How printable/popular are they? The shark has over 360 makes on Thingiverse, with glow-in-the-dark filament prints looking especially cool. And the adorable flexi octopus has 1,800 makes and counting!
- Where to find them?
- Shark: Thingiverse
- Octopus: Thingiverse
Bird Whistle
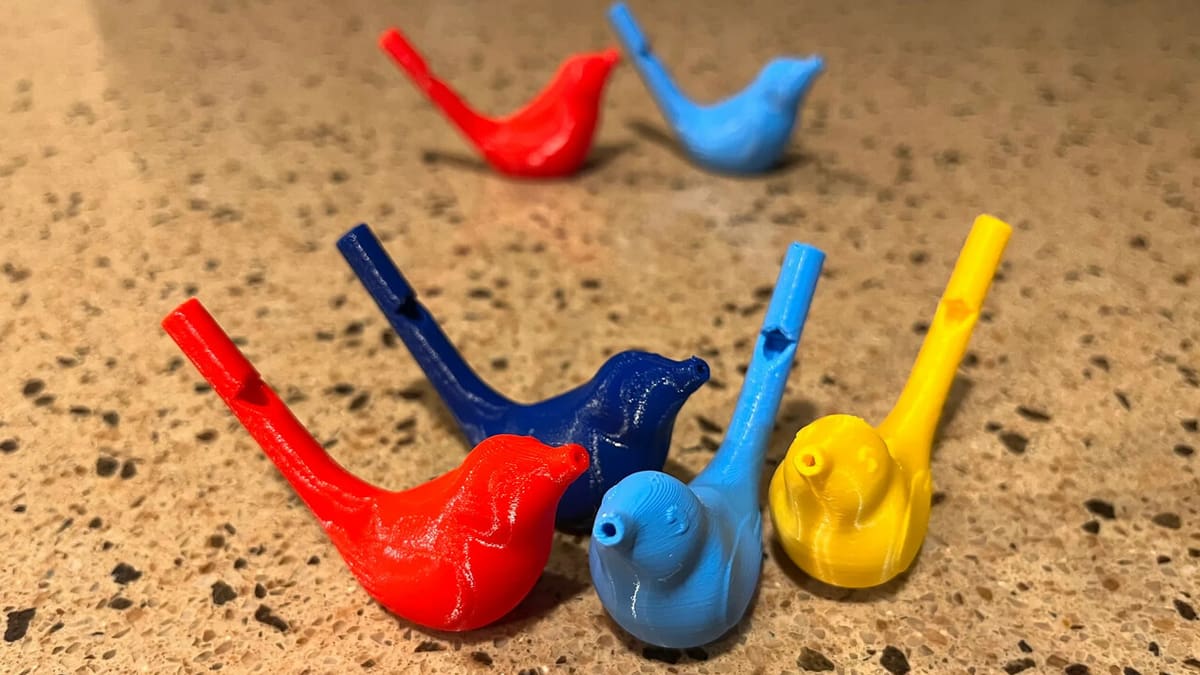
This bird-shaped whistle chirps like a real bird when you put some water in it. Younger kids love these, and we have to admit we’re a little partial to them ourselves. They’re just fun! Outdoor fun, of course, because dripping is guaranteed.
Our standard PETG recommendation for projects involving water applies here, but plenty of makers out there confirm that PLA works fine. If you want to make it as watertight as possible, we have a few pointers that might help.
- Who designed it? Sevro
- How printable/popular is it? Most of the 126 makers don’t just print one. For example, user AndyLowe printed 50 for kindergarteners.
- Where to find it? Printables
Singing Frog
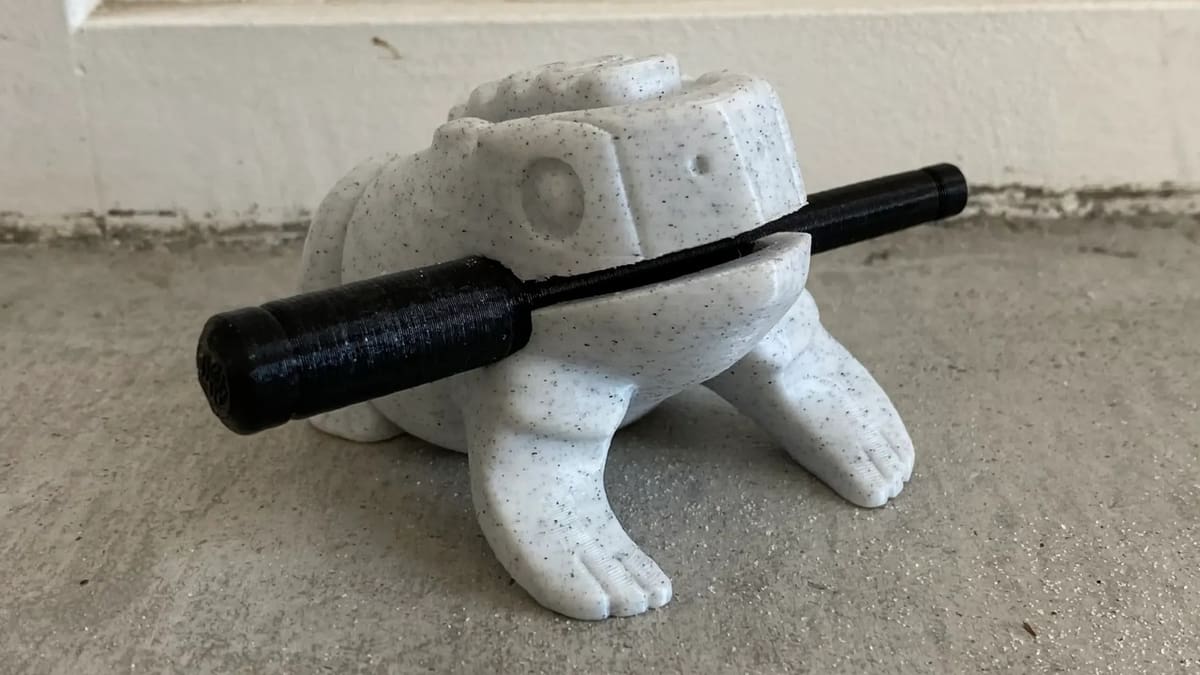
You may have seen these percussion frogs before. Rolling the included stick along the back of the frog produces a very realistic recreation of a frog ribbiting. Normally, these frogs are made out of wood. Luckily, they sound just as good when they’re 3D printed.
To get the right sound out of your frog, you’ll need to use a high infill percentage for the vibrations to align just right. Scaling the frog will make it produce a higher or lower pitch, so play around with the size until you find a pitch that you like.
- Who designed it? Wheelbarrow_of_melons
- How printable/popular is it? You can find almost 300 makes of this precious little guy on Printables alone!
- Where to find it? Printables, Thingiverse
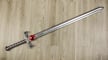
Collapsing Swords
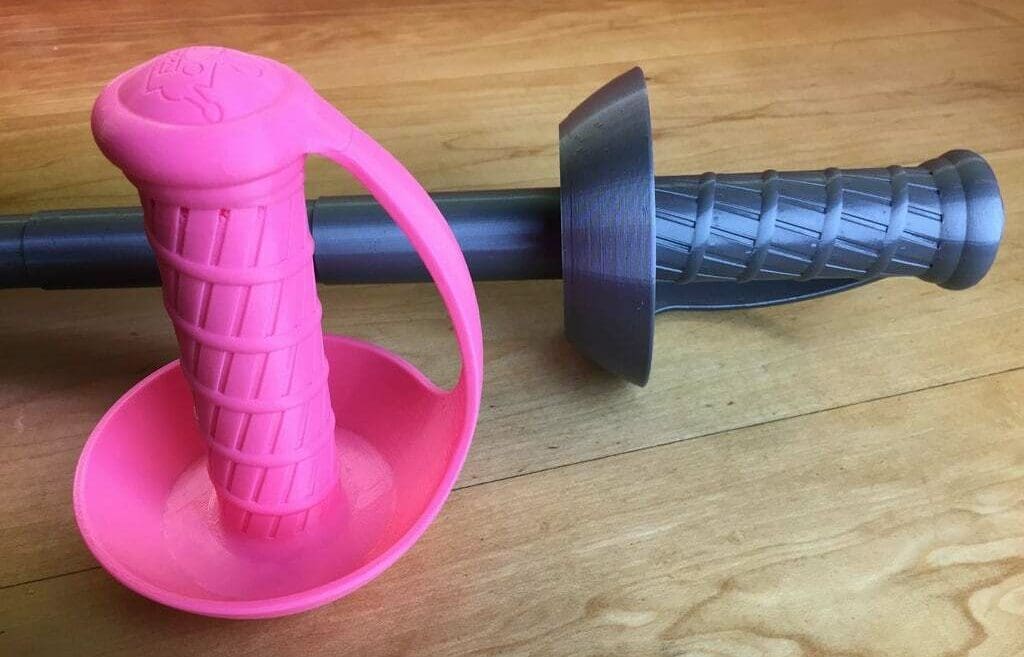
This may probably not be the best thing to hand your kid to keep them occupied in an antiques shop. In the right environment, however, collapsible swords are loads of fun. The designer has created collapsing pirate swords, katanas, daggers, lightsabers, and more to add even more fun to make-believe games.
A successful print of a collapsing sword requires a printer with good retraction, wipe, and coasting settings. Be sure to use a 0.4-mm nozzle and print slowly to avoid letting the blade sections fuse together. After you pop the sword off your build plate, give it a few wiggles, and gently retract and collapse the blade to allow for a smoother collapse over time.
- Who designed it? 3DPrintingWorld
- How printable/popular is it? 207 makes have been posted in a variety of colors, materials, and printers. Just be sure to dial in your retraction settings and consider using a forgiving material like PLA instead of PETG.
- Where to find it? Printables
Some Assembly Required
These toys may require some parts to be collected and put together.
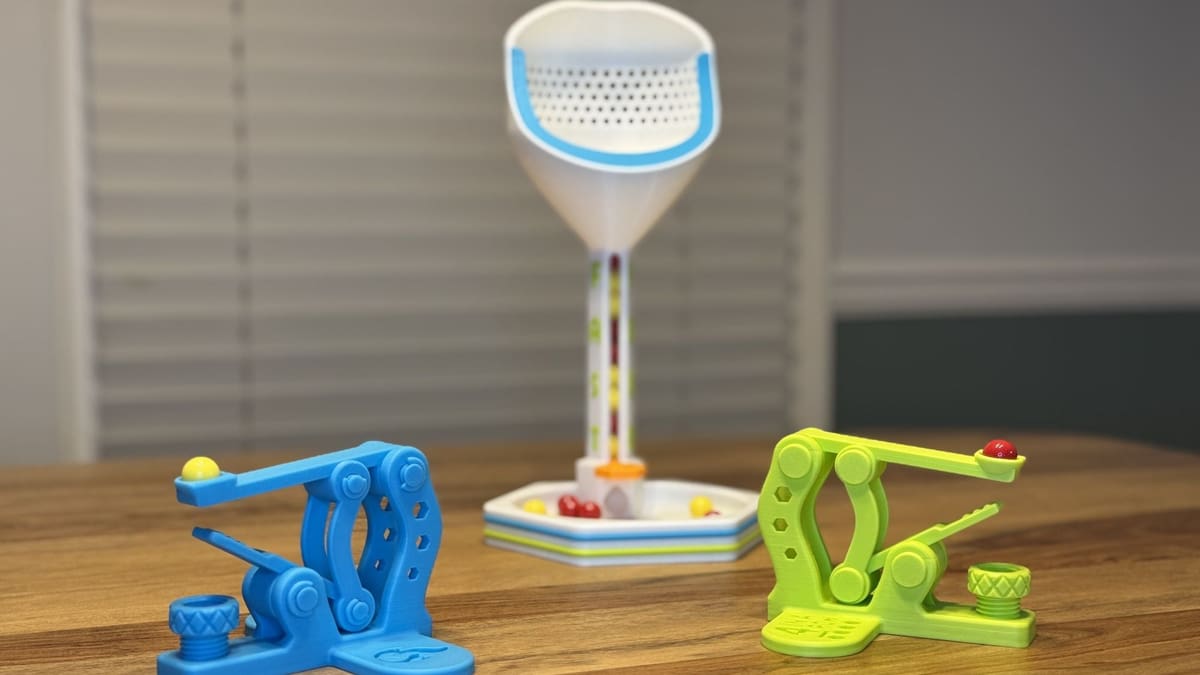
Fast Four
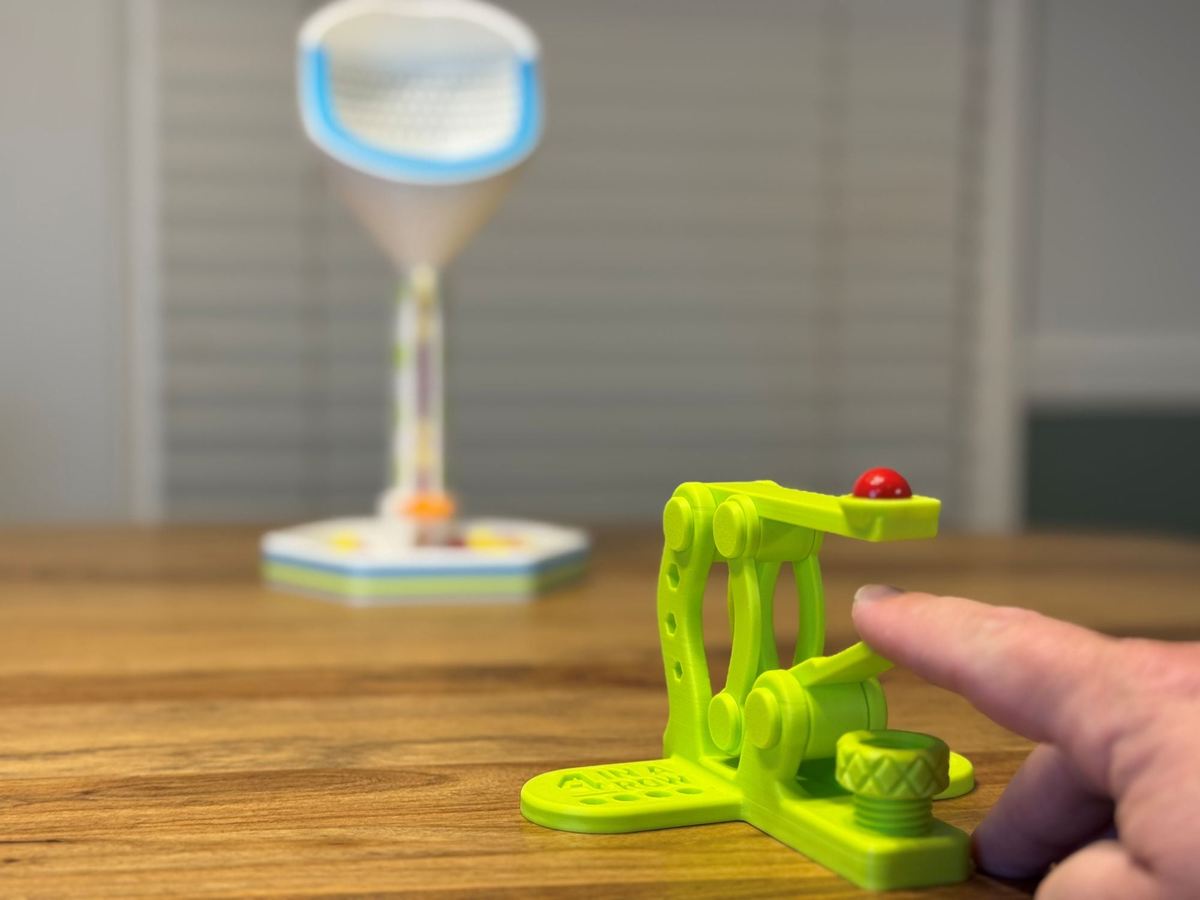
If you’re looking at this idea and doing a double-take, revisiting the catapult from earlier in the list, or wondering if it’s déjà vu, don’t fret. This concept takes the catapult to the next level, combining it with the classic game of 4-in-a-row.
Each player has to launch their marbles into the column, and whoever gets four in a row together, wins.
The base, column, and funnel where the marbles are aimed at can print all-in-one, while the catapult prints in parts and you then have to assemble it. Don’t worry, though, the designer included a very clear, visual guide on how to do so. While magnets are recommended, they aren’t needed, and you can either buy the marbles or 3D print the ones shared by a different maker.
The whole game might take some time to print – around 13 or 14 hours, depending on your setup – but by the looks of it, it’s well worth the effort!
- Who designed it? ozarkexpeditions
- How printable/popular is it? This wildly entertaining game has over 950 makes and has been downloaded more than 2,200 times.
- Where to find it? MakerWorld
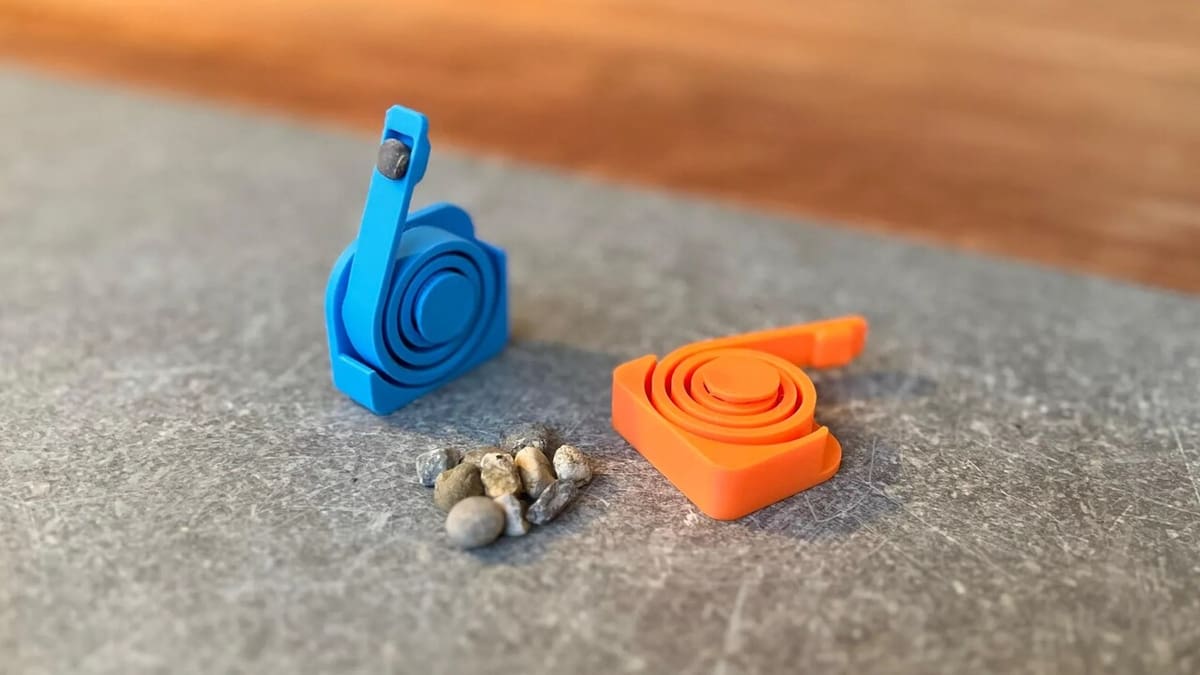
Twisted Spinning
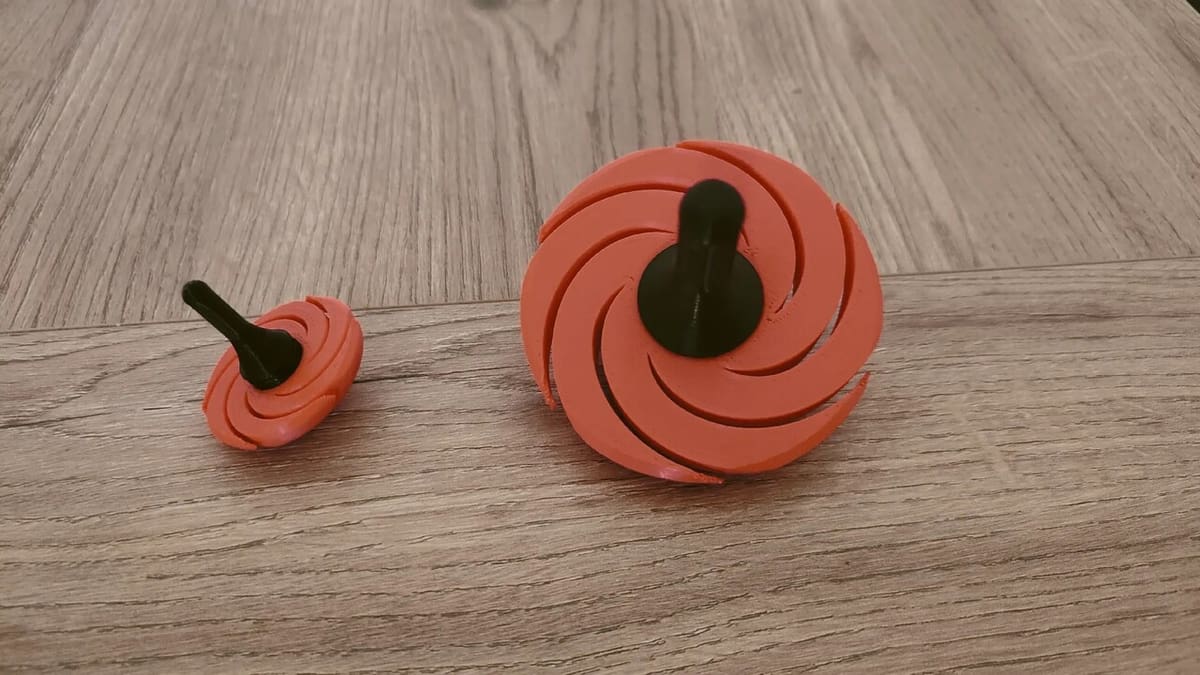
Spinning tops are said to be the oldest toys in the world, dating back nearly 6,000 years. Ancient spinning tops were made from everything from stone and wood to fruits and nuts. And now, you can make your own spinning top with a 3D printer! All you need to do is print and assemble the parts for some dizzyingly fun.
To replicate this, the author recommends using PLA with 100% infill, a layer height of 0.2 mm, and two walls. Other important tips are to configure the slicer to print the outer perimeters first and to orient the body part of the pawn towards the opening of the print bed. Several makers, such as Kristina 3D Prints, have praised the ease of printing and assembly. Because the pin on this model is held in place with a screw thread, it eliminates the need for glue – you’ll be ready to spin in no time!
- Who designed it? prntmkr
- How printable/popular is it? With over 7,600 downloads and 109 makes, it’s no exaggeration to say it prints as well as it turns.
- Where to find it? Printables
Bilboquet Ice-Cream Cone
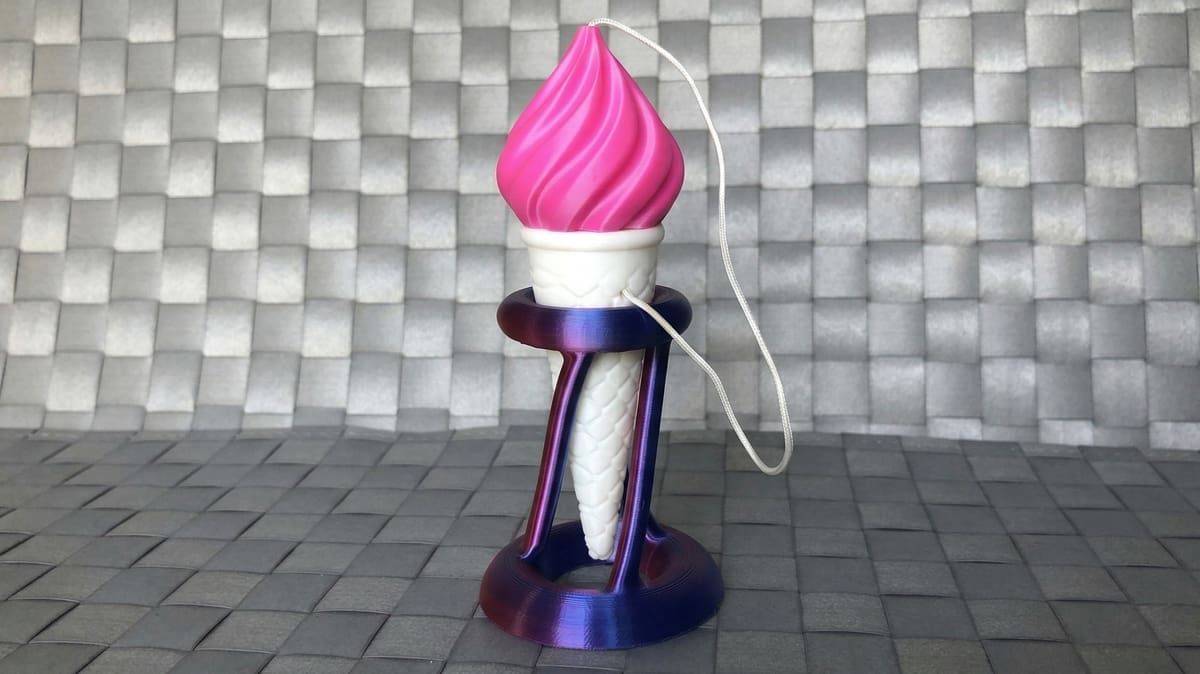
This is a delicious idea, a tasty version of the cup-and-ball game, which might lead to the kiddos requesting dessert once they’re done playing.
The model is split into four parts – cone, cornet, bilboquet tip, and base – so you can opt for different colors with no worries about material changes. All you’ll need is a piece of string, about 20 centimeters long as recommended by the designer, and then it’s just about assembly.
While the base will require supports given its intricate shape, the cone doesn’t. As for material choice, PLA should do the trick nicely, so be sure to get the yummiest looking one for the ice cream!
Squishy Turtles
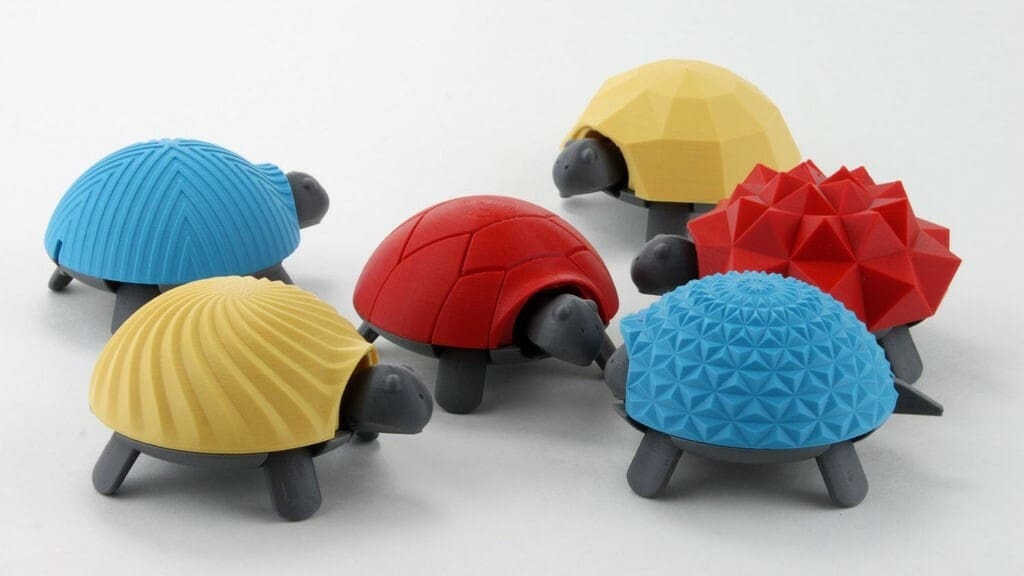
A toy list would never be complete without squishy turtles. Even the name sounds fun! With countless shell designs to choose from, this is a quick and easy model to print for babies.
Created with a suspension design, these turtles bounce up and down when you push down on the shell. Run wild with colors and designs!
- Who designed it? jakejake
- How printable/popular is it? Over 730 Thingiverse users have offered pictures of their prints. The possibilities are endless for color and shell design combinations.
- Where to find it? Pinshape, Thingiverse
Mini 13
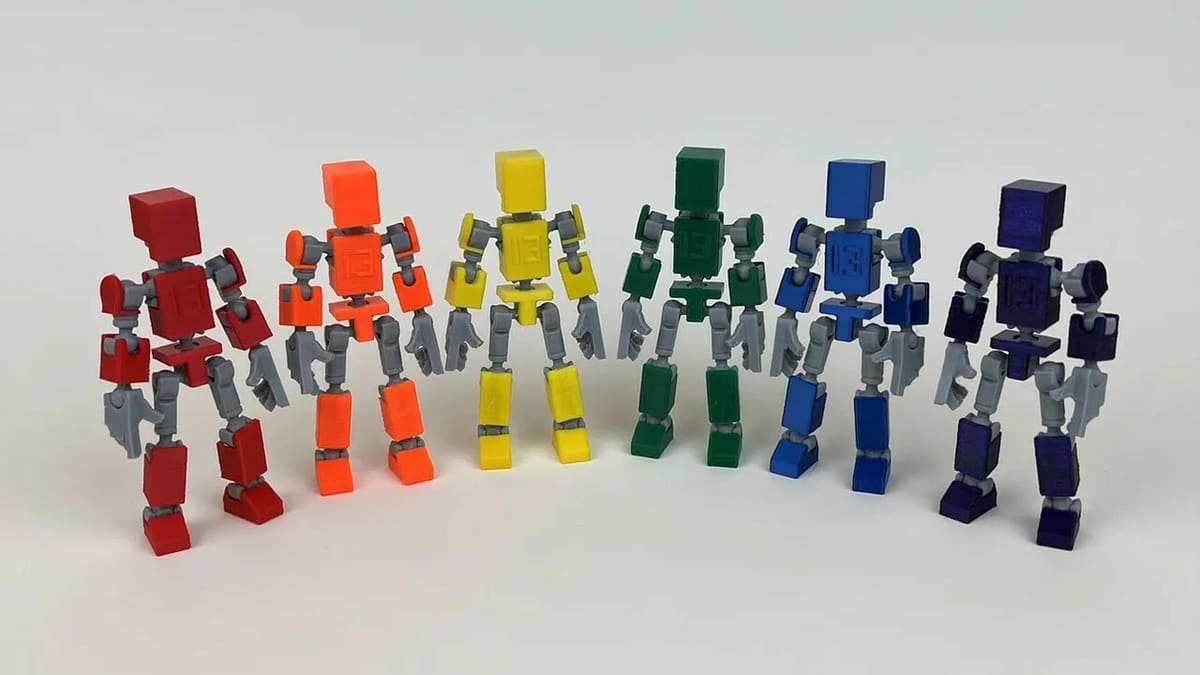
This extremely popular jointed figure is super modular and customizable. As the little sibling of the popular Lucky 13, Mini 13 is easier and faster to 3D print than the original model.
The designer recommends PETG for the frame parts, three perimeters, and a layer height of 0.15 mm. One of the main merits of this posable, snap-together print is the large community behind it. The remixes present limitless possibilities, with accessories, weapons, or even full character transformations!
- Who designed it? soozafone
- How printable/popular is it? There are over 880 posted makes on Printables, with many fun action scenes with multiple actors, props, and vehicles.
- Where to find it? Printables

Skewbits

Devin Montes at Make Anything came up with a pretty cool new puzzle game while trying to solve a totally different problem. Not discarding our mistakes can actually lead to great things, and here’s a video that proves it.
The game, Skewbits, is very tactile. Players morph the four base pieces into various shapes according to the preset puzzle outline. We have our money on kids spending more time in freeform creative mode, however.
The author also released version 2.0, with both aesthetic and functional improvements, including 50 problems to solve – check out the video!
- Who designed it? Make Anything
- How printable/popular is it? The game already has over 2,500 downloads, and a handful of makes have been shared.
- Where to find it? Thangs
Puzzle Plane

If you’re looking for something that’s both challenging and fun, this magnetic puzzle plane is a great choice. Once assembled, it will measure approximately 217 mm x 255 mm x 116 mm and, although it won’t fly, it can easily bring joy to little ones.
That said, the original model isn’t recommended for children between 0 and 3 years old due to the possibility of the 55 small magnets coming loose, as they are fixed from the outside.
Thinking about solving this, pepebuho designed a remix where the magnets are internal, but this involves a bit more work because it’s necessary to pause the printing to add a total of 109 magnets. Another remix, shared by Wildnet, offers the possibility of having rotating rear wheels.
- Who designed it? Deemoss
- How printable/popular is it? A soaring 112 makes, 8 remixes, and 149,000 downloads make it clear that it’s printable and very popular.
- Where to find it? Thingiverse
Pocket Copter
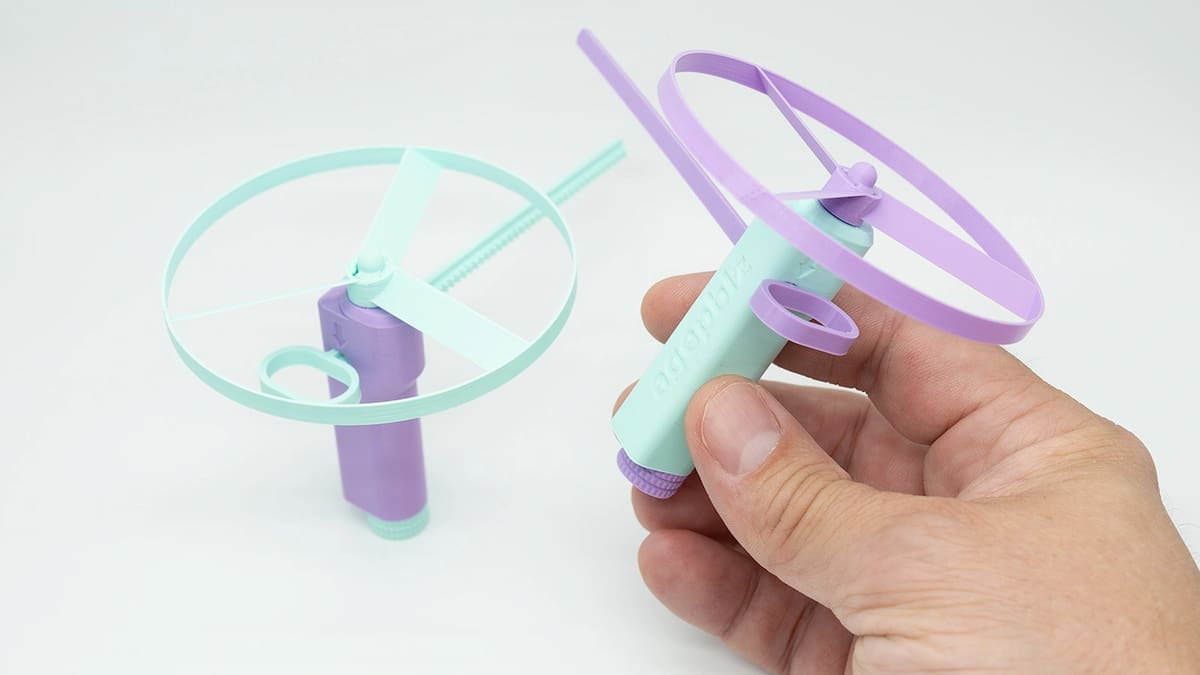
A fun and simple toy that’s sure to provide hours of entertainment to any child is the pocket copter. Using a gear and a rip cord, you can send the propeller flying into the air over and over again. Print out multiple propellers in different colors for some variety!
This toy only needs five parts to be printed, with minimal assembly required to get it up and working as soon as your prints are finished. The blades of the propeller are known to have issues printing properly, so be sure to thoroughly clean your print bed and slow down your speed if you run into any problems with printing.
- Who designed it? agepbiz
- How printable/popular is it? This is quite the popular toy, with over 19,100 prints reported by MakerWorld to date!
- Where to find it? MakerWorld
Hotrod Racer Balloon Car
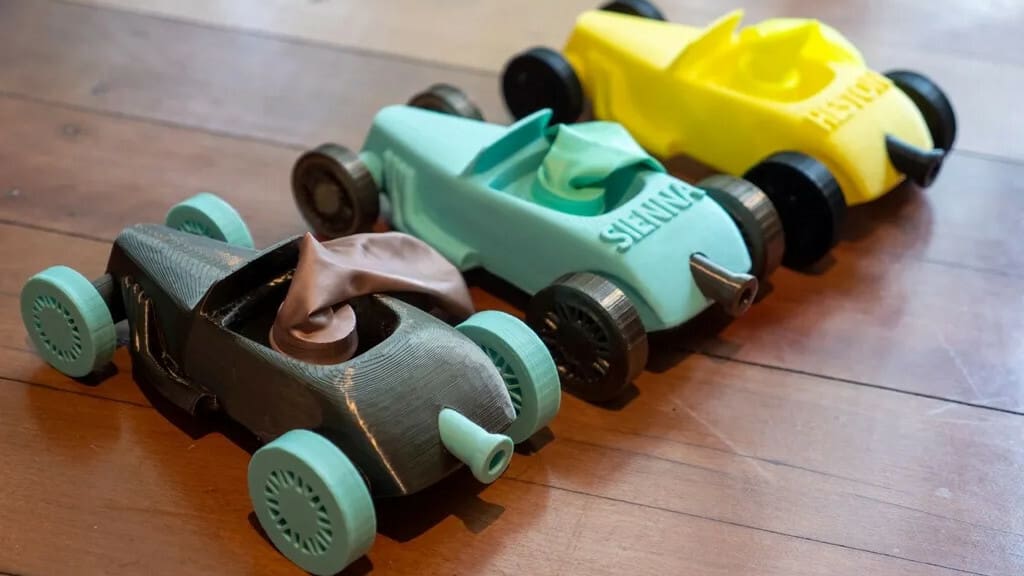
Physics and racing cars, what’s not to love? Use some colorful filament, add a couple of balloons, and the race is on!
This remix adds a mouthpiece for inflating the balloon, so you never have to disconnect from the car to re-inflate. The designer recommends using optional aluminum rod axles for maximum speed, but some users vouch for the fun they had with the fully printed version.
- Who designed it? PollyJeanius (remixed from VF)
- How printable/popular is it? There are 44 posted makes with most users posting several prints in different colors. Well, they’re called racers for a reason, right?
- Where to find it? Printables
Polypanels
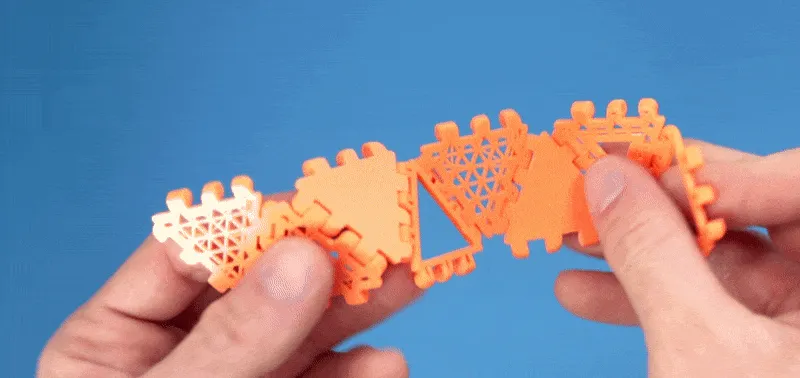
Polypanels have various shapes and sizes, but the edge connectors are always the same, allowing you to run wild with ideas. The parts snap together and can create flexible or firm shapes, so the possibilities are limitless! You can even design your own custom Polypanels.
- Who designed it? MakeAnything
- How printable/popular is it? Thousands of makers have printed and created designs with the Polypanel system. You can check out dozens of community Polypanel designs and prints on MyMiniFactory.
- Where to find it? MyMiniFactory
Duck Shooting Gallery
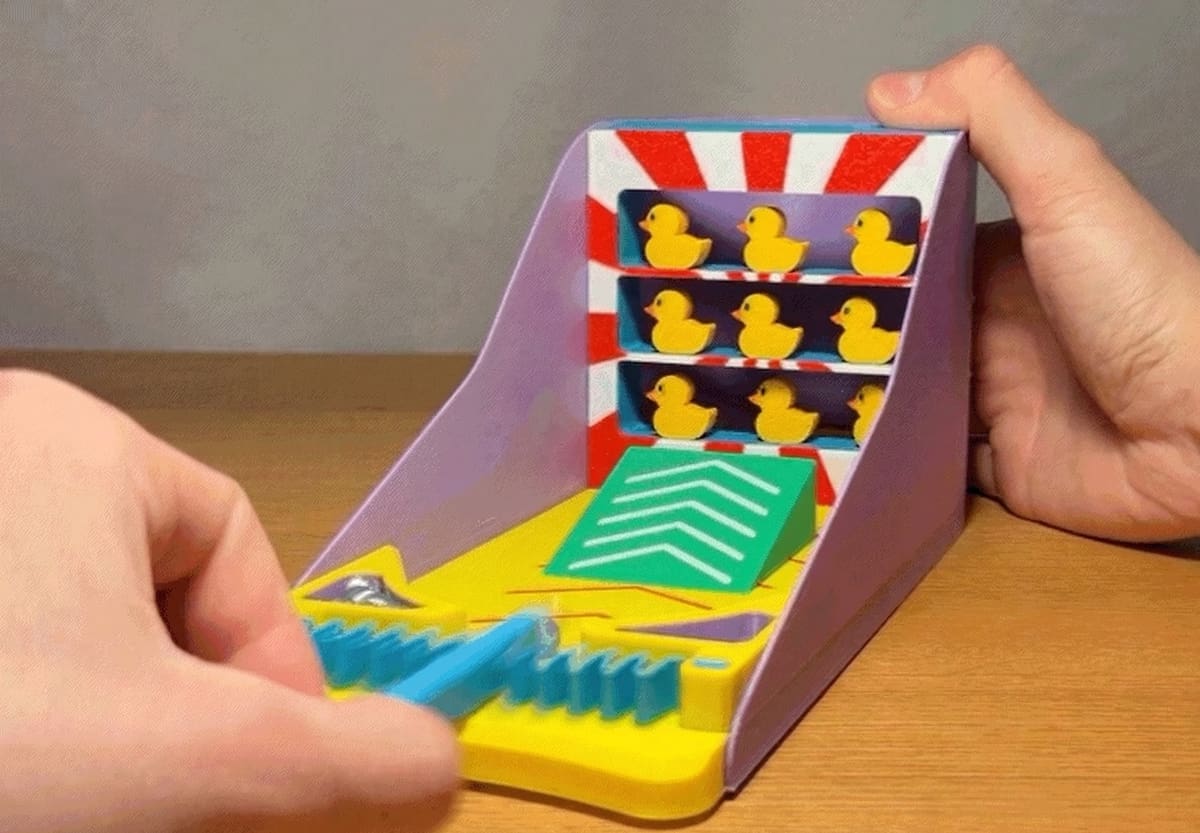
This is one of the more involved options on this list, but it will definitely mean countless hours of fun for the kiddos – and the adults!
The model is comprised of many parts, but the different ramps ensure that different heights can be reached for the goal. The designer’s take on their creation is colorful and engaging, and all the parts appear to print easily enough. You might want to check your 3D printer’s tolerances before you get started, though, given how the segments go together, but overall, it shouldn’t be a difficult print.
The launcher might benefit from TPU instead of PLA, to ensure durability, but overall, the maker’s version – apparently from PLA – looks like it does the trick all the same.
- Who designed it? fifindr
- How printable/popular is it? This new game has just under 100 downloads – given the amount of fun it promises, we’re sure there’ll be many more, as well as makes!
- Where to find it? Printables
Batteries Not Included
Building toys inspires creativity and invention. These will feature other parts that aren’t usually 3D printed, such as batteries and motors.
Magnetic Fishing
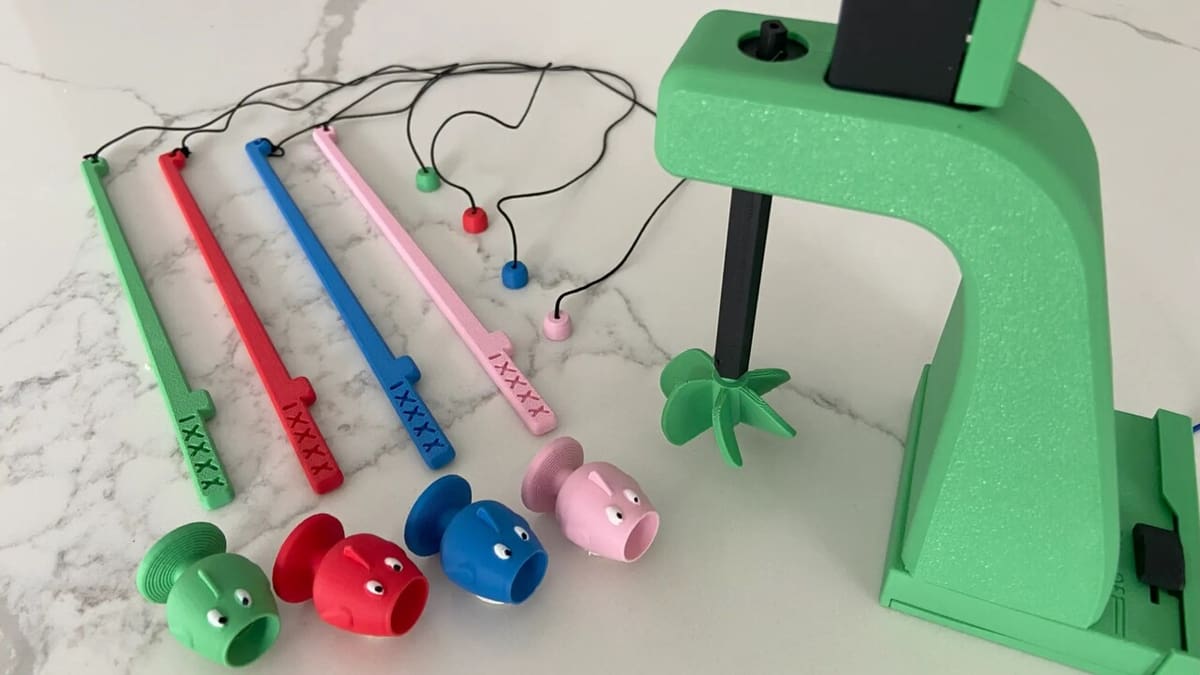
A weekend fishing trip sounds like a great idea, but what if you live in a big city far from any lakes or rivers? Well, if you have a 3D printer, the solution may be on the way with this cool toy set. The model uses Bambu Lab’s Maker’s Beginner Kit, available for ~$10, so you don’t have to worry about complicated electronics purchases. In fact, it’s mostly a matter of printing and assembling everything if you already have the magnets!
The designer included both notes and PDF assembly instructions, making the task much easier, and if you like the original version, the filament colors are specified so you can replicate it.
Printing time will depend on whether you’ve got a standard sized printer or a smaller one (e.g. Bambu Lab A1 Mini), so you might be looking at either roughly five or six hours of anticipation buildup. Settings are as 0.2-mm layer height, 2 outer walls, and 15% infill, and the ease and creativity behind this project explain why it won MakerWorld’s Maker’s Beginner Kit contest.
- Who designed it? Abe Builds
- How printable/popular is it? Over 415 makes and 1,300 downloads, as reported by MakerWorld, show that it won’t be difficult to make your own fishing fun.
- Where to find it? MakerWorld
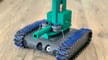
Wi-Fi Propeller Boat
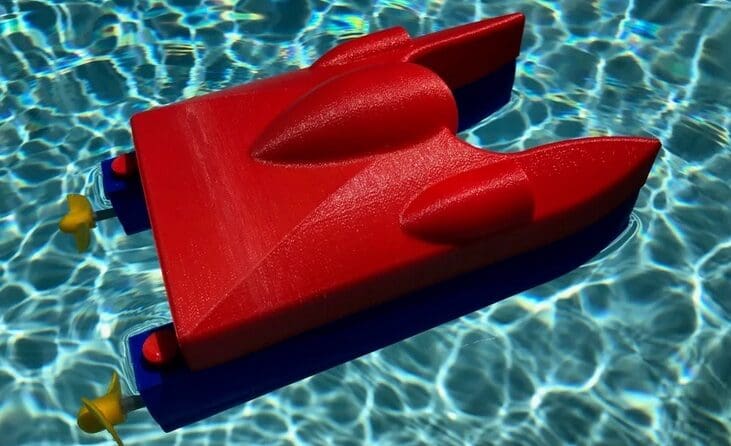
This Wi-Fi-enabled, remotely controlled boat has a complex assembly that features two propellers. It requires a Wi-Fi kit, controller, DC motors, ball bearings, batteries, resistors, connectors, and fastening tools (glue, servo tape, etc.) to connect to the 3D printed parts and operate successfully.
Although it resists splashes, it’s not waterproof and shouldn’t be submerged.
Autodesk Fusion was used to design its components. And when it comes to manufacturing, PLA filament material is recommended. You can follow the detailed instructions to set up the final assembly.
- Who designed it? gzumwalt
- How printable/popular is it? Its parts have 12 different STL files that can be edited in 3D Slash before 3D printing. They have been viewed almost 7,400 times and favorited 69 times.
- Where to find it? Instructables

T-10 Water Gun

Nothing beats a water gun fight in the heat of summer, but this isn’t just a pistol, it’s a true machine gun capable of annihilating your enemy! This model makes use of Bambu Lab’s Electric Water Spray Kit 01, which costs ~$17. If you’re in doubt about its firepower, check out the assembly and testing video shared by the author.
While this water gun brings plenty of fun, you’ll benefit from paying attention to the tips shared by the designer and other makers. From using 3 walls and 30% infill to avoid leaks, to (if possible) opting for PETG or PLA+ to increase durability, there’s plenty of useful information in the comments.
- Who designed it? QYM 3D 脑洞造物秦一鸣a
- How printable/popular is it? Over 780 downloads, 2,500 prints, and counting, are bringing lots of fun to scorching summer days!
- Where to find it? MakerWorld
SLAB Nerf Blaster
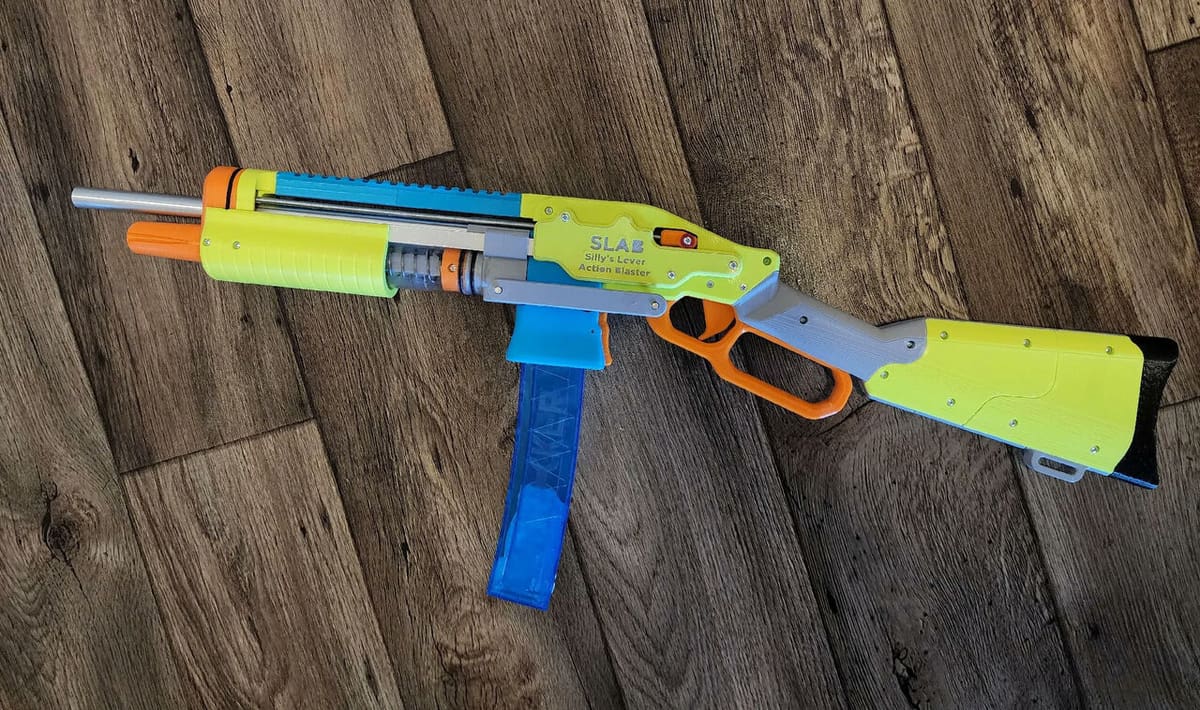
Nerf blasters and 3D printing are a match made in heaven. The amount of printable accessories that you can find for the hobby is staggering. You’ll find a good amount of fully-printed blasters as well, including the SLAB blaster. This lever-action model is one of the most popular for good reason, as it’s fun to use and easy to print.
After printing the body, you’ll need to order the rest of the hardware to complete the build. Luckily, you can find ready-to-order kits available in the model’s description, along with full tutorials for the build and tips for the best performance. The designer also has some other blaster builds uploaded as well!
- Who designed it? Sillybutts
- How printable/popular is it? You’ll find 130 makes of this blaster posted already, each in a unique color scheme.
- Where to find it? Printables
License: The text of "3D Printed Toys: 25 Great 3D Prints for Kids" by All3DP is licensed under a Creative Commons Attribution 4.0 International License.