How to Set Up Linear Advance in Marlin

Linear advance can predict nozzle pressure for more consistent extrusion. Read on to learn how to set up linear advance in Marlin!
In FDM 3D printing, the extruder and nozzle work to extrude material layer-by-layer to create the desired part. Unfortunately, because the relationship between the extruder and nozzle is fragile (both have to work perfectly for a perfect print), when any slight error occurs, print quality is reduced.
Specifically, after the extruder has stopped pushing the filament, excess material oozes out of the nozzle until there’s a gap between the filament and the nozzle in the hot end. This gap is repeated with every pause in extrusion, and the resulting inconsistent extrusion causes parts to have soft corners or bumpy walls, and might even require you to lower printing speeds.
Flaws like these have been normalized due to the nature of FDM 3D printing. Even if your printer is operating perfectly, you still might run into these errors. However, in recent years, technology known as linear advance has been developed to diminish or eradicate these issues’ effects.
3D Printing Foresight
Linear advance is a special firmware feature that expects and compensates for pressure building up in the nozzle due to switching between extrusion and retraction. This compensation yields prints with sharper corners, flatter walls, and cleaner solid infill, all while using higher printing speeds (if no other limitations exist). These enhancements are virtually unattainable using any other fixes like tuning slicer settings or leveling the bed, which are nevertheless still vital for successful prints.
Linear advance can be a little tricky, though, so in this article, we’ll go over how linear advance works as well as how to set or adjust it in your firmware.
What It's Solving
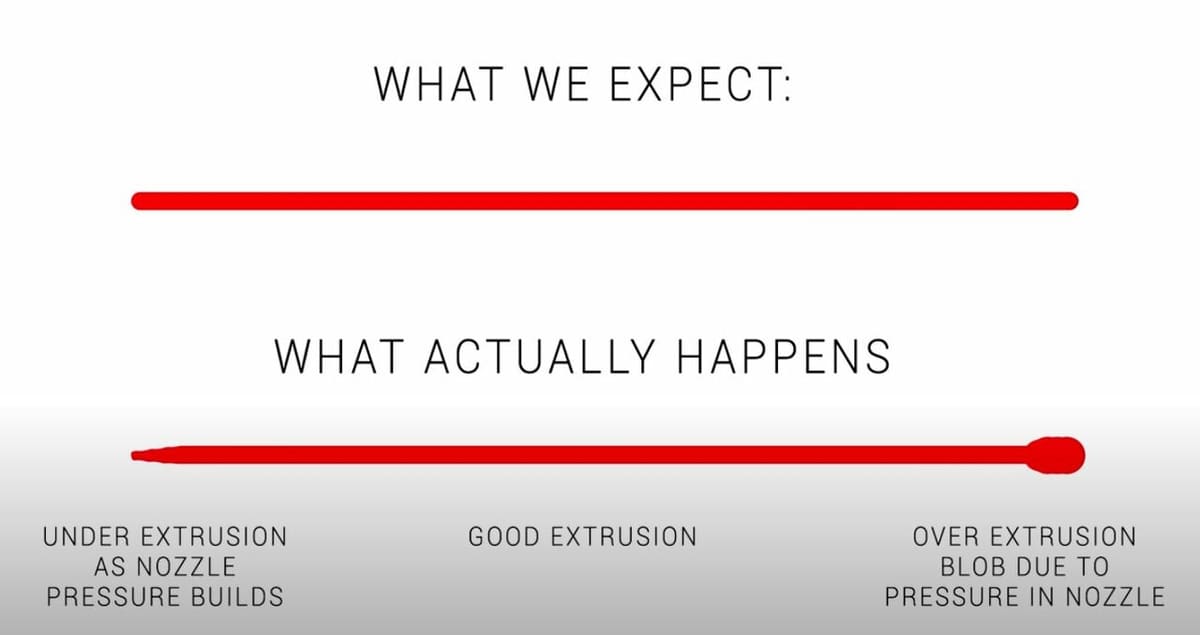
Before diving into how exactly linear advance works, it’s important to understand the problem the feature is meant to solve: non-constant material flow due to pressure changes in the nozzle. With extrusions and retractions, pressure builds up and releases in the nozzle, causing inconsistent and even lagged extrusions.
As we’ve mentioned, this is what causes filament to ooze out of the nozzle after extrusion has ceased, or material will start coming out too late because of the release of pressure (causing a gap in the filament flow in the nozzle) after a retraction. For example, if you tell your machine to print one straight line, as seen in the image above, the beginning of it will be under-extruded while the end will be over-extruded.
Higher printing speeds usually exacerbate this problem because filament flows faster but the nozzle pressure is still inconsistent, causing the extrusion to be equally or more inconsistent. This is why linear advance is so effective and helpful when using increased printing speeds.
How It Works
Linear advance is a feature on your 3D printer’s firmware that attempts to compensate for pressure in the nozzle and inconsistent extrusion. But how exactly does it do this?
K-value
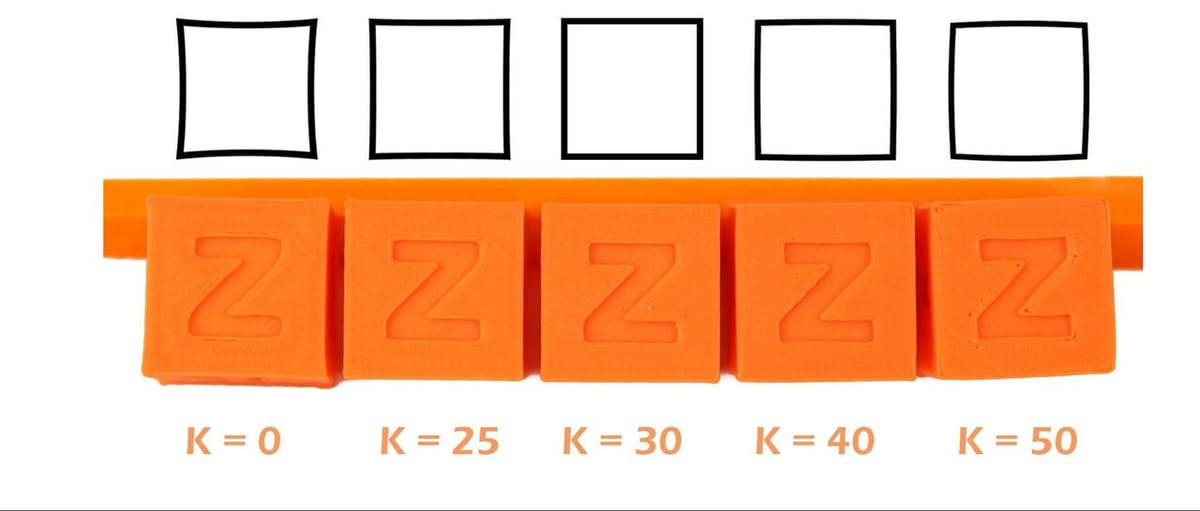
Linear advance extrudes an extra length of material for every 1 mm/s of print speed. The resulting “compression distance” is known as the K-value. Because it’s dependent on print speed, you can use it at both high and low (or normal) printing speeds. The larger the K-value, the more filament the extruder will compress into the hot end to synchronize the extrusion with the X- and Y-axes’ motion.
The K-value will probably be higher on a Bowden drive setup than a direct drive one and also vary across different hot ends. To account for this, you can change your K-value by editing and reinstalling your firmware or using a G-code terminal, but we’ll get into exactly how to do this later in the article.
Effects
Linear advance doesn’t actually prevent the build-up of pressure in the nozzle. Instead, it tries to keep the pressure constant by increasing extrusion as the print speed increases. In other words, linear advance ensures that the ratio of extrusion to print speed doesn’t change throughout the print.
If you’re wondering about the difference between the K-value and E-steps, the K-value is determined by the print speed, while the E-step value is applied to every extruder move, regardless of speed. Both values affect material flow, but it’s the E-steps that determine the base amount of material to extrude, while the K-value adds or subtracts from this amount based on the speed.
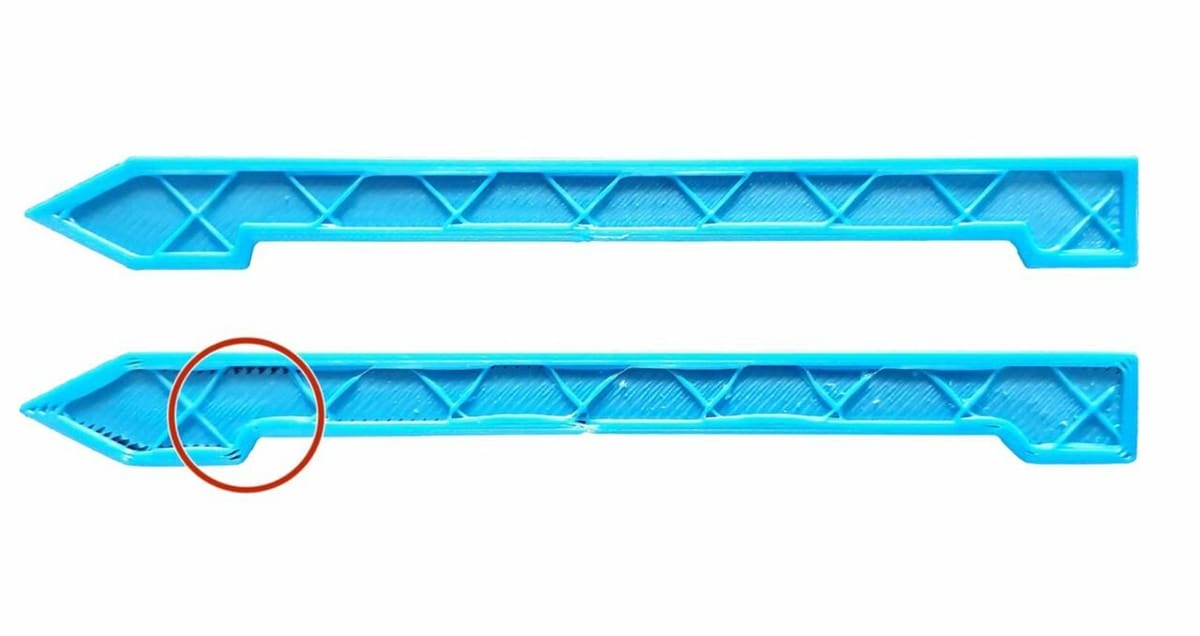
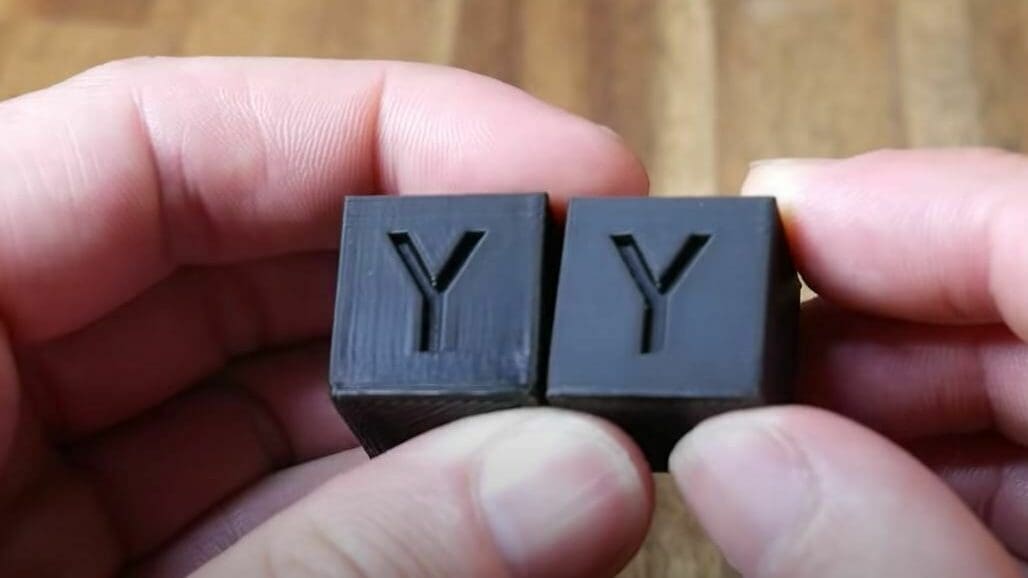
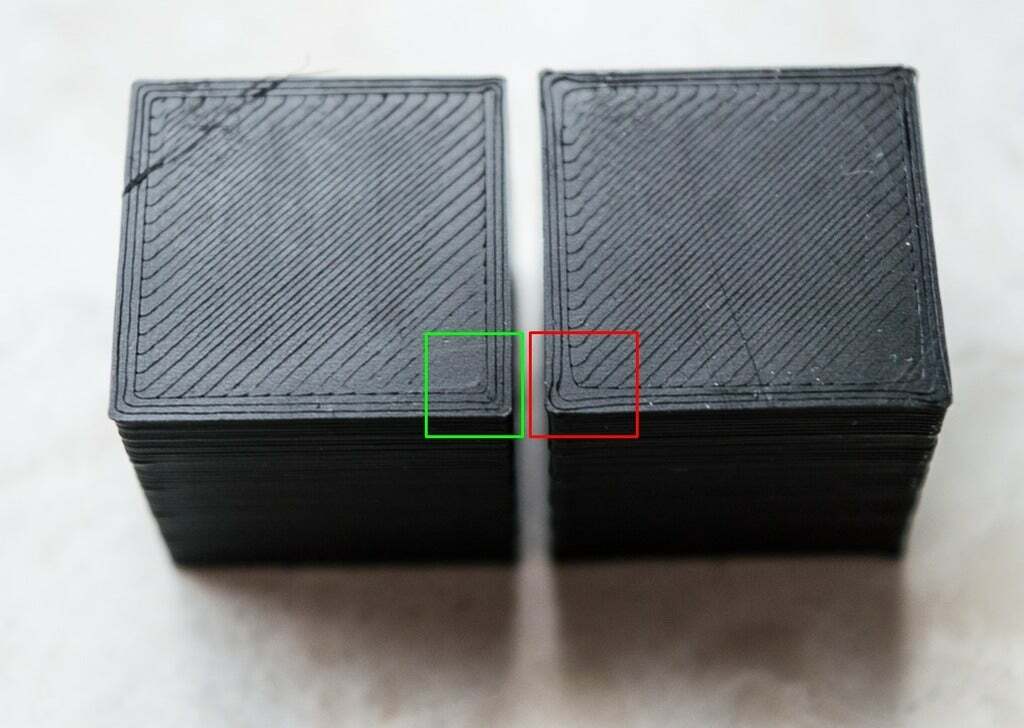
Apart from laying more consistent lines, linear advance is great for printing sharp corners. That’s because, with normal extrusion, the direction change at a corner often causes over-extrusion, resulting in a rounder corner. However, the harmonization between the nozzle flow and the X- and Y-axes’ movements reduces the over-extrusion, allowing for sharper corners.
Another example is bumpy or non-flat walls, which are once again primarily caused by inconsistent extrusion due to nozzle pressure. The consistent extrusion of linear advance helps keep the walls of a part flatter. This print quality improvement is visible on a part’s surface, especially if prints contain large, thin walls.
Support & Compatibility
While linear advance is a great feature to have, it’s not available on every printer or firmware. In this section, we’ll go over the compatibility for linear advance for both mainboards and firmware.
Mainboards
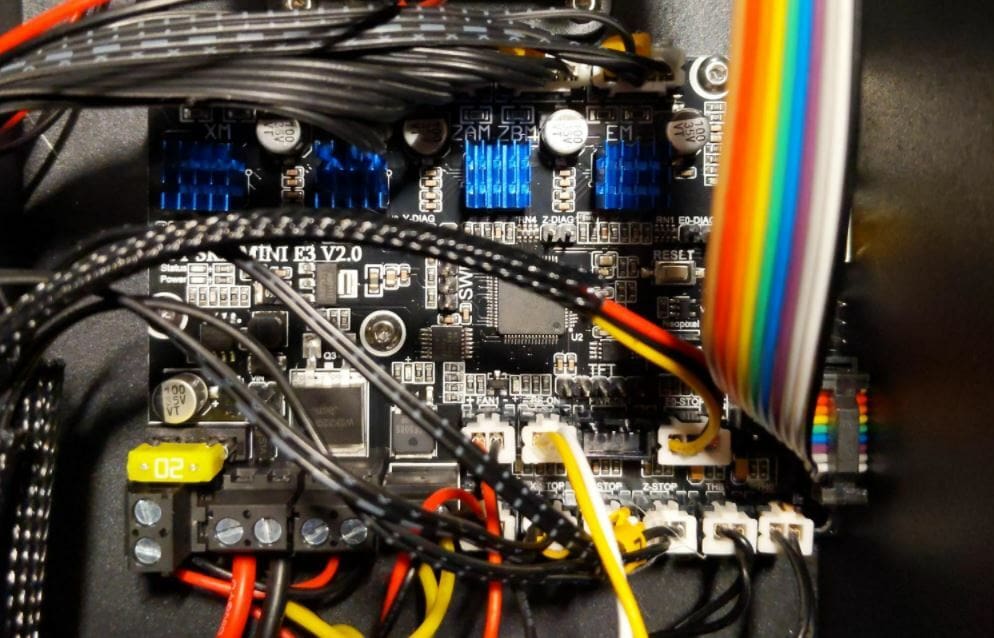
The linear advance feature isn’t compatible with every 3D printer mainboard. According to TeachingTech on YouTube, linear advance can be problematic on certain configurations of stepper motor drivers. For example, the TMC2208 drivers in stealth, legacy, or standalone mode, as seen on some Creality mainboards (e.g. Ender 3 and V2), won’t work.
If you’re looking for a mainboard or printer that supports linear advance, the Prusa i3 MK3S+‘s Einsy Rambo or the SKR Mini E3 work great. Alternatively, if you have a custom-built printer, you can use TMC2209 stepper motor drivers on a mainboard with customizable drivers like the Makerbase Robin E3D.
Firmware
Linear advance, as we’ve mentioned, is primarily controlled through your printer’s firmware. While this feature may start to be incorporated into other firmware (like Smoothieware), currently, it’s mainly showcased on Marlin firmware. Marlin is community-developed, open source, and the most popular firmware choice for FDM 3D printers. As a reminder, firmware interprets G-code so your printer can control its hardware as instructed.
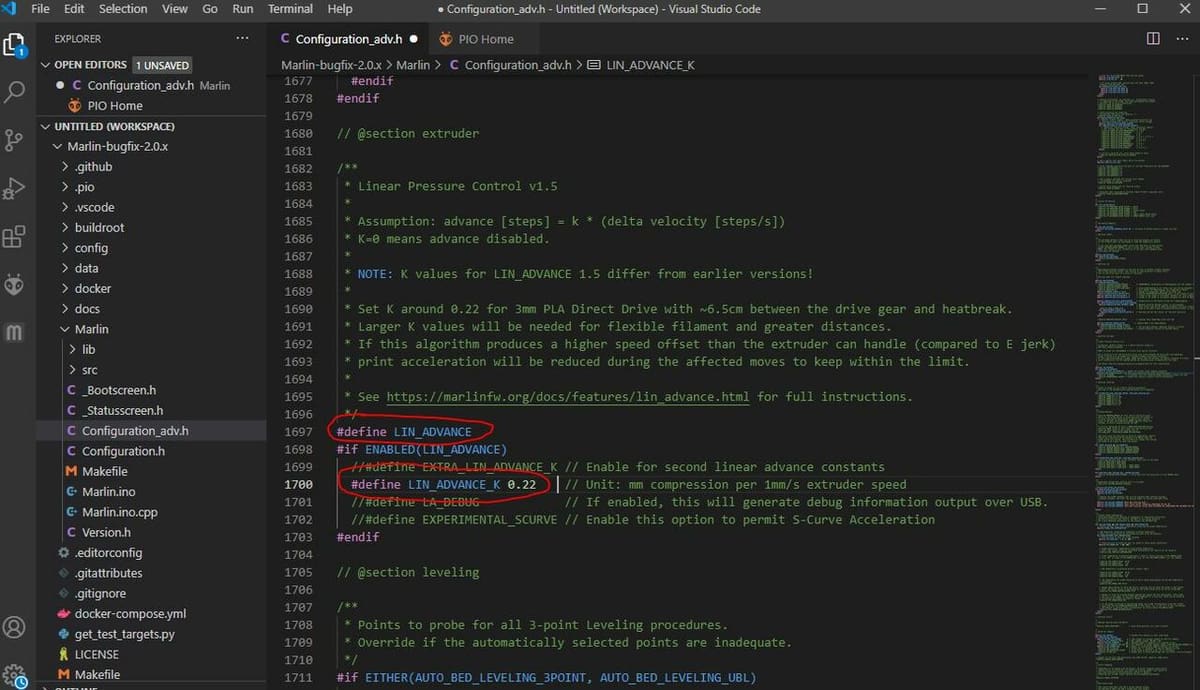
Certain Marlin-based programs also contain linear advance features, like the Prusa Marlin firmware on the Prusa i3 MK3S. To check for the feature, you can always search “LIN_ADVANCE” in your firmware’s “Configuration_adv.h” file.
Setting Up Linear Advance
Before we get started with how to set up linear advance, make sure your printer is in good condition, the extruder is calibrated, and the slicer settings, like temperature and retraction, are well-tuned. Don’t forget to level your bed, too, as you should before any 3D print.
To use linear advance, you’ll have to change and reflash the firmware on your printer, which can be a tricky process, especially for those who’ve never done this before. If you fall in this category, we recommend checking out our article about installing and changing firmware.
You can follow the steps below to test and adjust your linear advance K-value:
- Open up a firmware editor and upload your current Marlin or Marlin-based firmware.
- Under the “Configuration_adv.h”, uncomment (take out the “//”) the line “#define LIN_ADVANCE”.
- Save, compile, and upload your new firmware to your printer.
- Open the Marlin K-value generator and adjust the slicer settings on the interface to match the ones that you use (mainly temperature, nozzle diameter, print bed, speed, and retraction).
- Click the “Generate G-code” button at the bottom of the slicer setting portion of the generator website.
- Download the G-code script and load it onto your printer.
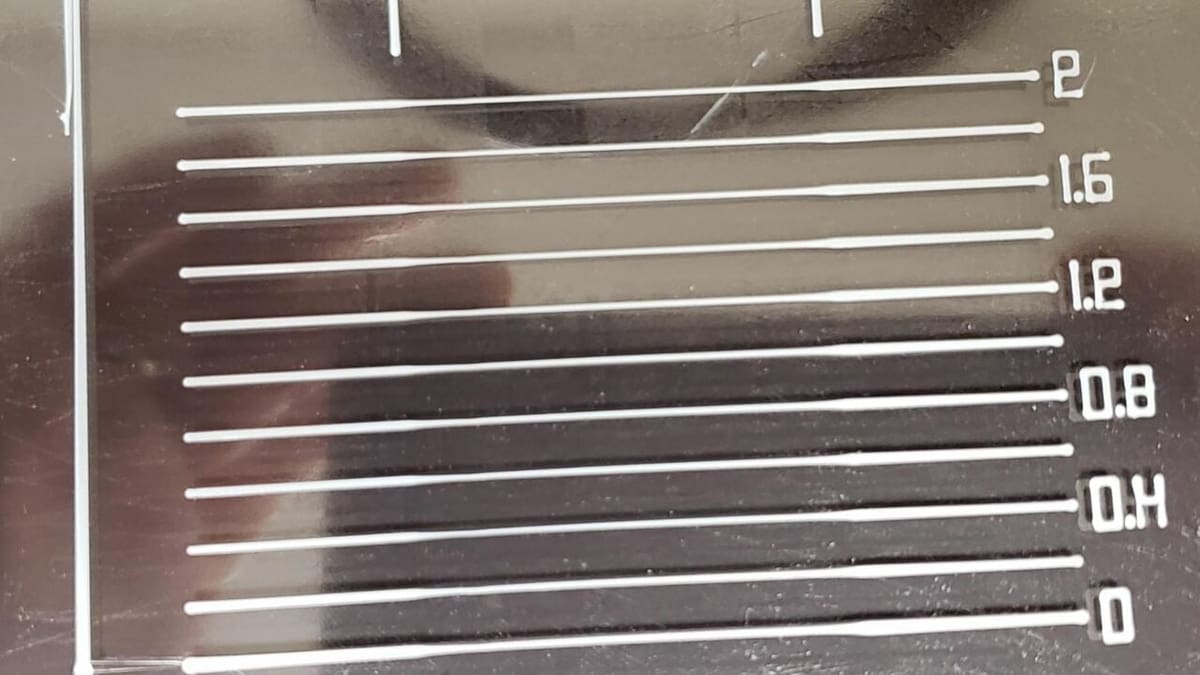
- Start the print and watch your printer to make sure it doesn’t mess up. When it finishes, be careful not to remove the small printed lines from the bed.
- Look at the lines printed next to their corresponding K-value and determine which one looks the most consistent regarding extrusion.
- Open your firmware editor or a G-code terminal, like Pronterface.
- In your firmware editor, scroll down to the “LIN_ADVANCE_K” value area and look at what your current K-value is. If you’re using a G-code terminal, send the “M900” command, and it’ll echo back to your current K-value.
- Adjust the K-value in your firmware editor and reinstall your new firmware. Or, send the “M900 K” command followed by the “M500” command in your G-code terminal.
That’s it; you’ve successfully set up linear advance on your 3D printer!
Make sure to retest and adjust your K-value when making significant changes to your printing temperature, speeds, or retractions, as well as if you change filament type.
Additionally, Marlin developers recommend turning off a few slicer settings, including combing, pressure advance, coasting, and extra restart length after setting up linear advance. Lastly, you should readjust your retraction distance as it should be a lot less due to the activation and tuning of linear advance.
Lead image source: cyborgninja42 via Reddit
License: The text of "How to Set Up Linear Advance in Marlin" by All3DP is licensed under a Creative Commons Attribution 4.0 International License.