ABS Acetone Smoothing: 3D Print Vapor Smoothing Guide

FDM 3D prints usually show layer lines. Learn about ABS acetone smoothing and how to get a totally smooth surface finish in four easy steps.
One of the many things that fused deposition modeling (FDM) 3D printers lack is the smooth finish you get from injection-molded parts. The surface of FDM parts has a rather matte, rough finish with visible layer lines, regardless of the layer height employed during printing. While newer printers can achieve much more refined layer heights and a combination with the right type of filament can make them barely visible, this might not necessarily apply to your setup or the model or material of choice.
When it comes to post-processing, one of the most popular ways to get rid of layer lines is sanding and filling until a smooth surface is achieved. As you can imagine, this can take ages to get anywhere close to smooth. However, a reasonably popular workaround solution for post-processing 3D printed parts is acetone vapor smoothing.
While PLA and PETG, arguably the most common hobbyist filaments, won’t smooth with acetone, this doesn’t mean they can’t be post-processed to achieve similar results. If you’re working with either these materials, check out our guides on smoothing PLA and PETG.
But as for acetone vapor smoothing, it’s a method that is mostly used with ABS and ASA filament.
Acetone is a colorless solvent that’s mainly used for cleaning purposes. ABS and ASA are highly soluble in acetone, so the topmost surface of the parts will swell with the solvent when exposed to acetone in vapor form. The swelling and subsequent evaporation of acetone causes a rearrangement of the surface structure, completely eliminating any visible layer lines and leaving a clean and smooth surface finish.
There are some drawbacks to this method, though. It can be hard to control the smoothing process, so some dimensional accuracy and small details can be lost after it’s done. Plus, excessively vapor smoothing a part can lead to a softening of its walls, making it weaker or warping it. Moreover, pure acetone is considered a safety hazard and must be handled with the utmost care, as we’ll see next.
A Word of Caution
Acetone can be an adequate (although uncommon) tool for everything from cleaning your hot end to welding together 3D printed parts. However, you need to keep in mind that acetone is a hazardous chemical.
To begin with, acetone is a highly flammable and volatile substance that can ignite at room temperature, so never use it near fire or anything that can create a spark – even your 3D printer. Also, ensure that acetone is stored in cool, well-ventilated areas away from direct sunlight and heat sources.
In terms of potential health effects, high-purity acetone can cause headaches, nausea, dizziness, drowsiness, and confusion if inhaled, according to the Canadian Centre for Occupational Health and Safety. Be sure to always work in a well-ventilated area and use respiratory protection equipment such as gas masks whenever possible.
Other personal protective equipment such as thick neoprene or latex gloves, as well as eye and face protection, is also highly advised because skin and eye exposure can cause mild to severe irritation.
Due to all these potential safety hazards, pure acetone can be a little troubling to source in some countries. Check out the current regulations in your country before considering this smoothing method.
Tools and Materials
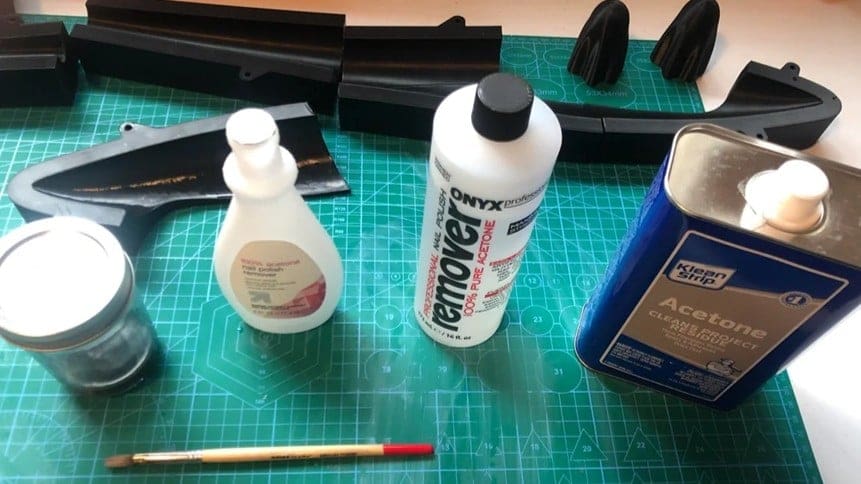
There are countless methods for acetone smoothing your 3D print, some more dangerous than others. If you’re still committed to acetone smoothing, there’s a simple way to do it with everyday household items. Besides the protective equipment mentioned before, here’s what you’ll need:
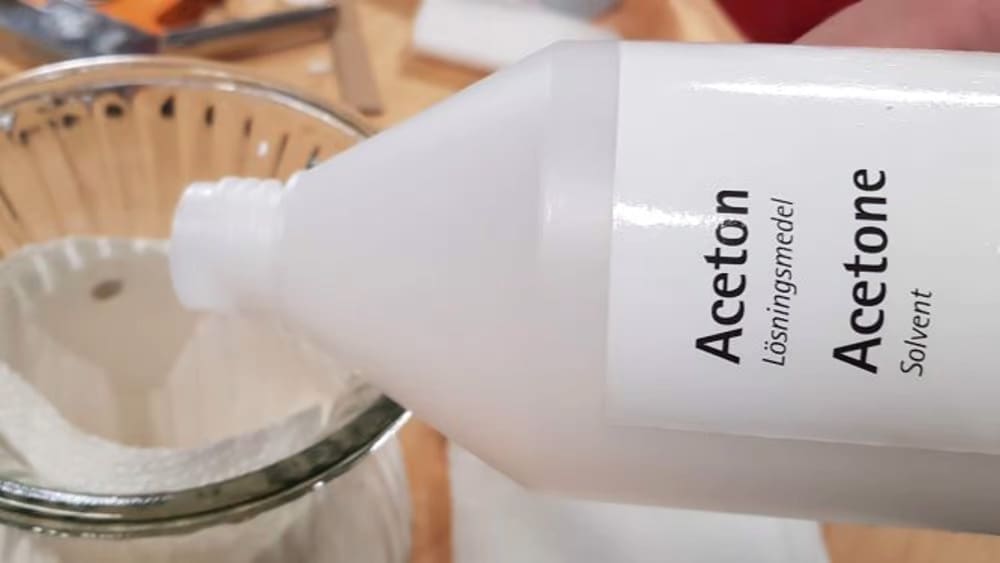
- Acetone: High-purity acetone (99-100%) is required. Acetone-based nail polish remover is diluted and doesn’t contain enough acetone to create a sufficient amount of vapor.
- Paper towels: These are soaked in acetone, which facilitates its vaporization. Any paper towels or tissues that can absorb liquids will work.
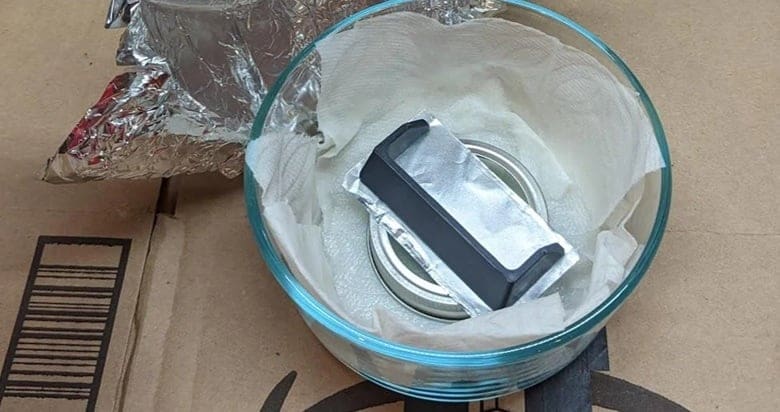
- Small magnets: These will hold the soaked paper towels against the container’s walls – one on the outside of the container and one inside. The number of magnets and the strength required will depend on the container itself (more below).
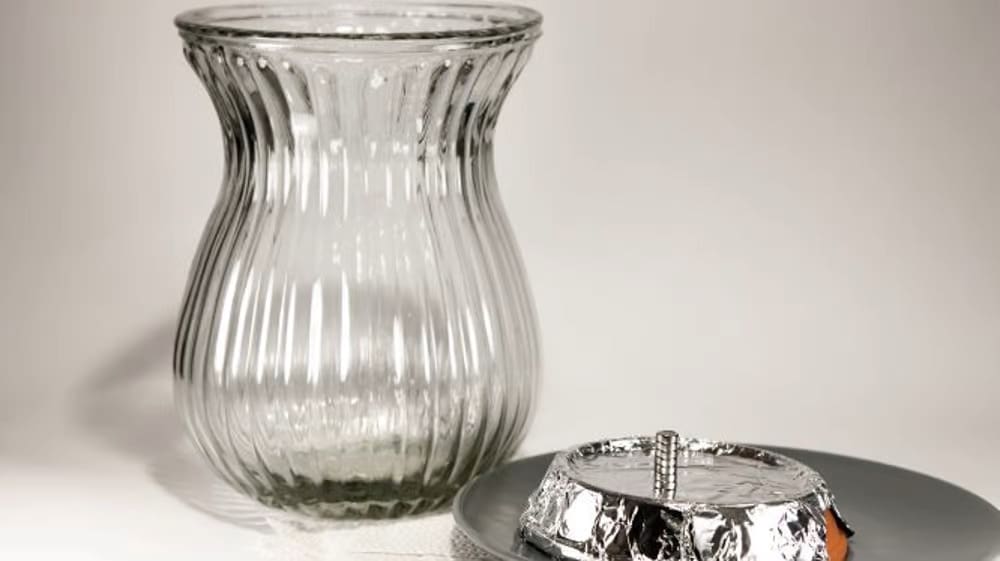
- Transparent container: This should be large enough for the 3D printed part and preferably made of glass so that it’s transparent enough to observe the smoothing process taking effect. If the container has a lid, great. Otherwise, you’ll need to use a plate that can seal it enough to trap the acetone vapor inside.
- Aluminum foil: This will isolate the ABS part and the bottom of the container, as metals are not dissolved by acetone.
If you plan on using a large container that leaves you with lots of extra free volume, you can also consider incorporating a small fan inside to promote circulation of the vapors. Otherwise, acetone vapors may sink to the bottom half of the container when left undisturbed for long periods of time. If you do opt for a fan, keep in mind that most small ones use brushed motors that can spark, which is extremely dangerous in a concentrated acetone vapor environment, so double-check what type you’re including.
Step 1: Preparation
Before handling the acetone, let’s set up the container and base to hold the print.
The Container
- Make sure the container can be sealed so that the acetone vapor remains inside. As the container will be placed upside-down during the process, the lid or some other surface (a plate, for example) will become the base where you’ll place the part.
- Attach dry paper towels to the inside surface of the container with the magnets in pairs. Make sure they’re closely pressed to the container walls and that there’s minimum slack. Keep in mind that ABS can rapidly dissolve and distort if any part of the acetone-soaked paper towel even lightly touches the part. Also, try to leave a small gap between tissues so you’ll be able to peek inside the container and observe the smoothing process.
The Base
- Consider how the part will be positioned according to the surfaces to be smoothed. The vapor will be able to reach the part’s top and lateral faces, but the bottom surface (which will be in contact with the aluminum foil) won’t receive the desired finish, so keep this in mind.
- Take an aluminum foil sheet and fold it three to four times to make a base on which the 3D printed part will rest. You can also use anything made of glass, metal, or even failed PLA prints to raise the foil and the part, thus ensuring that there will be no contact between the part and any liquids that may collect on the bottom.
Step 2: Start the process
Now, we’re ready to handle the acetone and get this smoothing started.
- Carefully soak the attached paper towels inside the container by pouring in small amounts of acetone and rolling the container until everything is covered. Ensure no excess liquid remains in the container; all should be absorbed by the paper towels.
- Place the container upside down on the lid, or base, with the 3D printed part. Remember to avoid touching the part with the soaked paper towels, and check whether there’s a sufficient seal between the container and base.
- Write down the time or start a timer to keep track of the duration of the process.
Step 3: Waiting for the Magic
Now, we just have to wait until the liquid acetone vaporizes and starts dissolving the layer lines of the 3D printed part.
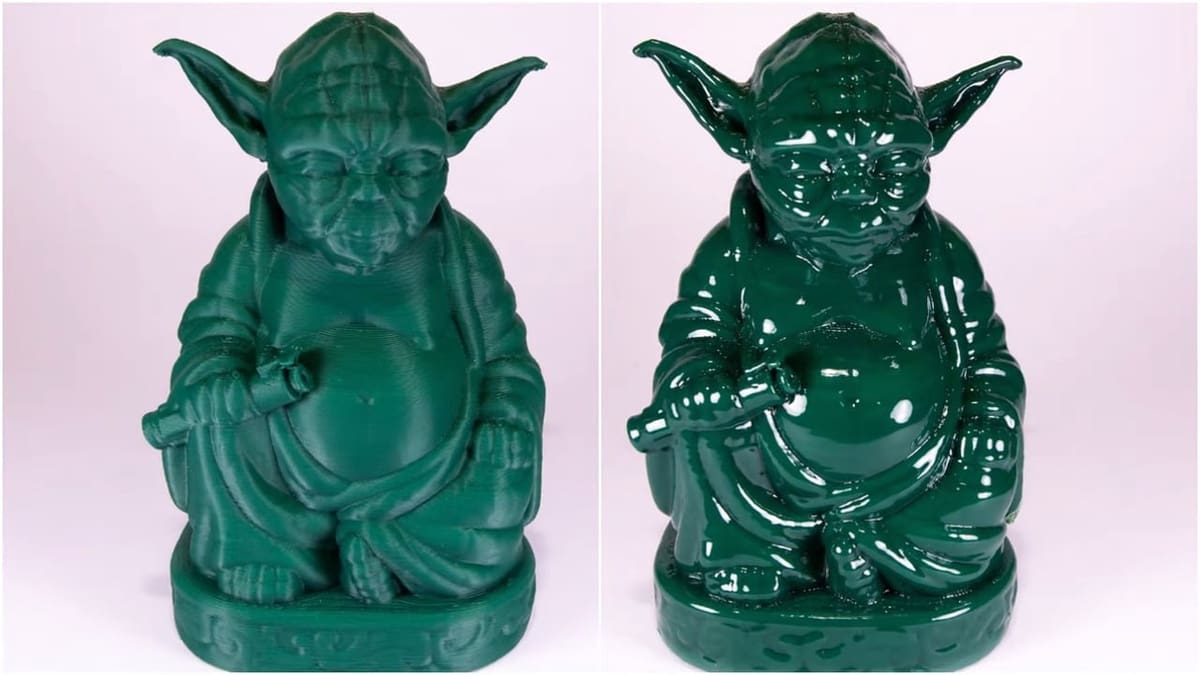
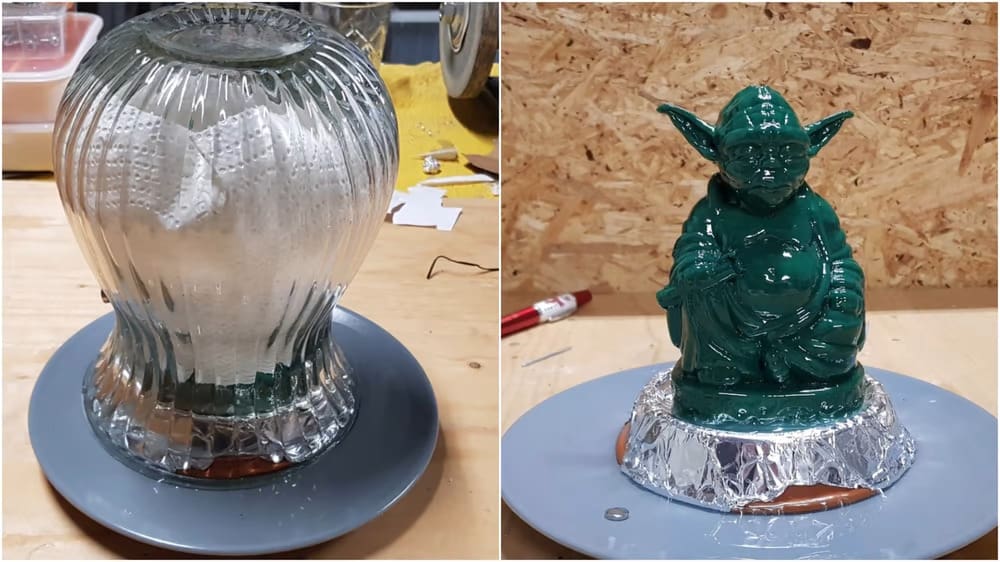
The duration of the process widely varies depending on the size of the part, the size of the container, the room temperature, and even how tightly the container is sealed. Usually, it can take anywhere from half an hour to a couple of hours. For reference, CheopisIV’s version of Budda Yoda shown above took just under two hours.
It should be much easier to follow the progress of the smoothing process with a transparent glass container. Otherwise, we would have to guess or even open the container, which would allow the vapor to escape.
There’s always a chance of over-smoothing the part, leading to the loss of all surface details or, worse, completely distorting the part. This is why a transparent container comes in handy.
It can take some practice to perfect the time required to get your desired level of surface finish, so don’t worry. After a little hands-on experience, you’ll figure out the best settings for yourself.
Step 4: Drying
Once you’re satisfied with how your part looks, it’s time to stop the process and let the dissolved surface dry out to become rigid again.
- First, make sure you’re in a well-ventilated area, then carefully remove the container, avoiding contact between the paper towels and 3D printed part.
- Refrain from touching the part once you remove the container. After all, it’s still in a semi-liquid state. You could leave fingerprints on the part or distort it entirely.
- Place the part in an isolated site and simply let it dry, allowing all excess acetone to vaporize into the air. It can take mere hours up to a couple of days to completely dry and become rigid again.
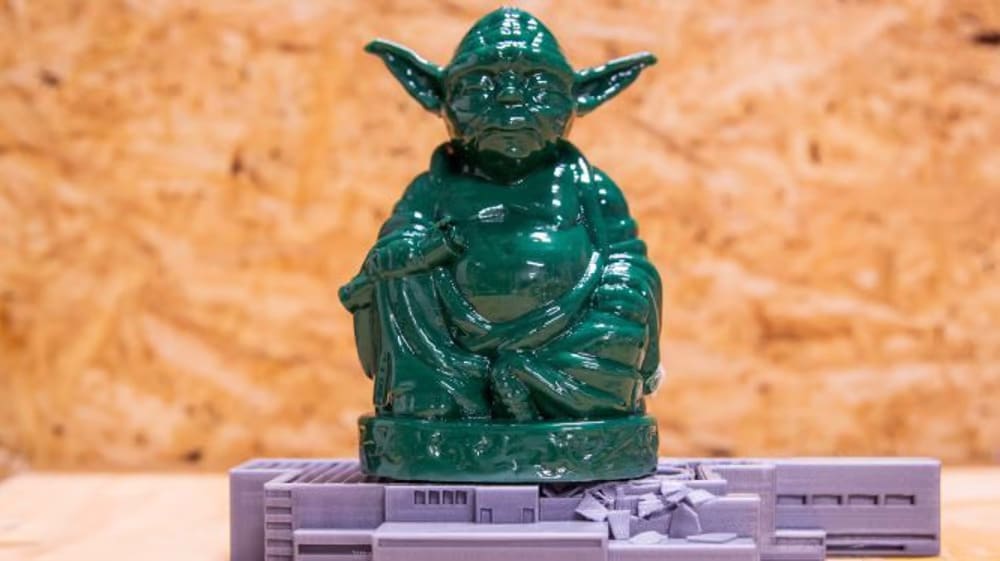
Be patient and enjoy. The part will start to look more shiny and polished when drying, and soon enough, you’ll be able to show off your injection-mold-looking part.
Have a go at it, and you’ll be amazed by the results you achieve once you perfect the method. Trust us! You’ll only want to try it more and more.
Multicolor Prints
If you’ve 3D printed a multicolor part with your multi-material setup, you might we wondering how acetone vapor smoothing might affect the part.
First of all, if you’ve opted for a multi-material print where a part is in ABS and another is in PETG, for example, remember that the latter won’t be affected by the acetone vapor, and will therefore not be smoothed. This will yield overall uneven results.
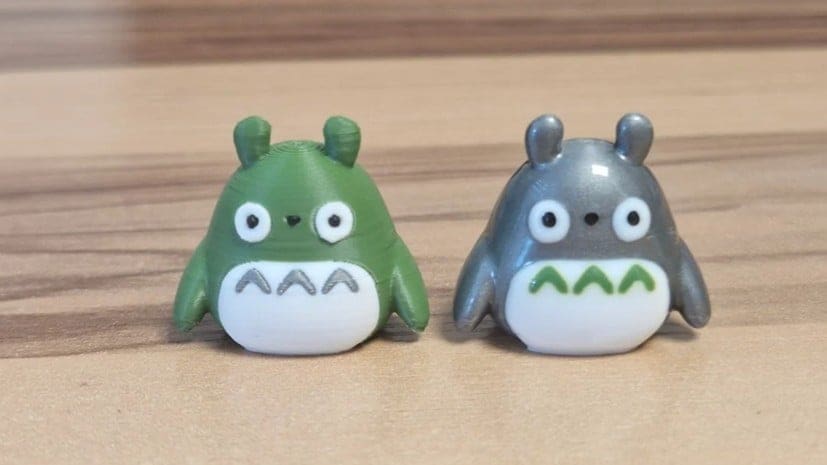
If the whole model is printed in ABS, as you can see from the image above, the first change you’ll note is that instead of the matte finish, the model will become glossy – something that can also make the colors appear more saturated.
Because of the transition of colors between or within layers, you’ll want to keep an especially close eye on the process. The boundary between the colors can blur and, if the ABS becomes too liquid, there may even be some bleeding between hues. Additionally, if you have high-contrast details or borders with sharp colors, these may lose their crispness.
Once you are satisfied with the magic, be especially careful not to touch the part when you’re preparing to dry it. Not only do you risk marking the print, but colors can also smudge.
License: The text of "ABS Acetone Smoothing: 3D Print Vapor Smoothing Guide" by All3DP is licensed under a Creative Commons Attribution 4.0 International License.