Cura: Outer Wall Wipe Distance – How to Use This Setting

Z seam issues can make or break a 3D printed part. Check out how to reduce your print's Z seams by changing Cura's Outer Wall Wipe Distance.
Print surface quality is one of the most important aspects of 3D printer tuning. The smoothness of the print surface determines the crispness of the print, the tightness of print tolerances, and even the model’s overall strength.
There are different sorts of issues that can diminish the surface quality of prints; one that can be difficult to eliminate is called “Z seam“. Fortunately, many slicers, including UltiMaker’s Cura (with the latest version 5.10.0 at time of writing), have dedicated settings that minimize the presence of Z seam on 3D prints.
In this article, we’ll explore Cura’s “Outer Wall Wipe Distance” feature, which is fairly straightforward to use and can help lessen or even remove altogether the Z seam.
And if your printer and Cura aren’t collaborating as you’d like them to, consider using Craftcloud – a handy alternative for hassle-free, high-quality prints without all the slicer troubleshooting. It connects you with printing services all over the world that can 3D print and deliver your part straight to your doorstep, no matter how small the job.
Let’s get started!

The Problem
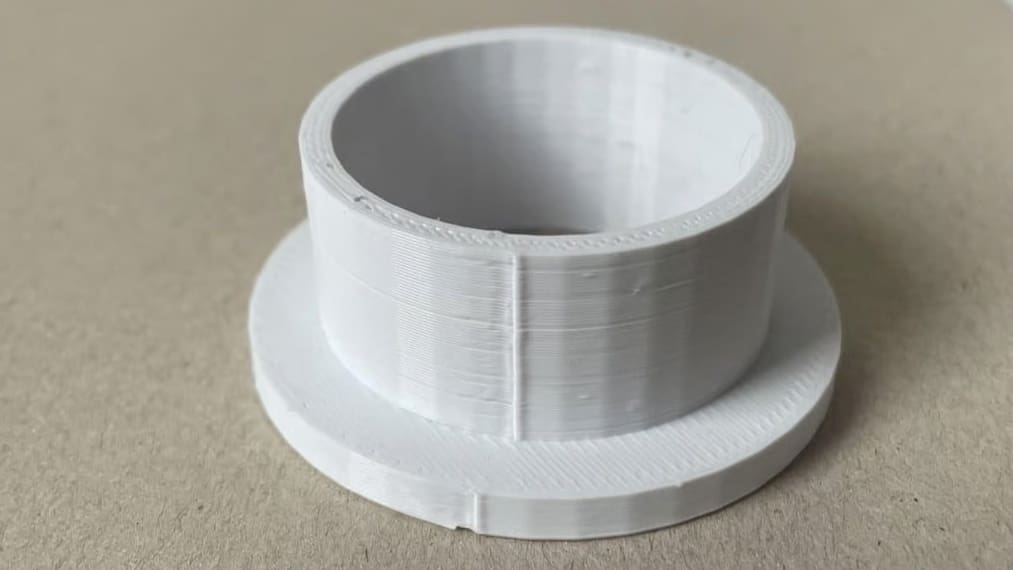
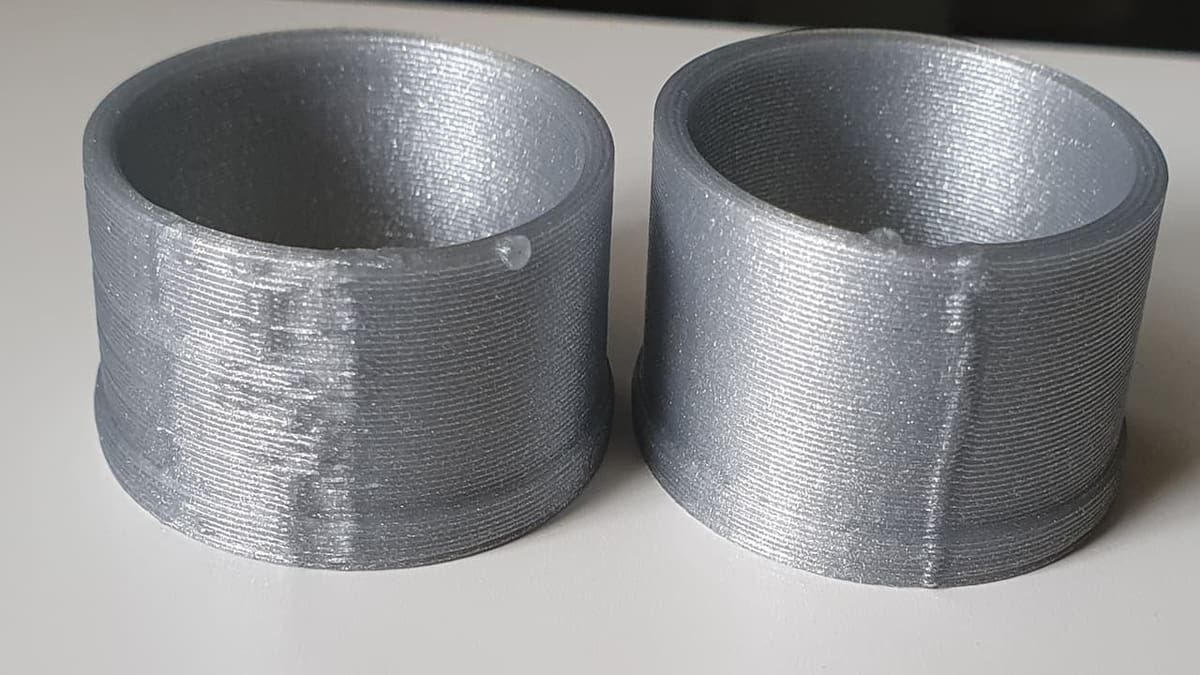
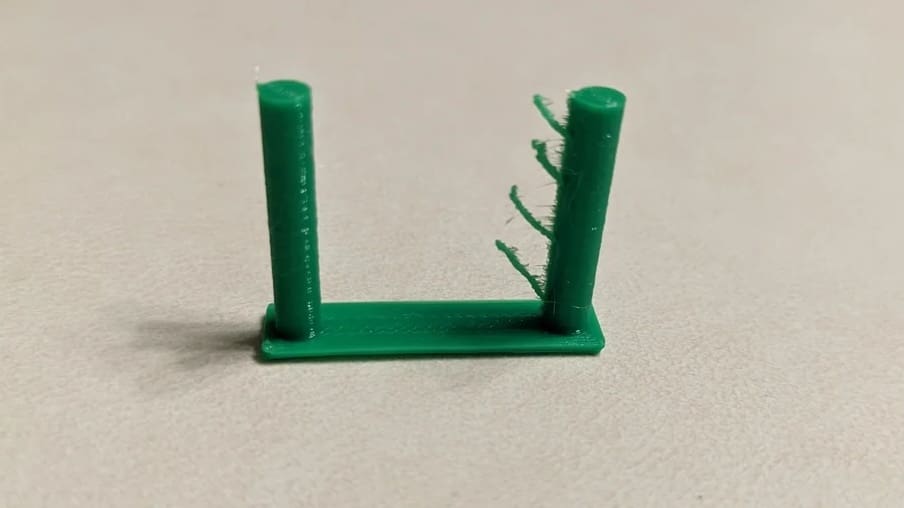
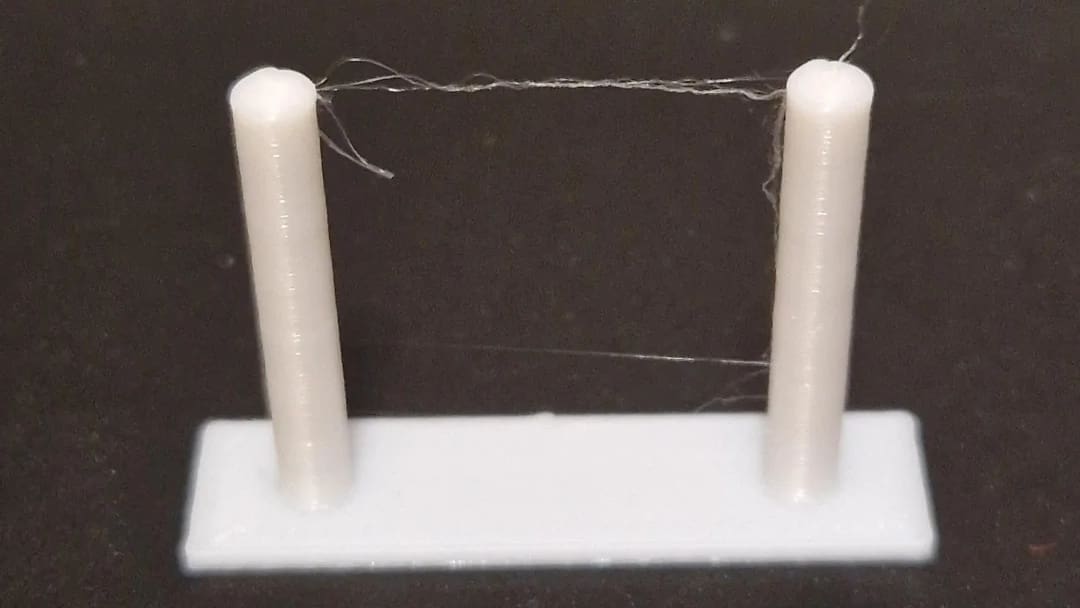
Z seam is a deformation that results from the buildup of filament each time the printer changes layers. It’s a consequence of extruders being unable to instantaneously stop and start the flow of filament. For this reason, this is really only a problem with fused deposition modeling (FDM) 3D printers.
During a layer change, the 3D printer pauses extrusion. But the backpressure from having just extruded an entire layer of filament will continue to push out the hot filament while the extruder stands still on the XY-plane (even if it’s just for a moment). Thus, the result is over-extrusion in that area of the layer.
One solution to this is to retract the filament before a layer change, but this isn’t feasible with certain filaments or even certain extruders; your hardware can affect how visible the seam is. Direct extrusion setups sit right on the hot end, giving tight control and usually a smaller seam. Bowden setups push filament through a long tube, so there’s more lag and the seam can often look bigger.
So, starting by knowing which system you have can help you pick the right settings to tame the Z seam.
Solutions
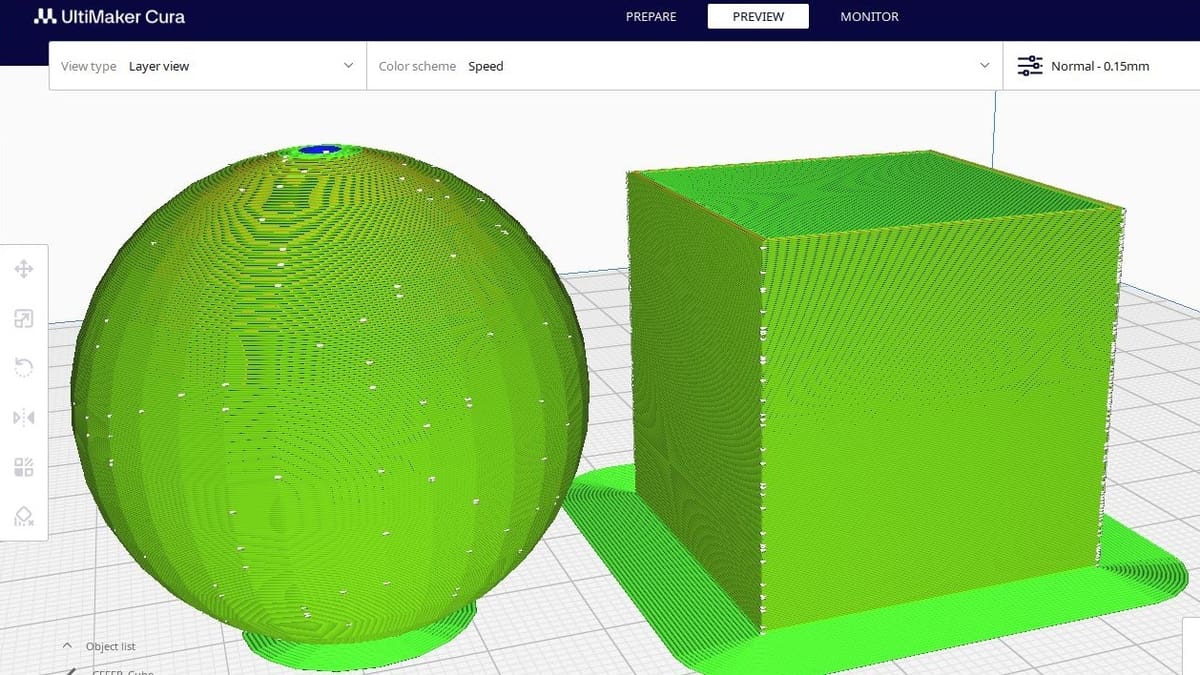
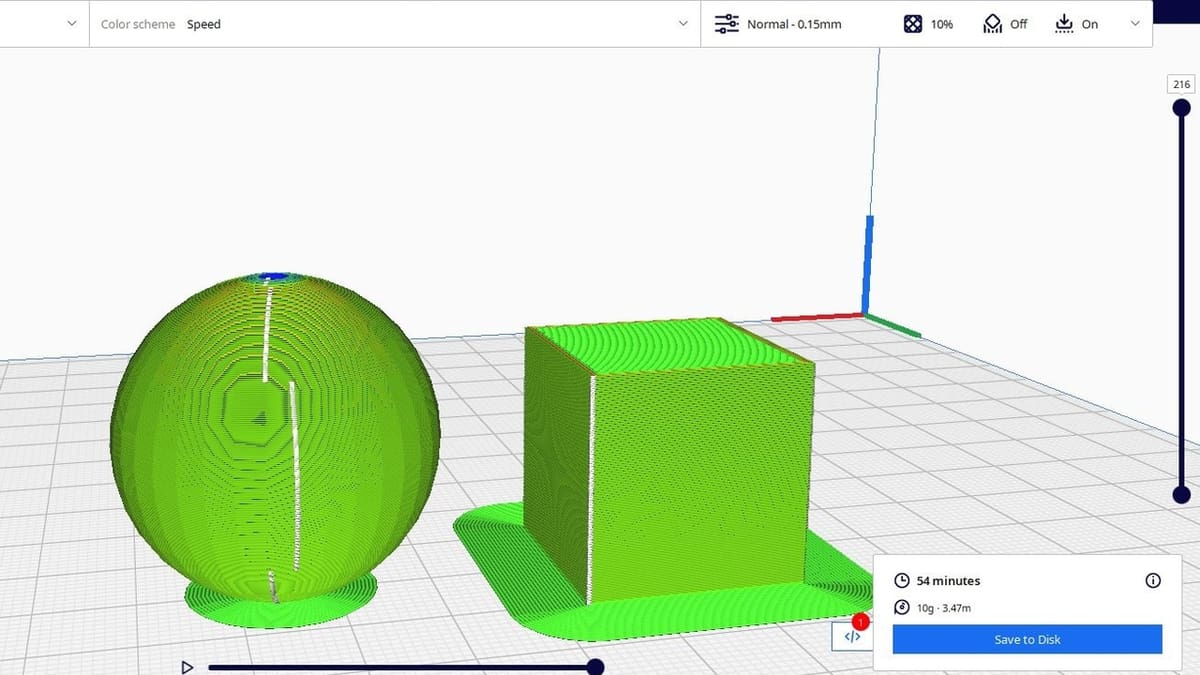
There are a variety of ways to reduce the presence of Z seam on a 3D print, and depending on the type of model, you might want to opt for a specific one. If you only need to reduce the noticeability of the Z seam, one option in Cura is to choose where the layers change (“Z Seam Alignment” and “Z Seam Position”). Depending on where you opt for, this could make it so that the Z seam is harder to notice – but it won’t be eliminated. The models pictured above – sphere and cube – show how “Random” seam alignment appears on different designs (i.e. the slicer takes advantage of the shape to make the seam as inconspicuous as possible).
Alternatively, Cura has a feature called “Coasting” that stops extrusion just before a layer change, reducing the pressure in the extruder that causes the blob at the Z seam.
However, there may be reasons for not using these adjustments. Changing Z seam alignment doesn’t improve tolerances, and coasting requires finely tuned retraction settings. In cases where tight tolerance is important or retraction is inhibited, changing the Outer Wall Wipe Distance of the print might be the right solution for you.
Outer Wall Wipe Distance is the distance that the 3D printer moves without extruding filament at the end of each layer before moving on to the next one. This extra travel essentially “wipes” the extra filament onto the wall instead of leaving a blob at the seam.
You may now be asking yourself, “Could I combine more than one technique together?” The answer is yes, in some cases. You can align the seam to a corner, enable coasting, and still use a moderate wipe distance. Sometimes it’s that mix of settings that really pulls the whole print together.
Why Use Outer Wall Wipe Distance
Changing the Outer Wall Wipe Distance does several good things for the 3D print surface finish. By smoothing out the extra filament into the print perimeter, it reduces the visibility of the Z seam, increases the smoothness, and tightens the tolerance of the wall.
A significant drawback to increasing the Outer Wall Wipe Distance is that it increases the total print time. After all, it adds an extra motion for every loop of every surface of every layer. In a print with several hundred layers, this additional time can become quite substantial. Additionally, if the Outer Wall Wipe Distance is increased too much, it could overheat the wall, which could melt part of the print at the Z seam.
How to Use It
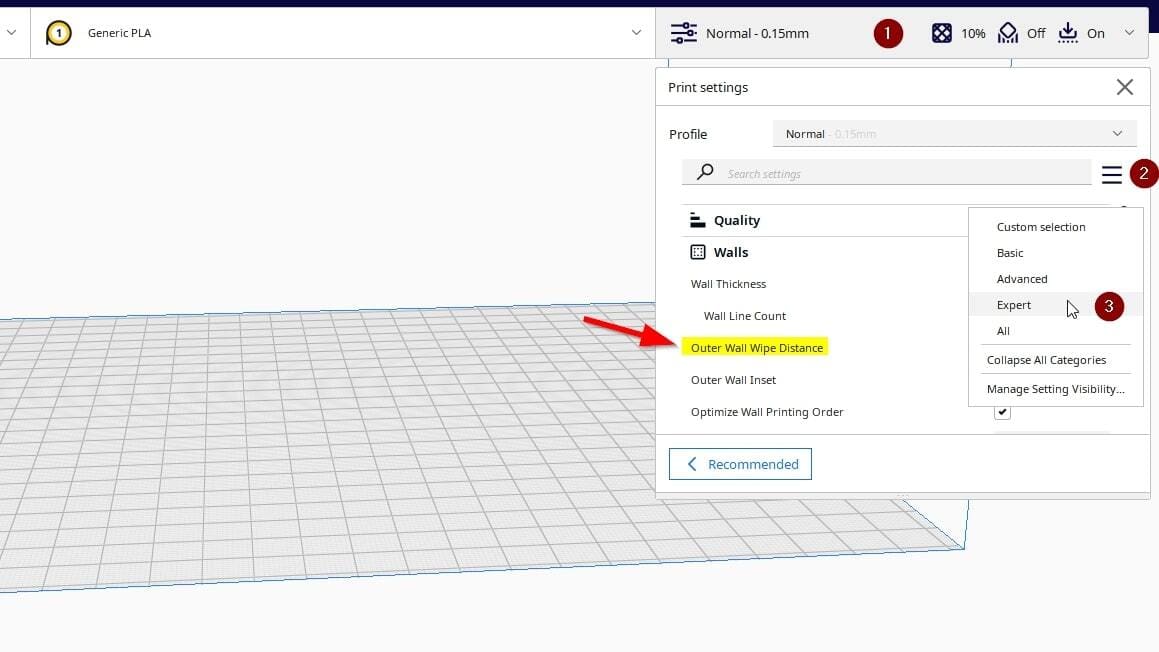
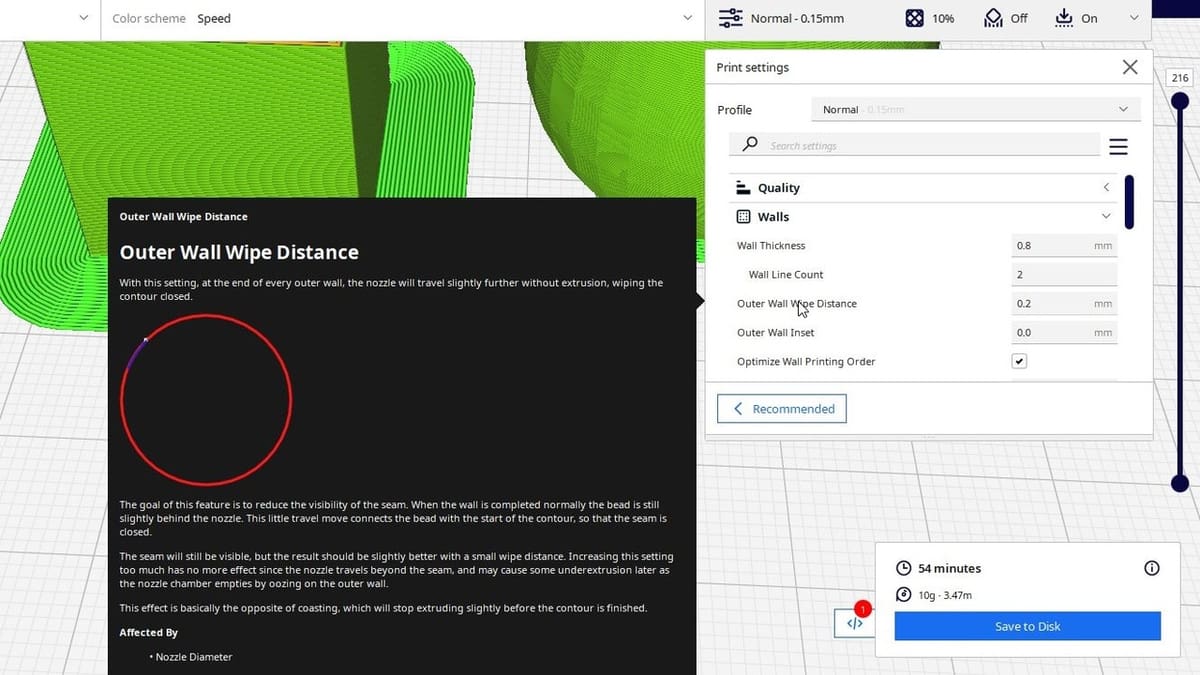
Cura doesn’t show every advanced setting by default, and Outer Wall Wipe Distance is among the hidden ones. Fortunately, it’s easy to access.
Start by opening the “Print settings” panel (1) and click the three-line menu icon (2), then select “Expert” or “All” (3) from the drop-down list that will appear. This will reveal all the advanced tuning options. Once you’re in the advanced view, scroll down to the “Walls” section. There you’ll find Outer Wall Wipe Distance.
If you’ve noticed a visible Z seam climbing up your print, this setting is worth tweaking. A small increase can help the nozzle “wipe” away excess filament and leave a cleaner seam.
But keep in mind that more isn’t always better. If the wipe distance is too long, nozzle pressure can drop too much before the next wall starts, which may leave a gap or groove where the new layer begins. On detailed parts, overwiping can even slightly distort the outer wall. That’s why it’s generally a good idea to keep the wipe distance under about 0.5 mm unless your own tests show that going longer helps without causing issues.
To dial it in, try printing a simple tall cylinder. Z seams are easier to spot on smooth, round shapes. If the seam fades or disappears, you’re heading in the right direction. If not, adjust in small steps and test again. Fine-tuning is the name of the game.
Recommended Value Ranges
In most cases, setting the wipe distance somewhere between 0.2 and 0.4 mm is a safe bet. It’s just enough to help blur the seam without cutting into your extrusion flow at the start of the next wall or blur the details.
For trickier materials like PETG, which are known to ooze a bit more, it often helps to bump that up to 0.5–1 mm. A little extra movement gives the nozzle a chance to clean itself off and avoid leaving behind blobs; we’ll look at different materials in a bit more detail below.
Some folks take it even further, trying 1.5 mm or more, especially when they’re chasing down seam gaps or persistent zits. And sure, in some cases that works. Just be aware that going too far can backfire: Instead of a blob, you might end up with a faint groove or thin spot. Like most slicer tweaks, it’s a balancing act; a small change can make a big difference.
Material-Specific Insights
Different filaments behave differently at the end of a layer, so dialing in the right wipe distance often depends on what you’re printing with.
- For PLA, less is more. It cools fast and doesn’t ooze much, so a light wipe of around 0.2 to 0.4 mm is usually all you need.
- PETG, by contrast, can be messy. It strings and blobs if not managed carefully, so values closer to 0.5 or even 1 mm are often more effective. Just make sure your retraction and temperature settings are also dialed in.
- ABS falls somewhere in the middle. It stays soft longer, so a moderate wipe – around 0.4 to 0.6 mm – can clean up the seam without dragging too much material around.
- For flexible materials like TPU, wiping can help reduce blobs, but the nozzle may leave a trail if it moves too far. Stick with a gentle wipe – usually under 0.8 mm – and watch closely for surface artifacts.
- Wood-filled or composite PLAs tend to behave unpredictably. In some tests, a wipe as small as 0.2 mm reduced stringing and cleaned seams without affecting layer adhesion. With these materials, always test on a small part first before committing to a long print.
Use Cases
Outer Wall Wipe Distance isn’t a setting you’ll need for every single print, but when surface quality matters, especially on visible or decorative parts, it can make a noticeable difference. Certain shapes and print scenarios benefit more than others, and understanding when to use this setting can help you get the most out of it.
The most common use cases are tall, smooth models like vases, cylinders, and round objects. These shapes don’t have sharp corners where you can easily hide a seam, so the Z seam often runs visibly up the side. In these cases, applying a small wipe at the end of each layer can help blend the seam into the wall, reducing the visual “zipper” effect that can otherwise distract from the print’s finish.
On the other hand, boxy or angular prints such as mechanical enclosures, architectural models, or low-poly designs often have natural corners or edges where the seam can be tucked away. When the seam is placed on a sharp edge or at the back of the model, it becomes much less noticeable. In these scenarios, you might not need a large wipe distance at all. A subtle value can help prevent bulges or zits without affecting the surface too much, especially if you’re already using seam alignment to hide the transition point.
Outer Wall Wipe Distance is also useful when printing small figurines or decorative parts where you want clean outer surfaces but can’t afford to hide the seam in just one direction. In cases like these, combining a random seam pattern with a short wipe can scatter and soften the seam marks across the model, giving the illusion of a seamless surface, especially when viewed under light.
Alternatives

FDM 3D printing can be tricky, and every slicer has different tools to help fix those annoying little seams and blobs that can appear on your prints. We already talked about Cura’s “Outer Wall Wipe Distance”, but this isn’t the only slicer with a solution. Let’s look at how PrusaSlicer and Simplify3D deal with the same problem.
PrusaSlicer
In PrusaSlicer, there’s a useful setting called “Seam gap distance”. It controls the distance between the start and end points of a perimeter loop. A positive value shortens the loop slightly, creating a tiny gap to reduce filament buildup and prevent a noticeable seam. A negative value does the opposite – it lengthens the loop slightly, letting the ends overlap just a bit to help hide the seam. You can use percentages (which are based on nozzle diameter) or absolute values, depending on what works best for your prints.
Another handy setting in PrusaSlicer is “Wipe while retracting”. This keeps the nozzle gently moving while it retracts filament. This tiny movement helps spread out any extra filament. These two settings together – Seam Gap Distance and Wipe While Retracting – give you better control and cleaner prints.
Orca Slicer
Orca Slicer has gained popularity among makers and hobbyists because it offers plenty of features and works well with many different printers. It’s based on Bambu Studio, which itself comes from PrusaSlicer, so naturally, you’ll find familiar tools like “Seam Gap” and “Wipe While Retracting”, working pretty much the same way as we previously explained for PrusaSlicer.
But Orca Slicer adds an extra twist: “Wipe on loops.” This feature makes a small inward movement right before your nozzle leaves a closed loop, smoothing out the seam transitions. You can even tweak the “Wipe speed”, giving you even more control.
Simplify3D
In Simplify3D, you’ll find similar feature called “Wipe Nozzle”, which makes the nozzle move slightly after finishing a layer. Unlike Cura, where the nozzle moves slightly forward to wipe, in Simplify3D the nozzle moves backward at the end of the loop. The recommended Wipe Distance for this feature in Simplify3D is 5 mm.
To enhance this further and avoid blobs, you can use an additional feature called “Perform retraction during wipe movement”. This prevents a stationary retraction by allowing the printer to retract while wiping.
To sum up, Cura, PrusaSlicer, Orca Slicer, and Simplify3D all have their own methods for managing seams, but the core goal is consistent across them: minimize filament buildup, maintain smooth nozzle movements, and produce seamless, high-quality layer transitions.
Tips & Tricks
Getting your Outer Wall Wipe Distance right isn’t always easy or obvious – it’s more about experimenting than just copying numbers. Each printer and filament behaves differently, so what works for someone else might not work for you. That’s why doing a few simple tests and looking closely at the results is important.
Pick an easy, smooth object to test with – something like a cylinder or a tall vase. These shapes clearly show any imperfections, making it easy to spot if your settings help or not. Print the same thing a couple of times, changing your wipe distance a little each time. Start small, then slowly increase it until your seam looks nice and clean.
When setting things up in Cura, switch to the Layer View and turn on the travel moves option. That way, you can see exactly how the nozzle moves around your print. You’ll get a better feel for how changing the wipe distance affects your model and where the seams appear.
Another helpful thing is the Settings Guide plug-in by Ghostkeeper, which you can easily install from the Cura Marketplace. This plug-in explains exactly what each setting does and how it might affect other settings. Having that information right there makes adjusting things simpler and faster.
Keep track of everything you try. Take quick photos of each print, jot down your settings, and note details like your filament type, temperature, or speed. Over time, you’ll create your own little library of settings that work well. Then, if a problem pops up again later, you can quickly look back and find what solved it last time. Even small details – like a different nozzle size or slightly changing speed – can affect your results, so taking notes is super helpful.
Finally, remember that Outer Wall Wipe Distance is just one piece of the puzzle. Other settings, like retraction, coasting, seam alignment, and print speed, all work together. Make small adjustments and give each one a chance to show its effect clearly. Slow, steady tweaking will give you smooth, clean prints without seams or blobs.
License: The text of "Cura: Outer Wall Wipe Distance – How to Use This Setting" by All3DP is licensed under a Creative Commons Attribution 4.0 International License.