
Bambu Studio Supports: Types, Settings & How to Use Them

When you master supports in Bambu Studio, you improve supported surfaces, make removal easier, save time, and reduce wasted filament.
Supports are one of the most useful tools in FDM 3D printing, but getting them right can make the difference between a clean print and a frustrating mess of wasted filament, rough surfaces, and supports that refuse to come off.
Bambu Studio offers a wide range of support settings and for most prints, its automatic generation may be just fine. But sometimes your parts will benefit dramatically from a little manual intervention. Tuning the support painting, support type, interface layers, materials, and detailed controls for spacing and structure can be a powerful tool, but it can also make the Support tab feel a little overwhelming at first.
In this guide, we’ll break down Bambu Studio’s support settings, explain what they actually change, and show you when it makes sense to adjust them whether you want easier support removal, cleaner supported surfaces, or simply less unnecessary support material.
Supports: What & Why?
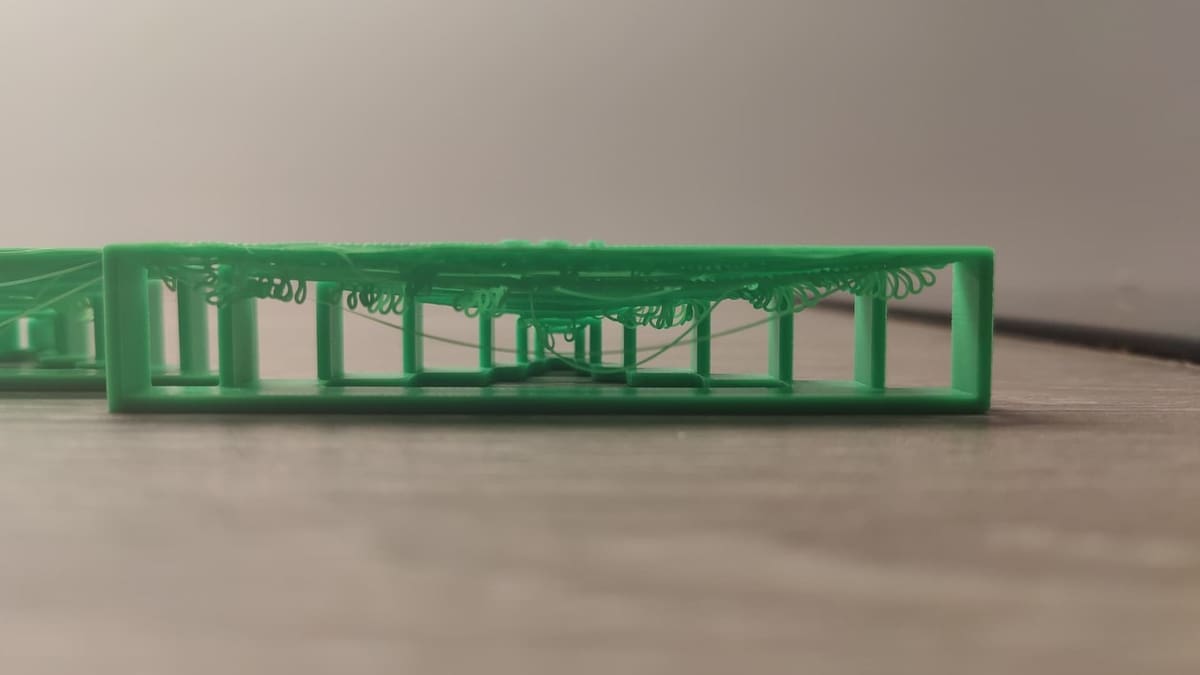
FDM 3D printers build objects one layer at a time, with each new layer normally resting at least partly on the layer beneath it. Problems arise when a model contains steep overhangs, large bridges, or sections that would otherwise begin printing in mid-air.
Depending on the geometry, you may be able to avoid supports altogether by changing the model’s orientation. Modern printers can also handle surprisingly steep overhangs and bridge short gaps without assistance. But once a feature extends beyond what the printer can reliably produce on its own, support structures provide a temporary foundation underneath it.
These supports can start from the build plate or, when allowed, from another part of the model. They continue upward until they reach the areas that need additional support, giving the printer something to build against instead of trying to extrude filament into empty space.
After printing, the supports are removed and discarded. Ideally, they should provide enough stability to produce a clean underside while still separating from the finished model without excessive force or surface damage.
That balance is exactly what Bambu Studio’s support settings allow us to control.
Various Supports & Techniques
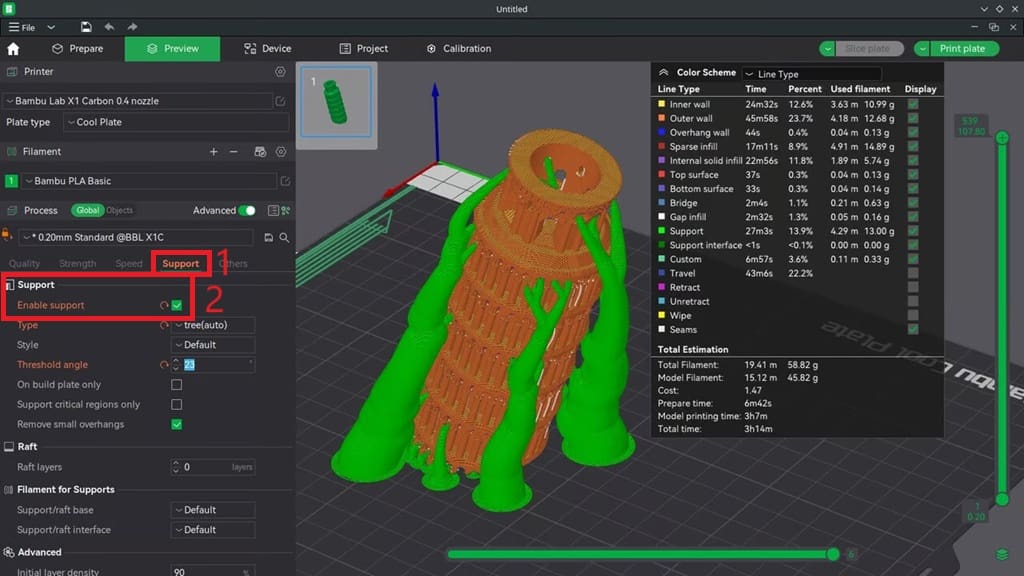
Before adjusting individual support settings, it helps to understand the two main choices Bambu Studio gives you: what kind of support structure to use and how those supports are generated.
Supports can be enabled from the Support section in the Process settings. From there, you can choose between Normal and Tree supports, as well as automatic or manual generation.
Normal vs. Tree
Normal supports build relatively straight, solid-looking structures beneath an overhang. Although they may appear like large blocks in the slicer, their interiors use a sparse support pattern to reduce material and printing time. A denser interface can then be added near the model to provide a better surface for the supported layers.
This works particularly well beneath broad, flat areas where a large section of the model needs consistent support. Their straightforward shape can also make them predictable and stable.
Tree supports take a different approach. Instead of filling the entire space beneath an overhang, branches grow upward and split as needed to reach the areas requiring support. Because these branches can route around parts of the model, they are especially useful for figurines, curved surfaces, and complex geometry.
Tree supports can often reduce the amount of material touching the model, but they aren’t automatically the best choice for every print. Large, flat overhangs may be better suited to Normal supports, while irregular or isolated overhangs are often good candidates for Tree supports.
We’ll look at the individual Normal and Tree styles later in the guide.
Auto vs. Manual
After choosing the support structure, you also need to decide where Bambu Studio should generate it.
With Auto supports, Bambu Studio analyzes the model and generates support beneath areas that meet its support criteria. One of the most important controls here is the Threshold angle, which determines how aggressively the slicer identifies overhangs for support.
Bambu Studio measures this angle from the horizontal plane, which can be confusing if you’re used to slicers or overhang tests that measure from vertical. In practice, increasing the Threshold angle generally causes more of the model to receive support, while decreasing it generates less.
The default 30° setting is a useful starting point, but it shouldn’t be treated as a rule. How much support a model actually needs depends on its geometry, material, layer height, cooling, print speed, and the capabilities of the printer.
With Manual supports, you take greater control over which areas should be supported. This is especially useful when automatic supports add unnecessary structures or when you know that a particular part of the model needs additional help.
Support Painting
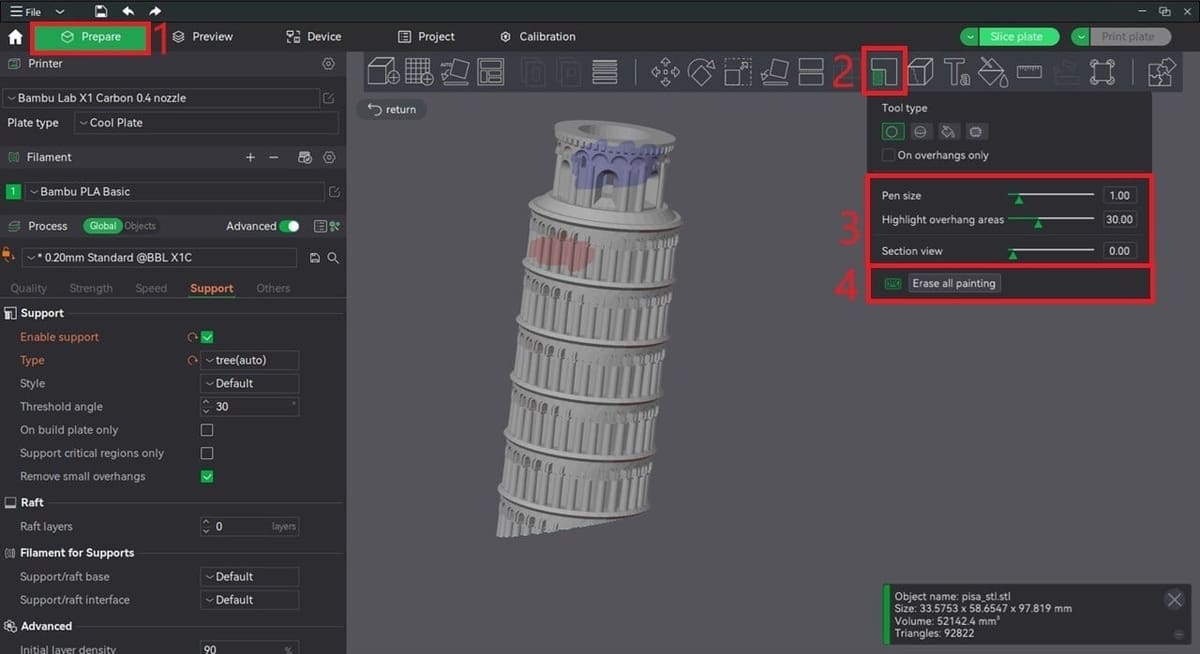
For more precise control, Bambu Studio includes a Support Painting tool.
After selecting the model in the Prepare workspace, you can paint directly onto its surfaces to indicate where support should be encouraged or blocked. This is much more precise than changing a global support setting just to fix one troublesome area.
Support painting also includes tools for adjusting the brush size, highlighting overhangs, and clipping through the model so that internal or difficult-to-reach surfaces can be painted.
Support blockers are particularly useful for areas where automatically generated supports would be difficult to remove, such as narrow holes, internal cavities, or delicate details. Support enforcers do the opposite, directing the slicer toward areas that you specifically want supported.
This combination of automatic generation and local control is often more effective than relying entirely on either approach by itself.
Basic Settings
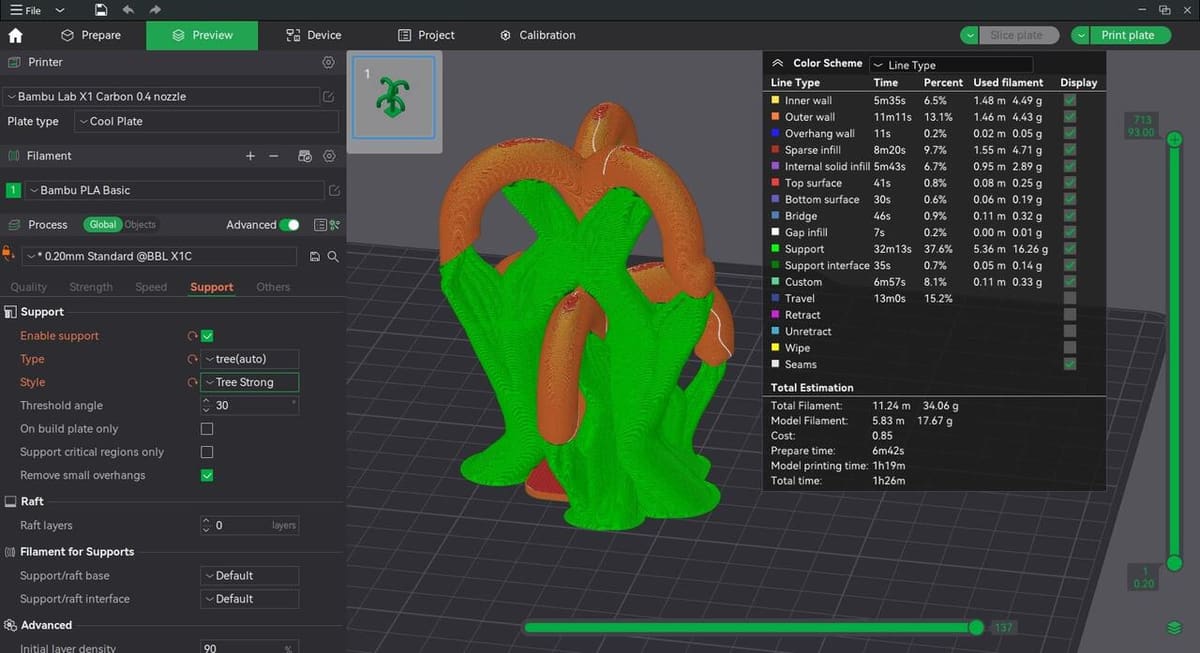
Once supports are enabled, a few settings have a particularly large effect on how much support Bambu Studio generates and what those structures look like. Before diving into interface spacing, branch dimensions, and other advanced controls, these are the options worth understanding first.
Support Style
Different styles can be selected for your supports, depending on whether you’ve opted to use normal or tree.
For Normal supports, you can choose between Grid and Snug.
Grid projects the areas requiring support downward and builds regular support columns beneath them. This produces a strong and predictable structure, making Grid particularly useful for large, flat, or horizontal overhangs.
Snug follows the contour of the model much more closely. Rather than filling a large rectangular area around the overhang, the support conforms to its shape, which can reduce unnecessary material and make it better suited to detailed models, irregular surfaces, and tighter spaces.
Neither option is universally better. For a large flat ceiling or mechanical part, Grid is often a sensible starting point. For more complex geometry where you want the support to closely follow the model, Snug can be the better choice.
Tree supports offer several additional styles: Tree Slim, Tree Strong, Tree Hybrid, and Tree Organic.
- Tree Slim uses thinner branches and is intended for smaller, lighter overhangs. Its compact structure can reduce filament use and leave fewer marks where the support contacts the model.
- Tree Strong uses thicker trunks and branches to create a more robust support structure. It is better suited to large or heavy overhangs where thin branches may not provide enough stability.
- Tree Hybrid combines Tree and Normal support behavior. Bambu Studio automatically chooses between the two structures in different areas of the model, making it particularly useful when a print contains both isolated details and broad overhangs.
- Tree Organic creates smoother, more naturally curved branches that route around the model toward supported areas. It is a versatile option for complex shapes and can reduce material use while making supports easier to remove.
If you’re unsure which Tree style to use, Organic or the default style is usually a good starting point. Switch to Strong when stability becomes more important, or Hybrid when the model contains a mixture of large flat overhangs and smaller isolated features.
On Build Plate Only
Enabling On build plate only prevents support structures from starting on top of the printed model. Instead, the support has to originate from the build plate and make its way toward the area that needs it.
This can be useful when you want to reduce the number of support structures resting directly on visible model surfaces, which can make removal easier and reduce unwanted marks.
There is a trade-off, however. Some areas may be impossible for support to reach from the build plate alone. Tree supports can often route around model geometry, but they still have limits.
For that reason, always check the sliced preview after enabling this option. If an overhang is left unsupported, you may need to disable it, change the support style, alter the model orientation, or use support painting.
Remove Small Overhangs

Remove small overhangs tells Bambu Studio to ignore some smaller regions that would otherwise receive automatically generated support.
This can reduce filament use, print time, and the amount of post-processing required, particularly on models containing lots of tiny details that the printer may be able to handle without assistance.
It should be used with some caution, though. Whether a small overhang can print successfully depends on its shape, orientation, cooling, material, and surrounding geometry. After enabling the option, inspect the sliced preview rather than assuming every removed support is unnecessary.
Support Critical Regions Only
When using Tree supports, Support critical regions only provides another way to reduce unnecessary support.
Instead of supporting every overhang that meets the normal threshold, Bambu Studio attempts to focus support on areas it considers particularly important to the success of the print.
This can significantly simplify a tree-support structure on some models, saving both filament and printing time. The downside is that less support also means relying more heavily on the printer’s ability to handle overhangs on its own.
As with “Remove small overhangs”, the best approach is to slice the model, inspect the unsupported areas carefully, and enable additional support manually where needed.
Advanced Settings
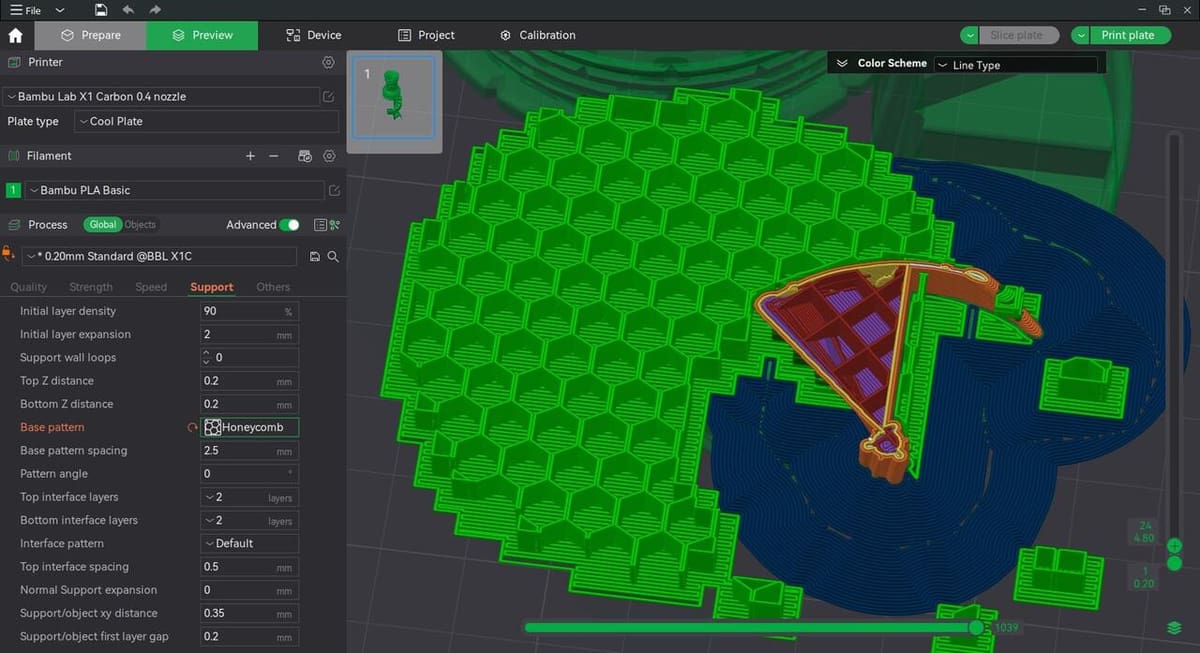
Once the basic support setup is working, Bambu Studio’s advanced settings let you fine-tune how supports are built, how closely they approach the model, and how the support interface is printed.
You usually won’t need to change every setting here. In practice, a handful of controls; particularly interface spacing, Z distance, and XY distance, have the biggest effect on support removal and the quality of supported surfaces
Base Pattern
The Base pattern controls the internal structure used for the main body of Normal supports.
Different patterns trade material usage and printing speed against rigidity. A lightweight pattern can reduce filament consumption, while a more interconnected structure can make tall or large supports more stable.
For most prints, the default pattern is a sensible starting point. Changing it is more useful when you have particularly large support structures, supports that are wobbling during printing, or when reducing material usage is a priority.
Base Pattern Spacing
This determines the distance between lines in the main support structure.
A larger spacing creates a more open support structure, reducing filament use and usually shortening print time. A smaller spacing makes the support denser and stronger, but consumes more material.
The important distinction is that the support base doesn’t normally need to reproduce a high-quality surface itself. Its main job is to hold up the much denser interface layers above it.
Because of that, increasing base spacing can sometimes save a considerable amount of filament without noticeably affecting the supported surface, as long as the structure remains stable enough to do its job.
Top & Bottom Interface Layers
The interface is the denser section between the main support structure and the model.
Top interface layers are placed between a support structure and the underside of the model it is holding up. They create a more consistent surface for the model to print on, reducing sagging between the widely spaced lines of the support base.
Increasing the number of top interface layers can improve the reliability and consistency of this surface, but also adds material and print time.
Bottom interface layers perform a similar job when support is generated on top of an existing part of the model. They create a controlled surface between the model and the support structure growing from it.
For many prints, the default interface layer count works well. If a supported underside looks particularly rough, however, the interface is one of the first areas worth investigating.
Interface Pattern & Spacing
The Interface pattern determines how the dense support interface itself is laid down, while interface spacing controls the distance between its lines.
This spacing is especially important because it affects both surface quality and support removal.
Reducing the spacing creates a denser interface. This gives the model more material to print against and can improve the finish of supported surfaces, particularly underneath large horizontal areas.
The trade-off is that a denser interface can be more difficult to remove.
Increasing the spacing makes the interface less dense and can help supports separate more easily, but go too far and the first model layers may begin sagging into the gaps.
Think of interface spacing as a balance:
- Smaller spacing: better supported surface, potentially harder removal
- Larger spacing: easier removal, potentially rougher supported surface
It is often worth adjusting this setting before dramatically increasing the amount of support underneath the model.
Top & Bottom Z Distance
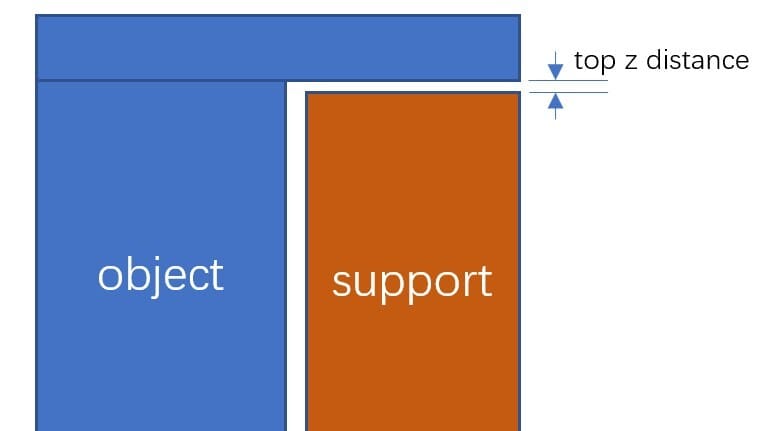
The Top Z distance controls the vertical gap between the top of a support structure and the model above it. This is one of the most important support settings in Bambu Studio.
A smaller gap places the model closer to the support interface. The first supported layer therefore has a better foundation, which can produce a cleaner underside.
However, bringing the two too close together can cause the support and model to bond, making removal difficult and potentially damaging the finished surface.
Increasing the Top Z distance makes supports easier to separate, but also gives the model more room to sag before reaching the layer beneath it.
The Bottom Z distance works in the opposite situation, controlling the vertical separation where support is built above an existing model surface.
When printing the model and support interface from the same material, some separation is normally required to prevent them from fusing together.
When using a support-interface material that doesn’t bond strongly to the model material, such as PETG with PLA, the Z distance can often be reduced substantially because the two materials don’t fuse well together.
Support/Object XY Distance
While Z distance controls the vertical separation, Support/object XY distance determines how closely the support can approach the model from the sides.
Reducing this distance allows supports to sit closer to vertical walls and edges. This can provide better support around tight geometry, but also increases the chance of the support touching or marking the model.
Increasing it gives the support more clearance and can make removal easier, but excessive spacing may leave the edges of overhangs poorly supported.
If supports peel away cleanly underneath a model but are difficult to remove from its sides, XY distance is one of the settings worth checking.
Support Expansion
Support expansion changes how far a Normal support region extends horizontally beyond the area Bambu Studio would otherwise generate.
Increasing the value can create a broader and more stable support structure, which may help beneath large overhangs or narrow support regions.
Reducing it keeps supports closer to the required area and can save material or provide additional clearance around nearby geometry.
As with many support settings, inspect the sliced preview after making significant changes. Expanding a support can cause it to appear in areas you may not have expected.
Support Wall Loops
Support wall loops control the number of perimeter walls around a support structure.
Additional walls can make tall or narrow supports more rigid and less likely to flex during printing. This can be useful when a support structure is unstable or repeatedly fails before reaching the overhang.
More walls also mean additional material and print time, so there is usually little reason to increase the setting unless extra strength is actually needed.
For most prints, the automatic or default setting is sufficient.
Support Ironing

Introduced in Bambu Studio 2.5.0, Support Ironing adds an ironing pass to the top of the support interface before the model is printed above it.
Much like conventional ironing on a model’s top surface, the nozzle passes over the support interface with a small amount of material to create a flatter, more consistent surface. This can improve the underside of supported horizontal areas by giving the model a smoother foundation to print on.
Support Ironing also includes controls for the ironing pattern, flow, spacing, inset, direction, and speed.
It does increase print time, so it isn’t necessary for every model. For prints where the finish of a supported surface is particularly important, however, it can be a useful option to experiment with.
If you don’t see “Enable ironing support interface,” enable Developer Mode in Bambu Studio’s preferences first.
Tree Branch Settings
When using Tree supports, Bambu Studio provides several settings for controlling the size, spacing, and movement of the branches.
Branch distance affects how closely neighboring support branches are generated. Smaller distances can create more support points and a denser tree, while larger distances generally produce a simpler structure.
Branch diameter controls the thickness of the branches. Increasing it can make tall or heavily loaded Tree supports more stable, but also increases filament use and can make the structure more cumbersome to remove.
Branch angle controls how aggressively branches are allowed to move sideways as they rise toward the model. A larger angle gives the tree more freedom to reach around geometry, while a more conservative angle produces straighter branches.
Branch diameter angle affects how branches become thicker as they approach their base. Increasing the size toward the bottom can improve the stability of tall Tree supports.
These controls are useful when automatic Tree supports are either too delicate or unnecessarily bulky. Before changing them individually, though, it is often worth trying another Tree style such as Strong, Slim, Hybrid, or Organic, since those presets already adjust much of this behavior for you.
As always, slice the model after making changes and inspect the support structure layer by layer. A setting that reduces material on one model can make another considerably harder to print.
Filament for Supports
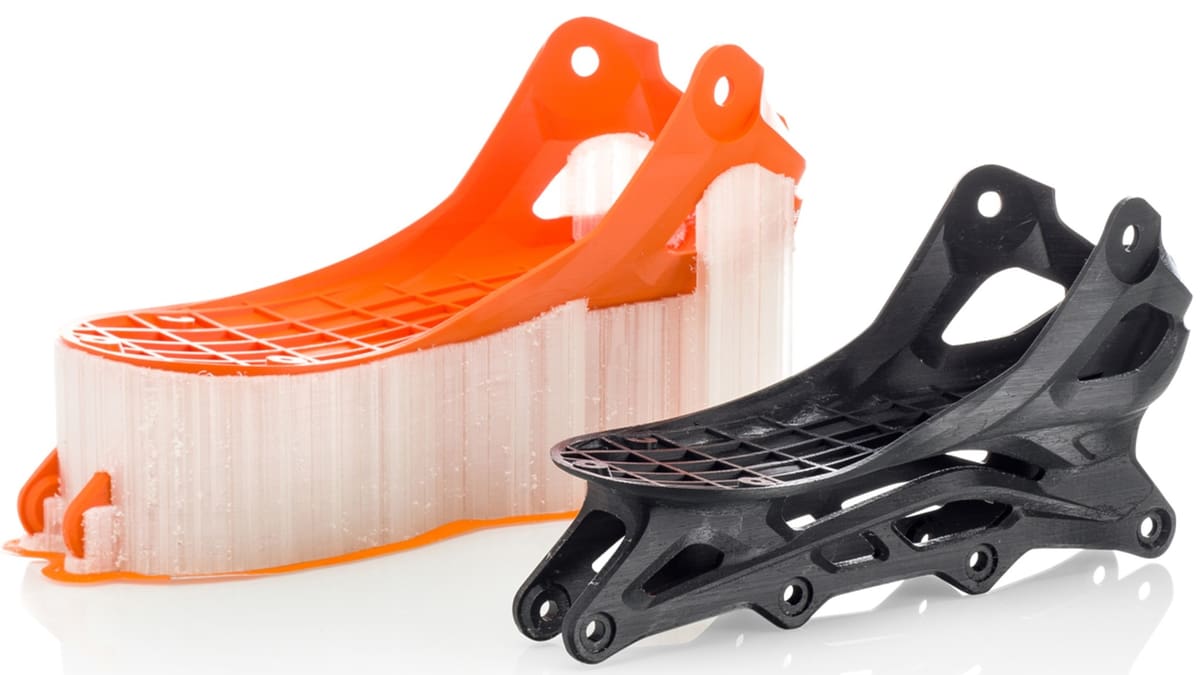
With a multi-material system, Bambu Studio lets you assign different filaments to the Support/Raft Base and Support/Raft Interface.
In most cases, it makes sense to print the support base with the same filament as the model and use a dedicated support material only for the interface layers. This minimizes filament changes and uses the specialized material only where it matters most.
Bambu’s Support for PLA/PETG, for example, is intended for the support interface rather than the entire support structure. Because it separates more easily from the model, you can often reduce the Top Z distance to 0 mm, giving the supported surface a flatter foundation and improving its finish.
You can sometimes achieve a similar effect by using PETG as an interface for PLA, or PLA for PETG, since the two materials bond relatively poorly to each other.
Soluble materials such as PVA are another option for difficult-to-remove supports, particularly around internal or complex geometry.
The main downside of multi-material supports is the extra filament switching. Frequent tool changes increase purge waste and print time, so check the sliced preview before committing to a support setup with many interface changes.
You May Also Like:

License: The text of "Bambu Studio Supports: Types, Settings & How to Use Them" by All3DP is licensed under a Creative Commons Attribution 4.0 International License.