3D Face Scanner: How to Scan & 3D Print Your Face

Setting up a 3D face scanner can give way to plenty of fun projects. Check out different scanning options and how to get that model ready!
In recent years, 3D scanning and printing technologies have revolutionized the way we bring our ideas to life. From intricate models to functional prototypes, these technologies have opened up endless possibilities for creative expression and personalized manufacturing.
One fascinating application of 3D scanning and printing is the ability to recreate a lifelike 3D model of your own face. Imagine capturing your unique facial features and preserving them in a tangible form, ready to be transformed into a physical object, like a bobblehead or a cake topper.
In this article, we’ll delve into the exciting world of 3D face scanning and printing. We’ll go over different ways of scanning your face, then we’ll share some tips on transforming the scan into a 3D printable model, and we’ll finally look into 3D printing the figure.
While our focus will be on using a smartphone or a dedicated scanner, there are other options available. For instance, you could use a webcam and a computer program, although this might limit your mobility during the scanning process and it might not get the best results, depending on your hardware’s capabilities.
So, if you’re ready to immortalize your face and unlock the creative potential of this technology, let’s dive in and discover how to bring your own likeness to life through the wonders of 3D scanning and printing.

Scanning on Your Phone
The arguably more accessible way to delve into 3D scanning is using your smartphone, and depending on your brand and type of device, this may go one of two main ways.
Photogrammetry
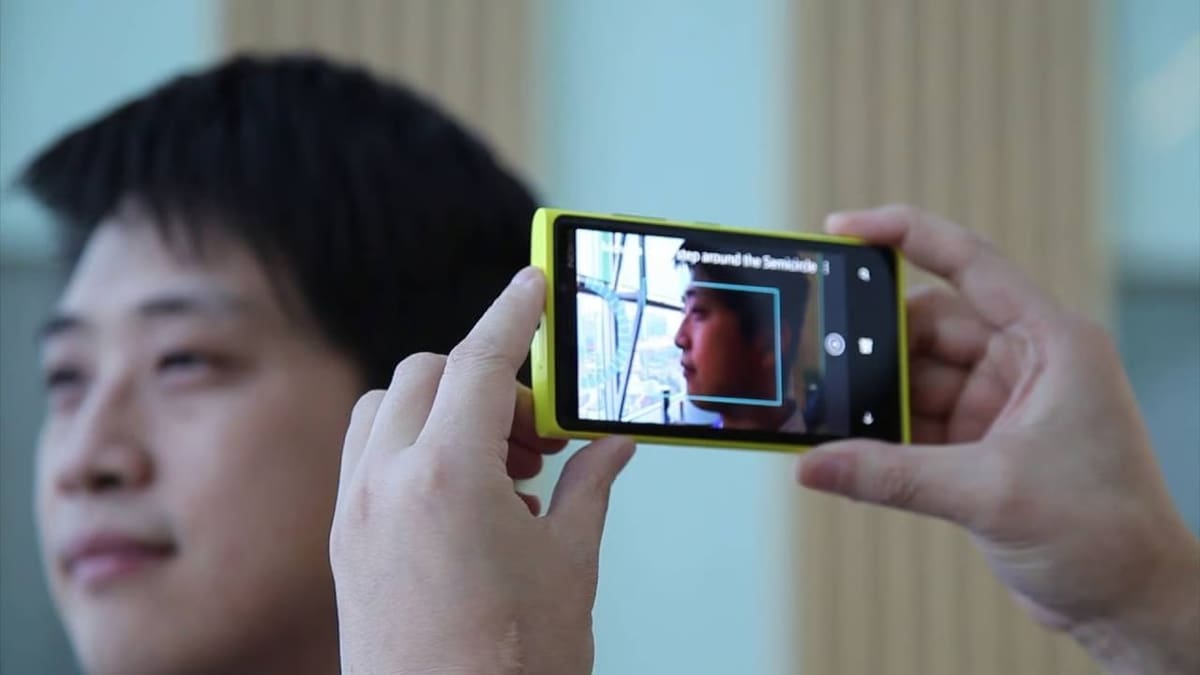
The simplest way is done using photogrammetry, which is, in a nutshell, a technique that allows you to create a 3D model using a series of photographs taken from different angles. The photogrammetry software then processes these images, analyzing them to generate a detailed and accurate 3D representation.
While any phone can be utilized for capturing images for photogrammetry, there are a few key considerations to ensure optimal results. Firstly, it’s crucial to maintain good lighting conditions and a stable position while taking photos. The background of your photos also plays a significant role, so it’s important to be mindful of it. Lastly, photogrammetry can have difficulty accurately capturing hair. Therefore, it’s recommended to wear a hairnet or, if one isn’t available, a beanie can serve as a practical alternative.
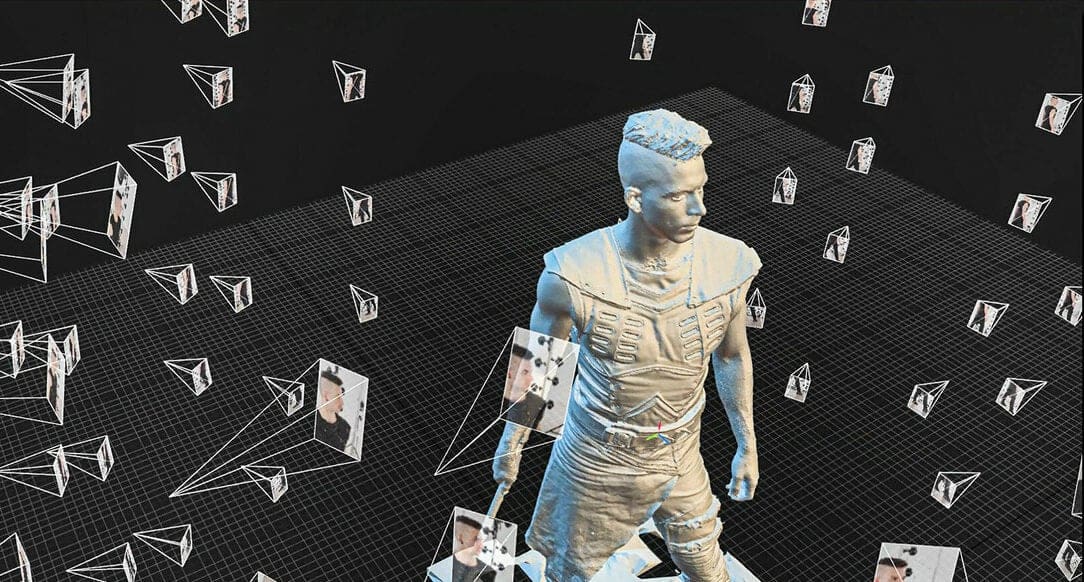
Once you’ve captured the necessary photos, the next step involves processing them through specialized software to generate a 3D model. There are plenty of photogrammetry software available, both free and paid, that employ advanced algorithms to analyze the photos and reconstruct a detailed 3D model.
These apps work by analyzing the photos, identifying common features, and creating a dense point cloud or mesh that represents the shape of your face. Once your 3D model is complete, you can export this mesh as an STL file (or other formats, depending on the particular app) to other programs such as Blender for further editing, or to directly use for 3D printing.
Some of the popular options include Kiri Engine, Polycam, and MagiScan.
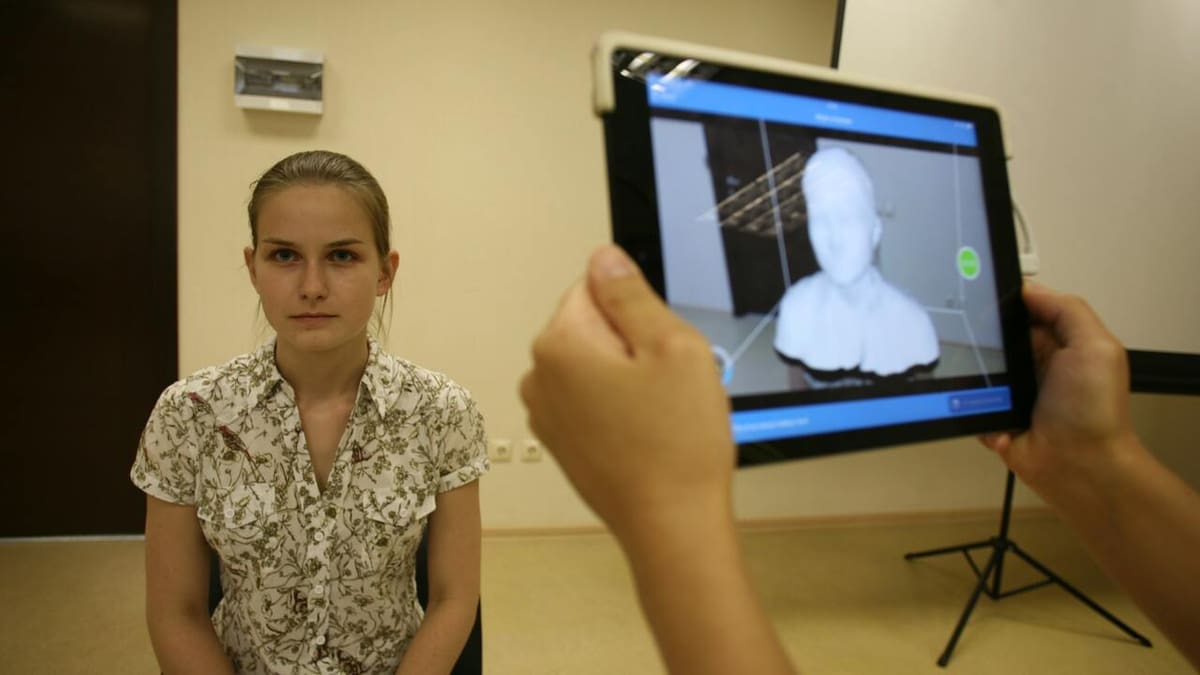
3D Scanning on iPhone
The iPhone, with its advanced technology, offers impressive capabilities for 3D scanning. It provides two primary methods for this purpose: Face ID and lidar scanning.
Starting from the iPhone X, Apple introduced Face ID, a facial recognition system that uses structured light scanning. It works by projecting thousands of infrared dots onto the user’s face to create a detailed depth map. This technology, combined with the iPhone’s dot projector, flood illuminator, and dual cameras, allows for effective scanning even in conditions that may not be suitable for photogrammetry.
The iPhone’s dedicated processor performs all the necessary computations on the device itself, eliminating the need for powerful external computation often required in photogrammetry. Once the scanning is complete, the data can be exported in 3D file formats like STL or OBJ (or more, depending on the specific app you’re opting for). These files can then be imported into 3D modeling software, such as Blender, for further refinement and preparation for 3D printing. Unfortunately, this dedicated sensor suite for facial scanning isn’t available on older iPhones.
Lidar (light detection and ranging), available on iPhone 12 Pro and later models, is a type of laser scanning that uses light pulses to measure distances. This technology allows for rapid 3D scanning of objects and environments, making it particularly effective for larger scenes or in low-light conditions. To get the best scans, ensure even lighting and consistent distance. Like structured light scanning, all the computation required for lidar is performed on the device, eliminating the need for external hardware.
As with non-iPhone phones, there are apps that can add even more to the scanning process: Kiri Engine is also compatible, while dedicated options include Scandy Pro, Scaniverse, and 3D Scanner App.
iPhone vs. Photogrammetry
While the iPhone’s Face ID and lidar scanning provide quick and convenient 3D scanning capabilities, photogrammetry offers a different approach. Photogrammetry uses a series of 2D photographs, taken from different angles, to create a 3D model. This method can produce highly detailed models, but it requires good lighting conditions and more time to capture the necessary images not to mention the computation required to identify and stitch the pictures to create the object. Additionally, the iPhone system offers more dedicated app options.

Dedicated 3D Scanners
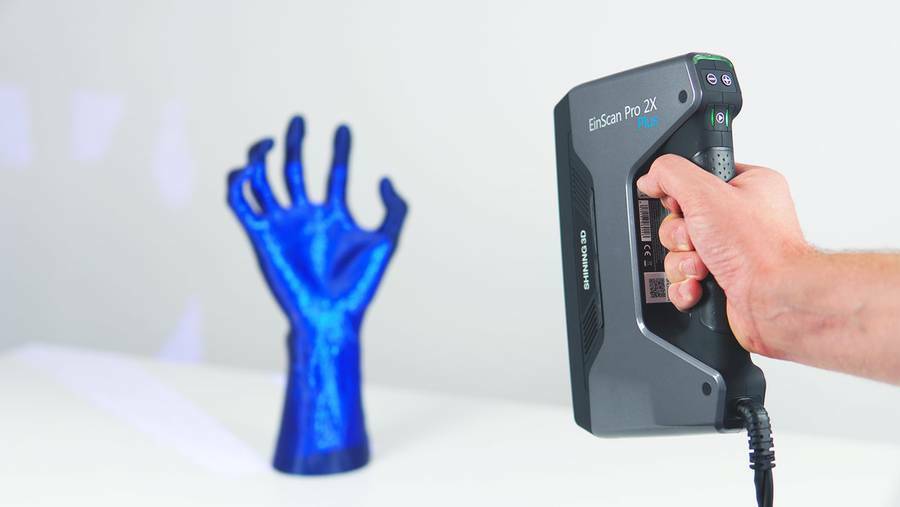
Moving beyond the realm of smartphones, the world of 3D scanning unfolds further with dedicated 3D scanners. These specialized devices, designed explicitly for capturing high-quality 3D scans, offer a step up in precision and additional features, making them a worthy investment for those seeking enhanced scanning capabilities.
Affordable 3D Scanners
For those just dipping their toes into 3D scanning, affordable yet effective options exist. Entry-level 3D scanners, such as those from Revopoint and Einstar, strike a balance between cost and performance. These scanners employ structured light or laser technology, enabling them to capture detailed scans without breaking the bank.
Revopoint’s scanners, for instance, stand out for their user-friendly design and competitive pricing, making 3D scanning accessible to beginners. On the other hand, Einstar’s scanners are known for their robust software support and versatility, accommodating a range of scanning needs.

Professional 3D Scanners
For the more discerning users and professionals, prosumer-level 3D scanners offer a leap in accuracy and feature set. Brands like Artec, Einscan, and FARO lead the pack in this category.
Artec’s scanners, renowned for their high precision and comprehensive software suite, are a favorite among professionals. Einscan offers a range of scanners that stand out for their high resolution and ease of use, catering to both beginners and advanced users. FARO’s scanners, while on the pricier end, are lauded for their exceptional accuracy and advanced features, making them a preferred choice for industrial applications.

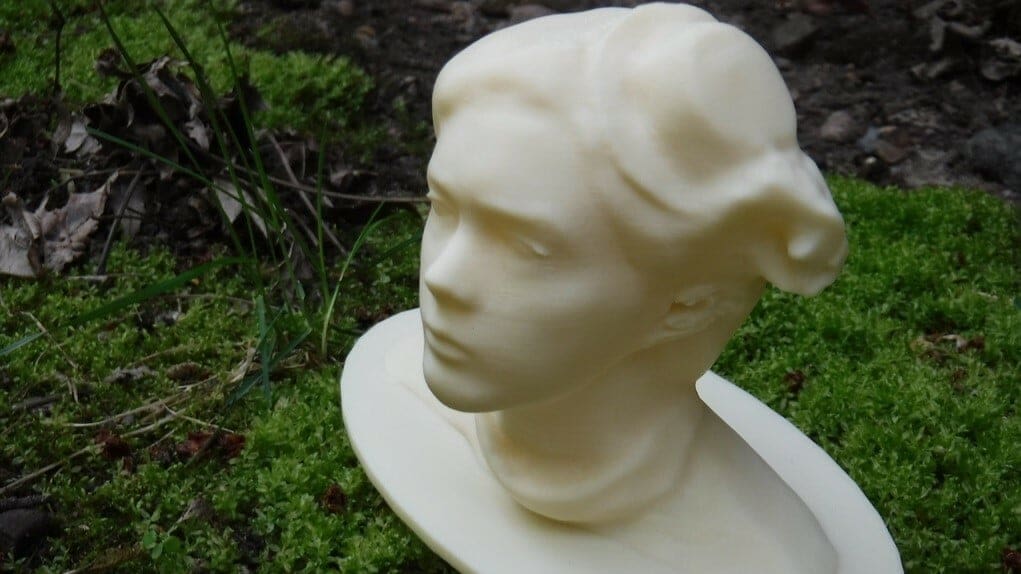
From Scan to 3D Printable Model

Once you’ve obtained the scan data of your face, the next step is to convert it into a digital 3D model. This process involves refining the scan data, cleaning up any artefacts, and creating a digital representation of your face that can be further processed and prepared for 3D printing. Here’s how you can accomplish this:
Scan Cleanup & Refinement
The first stage involves importing the raw scan data into a 3D modelling software such as Blender or MeshLab. Once imported, you’ll need to perform a cleanup and refinement process to eliminate any imperfections or unwanted artefacts present in the scan. This process ensures that the digital model accurately represents the scanned face.
Mesh Optimization & Simplification
Depending on the complexity of the scan data, it might be necessary to optimize the mesh. This optimization reduces the file size of the model, making it more manageable for 3D printing.
Within the 3D modeling software, you can use tools or features (often labelled as “remesh” or “reduce”) to simplify the mesh while preserving the essential facial details. It’s crucial to ensure that the final mesh is manifold (watertight) and free from errors or holes, as these could cause issues during the 3D printing process.
File Format Conversion
After finalizing the 3D model, the last step is to save it in a file format suitable for 3D printing. The most commonly used file formats for 3D printing are STL and OBJ. It’s important to ensure that the chosen file format is compatible with your 3D printer or the slicing software you’ll use to prepare the model for printing. This compatibility ensures a smooth transition from the digital model to the physical 3D print.
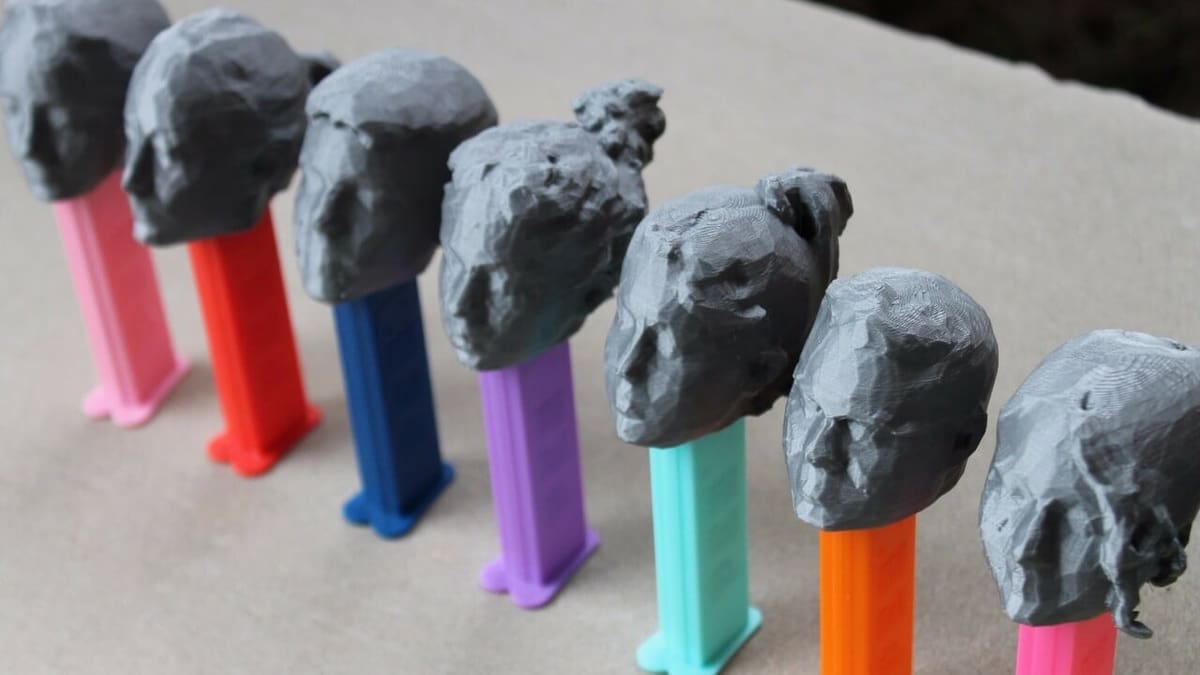
3D Printing Your Face
When it comes to 3D printing technology, hobbyists often gravitate towards FDM (fused deposition modeling) and resin-based printing (such as LCD). FDM is a popular choice due to its affordability and ease of use, making it ideal for beginners. Resin-based printing, on the other hand, offers higher resolution and is capable of capturing more intricate details, although it can be a bit more complex to handle.
Material Selection
The choice of material can significantly impact the final result of your 3D print. If you’re using an FDM printer, materials like PLA (polylactic acid), PETG (polyethylene terephthalate glycol-modified), or ABS (acrylonitrile butadiene styrene) are common choices. PLA is easy to work with and comes in a variety of colors, while PETG offers higher strength but has a tendency to string, and ABS is more durable and heat-resistant but can be trickier to print with.
For resin-based printers, there are a variety of resin technologies available, each with different properties. Stereolithography (SLA) printers can achieve higher print quality, while LCD printers can achieve quicker prints and are more affordable, and DLP machines are gaining more ground. The choice of technology will depend on the level of detail you want to achieve and the intended use of the print.
Slicing Settings for Quality
Slicing is the process of converting your 3D model into instructions for your 3D printer. During this stage, you can adjust settings to optimize the quality of your print depending on your technology of choice, be it FDM or resin-based. For instance, reducing the layer height can increase the level of detail in the print, as the printer will deposit thinner layers of material. Similarly, slowing down the print speed can improve accuracy and quality, as the printer will have more time to accurately deposit each layer of material.
Support structures are often necessary for overhanging parts of the model. However, they can leave marks on the print and should be used sparingly. If supports are necessary and you’ve got an FDM setup, consider using a material like HIPS (high impact polystyrene), which can be dissolved in water, making it easier to remove without damaging the print.
Post-Processing
Once your 3D print is complete, the final step is post-processing. This involves carefully removing the print from the build plate and cleaning off any support structures. Depending on the material used, you may also need to cure the print under UV light (for resin prints) or remove any residual filament strands (for FDM prints).
The surface of the print can then be refined through techniques such as sanding, priming, or applying a surface finish (although the specific technique will be affected by the technology and material of choice). It’s important to approach this step with caution. Over-sanding, for example, can lead to a loss of detail. A gentle touch is key. Once the print is smooth, painting can be a great way to add color and bring your 3D print to life.
License: The text of "3D Face Scanner: How to Scan & 3D Print Your Face" by All3DP is licensed under a Creative Commons Attribution 4.0 International License.