Revopoint Trackit Review: Heavyweight 3D Scanner Lightens Your Workload
Rating

Revopoint’s expansion into workflow-enhancing 3D scanning forms continues with the Trackit, a multi-mode laser 3D scanner that, paired with its companion tracking tower, eliminates the need for painstaking use of tracking dots.
Revopoint’s unrelenting march to offer the scanning hardware to suit all needs (at typically lower budgets) took a turn for the convenient late last year with the release of the Revopoint Trackit.
Launched via Kickstarter, and available now for around $5K, it is technologically similar to the company’s Metro series of scanners, with multiple laser-based modes of data capture plus RGB cameras for capturing color detail.
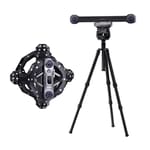
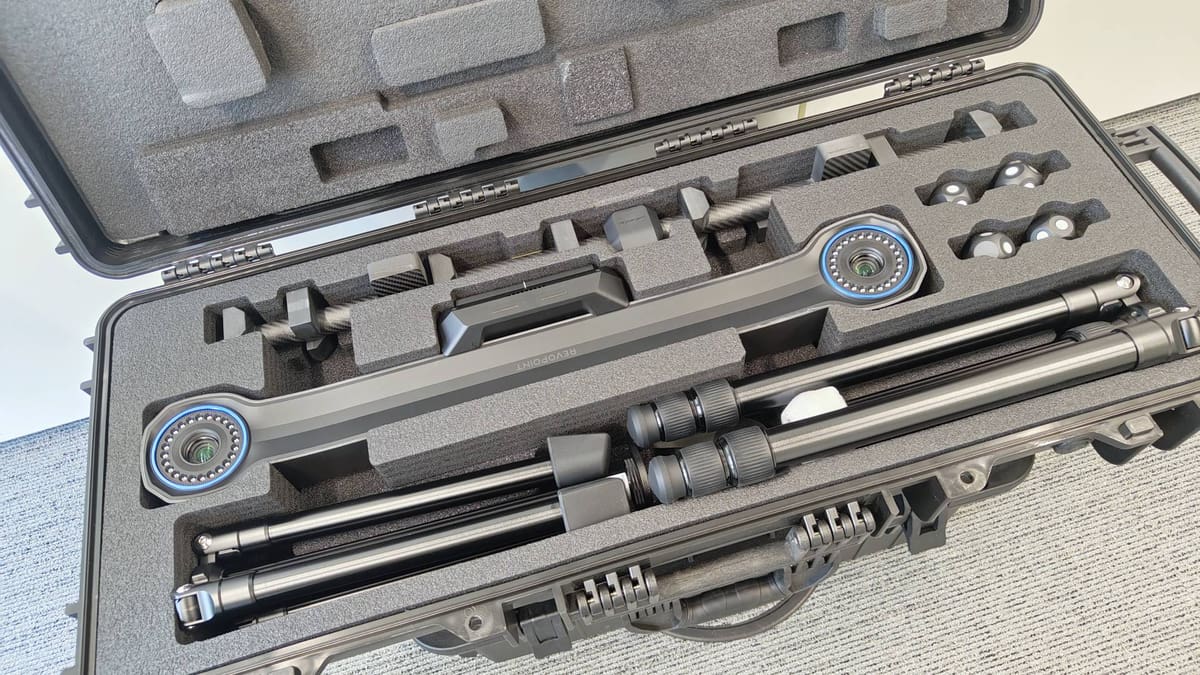
It has one major feature over conventional, wand-style counterparts, though: a tracking tower. Included in the system’s two-flight cases worth of packaging, this separate camera tracks the scanner’s movement, calculating the positioning and providing an alternate means to seamlessly scan without the jagged experience Revopoint’s feature-based tracking often provides.
The result is a revelation, removing one common and core issue with the scanning workflow and stitching together a highly capable system best suited to the task of ambitious and large jobs. And without driving you to the limits of your patience. In all of several weeks use of the Trackit intermingled with my regular 3D printing tasks, I’ve gotten a good feel for this scanner. If you’ve ever found yourself cursing the existence and need for tracking markers, the Trackit is probably the scanner for you.
Revopoint Trackit: At a Glance
- Light source: Blue laser (30x cross lines, single line)
- Single frame accuracy: 0.02 mm
- Volumetric accuracy: 0.02 mm + 0.04 mm × L (m)
- Max. fused point distance: 0.05 mm
- Recommended object size: 0.01–6 m
- Operational range: 200–400 mm
- Tracking options: Markers, markerless (using Trackit station)
- Texture capture: “High-resolution” RGB
- Release: 2025
- Price (MSRP): $4,980
The Tech
The Revopoint Trackit is a two-piece optical tracking 3D scanner designed to bring industrial-grade metrology technology within reach of engineers, reverse or otherwise, and serious product designers at a price point that doesn’t require a capital expenditure sign-off.
Where the company’s other scanning tech does a reasonable job – provided you’re willing to put the effort in creating the conditions for them to excel – the Trackit takes a massive leap forward with its tracking tower, watching the scanner itself and using that information to keep the data captured making spatial sense. Comparable systems from brands like Creaform exceed tens of thousands of dollars. The Trackit retails at less than $5K.
We’re not suggesting that the Trackit outperforms such systems, but its cumulative accuracy is far closer to them than Revopoint’s entry level options, with design forethought like temperature tracking for optimal performance and a carbon-fiber frame, which is not only light, but dimensionally stable. Let’s dig in.
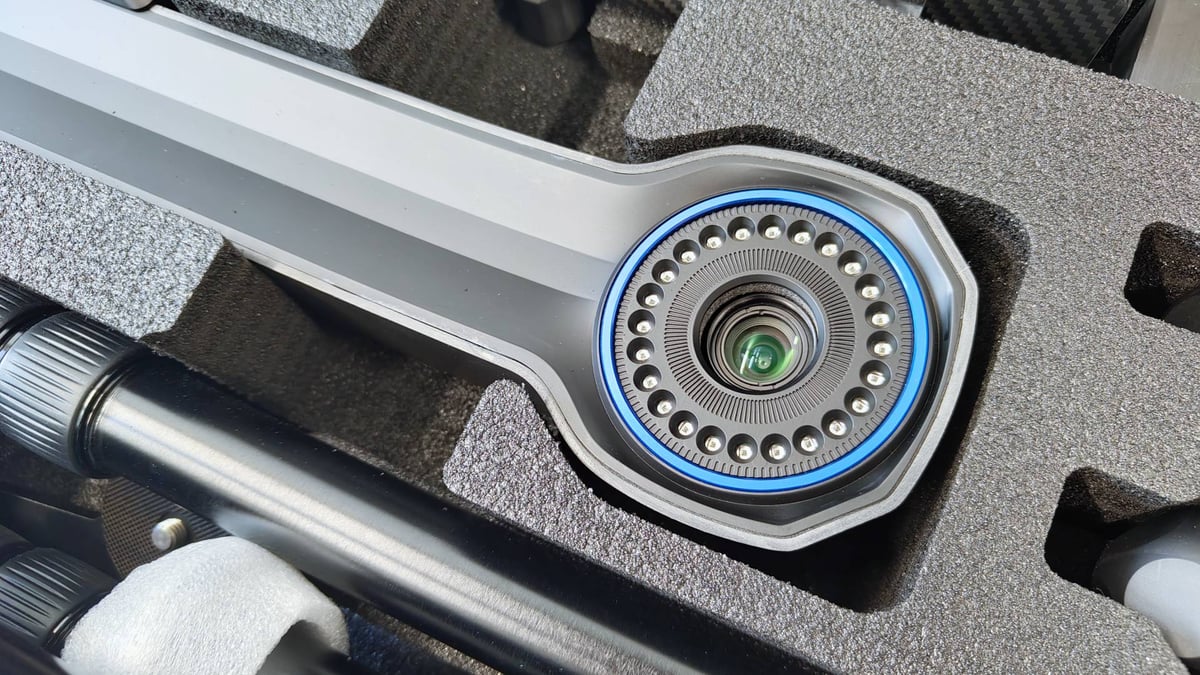
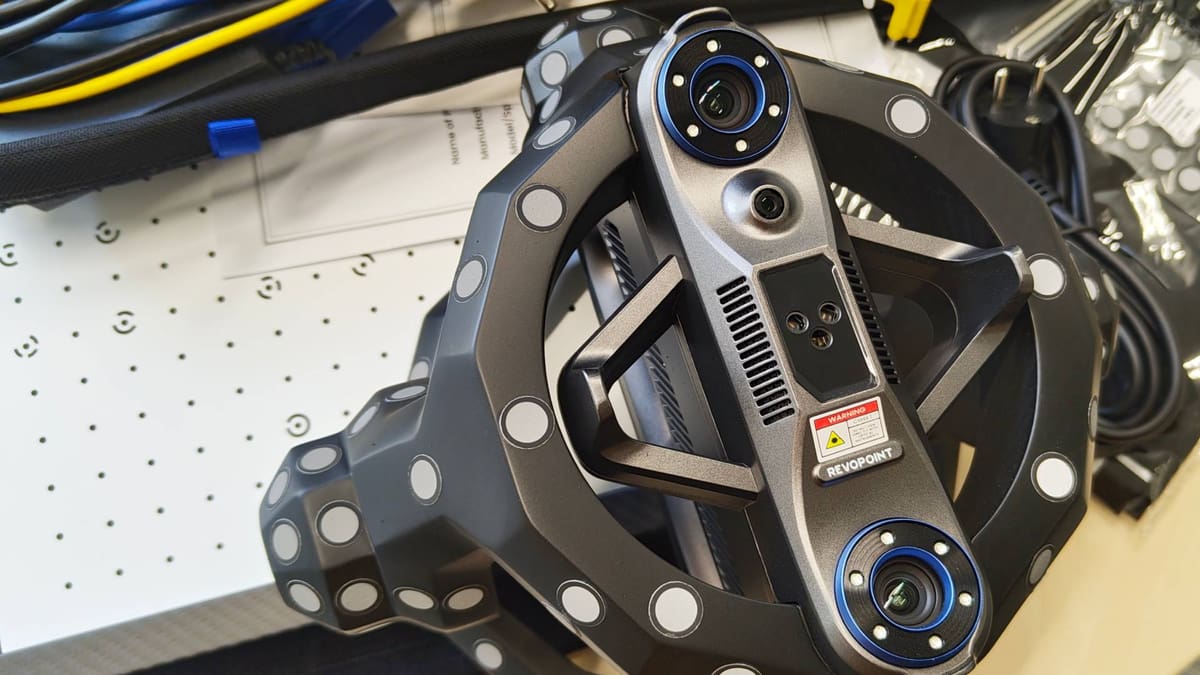
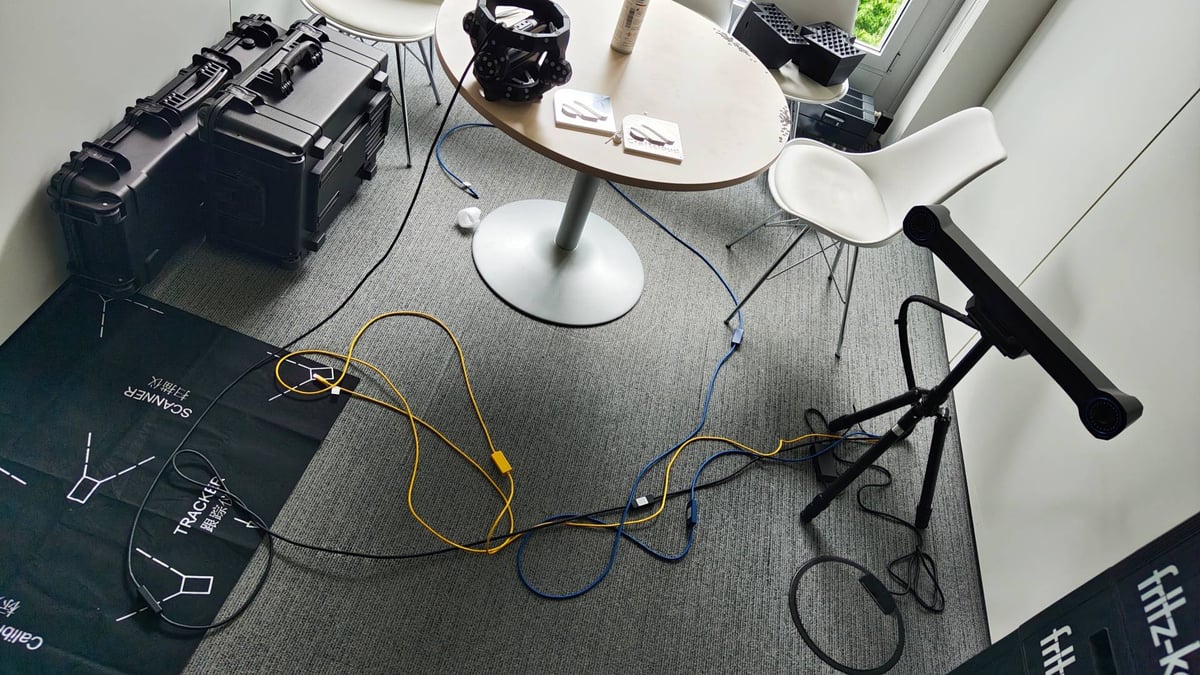
The Revopoint Trackit consists of two distinct units: a long, wide-headed tracker and a fist-shaped scanner. Together they form an “outside-in” capture system, a configuration that has existed in professional metrology for years but has never really been accessible at this price point before.
In all, the system comes in two large, wheelable flight cases – one each for the tracking tower and scanning unit. Each core part is accompanied by tripods and automatic gimbals, which are used exclusively for calibration.
Beyond this, there’s a several-meter-long loom of cables to hook the system up, plus calibration boards and a positioning mat to help you position the various components optimally when calibrating.

The calibration process itself is extensive, and tied to the specific board that ships with the scanner, which you have to validate as a part of the process. We found some mismatches between the printed instructions in the box and the guidance given by the software, leading to some moments of head scratching, before continuing with the digital, and presumably up-to-date, instructions.
A note on the software: The Trackit uses a dedicated version of Revopoint's scanning software; Revo Track. This is currently only available on Windows, so if you’re a Mac user with no intention of buying a new system just for the Trackit, you miss out on this beginner-friendly on-ramp.
There are two phases in the calibration: one for the tracking tower, which is automatic and uses gimbals (provided in the box); one for the scanner, which requires manual movement from you, the user.
In all, it took me a casual afternoon’s work, switching my attention between the scanner’s calibrations and other printing tasks in the All3DP lab. Expect the unboxing to take all of half an hour’s careful work.
The scanner and tower’s calibrations require the devices to be at optimal temperature – mid 20s °C – with a half-hour’s warm-up time baked into the first-time setup. If you work in a cool location, that may be something to wrestle with, getting the scanner and tower up to optimal temps.
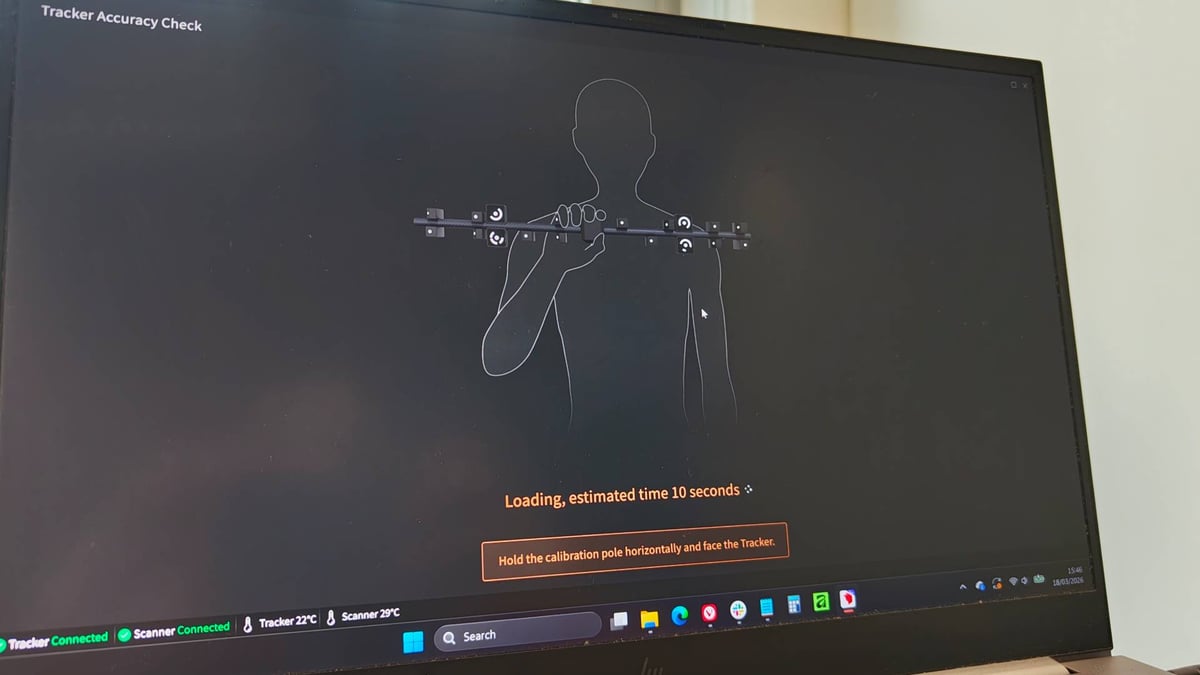
Overall, put aside a couple of hours’ time for calibration. The tower’s process requires you to reposition things up to the edge of its tracking range, meaning some 4+ meter’s distance. Don’t start the calibration in a tight space.
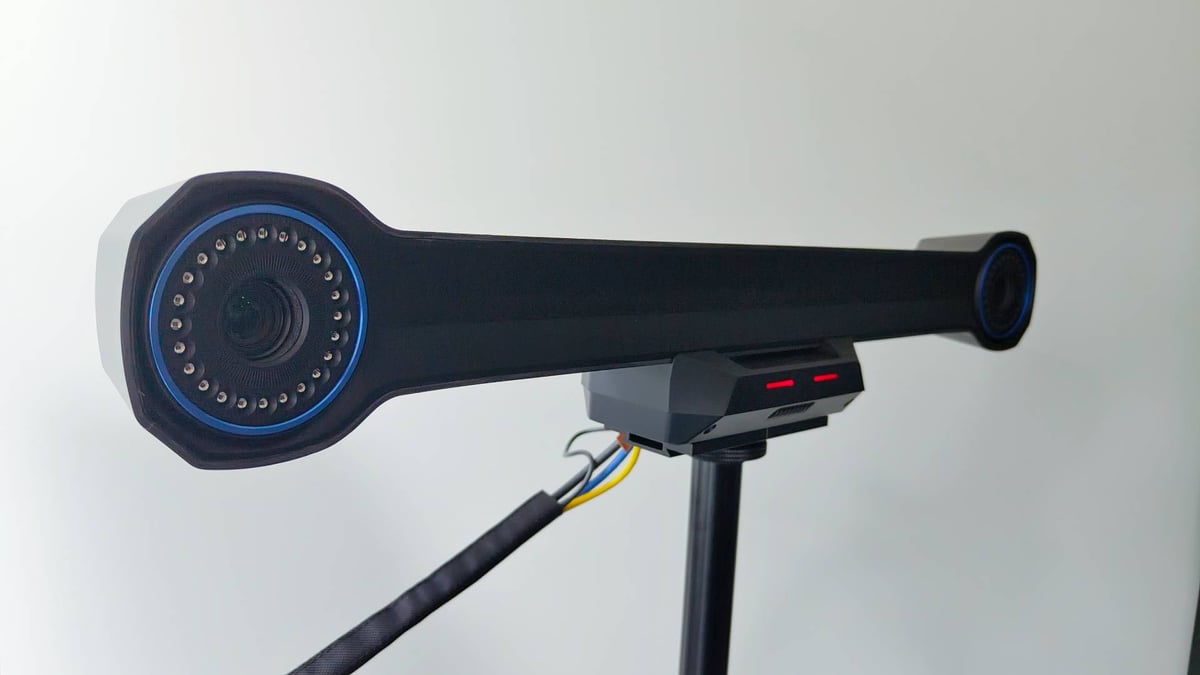
The scanner captures geometry using structured blue laser light, while the tracker ensures precise spatial alignment and reduced drift. Because the tracker only needs to maintain line of sight with the scanner – not the object itself – and because the scanner is absolutely riddled with tracking markers, the Trackit’s power is in the scanning of dark, shiny and metallic objects, as well as large spans that would typically require painstaking tracking marker placement. In addition to shortcutting that kind of work, it’s also a fundamental advantage over feature-based tracking, which has a tendency to drift: the system always knows where the scanner is in space, rather than relying on the object’s surface to stitch frames together.
Objects ranging from 10 mm to 6 meters in size can be captured, with measurement speeds reaching up to 1.5 million points per second. For larger workpieces that exceed the tracker’s stationary field of view, you can “leapfrog” the base station, repositioning incrementally around the object as you go. Doing this requires the use of anchor blocks or trackers, though, with the tracking tower needing to see five anchors shared between repositions in order to figure out and stitch multiple moves together. Magnetic anchor blocks are provided with the Trackit, as well as some removable, adhesive-backed tracking dots.
The scanner offers two distinct blue laser modes. The 30-line cross-laser mode delivers high-precision, high-efficiency scanning of surface areas, including direct capture of black, reflective, and metallic surfaces. The single blue laser line is optimized for fine scanning of narrow geometry – deep holes, grooves, and recessed features where a broad projection pattern would be inadequate. In practise, the distinction between the two tracks. We were able to eke out more usable detail in deeper recesses and holes using the single line mode, and the crossed lines does a general purpose job of capturing larger areas quickly.
It became clear during scanning that, even though our system was technically capable of running Revo Track, pushing a system to its limits does bottleneck performance – in single-line mode particularly, requiring far longer to capture enough detail to work with.
The blue laser operates at 460 nm wavelength. Single-frame precision reaches 0.02 mm, with volumetric accuracy of 0.02 mm + 0.04 mm × L(m), according to Revopoint. High-sensitivity temperature sensors continuously monitor both the scanner and tracker, alerting you to the possibility of thermally induced drift. Internal fans keep it from getting too hot during extended scanning sessions, while a “warm-up” interval is suggested at start-up if the scanner is too cold.
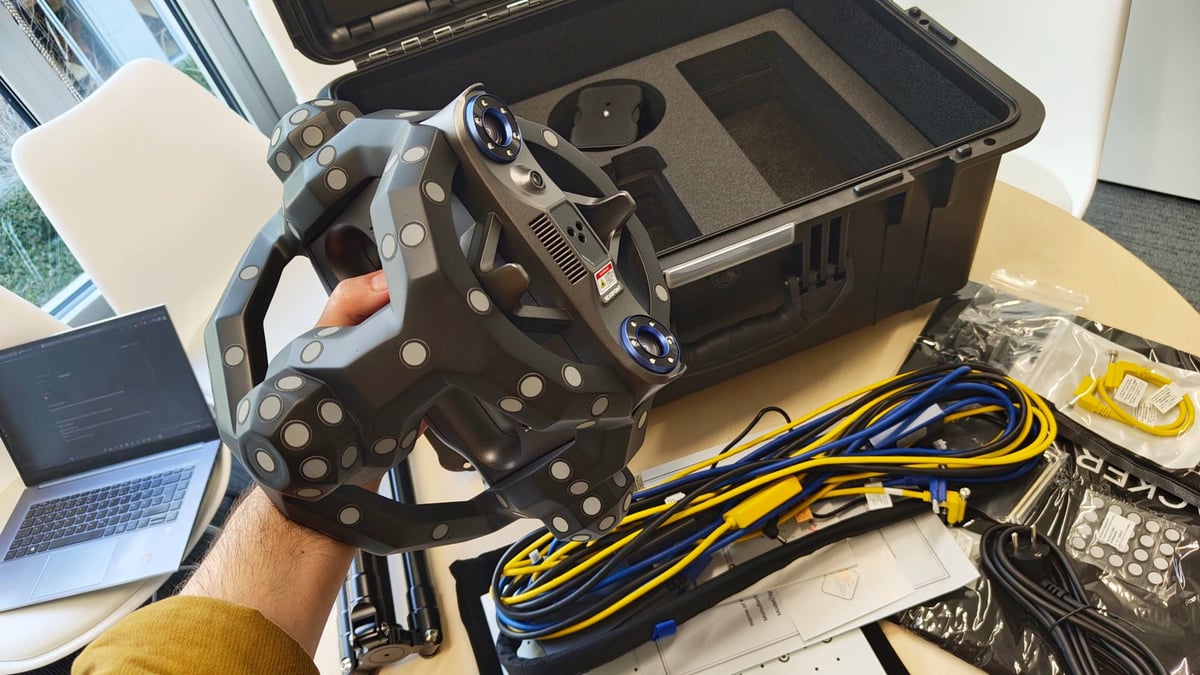
The scanning unit itself weighs 1.2 kg, a little over double any of the Revopoint Metro models. At the core of the scanning… “gauntlet,” for lack of a better word, is your typical wand-type scanner with onboard controls to adjust the exposure, as well as a pause button and mode switcher. The mode switcher is particularly useful, effectively full-screening the scan in progress when you need a better look at things but are a distance from your computer. You can also use these controls to adjust exposure when scanning in manual mode.
Less obvious, but exceptionally helpful, is that you can hold the scanner by its frame, mitigating its weight and taking the load off awkward positions and angles that would otherwise be a pain in the wrist during extended scanning sessions.
The Trackit is compatible only with Revopoint’s Revo Track software, which is free and standard with the scanner. Revopoint offers two additional paid programs that expand the Trackit’s usefulness further, though. There’s Revo Measure (~$500/y), ideally suited for metrology workflows including geometric dimensioning and tolerance analysis, scan-to-CAD comparison, deviation mapping, and inspection reporting; and Revo Design (~$500/y), a fully-featured reverse engineering tool that lets you quickly extract CAD-friendly analogs of your scanned data.
It’s all powered by QuickSurface, which is available independently but lacks the direct linkup between Revo Track for quickly porting work between the programs. Alternatively, for direct to print workflows, Revo Design Personal (~$225/y) does all the reverse engineering-ey stuff, but exports only STLs.
The Scanning
In the scheme of things, what you gain in sheer scanning freedom, you lose a little in agility. The Trackit is a large system, with the scanner umbilically tethered to the tracking tower whether you are using it or not. Even if you go feature-tracking only, the Trackit scanner gets its power directly from the tower.
Add to this the tracking tower’s distance requirements, you’re not necessarily going to be able to operate it in close quarters: the Trackit requires a lot of space. Anecdotally, just doing this review had me closing off All3DP’s small conference room, not only to (just about) give the Trackit the space needed to take advantage of its full tracking window, but also to safeguard my colleagues from the tripping hazards of the tracking tower and the wiring loom connecting it all.
As a fan of avoiding tedious work, as well as having used more than a handful of scanners in my time at All3DP, the Trackit stands apart for how quickly and fluidly you can accumulate a large stack of point clouds to work, without the necessity to futz about with tracking dots.
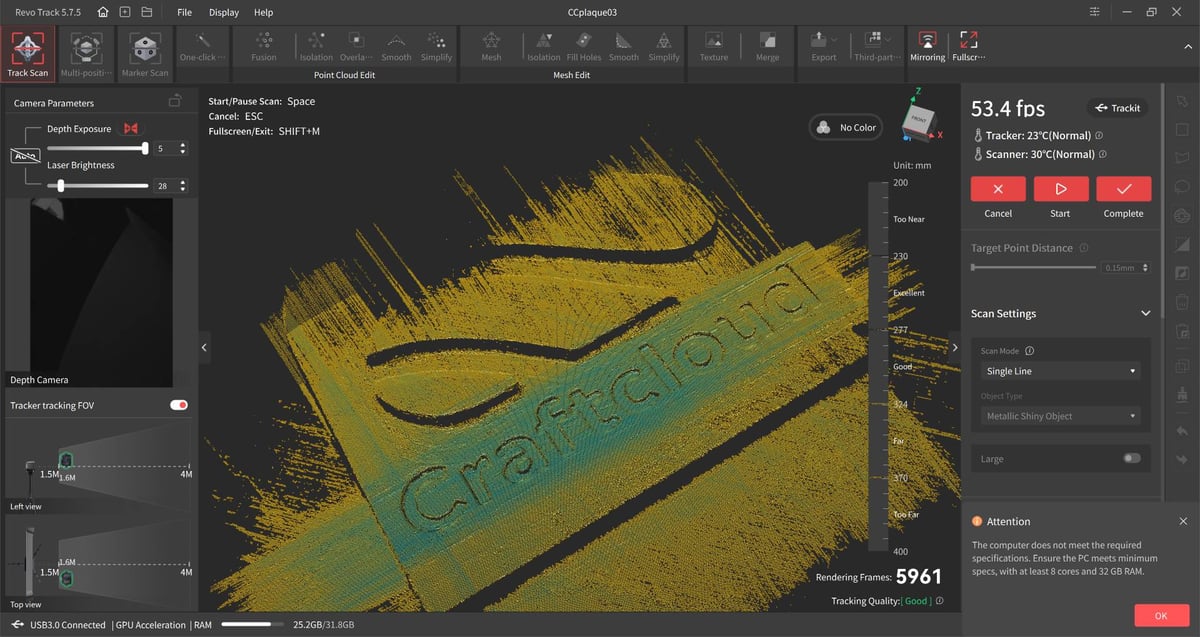
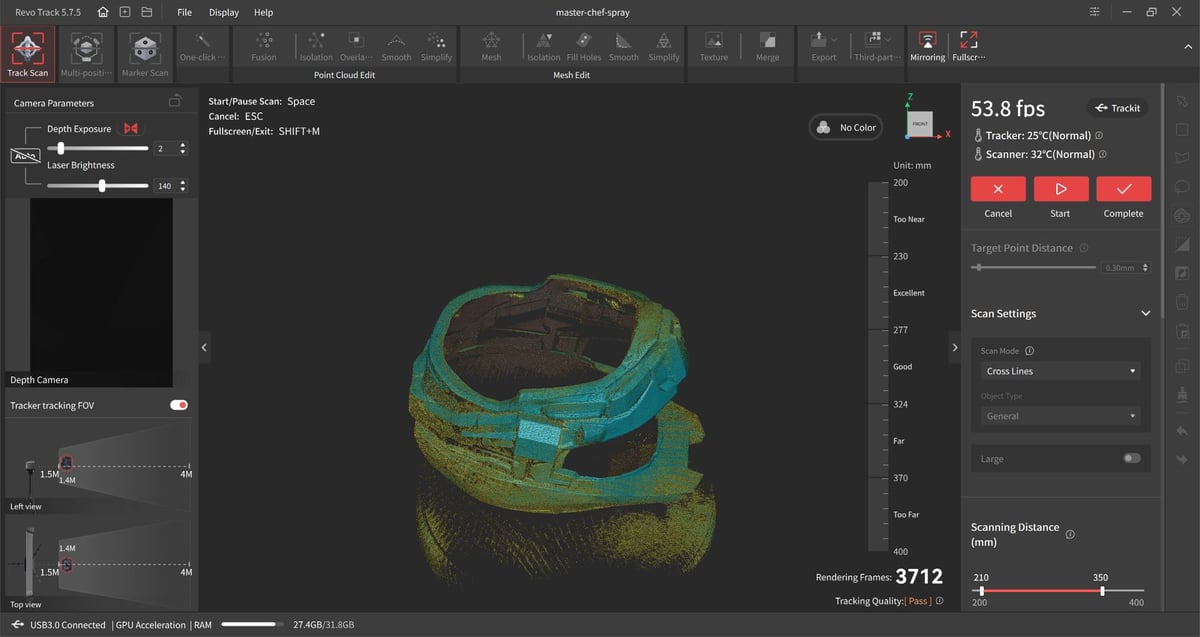
As ever, you get a sense from the live preview and its quality indicator whether you’re too close or far, and as you go, the preview gradually changes from yellow to green as sufficient data is captured in a given area.
A layer on top of this in the live action of scanning is the tracking tower’s LED “lock” indication lighting. If it can see the scanner and is tracking as expected, the lights are green. When it loses the scanner, things start flashing. You have to be looking at the tower to know this, though, which can pull focus from the scanning happening in front of you.
Other scanners address this with LED status indicators on the wand itself, something the Trackit lacks. It’s a minor gripe, but when the system works so seamlessly, it could have gone a step further to make it possible for you to go “headless” or rely just on the scanner and tower for an idea of how things are going.
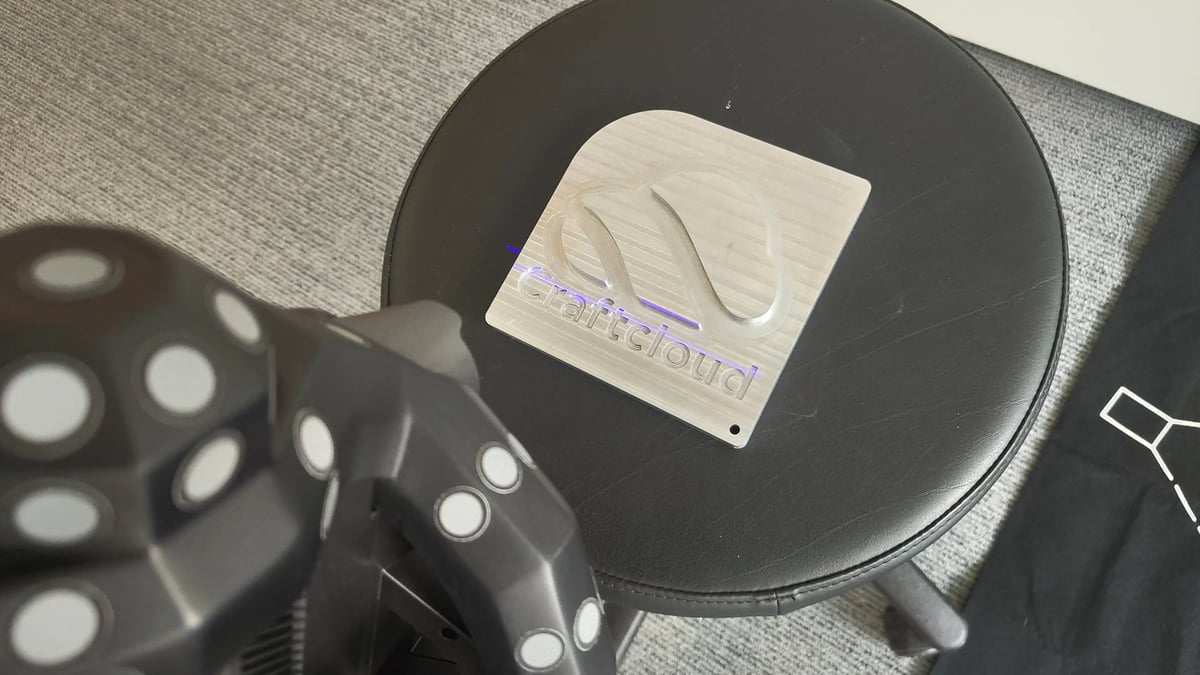
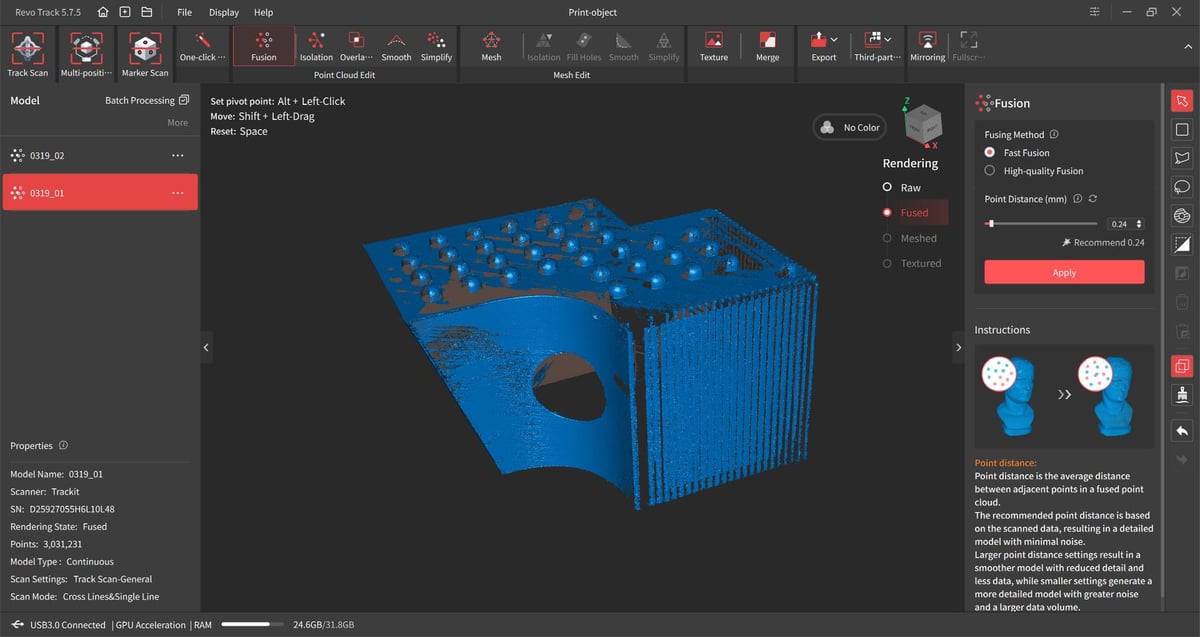
Our self-developed “scanbody” – a 3D print designed just to be scanned – is a nightmare for tracker dot-less feature-based tracking, so the Trackit should make light work of capturing it. And, mostly, it did.
Loading the scan into Revo Design, a Revopoint-branded skin of the incredibly intuitive QuickSurface reverse engineering CAD program, it was possible to extract sketch profiles and extrude, cut and pattern our way to a feasible digital dupe of our original 3D print.
Every step in the process adds some “noise” and potential for deviation from the original dimensions, but at several steps from raw scan data to a reverse engineered analog, we’re pretty pleased with the first time results. It’s not perfect, but acknowledging my own limitations and lack of training in any actual engineering or design field, I know that what I have is close, and that I could quickly whip it into shape in OnShape or Fusion.
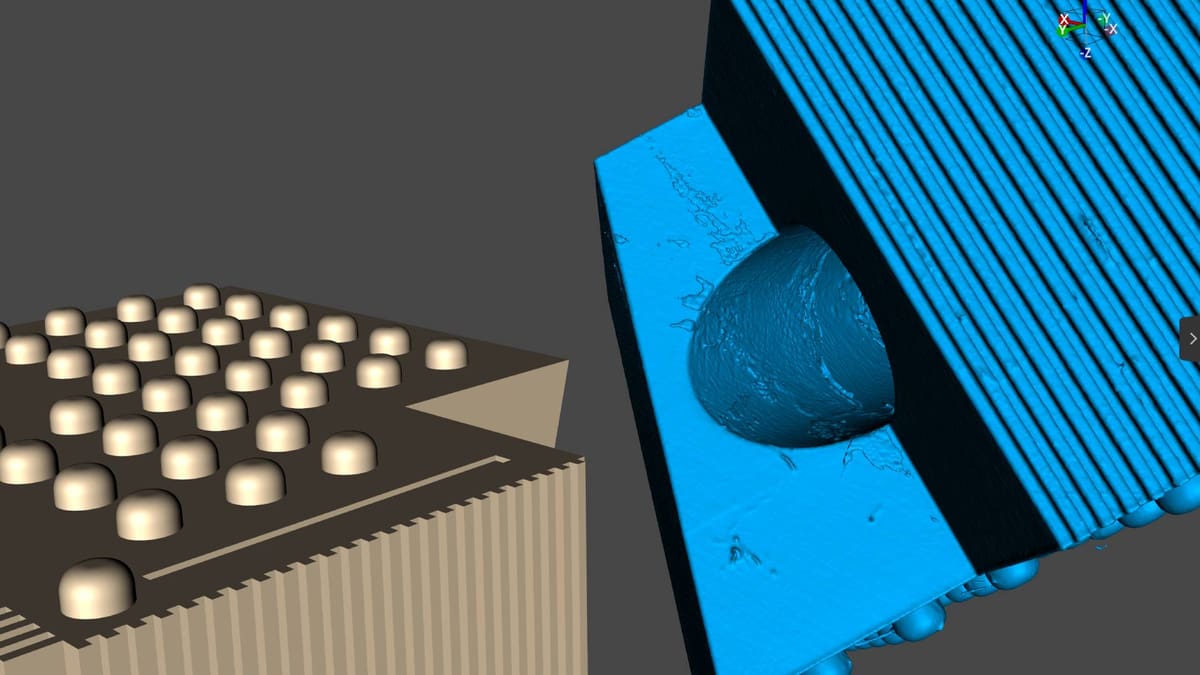
It does show what a reasonable effort using the scanner can achieve. The print scanned was a black, semi-glossy material. Scanning spray was used. Where the crossed lines mode failed to penetrate the print’s cylindrical void – a ~10 cm channel clean through the print – the single line mode captured enough data to create a clean sketch to extrude from the digital dupe.
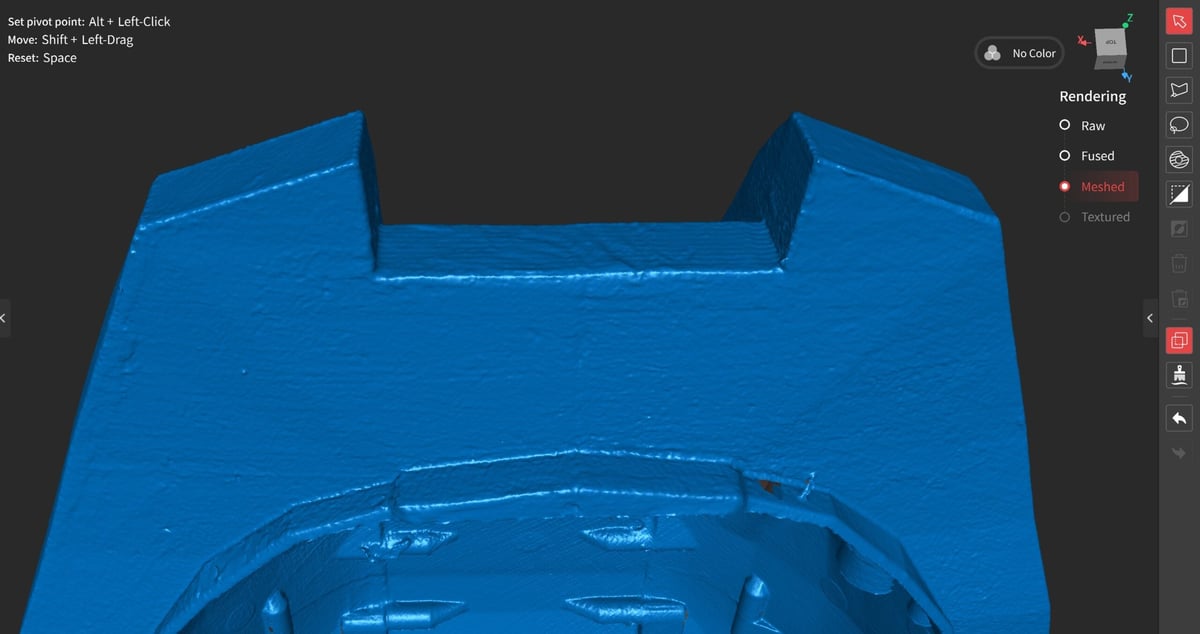
This 3D printed helmet, posed a much more challenging scan that required extensive single-line work to capture the internal void. The physical helmet I printed is a mess, with defects in the finish and post processing, making it ideal to see the kind of intricate surface detail the Trackit can pick up.
Being a laser scanner, you should be cautious to avoid eye direct eye contact with the laser when scanning. Revopoint claims it’s a class 1 laser, and therefore safe to use to scan people and animals, though only brief contact on the face and eyes is suggested in order to avoid discomfort.
Is It Worth It?
If your typical scanning work requires the frequent, custom use of tracking markers – I’m talking variate scans requiring fresh setups of markers every time, the convenience of the Revopoint Trackit wins every time.
It almost entirely does away with the tedium of tracking dots, with surprising flexibility in the possibilities to augment with manual dot placement for obscured areas, and leapfrogging the tower for tackling massive projects. You’re buying workflow simplicity and an easier degree of flexibility in your scanning.
The few downsides: it is a cumbersome system to set up, and getting the best out of the freedom of movement it can offer requires you have space – distance – to put between the tower and scanner. The Windows tax is a potential dealbreaker, and a surprising one Revopoint should surely address.
One soft question mark is that for all the claims of metrology-grade accuracy, there’s a lack of published, lab-verified data to say this is necessarily the one for critical, million-dollars-on-the-line situations. The same goes for most scanners at this price point, being fair to Revopoint. The company points out that the Trackit is “CNAS Certified Industrial Grade Accuracy” – an internationally recognized seal of approval from the China National Accreditation Service for Conformity Assessment – validating its possible accuracy, but my, your, and anyone else’s regular usage is likely to stray from the optimal, lab-conditions that provide such certification.
Letting it warm up and keeping it regularly calibrated (particularly after a big change in the weather/temperature) will help, but even things like choosing too small a point distance when you fuse your point cloud will introduce noise. For aesthetic scans, it’s small beer. For high precision work, we couldn’t say.
Ultimately, the Trackit is a recommendation for the easy-breezy workflow, convenience, and CAD-friendly software possibilities with what you scan – a compelling choice for medium-to-large-sized scans. If you know you’ll need to move around, the system’s outside-in setup is very handy, though we think its superpower for some folks will be mounting the tracking tower to a wall to create a dedicated scan zone, with not a sheet of tracking dots in sight.
Get our bi-weekly newsletter for the latest 3D printing news, deals, and guides.
We do not share your information! You can unsubscribe at any time.
By subscribing you agree to our Privacy Policy.
Recent news:
License: The text of "Revopoint Trackit Review: Heavyweight 3D Scanner Lightens Your Workload" by All3DP is licensed under a Creative Commons Attribution 4.0 International License.
CERTAIN CONTENT THAT APPEARS ON THIS SITE COMES FROM AMAZON. THIS CONTENT IS PROVIDED ‘AS IS’ AND IS SUBJECT TO CHANGE OR REMOVAL AT ANY TIME.