From Damaged Propeller to 3D Printed Propeller in 4 Days With Specialized Reverse Engineering Software

A Brazilian engineering team used 3D scanning, scan-to-CAD software, and ABS 3D printing to recreate a damaged four-blade propeller for an industrial cooling system in record time.
When a small plastic component fails inside an older industrial machine, the repair can quickly become more complicated than the part itself. With replacement parts unavailable for a legacy machine, it can sit idle while operators search for a solution.
That was the problem facing a machining operation in Brazil, where a four-blade propeller used in a CNC machine’s cooling unit had reached the end of its service life. The part, responsible for helping cool the machine’s oil exchanger, had already been repaired several times with silicone rubber. By the time it reached RVF3D, a Brazilian engineering and 3D design studio based in Rio de Janeiro, for repair, the propeller was visibly damaged, uneven, and no longer a suitable candidate for another patch.
Instead of trying to repair the old component again, RVF3D set out to recreate it instead not by using traditional CAD software, but with a solution designed specifically for reverse engineering parts.
From Damaged Propeller to 3D Scan
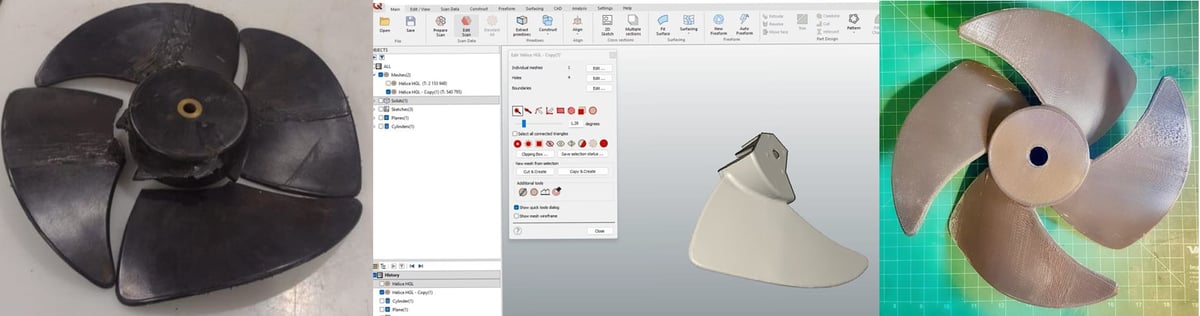
The first challenge was capturing the part accurately. The propeller’s black plastic surface and layers of previous repair material made it difficult to scan cleanly, so the team first sanded the blades to remove the worst surface defects. Blue scanning spray was then applied to make the surfaces less shiny and easier to capture.
Using a high-resolution 3D scanner, the company scanned both sides of the propeller on a manual turntable. The resulting scan was processed in the scanner’s software and exported as an STL mesh.
That mesh, however, was only the starting point. Since every blade on the original part showed some damage, the team selected the best-preserved blade as the reference geometry for the reconstruction with the aim of duplicating it in the final design.
Rebuilding the Part in CAD
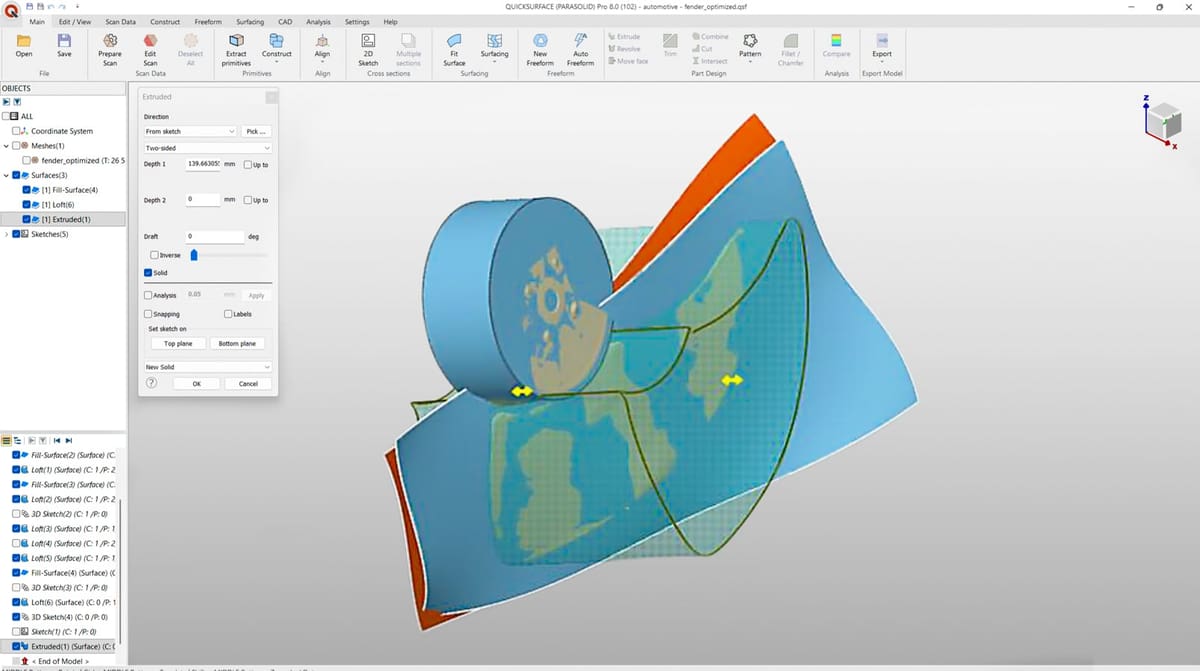
For this, RVF3D uploaded the SLT mesh to Quicksurface Pro, a CAD-like software specifically designed for reverse engineering. The platform offered tools to clean up the scan data, smooth the mesh, remove remaining imperfections, and align the propeller model to the XYZ axes. The team rebuilt the part as an editable CAD model inside Quicksurface in just a few hours.
RVF3D co-founder Ricardo Freitas says a software tool like Quicksurface offers more specialized reverse-engineering features compared to a pure CAD tool, like Solid Edge, which is an environment for creating and manufacturing new or modified designs, not creating a part from an existing part scan.
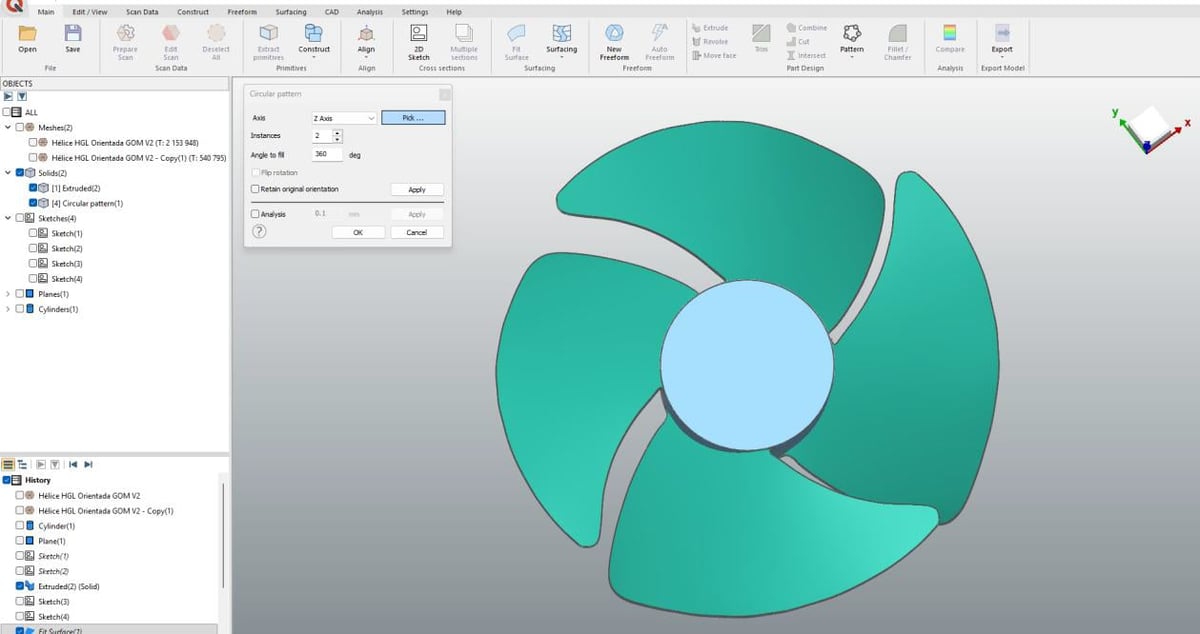
The workflow in Quicksurface included fitting surfaces over the best-preserved blade, sketching and extruding the central hub, trimming surfaces into a clean solid body, and using a circular pattern to recreate the propeller’s four-blade layout. Internal ribs and additional details were sketched and added to match the original part as closely as possible.
The finished CAD model reportedly stayed within 0.10 mm of the scanned STL data. Using the completed blade, they used the circular pattern inside Quicksurface to generate three more blades from the repaired blade.
Printing the Replacement in ABS
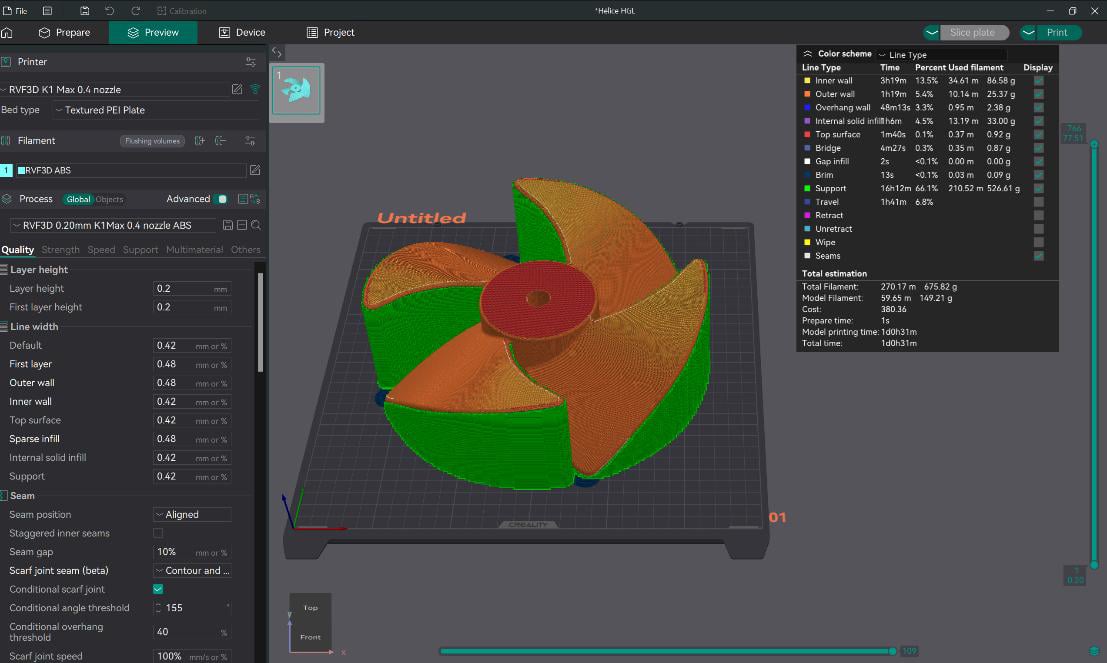
Before printing, the team improved the design in Quicksurface. They reinforced the junction between the blades and the central hub by adding fillets, thickened the internal rib walls, and smoothed the leading and trailing edges of the blades. Once the model was complete, RVF3D exported STEP and STL files and prepared the print in Orca Slicer. The replacement propeller was printed on an upgraded Creality K1 Max using ABS Premium MG94 black filament.
The geometry was not especially support-friendly, and the one-week deadline left little time for extensive design-for-additive-manufacturing optimization. As a result, the print required a significant amount of support material and ran for more than 24 hours.
Even so, the finished replacement was delivered within four days of RVF3D receiving the damaged original.
Before installation, the customer tested the printed propeller on a lathe at 1,800 RPM to check its balance and performance under rotation. The part passed the test and was approved for use in the cooling unit.
For older industrial equipment, that kind of turnaround is the real story. A component that might otherwise have caused prolonged downtime was reverse engineered, digitally reconstructed, strengthened, printed, and tested in less than a week.
It’s a practical example of how 3D scanning and additive manufacturing can help keep legacy machines running, especially when the original spare-parts supply chain has disappeared. Reverse engineering is more than just scanning an object: the critical work happens in turning imperfect physical geometry into a clean, editable, manufacturable digital model.
You May Also Like:


License: The text of "From Damaged Propeller to 3D Printed Propeller in 4 Days With Specialized Reverse Engineering Software" by All3DP Pro is licensed under a Creative Commons Attribution 4.0 International License.