Beginner or Expert? 25 Cool Arduino Projects, From Blinking LEDs to Home Robots

Looking for an Arduino project suited to your skills? Check the best for beginners and expert makers.
Arduino open-source boards remain the default “brain” for almost any electronics project. Reliable, affordable, and backed by a Project Hub database of more than 5,350 builds.
We’ve scrubbed the internet, from Arduino’s own Project Hub and GitHub to Reddit, Printables, and Instructables, for the best new projects worth building right now, and narrowed it down to 25. From a 3D-printed bipedal robot to a plastic-filtering robot fish, these are the ones that made the cut.
Got an Arduino board waiting for a project? Scroll on.
Otto DIY Robot
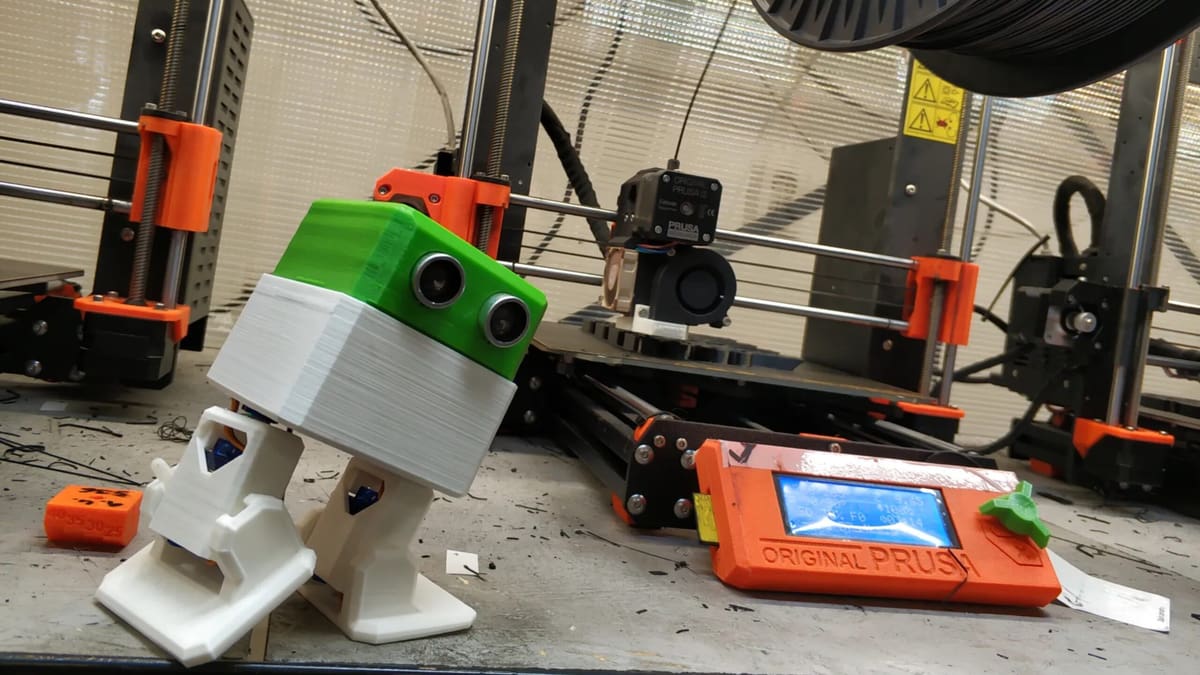
If you’ve never combined an Arduino with a 3D printer before, Otto DIY is hard to beat.
Otto is a small bipedal robot built around an Arduino-compatible Nano ATmega 328, four micro servos, an ultrasonic distance sensor, and a buzzer. Its printed body consists of a head, body, legs, and feet, with the servos acting as joints that allow it to walk and dance. The ultrasonic sensor lets it react to obstacles rather than blindly marching into the nearest wall.
One of Otto’s biggest advantages is documentation. The open-source repository contains printable files, CAD, Arduino code, libraries, assembly information, and additional how-to material, making it much easier to reproduce than many one-off robot builds.
Once the standard version is working, there are also plenty of community modifications and extensions to explore.
What we like: Few projects introduce 3D printing, electronics, programming, sensors, and mechanical assembly this neatly in one package.
Who made it? Otto DIY community
More information: 3D printing files on Printables | CAD, code & guides on GitHub
Skill level: Beginner
LED Fidget Keychain
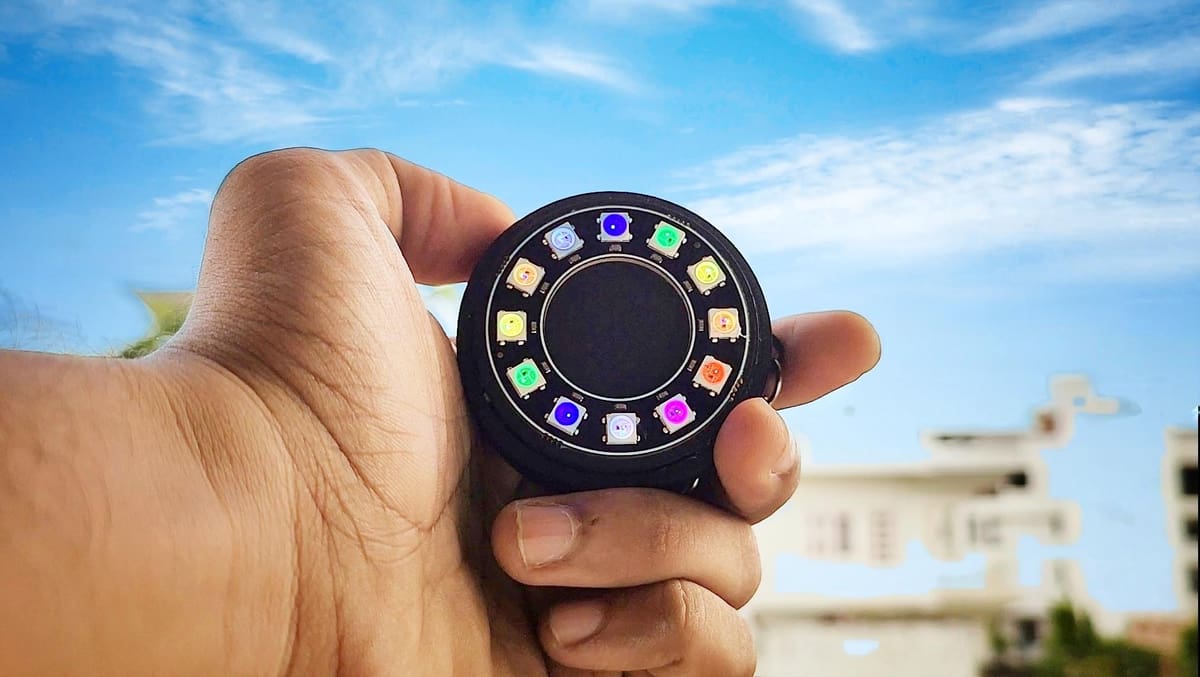
Maker Vishal Soni packed an entertaining little game into a keyring. So, if you’re bored while commuting or in a waiting room, you’ll always have something to grab your attention.
The game itself is simple. First, an LED ring will display a random color. Then the game starts, LEDs light up, and once the color is displayed, you press the button. Bravo, you scored.
The project may look complicated, but it’s not rocket science. Component-wise, Vishal used an Arduino-based Attiny85, an LED ring, a rechargeable battery pack, and a button, which are put into a 3D printed case. Programming the Attiny85 is easy, as the code is already written, and once you’re done, you can start assembling the components.
What we like: You can admire your maker skills whenever you use your keys.
Who made it? Vishal Soni
More information: Instructables
Skill level: Beginner
Hollow Clock 4
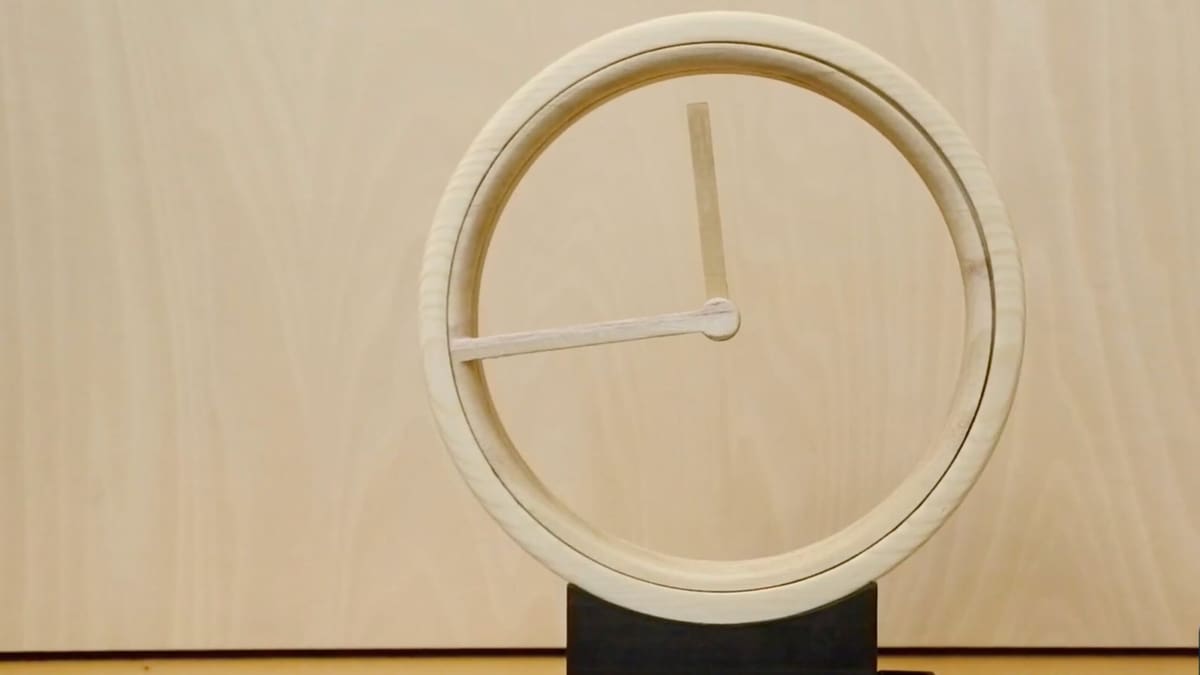
At first glance, the Hollow Clock appears to have an hour hand floating in mid-air.
The illusion comes from an ingenious printed mechanism. A stepper motor drives a system of rings and gears, while a magnet transfers motion to the seemingly unsupported hour hand.
The Arduino-compatible Hollow Clock 4 design uses a Nano and 28BYJ-48 stepper setup, and the project files include Arduino sketches as well as the printable components. The design has proved particularly popular with the 3D printing community; one showcase of Hollow Clock 4 attracted more than 1,700 votes on Reddit.
There’s now a newer Hollow Clock V as well, but Hollow Clock 4 remains the more relevant version here because of its Arduino-based electronics.
What we like: It’s an excellent example of relatively simple electronics becoming much more impressive through clever mechanical design.
Who made it? Shiura
More information: STL files & Arduino files on Thingiverse
Skill level: Intermediate
SMARS Modular Robot
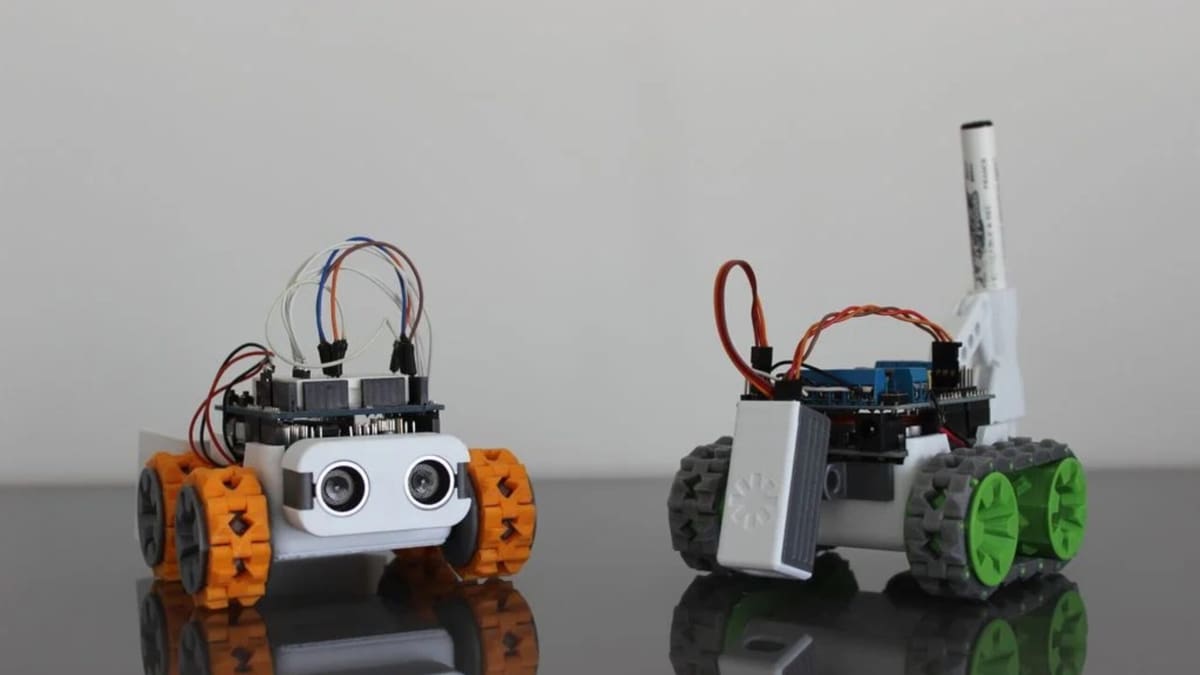
SMARS (Screwless/Screwed Modular Assemblable Robotic System) is more of a robotics platform than a single finished robot.
Its printed chassis, wheels, tracks, and sensor mounts are designed so makers can easily change the configuration or develop their own modules. The original design deliberately uses relatively few components and can even be assembled without glue, soldering, or screws in some configurations.
Add an Arduino Uno, two motors, and sensors, and the result can become an obstacle-avoiding rover, line follower, Bluetooth-controlled vehicle, or something entirely different.
What we like: Rather than simply following instructions once, SMARS encourages you to design new modules and turn the original project into your own.
Who made it? Tuitxy
More information: STLs & documentation on Cults | Thingiverse model
Skill level: Beginner
Automatic Pet Feeder
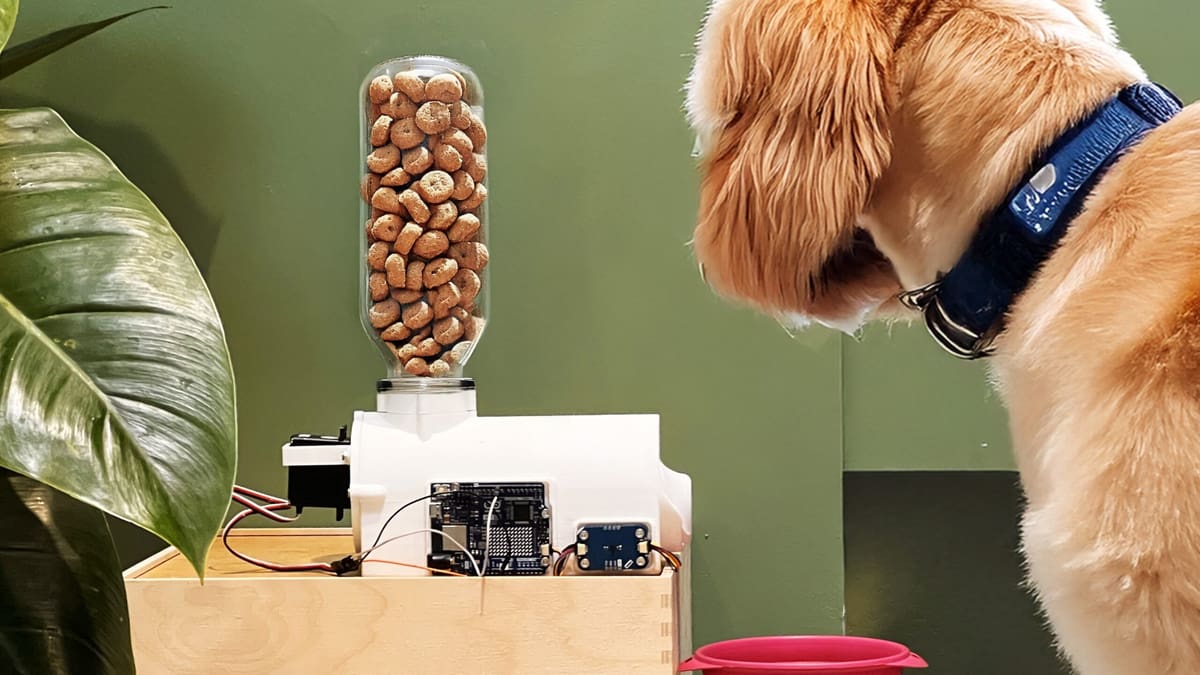
An Arduino can also supervise someone else’s dinner.
Arduino’s 3D printed pet feeder uses a servo-operated dispensing mechanism to release food automatically. The current build uses an Uno R4 WiFi alongside distance sensing, LEDs, a buzzer, and a continuous-rotation servo.
The printed components form the dispensing mechanism itself rather than merely providing a box for the electronics, making this a particularly clear example of electronics and additive manufacturing working together. Arduino’s Project Hub provides code and downloadable project resources, and the build has attracted close to 50,000 views.
It could also be adapted relatively easily: change the hopper geometry, alter portion sizes, add scheduling logic, or integrate a different sensor.
What we like: It’s practical, easy to understand, and gives the printed parts an actual mechanical job.
Who made it? Arduino
More information: Build guide, code & files on Arduino Project Hub
Skill level: Beginner
Programmable Modular Lighting
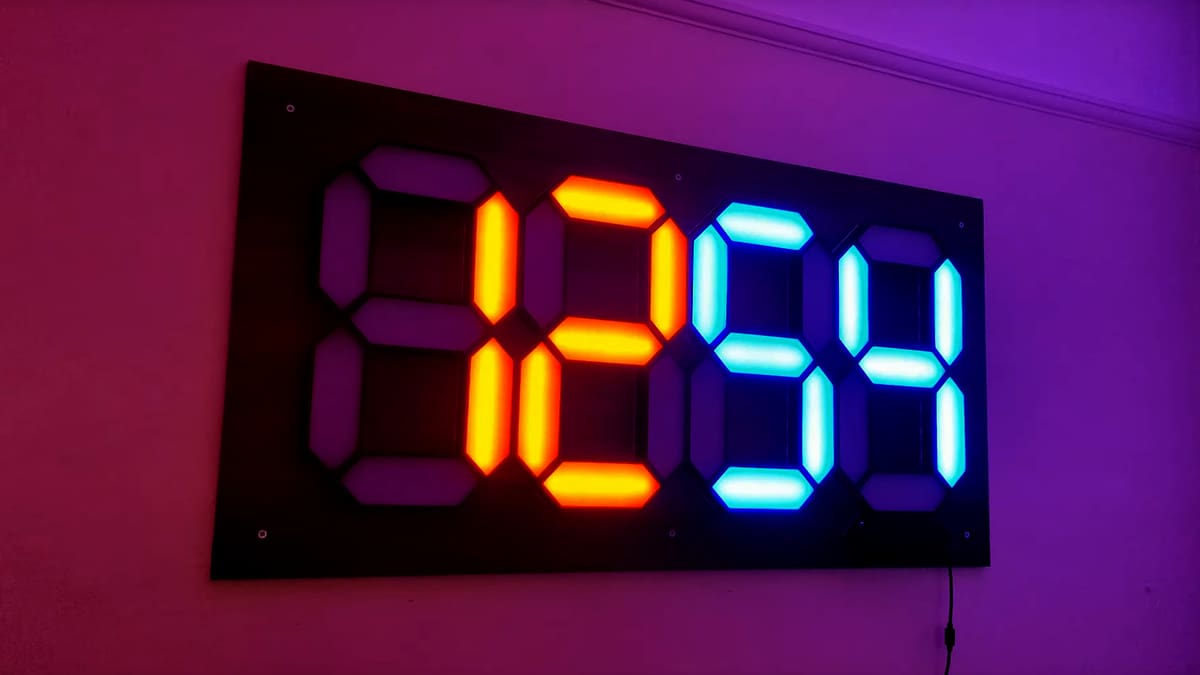
Addressable LEDs are an Arduino favorite, but putting them behind a custom 3D printed structure makes things considerably more interesting.
Projects With Red’s modular lighting system uses printed segments to hold addressable RGB LEDs in configurable patterns. The same modules can also be assembled into a four-digit display capable of showing the time, temperature, humidity, and other information.
The project’s GitHub repository includes its printable models, code, wiring information, and component list, with an accompanying video explaining assembly and programming.
The project currently uses an ESP32 rather than an official Arduino board, but it’s programmed using the same maker ecosystem and is a strong example of where Arduino-style projects have evolved.
What we like: It looks like a polished consumer product but remains highly customizable in both hardware and software.
Who made it? Projects With Red
More information: 3D models, code & instructions on GitHub | Build video on YouTube
Skill level: Intermediate
The Great Resistor Desk Lamp
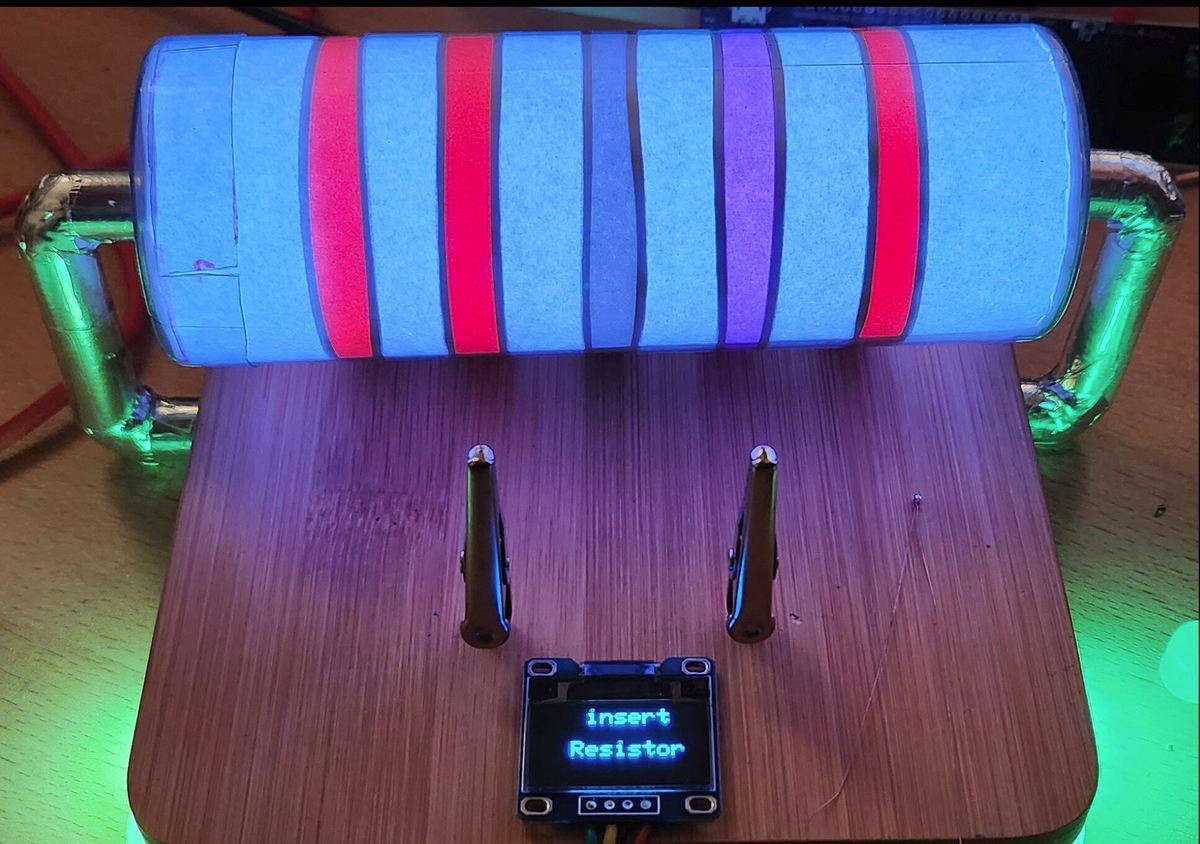
The Great Resistor isn’t simply a lamp shaped like an electronic component. It can actually measure one.
If you’ve ever wondered why art can’t be practical, you’ll love The Great Resistor. On the surface, it’s a desk lamp shaped to mimic an oversized through-hole resistor, with an Arduino Nano hidden inside to control the color bands, which denote the part’s resistance and tolerance.
Put a real resistor between two metal pillars, though, and the microcontroller reads its resistance value – displaying it on a compact screen towards the bottom of the lamp while automatically adjusting the large-scale color bands to match. “To this day, I still have trouble to decode the color code of resistors,” Oeve writes. “I hope this device will help me to learn them properly.”
It’s an unusually good combination of practical electronics and deliberately oversized industrial design, and the printed body is essential to both the joke and the function.
What we like: It transforms something many makers struggle to memorize into an interactive desk object.
Who made it? Jayson Oeve
More information: STLs, electronics & build instructions on Instructables
Skill level: Intermediate
Digital Filament Spool Scale
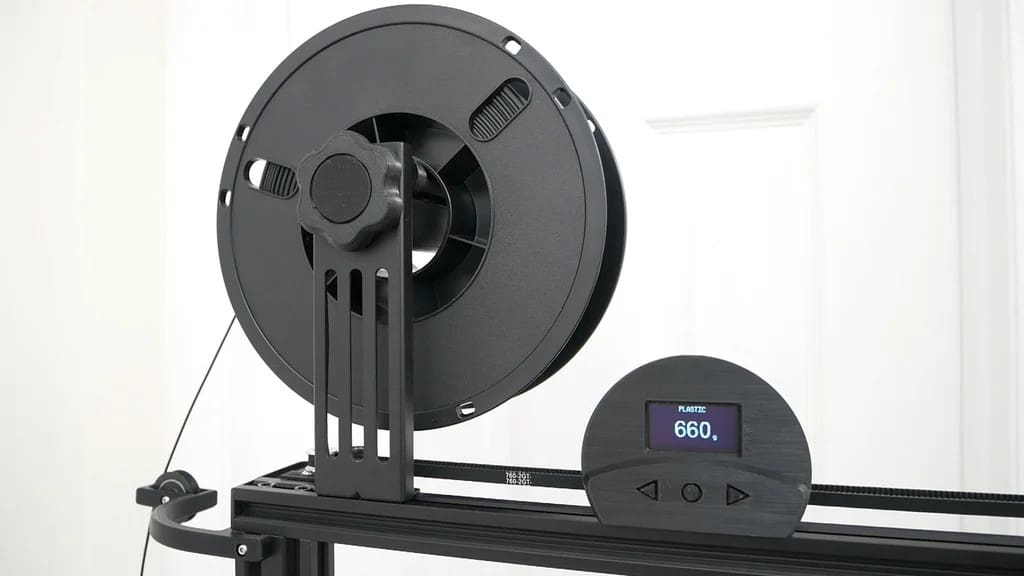
Few Arduino projects are as directly useful to a 3D printer owner as this one.
If you’ve ever wanted a way to see how much 3D printing filament you have left on a spool at a glance, this project from maker InterlinkKnight can help. On the surface, it’s a simple spool holder designed to feed filament into the 3D printer of your choice smoothly; internally, an Arduino Nano connected to an OLED display and HX711 module with a load cell can measure the weight of the installed spool and its filament to provide an up-to-the-second look at how much you’ve got left.
A clever memory system allows you to tare an empty spool and subtract it from the reading, while multiple profiles mean you can switch filament spools without losing track of the tare weight of each spool. Everything is controlled via a simple three-button control panel underneath the OLED display, with InterlinkKnight promising there’s no need to edit the Arduino sketch or to even calibrate the load cells.
What we like: You use your 3D printer to make a tool that improves your 3D printing workflow.
Who made it? InterlinkKnight
More information: STL files, code & instructions on Instructables
Skill level: Intermediate
OG Star Tracker
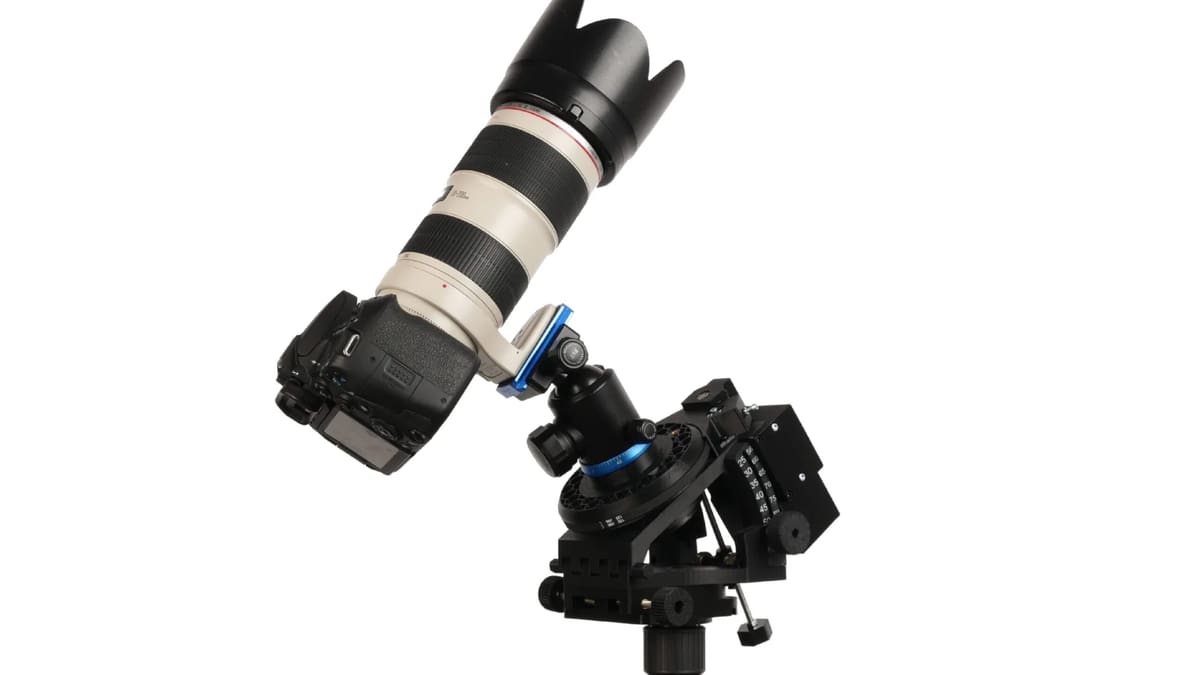
Astrophotography gets difficult when exposures become long enough for Earth’s rotation to turn stars into streaks.
The OG Star Tracker tackles that problem with an Arduino-controlled, largely 3D printed equatorial tracking mount. Once aligned, its motorized mechanism moves a camera to compensate for the Earth’s rotation.
Designer Ondra Gejdos built the project around affordability and home manufacture, providing printable files, firmware, a parts list, assembly information and using simple parts like Arduino Nano. The project has continued to develop, with its GitHub repository receiving new firmware releases as recently as March 2026.
What we like: This isn’t merely an electronics demonstration – it produces genuinely useful astrophotography equipment.
Who made it? Ondra Gejdos / OG Star Tech
More information: Printable parts on Printables | Firmware & project files on GitHub
Skill level: Intermediate
Animatronic Eyes & Face

For a different kind of servo project, how about a pair of mechanical eyes that wake up when someone walks past?
Maker 101’s animatronic face combines an Arduino Nano, five MG90S servos, a PIR motion sensor, and a small MP3 player. Printed eyeballs, eyelids, universal joints, bars, and holders transform those components into a face capable of looking around, blinking, and playing sounds when movement is detected.
Using an Arduino Nano, the Arduino Project Hub tutorial provides the source code and downloadable STL files directly on the build page, including the eye holder, eyelids, eyeballs, face, joints, bars, and rear housing.
What we like: It teaches synchronized servo motion and mechanical linkages without requiring you to construct an entire robot.
Who made it? Maker 101
More information: Code, STLs & complete guide on Arduino Project Hub
Skill level: Intermediate
3D Printed CNC Plotter
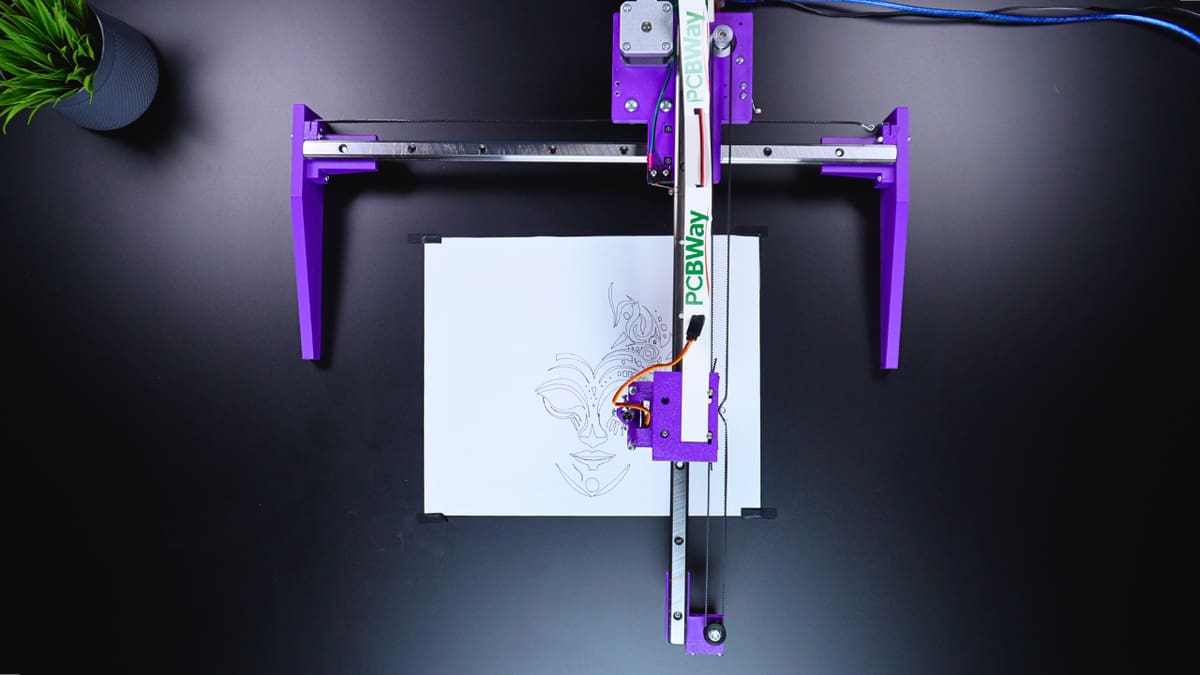
A 3D printer is a computer-controlled motion system, so it’s fitting to use one to manufacture another computer-controlled motion system.
Maker 101’s CNC plotter uses two NEMA 17 stepper motors, linear rails, GT2 belts, and a servo-operated pen lift inside a structure assembled from numerous printable components.
The machine accepts G-code and can reproduce drawings generated using software such as Inkscape. Its Arduino Project Hub guide supplies GRBL-based software and a substantial collection of downloadable STL files for the chassis, brackets, belt connectors, pen mechanism, and other components.
Building it introduces many of the same concepts found inside your 3D printer: stepper motors, linear motion, belts, limit switches, and G-code.
What we like: You learn how CNC machines work by constructing one.
Who made it? Maker 101
More information: STLs, GRBL code, BOM & instructions on Arduino Project Hub
Skill level: Intermediate
Compact 3D Printed Robotic Arm & Controller
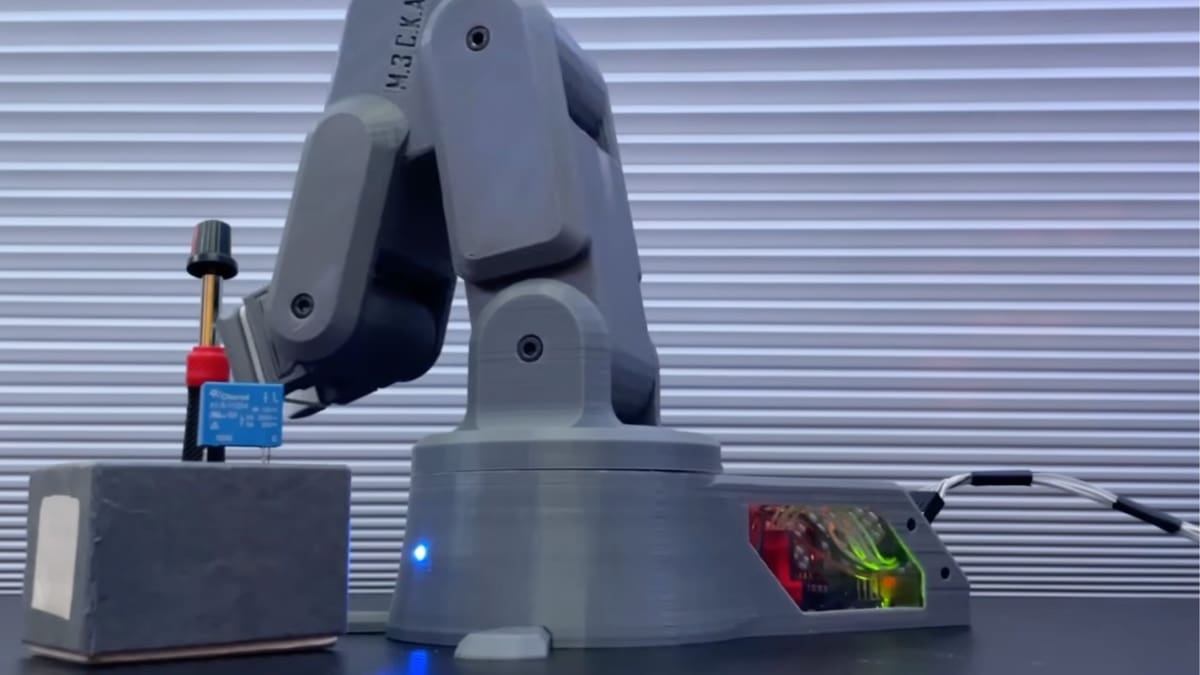
There are hundreds of printable robot arms online, so documentation makes a big difference when choosing one to actually build.
This compact arm combines printed structural components with MG90- and MG996R-class servos, a PCA9685 servo controller, and an Arduino Leonardo. More unusually, the maker also designed a dedicated physical controller for operating the arm rather than relying entirely on a PC.
The CAD and code are available through GitHub, while the Arduino Project Hub entry provides the component list and project overview.
What we like: Building both the arm and its controller makes it feel like a complete machine rather than just a collection of moving joints.
Who made it? Jon Serra
More information: Arduino Project Hub build page | CAD & code on GitHub
Skill level: Intermediate
InMoov Robotic Hand & Forearm
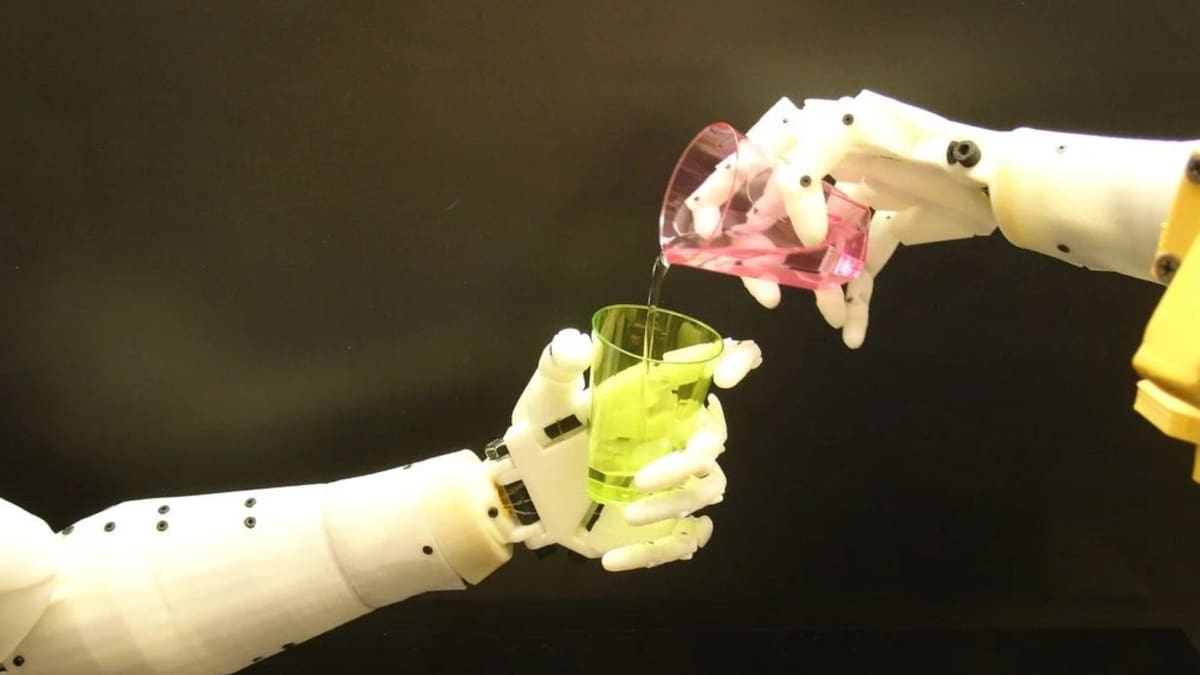
If one small robot arm isn’t ambitious enough, InMoov offers considerably more room for expansion.
Created by Gaël Langevin, InMoov is an open 3D printable humanoid robot project whose individual components can be produced using desktop printers. Arduino boards and servo motors bring the printed joints to life, with tendon-like cords commonly used to actuate the fingers.
You don’t have to print the entire humanoid. A hand and forearm make an impressive project on their own, and makers continue adapting them more than a decade after the original files appeared.
A 2026 community build, for example, used an Arduino Uno, six servos, braided fishing line, and InMoov’s Thingiverse files to create a functioning hand and forearm.
What we like: You can begin with a single hand and potentially keep expanding until you’ve built a human-sized robot.
Who made it? Gaël Langevin
More information: Original hand files on Thingiverse | InMoov project website
Skill level: Advanced
PS4-Controlled Robot Dog
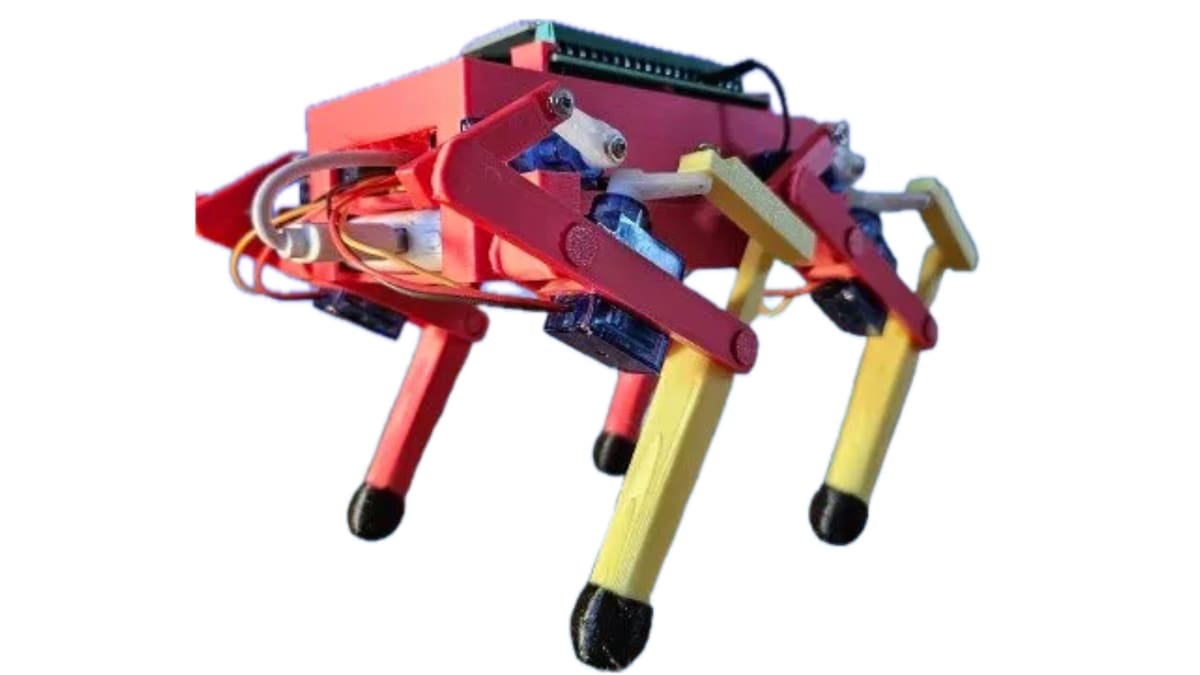
Wheeled robots are comparatively easy. Legs make things much more interesting.
This printable robot dog uses an ESP32 programmed through the Arduino IDE and eight SG90 servos – two for each leg. A PlayStation 4 controller communicates with the ESP32 over Bluetooth, allowing the robot to walk forward and backward, rotate, sit, and stand.
MakerWorld designer espRyk provides the printable model together with a parts list, wiring instructions, servo pin assignments, and programming documentation. The listed print profile takes about 7.5 hours over two plates.
Because battery position and weight can affect the gait, there’s also plenty of scope for mechanical and software experimentation once the standard robot works.
What we like: It introduces gait programming and multi-servo coordination without requiring specialist robotic actuators.
Who made it? espRyk
More information: 3D files, BOM & instructions on MakerWorld
Skill level: Intermediate
3D Printed Self-Balancing Robot
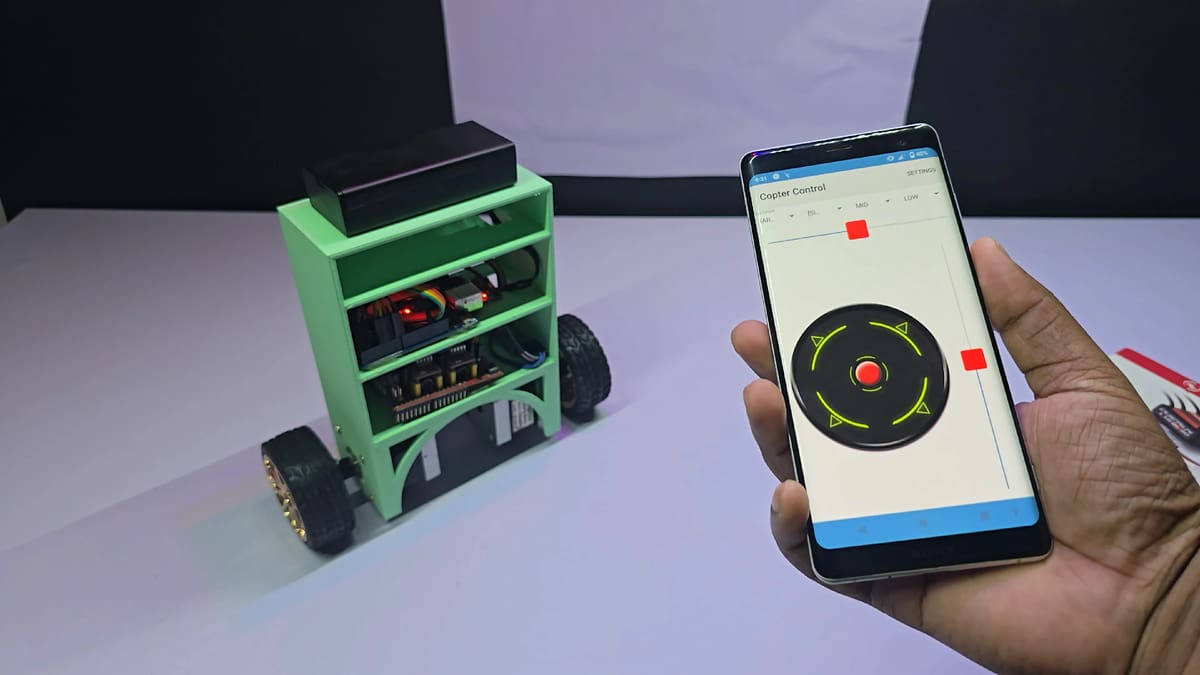
A two-wheeled balancing robot is effectively an inverted pendulum constantly trying to fall over, and constantly correcting itself.
That makes it an excellent control-systems project.
This 2026 build combines an Arduino Uno, an MPU6050 motion sensor, a CNC Shield, A4988 stepper drivers, NEMA 17 motors, a Bluetooth module, and a printed chassis. Its Arduino repeatedly monitors the robot’s angle and adjusts the motors to keep the machine upright.
The accompanying tutorial covers assembly, wiring, BalancingWii firmware, motor direction, MPU6050 calibration, Bluetooth control, and PID tuning. The creator also provides STL files, firmware, and a circuit diagram through the resources linked with the video.
What we like: It demonstrates the difference between simply commanding a motor and using feedback to control a dynamic system.
Who made it? Robot LK
More information: Full build tutorial & download links on YouTube
Skill level: Advanced
Formula 1 Steering Wheel
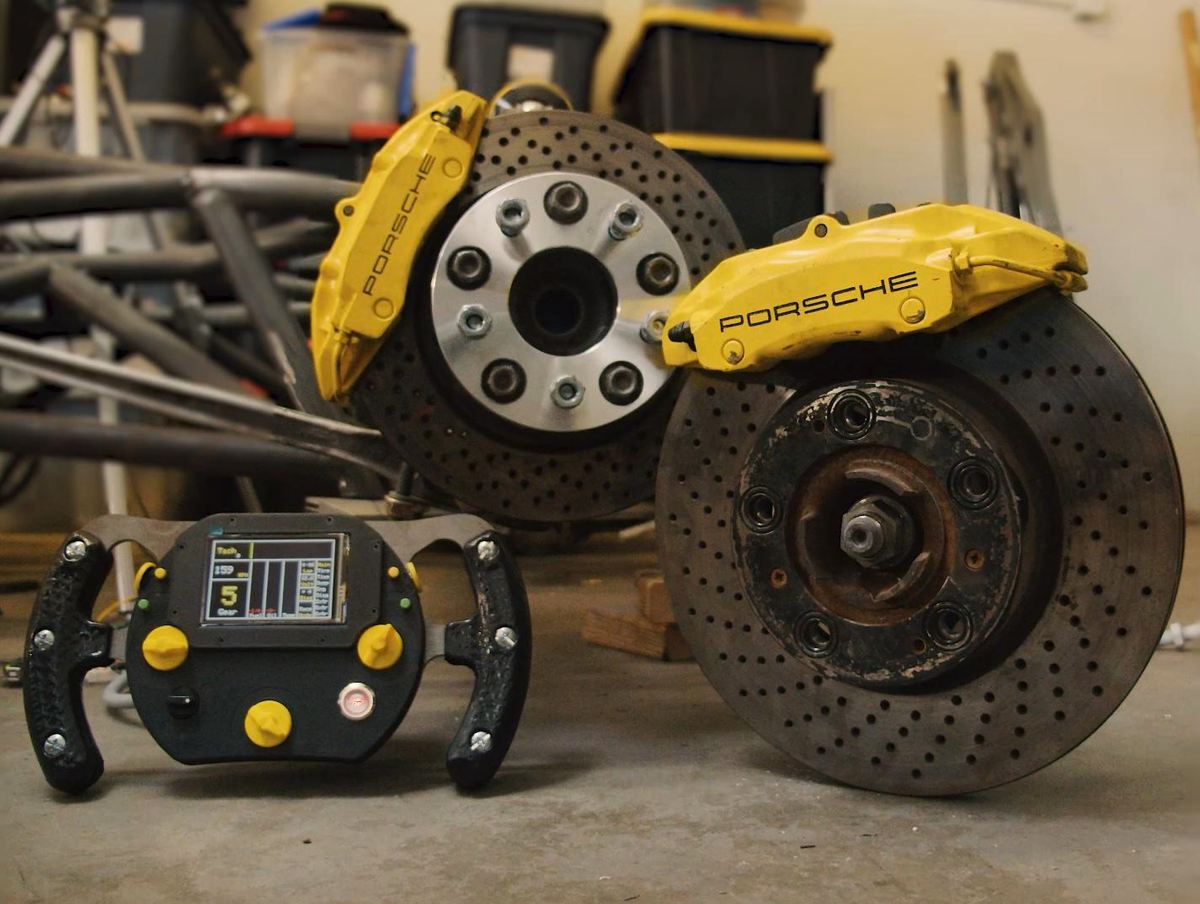
DIY sim-racing controllers are already popular, but Wesley Kagan’s Formula 1-inspired steering wheel takes the idea considerably further.
The project integrates Arduino Micros, a display, buttons, rotary controls, and 3D printed TPU grips into a custom steering system. An Arduino Mega also gathers sensor information for the wider vehicle electronics.
Not everything comes directly off the print bed: parts of the structure use laser-cut or machined components. Still, the design is an excellent demonstration of custom manufacturing around a set of electronic controls. Arduino itself featured the project and its electronics in detail.
Even if you aren’t building a V12-powered race car, there’s plenty here to inspire custom sim-racing controllers and other specialized interfaces.
What we like: It demonstrates one of 3D printing’s biggest advantages: designing controls around the user rather than adapting an off-the-shelf interface.
Who made it? Wesley Kagan
More information: Original build | project write-up on Arduino Blog
Skill level: Advanced
Music Reactive LED Strip
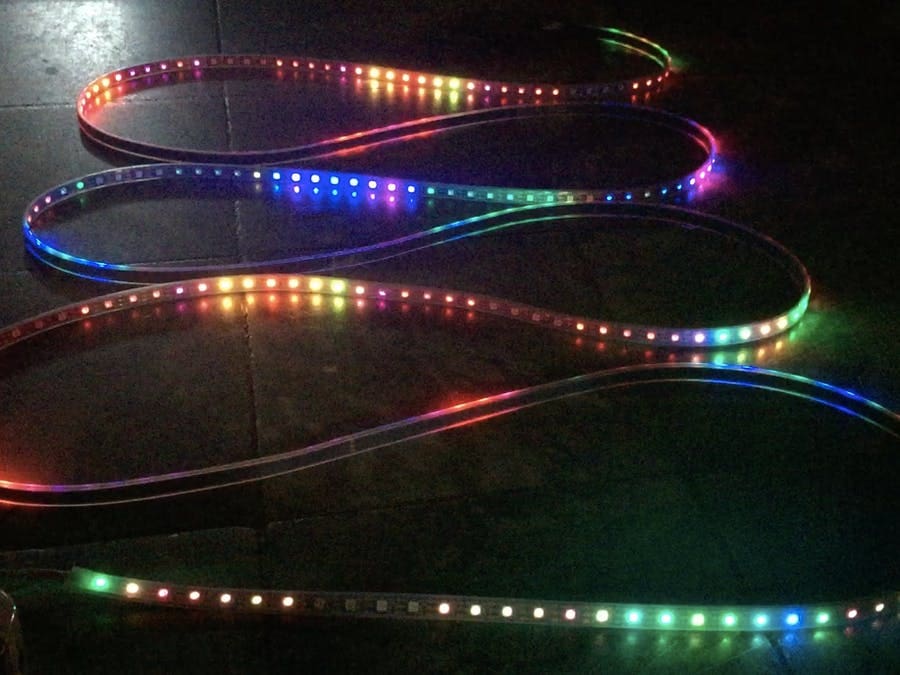
This sound-reactive LED strip build dances to the music and is relatively easy to assemble. A microphone picks up the music, passing the information to an Arduino R3, which then regulates an LED strip’s brightness and color scheme.
The electronics are relatively simple, making this an approachable introduction to reading sensor input and controlling individually addressable LEDs. It also leaves plenty of room for experimentation with different animations, sensitivity settings, strip lengths, and reactions to music.
What we like: It turns a small collection of inexpensive Arduino components into a lighting effect that reacts to the room rather than simply repeating a programmed animation.
Who made it? DIY Builder
More information: YouTube
Skill level: Beginner
Automated Bean Sprouter
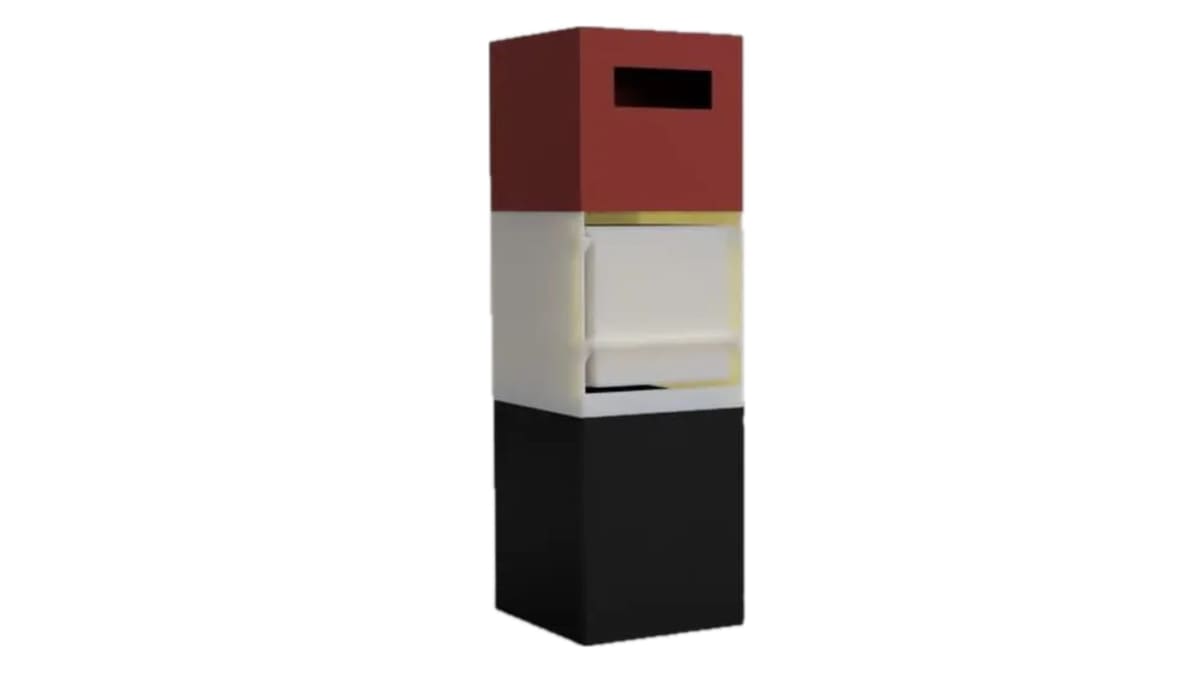
This 3D printed sprouting machine automates one of the repetitive parts of growing edible sprouts: rinsing them regularly.
An Arduino Uno controls a water pump that periodically sends water through the seed tray before allowing it to drain away again. The printed structure holds the trays and watering system together as a purpose-built appliance rather than treating the printer as an afterthought.
The basic concept also leaves plenty of space for experimentation. Sensors could be added for water level, humidity, temperature, or light, while the timing could be adjusted for different crops.
“Sprouts are rich in minerals and vitamins and can be eaten in soups, salads, and stir-fry,” Maler, Nico Pretorius, explains. “Sprouting seeds is easy; in short, the seeds get soaked in water for a few hours. I normally do mine overnight. After that, it is rinsed and placed in a container; it is rinsed regularly until it is ready for harvest. This automated sprouter does the watering bit for you. Every hour the water pump switches on for 10 seconds, long enough to cover the seeds in the drawer with water.”
What we like: A refreshingly practical Arduino automation project that doesn’t require building another rover.
Who made it? Nico Pretorius
More information: Printable files & complete guide on Instructables
Skill level: Intermediate
Gillbert, the Plastic-Filtering Robot Fish
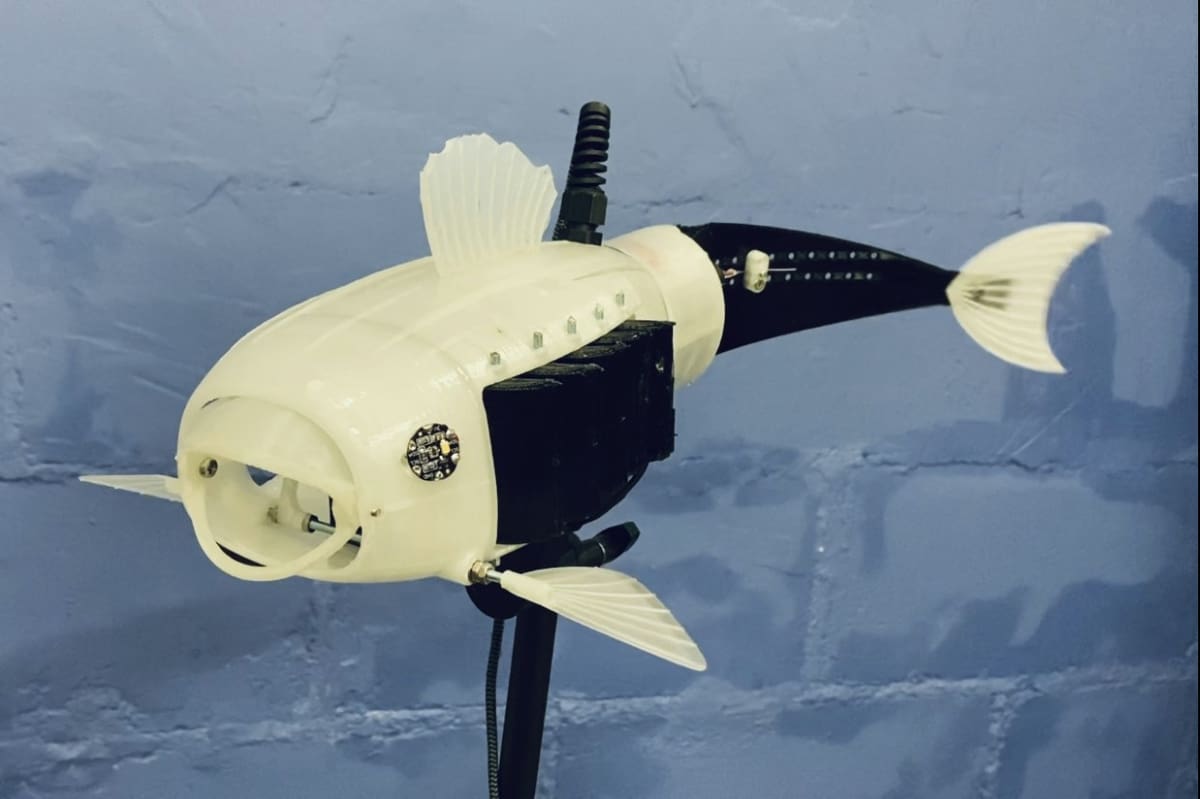
Gillbert is among the more unusual projects to combine Arduino and additive manufacturing.
Originally proposed by Eleanor Mackintosh for the Natural Robotics Contest, the idea was developed into a working 3D printed robotic fish by Robert Siddall and colleagues.
An Arduino Nano 33 IoT controls the prototype connected to an XBox One controller, while a mesh-lined gill system captures plastic particles from water as the fish operates. The design was released as an open project so other makers and researchers can download the CAD, manufacture the robot, and continue experimenting with it.
It’s considerably more complicated than assembling a hobby rover, but it demonstrates how accessible manufacturing and microcontrollers can contribute to experimental environmental robotics.
What we like: It’s imaginative, reproducible, and aimed at a real-world problem.
Who made it? Eleanor Mackintosh, Robert Siddall, and collaborators
More information: Download the robot CAD on GrabCAD | project overview on Arduino
Skill level: Advanced
Open-Source Arduino/ROS2 LiDAR Robot
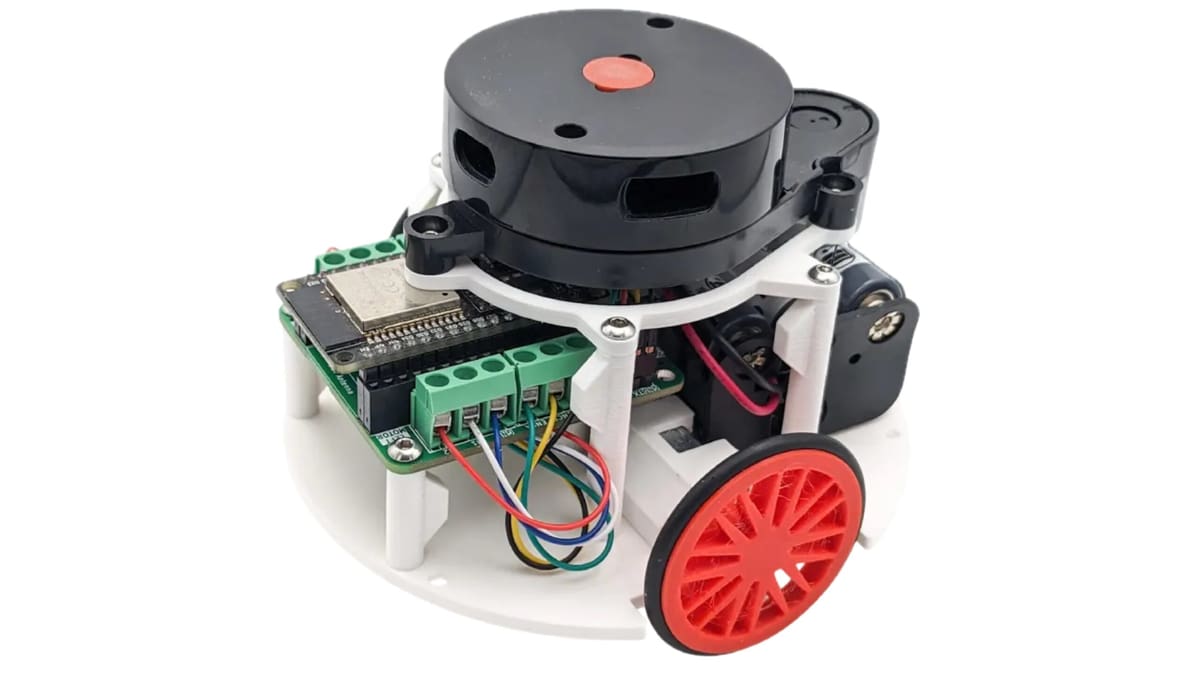
This project shows how far the Arduino ecosystem can stretch beyond blinking LEDs and basic obstacle avoidance.
An ESP32 runs Arduino-based firmware to collect data from a 360-degree LDROBOT LiDAR sensor and control two encoder-equipped motors. The sensor data is streamed over Wi-Fi to a computer running ROS2, where mapping and navigation software calculate where the robot should move before sending commands back to the ESP32.
The creator designed the robot body in Fusion 360 and 3D printed it.
What we like: It provides an unusually accessible bridge between hobby Arduino projects and the software stack used in larger autonomous robots.
Who made it? Maker’s Pet / Kaia.ai
More information: Step-by-step tutorial on Maker’s Pet | Arduino/micro-ROS firmware on GitHub | ROS 2 software on GitHub | Motor-driver schematic on GitHub
Skill level: Advanced
Split-Flap Display
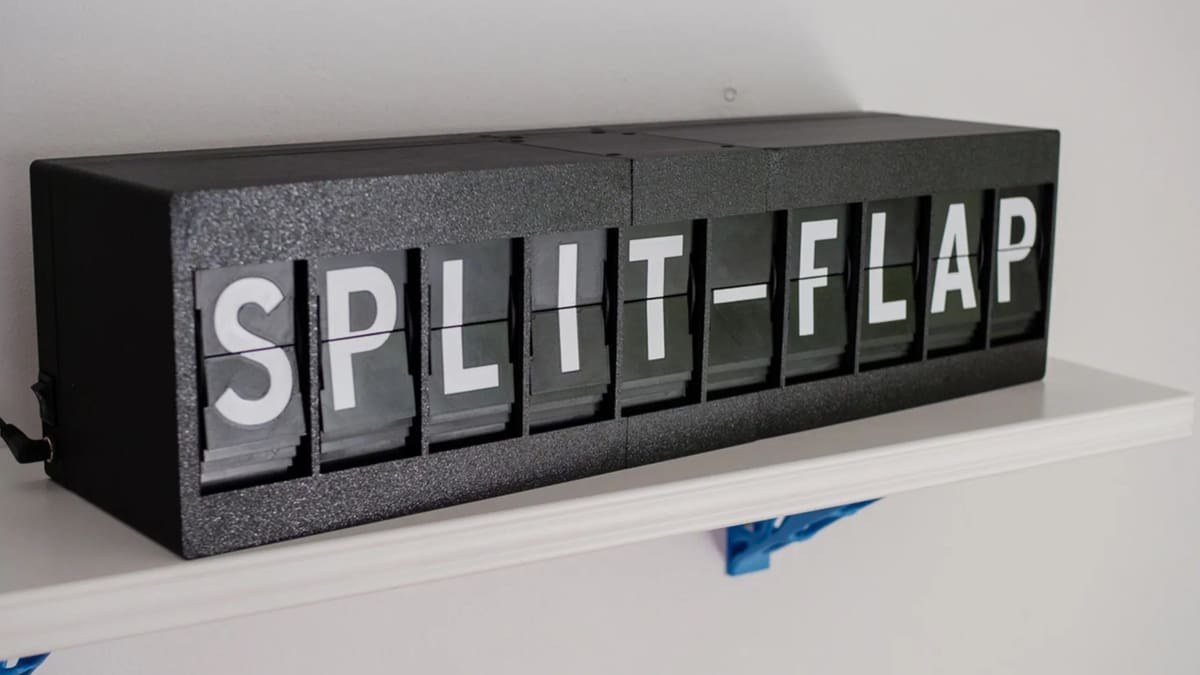
Long before LED matrices became ubiquitous, split-flap displays showed arrivals, departures, and other information by physically flipping through printed characters. David Kingsman’s project recreates that wonderfully mechanical effect with 3D printing and Arduino.
Each display unit contains a drum of printed character flaps driven by a 28BYJ-48 stepper motor. An Arduino Nano controls the motor through a ULN2003 driver, while a Hall-effect sensor and magnet give the mechanism a reference position so it can find the correct character after startup. Multiple units can be joined together to spell words, display the time, or show other information.
An ESP-01 acts as the master controller, providing a web interface and communicating with as many as 16 Arduino-powered display units over I2C. The project is particularly print-heavy: the case, drums, frames, and even the two-color character flaps are designed to be 3D printed. The downloadable documentation also covers custom PCBs, assembly, programming, and calibration. The design took second place in Prusa’s 2021 Time Keepers contest.
What we like: The clicking, flipping mechanism gives this project a physical personality that an ordinary LCD or LED display simply can’t replicate.
Who made it? David Kingsman
More information: 3D printing files & build instructions on Printables | Arduinocode & PCB files on GitHub
Spectrum Analyzer
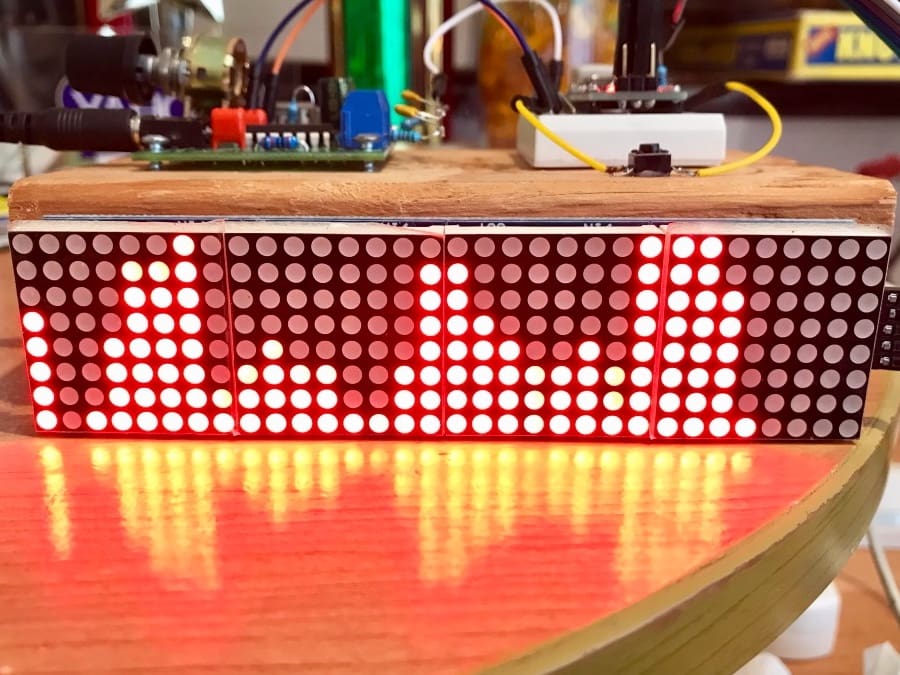
Every serious professional music studio used to have a visualizer bar resting on their mixing console. It showed how much punch a certain frequency band delivered, ranging from the ultralow bass frequencies (on the right end) to the tones only bats can hear (on the left).
These bars came with a big price tag, but now, you can build one with an Arduino R3 , some electrical components, and LED matrix elements. It will reach from the lowest bass up to 19 kilohertz, which is good enough for audio signals.
It’s an easy project for everyone who can hold a soldering iron at the right end.
What we like: Blinking lights, synchronized to your favorite music tracks!
Who made it? Shajeeb
More information: Arduino Project Hub
Skill level: Intermediate
Phantom Automatic Chessboard

Called the Phantom, this Arduino Nano-based project is one of the best-running Kickstarter projects of 2021. Magnets move the wooden Staunton chess pieces. The engine lets you play online chess against any human on the planet and comes with Maja, a chess engine that adapts to your playing style and doesn’t just beat the heck out of you.
The engine lets you play online chess against any human on the planet and comes with Maja, a chess engine that adapts to your playing style and doesn’t just beat the heck out of you.
The best part is that the whole project is based on a Creative Commons 4. 0 license (BY-NC-ND), and it’s open and well-documented. It’s a complex project with many moving parts (pun intended) and will keep you busy for weeks. Doesn’t it look beautiful?
The project combines electronics, software, mechanical motion, calibration, and fabrication, making it substantially more involved than most Arduino builds. Its documentation also explains the development of the mechanism and the connection between digital chess and the physical board.
With the finished system able to connect physical pieces with computer or online play, the result feels much closer to a commercial product than a weekend electronics experiment.
What we like: The technology largely disappears into the finished object – often the mark of a particularly good maker project.
Who made it? Carlos Lopez Pendas
More information: Full Phantom build on Arduino Project Hub
Skill level: Advanced
Robot Kitten
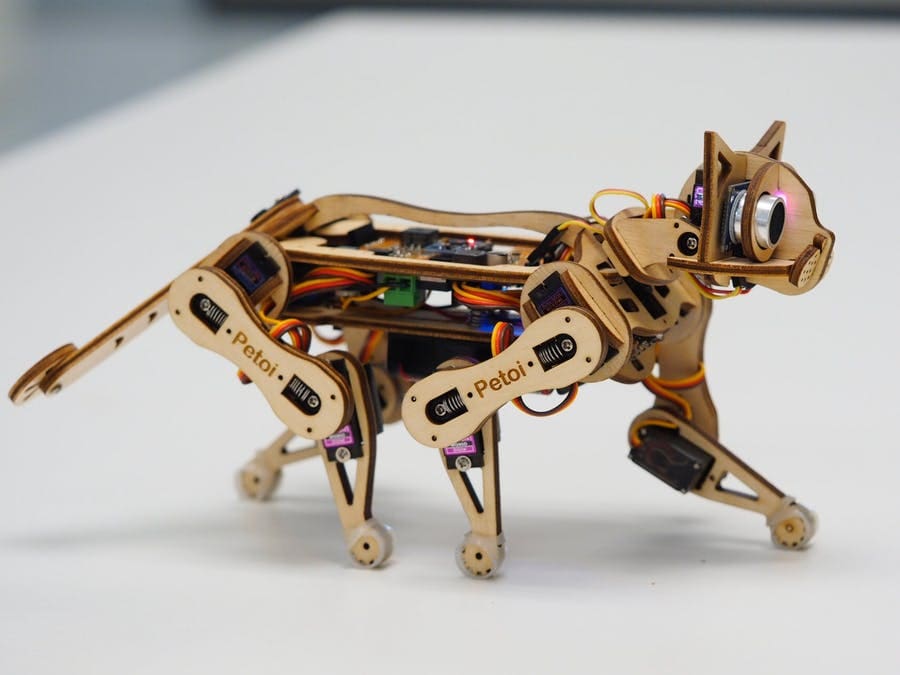
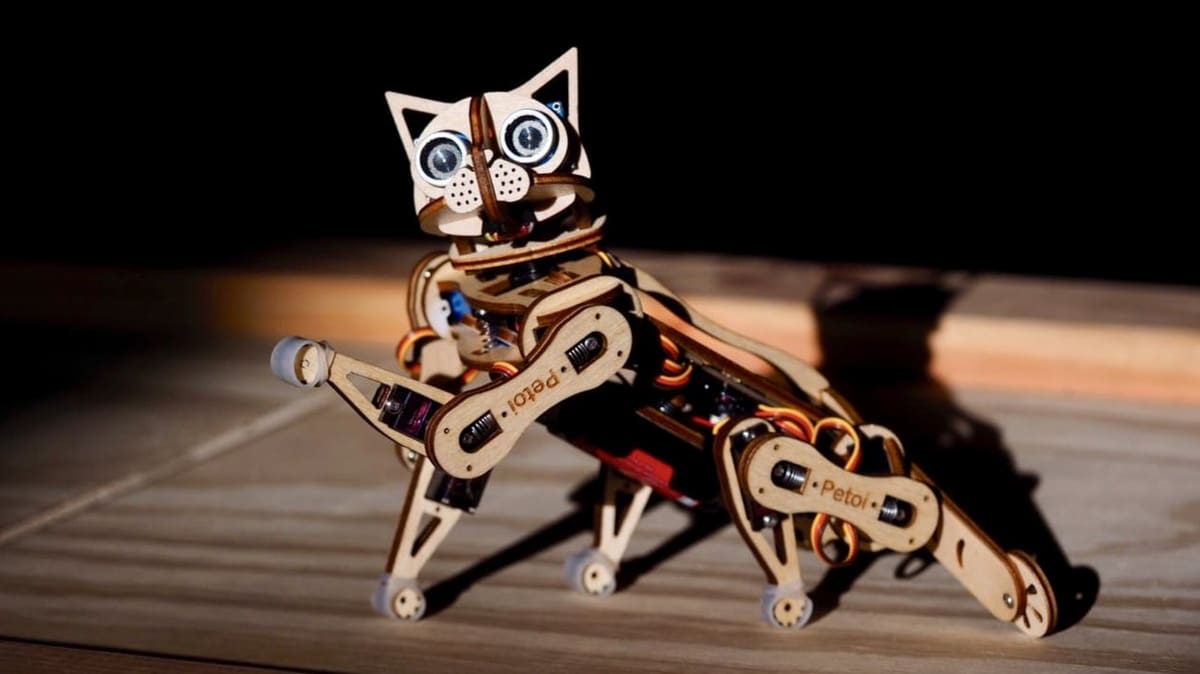
You’ve seen Sony’s Aibo, watched Boston Dynamics’ Spot boogie on down, and now it is time for a ROBOKITTEN! The Petoi Nybble is a laser-cut robot that resembles a kitten. It can run thanks to an Arduino Pro Mini. It even learns from you, and you can dig deeper and learn even more thanks to its OpenCat framework.
What we like: It’s a cool, sophisticated project. And you don’t have to empty the litter box.
Who made it? Rongzhong Li
More information: Hackster
Skill level: Advanced
Axis Camera Slider
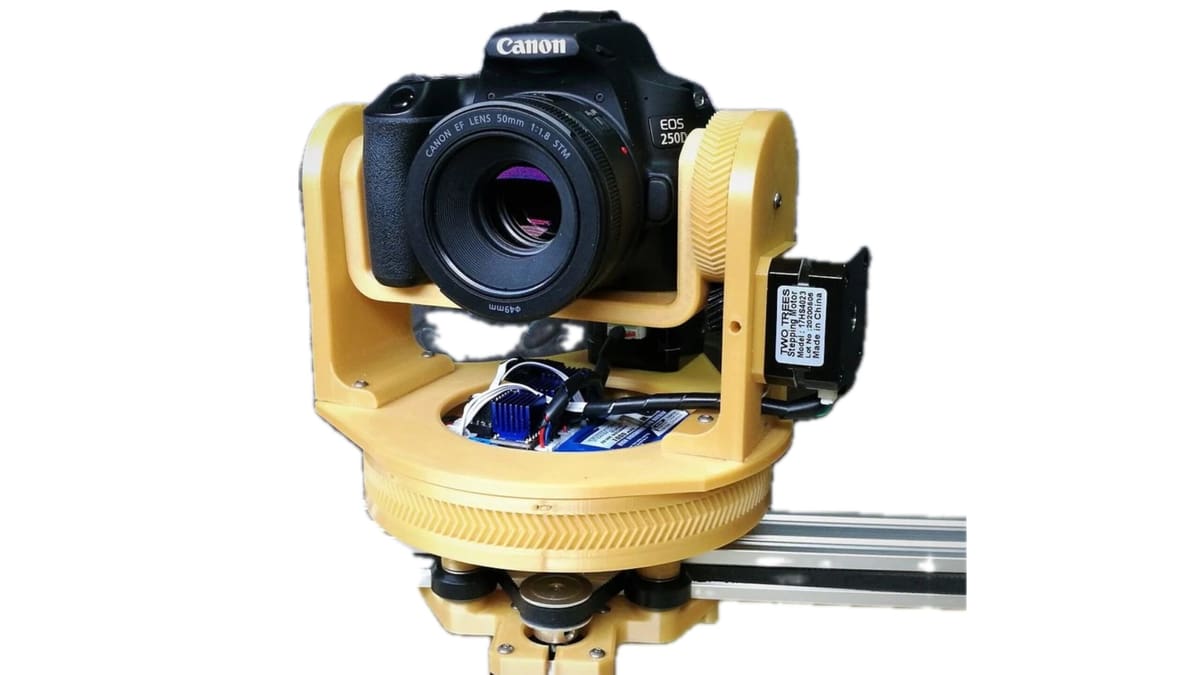
Smooth pans and tracking shots normally require dedicated camera equipment, but this project shows how much of that hardware can be made with a 3D printer and an Arduino.
This three-axis camera slider combines an Arduino Nano with three NEMA 17 stepper motors and TMC2208 drivers to control pan, tilt, and linear movement. The camera carriage travels along aluminium V-slot extrusion, while the printed pan-and-tilt mechanism uses geared stepper motion to position the camera precisely.
Hall-effect sensors allow each axis to automatically find its home position, and the Arduino can even trigger a DSLR’s shutter for automated time-lapses and panoramic sequences. Commands can be sent over USB or Bluetooth, while the electronics can run from a 12V supply or battery for portable shooting.
A large part of the machine is 3D printed, and the creator has released STL and STEP files alongside the Arduino firmware, custom PCB Gerbers, a schematic, a parts list, and documentation.
What we like: It turns a 3D printer and relatively accessible Arduino hardware into the kind of programmable motion-control equipment normally associated with much more expensive video gear.
Who made it? isaac879
More information: STL & STEP files on Thingiverse | Arduino code, schematics, PCB files & parts list on GitHub | Build and demonstration video on YouTube
Skill level: Advanced
You May Also Like:


Lead image source: Rongzhong Li
License: The text of "Beginner or Expert? 25 Cool Arduino Projects, From Blinking LEDs to Home Robots" by All3DP is licensed under a Creative Commons Attribution 4.0 International License.