Lithophanes with Cura: Easy Tutorial (incl. Best Settings)

Lithophanes turn digital pictures into tangible ones that you can see when light shines through. Check out how to make a lithophane in Cura!
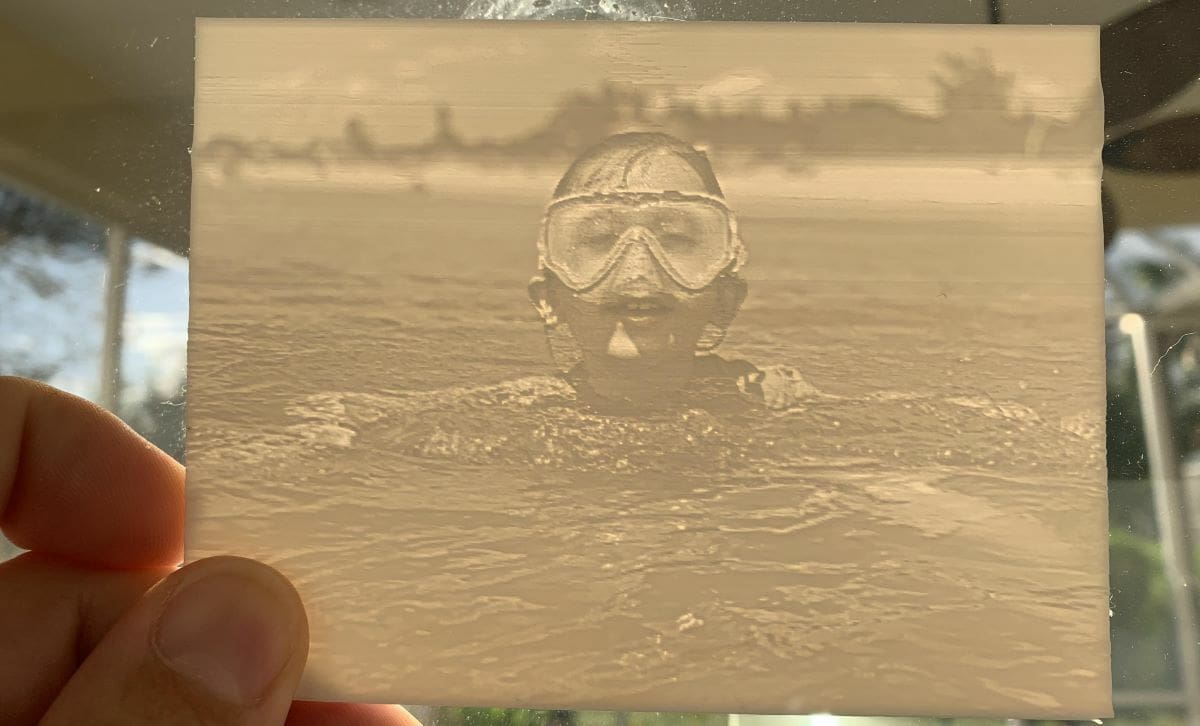
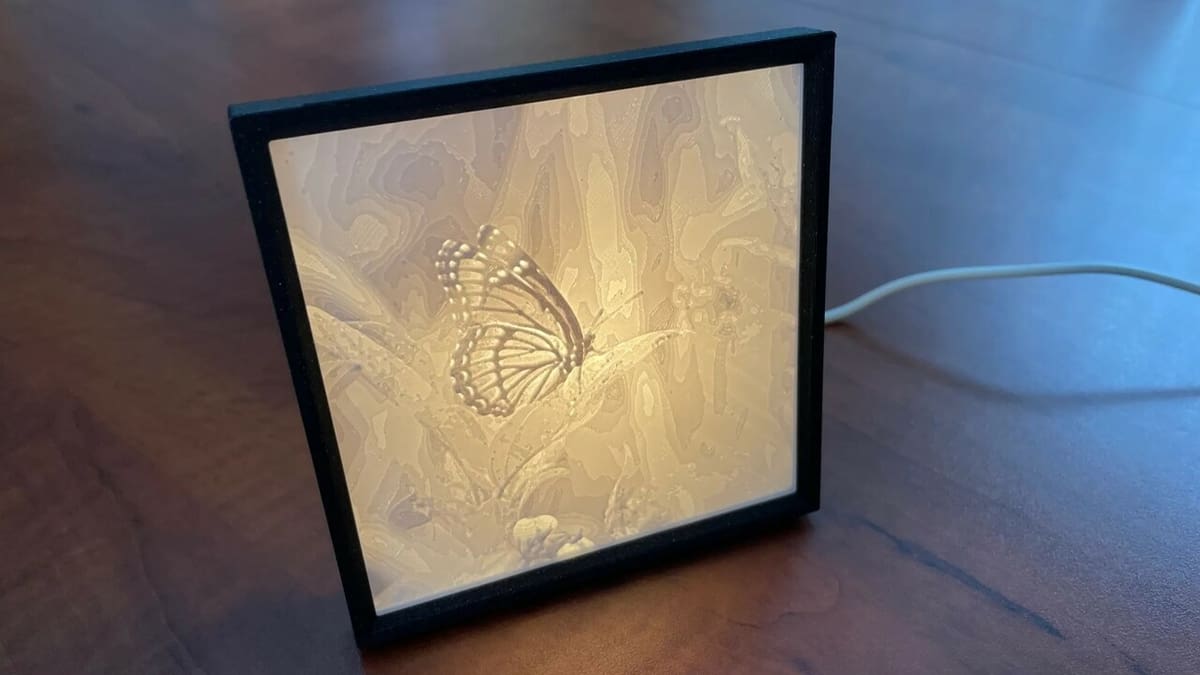
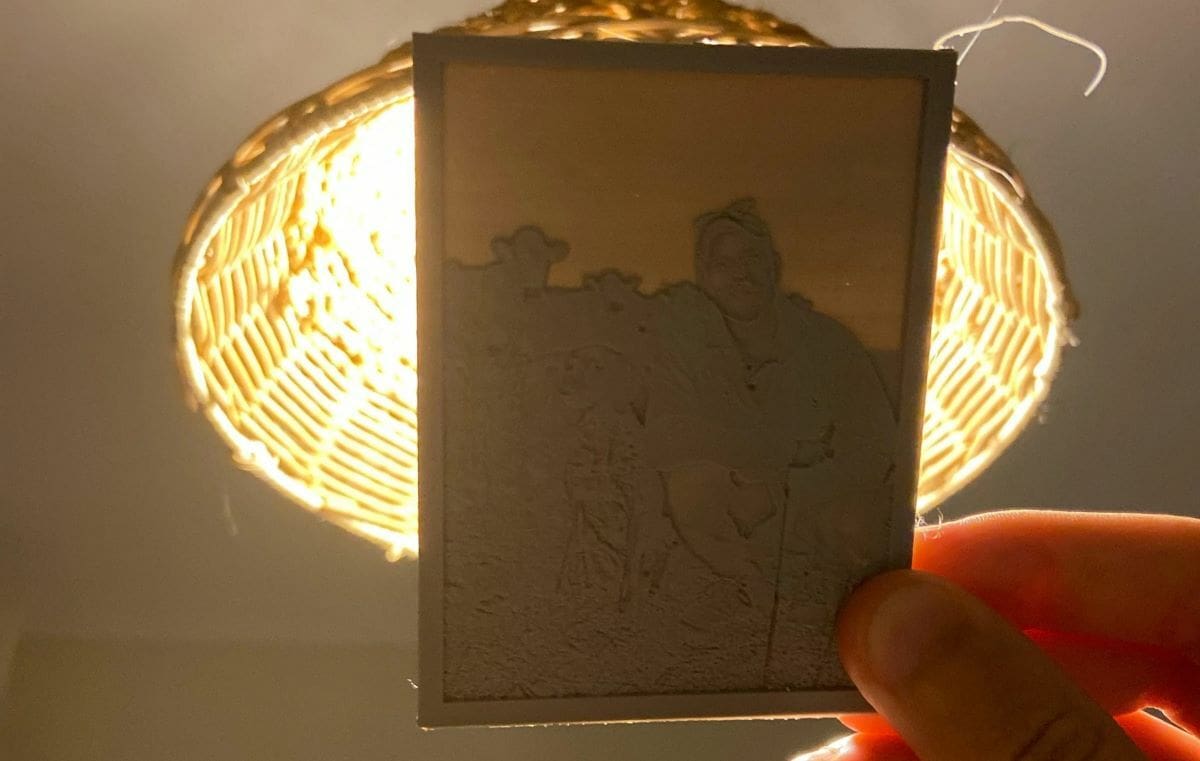
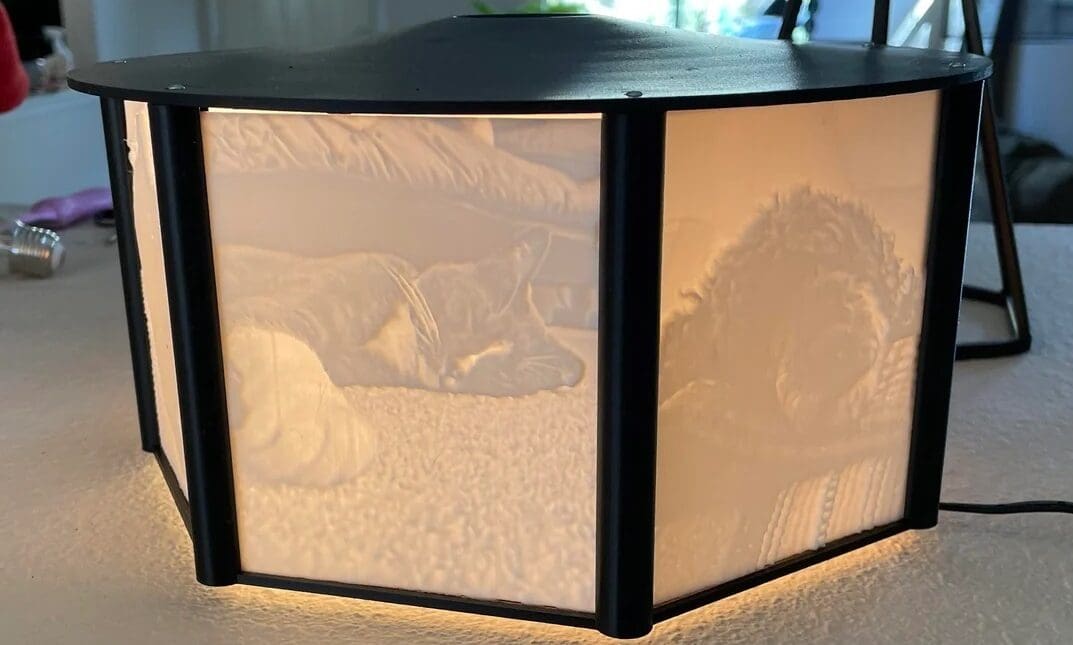
Imagine a thin, almost see-through picture frame. It looks normal until you turn on a light behind it or put it in front of the sun. That’s when a magic trick happens! A picture appears on the frame, glowing from the light behind it. This is known as a lithophane.
Lithophanes use different thicknesses to play with light. Thicker parts block more light, making them appear darker, while thinner parts let more light through, making them brighter. This creates a cool, almost 3D-like image when lit from behind.
Traditionally, lithophanes were made from porcelain, but thanks to 3D printing, you can easily generate and print them in any size, shape, or color you want. 3D printing lithophanes is a fun way to transform your favorite photos into unique, glowing art pieces.
And it’s easy, too! For example, to create your own 3D printed lithophane in Cura, all you have to do is choose a high-contrast, high-resolution photo and import it into the slicer, adjust the relevant settings, and slice the model. Finally, send the instructions to your 3D printer and watch your creation come to life!
In this article, we’ll delve into the amazing world of 3D printed lithophanes. We’ll look into why Cura can be a great choice, which photos can work best, and what slicing settings you should opt for in Cura, along with some common troubleshooting tips.
And if Cura is doing wonders for you, but your 3D printer isn’t up to the task, consider Craftcloud. With manufacturers all over the world, it’s as easy as uploading the STL, selecting the filament and manufacturer, and waiting for the lithophane to be delivered to your doorstep.
Why Use Cura?
While there are convenient online lithophane generators that streamline the process, Cura is a great alternative. If you don’t have a reliable internet connection, don’t need greater control over the design, or simply want a straightforward solution for simpler images, Cura is an excellent choice.
There are many reasons to consider Cura for creating your lithophanes.
Firstly, it’s a free and open-source slicer. Its wide compatibility with 3D printers and prebuilt profiles speed up the process for many users. For experienced makers, the number of available settings allows for precise control over the generation process.
Specific advantages include the important option to have an image as a heightmap (which converts the image into a 3D model for the lithophane), precise print speed control, and customizable wall ordering. You also benefit from Cura’s vast community support network for advice or troubleshooting. Overall, Cura is one of the best slicer software for slicing lithophanes for printing.
Before we look into how to create a lithophane with the popular slicer, we’ll go over a few image considerations to ensure the best possible results.
Image & Filament Considerations
When creating lithophanes, you have flexibility in the file formats that you can import into Cura. Here’s a look at the most common options and their characteristics:
- JPG/JPEG: The most widespread image format. Be mindful that heavy JPEG compression can introduce artifacts, which might translate into unwanted surface irregularities on your lithophane.
- PNG: An excellent lossless format that preserves image detail well. A top choice for lithophanes where contrast and clarity matter.
- BMP: A less common option now, but one that offers full-color support. If you must use a BMP, make sure it’s a high-quality one to avoid visual noise.
When choosing the image for your lithophane, prioritize a high-contrast, high-resolution option for good results.
High-contrast images with clear light and dark areas will provide the most dramatic effect; if all the colors are similar or there are many shadows over an object, it will be trickier for the program to fully understand where one object ends and another (or the background) begins. Grayscale conversion often improves the translation of the image into a lithophane.
For the best detail, use a high-resolution image, as this will help offer a more accurate lithophane. Finally, don’t be afraid to adjust the brightness and contrast, crop the image as you’d like the lithophane to be, and apply filters to tailor your image before converting it into a 3D print.
Filament Choice
Selecting the right filament plays a very important role in creating successful lithophanes. Here’s why white or light-colored PLA is generally the top choice:
- Translucency: PLA, especially in lighter shades, allows light to pass through effectively, creating the illuminated image effect that makes lithophanes so unique.
- Ease of printing: PLA is a beginner-friendly filament that prints at relatively low temperatures and isn’t as fussy to print with as ABS, for example.
- Affordability: As one of the most cost-effective filaments, PLA is an excellent option for experimenting and refining your lithophane designs.
While it’s possible to use filaments like ABS or PETG, they present additional challenges. ABS is more prone to warping and requires higher temperatures and an enclosure for proper printing. PETG, though slightly more translucent than ABS, may still require very thin walls to achieve a similar effect as PLA and might need more post-processing.
Next, we’ll go over the best settings if you’re 3D printing a lithophane with PLA – if you decide on a different material, keep in mind that different temperatures, speeds, and even a different setup might be necessary.
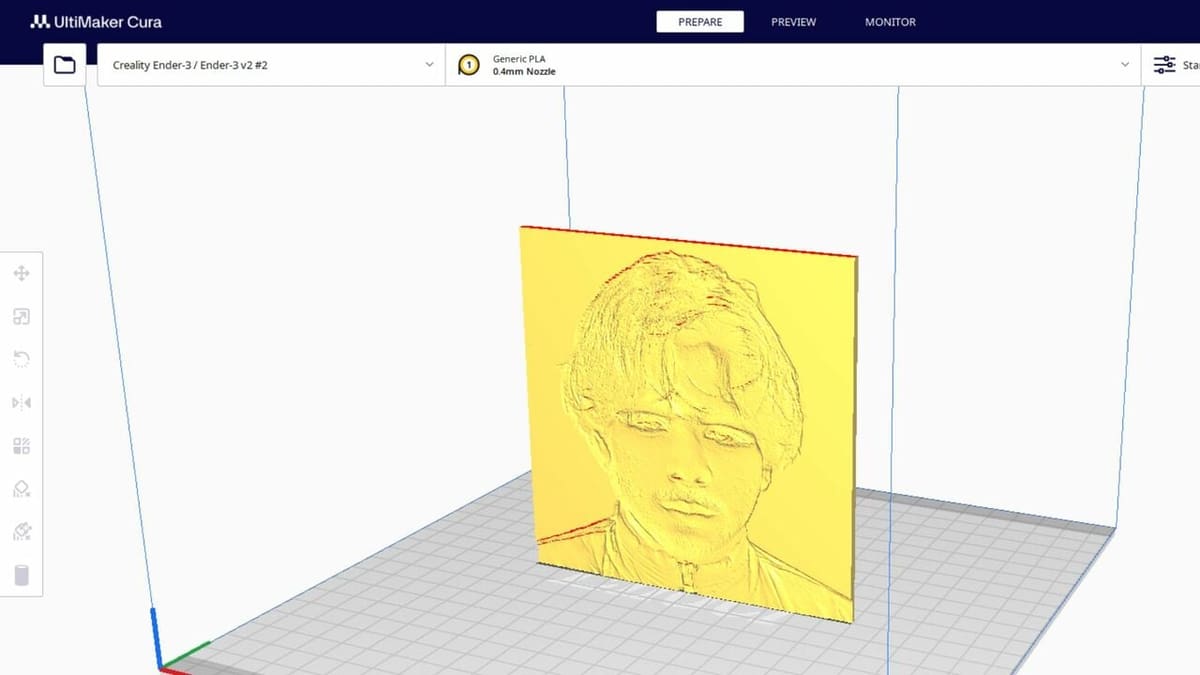
Upload Your Image
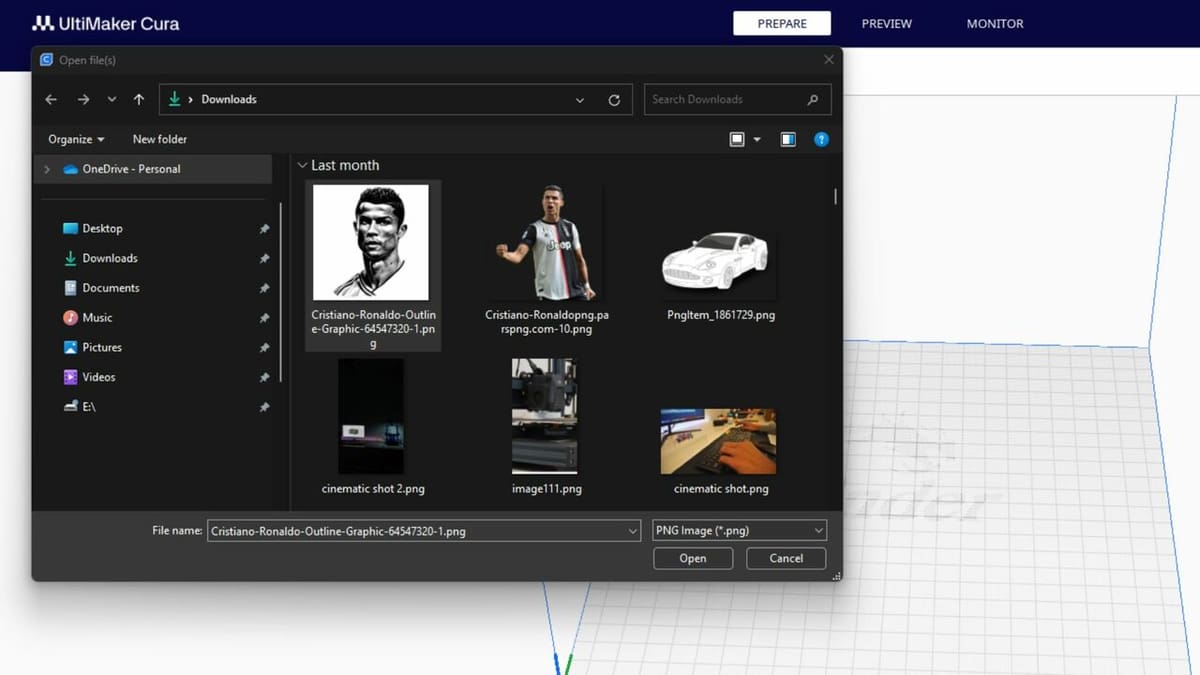
Getting started in Cura is easy. First, you have to upload an image into Cura by following these steps:
- Open the program.
- Go to “File > Open File(s)” and select the image from the folder where it’s saved.
- Click “Open” or press “Enter”.
The “Convert Image” menu will pop up, where you can adjust the settings of your lithophane.
Model Settings
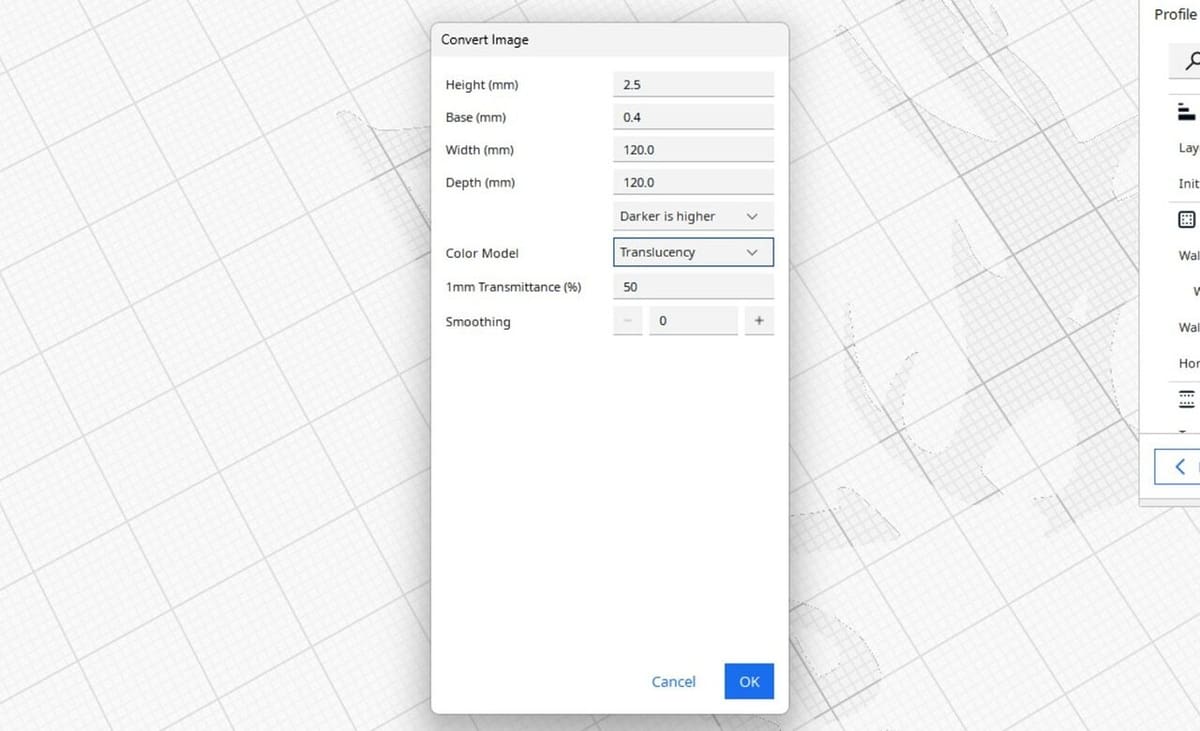
Once you’ve chosen and imported the perfect image for your lithophane, the next step is to adjust the settings for optimal results. Cura allows you to convert 2D images into 3D printable models suitable for lithophanes.
These settings directly affect the physical dimensions of your lithophane:
- Height: This controls how thick your lithophane will be. A thicker lithophane shows more dramatic contrast (stronger lights and darks), but it also takes longer to print. Start with a thickness of around 3-5 mm, but tweak this if you’re not seeing good results.
- Base: This is like a sturdy platform your lithophane sits on. Make sure the base is thick enough to keep your lithophane stable. The default 0.4 mm should work, although depending on the size of the lithophane, you might want to increase it for more stability.
- Width: A pretty self-explanatory setting, width controls how wide your lithophane is. If you input a value that’s too high for the size of your build plate, you can scale it down (or up, if the value was too small) once the image has been imported. This setting will automatically affect the depth.
- Depth: Another straightforward setting, depth controls how long the lithophane is. If you change it from the default, it will automatically change the width as well.
- Contrast: A “Depth” subsetting (which doesn’t have an actual name), this important setting tells the software how to turn your image into a 3D model. You can select between “Darker is higher”, where the software will make the darker areas of your image thicker, blocking more light, or “Lighter is higher” for the opposite processing.
- Color Model: Cura gives you two options in the color setting: Linear and Translucency. They don’t differ much, but in theory, the translucent version should result in better lithophanes.
- 1mm Transmittance: This setting refers to how much light goes through parts of the print that have a 1-mm thickness. Increasing the value gives more contrast in lighter parts and less contrast in darker parts of the print.
- Smoothing: This setting can make the edges of your lithophane softer. For a crisp, well-defined image, stick with a very low smoothing value between 0-2.
Slicer Settings
In addition to the specific settings that affect what your lithophane looks like, there are 3D printing aspects that you’ll want to work with to ensure the best possible results.
Orientation
To start with, it’s recommended that you opt for a vertical orientation, which will offer a pretty important benefit. Because print layers will run along the height, they will be far less noticeable on the front and back surfaces where the image is displayed. This means that for crisper details, a vertical orientation will be best. That said, if it’s a slim lithophane or very long or tall and you run into wobbling, a flat orientation might be best.
Print Settings
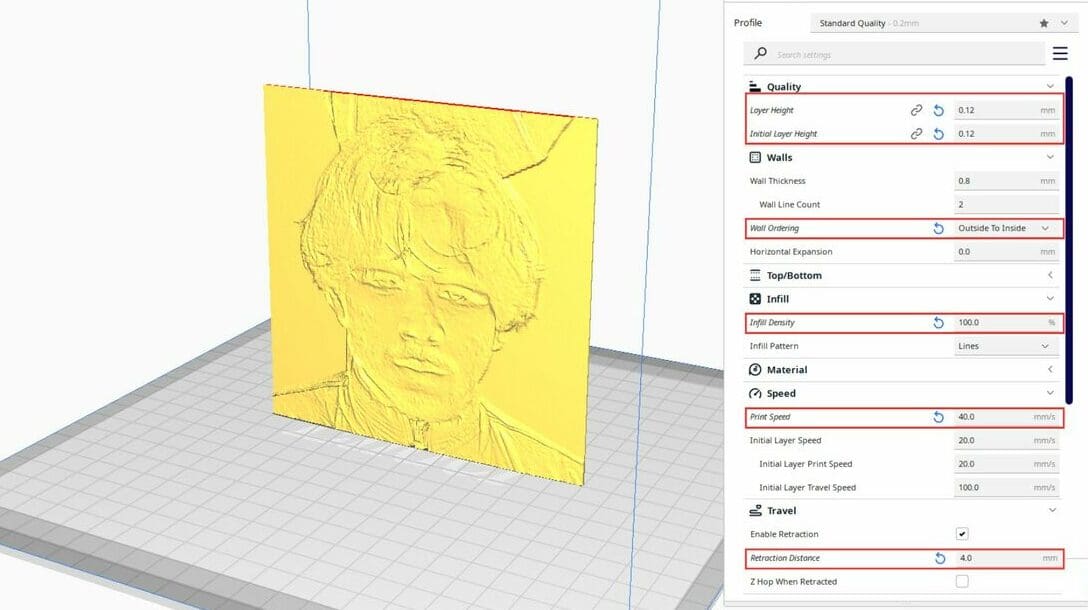
- Layer Height: A layer height of 0.1-0.12 mm strikes a balance between detail and print time. Smaller layer heights will take longer to print but will also result in smoother images, so it will depend on the original image, the size of the lithophane, and how much time and filament you’ve got.
- Infill: While 100% infill is commonly recommended, 99% can be sufficient and may reduce print time slightly. Either way, a very high infill percentage or a high number of walls is needed to ensure that light is fully blocked and to avoid unwanted infill patterns showing through.
- Infill Pattern: While most infill patterns will work for lithophanes, a rectilinear or grid pattern is often the least likely to become visible when the model is illuminated. But if you’re using 100% infill, it won’t matter which pattern you use.
- Print Speed: A slower speed of 40 mm/s or below is recommended. Lower speeds increase the precision of fine details. Lithophanes are thin, and as they grow upwards, they might wiggle if you print fast.
- Wall Ordering: “Outer Before Inner Walls” often leads to cleaner edges, important for accurate image representation in the final lithophane.
- Retraction: Start with a retraction distance of 1-2 mm and a speed of 40mm/s. Adjust incrementally based on your printer and filament type to minimize blobs and strings, as these imperfections can mar the clarity of your lithophane.
Bed Adhesion & Supports
As for bed adhesion assistants, if you’re opting for a vertical orientation, either a raft or a brim should be enabled. While a raft might be more beneficial than a brim because it provides a larger surface area for better adhesion and helps prevent warping (a significant concern for thin lithophanes), a brim will also mean fewer potential issues when removing it.
As for supports, unless there are significant overhangs, they shouldn’t be necessary. If Cura indicates that there will be issues printing without them, tree supports will be best. If using tree supports, adjust the settings to minimize their contact area with the model for easier removal.
Settings Summary
To sum up, if you’re using Cura to slice an image to print as a lithophane, here are the main settings/tips you’ll want to work with, if you’re printing with PLA:
- Layer Height: 0.1 mm for a good balance of detail and print time.
- Infill: 99% (or a high number of walls) to ensure sufficient light blockage.
- Print Speed: 40 mm/s or slower for precision.
- Wall Ordering: Outer Before Inner Walls for clean edges.
- Retraction: Minimize as much as possible, starting around 1-2 mm distance and 40 mm/s speed.
- Build Plate Adhesion: Raft or brim for maximum stability.
Additional Tips
- Image Preparation: Use high-contrast images for the best results.
- Filament Choice: White or light-colored PLA is ideal.
- Test Prints: You should calibrate your settings using small test lithophanes or a test card before printing the actual model.
Troubleshooting
Even with the best settings, you might encounter some printing challenges with your lithophane. Here’s how to address a few common problems.
Under-Extrusion/Gaps
- Calibrate the printer: This process ensures that your printer is pushing out the correct amount of filament. Under-extrusion occurs when the extruder isn’t pushing enough filament, which leads to gaps or weak spots in your lithophane.
- Increase infill overlap: This setting controls how much neighboring infill lines overlap, ensuring that no gaps are left for light to pass through the lithophane unevenly. Start with a 10-15% overlap and increase if gaps persist.
- Check filament flow/extrusion multiplier: In some cases, slightly increasing the flow rate (usually by 1-5%) can help fill in tiny gaps.
Warped Base
- Check bed leveling: A level bed is very important for any successful print, as improper leveling leads to warping, especially for thin, tall objects like lithophanes. So before you start printing, make sure your bed is properly leveled.
- Bed adhesive: Since lithophanes are thin and tall objects to print, you can use glue, hairspray, or specialized 3D printing bed adhesives to increase the first layer’s bed adhesion.
- Raft or brim: As mentioned, if you haven’t, add a raft or brim to your print to provide a wider base.
Layer Shifting
- Tighten belts: The X- and Y-axis belts control your printer’s horizontal movement. Loose belts lead to inaccurate motion and can result in layers shifting, ruining the lithophane’s detail, so ensure that they’re tight.
- Reduce print speed: Fast, jerky movements put stress on the printer’s mechanics, especially in the case of lithophanes, as they are such thin and tall objects. Slowing down gives your printer more time to execute each move accurately, preventing layer shifts.
- Check mechanical components: Ensure smooth movement of the print head along both the X- and Y-axes. Look for loose screws, worn bearings, or debris obstructing movement.
License: The text of "Lithophanes with Cura: Easy Tutorial (incl. Best Settings)" by All3DP is licensed under a Creative Commons Attribution 4.0 International License.