Master Your Flow: The Only Extruder Calibration Guide You Need

Whether it's E-steps or rotation distance, Marlin or Klipper, calibrating your extruder is critical to printing success. Here's how to get it set correctly.
If you suspect your machine of persistent under or overextrusion – typically, gaps between layers, walls, and a general weakness to the prints (underextrusion), or loose detail and frequent nozzle clogging (overextrusion) – improper extruder step values may be the reason why.
Ensuring the this value is set appropriately is crucial for successful prints; it’s the only way to know that your printer is delivering the correct amount of filament to the hot end during a print. And while it may not present the full solution to your 3D printing issues (so many other things can compound on top of improper extrusion step values) it is a foundation-level step to understand and control your system.
Your printer and firmware strongly influence whether this is something you calibrate and change. Modern printers, like those from Bambu Lab, close off these values, but are also so stringently controlled that it’s unlikely to be your issue in the first place.
Below are the steps to correct your extruder calibration on Marlin and Klipper systems; the process of measuring, calculating, and adjusting them is commonly simple – a matter of observation and process, and number punching. Just know that you’ll need the following things, no matter your firmware.
Equipment list:
- A length of scrap filament: For the sake of your proximity to it melting, and the temperature required, just use your cheapest PLA (around 30 cm will do).
- A fine marker pen: You need to be able to mark the filament clearly.
- Calipers: There is measuring involved.
- Pen and paper/computer: You’ll need to note down your measurements; if you’re not at the computer you’re using to adjust the values, then jotting them down on a scrap of paper is of course fine too.
What are Extrusion Steps?
Different firmware call the values different things. In Marlin, it’s E-steps. In Klipper, rotation distance; both similar approaches to the same thing: the stepper motor’s movement translating to the expected motion in the system.
Marlin’s E-step calibration applies specifically to the motor that delivers filament in your printer – the extruder. Klipper, more broadly, groups it with all of the other motors for movement, too.
Common across them all is that stepper motors don’t change, whether they’re pushing filament or pulling a belt – they require electrical impulses to rotate their driveshaft which, in a 3D printer, translates to linear motion. Our guide to stepper motors and what they are explains this better.
Preparation
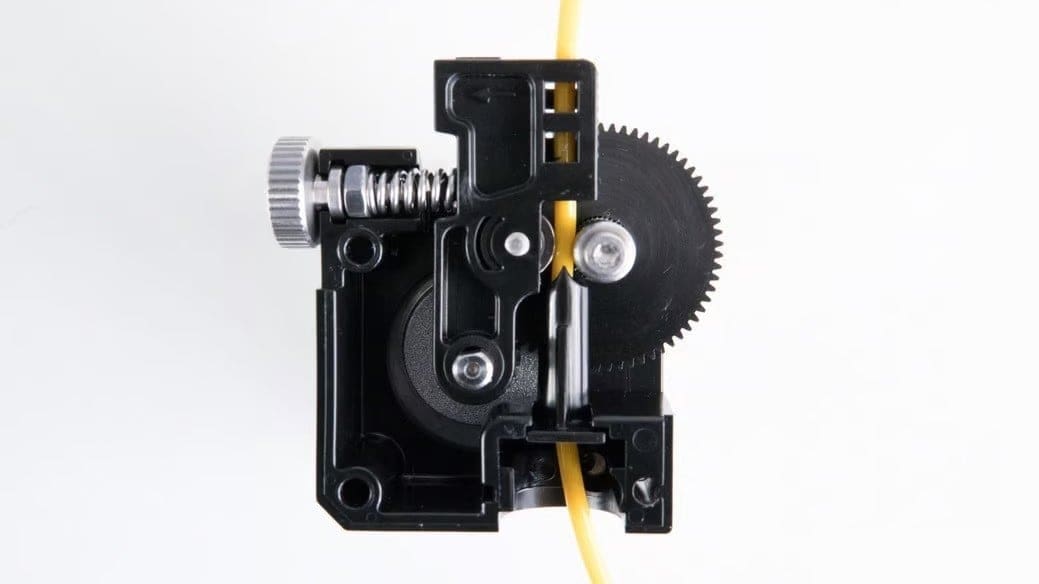
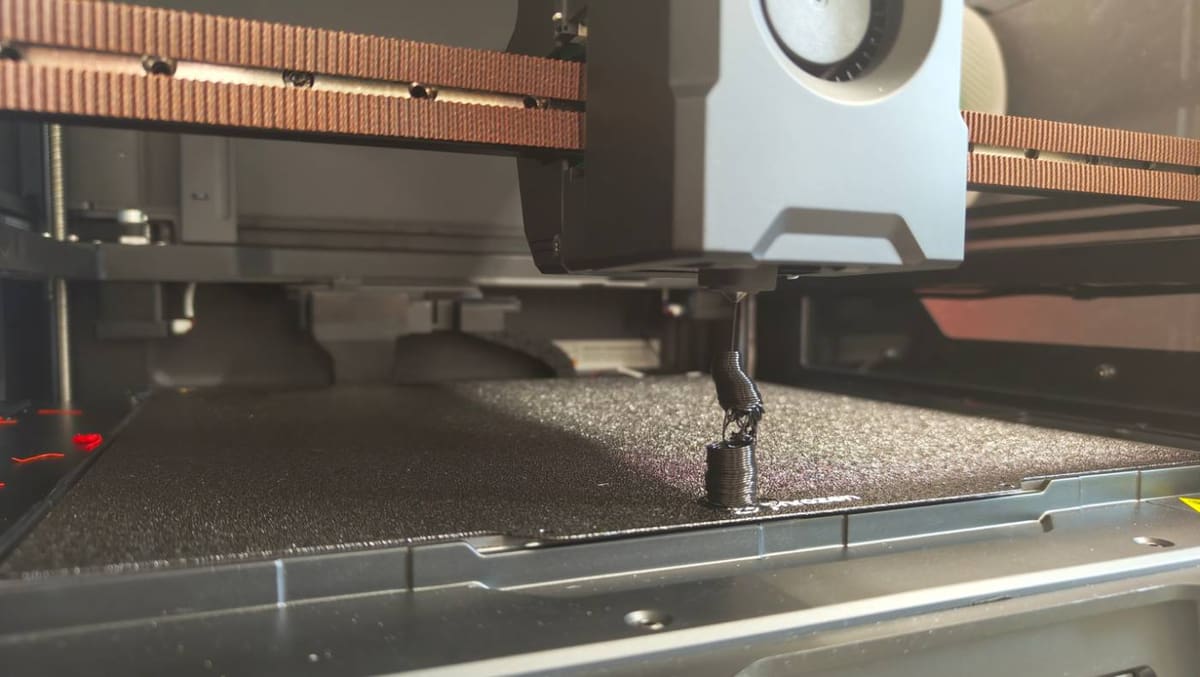
The first step depends on whether you are calibrating a 3D printer with a direct or Bowden extruder. Start by unloading any filament in the hot end and removing it from the filament path.
Loading: Bowden Extruder
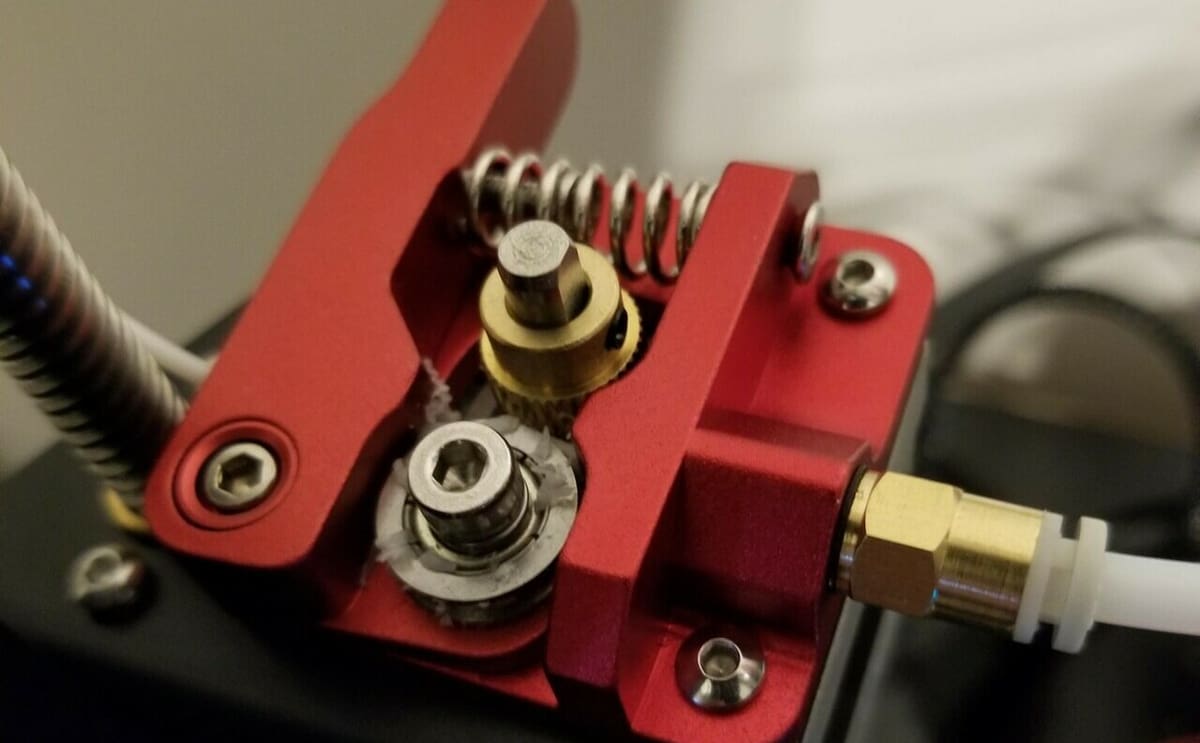
With the filament unloaded, disconnect the Bowden tube from the pneumatic fitting of the extruder. With your extruder free of tubes, insert one end of your scrap of filament, putting pressure on the lever arm so that you can pass it completely through the extruder.
Loading: Direct Extruder
If your printer has a direct extruder, you may like to remove the heater block and nozzle from the feed tube. (Leave it electrically connected but tucked away where it won’t burn you or cause any damage.) While this will allow you to later re-use the filament pushed through the extruder and eliminate the possibility of blockages or nozzle back pressure interfering with your calibration, it is also a complete hassle. If you’re content “losing” the scrap of filament to the process, leave the hotend attached and take things slow.
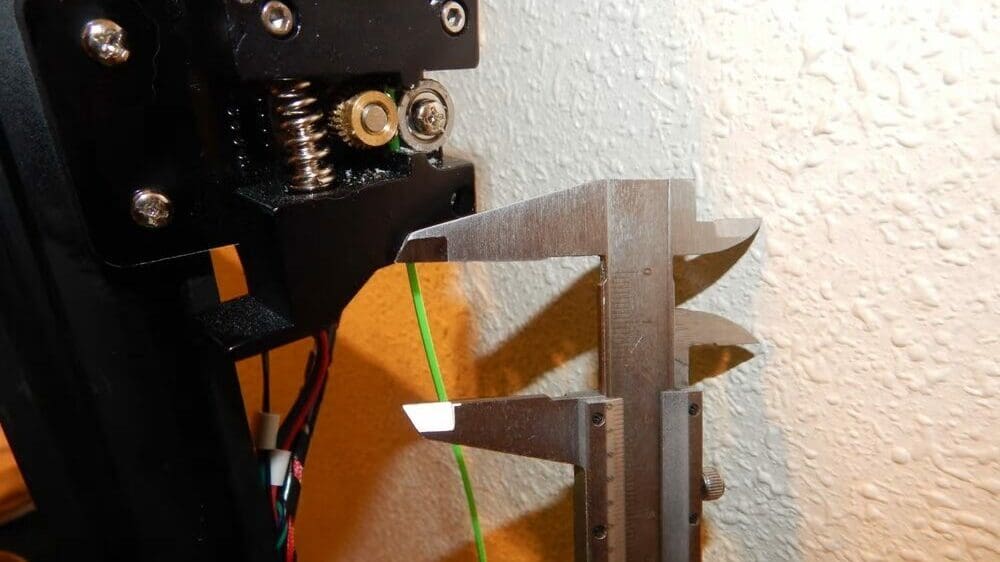
Mark the Filament
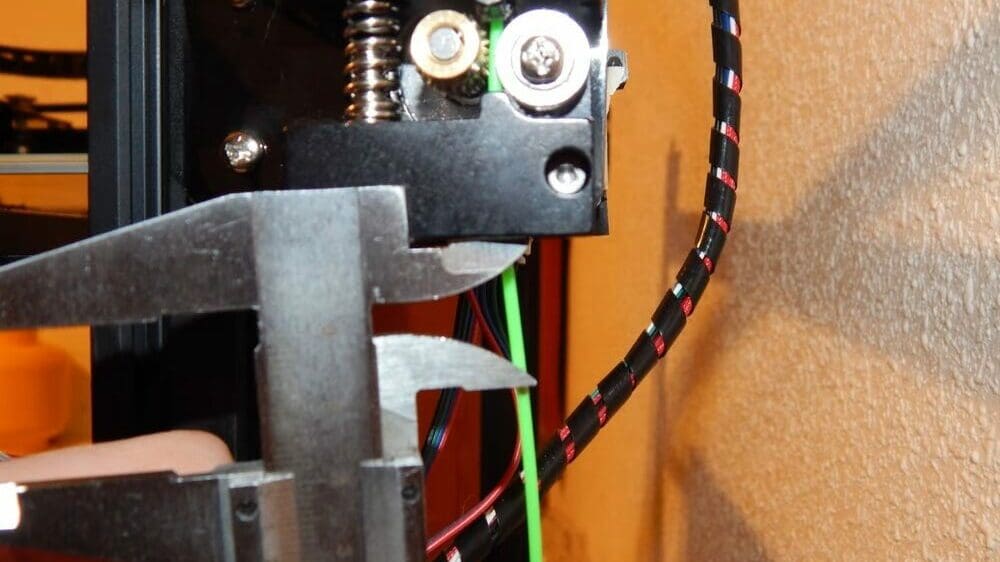
We’ll be sending 100 mm of filament through the extruder. Before doing that, however, you’ll need to mark the filament at a distance of 120 mm away from the extruder’s entrance. This mark must be on the “spool” side of the extruder, of course – we’re feeding this filament as if it were going to the hot end. The extra 20 mm gives us a measurable length of filament before the extruder entrance to check for over- or under-extrusion.
Tip: Different printers behave differently: Depending on your machine, your printer's firmware may prevent manual extrusion commands while the printer is "cold" – the hot end needs to be above a certain temperature (under the expectation that it will be melting the filament).
If you know which firmware you’re using, you can jump straight to the respective Marlin and Klipper sections. First up, Marlin.
Marlin
Communicating with Your Printer: Marlin

We’ll cover three ways to talk to your printer and command it to jog the extruder along for you here.
Serial Interface
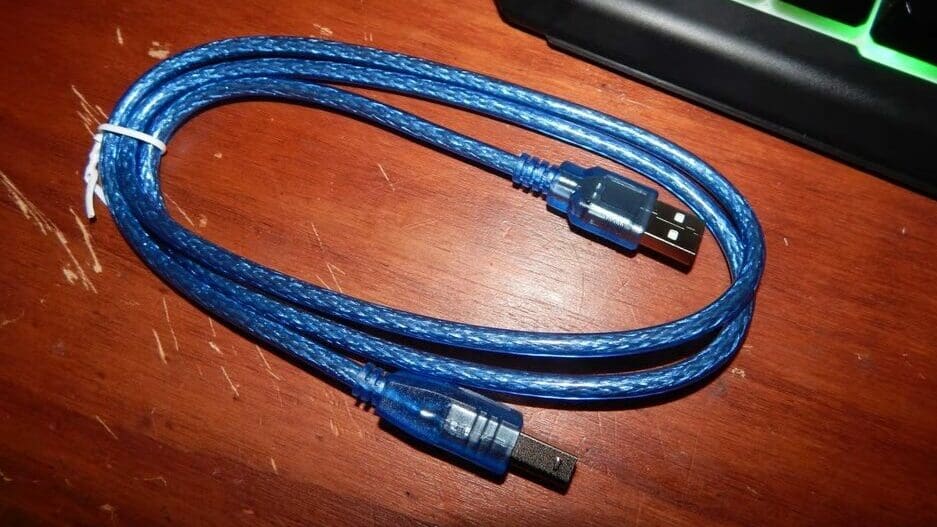
Connect your printer to the computer, either by USB or Wi-Fi (if your printer is able to do so). Open up and connect your slicer software of choice that allows you to send single-line G-code commands to the printer. If you aren’t using a networked control interface like OctoPrint, then Pronterface is a quick, low-effort alternative.
Alternatively, with most RAMPS and ATmega-based printers you should also be able to use the Serial Monitor in the Arduino IDE.
Enable “Relative Mode” on the extruder by sending the command:
M83
…to the printer.
SD Card Method
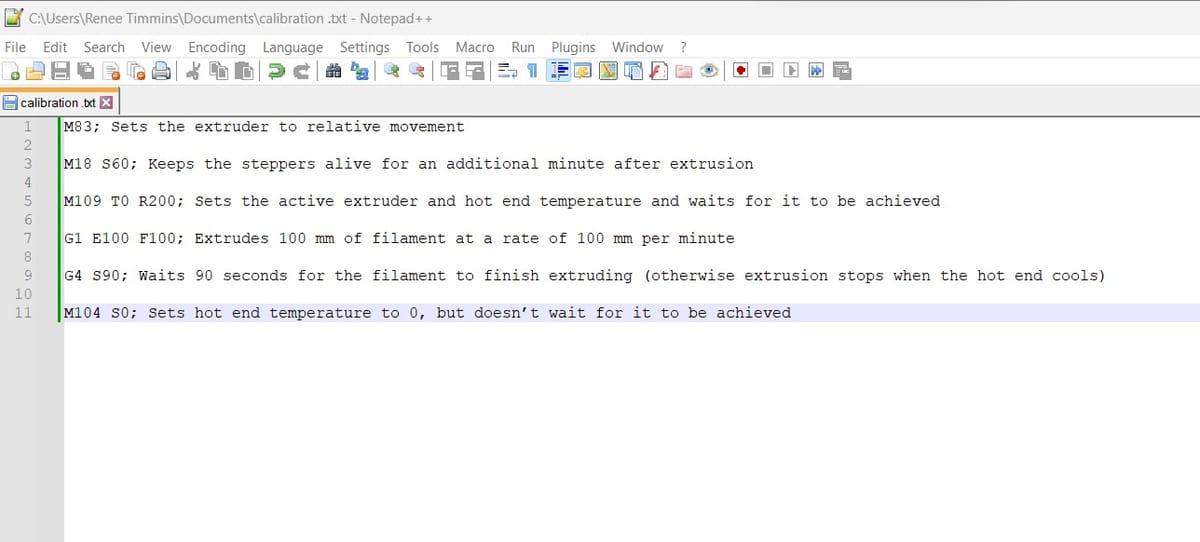
For this method, we’ll only need a few lines of G-code. This can be written in your computer’s default notepad or text-editing app.
Copy the below code in its entirety into the text editor. Don’t mind the comments that follow the commands – that’s just verbose G-code (explaining itself). Check out the Marlin website for more information on each command – it’s a good idea to familiarize yourself with the relevant code before you punch it into your machine.
M83; Sets the extruder to relative movement

M18 S60; Keeps the steppers alive for an additional minute after extrusion

M109 T0 R200; Sets the active extruder and hot end temperature and waits for it to be achieved

G1 E100 F100; Extrudes 100 mm of filament at a rate of 100 mm per minute

G4 S90; Waits 90 seconds for the filament to finish extruding (otherwise extrusion stops when the hot end cools)

M104 S0; Sets hot end temperature to 0, but doesn't wait for it to be achieved
Save the file with a name that’s easy to spot and remember (like “ext_cal.gcode”) to your SD card.
If you have a multi-extruder machine, you’ll need to change the “T0” in the M109 command to the correct extruder (e.g. M109 T1 R200). Save a separate file for each extruder – give them recognizable filenames (e.g. “left_ext_cal.gcode”, “right_ext_cal.gcode”).
Measure: Marlin
Now, using whichever way you are communicating with your printer, it’s time to get your filament moving.
Serial Interface
First, send:
M109 T0 R200
…to select extruder 0 and preheat the associated hotend to 200 degrees.
Then send the command:
G1 E100 F100
…to the printer. This will slowly run what the machine interprets to be 100 mm of filament through the extruder at a rate of 100 units (millimeters) per minute.
All of this action happens over the course of a minute to avoid any problems with filament tension or pressure in the hot end that could muddle results.
If you have a multi-extruder machine, you’ll have to repeat this step, changing “T0” to the appropriate T-identifier of each extruder.
SD Card
Simply insert your SD card and select your calibration print “ext_cal.gcode”. “Print” it as you would a real print job.
For both of these methods, you should watch and listen closely during extrusion. Pay particular attention to filament slipping or grinding and skipped steps (little clicking noises). If these occur, you should troubleshoot that issue before calibrating your extruder.
Tip: Go longer, but only if you can measure it accurately. A longer scrap of filament, such as 500 mm, would provide a more accurate result, but is harder to measure accurately and can waste a lot of plastic. If you know you can accurately measure a longer test, change the 'E' value to the number of millimeters you intend to use (e.g. G1 E500 F100). Beware: you could increase the feedrate too, but you risk skips or crashing into your hotend's maximum flow rate for PLA.
Measure Again
Once complete, the printer should have extruded exactly 100 mm of filament. To check this, measure from the filament entry point on the extruder to the mark you made on the filament.
If the measurement is 20 mm, your extruder is delivered what it’s supposed to and you can leave this guide. Your printing issue lies elsewhere.
If your measurement is more than 20 mm, your printer is likely suffering from under-extrusion, and your steps/mm setting needs to be increased. And, naturally, if the measurement is less than 20 mm, the printer is over-extruding and your steps/mm setting needs to be reduced.
Calculate Steps per Millimeter: Marlin

In order to accurately tune the extruder, we need to determine the printer’s current step/mm value and then calculate the correct E-step value. If this value wasn’t previously known to you, you’ll either need to retrieve the value from you printer’s UI (if it lets you) or communicate with the printer using a G-code sender.
Serial Interface
Send command:
M92
…to your printer. This will return a string of values. Find the line that starts with"echo: M92"then find the E-value (usually at the end of this line). This is the current steps/mm value.
If the M92 command doesn’t work, you may be running older firmware. Try the command “M503” instead.
Calculation
- First, we need to know how much filament was actually extruded. We can find this by subtracting the distance from the extruder to the mark on the filament from 120:
- 120 – (your measurement) = (actual length extruded)
- Next, we need to know how many steps the extruder took to extrude that much filament. We can determine this value by multiplying the steps/mm value by the length we should have extruded, in this case, 100 mm:
- (steps/mm value) x 100 = (steps taken)
- Lastly, we can calculate the correct steps/mm value by dividing the steps taken by the actual length extruded:
- (steps taken) / (actual length extruded) = (new steps/mm value)
Now, all we have to do is set this final value as the printer’s steps/mm value.
Set New Steps per Millimeter: Marlin
Updating the E-step value is straightforward and, like most of the other steps in this process, is done with G-code commands.
Serial Interface
To set a new steps/mm value, first send the command:
M92 E###.#
…replacing the hashes (#) with the new steps/mm value you obtained from the last step.
To save this value to the printers memory, sent the command:
M500
The best thing to do at this point is to turn your printer off and on again and check if the change took.
Send the command:
M92 (or M503)
…to your printer again to check that it returns your updated value. If not, repeat the first part of this step.
SD Card
In the same way that you wrote the G-code for the extrusion, if you aren’t using a serial connection to work with the printer, you’ll need to write a small piece of G-code, save it on the card and “print” it to set the new value. Copy the following, remembering to change the value with your new steps/mm:
M92 E###.# T0; Replace the hashes (#) with the new steps/mm value you obtained from the last stepM500; Saves the new value into the EEPROM
Save this to your SD card. We suggest a filename with the number in it, for example, “esteps_92-8.gcode” so that the file and information are easy to recall when needed.
Confirm it Worked: Marlin
To check that your extruder’s E-step value is now correct, you can repeat steps 1 to 4. This time, you should get a value of exactly 20 mm between the extruder and the mark. If not, recalculate the value and save it again.
You may also find that each time you calibrate you’re setting the system on either side of some center point. If this happens, set the steps/mm value to an average of your results and run a test print. If the printer is printing well, you don’t need to calibrate.
Multiple Extruders
If you have a multi-extruder machine, it may not support multiple E-step values. Unless you built the configuration file yourself, it’s not possible to find out from your machine. While the manufacturer should be able to advise on this issue, a giveaway would be that after you repeat steps 1 to 4, all of your extruders are using the value you set for the first extruder (T0).
Tip: There is a workaround for multiple extruders using start G-code. If you can't set multiple extruders at the system level, insert M92 E###.# into the each of related extruder's start G-codes (replacing the #s with the respective values).Alternative (Cowboy) Method

So, you don’t like writing G-code, but you still want to update your E-steps? Well, if you’re running Marlin 2.0 with an LCD screen and controller, you’re in luck!
Simply set up the filament as described in step 1, pre-heat the nozzle, and jog 100 mm through the extruder. Be careful! When jogging, the extruder is in absolute mode by default, and it gets commands in the order you send them. If you go too far and then reverse, that is what the extruder will do.
Once you’ve jogged the filament through, find the Motion menu. Your current E-steps/mm will be noted here (usually right down the bottom). You can then perform the calculation described in step 4. If you need a new value, enter it in the same menu. Don’t forget to save your new values using the “Save values” selection in the next menu.
Run the test again and again, if you like. This jogging method is extremely handy for quickly checking your calibration and repeatability of the extruder motion.
Klipper
Communicating with Your Printer: Klipper
As you are probably well aware, Klipper firmware lets you modify values and your printer’s behaviour on the fly, making it far more flexible than Marlin. As such, the steps to determine your extruder’s rotation distance require less juggling of software.
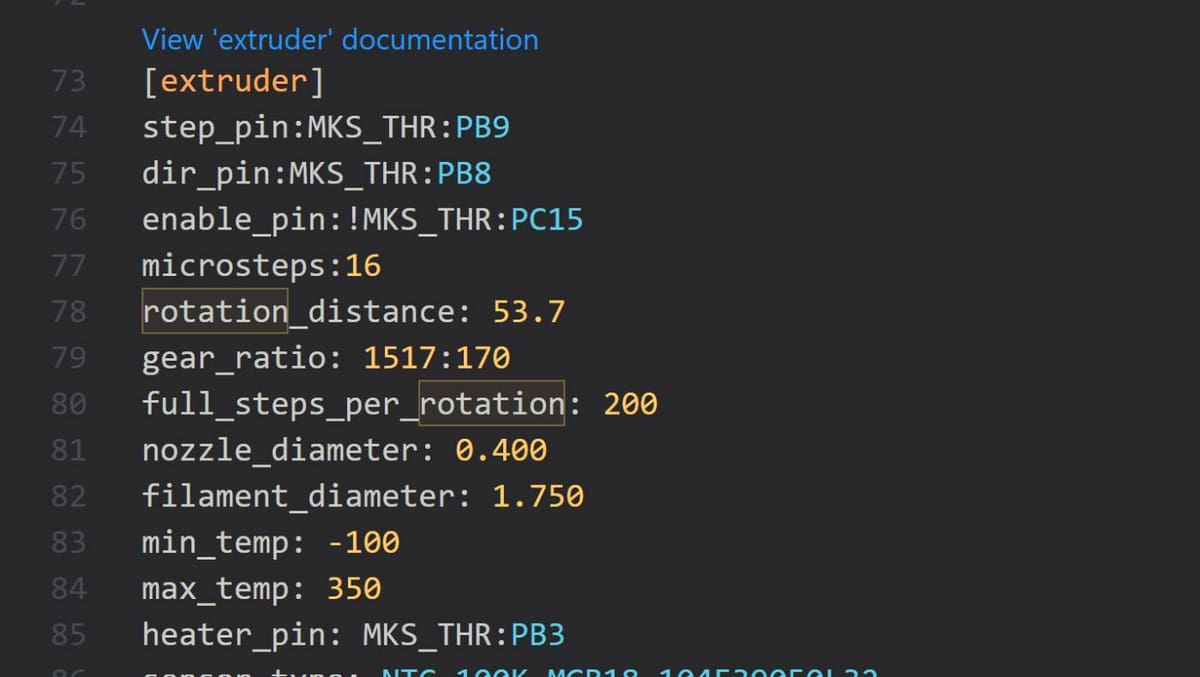
Tip: Before we start the calibration test, dip into your printer's current config file (printer.cfg– accessible via your browser interface for the printer) and note down the currentrotation_distancevalue for the extruder. You'll need this later when calculating a new value.
With your printer powered on and connected to your local network, open the control interface in your browser. You have direct control of the machine here, including sending an extruder feed command and controlling the speed of the extrude.
Measure: Klipper

Load the filament fully through the extruder. It should be engaged by the extruder gears. Using the marker pen, measure 120 mm from the entry point of the extruder and mark the filament. We will feed 100 mm through the extruder, and should be left with 20 mm between the extruder and mark when it’s done.
Web UI – Tools
In the web interface for your printer (our example images show Fluidd – your interface may vary) set the hotend to 200 °C and give it time to warm up.
Once at temperature, set 100 mm of filament to extrude at 5 mm/s or slower. The speed is arbitrary, but 5 mm/s seems slow enough to avoid the risk of the motor skipping or “slipping” due to high pressure in the nozzle.
Web UI – Teminal
If your web UI is missing direct control of the extruder and extruder speed, you can fire G-code commands to the printer via the terminal, instead. Before you do, set your hotend to heat up to a temperature appropriate for the filament you will be using.
Input:
G91; sets relative positioning
…followed by:
G1 E100 F100
This tells the printer to feed 100 mm of filament at a rate of 100 mm/minute. Again, the exact feed rate is pretty arbitrary –we just need it to be slow enough to avoid issues feeding it, particularly if the filament is going through the hotend (not a concern for Bowden style extruders).
Measure
Once the motor stops turning, take your calipers and measure the distance from the extruder intake to your mark again. If you asked for 100 mm and started at 120 mm, you should see exactly 20mm remaining. If you see more or less, note down the number and prepare yourself for some quick math.
Calculate Rotation Distance: Klipper
Fortunately the term “math” is doing some heavy lifting here – it’s a simple ratio calculation to correct the set value against any deviation we just measured. Here’s the full formula, but we’ll break it down into steps below:
New Rotation Distance = Current Rotation Distance * (Actual Distance / Requested Distance)
Calculation
- First, we need to know how much filament was actually extruded. We can find this by subtracting the distance from the extruder to the mark on the filament from 120:
- 120 – (your measurement) = (actual length extruded in mm)
- The next value we need to calculate is the multiplier, which we get by dividing the actual distance by the requested distance.
- Actual Distance / Requested Distance
- Lastly, we multiply the printer’s current rotation distance – which we noted down from the config before we began – with our calculated multiplier
- Current Rotation Distance * (Actual Distance / Requested Distance)
Using our example: if your current config says 53.700 and the extruder only delivered 98 mm of the requested 100 mm, your math would be 53.700 * (98 / 100), giving you a new value of 52.626.
This new number is our corrected rotation distance for the extruder. The official Klipper documentation recommends you round the number to the nearest three decimal places.
Set New Rotation Distance: Klipper
The final step is making the change permanent. As we did to find the initial extruder rotation distance, once again open your printer.cfg file and navigate to the section. There, update the rotation_distance line with your new, calculated number.
Click “Save & Restart”. This reloads the configuration and commits the new values to the system.
Confirm it Worked: Klipper
You should, of course, check your work, so repeat steps 2-3, measuring the filament and “extruding” a set amount.
It should be the case that your extruder now feeds exactly 100 mm of filament this time, leaving you with 20 mm between the extruder entry and the mark on the filament.
Tip: For printers with multiple extruders, pay attention that you are calculating new values for the correct extruder. Updating in the config means simply inserting the new values for each respective rotation distance line of each extruder.
What Next?
Calibrating your extruder is a fundamental step for understanding your printer and ensuring it’s doing exactly what you ask it to. Even if your printing issues persist, it provides you with a solid foundation to continue troubleshooting from. If you’re still trying to diagnose and fix issues with your print, check out some of our other guides.

License: The text of "Master Your Flow: The Only Extruder Calibration Guide You Need" by All3DP is licensed under a Creative Commons Attribution 4.0 International License.