20 Free 3D Printer Test Print Models

Calibrating your 3D printer can be a pain, but it doesn't have to be! Check out 20 3D printer test print models available for free.
Torture isn’t generally thought to be a good or useful thing. However, in the context of 3D printer calibration, “torture” is used to describe a maker’s best friend: torture calibration tests.
Torture test models are designed to specifically test certain abilities of your 3D printer. For example, one model may test your printer’s ability to span bridges or print overhangs. Other torture tests might test dimensional accuracy or surface finish. Still, others may test slicer settings such as speed, temperature, or layer extrusion. And there are also tests specifically designed for resin printers.
Ready to challenge your hardware? We’ve found the best calibration tests to assess your printer’s capabilities. Let’s do it!
3DBenchy
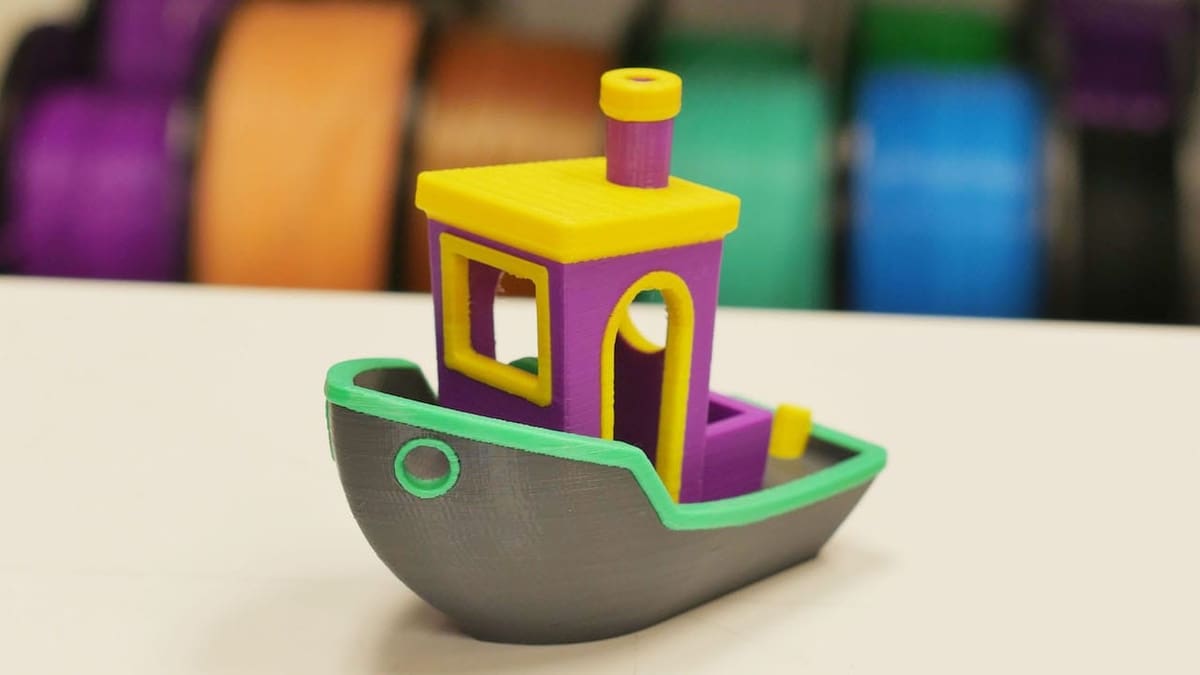
Let’s start with the classic: 3DBenchy is the flagship of all 3D printer torture tests. This model tests everything from overhangs to extrusion.
If you want to put your printer to the test, Benchy will help you pinpoint the settings to tweak for perfect prints. And a few Benchys hanging around your printer is a sure sign of a seasoned maker!
And while there’s been a bit of controversy at the beginning of 2025, the little boat that could has been relicensed under CC0.
- Who designed it? CreativeTools
- How printable/popular is it? Over 4,000 makes have been shared of this model across both sites. Benchy has been printed with hundreds of machines and materials in every color imaginable.
- Where to find it? Thingiverse, Printables
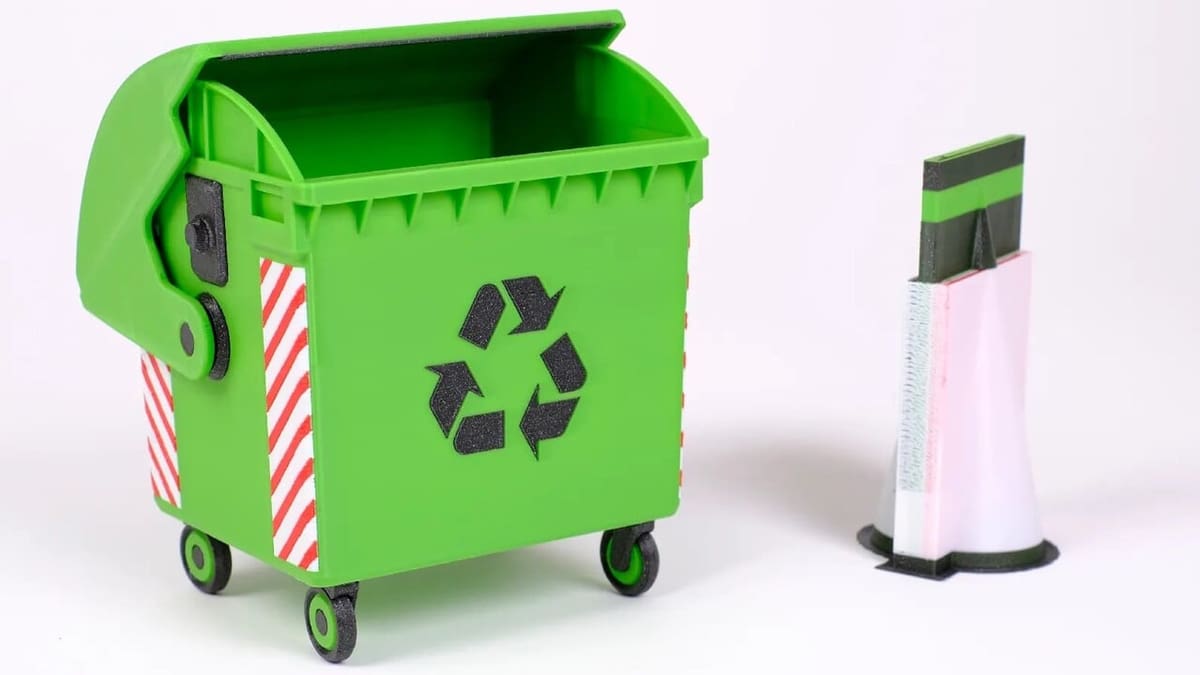
3D Boaty
If a boat is named after a bench, why shouldn’t a bench be named after a boat?
So, although the name reminds us of the classic test print, this model is aesthetically very different – yet it also tests aspects like bed adhesion, overhangs, bridging, hole precision, and more. In addition to ending up with a beautiful bench, you’ll be challenging your printer using only 16.5 grams of filament.
When printing this, you can check a score sheet and compare your model to see how well your printer is working. For each leg of the stool that loses adhesion, for example, 1 point is deducted – and 6 points are deducted if you use a brim. Users like coarel point out that it can be a much rougher print than the famed Benchy.
- Who designed it? Depep1
- How printable/popular is it? More than 20 remixes and around 128 makes have been shared so far, showing how failures and many challenges have been overcome.
- Where to find it? Printables
All-in-One
This all-in-one 3D printer test is exactly what it says it is! Overhangs, bridges, stringing, extrusion, temperature, belt tension – this model tests them all. If you want to test your printer on multiple layers (pun intended), be sure to try this torture test!
After printing, if there are some parts that need attention, you can find a fix by reading our comprehensive troubleshooting guide.
- Who designed it? majda107
- How printable/popular is it? Over 230 Thingiverse users have posted makes of this model, including a variety of amusing fails and dumbfounding successes. Hopefully, after tuning your machine, yours will be one of the successes.
- Where to find it? Thingiverse
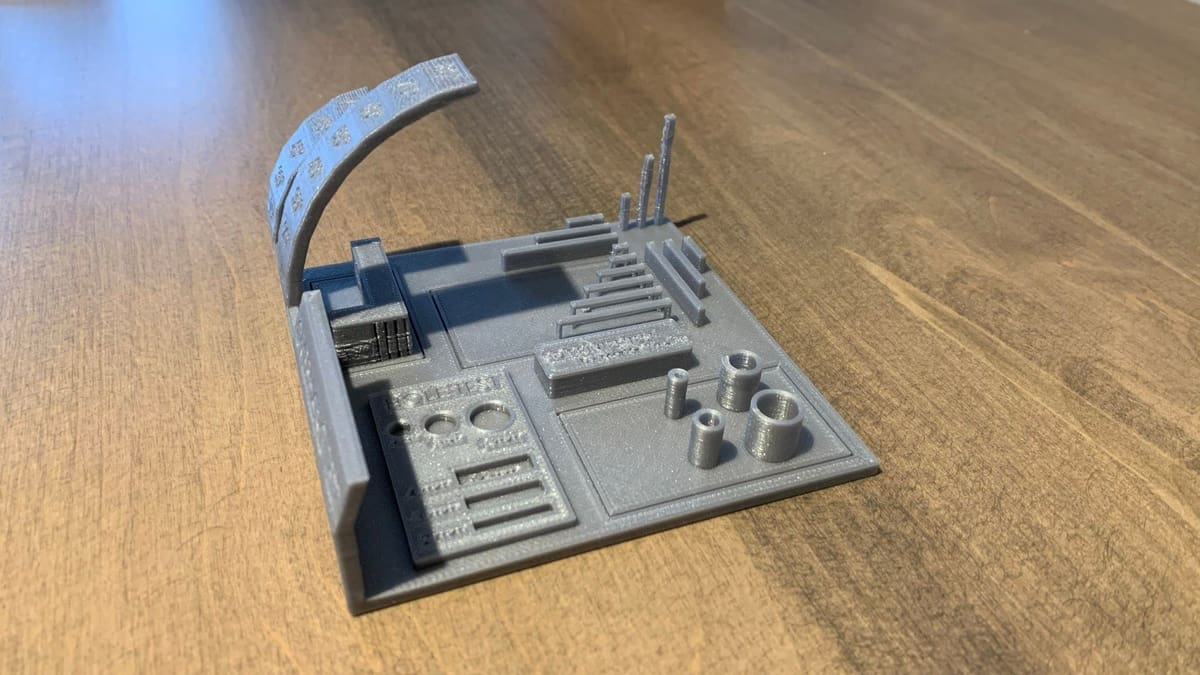
Octagon
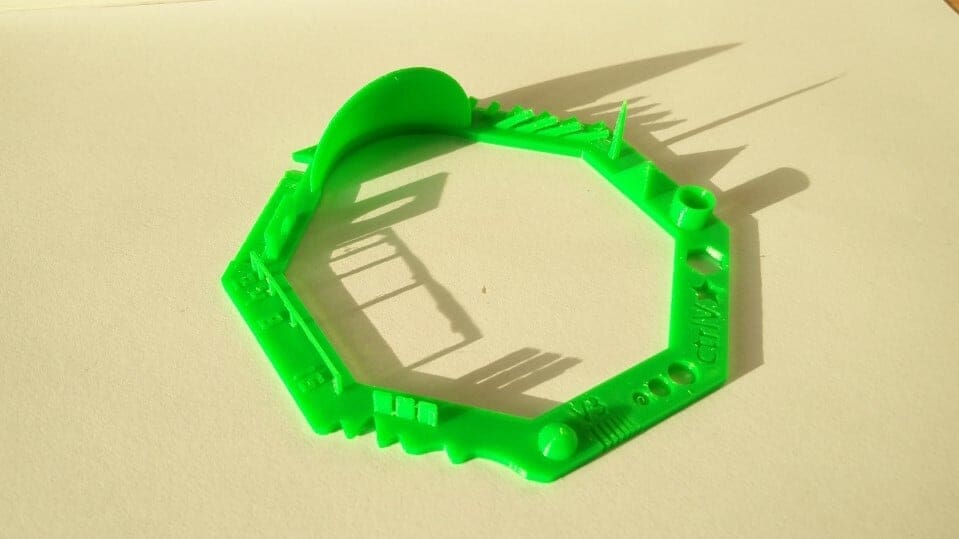
This eight-sided calibration test has an empty center and devotes each side to a few specific 3D printing challenges. A total of 21 different elements are tested, including negative space (indentations), dimensional accuracy, overhangs, warping, and spikes (sharp points).
Dimensional accuracy looks like it was a primary concern for the designer because they listed how long or large each feature should be in the project’s description.
- Who designed it? ctrlV
- How printable/popular is it? With over 305 recorded makes, many users have printed this print and enjoyed its ability to test many aspects of print quality.
- Where to find it? Thingiverse
XYZ Cube

This calibration cube is a simple, fast, and easy model to put your printer to the test. Its primary goal is to help you dial in your printer’s dimensional accuracy by tweaking its axes’ steps per mm. But you can also use it to test temperature, extrusion, and vibration.
It’s a simple design that allows you to easily check aesthetic issues, and with a print time of less than 30 minutes, it’s beyond handy.
- Who designed it? iDig3Dprinting
- How printable/popular is it? This cube has been printed more than 1,000 times and there are over 90 remixes.
- Where to find it? Thingiverse
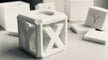
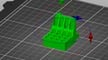
Hollow Cube
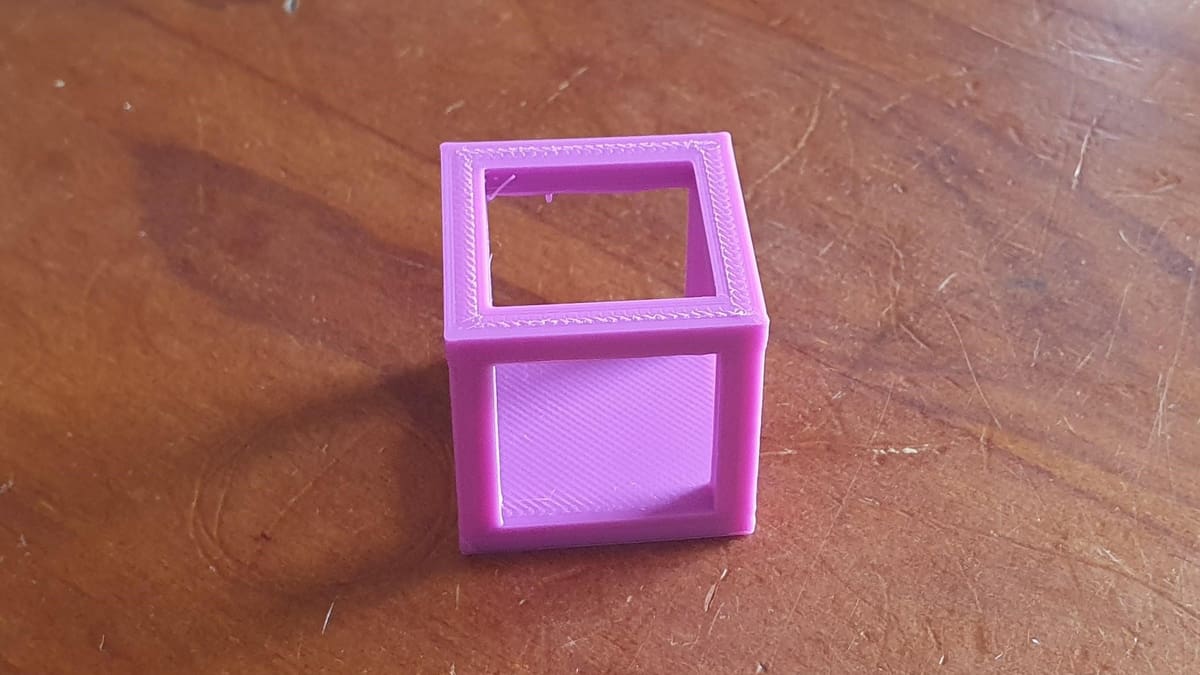
This hollow calibration cube is a test print in the shape of a wireframe cube with a solid base. In other words, as seen in the image above, this test only prints the edges of a cube, leaving gaps for the faces.
Overall, this test is a quick and effective way to test retraction, oozing, bridging, dimensional accuracy, and layer shifting.
- Who designed it? orionwnix
- How printable/popular is it? This test print has 30 recorded makes and 9 remixes on Thingiverse. Makers have shared images of both successful and failed prints, meaning the test is neither too easy nor too difficult.
- Where to find it? Thingiverse
Cali Cat
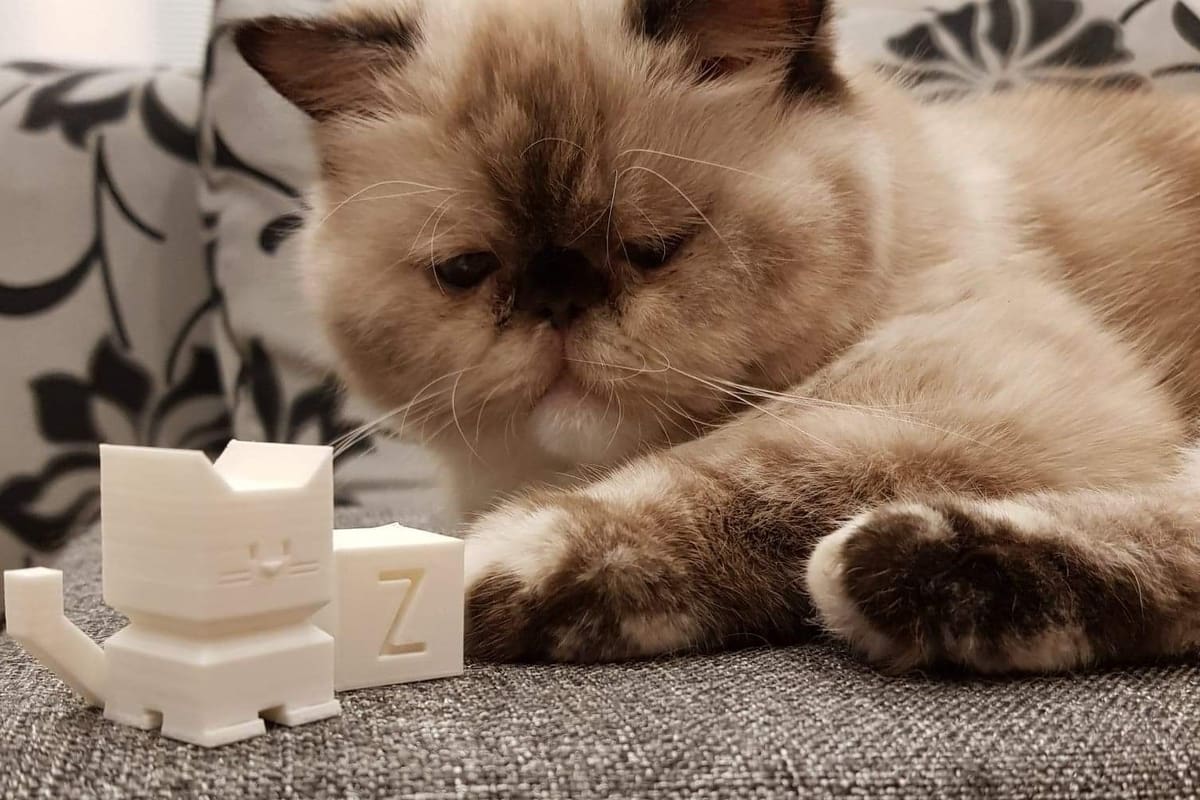
Cali Cat (shortened from the Calibration Cat) is a simple and adorable model that tests your printer’s dimensional accuracy, overhangs, detail, bridging, extrusion, and vibration in under an hour! Designed for initial calibration, this cat will help you achieve purr-fect prints in no time at all.
Pro Tip: If you print one cat twice as big as another, the small cat will fit squarely on top of the big one.
- Who designed it? Dezign
- How printable/popular is it? Over 640 Thingiverse users have posted makes of this model, and there are more than 135 remixes, too! It’s been printed on many different machines with various materials.
- Where to find it? Thingiverse
The Torture Toaster
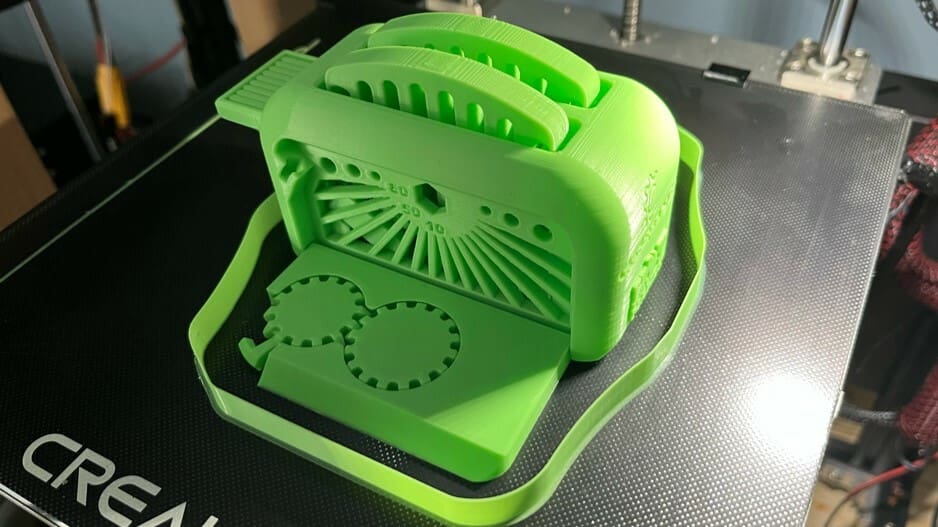
Next, this print-in-place toaster with two hinged doors and a lever will put your printer to the test! It’s designed to verify tolerances, overhangs, and bed adhesion. If all goes well, you should be able to push the lever to pop the toast up, just like on a real toaster. However, if your printer isn’t up to the task, your toast won’t be able to move!
The creator recommends printing with 20% infill and a 0.2-mm layer height as a starting point. No brim or supports are required.
- Who designed it? Clockspring
- How printable/popular is it? This design has around 130,000 downloads and over 480 posted makes on both sites.
- Where to find it? Printables, Thingiverse
Temperature Tower
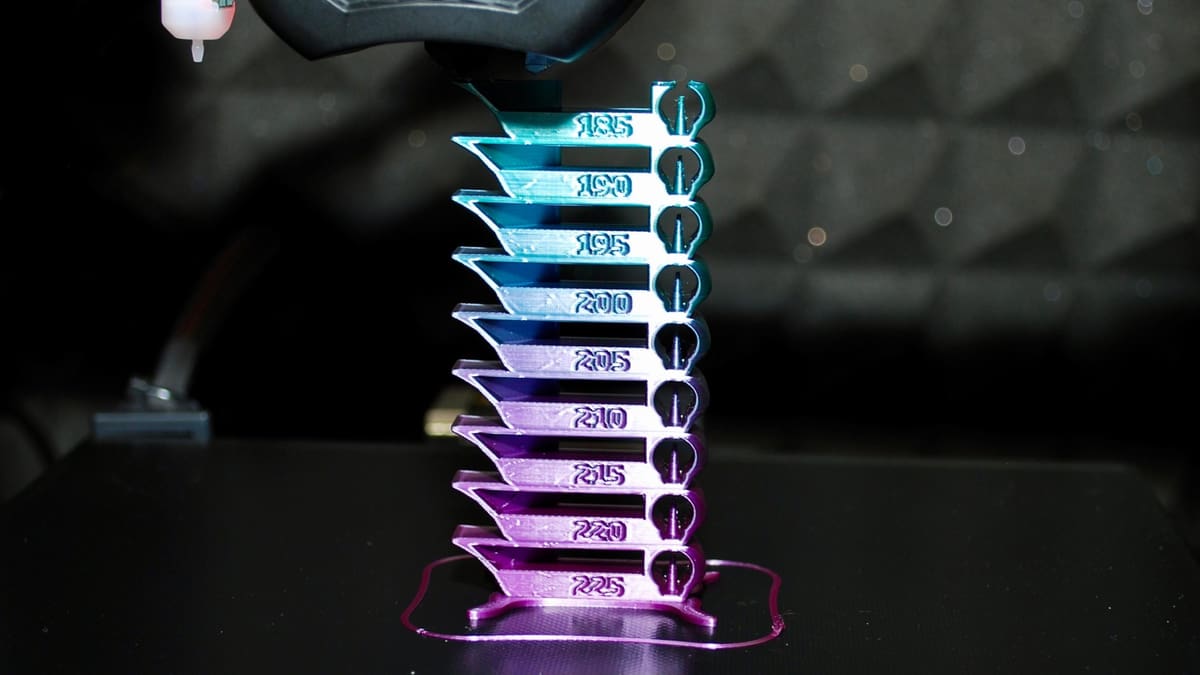
As the name implies, this model is a smart, compact temperature calibration tower. It tests overhangs, bridges, stringing, and even your printer’s ability to print curvy shapes. Of course, it’s also a great way to quickly calibrate your printer’s temperature for a particular material.
For deeper dives, you can check out our guides on using a temp tower in Cura and in PrusaSlicer.
- Who designed it? gaaZolee
- How printable/popular is it? Over 140 Thingiverse users have posted makes of this model, which were used to calibrate various machines for different materials. There are also 46 remixes with different heights and other modifications.
- Where to find it? Thingiverse

Phil A. Ment
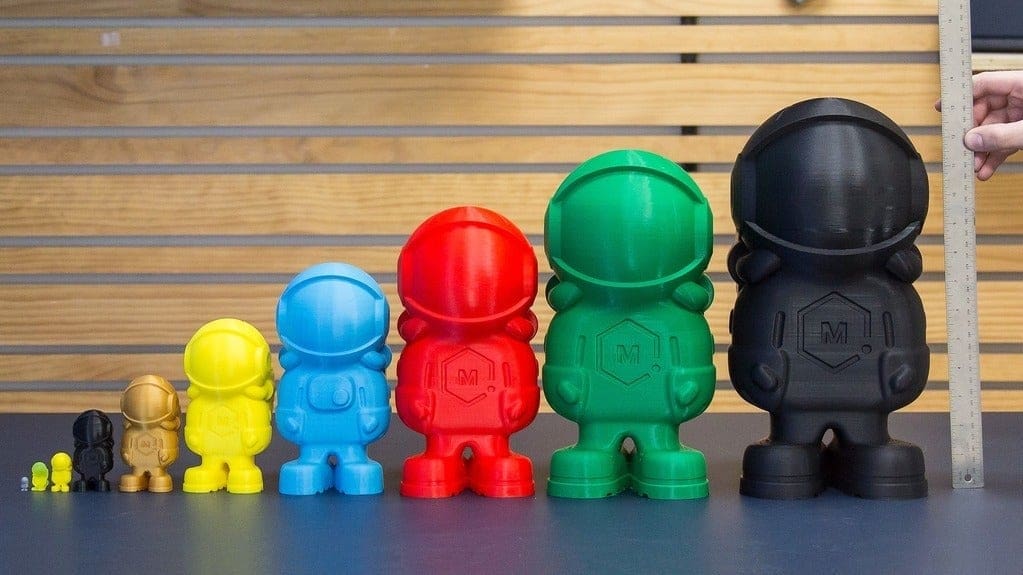
Phil A. Ment is MatterHackers’ adorable mascot, designed to help makers calibrate their printers to a ‘T’. According to the company’s description, “Phil has several features specifically to put your printer through its paces.” The torturous targets include some small embossed and inset details and the smooth dome of Phil’s helmet. Other tricky tests include overhangs, bridging, cylinders, fillets, and chamfers.
The smallest and largest recorded prints are 5- and 1,397-mm tall, so scaling this test print should be no trouble. You can even choose from several versions of Phil, including models optimized for resin and even a Santa Phil!
- Who designed it? MatterHackers
- How printable/popular is it? Around 215 makes have been posted on Thingiverse, with many people sharing their Phil A. Ment armies!
- Where to find it? MatterHackers, Thingiverse
Benchbin

One of the biggest pains of 3D printing is wasting material; while multicolor printers or setups can make beautiful pieces, they can leave a considerable mess in their wake.
This benchmark model tests color change and overall print quality, print speed, and material waste, without the need for any supports or flaps.
The wheels are printed separately to the main part, but once assembled they’re functional – just like the lid. The designer created this to use up to four different colors and test different multicolor printing solutions.
To see how this can be useful, check out this make by Knarfrun75. They detected stringing with the red filament that hadn’t been noticed before.
- Who designed it? Prusa3D
- How printable/popular is it? Almost 3,800 downloads and around 60 make it clear that it’s a perfect challenge for multicolor calibration.
- Where to find it? Printables

Spider's Web
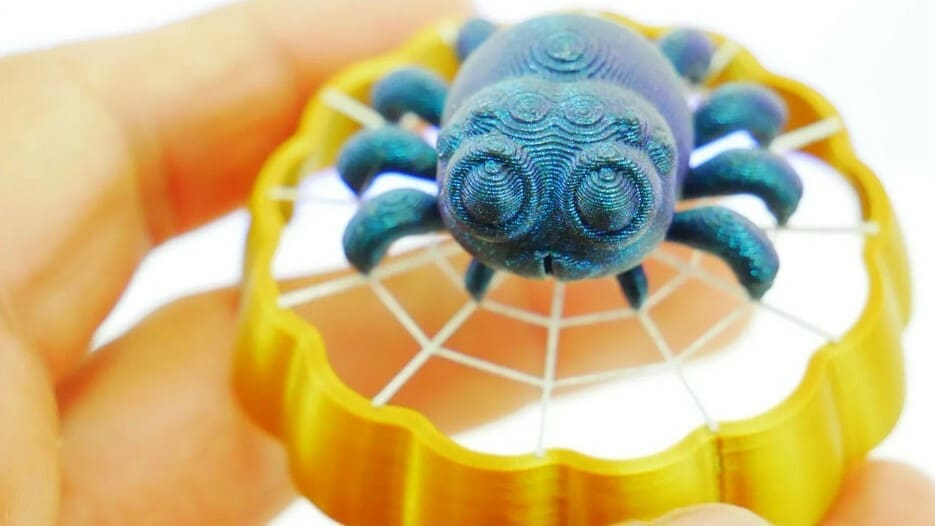
This Halloween-themed stress test is intended to verify the bridging capabilities of your machine. If all goes well, you shouldn’t see any stringing or loose strands of filament. The model consists of a thin web supported over a base and a cute spider perched on the web.
The web bridging is considerably wide and consists mainly of single lines of 3D printed filament, so it’s a challenging and fun print to try. Of course, no supports should be used during the print, and a 0.2-mm layer height or smaller is recommended. The creator recommends keeping an eye on things while printing, as there’s plenty that can go wrong!
- Who designed it? E3DOfficial
- How printable/popular is it? This model has over 20,000 downloads and almost 860 shared makes, so it’s definitely printable.
- Where to find it? Printables
Bed Leveling Calibration (Parametric)
Bed leveling is often the trickiest part of 3D printer calibration. This model is here to help! It helps you see how to improve your first layer to produce the best prints.
- Who designed it? pgreenland
- How printable/popular is it? 15 Thingiverse users have leveled their printers’ beds with this helpful test print, and you can also find around 280 remixes.
- Where to find it? Thingiverse
Clearance Tolerance Test
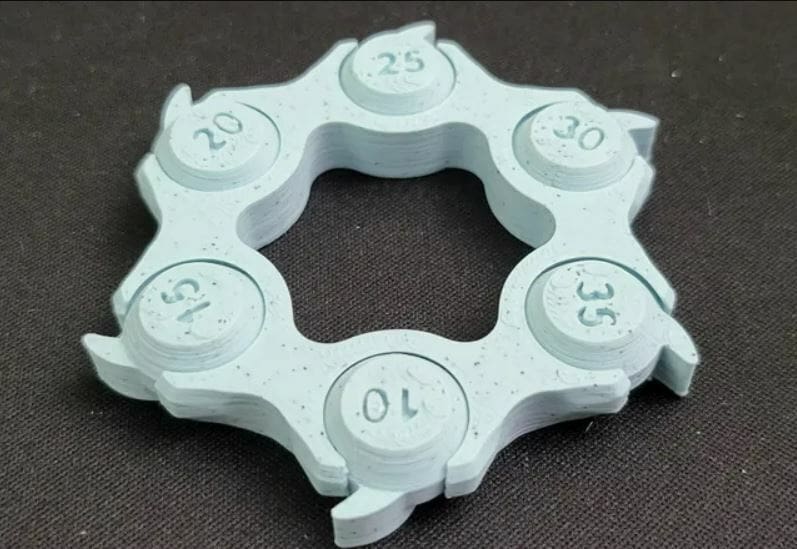
Tolerances are a critical aspect of functional 3D prints. Adjusting them can be tricky and time-consuming. According to comments from users, this clearance tolerance test is small and fast to print. That way, it will save you time.
The design has six different clearance tolerance gaps, starting with 0.1 mm and increasing to 0.35 mm. It consists of a main structure with detached parts around it. The goal is to verify if the detached parts move after the print is finished. If they are stuck in place, you can work on your printer, the printing parameters, or your materials to improve your tolerances to a… tolerable level.
You can check the range of parameters other makers have used and compare them to your values in the comments from the community.
- Who designed it? 3DMakerNoob
- How printable/popular is it? This model has more than 44,000 downloads and 724 shared makes.
- Where to find it? Printables
Z Hop
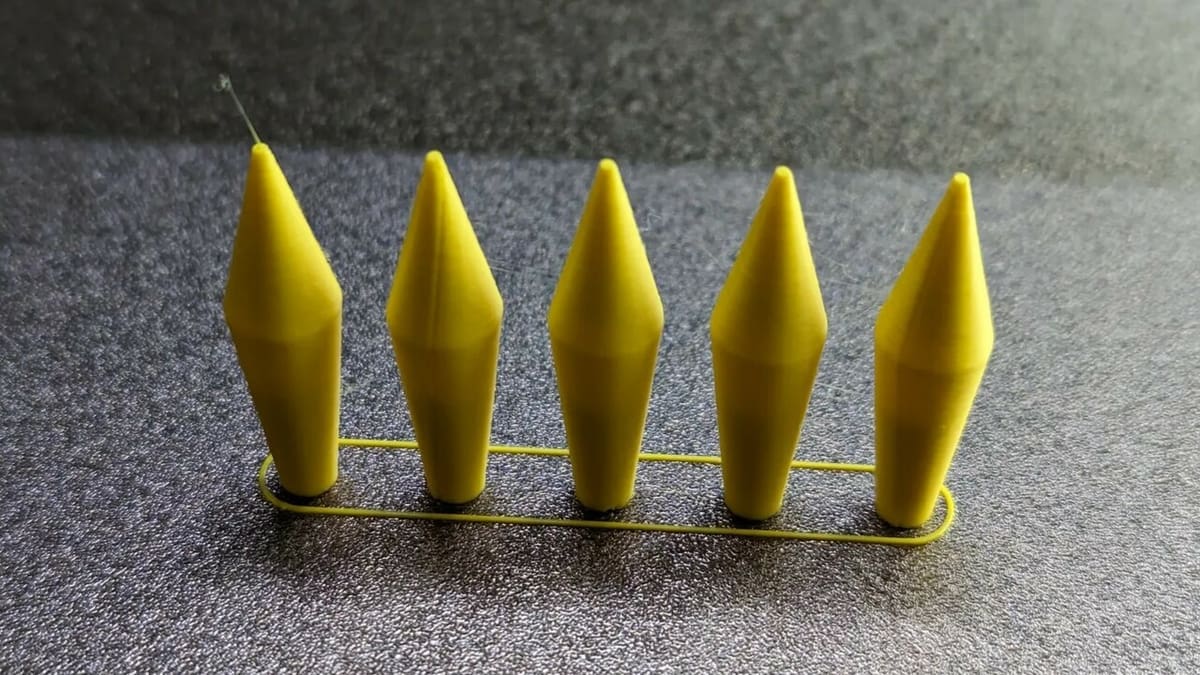
This simple and fast-to-print model is aimed at tweaking your printer’s Z hop, which is basically a slicer setting that prevents your model from being knocked over by the printhead mid-print. In addition, fine-tuning the Z hop setting can help you achieve smoother prints, as it gives the nozzle some clearance.
The designer notes that while this model looks fairly simple, it’s still difficult to print. You can print it with or without a brim to test bed adhesion.
- Who designed it? lostintech
- How printable/popular is it? This test model has around 45 shared makes. Many makers were able to print this successfully with no issues.
- Where to find it? Printables
PolyPearl Tower
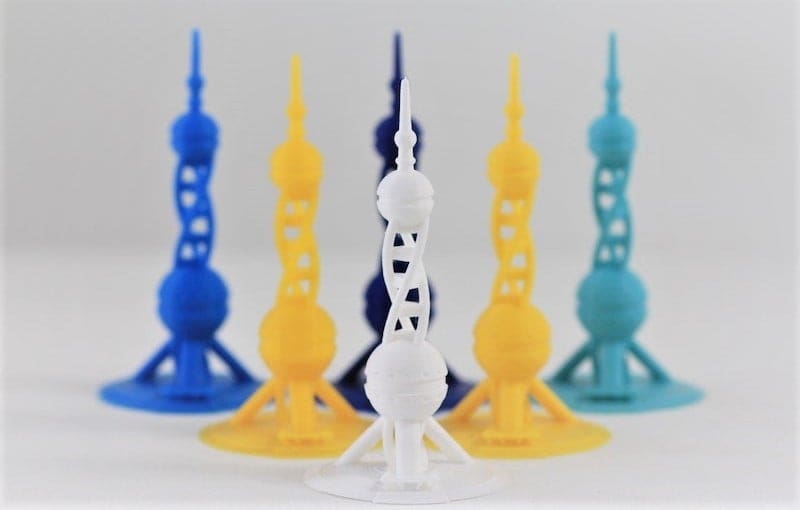
The PolyPearl tower is a great print to test bridging, curves, overhangs, stringing, and much more. Described as a torture tower with a twist (literally!), this model is sure to help you quickly calibrate the ideal settings for your printer or filament.
- Who designed it? Polymaker_3D
- How printable/popular is it? Over 85 Thingiverse users have calibrated their 3D printers with this quick, easy, and beautiful torture tower.
- Where to find it? Thingiverse
5-mm Steps
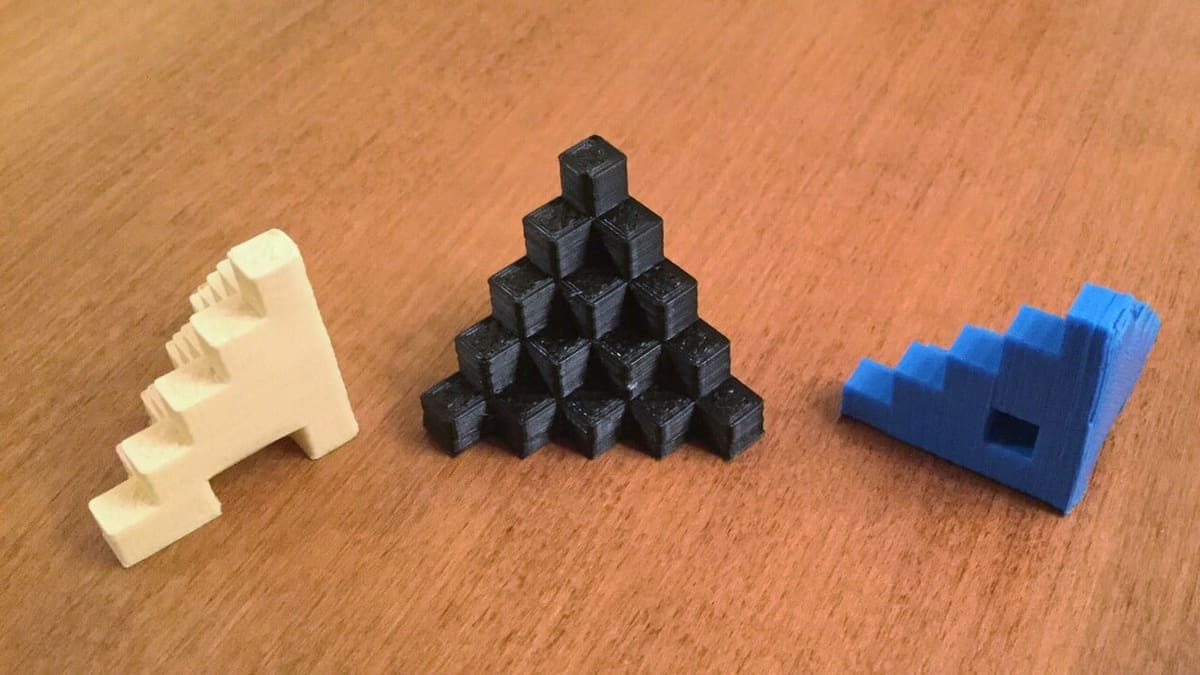
This next calibration print consists of many 5-mm cubes in a stair-step pattern up the side of a quarter-pyramid. However, if the design only had 5-mm cubes, it wouldn’t be testing much; the model also contains gaps to serve as bridging tests.
According to the designer, this calibration model allows you to check your printer’s dimensional accuracy, bringing capabilities, cooling settings, and E-steps.
- Who designed it? MCroucher
- How printable/popular is it? This 5-mm cube test print has nearly 230 recorded makes on Thingiverse with 9 remixes. The pictures that have been shared so far are mostly successful prints, so achieving a near-perfect print of this model should be possible.
- Where to find it? Thingiverse
Slope Angle

This test highlights the effects of staircasing on prints based on the slope’s angle. Staircasing is the appearance of tiny steps instead of smooth curves, an almost unavoidable result of producing a part in layers.
This design includes nine different angle arrangements (each of two angles that add to 90°) starting from 5° and 85°, letting you see which angle works best to minimize the stair-casing effect on prints with a slope.
Once you find the right angle, you can properly orient models that contain a curve so that the curve is at the determined angle and the slope will look more uniform and natural. Alternatively, you can print a few of these calibration models at different layer heights and use the one that works best.
- Who designed it? Devstroyer
- How printable/popular is it? This slope test print has over 29,800 views and 2,700 downloads. While there aren’t any community prints, the designer posted numerous images of great prints, so printing this calibration model should be easy.
- Where to find it? Cults
Shootout Collection
The tech magazine Make: has made its own assortment of test prints for 3D printers. In total, there are seven different calibration tests covering many printing challenges, including bridging, X-, Y-, and Z-axis resonance, fine detail, dimensional accuracy, overhang angles, and more.
- Who designed it? Make
- How printable/popular is it? 74 users have shared recorded makes for this test print project, and there are 7 remixes of these designs on Thingiverse. Based on the images from the recorded makes, it seems many users spent a lot of time using the bridging test to tune their machines.
- Where to find it? Thingiverse
Cali-Dragon
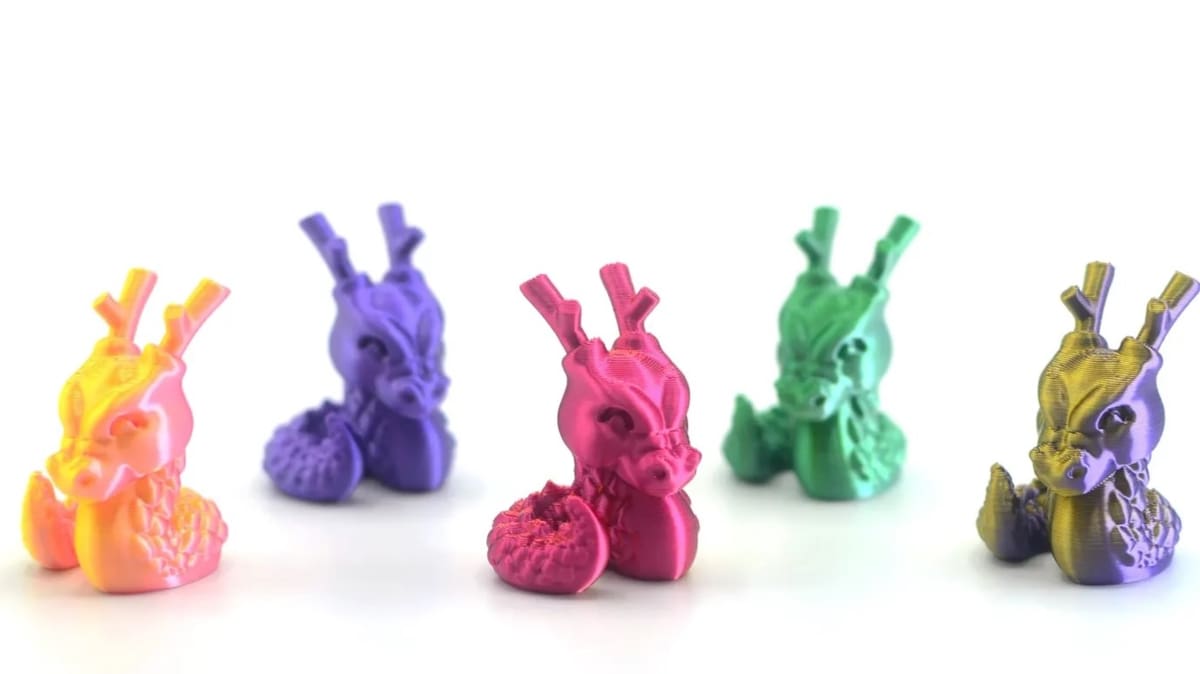
This adorable model isn’t intended to test precision and tolerances. The goal here is to verify other parameters focused on less technical prints that just have to look pretty. To accomplish that, the Cali-Dragon allows you to test surface smoothness (layer consistency), stringing, small perimeters, overhangs, ghosting, and details. This design looks so nice that it also serves well as a material test to verify the color and quality of a new filament spool.
The creator says that it can be printed with no infill at all, and other printing parameters like layer height and wall count will be defined as the way you wish to test the parameters of your printer. A suggestion is to start with a 0.2-mm layer height and three walls, then tweak according to your needs.
- Who designed it? McGybeer
- How printable/popular is it? There are over 1,740 makes of this model combined from the different sites.
- Where to find it? Cults, MyMiniFactory, Printables, Thingiverse
License: The text of "20 Free 3D Printer Test Print Models" by All3DP is licensed under a Creative Commons Attribution 4.0 International License.