Bambu Lab Slicer: Bambu Studio – All You Need to Know

Here's everything you need to know about the Bambu Studio Slicer. Read on to learn how to use this slicer with your 3D printer!
Bambu Studio by Bambu Lab is their entry into the ever-growing group of custom slicers provided by 3D printing companies. While Bambu Studio is based on PrusaSlicer and references some ideas from UltiMaker’s Cura, it also stands apart as a unique slicer in its own right.
Like many other popular alternatives, Bambu Studio is an open-source slicer. However, it also includes an optional closed-source network plug-in, which is used to communicate with Bambu Lab printers.
The biggest difference you’ll see between Bambu Studio and alternatives is its project-based workflow. This tool offers the ability to build out several plates worth of prints and create a project plan, including the total filament used, filament cost, printing time per plate, and total print time.
In this article, we’ll go over the features and functions of Bambu Studio, and cover everything you need to know about this unique slicer. Let’s dive in!

Accessibility
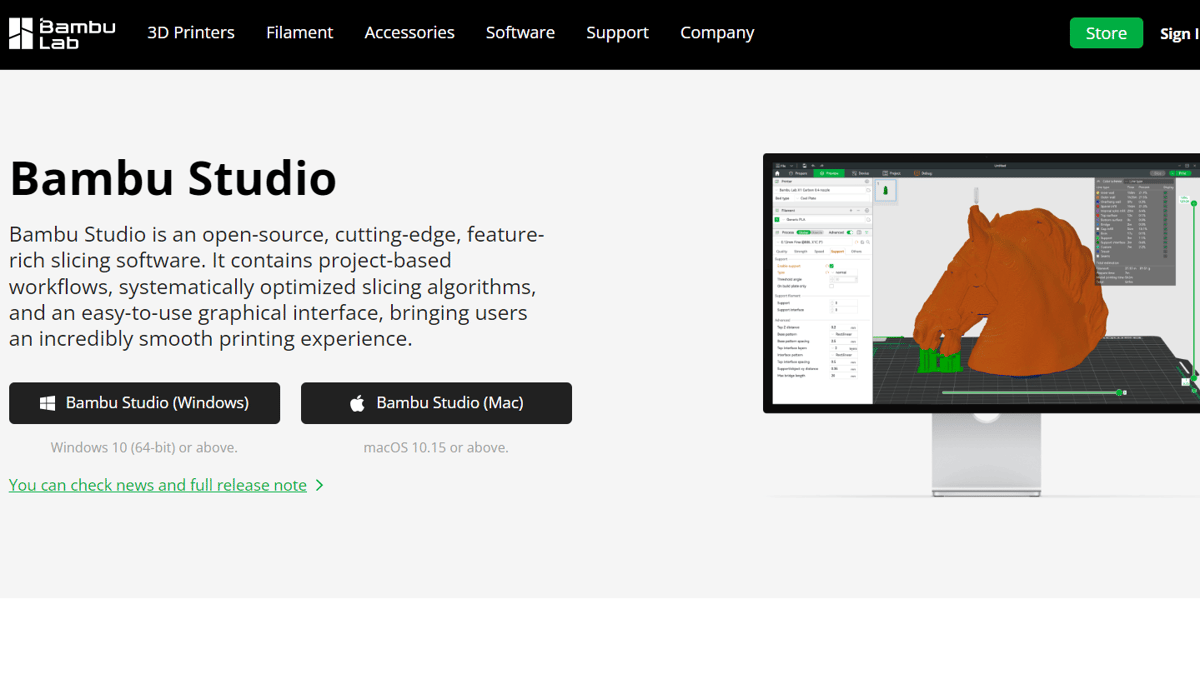
Bambu Studio is officially available on Windows and MacOS, with Linux support currently available from the community. Bambu Lab doesn’t describe any technical specs beyond the following system requirements:
- Windows 10 (64-bit) or above
- MacOS 10.15 or above
For Linux, they provide an AppImage and directions on how to compile for Ubuntu and Fedora Linux. Although it started as a community feature, Bambu Lab has picked it up and added it to their official releases on GitHub.
Once installed, setting up Bambu Studio is straightforward. They have pre-installed profiles for several brands of printers other than their own that are well-tuned to help new users get started. Once users feel more comfortable using the program, they can check out the slicer’s advanced features. These sought-after tools include tree supports, support painting, and ironing, as well as classic and Arachne wall generation options.
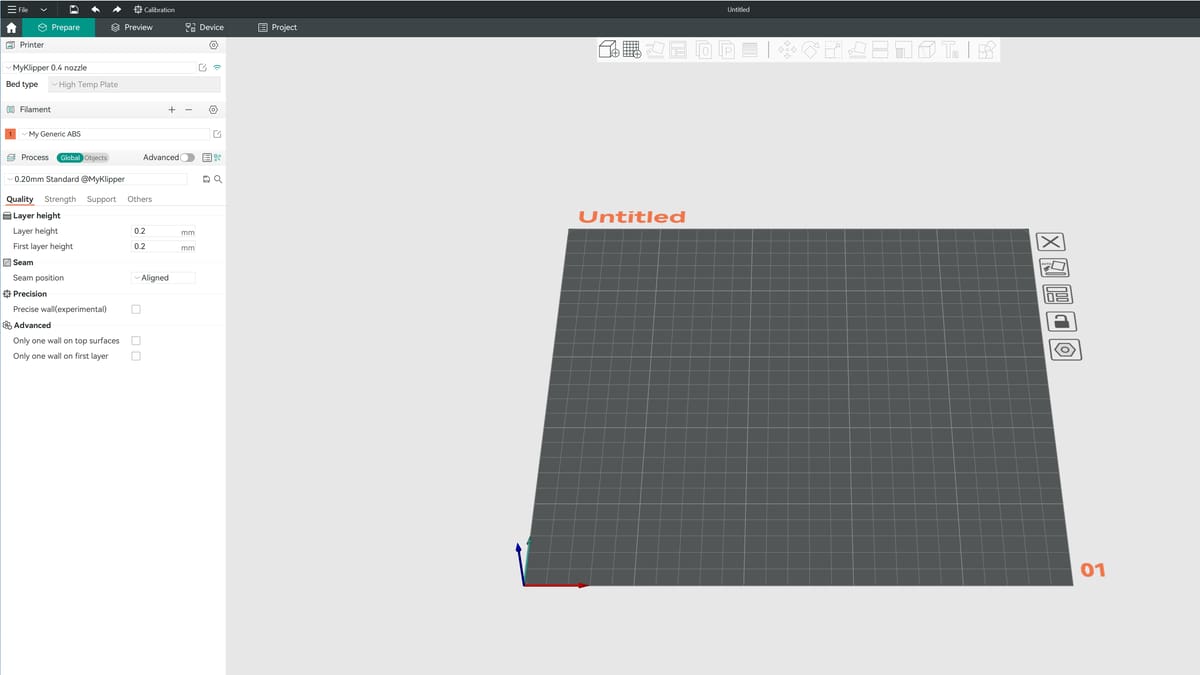
UI & Layout
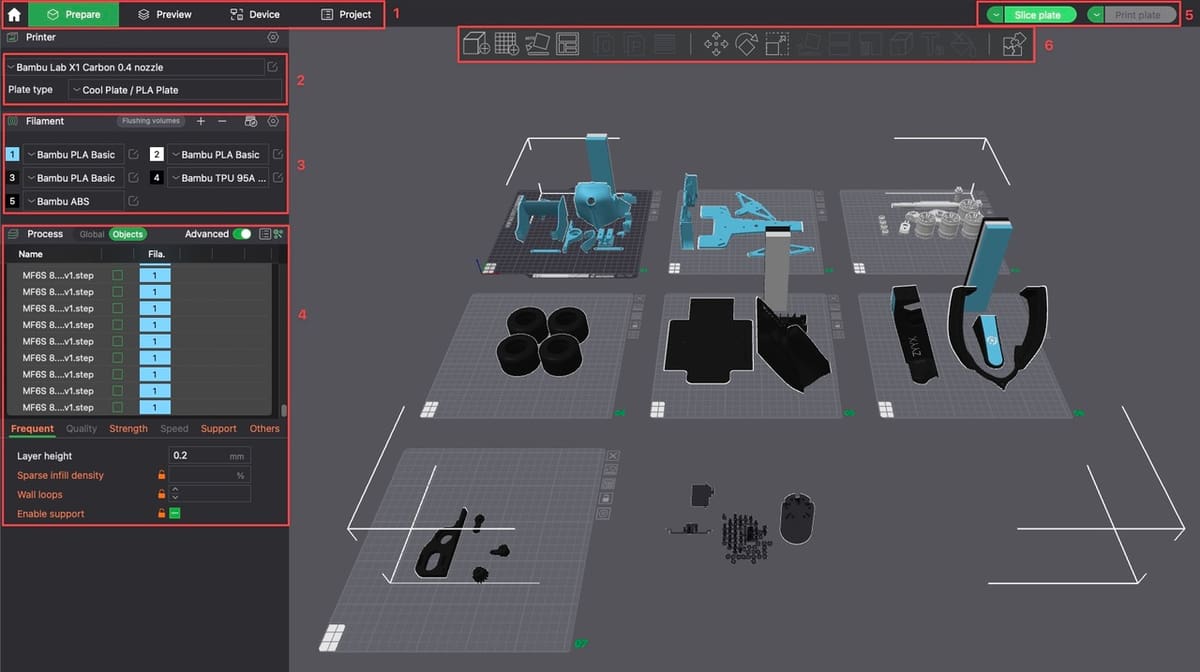
The UI layout of Bambu Studio is very easy to pick up and learn. It offers a modern user experience, and one can quickly go from beginner to expert on this slicer with a little practice. Here’s an overview of Bambu Slicer’s UI:
(1) App Menu Bar
In this bar, you’ll find the five main sections of the slicer:
- The home icon is used to open or import projects.
- Prepare View is where the magic happens in Bambu Studio. From tweaking and tuning to customizing everything about your print job, it all happens here.
- Preview your project after slicing to see estimates on timing and filament usage as well as any warnings or errors it may detect in the extruder path or over the plate.
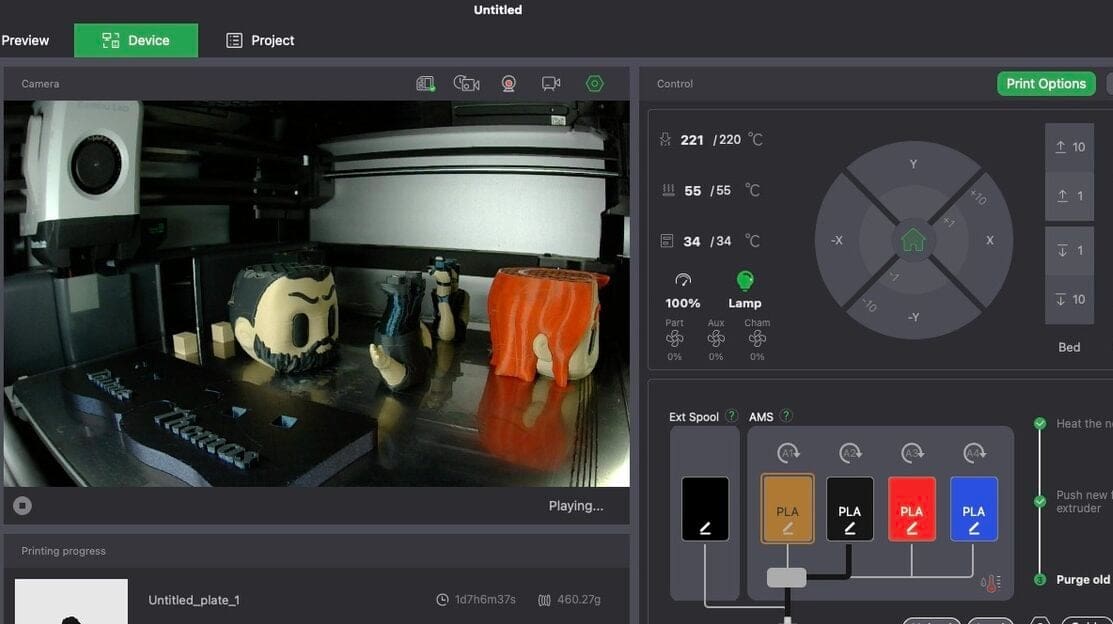
- Device provides you with a live view through the camera function and updates on the filament, temperature, and printing progress.
- Project has a few unique tools. Here, you can attach pictures, documentation, and a build list of materials that describe your project in detail.
(2) Printer & Plate Selection
Here, you will select the printer you want to slice for as well as the plate type (when using a Bambu Lab printer).
(3) Filament Selection
There are three ways to view your filament selection in Bambu Studio.
- When you are building a project, you can list the filament you will use, and it will be displayed here.
- If you have an Automated Material System (AMS) by Bambu Lab, it will display all the filament currently within the AMS. When using the AMS, you’ll also be able to calculate the flushing volumes of each filament change. This allows you to change the amount of filament extruded between filament changes to ensure that the proper color will be dispensed. Bambu Studio does a great job at auto-calculating, but you can also manually configure it.
- If you are just using a single roll of filament, this section will be empty.
(4) Process Options
This area is broken up into two sections: Global and Objects.
- The Global section is where you’ll find typical settings, such as infill percentage, layer height, quality settings, speed, and supports. Under Strength, you can adjust settings that will increase the strength of your part, which is useful if you’re printing a functional print. In Others, you’ll find additional print settings, including fuzzy skin, slicing modes, filament flush settings, and bed adhesion.
- The Objects section view is similar to Global, but now it’s specific to each object. This allows you to customize every object on your build plate.
(5) Slice & Print Plate
Like on other slicers, these buttons will run the slicing or print to plate. The print plate button is greyed out until you slice.
(6) Tool Bar
While some of these icons may look familiar as they come from PrusaSlicer, there are a couple of unique ones. For example, the grid icon with a plus sign adds plates to your workspace.
There’s also the paint bucket, which isn’t for painting supports but for multi-material selection. This will allow you to select which filaments to use for specific parts of an object you’re painting, allowing you to “paint” on different filaments to the object. This can be useful for multi-color prints or for projects using different filaments, such as dissolvable support filament.
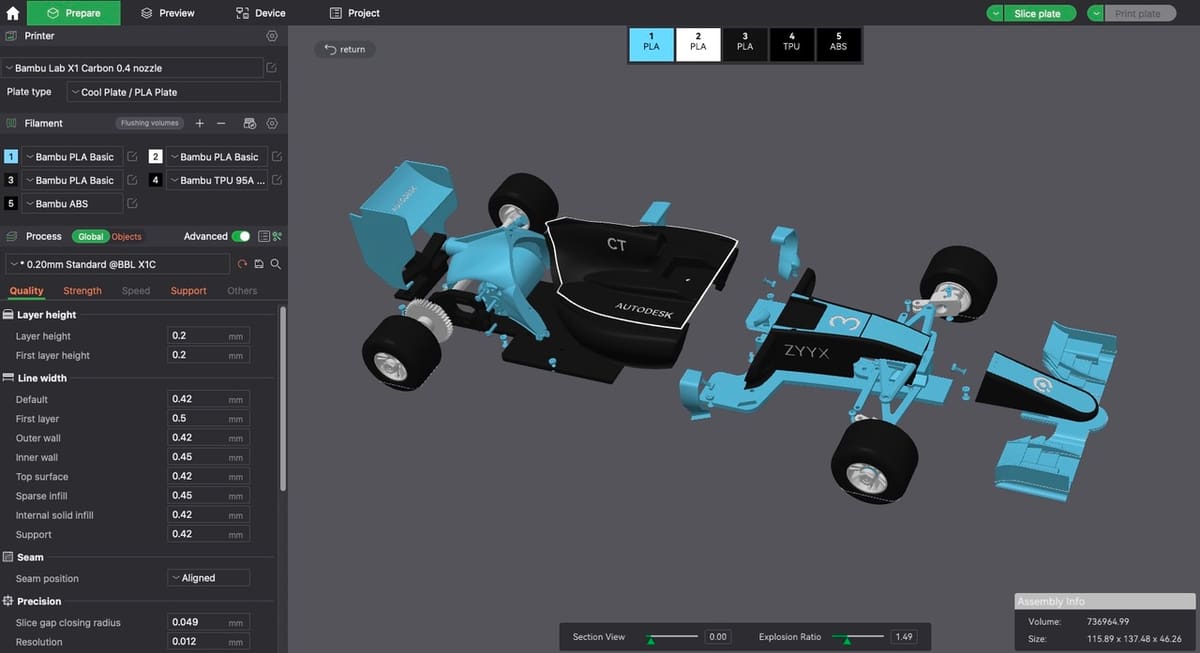
Finally, the puzzle piece is used for the assembly view. This tool allows you to view a completed project instead of the object view with parts across multiple virtual plates. Assembly view is a great way to check that projects with multiple pieces go together smoothly without having to print first.
Features & Functions
Bambu Studio has some really unique features and functions that we’ll go over in this section. Here’s a look at three standout features.
Project Based Workflow
One of the most unique features of Bambu Studio is the project based workflow. This workflow allows a creator to bundle together images, a bill of materials, assembly guides, and text notes they may want to include with their project.
Additionally, it lets you switch between object and assembly views, allowing you to see the finished work that all the objects you print will create. No other slicer includes a workflow like this to date. This feature helps creators ensure that their project vision is replicated exactly as it should be, which can be critical for projects such as 3D printed RC cars or planes.
Another useful aspect of this feature is plate management. When you’re printing several pieces that don’t fit on one build plate, you can add up to 36 plates to your build area and spread your parts across all of the build plates. This allows you to have build plates for specific filaments or printing profiles.
To access the project-based workflow in Bambu Studio, go to the Project tab on the app menu bar.
Filament Customization
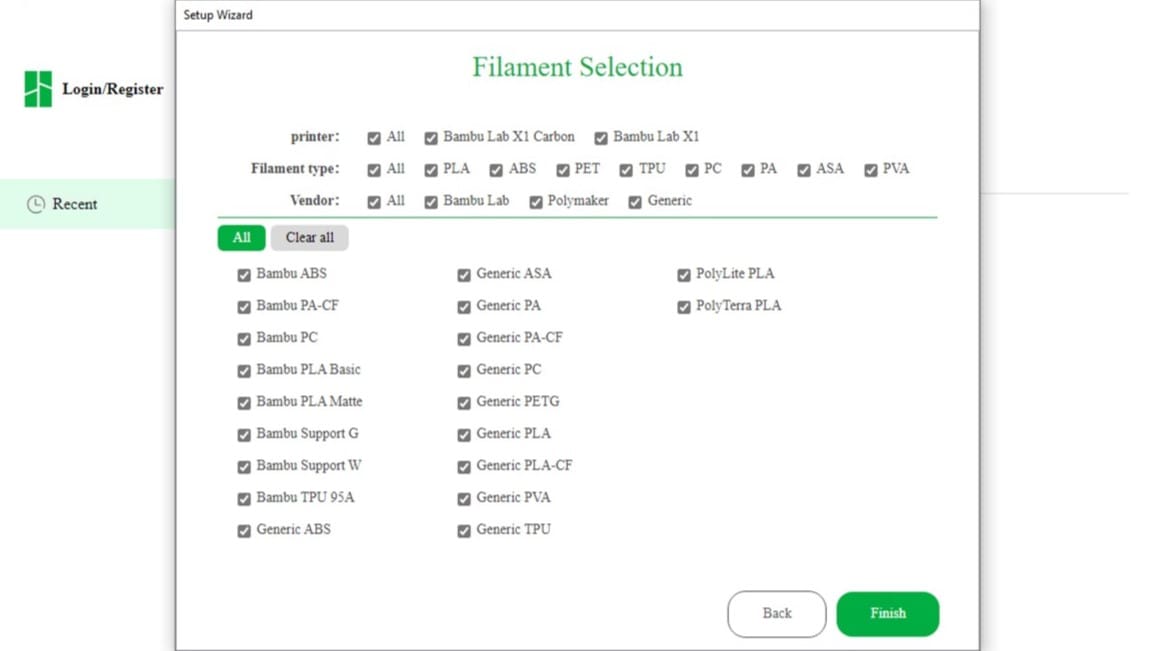
Bambu Studio has over 30 different filament profiles, ranging from your run-of-the-mill PLA all the way through to the more exotic PC, PAHT-CF, PET-CF, and Support types. Since this is a product from Bambu Lab, the majority of the filaments are Bambu based. However, there are also a wide variety of generic profiles and a handful from Polymaker.
You also aren’t limited to the pre-set profiles, and you can also build and tweak your own. Bambu Studio provides you with the ability to make your own custom profiles for a wide variety of filaments, including PLA, ABS, ASA, PETG, TPU, PC, and more.
Turning on these profiles is as simple as clicking the gear icon in the Filament section under the Prepare tab.
Go Live
Another unique feature is the slicer’s ability to “Go Live”, which creates an Open Broadcaster Software (commonly referred to as OBS) source so that you can stream what you are printing on your Bambu Lab-based printer. This unique feature has risen out of the popularity (and satisfaction) of watching a 3D printer in action.
You can find dedicated TikTok and YouTube videos of 3D printers printing. Additionally, this feature makes it incredibly easy for content creators to add their printers to their live streams or videos.
To turn on this feature, go to the Device tab, click the Camera icon, and toggle Go Live.
User Experience

While Bambu Studio has an amazing array of advanced features, the slicer is still beginner-friendly.
You can see this attention to detail with the notices that link to specific wiki help articles. These are little windows that pop up in the bottom right-hand corner of the screen based on your specific task or when the slicer finds an error during G-code generation. In addition, the slicer can be configured to automatically install new updates, ensuring you’re always up to date with the latest features and functions.
Many users report a positive experience using the slicer, especially with Bambu printers. However, even though it caters to their own devices, Bambu Studio is still a powerful slicer that you can use for third-party printers. Specifically, it offers printer configurations for Anycubic 4Max Pro, Voron 2.4, Voron Trident, Voron 0.1, and the Creality Ender 3 V2. Just keep in mind that if you use a non-Bambu Lab printer, you’ll lose features under the Device section of the slicer, such as the live camera, temperatures, and print progress.
Of course, users also run into some problems when using Bambu Studio, such as lags and STL issues. However, these problems are typically fixable and don’t seem to impact the overall user experience.
Company & Community Support
If you ever require help while using Bambu Studio, you have plenty of options. Bambu Lab has a FAQ page, an official wiki, and a community forum where users can search and find resolutions to common issues. However, if you need help beyond what’s available on these pages, you can reach out to online technical support via a ticketing system. If you’re a business using Bambu Lab-based products, you can also access a specific customer portal for support.
Additionally, there’s an active community around Bambu Studio. You can connect with users from around the globe, share your favorite Bambu 3D prints, learn new tips and tricks, and get answers to your questions by checking out the Facebook, GitHub, and Reddit communities. The active Discord community boasts over 10,500 users, and there are users from the community and company.
Finally, if video tutorials are more your speed, Bambu Lab has a robust YouTube channel with videos covering everything from common maintenance to replacing parts on printers. However, they don’t currently have any content about their slicer on the YouTube channel.
Alternatives
We’ve talked a lot about Bambu Studio, but there are also a couple of noteworthy competitors worth considering. Keep in mind that each of the following slicers are open source and free.
- Cura: Cura is open-source and free software from UltiMaker that’s compatible with many third-party 3D printer brands. Easy to use and learn, this ever-evolving slicer provides a solid foundation for all your slicing needs. Compared to Bambu Studio, Cura’s user interface is a bit simpler. When it comes to printer compatibility, Cura is king, with more printer profiles than Bambu Studio.
- PrusaSlicer: Based on Slic3r, PrusaSlicer is free and open source from Prusa. However, PrusaSlicer has a slightly steeper learning curve. While PrusaSlicer provides easy access to advanced functionalities, setting labels can come with more complex wording (i.e., walls vs perimeters), and there’s no in-app hover text or context to help guide you.
- OrcaSlicer: A fork of a fork of a fork, OrcaSlicer began as a community-customized Bambu Studio that quickly evolved into its own slicer. It has differentiated itself with utilities like calibration tools for flow, pressure advance, retraction tests, temperature towers, and tolerance tests. Additionally, it makes it easier to add third-party printers and offers a larger set of pre-defined printer profiles.
License: The text of "Bambu Lab Slicer: Bambu Studio – All You Need to Know" by All3DP is licensed under a Creative Commons Attribution 4.0 International License.