15 3D Printed Woodworking Tools That Save You a Trip to the Hardware Store

Fifteen community-designed clamps, jigs, and guides that print in an evening and outlast their store-bought rivals.
Upgrade your woodworking shop with some basic and custom tools. Hand-screw clamps, router jigs, sanding blocks: each one of these 15 3D printed tools solves a problem you already have, and most can print overnight.
We pulled the best designs from online repositories such as Thingiverse and Printables, vetted by thousands of downloads and remakes from other makers, not just us.
The great thing about woodworking is that there are a million ways to achieve the end result. Whether you’re a hand or power tool woodworker, 3D printing can make your work more accurate, faster, and often safer.
Of course, the best tool is the one that perfectly fits what you’re trying to do, and the main benefit of 3D printing in any workshop, including woodworking, is the ability to make that exact tool.
Designing your own tools, jigs, or accessories for your other tools can really supercharge the capabilities of your workshop. Whether copying existing tools that have evolved to near perfection over hundreds of years or creating completely new tools with the geometries that additive manufacturing allows for, you’re sure to find something to use in your workshop.
If you see something you like, but your 3D printer is currently out of commission, try Craftcloud. With a wealth of material, color, and finish options, you can order prints to your specifications and have them delivered right to your doorstep.
Hand-Screw Clamp
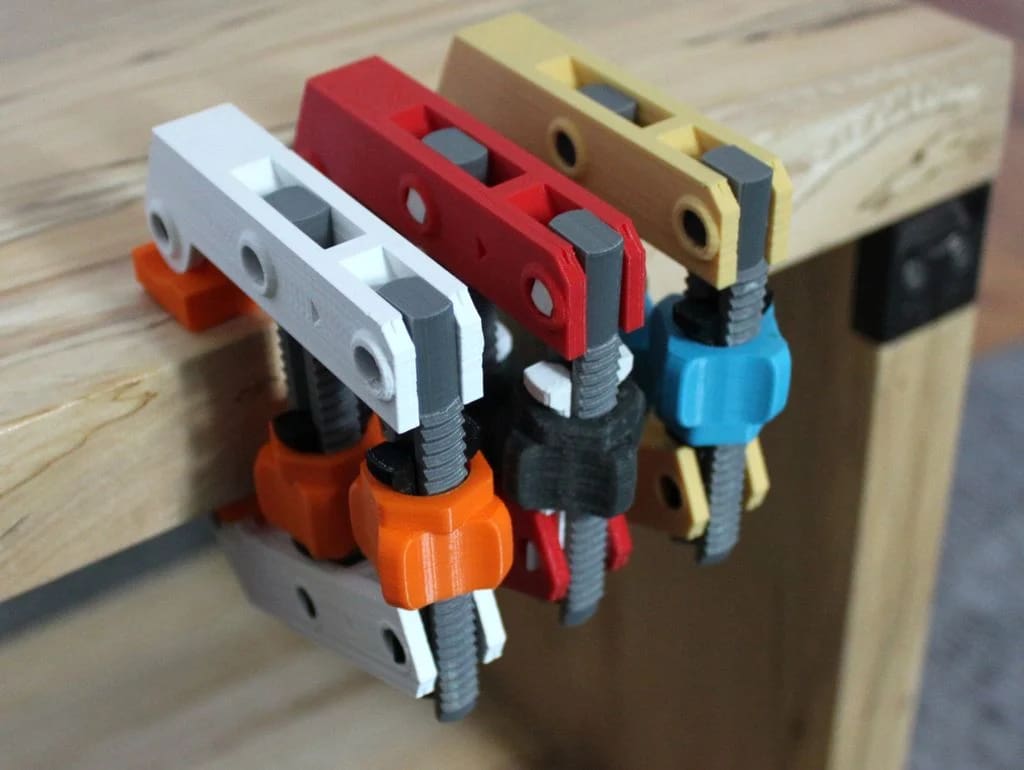
Hand-screw clamps are a shop staple, but not something easily translated into a printable design. This proof of concept by Jakejake proves otherwise. Although the maker admits that it won’t match the strength of a real metal and wood clamp, this design is as strong as your 3D printer allows.
Caution: Maker jakejake warns the “SlideHinge” parts tend to fail first, but that printing it using solid infill may make it stronger. He also admits the design is tricky to assemble and that applying soap or wax may help to make the clamping smoother. With 53K downloads and 20 remakes, looks like the designer has done something right.
- Who designed it? Jakejake
- How printable/popular is it? This hand-screw clamp has 280 posted makes and over 42K likes so far.
- Where to find it? Thingiverse
Corner Radius Jig
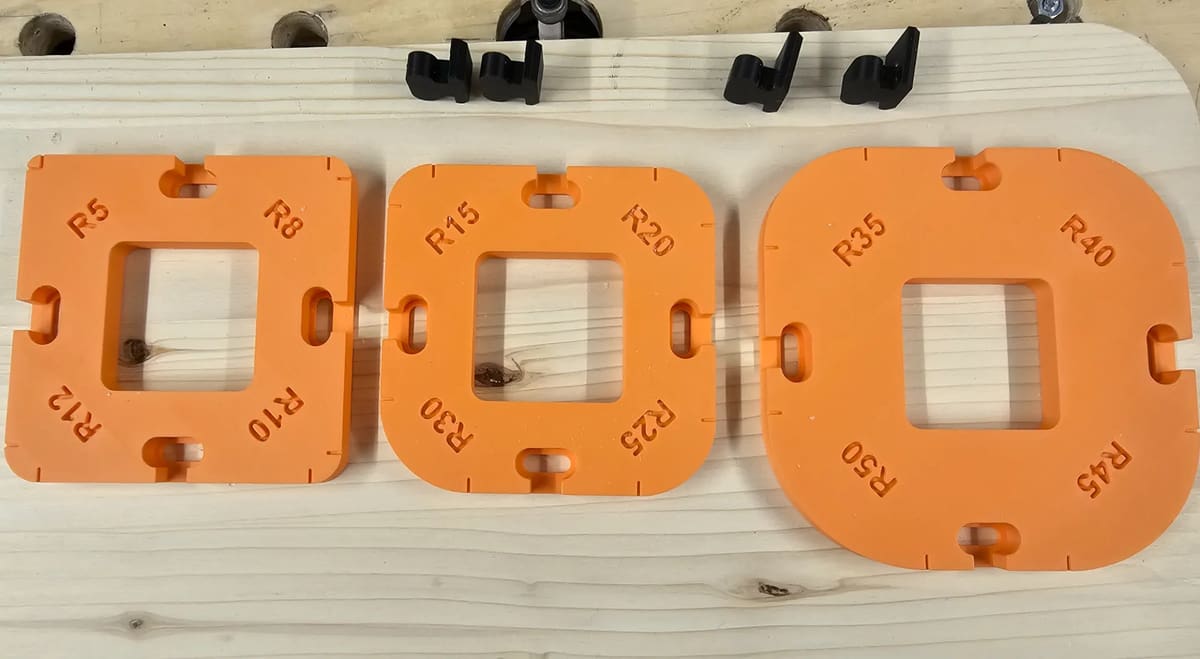
This template takes the guesswork out of getting consistent, professional-looking rounded corners on all our woodworking projects. It provides a set of interchangeable radius options to match the corner profile and then guides your router with a flush-trim bit around the template for clean, repeatable results.
To hold the template in place, this design uses a snap-in locking system, so you don’t need extra clamps to hold it in place, making the entire procedure much faster. One maker liked it so much they designed a box to store them in!
- Who designed it? Pomguy
- How printable/popular is it? This print has over 7.8k downloads and over 3.7k likes.
- Where to find it? MakerWorld
Nail Finger Protector
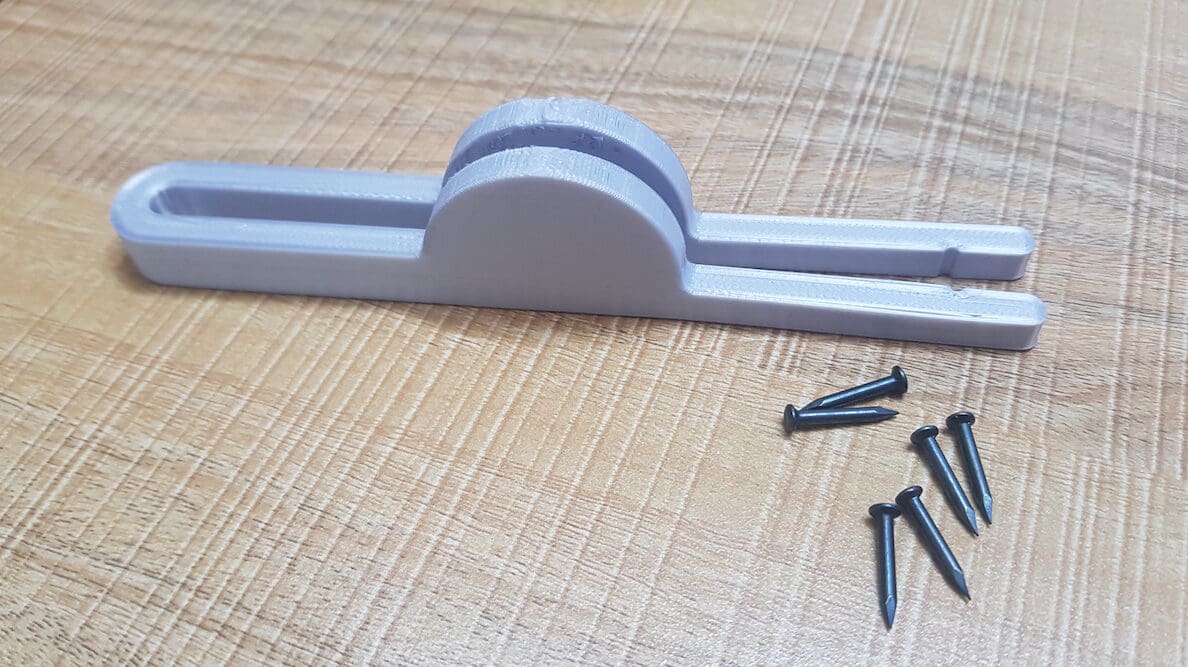
If you’ve ever had to work with small nails, then you know how painful it can be. To save yourself the frustration – and potential injury – while working with these nails, consider printing yourself a finger protector. This print will hold your nail straight up while you hammer it into the wood, keeping your fingers a safe distance away the entire time.
This quick print can save you a lot of time, especially if you have multiple nails that need to be hammered in. The designer created 11 different models, one for each of the most common nail sizes. They even left a chart to help you decide which file is right for you!
Pocket Hole Jig
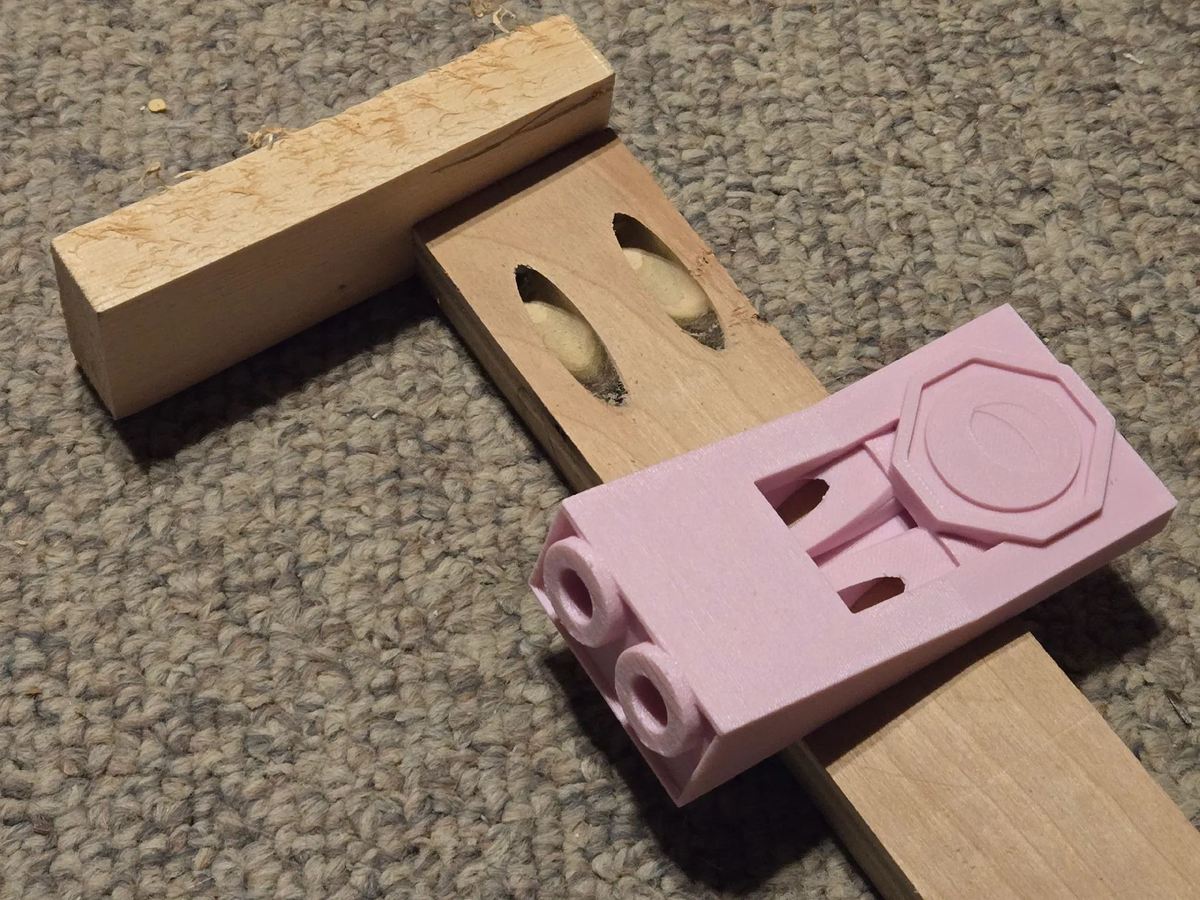
Pocket holes are one of those joinery tricks that make a huge difference once you’ve got the right jig. This Pocket hole jig by Henry does the trick. It is designed to work like the Kreg jig and even uses the same drill bit. Although it doesn’t include the metal insert like the original, the maker claims it will still last for years. Although don’t be surprised if some of the excess plastic is shaved off during your first use.
Henry suggests printing with PC for best results, although he says both PLA and PETG would work as well. One maker had good results printing it with PET-GF, while one used PLA and said it held together for 12 pockets, which as luck has it, was all they needed.
- Who designed it? Henry
- How printable/popular is it? The model has 68 makes but has been downloaded around over 8,800 times.
- Where to find it? Printables
Speed Square
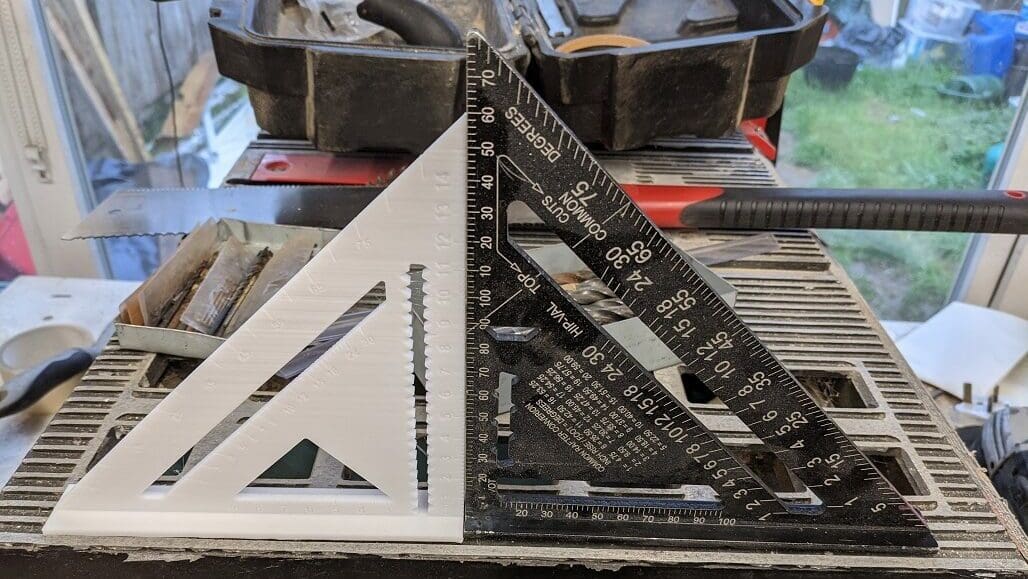
How do you check that those cuts you made with the miter box are actually square? This simple speed square will do the trick. These tools are for quickly laying out your cuts or checking square construction during assembly.
This model comes in both metric and imperial, so you can have your preference. Given that an aluminum speed square can cost anywhere between $5 and $75, a 3D printed speed square could be the way to go if you need something that might end up being sacrificed to the project.
This is a long, tall print with all the challenges that brings. Further, if you have a lot of Z wobble or your motion system isn’t calibrated, this tool may not be as accurate as you want.
- Who designed it? PPep54
- How printable/popular is it? This popular model has 17 posted makes and 1 remix.
- Where to find it? Thingiverse
Drill Stop
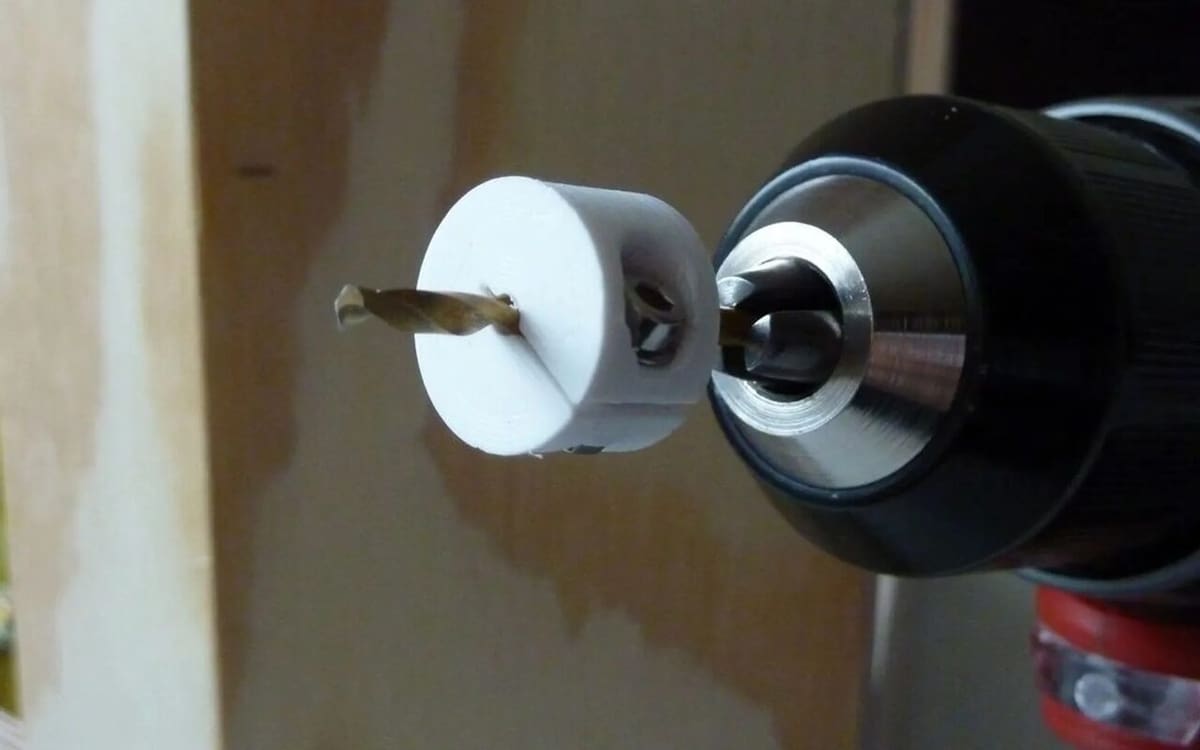
Drilling a blind hole can be tricky. While you’re holding the drill bit square to the work and not letting it wander, you’re also trying to prevent the bit from driving too deep or through the workpiece. Many people will put tape at the appropriate depth, providing a visible indication of when the hole is deep enough. A physical stop, however, is so much easier.
Unfortunately, most commercially available drill stops either attach to the side of the drill – making them useless for anything other than the center of a flat surface – or they use a screw to clamp a piece of metal to your drill bit. This means the stop might not be square to your drill bit and may also damage the flutes.
Luckily, this design clamps to the bit by closing the center hole diameter. This ensures the stop will be the right size for your bit to fit snugly and squarely. The design is also parametric; an OpenSCAD file is included for those who want to make changes.
Printing-wise, this is very straightforward. Keep in mind that you’ll need a separate model for each drill bit diameter you want to use it with.
- Who designed it? ksuszka
- How printable/popular is it? There are 16 posted makes of this design so far.
- Where to find it? Printables
Router Lifter
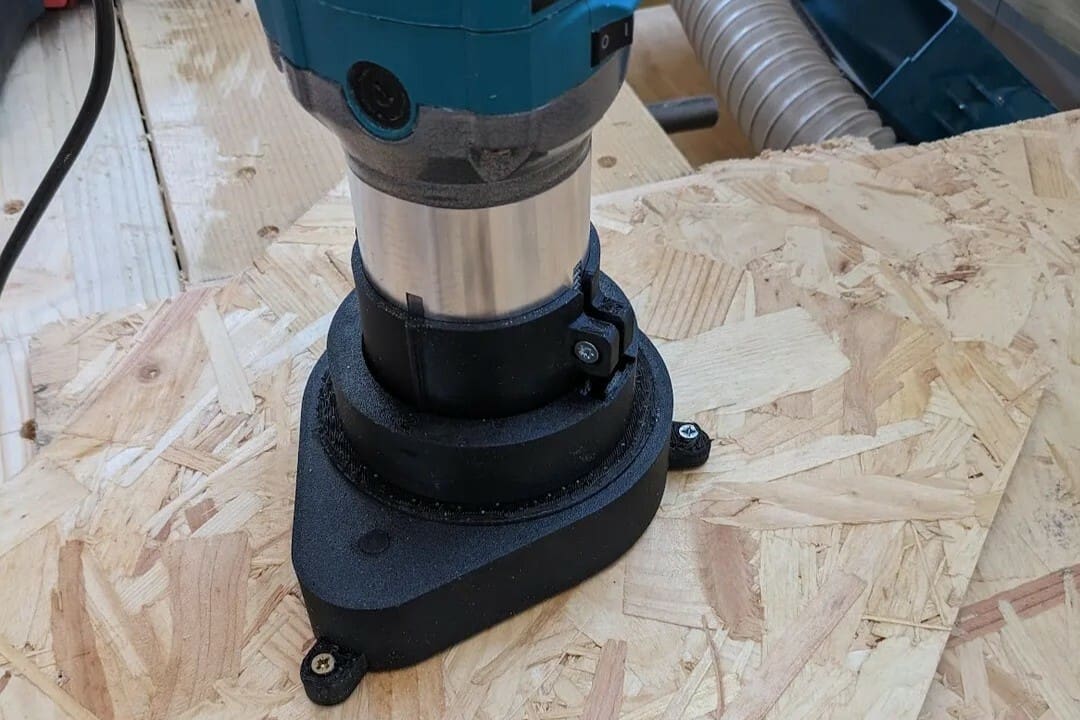
If you’ve tried hand routing a rabbet or the slot for a draw bottom, you know how hard it is to keep the bit moving in a straight line – no matter how many guides you use. The solution to this is a router table with an adjustable fence. This brings up one small problem: In order to adjust the depth of your cut, you must reach under the table and press the router up against gravity while simultaneously measuring the protruding bit above the table.
Enter the router lift. The most high-end units have a scale on the mechanism that allows you to measure the change in depth as you move the bit up and down. Those units cost upwards of $600.
This 3D printed model may still need a ruler to set the height, but you can print this for less than the cost of a spool of filament. It’s designed for a 65-mm router. Before you invest in a high-end unit, give this print a try.
- Who designed it? Aldo
- How printable/popular is it? The model has been downloaded around 700 times, and there’s 2 posted makes. The designer also posted a video tutorial to aid with assembly.
- Where to find it? Printables
Sanding Block
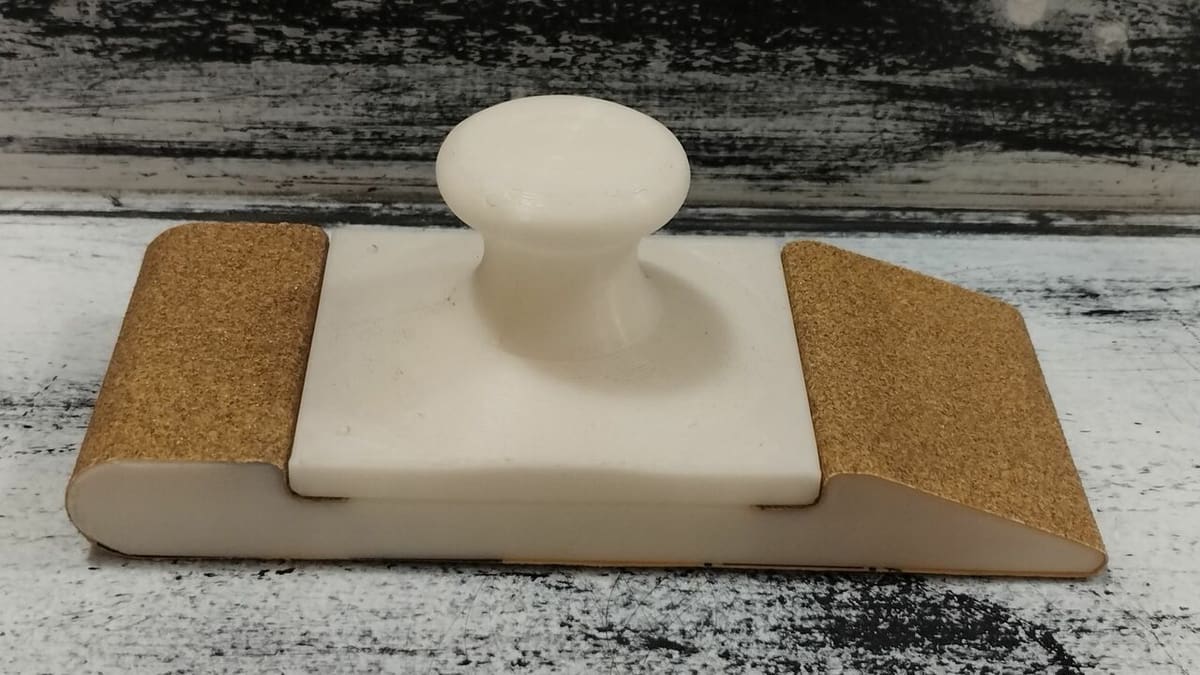
Getting a nice finish on your wood using sandpaper can be tough with just your hands; that’s where a sanding block comes in. This tool will make sure that you’re sanding evenly across your wooden surfaces and leave them flat and smooth. Sanding blocks are great because they can take any type of sandpaper you have on hand.
This model, in particular, requires no additional hardware to keep your sandpaper in place, using printed threads instead. If this design doesn’t suit your needs, there are plenty of different sanding block models available. The best part about 3D printing a sanding block is that you can scale one to be the perfect size for whatever job you have in mind. You’ll want to make sure to use upwards of 25% infill to keep this tool from breaking during use.
- Who designed it? Gumo_design
- How printable/popular is it? This is a popular design with over 18,000 downloads. In addition to the 21 makes, 5 remixes have been shared that add even more versatility.
- Where to find it? Thingiverse
Featherboard
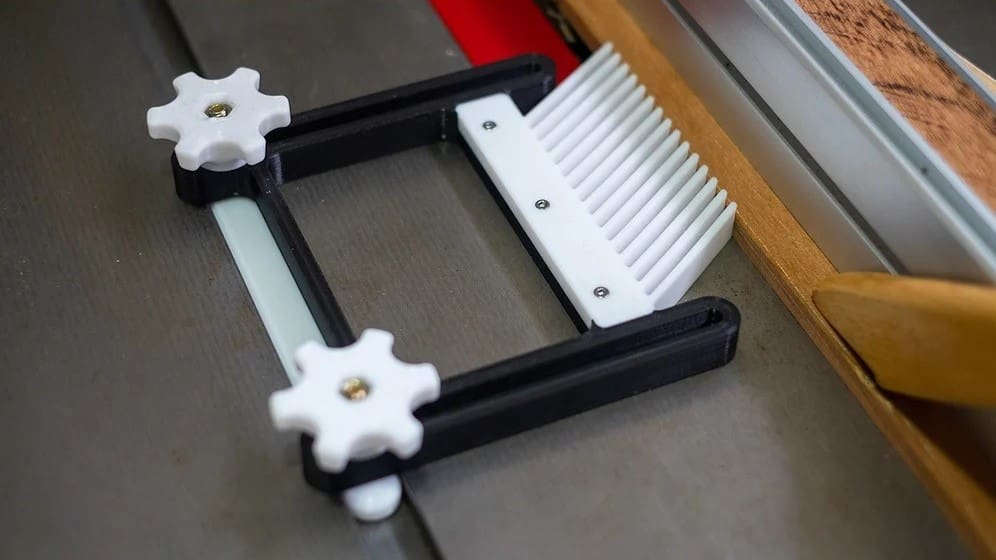
If you built a router table with the previous design, you may have noticed that your fingers can come scarily close to the sharp parts of the tools while they’re moving fast. This could go wrong very quickly.
To avoid hurting yourself, you might want to print out some of these featherboards. If you mount a featherboard on the fence, the featherboard can hold your workpiece against the fence and table as you slide it through, moving your fragile hands away from the sharp spinning thing while allowing excellent control of the stock. Oh, and the featherboards also prevent kickback by being raked in the direction of work.
This particular version is reversible and allows you to swap out the feathers if you break one or the work calls for lighter or stonger workholding. There is even a camlock version for situations where you really can’t afford the workpiece backing out. In terms of printing, it should be very straightforward, but the model is large and flat, so make sure your bed adhesion is dialed in.
- Who designed it? scaryPug
- How printable/popular is it? The model has 3 makes and over 1600 downloads.
- Where to find it? Thingiverse
Magnetic Pocket Clip
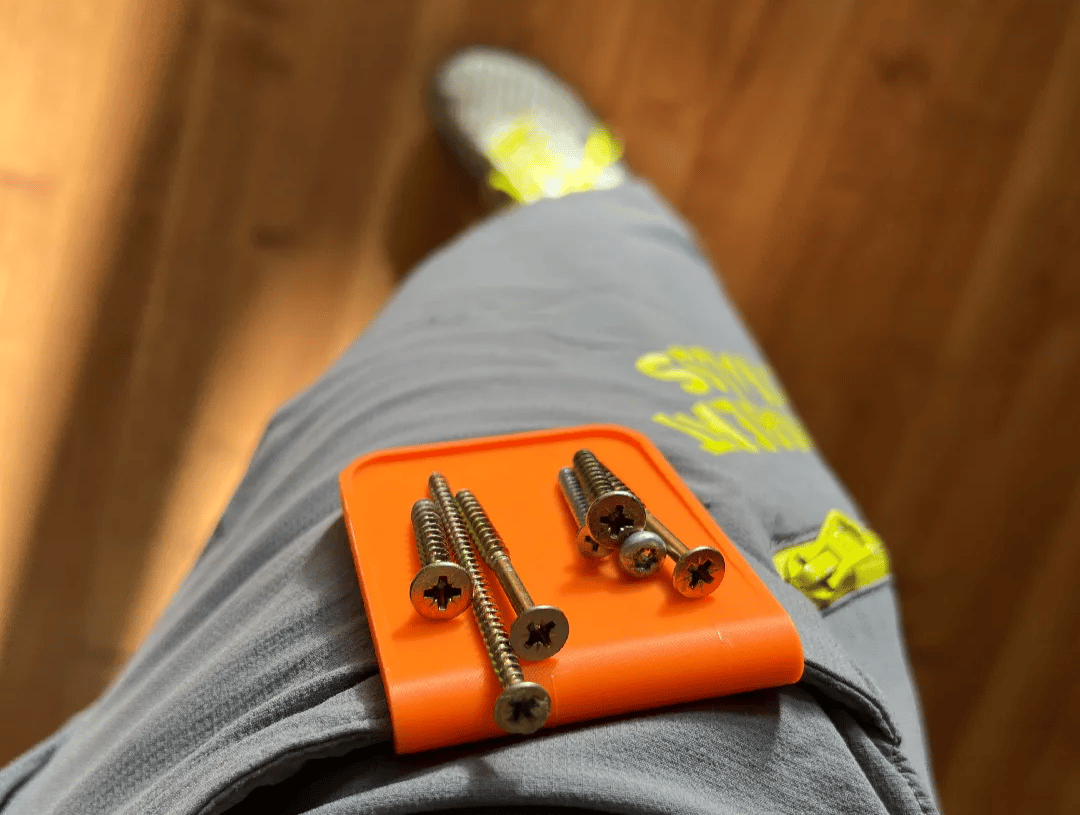
Anyone who’s ever fumbled a mouthful of screws while up a ladder will appreciate this one. It’s a magnetic pocket clip that hooks onto a belt, pocket, or waistband and gives you a quick-access spot for screws, nails, bits, or any small hardware you’d otherwise be juggling by hand. Since it holds by magnetism, it also doubles as a handy attachment point on any metal surface around the shop.
The clip relies on four 20 x 10 x 3 mm magnets embedded inside it, which means the print isn’t fully hands-off. The profile is set up to pause twice — at layers 142 and 314 — so you can drop two magnets in at each stop before resuming. It adds a couple of minutes of attention mid-print, but it’s a quick trade-off for a clip strong enough to keep tools in place even while you’re moving around the jobsite.
- Who designed it? fifindr
- How printable/popular is it? The model has been downloaded over 1k times, has close to 1400 likes on both platforms combined. So far there have been 4 reported makes on Printables!
- Where to find it? Printables, MakerWorld
Trigger Clamp
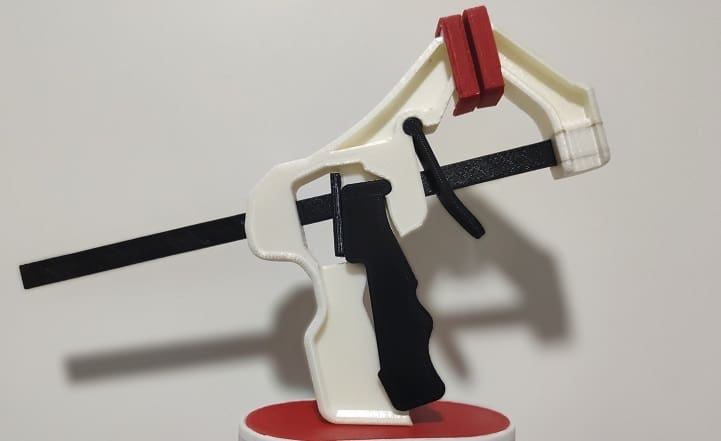
So, you’ve cut and shaped the pieces of your creation, and it’s time to glue. (They say woodworkers can never have enough clamps, and when it comes to gluing, that certainly rings true.) But you’re short just one clamp, and it doesn’t need a ton of clamping force. It might be time to print one (or more) of these quick trigger clamps.
Clamps of this style are exceedingly useful, as you can hold an item in place with one hand while you clamp with the other. They’re not limited to woodworking either. They can also be used to hold ropes for camping, metal for metalwork (watch that temperature, though), as well as many other applications.
The multi-part design is based on the injection molded version you can buy at most hardware stores. You’ll need some springs to make the whole thing go, but you most likely have some lying around in that old Creality extruder. The Thingiverse listing has tips for print orientation and supports.
- Who designed it? Arron_mollet22
- How printable/popular is it? The model has 10 posted makes as well as over 102k downloads.
- Where to find it? Thingiverse
DisKeeper
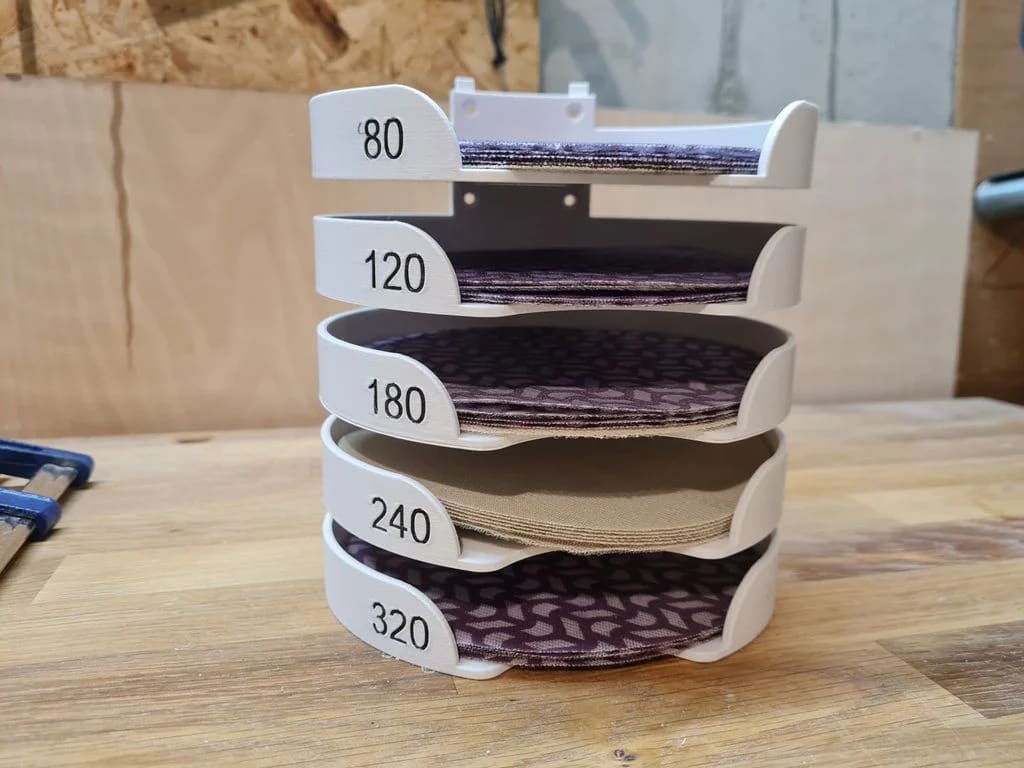
Keeping sanding disks organized is a small thing that makes a big difference in the shop — nobody wants to dig through a drawer of mixed grits to find what you need. This holder is designed for 125mm and 150mm disks that lets you stack multiple units together without any hardware, but also includes screw holes for attaching to the wall for stability (recommended for stacking more than five units).
Each holder can be customized with the number of the grit it contains for easy visibility, and to save material, there’s a version that uses honeycomb infill on the base. And if you need a matching wall holder for your orbital sander, maker Sebastiandruckt also has a design for that.
- Who designed it? Sebastiandruckt
- How printable/popular is it? This tool has been downloaded over 8k times combined from both sites and has 60 documented makes!
- Where to find it? Printables, Thingiverse
Corner Clamp
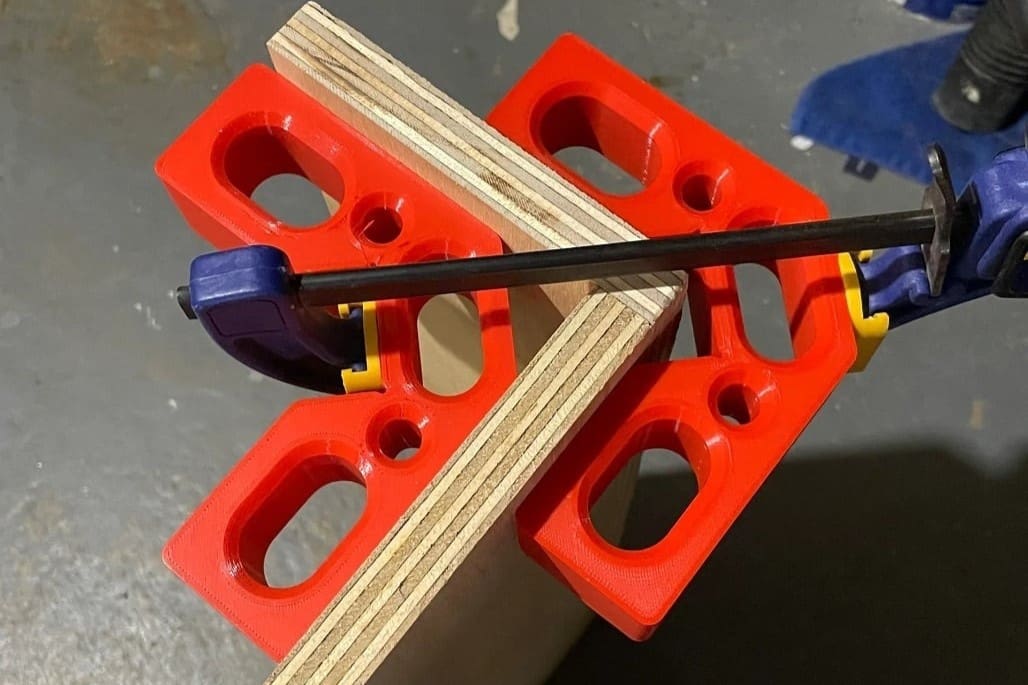
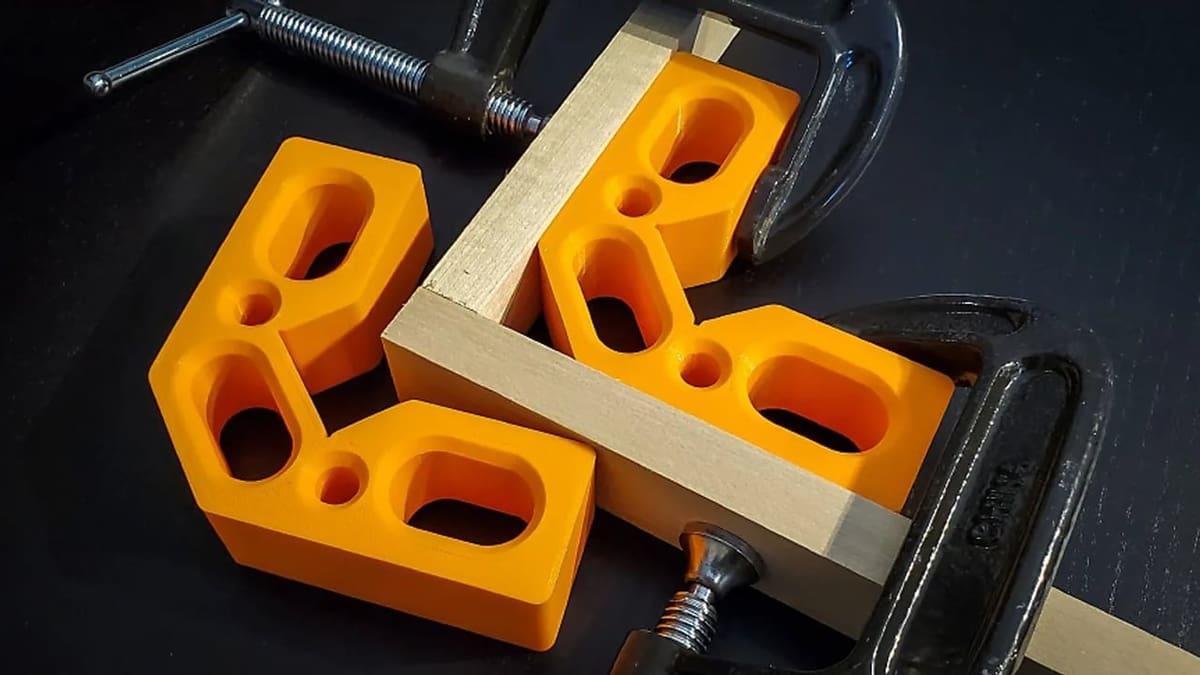
So, you’ve made the clamp but realized that you have no way to clamp your project together squarely. Well, corner clamps are usually the way to go. Simply print out the size you need – there are 32 to choose from – and away you go.
The design includes multiple locations for clamping, including flats for setting a single clamp at 45 degrees across a corner. You’ll want to use a lot of shells and some fairly high infill and adjacent settings, as the force these will experience can be quite significant.
Given lots of walls and infill for strength as well as sheer size means your machine may be running for quite some time.
- Who designed it? TheRedcoat
- How printable/popular is it? These clamping squares have 304 posted makes as well as 2 remixes.
- Where to find it? Printables
Saw Horse Folding Bracket
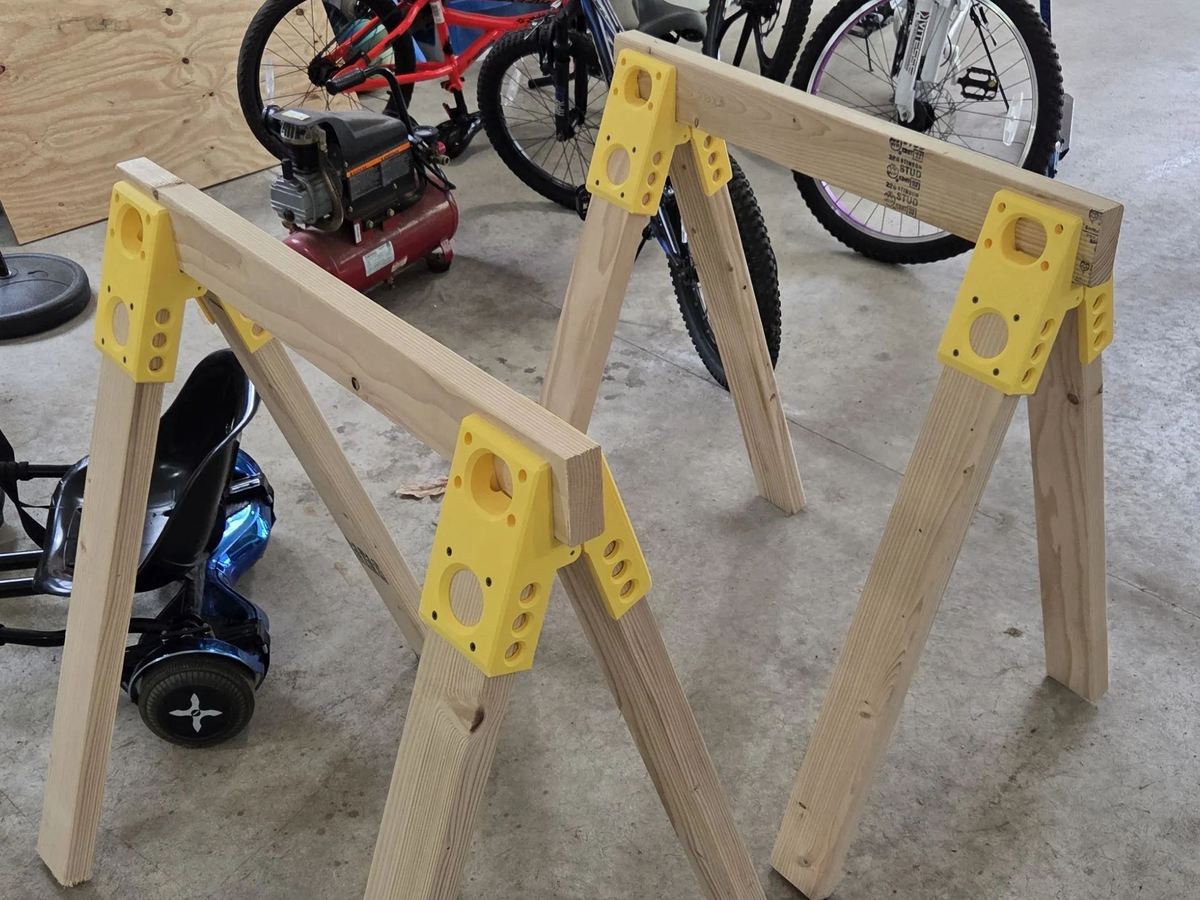
Sawhorses are a shop essential, but there’s something satisfying about printing your own brackets instead of buying a set — and this design more than holds its own. The maker put it through a real stress test, stacking on cement paver blocks until it supported over 475 lbs (215 kg) without failing, putting it right up there with commercial hardware.
The build was optimized to keep filament cost down without sacrificing strength: all four brackets for one sawhorse use well under a 1 kg spool. Print with the flat side down (no supports needed) in PLA at standard settings, and round up a small hardware kit — dowels, deck screws, and five 2x4s — to finish the build. Leave out half the top screws if you want the frame to pivot for easy storage.
- Who designed it? Sanford Prime
- How printable/popular is it? Combined from both sites, over 4000 people have downloaded the model so far, with more than 4000 liking it. So far, Printables reports 7 makes.
- Where to find it? MakerWorld, Printables
Chisel Angle Guide
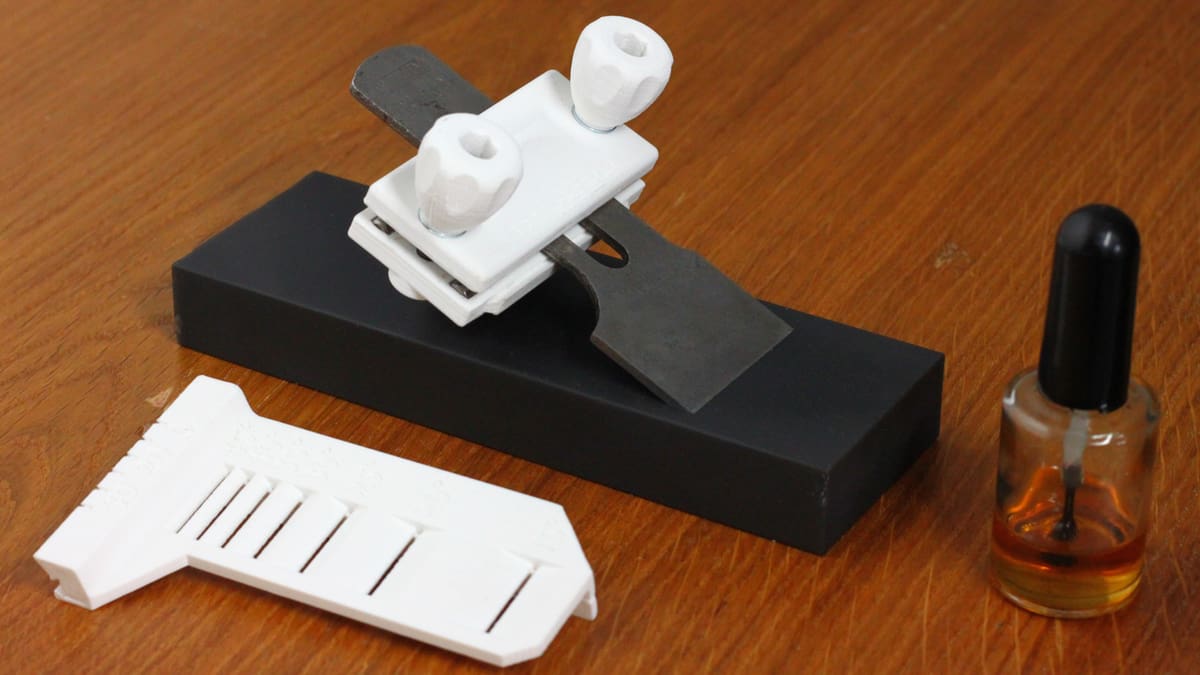
Keeping your chisels sharp is important if you want them to perform consistently between your projects. The process of actually sharpening a chisel requires you to keep the blade at a constant angle to avoid changing the intended angle of the chisel blade. These types of guides usually cost quite a bit for a decent set.
This print looks to solve this issue by providing you with a modular sharpening guide. This model can take any blade up to 50 mm in width. It has a range between 15 and 45 degrees, with 5-degree notches in between so you can choose the perfect angle for any given chisel. While the print does require metal inserts for some additional strength, the designer made sure to include all of the necessary hardware in the description.
It should be noted that the model costs ~$5, yet that’s significantly less than the price tag for a purchasable option.
- Who designed it? Bricosoluce
- How printable/popular is it? This model is a rare find. It may only have around 33 downloads at the moment but the accompanying YouTube video showcases the print’s effectiveness.
- Where to find it? Cults
License: The text of "15 3D Printed Woodworking Tools That Save You a Trip to the Hardware Store" by All3DP is licensed under a Creative Commons Attribution 4.0 International License.