SuperSlicer: How to Get Started

SuperSlicer is a remixed version of PrusaSlicer, with more adjustable and community-inspired settings. Read on to learn what it has to offer!
A familiar name in the 3D printing community, Slic3r was one of the first open-source 3D slicers to appear on the scene. This software has been forked over 1,000 times to create altered versions of the program. Believe it or not, even major competitors like PrusaSlicer were forked from Slic3r.
Continuing the trend, SuperSlicer is a popular fork of PrusaSlicer, and therefore also based on the original Slic3r. SuperSlicer was started by a community member known on GitHub as supermerill, but many other community enthusiasts contributed to the project, too.
SuperSlicer is similar to both the main version of Slic3r and PrusaSlicer because it’s kept up to date with the newest versions of PrusaSlicer. However, SuperSlicer has its own unique features, making the program a handy and powerful slicing tool. For example, it allows for independent acceleration control and cooling fan speed control of different print features, such as perimeter and infill acceleration. It offers users more setting options to fine-tune and the opportunity to get more creative with their prints and how they use their machine.
In this article, we’ll cover the PrusaSlicer derivative, SuperSlicer, discussing its features, layout, user interface (UI), and more. We’ll also compare the program to PrusaSlicer to show its advantageous features.
Accessibility
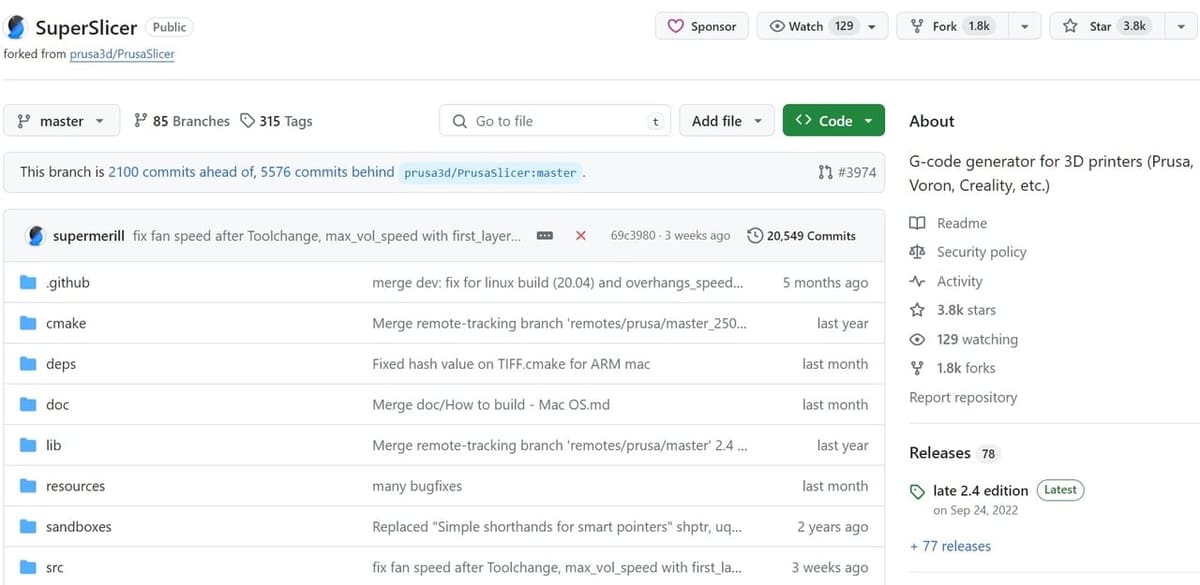
SuperSlicer is available for download through GitHub. Just like its predecessors, it’s also an open-source slicer, and source codes are published with every release. SuperSlicer is officially available in Windows, MacOS, and Linux. You’ll need to unzip the files yourself, but after that, you can run it immediately.
The MacOS versions have not been tested for some newer versions, so you might need to compile it yourself. Don’t worry, as there are detailed compilation instructions available.
Once installed, it’s easy to get up and running with SuperSlicer. It offers pre-installed profiles for many printer brands and models. However, some of these are not optimized, and users should use the advanced settings to tune profiles for best results.
UI & Layout
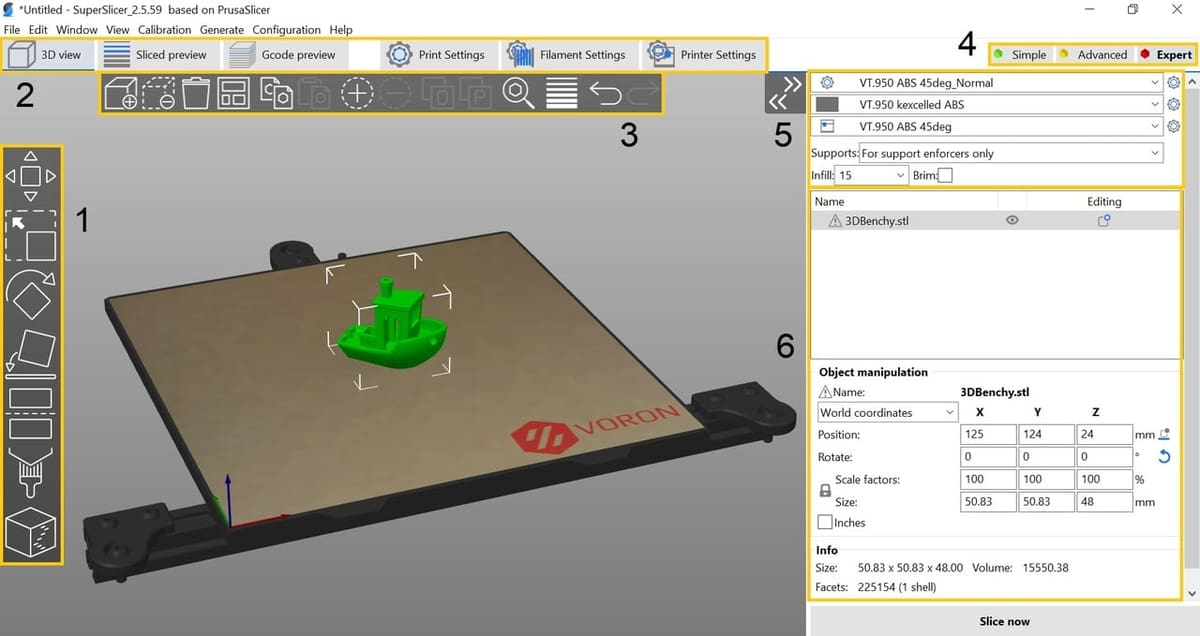
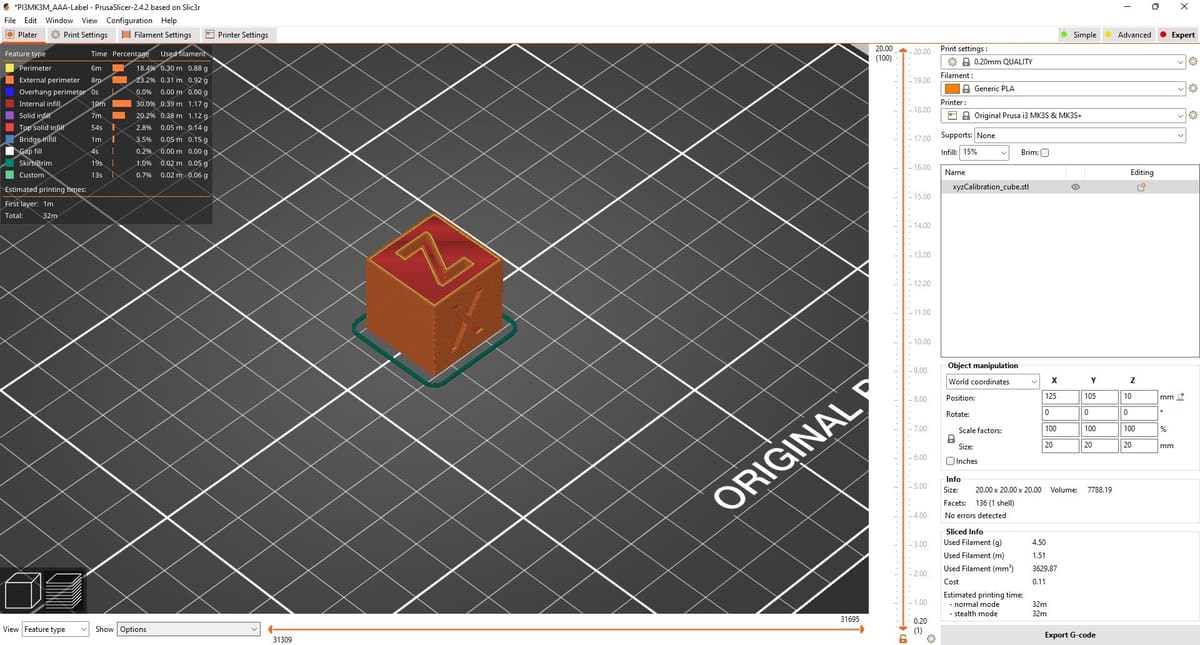
The UI and layout of SuperSlicer are very similar to PrusaSlicer and Slic3r. If you’ve used one of these programs before, you should be able to get the hang of SuperSlicer quickly, as the layout and major categories are the same. Here’s an overview of the UI:
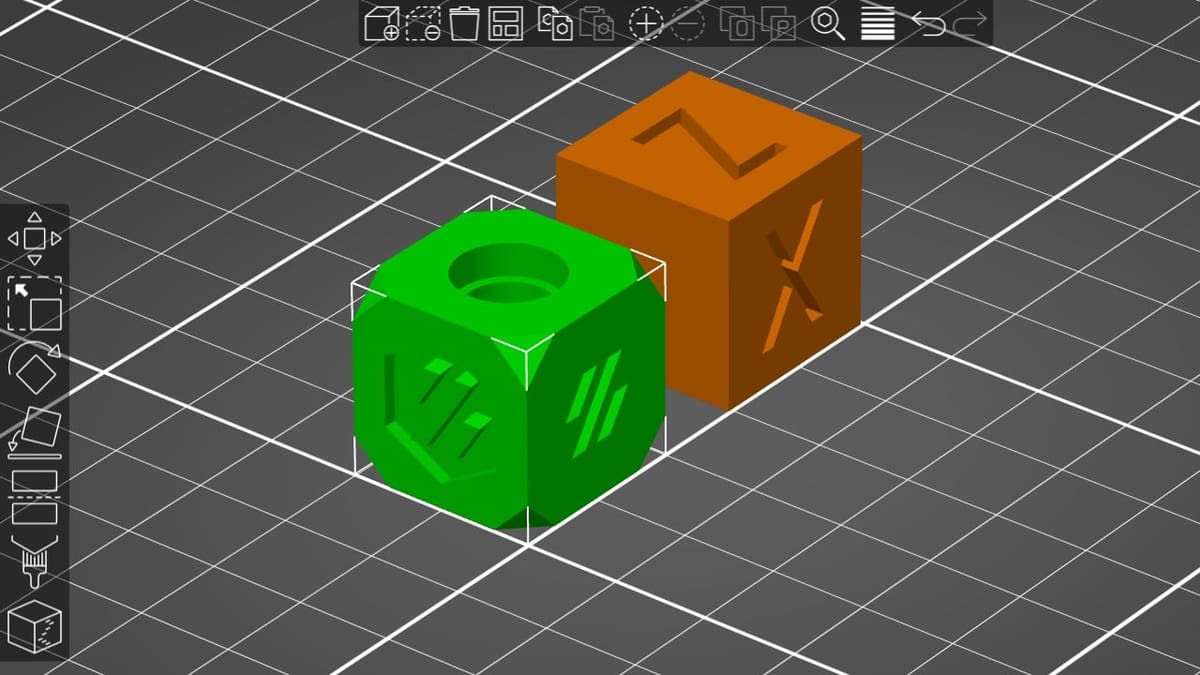
(1) Left Toolbar
In this toolbar, you’ll find tools for quickly manipulating the model(s). From top to bottom:
- The move icon moves the selected model(s) in any axis.
- The scale icon enables uniform scaling of the selected model(s).
- The rotate icon rotates the selected model(s) on any axis.
- The place on face icon selects a side for the selected model to face the bed.
- The slice icon cuts the selected model along the Z-axis to an inputted height. The user can choose whether to keep both the top and bottom, just the top, or just the bottom.
- The supports enforcers icon allows the user to paint only the parts of the model that require supports.
- The seam painting icon allows the user to manually paint a seam to be used in the print.
(2) Menu Bar
The menu bar contains six tabs. The first three tabs are for model viewing and previewing, while the other three tabs are setting categories. These setting categories are later organized into more specific sections and groups.
- 3D view is where the user prepares the model(s) for slicing.
- Sliced preview displays just the layers of the sliced model.
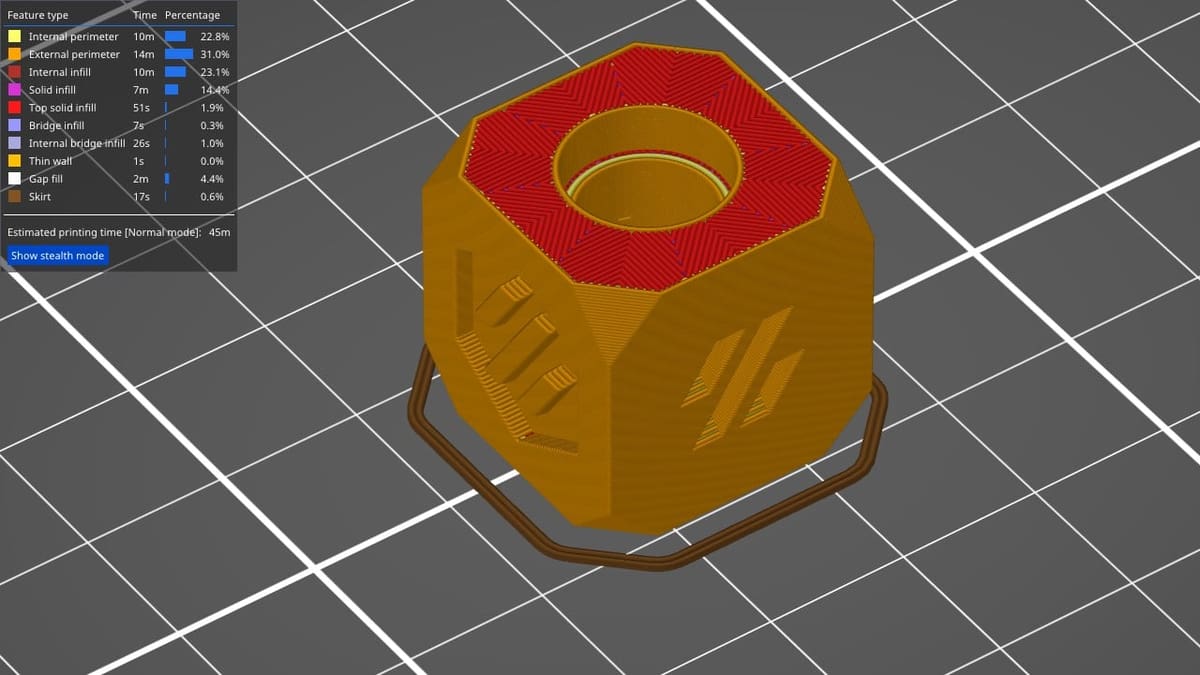
- Gcode preview displays not only the sliced model, but also print feature types and other information.
- Print Settings displays settings for a specific print. This includes perimeter count, infill, speeds and accelerations, and more.
- Filament Settings displays settings for a specific filament. This includes print temperature, extrusion multiplier, and fan speeds, amongst others.
- Printer Settings displays settings for a specific 3D printer. This includes maximum print sizes, maximum print speeds, retractions, custom G-code, and more.
(3) Top Toolbar
The top toolbar contains tools for quickly managing the model(s). From left to right:
- The import model icon imports model(s) into the slicer.
- The delete model icon deletes selected model(s) from the slicer. Alternatively, the user can press the delete or backspace key on their keyboard.
- The delete all icon deletes all model(s) currently loaded into the slicer.
- The arrange all icon arranges all model(s) on the build plate. Arrangement options can be customized by the user.
- The copy and paste icons copy and paste the selected model(s). Alternatively, the user can use the Ctrl+C and Ctrl+V keyboard shortcuts.
- The add instance and delete instance icons add or remove one of the selected models.
- The split to object icon splits a 3D model into several objects (as long as there are parts in the 3D model that are not connected).
- The split to parts icon splits a 3D model into several parts. These parts are still part of the same object.
- The search icon allows the user to search for a specific slicer setting. Alternatively, the user can use the Ctrl+F keyboard shortcut.
- The variable layer height icon allows the user to set different layer heights for different parts of the model.
- The undo and redo icons allow the user to undo or redo a command. Alternatively, the user can use the Ctrl+Z and Ctrl+Y keyboard shortcuts.
(4) Difficulty Setting
In SuperSlicer, the number of settings shown in the Setting Menu depends on the selected difficulty. The “Simple” difficulty only displays the most basic settings, the “Advanced” difficulty displays additional settings, and the “Expert” difficulty displays the entire range of SuperSlicer’s configurable settings.
(5) Profile Selection
In SuperSlicer, the settings are organized into three main categories: “Print Settings”, “Filament Settings”, and “Printer Settings” (refer to “Menu Bar” section above). These settings are independent of each other, and you can mix and match any of the profiles in the three categories for a print.
When you first open Superslicer, a configuration wizard will appear where you can choose presets or create a custom profile (just like in PrusaSlicer). You can also import a configuration bundle into the program.
You can then select which profile to use for each of the three categories. Simple settings (infill, support generation, brim) are also displayed for quick changes.
(6) Model Management
This part of the slicer provides an overview of loaded models, and the user can customize the size and other settings for each model.
As of December 2023, the late 2.4 edition (version 2.4.58.5) is the latest stable version of the program. The newest pre-release version, version 2.5.59.3, serves as a bugfix release (along with other improvements) for the Arc fitting edition (version 2.5.59.2), which offers both classic and customizable Arachne perimeter generation options. Besides the program’s nice aesthetic, the interface is very smooth with minimal glitches or bugs.
Features & Functions

SuperSlicer, as we’ve indicated, contains many useful features throughout its interface. Let’s go over these functions to display the benefits, and a few drawbacks, of using SuperSlicer.
Machine Settings
The machine settings in SuperSlicer are under the “Printer Settings” tab on the program’s interface. SuperSlicer also has a built-in printer control portion where you can plug in your print server’s API key (like one from OctoPrint). With your printer connected to your slicer, you should be able to upload files and start prints.
In this machine settings tab, you can also set what firmware flavor or base program you’re using. SuperSlicer supports 13 firmware flavors (compared to PrusaSlicer’s 10), including Marlin, Smoothieware, RepRap, Repetier, Sprinter, and more. Moreover, you can activate special firmware features from your slicer like a fan startup delay, and it supports stealth mode.
There are many other more advanced features in SuperSlicer, like setting your jerk and acceleration speeds. You can also set your Z-axis stepper motor step distance, which is said to be useful for making the surface of your print look nicer.
SuperSlicer also stays very up-to-date in terms of adopting the new settings appearing in PrusaSlicer that aren’t already on the platform. For example, SuperSlicer offers basically the same FreeCAD scripting integration and auto-generating test print models as PrusaSlicer.
Printing Settings
SuperSlicer has some special features for slicing models that very few (if any) slicers have, especially concerning the surface quality of parts.
There are basic settings like infill density and pattern, print speeds, and supports. However, SuperSlicer also adds useful settings like ironing, which uses the nozzle’s heat to iron and smooth out the top layers of a part. It also offers the single perimeter top surface setting, which gives the top layer a smoother finish.
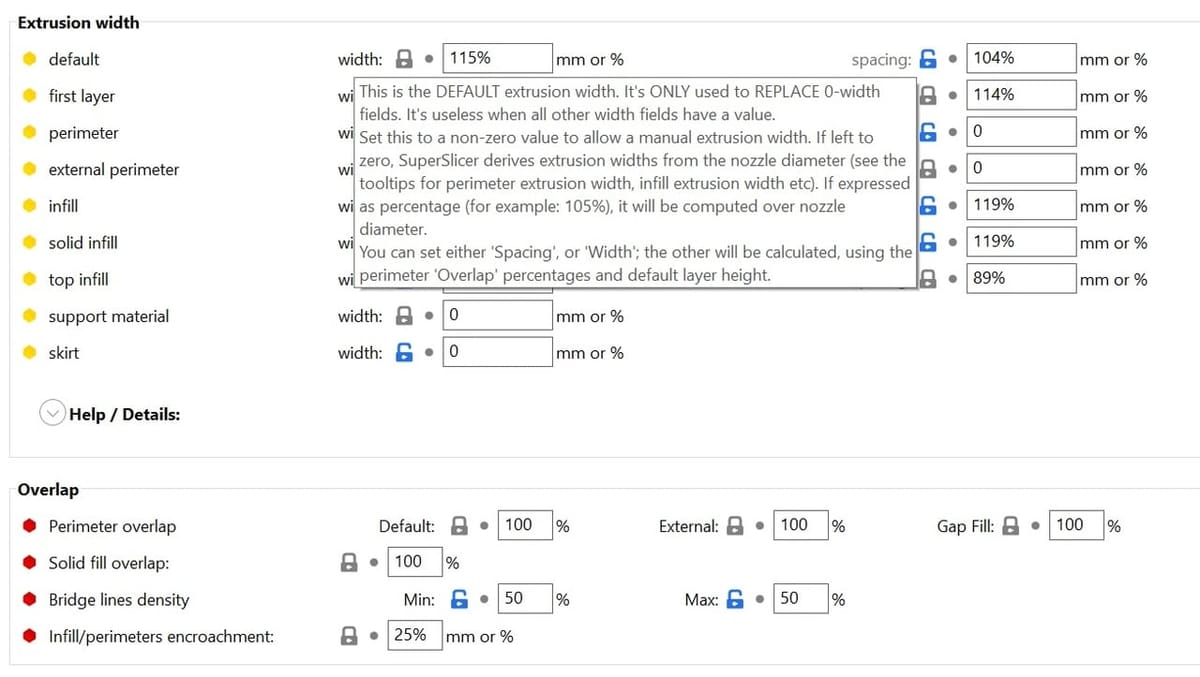
SuperSlicer has customizable settings that allow for faster printing while maintaining part quality and strength. For example, it allows for independent acceleration control of every print feature, so you can (for instance) run a lower acceleration value on the outer perimeter but a higher acceleration value for the infill. A few other settings include custom defaults for width and flow, curve smoothing, extruder clearance, and more.
Additionally, SuperSlicer seems to work very actively with its community, quickly responding to requests for new features. As such, you can expect to continually get the latest and most innovative slicer settings.
When it comes to basic and advanced slicer settings, SuperSlicer goes above and beyond. Not only do these settings help you fine-tune the print quality of models, but they also allow you to get creative with how you print parts.
Filament Settings
The filament settings in SuperSlicer are the options that are relevant to the specific filament you’re printing with. Like the other categories in SuperSlicer, there are the basic settings, like temperatures, cooling, retraction, and filament type, and more advanced options. These higher-level settings include multi-material printing, lifting the Z-axis, wiping the nozzles, and more. There’s also independent part cooling control, where users can vary the part cooling fan speed based on print features and layer times.
While these expert settings may make SuperSlicer look more complicated, they allow users to make their prints look better. Many of these advanced settings can also be found in other slicers, but SuperSlicer includes an impressive range, making the software a one-stop shop for many useful slicing tools.
Calibration & Integration
SuperSlicer has some very unique calibration and integration features that are another reason the slicer is so powerful. The calibration tools can be found in the top toolbar on SuperSlicer and enable you to create G-code scripts for calibrating your 3D printer. These are recommended to be adjusted to solve printing issues and when switching between machines or filaments.
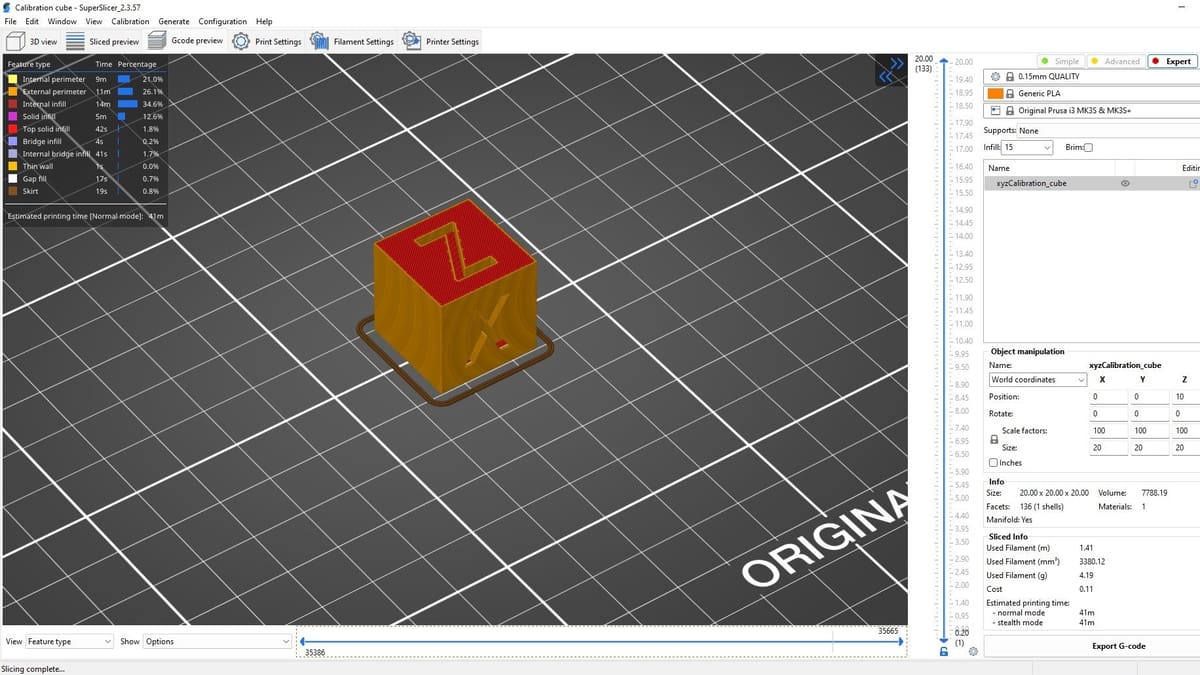
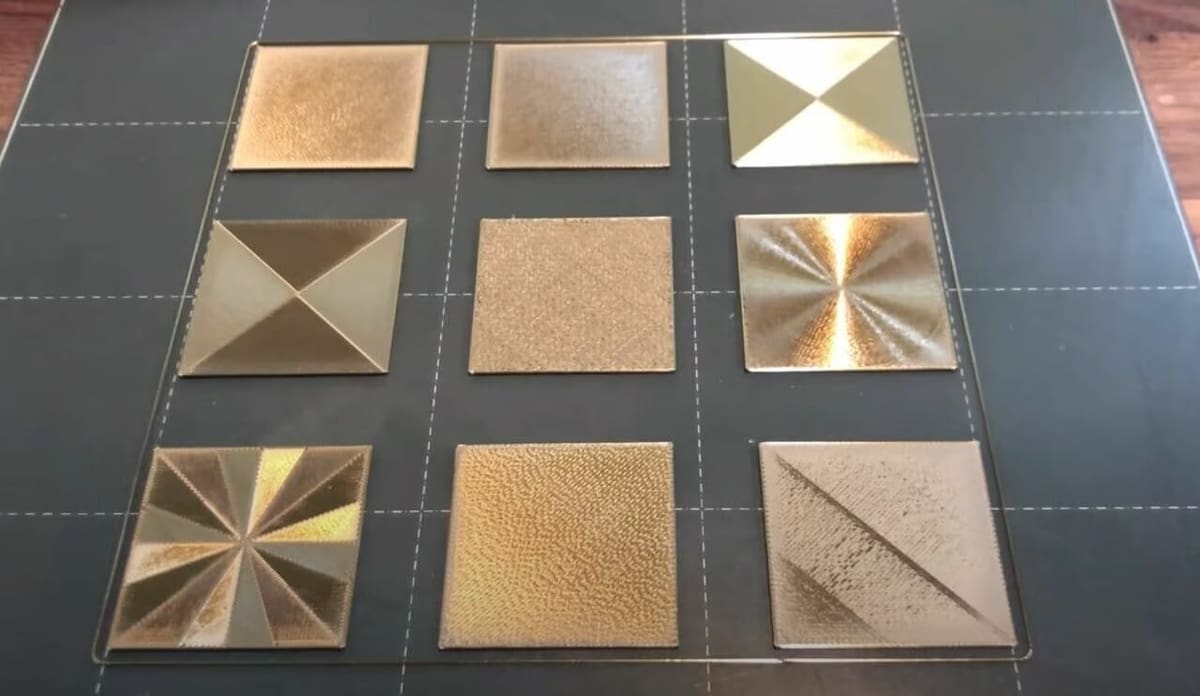
There are a few calibration scripts you can use, split into three categories: printer, filament, and slicer. In the printer category, you can run a bed leveling sequence and extruder calibration script. In the filament calibration section, you can run a filament flow and filament temperature calibration to ensure your filament settings are adequate. In the slicer section, you can run calibration tests to find the right bridge flow and ironing pattern; you can also print either of the pre-loaded calibration cubes!
There’s also an integration (“Generate”) tab on the top toolbar of SuperSlicer that you can use to design objects using programming. Currently, the only option (besides the help button) in the generation tab is the integrated FreeCAD python script. With the SuperSlicer FreePySCAD tool, you can model 3D parts using Python, which might be useful if you know the language and want to design models directly in your slicer.
These extra calibration and integration functions really show how SuperSlicer offers features beyond basic slicer settings that take the program to the next level. Hopefully, the developers of SuperSlicer will continue to add integrations to the “Generate” tab, in addition to the FreePySCAD feature.
Arachne
Lastly, Arachne is supported in 2.5.59.x versions of SuperSlicer. Simply put, Arachne perimeter generation adjusts the line width of perimeters to fill in gaps more efficiently. This drastically reduces the usage of the gap fill feature and leads to stronger parts and faster print times. Giving your printer the ability to vary line width can also improve fine detail on prints.
In the newest SuperSlicer (version 2.5.59.3), the Arachne features work just as well as other slicers that support the functionality, and functionality is expected to get even better in the upcoming updates.
User Experience
Although SuperSlicer is highly advanced with a wide array of configurable settings, it’s still suitable for beginners. Like PrusaSlicer, SuperSlicer provides three difficulty presets, including “Simple”, “Advanced”, and “Expert”. Each setting level shows a different number of settings on each page. This is so newer users don’t get overwhelmed, and expert users can make use of SuperSlicer’s large library of advanced settings. Apart from that, hovering your cursor over a setting or option shows a detailed explanation of the setting’s functionality.
SuperSlicer is the most popular slicer for advanced FDM printing communities. Annex Engineering, VzBot, and Voron all have profiles made for SuperSlicer. There are also plenty of positive experiences reported by the community on Reddit and YouTube. Many users love how much you can fine-tune prints. One of the only downsides noted by Reddit users is that the program lacks tree supports.
Although some users are unhappy that development was rather inactive in the past year, the lead developer, supermerill, announced that he would develop SuperSlicer full-time from November 2023 (starting from Version 2.5.59.3). Development is now back on track, including a merger with PrusaSlicer 2.7. You can join SuperSlicer’s Discord server to get more up-to-date information.
Community Support
SuperSlicer is an open-source project, and while contributors may receive donations or gifts, they aren’t paid. It’s probably fair to assume that if members of the 3D printing community are willing to spend countless hours improving the program for free, then SuperSlicer has a decent amount of community support.
Developers aren’t the only people involved in shaping this program, however. For example, many users leave feedback to help improve the slicer. The project’s GitHub page has a fairly active discussion community and an issues page where users can highlight areas of SuperSlicer that need refinement.
While the main place you can find help for SuperSlicer is GitHub, there are also helpful tutorial videos on YouTube. With just a quick YouTube search for SuperSlicer, you’ll see a good number of results. While you may find more community support for popular programs like Cura, SuperSlicer is very powerful, and more and more people are using it.
You can also find help for SuperSlicer from the active Voron and Annex Engineering Discords, where most users turn to SuperSlicer for its advanced settings. Also, the active Reddit community shows the enthusiasm users have for this slicing program. Even if SuperSlicer isn’t as widely used as mainstream alternatives like Cura, it’s more powerful, and its users are well aware of the value and benefits this software has to offer.
SuperSlicer vs. PrusaSlicer
As we’ve mentioned, SuperSlicer developed out of Prusa Research’s PrusaSlicer, which was, in turn, a fork of Slic3r. The question is, then, just how different are they?
More Control
To start, SuperSlicer was developed to provide users with more control over their slicer than what was possible with PrusaSlicer. So, naturally, SuperSlicer outperforms PrusaSlicer when it comes to the number of adjustable slicer settings. However, even though SuperSlicer has more options than PrusaSlicer, other programs, like Cura, still have considerably more adjustable settings.
SuperSlicer has many additional features too, such as its calibration tools and integrated Python design tool from FreeCAD. PrusaSlicer doesn’t include these extra features that really make SuperSlicer stand out from its competition. Some other slicers support plug-in features, possibly allowing you to integrate similar tools, but SuperSlicer has the Python tool ready to go without any extra downloads.
Less Development
PrusaSlicer does outperform SuperSlicer in at least one aspect: development and user experience. Prusa Research is a leading manufacturer in the consumer and prosumer 3D printing industry, with incredibly popular 3D printers like the Prusa i3 MK3S+ under their belt. For this reason, PrusaSlicer has a massive following and a lot of community support, significantly more than SuperSlicer.
With this added community and company development power, Prusa Research excels at producing bug-free, stable versions of its program. Although, while SuperSlic3r was pretty littered with bugs in earlier versions, we experienced no issues with the latest Gravel stable edition. However, the GitHub issues page suggests that some bugs can occur with certain features.
Lastly, for basic users, SuperSlicer can be a little tricky to download, especially if you have to configure it to make binaries, while PrusaSlicer is an easy, basic download.
All in all, SuperSlicer is a great program, and it has many useful features geared toward experimental 3D printing enthusiasts who want more control over their slicer. When compared to other slicers available, SuperSlicer excels in settings, layout, and other features. For this reason, you might want to use SuperSlicer if you like PrusaSlicer but want even more settings and aren’t worried about occasional bugs.
Alternatives
Apart from PrusaSlicer, here are some other notable options worth considering:
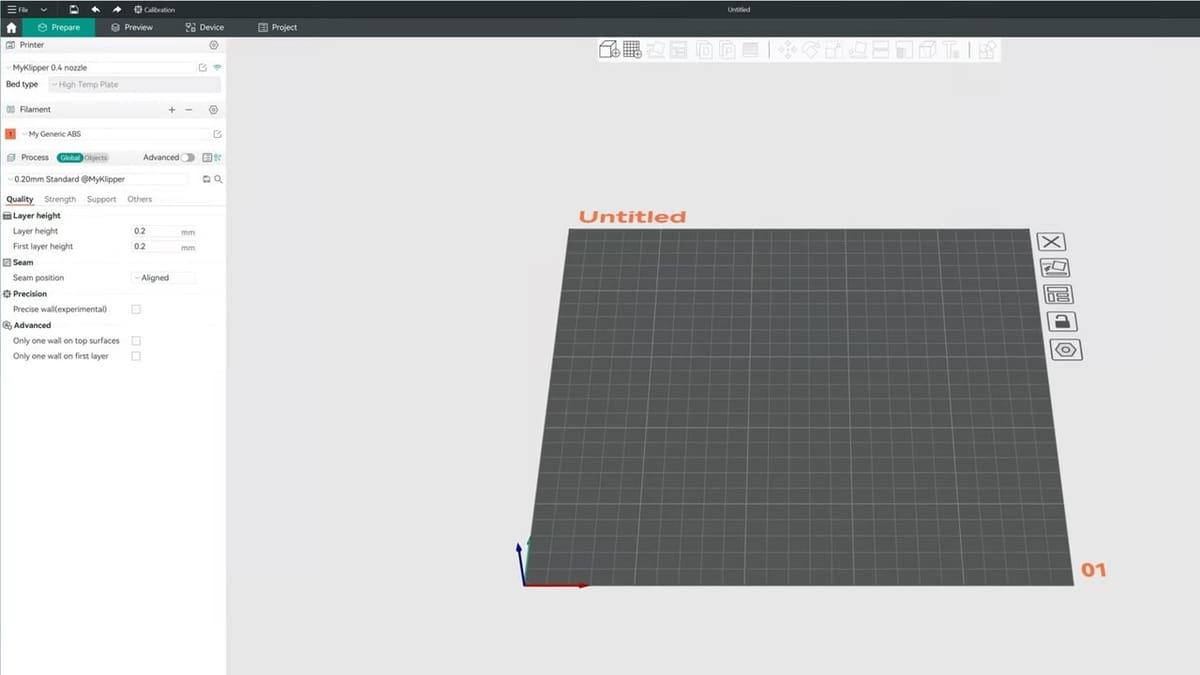
- Orca Slicer: Orca Slicer is a fork of a fork of a fork from Bambu Studio, Bambu Lab‘s slicer. It’s a relatively new slicer that incorporates many features from SuperSlicer, such as built-in calibration tools for flow and pressure advance, as well as Klipper support. It’s feature-rich, powerful, and offers a wider range of printer profiles than Bambu Studio.
- Cura: An open-source slicer from UltiMaker, Cura is a relatively mature option with a different UI than SuperSlicer, PrusaSlicer, and OrcaSlicer. (As forks of Slic3r, their UIs are quite similar). It’s the choice for many beginners due to its popularity, ease of use, and many well-made and tested printer profiles. However, it offers fewer features and customization options.
- Slic3r: Slic3r, developed by Alessandro Ranellucci, is an open-source slicer from the RepRap days. It serves as a basis for the best slicers around today, and many of the features that currently exist in modern slicers were first tested and developed in Slic3r. In fact, SuperSlicer, OrcaSlicer, PrusaSlicer, and Bambu Studio all originated from Slic3r!
License: The text of "SuperSlicer: How to Get Started" by All3DP is licensed under a Creative Commons Attribution 4.0 International License.