This Fix for Oozing Saves Time and Filament

Ditch Klipper's Pressure Advance tuning tower! The Pattern method is faster and more precise. Learn why it's better and how to use it.
3D printer oozing can drive a maker crazy. Is it wet filament? Poor retraction settings? Issues with the printer’s extruder or hot end hardware? The potential causes are numerous, and the firmware features Linear Advance (Marlin) and Pressure Advance (Klipper) were designed to mitigate, if not eliminate altogether, those unwanted blobs across your prints.
While oozing can occur due to hardware problems, it also occurs due to pressure in the nozzle during decelerations. On the flip side, you’re likely to see underextrusion during accelerations because pressure is still building in the nozzle. The affect of these pressure changes on the flow of filament is especially apparent when printing at high speeds.
The algorithms underlying Linear Advance and Pressure Advance prematurely decelerate, then stop extrusion to compensate for ooze. During accelerations, the algorithms prematurely start extrusion to build pressure, ensuring adequate material flow. The amount of compensation applied is determined by specific values. Pressure Advance, for example, relies on a pressure_advance “calculated value” (also known as “K-value”) and “smooth_time” – both of which are in the extruder section of the Klipper config file.
The optimal values depend on a variety of factors, including nozzle temperature, print speed, acclerations and decelerations, material, among other. Therefore, Linear Advance and Pressure Advance need to be tuned for your exact printing setup.

The Default Method
Among the well-known tuning methods is Klipper’s default tuning tower. With this method, a thin-walled tuning tower is printed using a range of differing K-values from bottom to top, using printing parameters defined by the user. The optimal K-value is selected by visually estimating the layer at which the corner is sharpest.
However, determining the sharpest corner isn’t always straightforward. Unexpected artifacts may complicate assessing the print, leading some makers to report that their prints don’t resemble the reference photos in the guide. Moreover, some argue the tuning tower isn’t the best for assessing the impact of changes to the “smooth_time” value. Users have noticed defects introduced by these values, and at least one user suggests it’s easier to see these blemishes looking from the top down on specific layers – which isn’t possible with the tuning tower.
All of that is to say, the tuning tower method is relatively imprecise, and non-ideal test print outcomes could lead to misinterpretation and frustration.
The Better Method
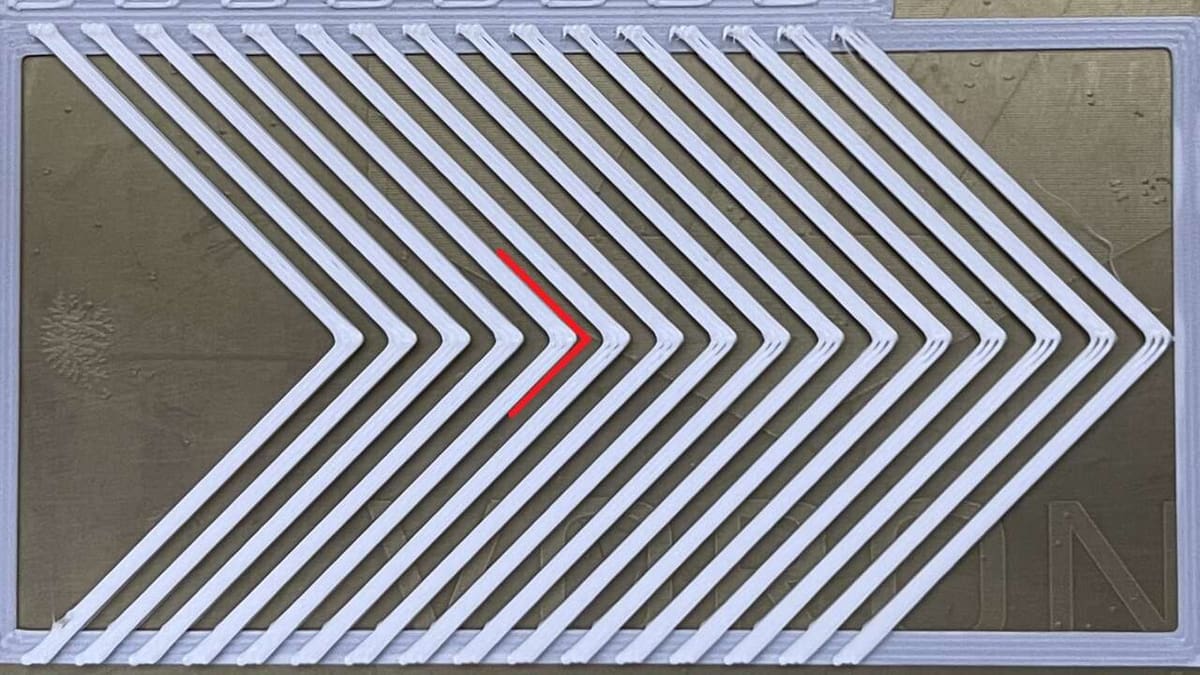
A faster and more precise method is the Pattern method found in Ellis’ Print Tuning Guide. With this method, the user prints a series of thin right angles with a gradual user-defined range of K-values, along with other user-defined printing parameters. This allows for a direct, clear top-view comparison of various K-values, allowing for a more accurate value to be determined. Simply select the K-value that corresponds to the sharpest corner – that is, the corner with least corner gapping or bulging.
The Pattern method is faster and uses significantly less filament to print. This is especially helpful given the fact that users may have to do this tuning often; Pressure Advance / Linear Advance should be calibrated specific to the printer and spool of filament the user intends to print.
More information and the G-code generator can be found in the Pattern method section of Ellis’ Print Tuning Guide.
Tips
The first thing you should do before diving into any Pressure Advance / Linear Advance tuning is to confirm that your printer’s hot end can manage the volumetric flow rate necessary to achieve clear test results. As we mentioned above, underextrusion and oozing are most likely to appear at high speeds, so the tuning process often calls for a high print speed. This will, in turn, require a hot end and temperatures capable of melting the filament fast enough to extrude properly.
Let’s say you’re printing the tuning test with a 100 mm/s print speed, a 0.4-mm extrusion width (also called “Line Width” in some slicers) and a 0.3-mm layer height, the printer’s hot end must be able to handle a volumetric flow of 12 mm3/s – which is a stretch for some stock hot ends. If your hot end can’t handle this, you’re likely to see severe underextrusion, resulting in poor layer adhesion and gaps in the print. Users may mistake this as an excessively high PA value when in actuality, they’re outrunning their hot end’s melting capacity.
Therefore, check your hot end’s max flow rate to ensure you’ll get accurate tuning test results. Depending on what you find out, you may have to adjust the print speed of the tuning test to match your printer’s melting capacity.
Tuning Considerations
Based on our experience, we have some important things for you to keep in mind when tuning with the Pattern method:
- Klipper’s documentation gives 100 mm/s as an example print speed, and you’ll also see this as the default print speed in Ellis’ calibration tool. That being said, if you normally print at higher speeds, you should tune Pressure Advance / Linear Advance based on your typical speed settings. For the best dimensional accuracy and part strength, use your outer perimeter speed and acceleration settings.
- Generally, the higher your printing speeds (print speed, accelerations, and decelerations), the lower your K-value. This is because higher speeds mean there will be less time for the hot end to ooze; therefore, the extruder doesn’t have to compensate as much.
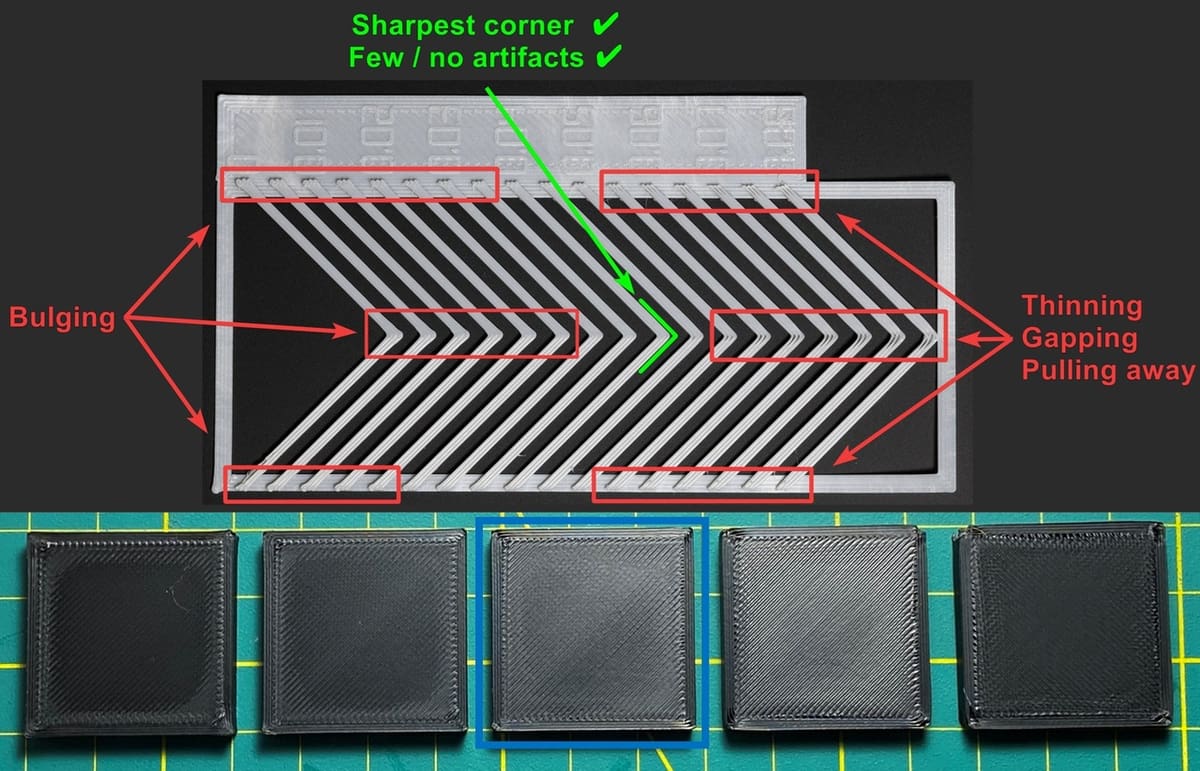
- While very high K-values may look great in prints, it also results in high corner gapping. This can lead to a loss of part strength. Based on the test print results, it’s recommended to choose the sharpest corner with little to no gapping.
- If you’re getting weird results, it might be due to an inappropriate smooth_time value. While the smooth_time is ideally 0, this is impossible because the extruder isn’t able to instantaneously accelerate and decelerate. A high smooth_time limits extruder acceleration to prevent extruder skipping, while a low smooth_time can result in more precise corners but will require higher extruder accelerations. You can change smooth_time as low as your extruder permits before it starts skipping, but for reliability’s sake, don’t keep it too low – results are often diminishing in this aspect. For most direct extruders, 40 ms is a good start.
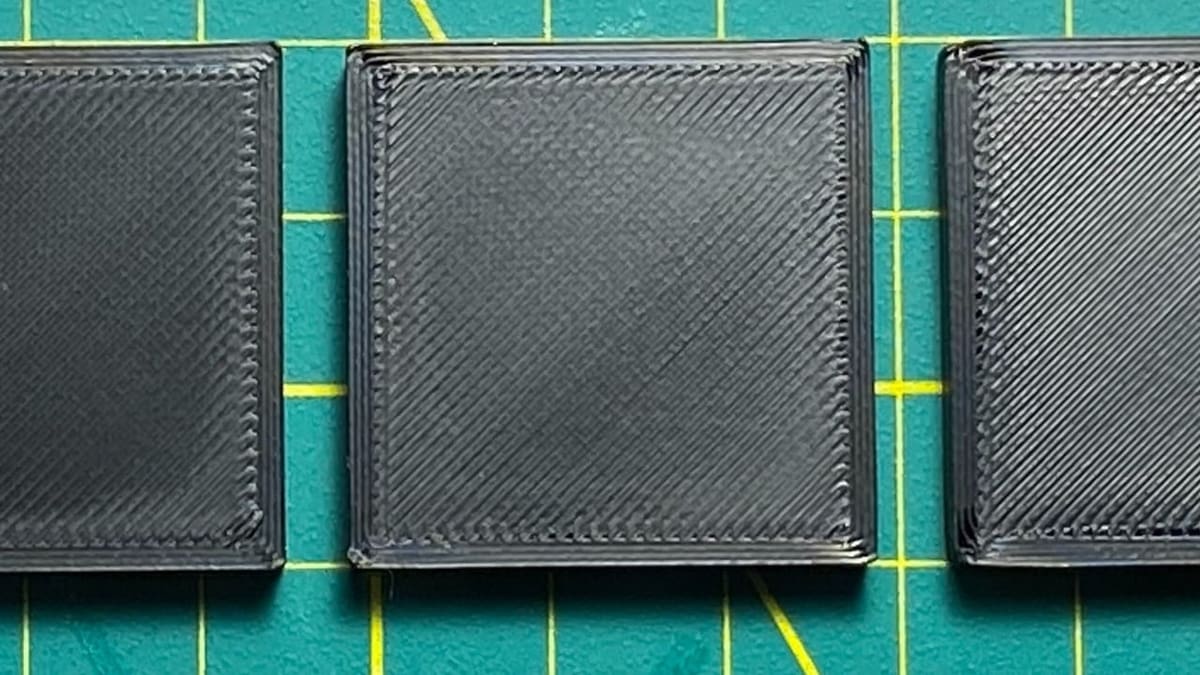
- Make sure to print a series of thin test squares using your newly obtained K-value. There shouldn’t be significant corner bulging or gapping. The middle square in the image above is a great example.
Finally, please remember that there is no “perfect” K-value due to the nature of the FDM printing process itself. A tiny bit of corner bulging or gapping is unavoidable due to the printing speed differences between the internal and external perimeter. Rest assured that it won’t affect your part’s dimensional accuracy or strength.
Get our bi-weekly newsletter for the latest 3D printing news, deals, and guides.
We do not share your information! You can unsubscribe at any time.
By subscribing you agree to our Privacy Policy.
You Might Also Like:
License: The text of "This Fix for Oozing Saves Time and Filament" by All3DP is licensed under a Creative Commons Attribution 4.0 International License.