
Free STL Editors: How to Edit & Repair STL or 3MF Files

From basic options to advanced ones, check out the best free tools to repair or edit digital model files, from Tinkercad to Blender, and more.
If you’ve downloaded, received, or generated an 3D digital file from a text or image-to-model generator, you may need to clean it up, repair it, or make small changes before sending it to your printer. Maybe your slicing software has alerted you to file defects like non-manifold edges.
Don’t worry, it’s easier than ever to repair STL or 3MF files.
In fact, most slicing software today already fixes small errors in your files without you even noticing. You should only get alerts these days when a 3D model has flaws that make it unprintable.
Why might you have an unprintable digital file? AI can make it faster and easier than ever to generate “printable-looking” designs, the resulting digital files, however, may include holes or disconnected surfaces. An STL file is essentially a shell; if it isn’t properly closed or “water tight”, it can contain thin walls, missing faces, or other issues that cause failed or poor-quality prints.
The second reason there may be more unprintable 3D models lately is more accessible (i.e. cheaper and better) 3D scanners. These tools have democratized the creation of digital models from real-world objects. Yet, many novice users generate scans with holes, noise, or incomplete data, which can produce STL files that are difficult or impossible to print without repair.
Common Issues:
- Non-Manifold Edge is a problem area where the mesh is not connected like a clean, closed solid, often because a boundary has too few or too many adjoining faces.
- Floating Faces are parts of the model that are not connected to each other.
There are two main types of software that can help: CAD programs and mesh editing tools.
To fix common STL flaws, like non-manifold edges, you may just need a too like Formware or MeshLab that are more automatic upload-and-hit-fix solutions. Free CAD software, like Tinkercad, FreeCAD, and Blender, is usually the best option when you need more control over the design of the entire model. The downside is that there’s a learning curve to most CAD.
Here we look at the best free CAD and mesh editing programs for STL and 3MF editing and repair. We’ll also point you toward beginner-friendly tutorials, so you can start fixing common issues like like a pro. Note that not all tools will let you upload a 3MF and also be aware of the format the tool will let you export your model as.
Quick Fix Guide
Free Mesh Repair Tools
Automated mesh repair tools can be a great quick fix. Upload your file and repair it with one click. The trade off is the lack of control in how the model is fixed, which, isn’t often an issue. If you do run into a situation where the automated fixer changed the geometry of your part, your next option is CAD software.
When using a browser based mesh tool that require file uploads, of course avoid uploading confidential client or commercial designs.
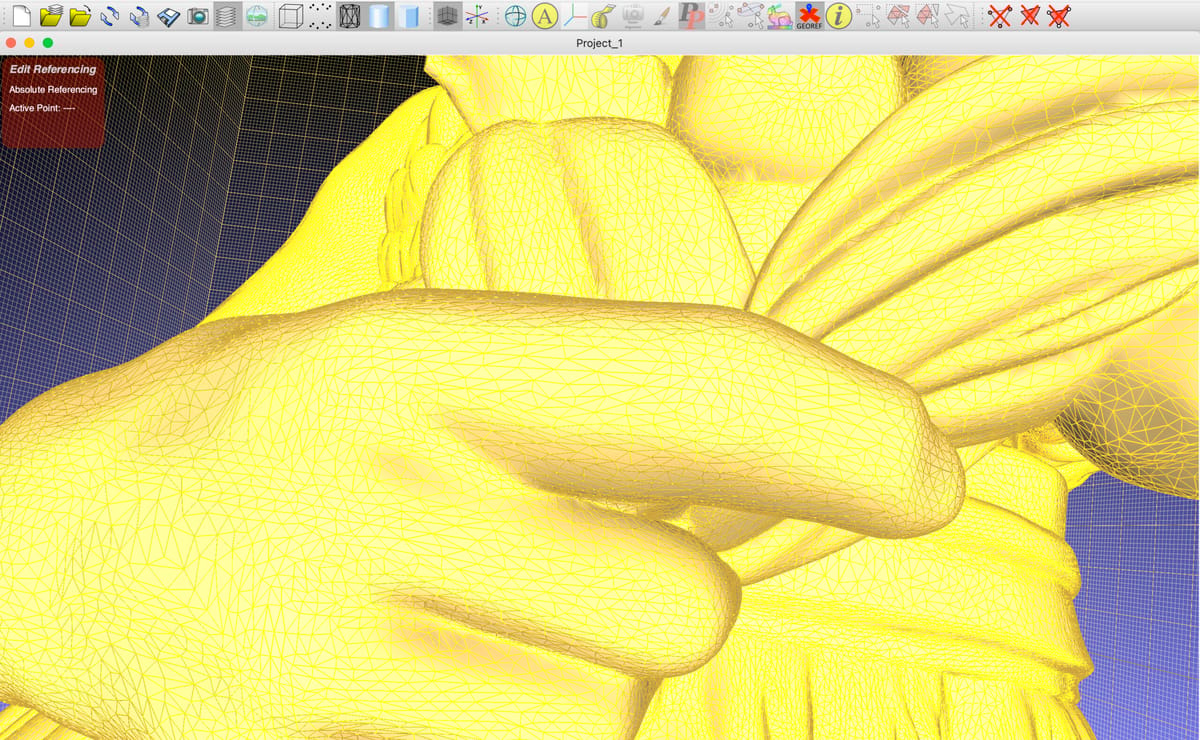
Formware
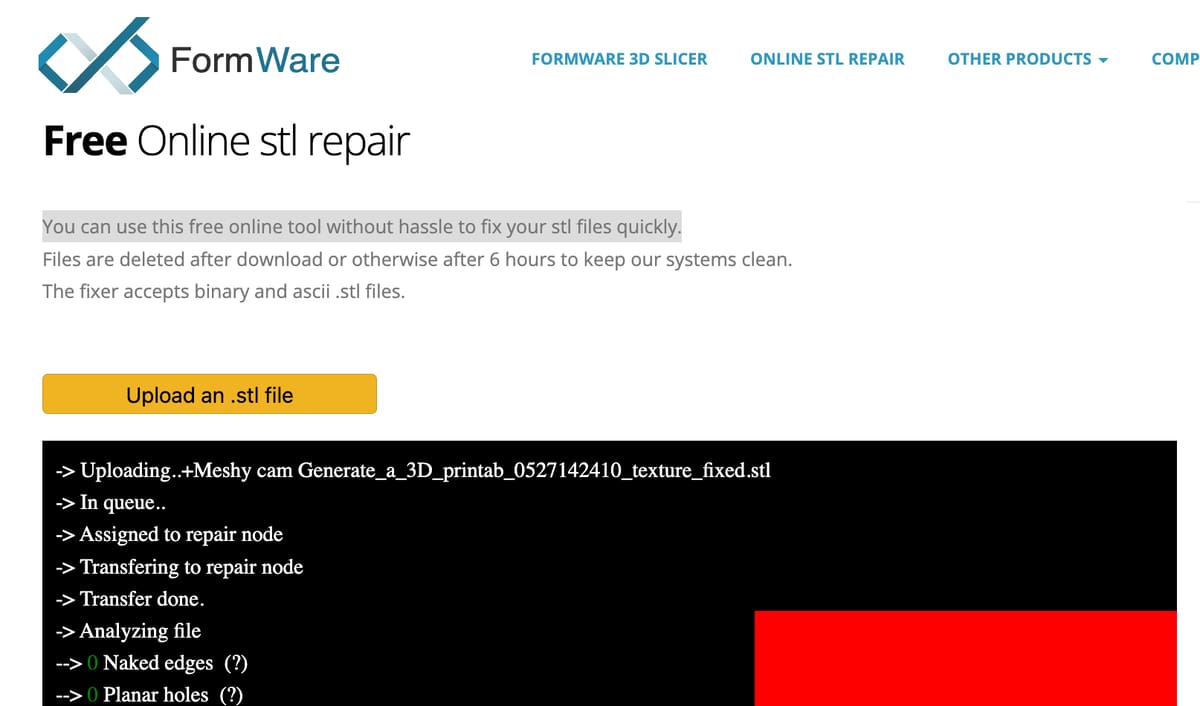
If you use Bambu Studio, you may already know Formware, since it’s the software’s recommended mesh fixer.
Formware is an easy one-click, browser-based repair tool. It can be a quick fix for files with few errors, or you can wait a while for more complex files. You can only upload and download STLs, not 3MFs.
MeshLab
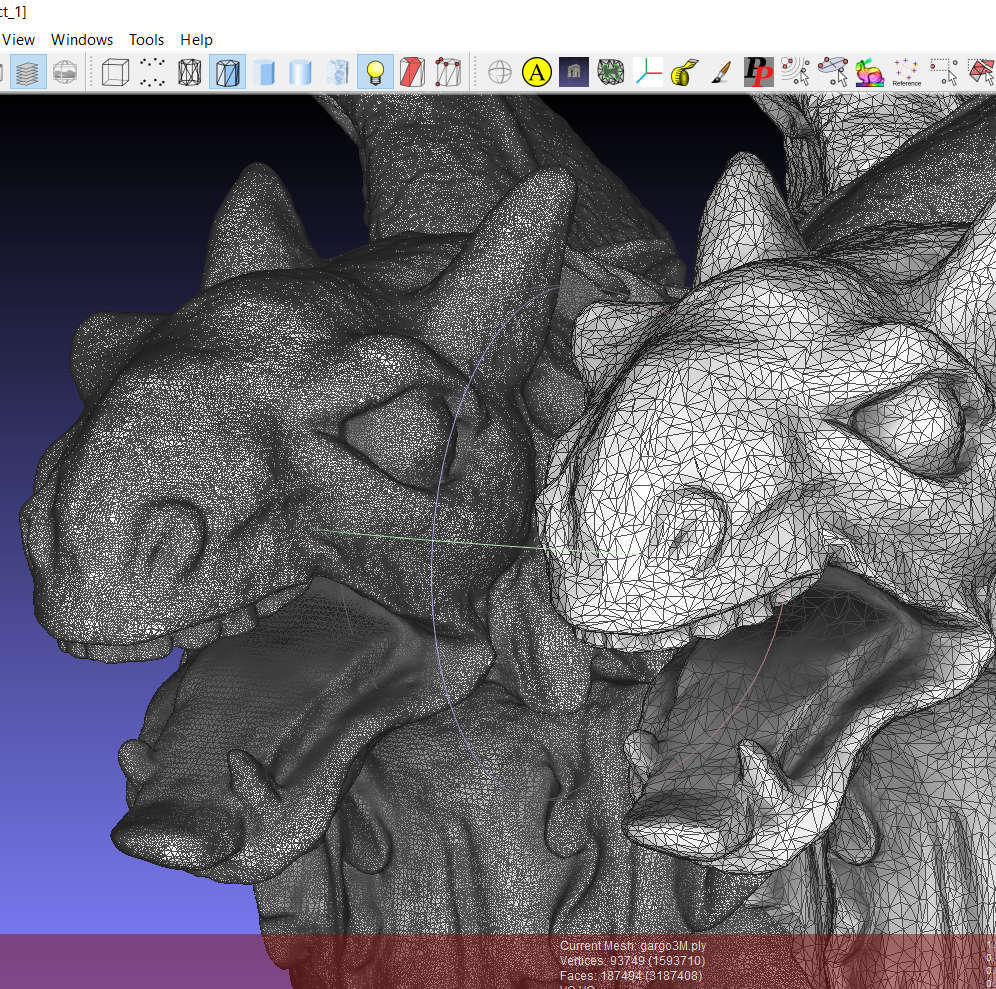
MeshLab is a free, open-source mesh editing program used to inspect, clean, repair, and convert 3D models, including STL files. It’s especially useful for fixing messy geometry, removing duplicate elements, closing holes, simplifying dense meshes, and preparing files for 3D printing.
MeshLab is best for users who want more control than a one-click repair tool, especially when cleaning scans, simplifying dense meshes, or inspecting problem geometry.
To get started, open your STL file in MeshLab and use the Filters menu, where most repair tools are located. Good first steps include checking for duplicate vertices or faces, removing isolated pieces, and using hole-closing tools for gaps in the model. After making changes, export the repaired file as a new STL so you keep the original file as a backup.
A few beginner tips:
- Use Filters > Cleaning and Repairing for common mesh cleanup tools.
- Use Render > Show Non Manif Edges to spot non-manifold problem areas.
- Try Filters > Remeshing, Simplification and Reconstruction if the model is too detailed or heavy.
- Always inspect the model visually after each repair, since automatic fixes can sometimes change the shape.
- Save a copy before editing, especially when working with downloaded or AI-generated STL files.
You can download MeshLab for free from the project website.
Aspose
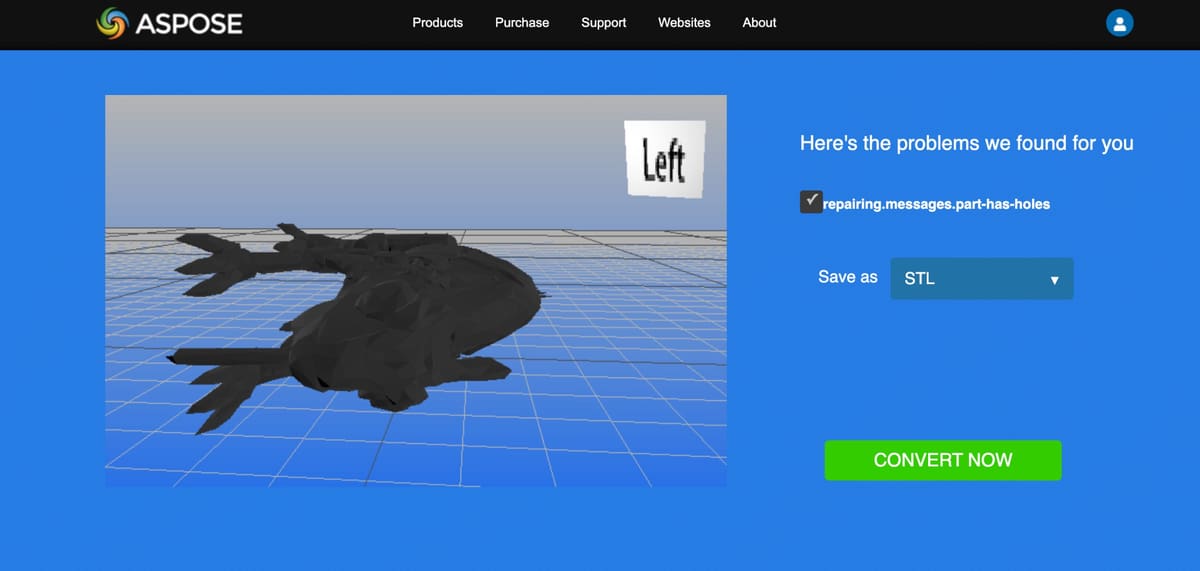
Aspose (free and browser based) is as quick and easy as it gets for no-fuss SLT repair. The company makes a lot of file apps, so look for the one called Aspose.3D Repairing. It’s a cloud-based tool that fixes corrupted or invalid 3D mesh files directly in your browser, without needing to install software. Just drag-and-drop your .stl file (there’s a limit to the size) and click on “fix”. If you have an OBJ you can convert it to an STL with another Aspose tools called OBJ to STL converter.
Aspose detects issues such as incorrect normals, missing normals, lack of thickness, and unexpected holes. It’s best for quick automatic fixes, not for redesigning geometry or controlling exactly how the repair is made.
MeshInspector
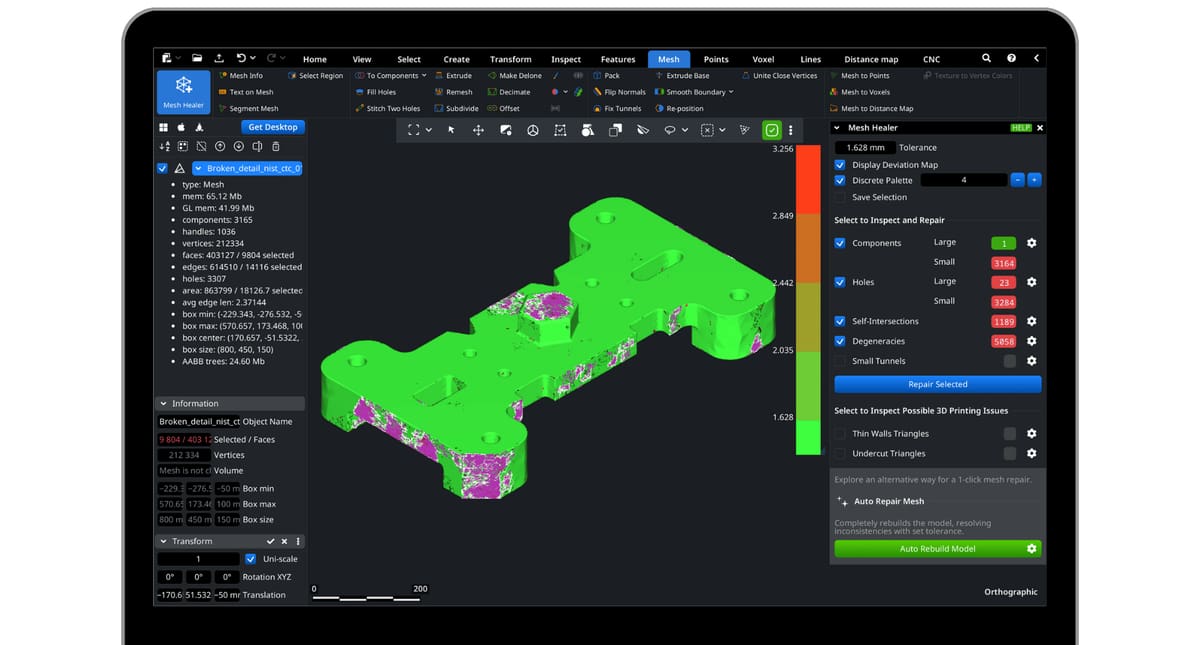
MeshInspector (browser based + desktop, basic version is free) fixes files with one click, it says, but we found it did so much more. It first auto-repaired the non-manifold edges but flagged some holes it said we should repair. For more accurate and detailed repair we could have fixed them individually and manually but opted for the “Auto Repair Mesh” button. Again, our holes were fixed and the file loaded nicely into our slicer.
If you’re looking for more than an auto-repair or if the auto-repair takes detail out of your model that you need, MeshInspector has a very user-friendly interface for learning the basics (and some advanced methods) of fixing models in the most accurate way possible. It’s not free, though. A basic version that has just limited tools, is free, and you can try the advanced version with all the repair tools free for 30 days (we used this option), but after that, you’ll need to subscribe: $300 a year for advanced mesh editing, then a pro version for $790 that includes 3D scan data to mesh, CT, and MRI data to mesh and more.
Fixing STLs in CAD Software
Sometimes, an automatic mesh fixer can only take you so far. These tools are great for closing holes, removing duplicate faces, or fixing non-manifold geometry, but they usually can’t rebuild a model’s actual design intent.
If an STL file has the wrong dimensions, missing functional features (or parts you want to delete), poorly placed screw holes, weak connection points, or a part that needs to fit precisely with another component, free CAD software may be the better choice.
Programs like FreeCAD, Tinkercad, Blender, or Fusion let you create clean shapes, adjust measurements, add or remove features, and rebuild damaged sections more accurately than a mesh repair tool can. In other words, when the problem is not just a broken mesh but a design that needs real changes, CAD software gives you much more control.
Tinkercad
Tinkercad is a completely free online CAD program developed by Autodesk. You can access the tool by making a free account on the Tinkercad website or logging in with an existing Autodesk account. Its main feature is its use of basic shapes and primitives as building blocks to create 3D models.
Tinkercad can be very useful for simple STL edits such as adding text, splitting a design, or combining two STLs into a single model.
The tool is easy to use, runs smoothly, and has all the basic tools you need to create a simple 3D model. However, it’s missing some key features of a proper STL editor, particularly tools for surface modeling and mesh repair.
That said, it can be a great option to help you get your bearings or to work on specific, basic editing issues if that’s all you’re after. Here’s how to do it.
Step 1: Import an STL File
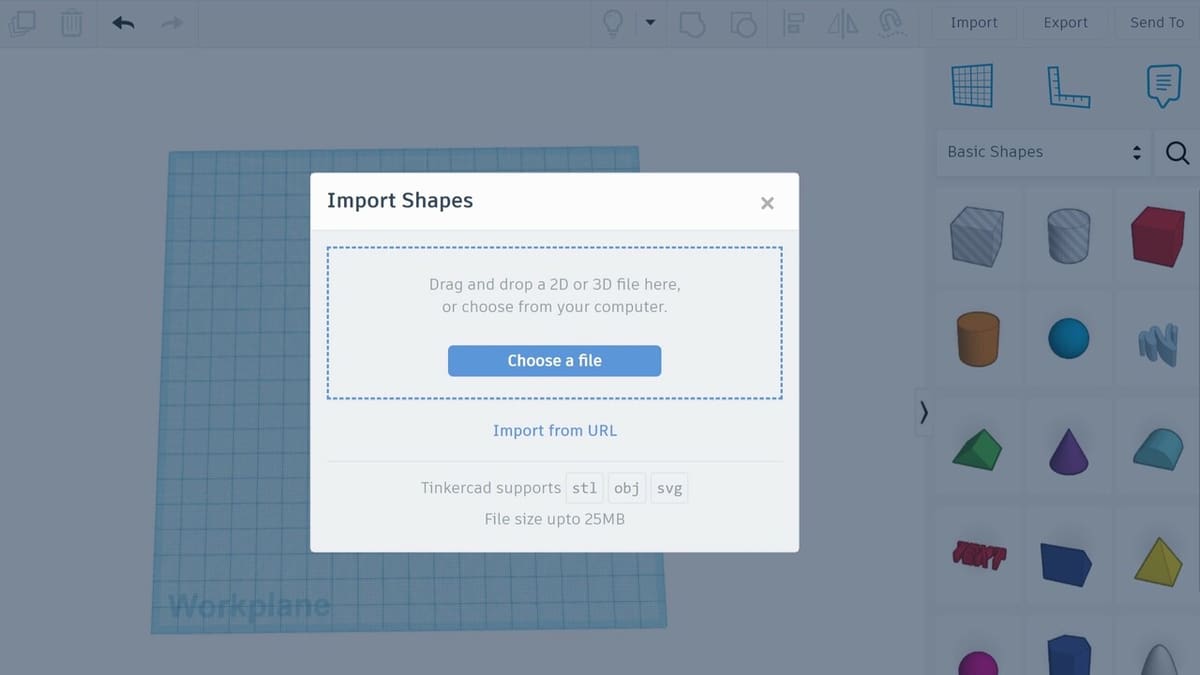
Once you have created and logged into your free Tinkercad account, you can edit your STL file. The first step is to import the file.
- Open a new design.
- Click “Import” in the upper right corner.
- Select “Choose a file”.
- Select your STL of choice, then click “Open”.
Before importing into the workspace, Tinkercad gives you a basic overview of the STL, including the part dimensions. If you need to scale your design, this is the time to do it.
- Simply enter the scaling percentage or the desired dimensions into the fields.
- Click “Import”.
It may take a minute for Tinkercad to upload the file into the workspace, depending on the complexity and file size.
Step 2: Edit STL File
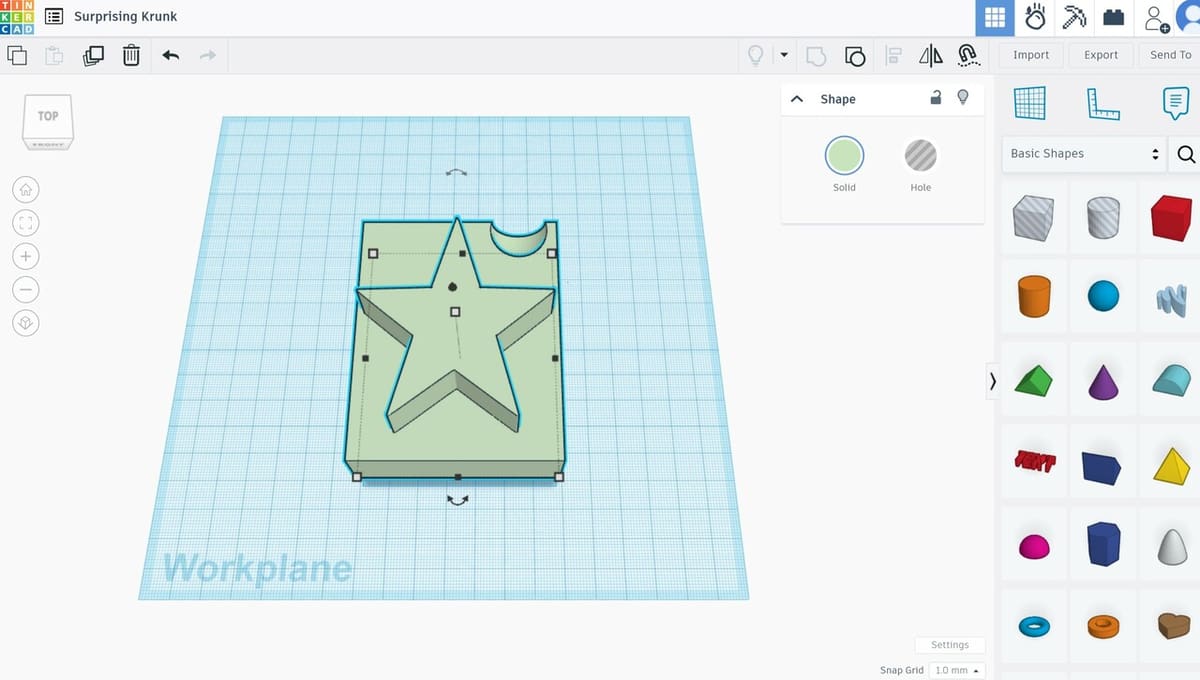
Once Tinkercad has finished importing your file, you can use any of the basic shapes, shape generators, or various other shapes provided to edit your STL. Additionally, you can import other STL files and use those to modify your design further.
- To merge two models, move them until they are combined as you want them to be, then, with both selected, click on “Ctrl + G”. To ungroup them, click on “Ctrl + Shift + G”.
- To add a hole, add a sphere from the Basic Shapes menu to the right, and locate it where you want it to add the hole in the model.
- From the top right “Shape” box, select “Hole”. Then select the other model as well (by clicking on it while pressing “Shift”), and group them (“Ctrl + G”). Your model should now have a hole.
You can also adjust size and scale using the drag points within the workspace.
Step 3: Export as STL File
Once you have edited the design to your liking, you can export it as an STL.
- Select everything you want to export.
- Click “Export” in the upper right corner.
- Follow the prompts to export the design as an STL file.
Blender + 3D Print Toolbox
Blender is a highly diverse, feature-rich program that can be easily downloaded from the Blender project website. Blender is a great STL editor if you want to create high-poly models, offering many tools to sculpt and work out fine details. It also makes it very easy to import STL models and prepare them for modeling.
However, it has a relatively high learning curve due to its huge assortment of tools and commands. It also requires high computing power to display some models, especially if you subdivide the model into many smaller faces.
Let’s look at how you can work on your STL files.
Step 1: Open STL File
- Open Blender, click on the workspace, and delete the default cube by hovering with your mouse above it and pressing the “Del” button.
- Click on “File > Import > Stl (.stl)”, browse for the file you want to open, and import it.
Step 2: Edit STL File
- Switch from “Object” to “Edit” mode by pressing the “Tab” or selecting “Edit Mode” from the drop-down menu in the top left of the screen. You should now see all the edges your model is made of.
- Then hit ‘A’ to select all elements so the model shines orange. You can also select individual points, edges, or planes by drawing a box over them with the left mouse button.
- To convert the triangles to rectangles, use “Alt + J”.
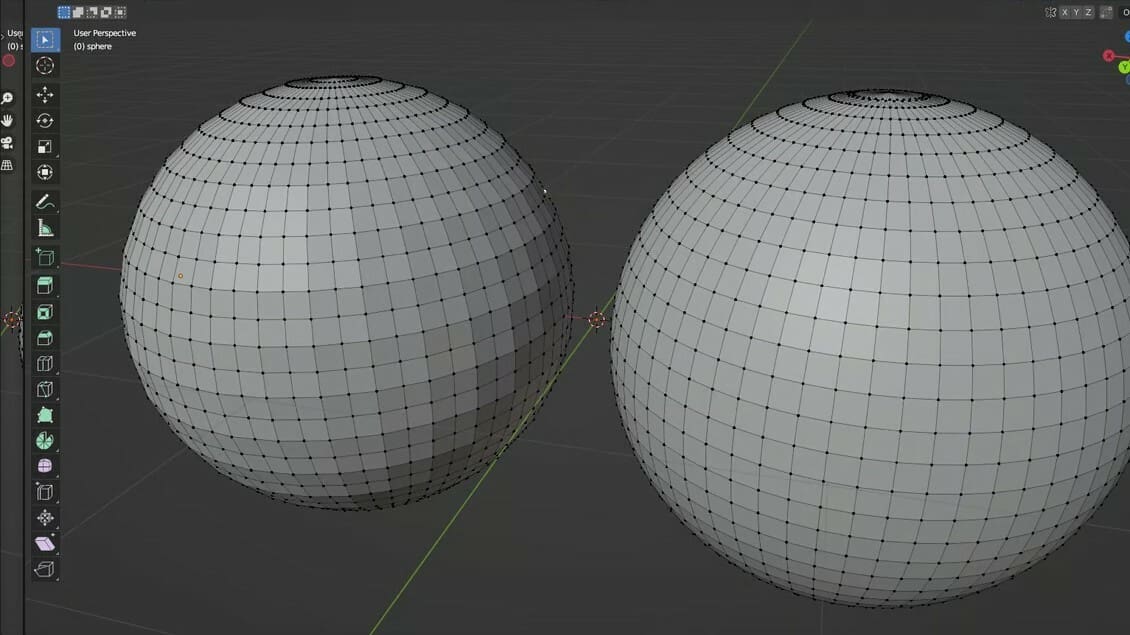
- You can now change the number of tiles the model is made of by selecting the “Edge” tab in the top menu and then opting for “Subdivide” or “Un-Subdivide” from the drop-down menu. Alternatively, you can right-click to access the “Subdivide” tool.
This approach only increases the number of polygons by interpolating them from the pre-existing ones, meaning that your model won’t have more detail, only more faces. If you want to increase detail, i.e. surface curvature, then you need to go back into “Object Mode” and apply a “Subdivision Surface” modifier and export the resulting geometry once more as STL.
- While in Edit Mode, activate the three different selection options, “Vertices”, “Edge”, or “Face select” by pressing “1”, “2”, or “3” on your keyboard, respectively, to edit parts of the model.
- To extrude a face, select it and right-click on it. From the drop-down menu, select “Extrude Faces” and then move the face as far or as deep as you want it to go. Finally, press “Enter” or click anywhere on the Viewport. Alternatively, you can select the “Extrude Region” tool from the right-hand options.
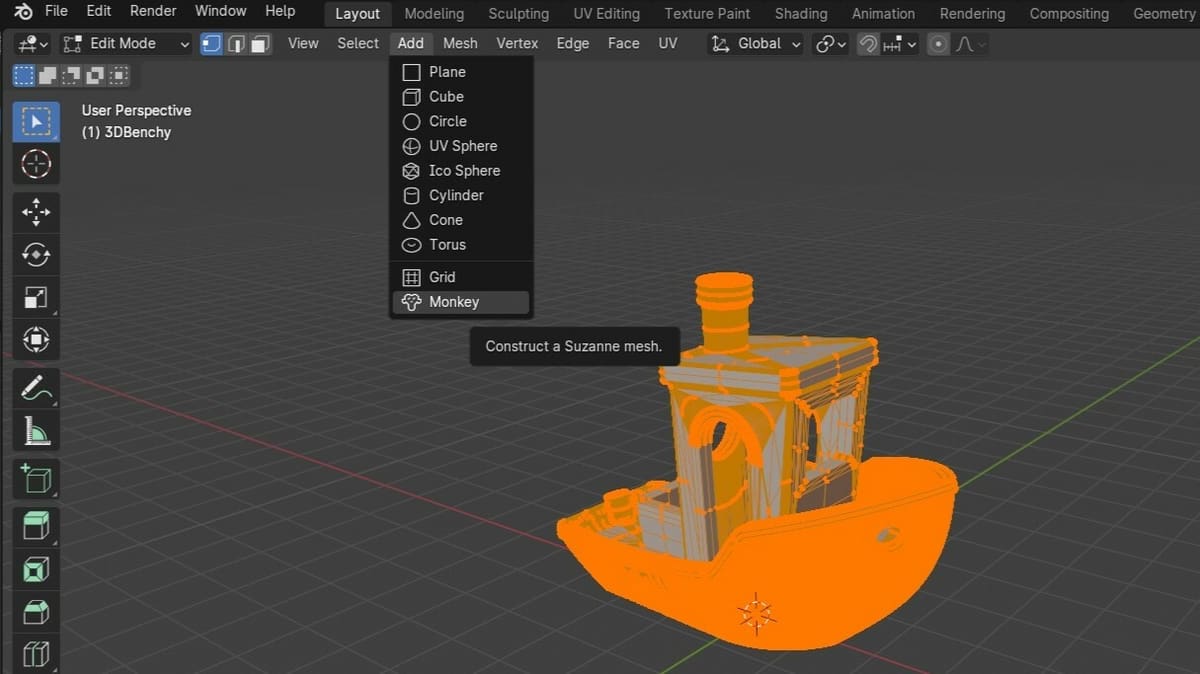
- Search for different shapes, such as planes, cubes, or spheres, to add them to your model by going to the “Add” drop-down menu in the top of the viewport or by pressing “Shift + A” and then selecting what you need.
- In “Object Mode”, go to the Modifiers Properties in the menu to the right, and navigate “Add Modifier > Generate > Boolean”. Select whether you want an “Intersect”, “Union”, or “Difference” kind of combination with the main object, and from the “Object” selection, click on the square and select your model. Then, click “Ctrl + A” or select “Apply” from the arrow next to the operation.
Step 3: STL Repair
Apart from STL import, Blender offers a native STL repair tool.
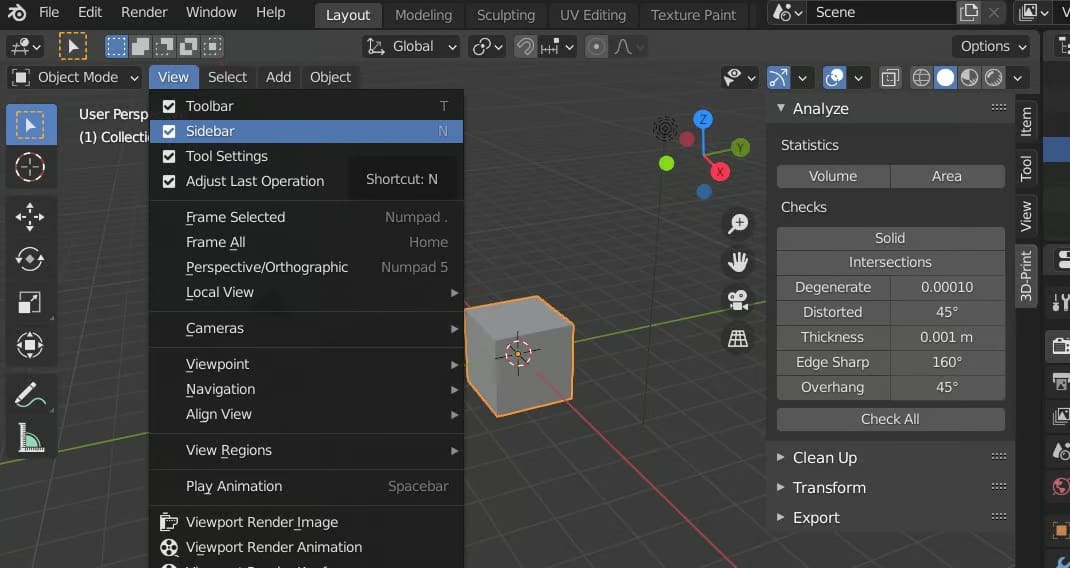
- Enable or install the 3D Print Toolbox from Blender’s Add-ons or Extensions area, then open it from the sidebar with the N key.
- You can now access the toolbox in the right sidebar (ensure you have the sidebar enabled under “View”). You can press ‘N’ to toggle this feature and then select “3D-Print” from the tabs.
Blender’s 3D Print Toolbox allows you to address issues that might cause your STL file to print incorrectly, including:
- Overhangs that require support structures when printing with FDM and other techniques.
- Wall thickness issues that may lead to areas that cannot be printed because they are too thin.
- Non-Manifolds that confuse 3D printers with overhanging or intersecting geometry.
You can check for all these issues by pressing “Check All” or going through them one by one. At the bottom of the toolbox, there will be a list of errors you can cycle through. To repair vertices and edges, press “Isolated”. To make your mesh manifold, press “Make Manifold”.
Step 4: Export as STL File
To export your object go to “File > Export > Stl (.stl)” and follow the prompts to save your file.

FreeCAD
FreeCAD is open-source and free-to-use CAD software that offers many different tools for 3D modeling. You can download FreeCAD for free from the FreeCAD project website. Simply select the correct version for your OS and start the installation.
FreeCAD is excellent for precise, functional parts, but it is less comfortable for sculpting organic shapes or repairing very messy scan data. It works best when you want to convert, rebuild, or dimensionally modify a part rather than simply patch a mesh.
When it comes to editing STL files, a serious limitation is that FreeCAD struggles with intercepting structures. This may result in meshes with intercepting edges being ruined.
That said, plenty can still be done with it, so it might just be the program that suits your needs.
Step 1: Open STL File & Convert It to a Solid Model
- Open FreeCAD and create a new document by clicking on “File > New”.
- Click “File > Import” and select the object you want to modify.
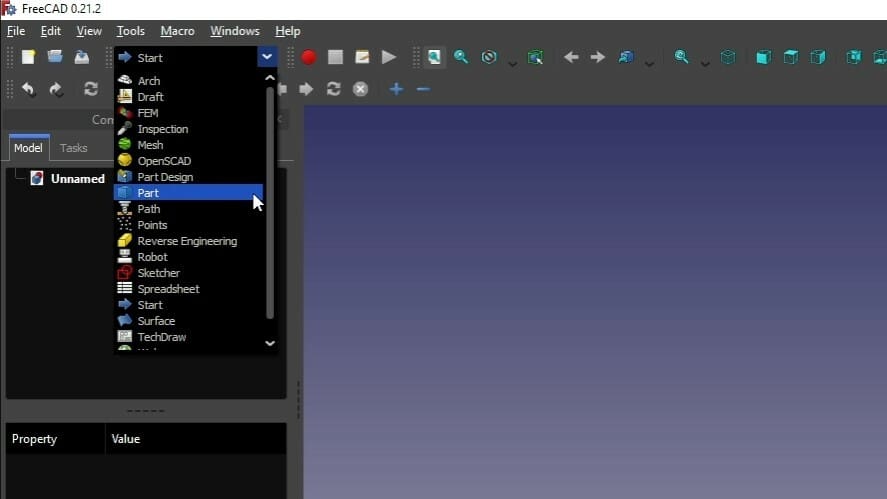
- Change your workbench to “Part”.
- Select the imported object in the “Model” window.
- Now click on “Part > Create shape from mesh…”. This will split up the imported object into many small triangles. You can adjust the precision of tessellation, but 0.10 is perfectly fine for most objects. If the number gets smaller, it will take longer to convert the object.
- You can now delete or hide the imported mesh. This will show you the shape of your imported object consisting of many triangles.
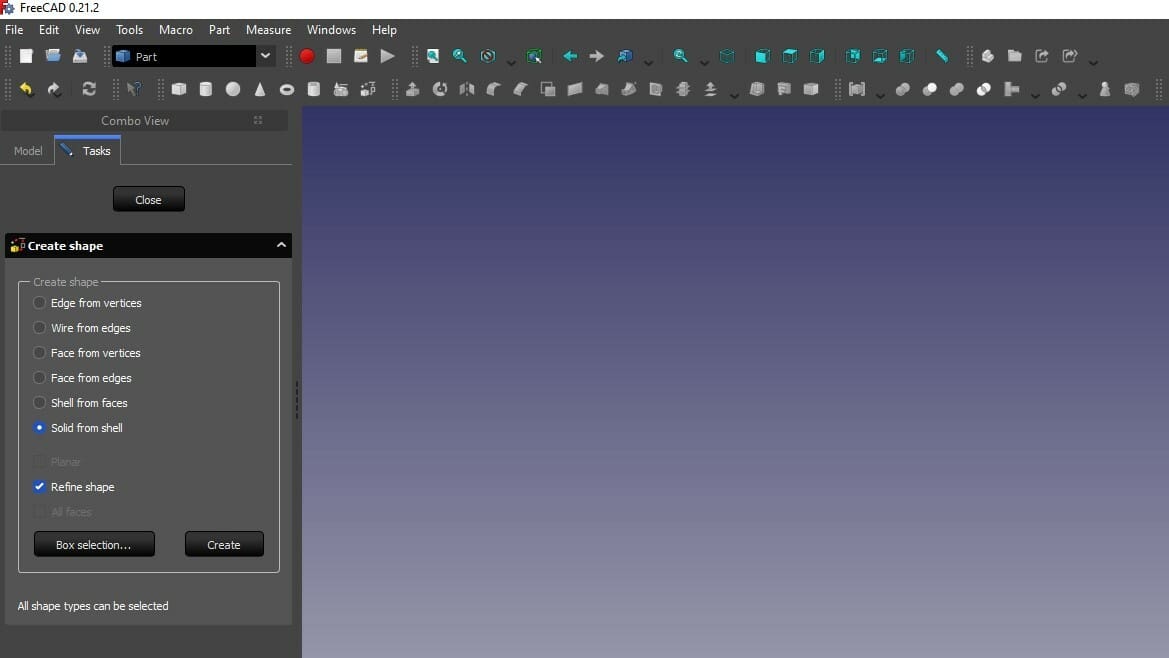
- Click “Shape builder” to create shapes and select “Solid from shell”. Now click on any triangle forming your imported object and then on “Create”. You will not notice anything because the shape is overlapping the solid. Click “Close” to finish.
- Next, delete or hide the old shape. You now have a solid object of your mesh file ready for editing.
Step 2: Edit STL File
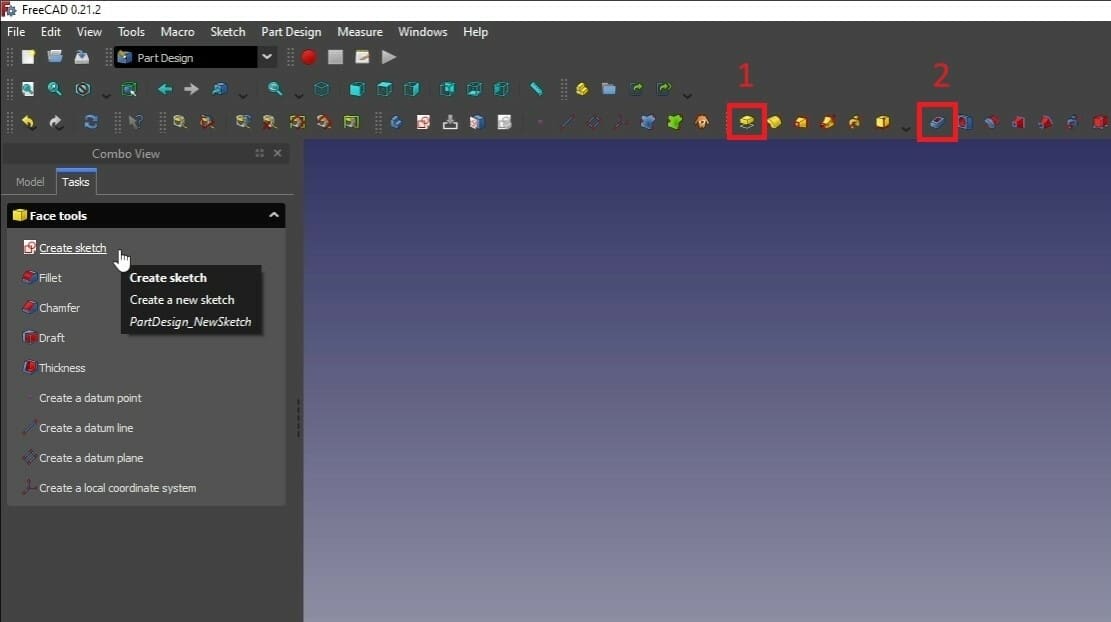
- Switch your workbench to “Part Design”.
- Click on any face you want to add or remove material so it shines green.
- Now click “Create sketch”.
- Create a shape you want to extrude or cut into using the tools for drawing a circle, rectangle, or line.
- Click on “Close” to confirm the sketch. If you want to edit the sketch, double-click it in the model tree.
- Now select a feature you want to apply. You can use the “Pad” tool (1) to extrude or the “Pocket” tool (2) to cut elements.
Step 3: STL Repair
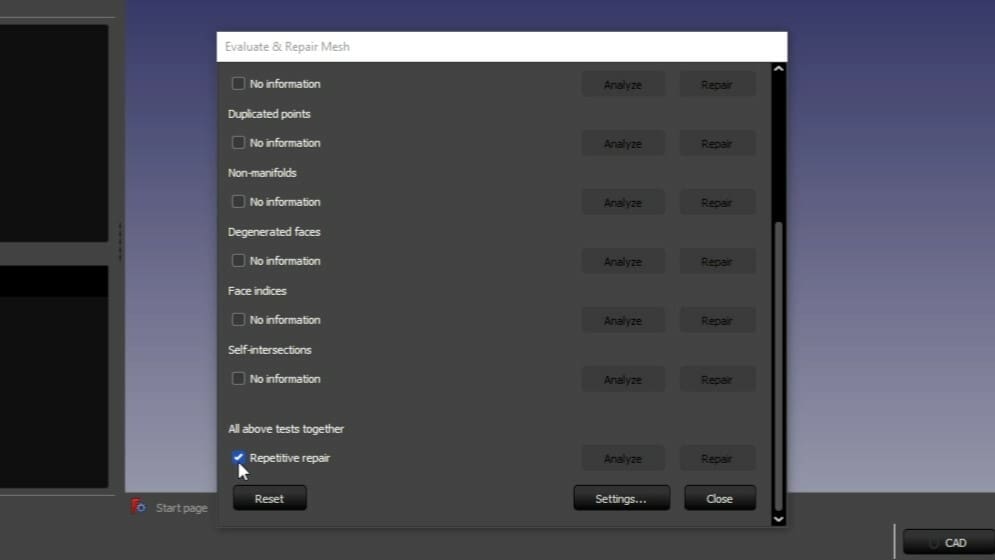
FreeCAD also features an extensive mesh repair tool:
- Select “Meshes > Analyze > Evaluate & Repair Mesh”.
- From the options that appear, on “Mesh Information” select the mesh you want to repair.
- Unless you’re specifically looking to evaluate one aspect, check the box for “Repetitive repair” and then click on Analyze and then click Repair.
Step 4: Export as STL File
- Select the last feature in the model tree to export the repaired file.
- Then click on “File > Export” and select “Mesh formats”.
Fusion
Fusion (until recently known as Fusion 360) is a cloud-based 3D CAD/CAM software developed by Autodesk. It can be used for free on its personal use license, which has certain limitations but fortunately provides access to powerful mesh editing and creation tools. These tools support both parametric and direct modeling modes where you can insert, repair, and modify mesh bodies to prepare them for manufacturing.
It’s good and practical software to work with. While the learning curve can be steeper than simpler programs such as Tinkercad or Meshmixer, there’s plenty of information about how to use it, and once you get used to the user interface and tools, it naturally becomes a powerhouse for 3D modeling.
Step 1: Open STL File
- On the Design workspace, select the Mesh Tab.
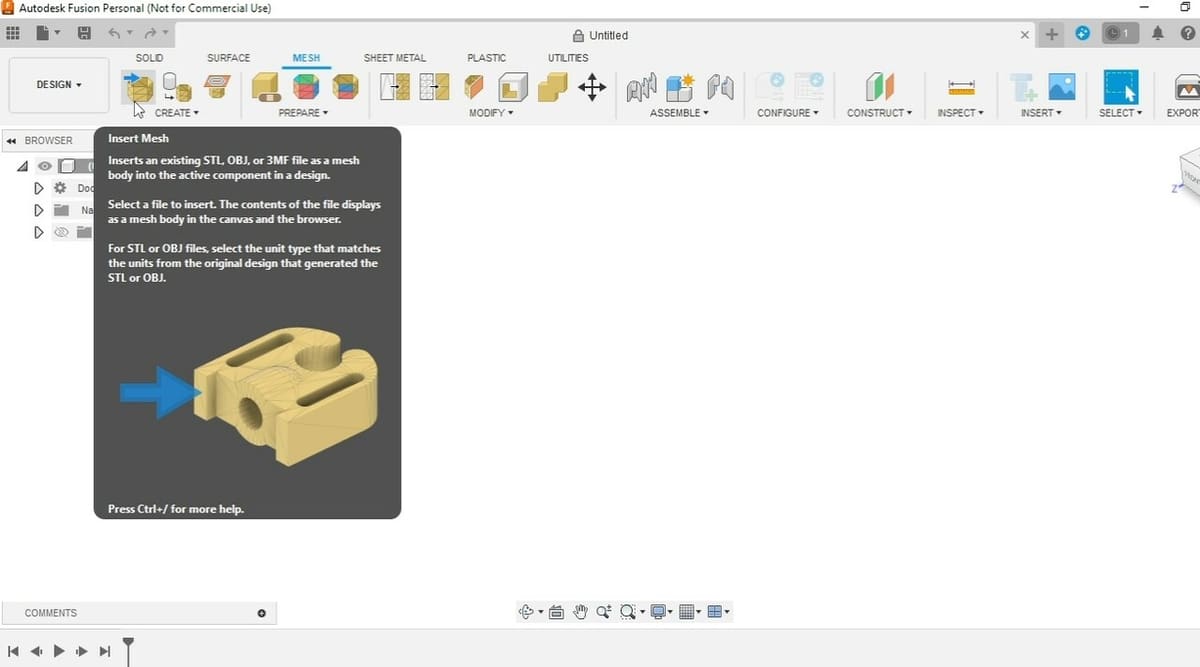
- In the Mesh tab, from the “Create” group, select “Insert Mesh”.
- You can select a mesh from your cloud files or from your computer. Accepted file types include STL, OBJ, and 3MF.
- This will load the mesh and a window will pop up on the right. There you can flip the direction and click “Okay” to finish the process, to make the mesh normals face out.
Step2: Edit STL File
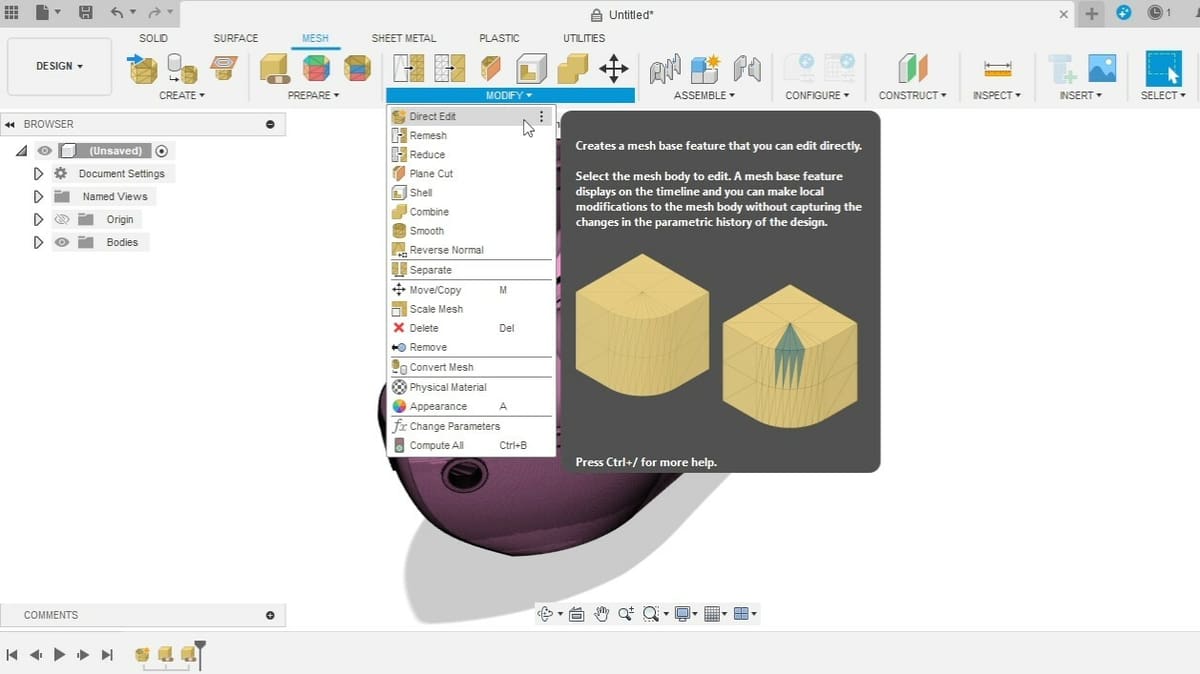
- Many editing commands are available from the “Modify” group, such as Combine, Smooth, Plane Cut, and Scale.
- You may also use the “Direct Edit” tool, with which you can make direct modifications to the mesh body without capturing the changes in the parametric history of the design. With that, all the modifications will be kept in a single instance on the history line.
Step 3: STL Repair
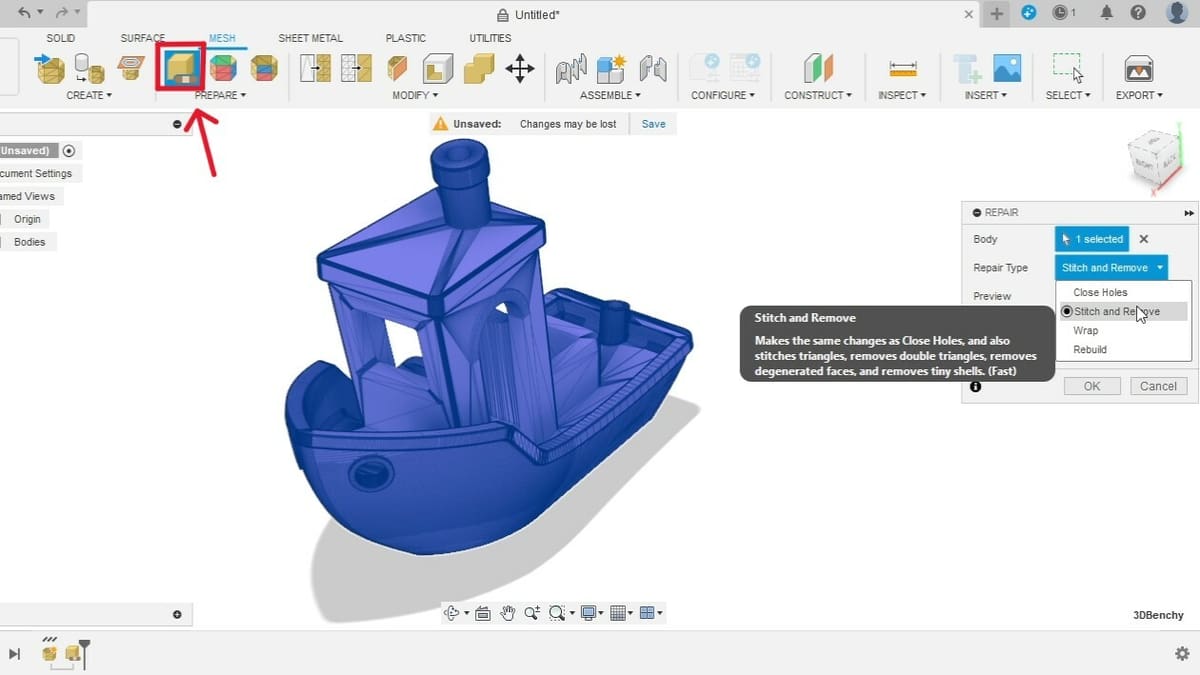
- From the “Prepare” group, select the Repair command.
- This will open a pop-up window on the right, where you can select the bodies to modify.
- The Repair Type options include Close Holes, Stich and Remove, Wrap, and Rebuild.
Step 4: Export as STL File
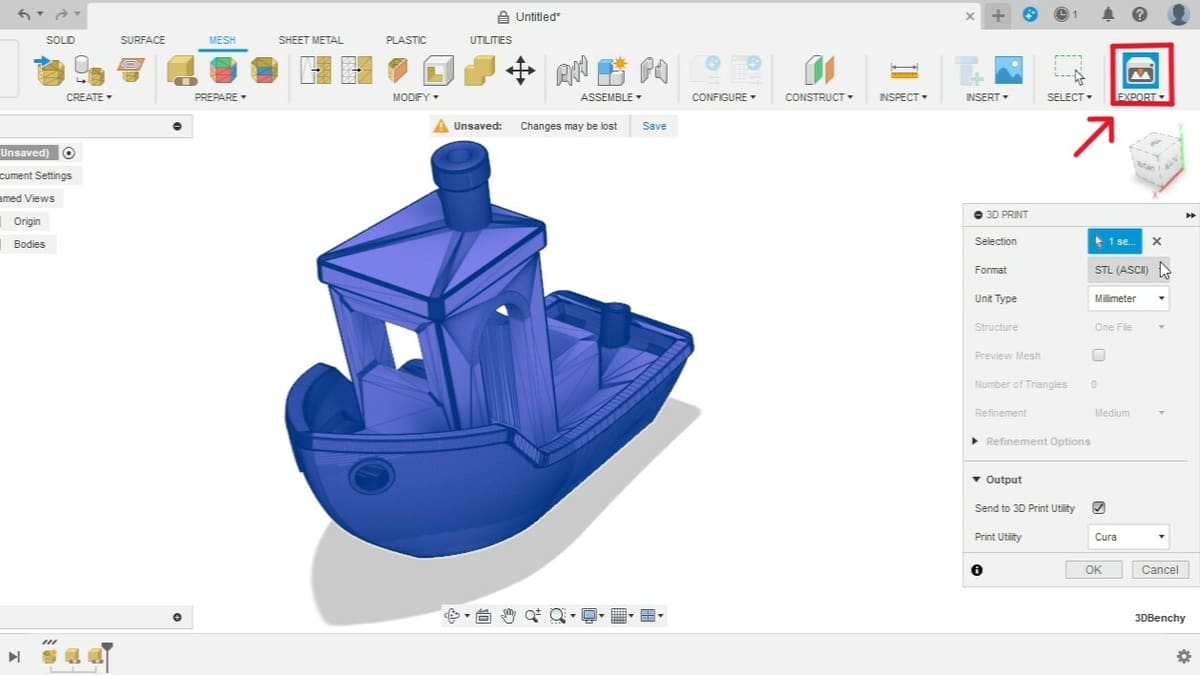
- In the Export group, select the 3D print command.
- On the window that pops up to the right, select the mesh bodies to export, the desired file format, and the unit type.
- You have the option to output the mesh directly to the slicer by checking the box for “Send to 3D Print Utility”.
- Otherwise, leave it unchecked and you can download the mesh.

License: The text of "Free STL Editors: How to Edit & Repair STL or 3MF Files" by All3DP is licensed under a Creative Commons Attribution 4.0 International License.