
17 Epic 3D Printing Fails & Why They Failed

Need a confidence boost? Check out these epic 3D printing fails that'll make you laugh, cry, and wish your printer could apologize.
Generally, when we think about printing failures, we think of common problems like an uneven print bed, incorrect settings, or bad luck contributing to a print that is, at worst, un-useable and, at best, somewhat useable.
However, these simple, common problems don’t qualify as an epic fail in our books. The prints we’ve found are epic in that they not only fail themselves but also end up either destroying things or altering the lives of the 3D printing enthusiast in a significant and confidence-shattering way.
Read on to see some 3D printing horror stories that will make you laugh, cry, and really wish you’d spent that extra $50 on the printer with thermal runaway protection already activated because, jeez, you didn’t see that coming…
Let’s dive right into the train wreck that is 3D printing epic fails.

Catastrophic Printer Problems
In this category, we have examples that end in some form of significant destruction to the printer or the build plate. These are the types of epic 3D printing fails that nearly make makers meet their maker or that require a long sigh and additional money spent trying to fix the damage.
When it comes to these examples, we hope to never see them happen to our own printers (or yours).
Heat Block Hazard
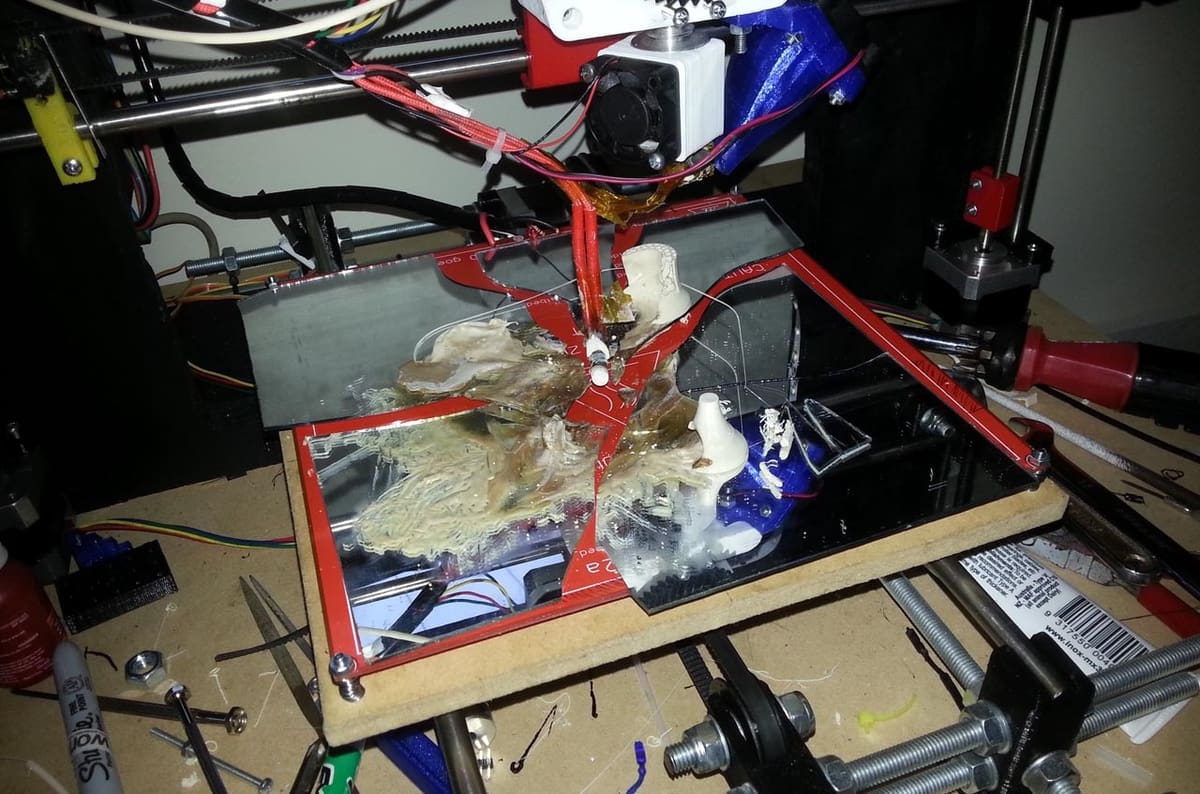
This is a 3D printing fail that every 3D printing enthusiast worries about. In this example, Reddit user OpusMcn set his printer to work overnight. Halfway through, the heating element worked its way out of the heater block and fell onto the PLA part.
When this happens (and your printer doesn’t have thermal runaway protection), the printer will continue powering the heating element in an attempt to raise the read temperature of the thermocouple. This leads to a blazingly hot heating element sitting on flammable plastic for hours until it either burns your house down or wakes you up with the jarring smell of burning plastic.
While the heating element probably wasn’t secured into the block well enough, for modern printers, it’s highly recommended that thermal runaway protection be installed or enabled for printers to lessen the risk of this exact thing happening. This could potentially happen during any print when a printer doesn’t have thermal runaway protection. Luckily, most current printers include this functionality to prevent these types of potential fires – just be sure to double check before starting your next print job.
- What is it? A free heating element melting into a plastic part for hours while the user slept.
- What happened? The heating element worked itself free from the heater block and fell onto the surface of the print.
Humpty Dumpty Had a Great Fall
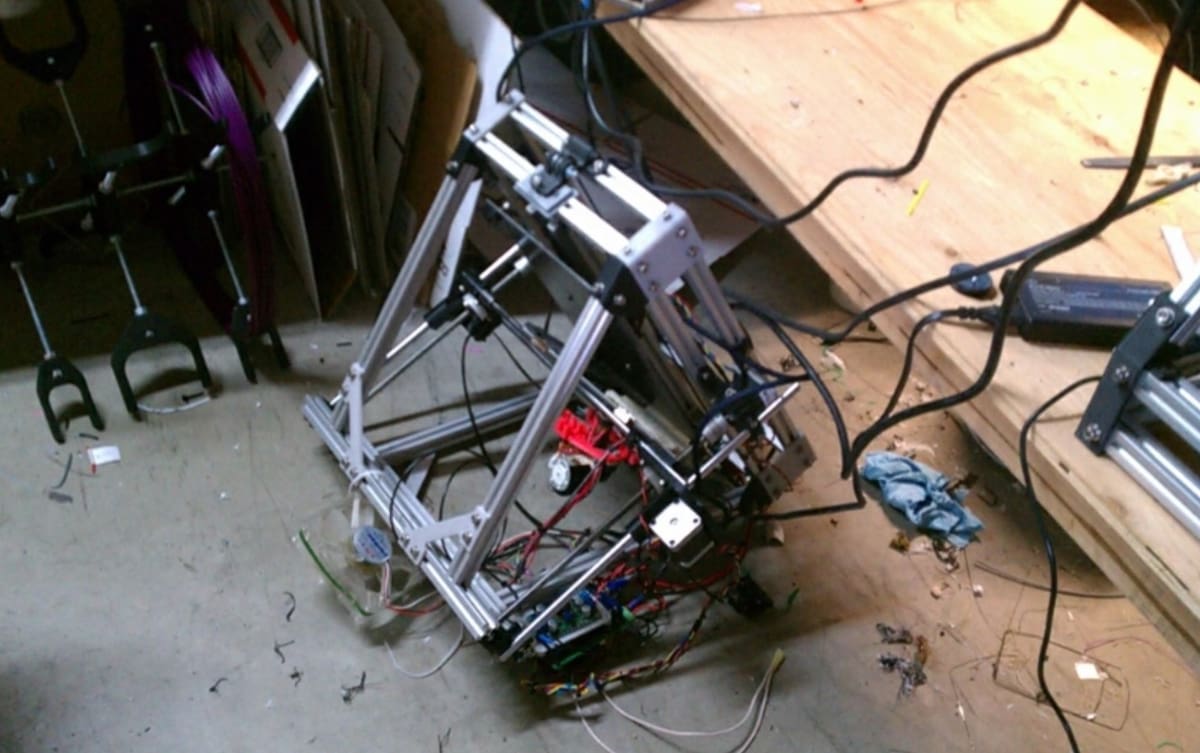
When your print throws itself off a table to end its suffering, it might be time to rethink your 3D printing setup. This horrifying case of 3D printer suicide was brought to you by the end of the filament being stuck in the spool. In this case, we’d say that 3D printing enthusiast Chris Cecil clearly has a great spool setup – so good, in fact, that it’s capable of dragging a 3D printer to its death.
After the fall, the printer only had damage to the X-axis as well as some Z-axis components. Somehow, the borosilicate printer bed didn’t break, though we think that had more to do with luck than anything else.
After the accident, Chris decided to secure his printer with anything and everything that will keep this from happening again. He even considered adding a granite base to prevent movement in the future.
- What is it? A printer that threw itself off the table.
- What happened? Filament didn’t disengage from the end of a spool and, over time, dragged the printer off the table.
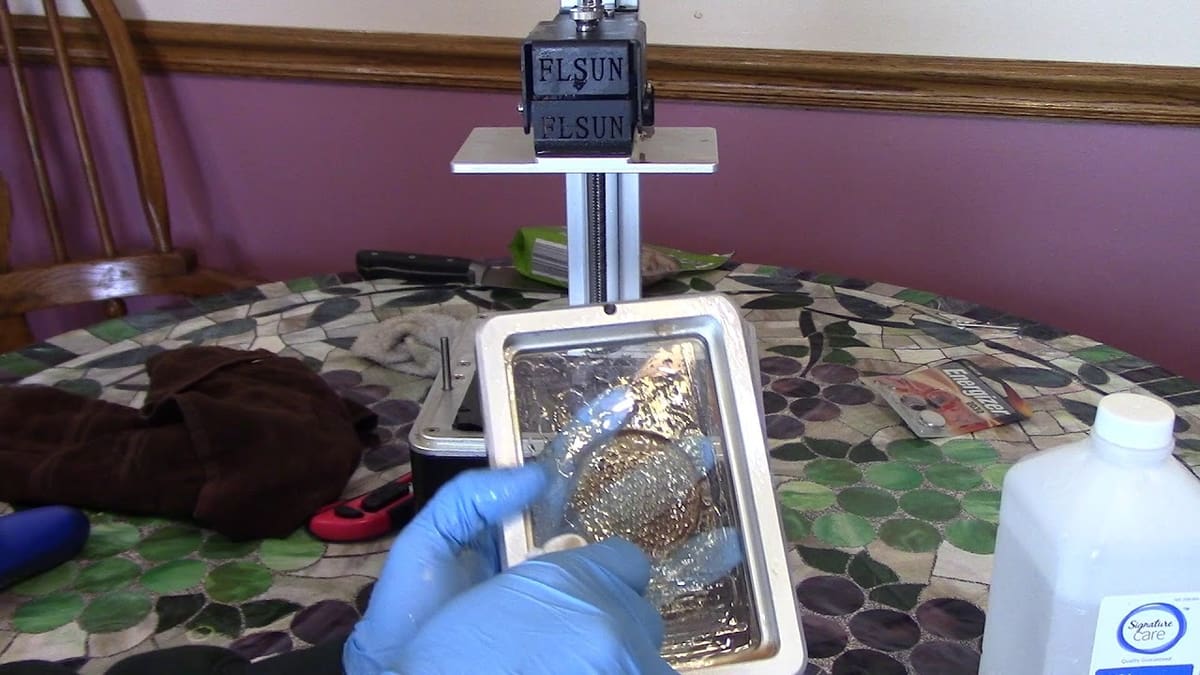
In Case of Printing, Break Glass
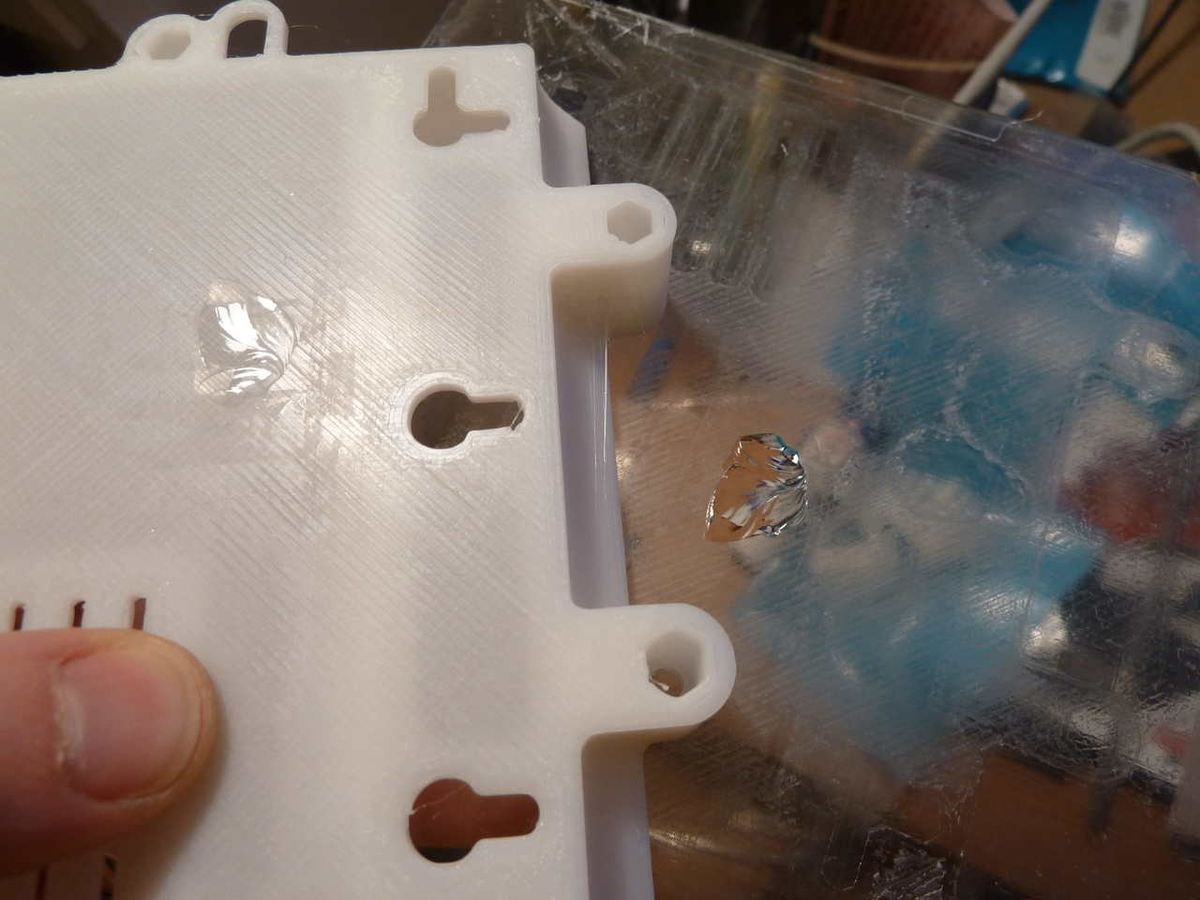
One of the most annoying features of 3D printing for newbies is the inability to get filament to stick to the build plate. Without that, you can’t really print anything, and this can be a frustrating cycle of trying and failing. Not to worry – we’ve got you covered with everything you need to know on bed adhesion.
But this epic fail isn’t as simple as sticky adhesion.
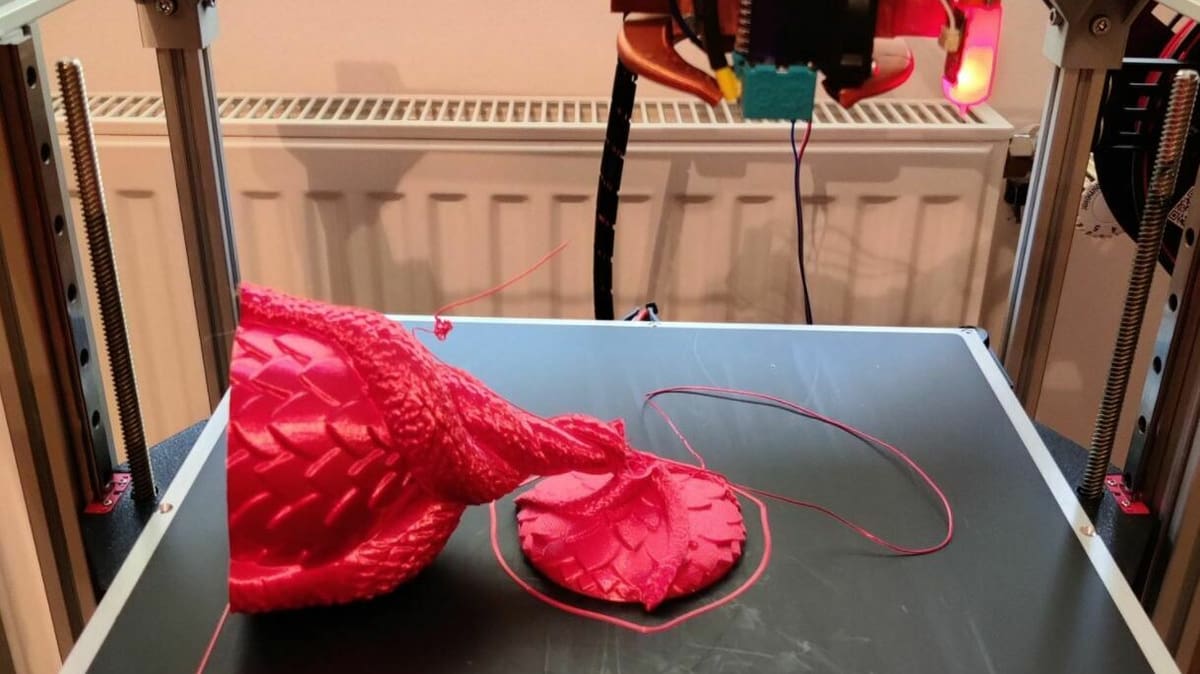
Here, programmer Sandy Noble printed something meant to hang using most likely PETG on a glass build plate with dilute PVA glue on it. This bond has been described as being so strong that when the part cools down, the thermal stresses imparted during printing can literally rip chunks of glass out of the build plate itself. We don’t exactly know what this part was – perhaps some kind of mount. Nevertheless, it had a large flat surface area, which probably didn’t help when trying to remove it from the build plate.
- What is it? A part printed on a glass bed with PVA adhesive.
- What happened? When using PETG and adhesives, it’s important to not print directly onto a glass build plate. The adhesive forces between the PETG and the glass interface are so strong that thermal stresses from the printing process can literally rip glass chunks right out of the build surface when the part cools down.
Filament Failures
These failures aren’t quite as catastrophic as the destruction of printers, but they often yield unexpected and unwelcomed surprises. One of the most important things about 3D printing is the filament. If the quality is poor or the spool isn’t hung correctly, the quality of your prints will suffer immensely. Check out our All 3D Printing Filament Types Explained – Properties, Printing & Best Uses to save yourself any guessing.
The following 3D printing filament fails will really string you out.
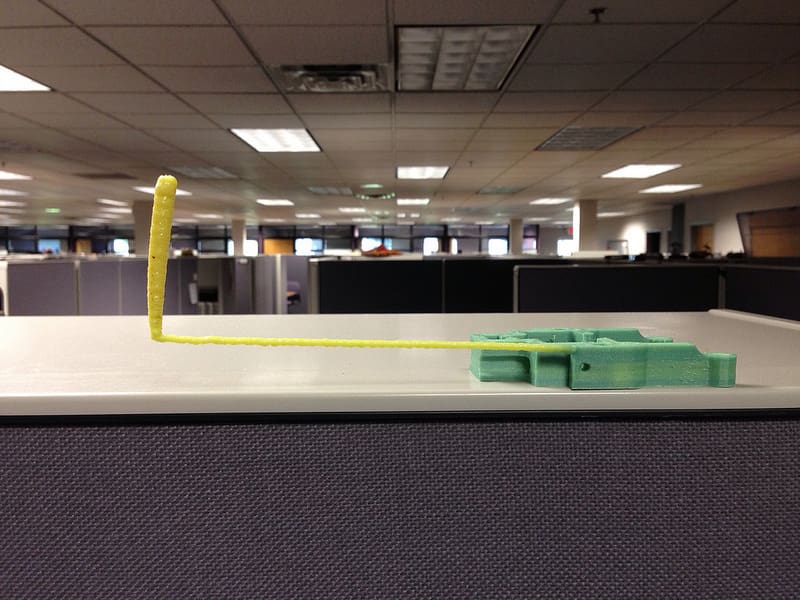
Connector Catastrophe
This failed print unrolled eight hours’ worth of filament, which will be quite difficult to re-spool. When it comes to 3D printing, gently and consistently unrolling filament is the key to getting prints to turn out with few blemishes.
In this case, the boxy-looking print didn’t have many issues, however, for Bowden extruder setups, the push-fit connectors are important for feeding the filament into the hot end with low resistance. Once a push-fit connector fails in this way, the extruder motor won’t feed the filament into the PTFE tube correctly, instead bunching up.
In this failure’s case, we’d suggest investing in a higher quality push-fit connector. Additionally, mounting the spool to spin more smoothly may help.
- What is it? The start of a beautiful spool-ey mess.
- What happened? A push-fit connector in a Bowden-style setup popped off during printing, which caused the filament to stop feeding into the hot end correctly and then bunched up into a mess.
Spool Explosion
According to YouTuber rwg42985, this spool of black PLA became so brittle that the spool exploded into tiny fragmented shards of filament that were flung all over the room. This spool explosion is a wild example of what happens when you try to re-spool filament in a non-ideal environment.
PLA needs a humidity of less than 50%. (Although many sources state narrower ranges, there isn’t a set rule, as PLA additives and types vary widely.)
It’s likely that this happened due to a combination of extra stress on the re-spooled filament and inappropriate humidity in the storage room. Relocating the filament and 3D printing equipment to another room that has better humidity conditions would be a good way of preventing such a failure. Another solution is drying filament.
- What is it? A spool of exploded black filament.
- What happened? After re-spooling some black filament and leaving it out, the material exploded into many pieces all over the floor and table.
Rooster Malfunction
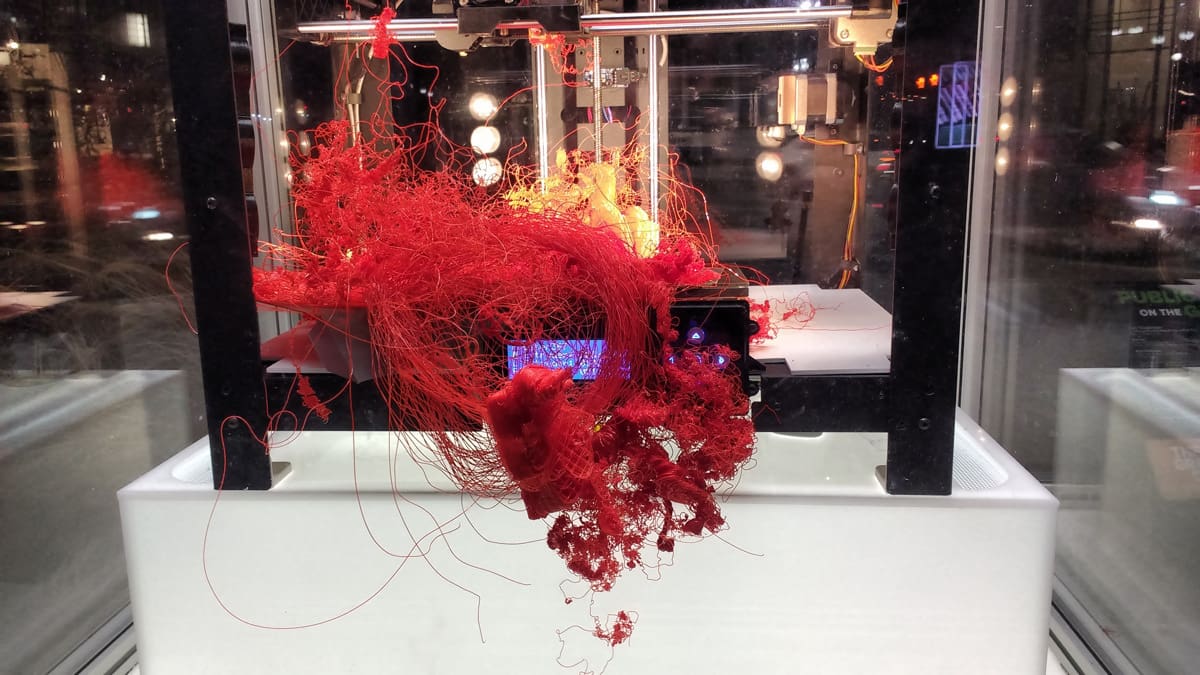
This Boston-area 3D printing art exhibit called “Make and Take” was a project in 2017 to celebrate the year of the rooster for Chinese New Year. The goal of this project was to 3D print 2,017 tiny roosters in an outdoor space.
Chris Templeman, the artist behind the printed roosters, learned the hard way how a 3D printer can create epic fails. The rooster explosion pictured above happened because 12 roosters’ worth of plastic was printed over and over until the printer was checked on.
This is an epic fail primarily because of the enormous waste of filament from so many roosters gone awry. It’s an example of what can happen when you leave a 3D printer unattended for hours and hours.
While we couldn’t find the exact design, if you want to give roosters a go, there’s a similar model on Thingiverse.
- What is it? 3D printed roosters gone wrong.
- What happened? Technically, many different things failed in the duration of this project. In this case, roosters kept printing and printing after one of them detached from the build plate creating a 12-rooster filament explosion.
Stay Patient
Switching filaments in the middle of a print is a simple way to create layer-based multicolor prints without a dual-extrusion hot end. This type of multi-color printing is typically performed by pausing the print and manually changing the filament or using an automated system like Prusa’s MMU.
Mid-print filament swaps have a few uses, but one of the most common is to make the text on a 3D model stand out from the rest of the print so it’s more easily readable. The trick to doing this is to ensure that the filament switch occurs at the right layer. If done too soon in the print, like what happened to this print, the text will still blend into the rest of the model.
For this user, luckily, they were still able to salvage one of the two labeled screw guides in their print by changing the filament back for a few more layers. However, whenever making a mid-print filament swap, make sure to go into your slicer and check which layer you need to make the switch at. In Cura, you can also activate a feature that shows what layer the print is currently working on, which can help with this process.
While this wasn’t technically an issue caused by filament, it certainly involved its proper use.
- What is it? A mid-print filament swap performed too early.
- What happened? The user swapped the filament on the print too early, causing one of the model’s text to not be distinguishable from the rest of the model.
Common Calamities
While some of the epic fails on our list are rare events, others are actually quite commonly experienced by 3D printers.
These fails include everything from running out of filament at an inopportune moment to the creation of a sticky mess. Whatever the case, these are similarly frustrating to fix, clean, and reset.
Isn't It Supposed To Be Flat?
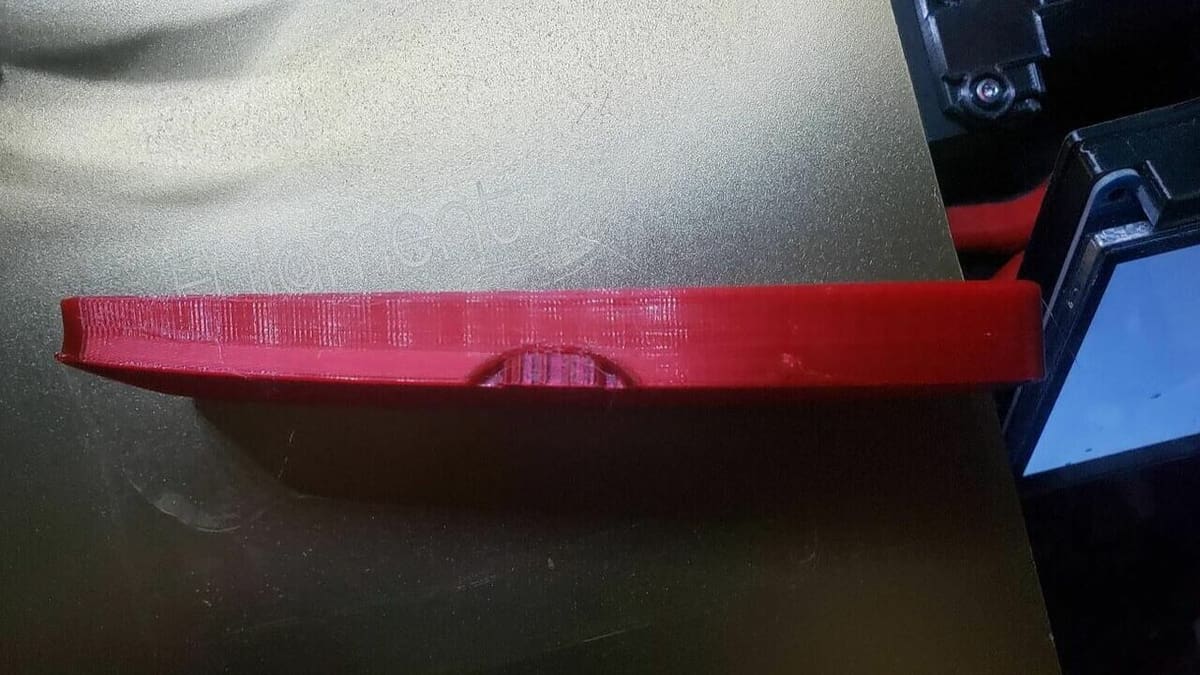
Warping is one of the most common issues out there, caused by a lack of bed adhesion and usually leading to a corner of a print lifting off of the build plate. While warping is certainly annoying, it’s not always a large problem. In this failure, however, warping distorted the entire bottom of a rather large print. The worst part about the failure is that the user printed the part in PETG – a material usually less susceptible to warping – and on a PEI build plate, which is typically very good for adhesion.
One of the best ways to solve warping is to increase your printer’s bed temperature or the ambient temperature around the printer. You can also use an extra adhesive (e.g. glue, hairspray) on the build plate to encourage bed adhesion, as well as activate a brim or raft on prints. However, you’re going to want to make sure you prevent warping, as slight alterations in prints, especially those meant to line up with other parts, can ruin them entirely.
A warping failure of this magnitude could occur on any print that has a large base area that touches the build plate.
- What is it? A part that came out with a completely warped bottom.
- What happened? Using too low of a bed temperature or not enough of an adhesive caused the print’s bottom to cool down and contract.
A Sticky, Hard Mess
Epic printing fails aren’t just limited to FDM printers. Even resin 3D printers fail at times, and one of the worst ways they can fail is when a print detaches from the build plate and gets stuck to the FEP sheet, the translucent physical barrier between the liquid resin and the curing source.
In resin 3D printing, the FEP sheet is delicate, and scraping the print off will almost certainly cause damage. In addition, working with a resin 3D printer is generally a very sticky and messy process, as resin is inherently quite viscous and hazardous to get on your skin.
Luckily, YouTuber Dylan Kowalski demonstrates a method of removing a stuck print using isopropyl alcohol that’s much gentler on the sheet than scraping would be. This doesn’t guarantee that the FEP sheet won’t be damaged, but it may save you a few bucks in this situation.
Just make sure the alcohol evaporates and gets cleaned out completely before you start your new print. Otherwise, this might lead to resin not curing.
- What is it? A resin 3D print stuck to the FEP sheet.
- What happened? For large surface area prints, particularly without supports, the resin part can stick to the FEP sheet.
Wiggle, Wiggle, Wiggle
Usually, when you 3D print a calibration cube, you want it to turn out like a cube that can be used for calibration. Alas, sometimes your hopes are left unfulfilled, like this user’s epic failure of a slanted and wiggly calibration cube that should never be used to measure anything.
This type of failure is common in 3D printers, particularly for new users, because it indicates some significant slack in the 3D printing belts that move in the X- and Y-axes. When belts are too tight or too loose, they can significantly alter the final appearance of the part and lose dimensional stability.
- What is it? A calibration cube indirectly indicating poor printer calibration.
- What happened? Due to loose belts, the calibration cube was printed slanted with visible vibrations.

To the Moon & Back... or Not
This gigantic “rocket” won’t be flying anywhere so fast, but this is the largest 3D printing epic fail on our list. Joel Telling from 3D Printing Nerd acquired this from 3D printing company SeeMeCNC. It was supposed to be a very tall rocket with SeeMeCNC written on the side of it. Partway through printing, however, the mechanism for feeding filament failed and the nozzle stopped printing.
If you’re up for the challenge, you can get the files for this rocket at Repables.
- What is it? A human-sized SeeMeCNC rocket that failed to finish, thanks to a faulty material feed.
- What happened? Partway through the print, the mechanism for feeding filament jammed and plastic was no longer being fed to the nozzle.
Stranger Things
The final category of epic fail 3D prints are ones that really make you go, “Hmm, that’s odd.” Our list of stranger things that have failed includes printing results that make us think, that make us want to forget, and that seem impossible.
Overall, these things are the most surprising epic fail prints on our list.
No Way Out
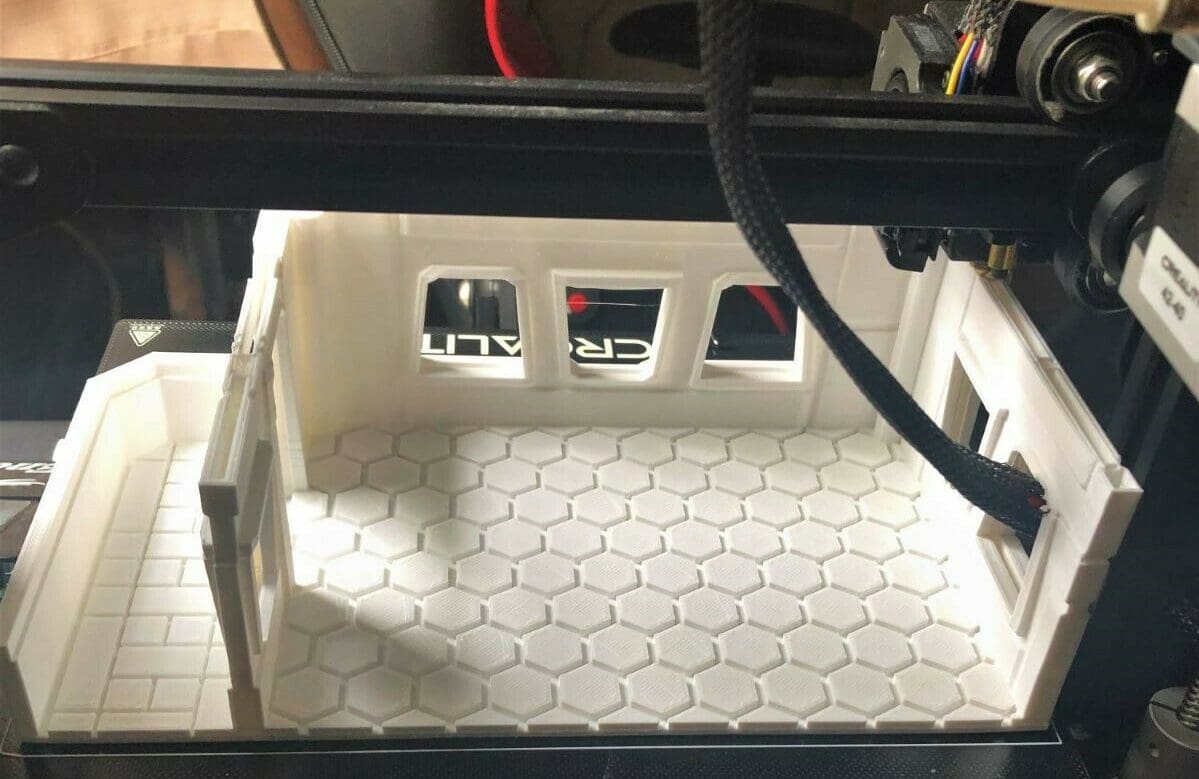
It can feel terrible to have a failed print, but it may be even worse to have a great print and know that you have to break it to save your printer. In the case of this failure, the wiring mesh for the printhead, which contains wires for the thermistor, heating cables, and fans was trapped inside the print. Luckily, the person who posted this failure stated that they’ll disassemble their printhead to save the print, but this can take a long time.
The cause of this failure is simply a lack of cable management. Wires or wiring mesh shouldn’t be able to reach the build plate on any printer. This house-like print had the perfect size of windows to capture the loose wiring mesh, creating this hilariously-terrible failure.
- What is it? A terrible situation in which the 3D printer trapped its loose printhead wiring mesh inside of a gap in the print.
- What happened? While there isn’t much detail about this print, it’s likely that the print wasn’t properly attended to or watched, which could have prevented the failure. However, the core cause of the issue is a lack of cable management, as the wiring mesh shouldn’t be able to interfere with the print.
One Man's Failure...
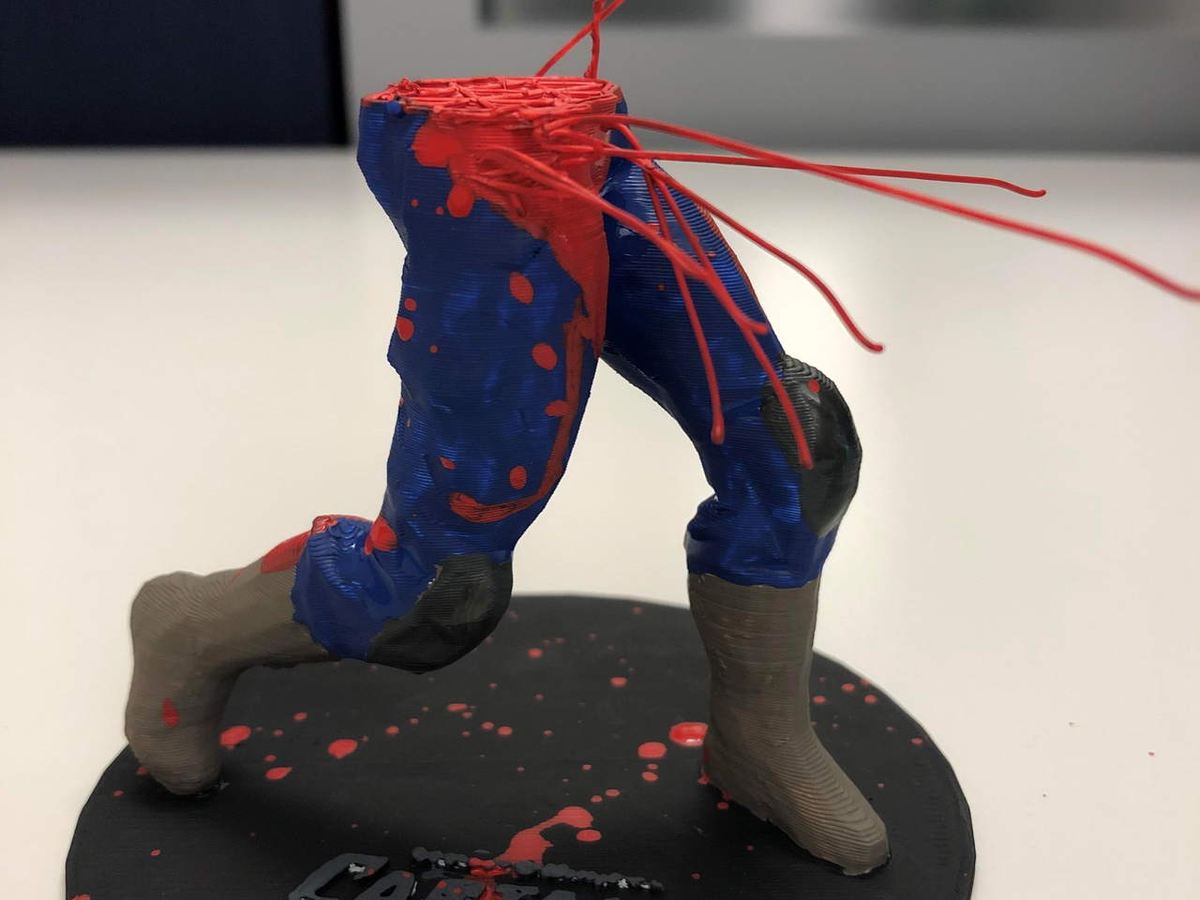
This Captain America miniature puts the “epic” into “epic fail”. As you can see, the print failed about halfway through printing America’s ass (don’t take our word for it – Ant Man said it). Most people would have just accepted the fail and moved on to try again, however, this Reddit user had other plans.
This “failed” miniature was simply painted to look like Captain America and cut in half, complete with projectile entrails. We have to admit that, while this is definitely a failed print, it’s one of the most successful fails we’ve ever seen. There are several similar designs through MyMiniFactory if you feel like printing your own Cap.
- What is it? Captain America vs. a wood chipper.
- What happened? The nozzle clogged, leading to a partially-printed Captain America figure. For future reference on unclogging nozzles, check out our article 3D Printer Cold Pull: How to Do It.
And Snap Goes the Print
Of course, print strength is very important for after-printing purposes, but it can also be critical during printing. This print was going smoothly until it snapped in half, completely ruining the almost-excellent print. The model’s structure was similar to a bottleneck, presenting an obvious point of weakness that made the model a more likely victim of breaking mid-print.
According to the maker, they used too high a print speed, making the infill structure very weak. However, a slight shove from the nozzle at the top of the print was the ultimate cause of the snap. If you’re printing models that have a converging structure, you can try to avoid this issue by using a slicer setting like Z-hop, which prevents the nozzle from hitting the print. Alternatively, you could print the model upside-down, as a user suggested.
The model appears to have presented challenges to other makers as well. Perhaps the user who posted the failure can take some comfort in that?
- What is it? A print that snapped in half near the end of printing.
- What happened? The model had a converging structure making the part easier to break near the bottom. A high print speed made the infill weak so when the nozzle accidentally ran into the print near the top, leverage caused the print to snap in half.
Can't Overhang, or Can It?
What makes this print a truly epic fail is how unbelievable it looks!
Usually, when a 3D printer tries to print an overhang, it’s at most a few dozen millimeters or so. However, this overhang looks like it’s hundreds of millimeters, and yet, it still printed without much sagging. It probably wouldn’t happen again even if the user tried.
- What is it? A laughably-long unsupported overhang.
- What happened? Our guess would be that there was an incredibly powerful fan or perhaps a very cold room during printing?

There's Always That One

If your 3D printer fails in one area, such as the first layer or a piece of the print, a chain reaction of failure throughout the whole print may follow. All six of these articulated slugs started out okay (one isn’t pictured). While five made it to the finish line, the middle slug had some issues.
The maker stated that the failure happened overnight. They don’t know for sure what caused the middle slug to fail though the other ones came out clean, but they suspect the problem was likely caused by the printhead un-adhering the print from the build plate, causing significant layer shifting in all areas of the print.
- What is it? A set of six slug prints with five of them maintaining decent print quality and one absolutely failing.
- What happened? Most likely, the printhead pushed the middle slug, breaking its adhesion to the build plate. The other slugs kept the middle one in place, but as the printhead and bed moved, content layer shifting caused the print to fail.
Don't Go Into the Light...
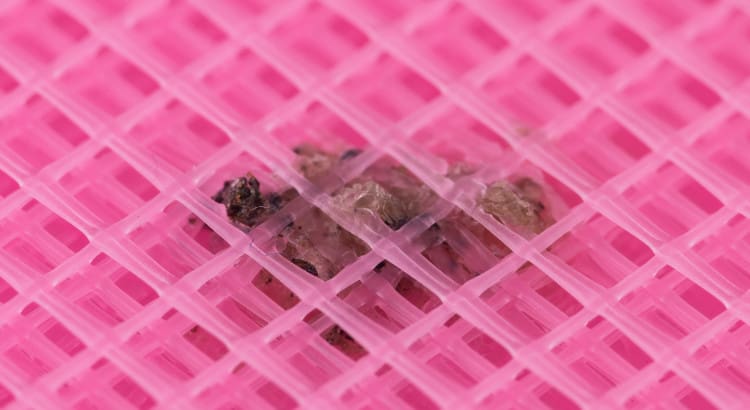
We saved the most disgusting for last. You’re welcome! Occasionally in 3D prints, you get small dark spots where the filament starts to burn from overheating. This is not one of those fails.
This brown “spot” was actually a moth that flew into the printing area after likely being attracted by the printer lights.
By some accident, the moth was literally printed into a molten grave. Aside from being incredibly disgusting, this type of print fail is rather unsettling because the moth could have easily caused a printer fire. On the other hand, the user’s print room now has one less bug.
- What is it? A (dead) moth trapped inside a print.
- What happened? The lights on the 3D printer attracted a moth, which was then entrapped by the 3D print.
License: The text of "17 Epic 3D Printing Fails & Why They Failed" by All3DP is licensed under a Creative Commons Attribution 4.0 International License.