The Best Open-Source 3D Scanners

Open-source 3D scanners make the technology cost-effective and customizable. Check out the best open-source projects!
3D scans are ultimately only as good as your software, so you may be tempted to get the most expensive one your budget will allow. However, this may not be as straightforward as you’d think.
Just because a program has a million bells and whistles doesn’t mean it will work the best. In fact, the opposite is often the case. 3D scanning technology is at its most sophisticated when it’s streamlined for intuitive use.
That’s where 3D scanning and open-source software make great partners. Open-source means the software is free to download and use, and all of the code is available to modify for your specific needs. 3D scanning and open-source software are both part of the exploding do-it-yourself community, where success isn’t necessarily measured by the cost. So, they’re a natural fit for each other.
Open-source 3D scanner software lets you see into the thought process of the creators as well as even comment and participate in a conversation that sparks the evolution that’s critical to creation.
That being said, let’s start with taking a look into and understanding how 3D scanning technology works, then we’ll dive into some projects to get you started scanning in no time!

Real to Virtual

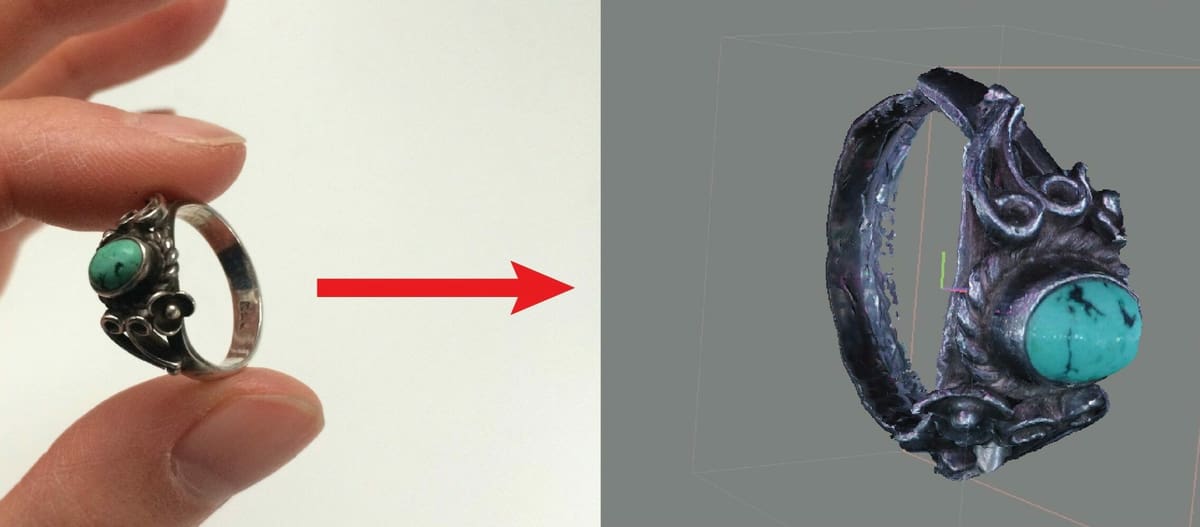
3D scanning is a great companion to the additive manufacturing family. It lets you create models of real-life objects and spaces without needing to know their design specifications beforehand. 3D scanning does the measuring for you, so you can ditch the measuring tape. This is super helpful in a wide variety of industries and hobbies, as it’s a non-intrusive way to replicate 3D objects.
If you’re not familiar with 3D scanners, you can think of them as advanced video cameras. Using a variety of techniques, they capture light in order to generate digital maps of 3D objects. Sure, there are some professional 3D scanners that get the job done. But with today’s technology, you can also 3D scan using a phone and, surprisingly, a Xbox 360 Kinect!
Once this map is complete, the appropriate software helps you create a replica design of the object you scanned. Within that software, you can either leave the design exactly as is for a direct clone or you can make modifications to the design details.
There are numerous software options for your open-source 3D scanners. Some of these scanners use their own software for control and calibration, while others use photogrammetry software that is freely available online. All of these software, which vary for different scanners and also in their applications, have one thing in common – they’re all free to use and completely open-source.
In this article, we’ve narrowed down the best open-source 3D scanners you can build. However, before we get into these, there are a few things to know before you determine the most suitable 3D scanner for you.
Considerations
With the countless DIY projects and purchasable options, some aspects need to be determined to draw the line on what, exactly, makes a great 3D scanner.
- Open-source: The 3D scanner’s complete information and files are available to all, allowing you to easily study or modify the design, parts, and components, and to share them online without restriction. Even the scanning and image processing software should also be free, modifiable, and easily accessible.
- Easy-to-source components: You should be able to easily acquire or purchase all of the components required by the 3D scanner to produce the best results, whether with a complete electronics kit or individual components.
- Documentation and support: 3D scanners should have accessible and relevant documentation that’s simple to follow, along with good community support. This way, if you’re having trouble with a specific aspect of the scanner, you can find solutions or guides to assist you.
- Ease of use: The assembly and operation should be easy to understand and intuitive, and using the 3D scanner and its software should be straightforward with help guides, documentation, and tutorials.
With these considerations in mind, let’s go over our picks.
Buy or DIY
All the 3D scanners in this category give you the option of purchasing readily available kits or 3D printing and laser cutting parts and building them yourself with compatible key components.
Even if you don’t purchase the kits, there are many good instruction guides and tutorials available to help you get your scanner up and running.
BQ Ciclop

If you’ve got a 3D printer and don’t want to pay manufacturing costs for something you can put together yourself, the BQ Ciclop might be right up your alley.
This 3D scanner goes all in with its open-source nature by making available the plans to print its body. You can modify the scanner to house any electronics that you buy from the company. Plus, BQ provides its own open-source software for the Ciclop available on GitHub called Horus, making the hardware and software integration seamless.
Know that the Ciclop can be difficult to put together in its unmodified form, and it can be a bit expensive to buy the whole kit. So, if you’ve got the will and the way, it’s best to go with only the electronics and make your own design to house them. Then you can take advantage of its 0.3- to 0.5-mm layer resolution!
It’s possible to purchase the entire kit, which includes the 3D printed parts along with essential components, such as the lasers, a controller board, a stepper driver, a stepper motor, wires, cables, and a power supply.
- Creator: BQEducacion
- Project pages: GitHub, Thingiverse
- Key components: BQ Ciclop kit or 3D printed parts, lasers, camera, controller board, and stepper driver and motor
- Kit price: ~$160
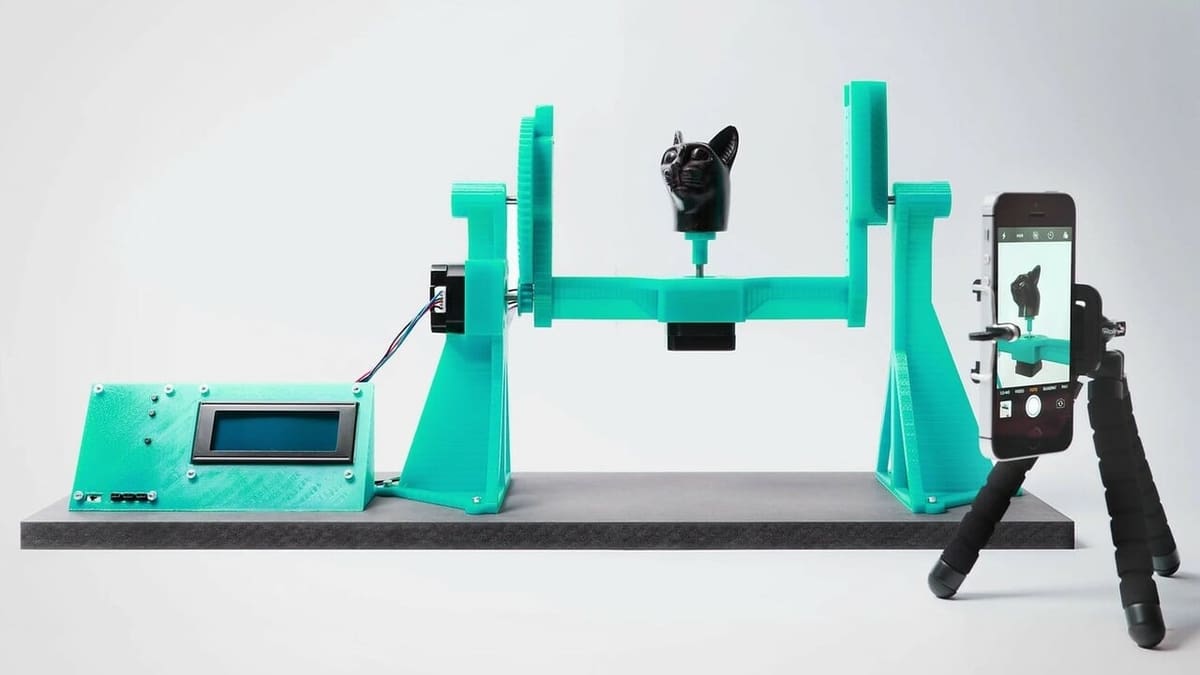
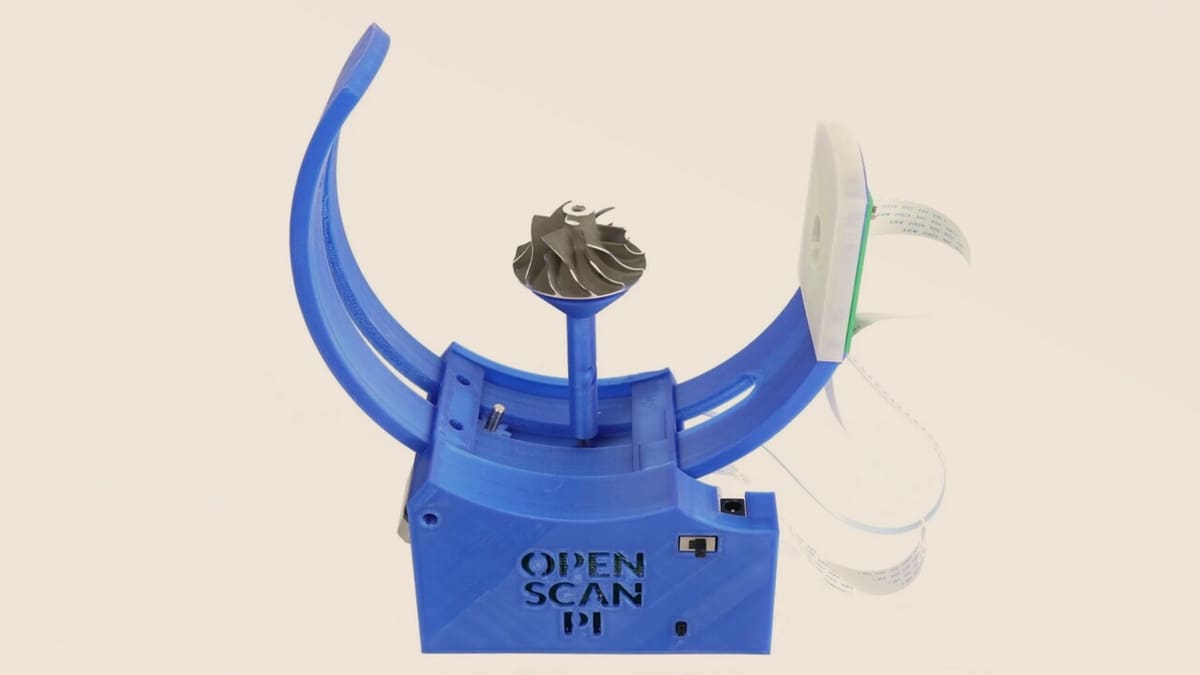
OpenScan Classic
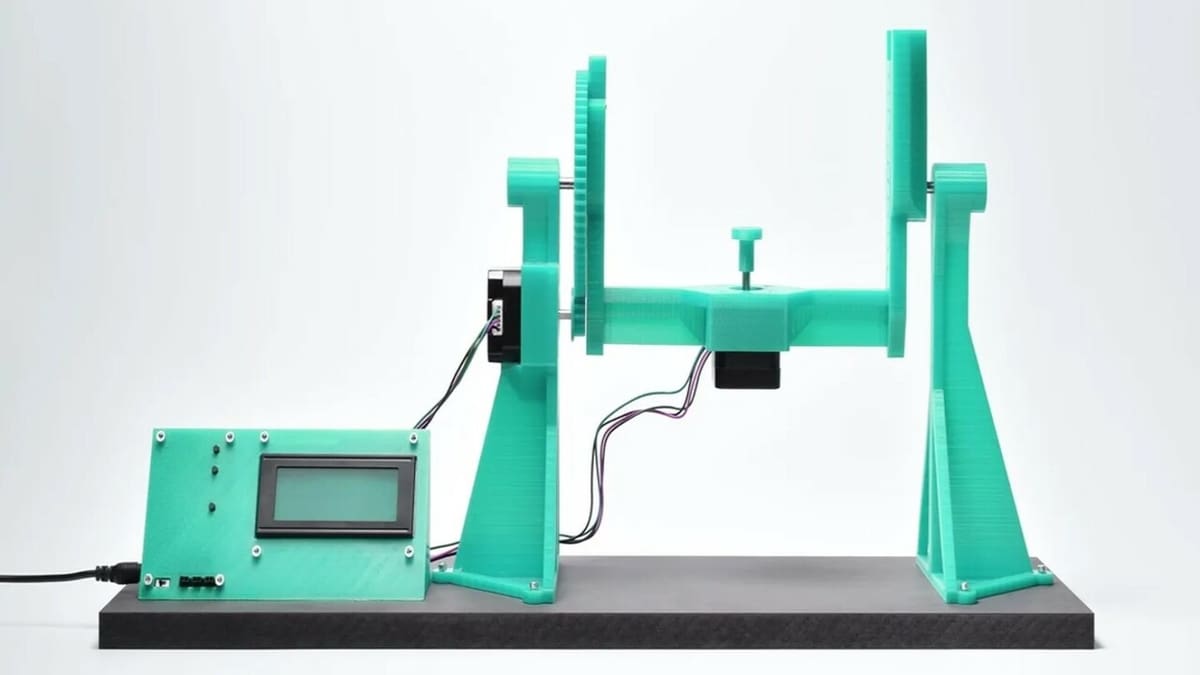
OpenScan Classic is the v2 of the original OpenScan 3D scanner, and it’s quite versatile because you can use any camera for it, such as a Raspberry Pi camera, an Arducam, a smartphone, or a DSLR.
The 3D printed scanner uses two motors to pivot the object, while your camera captures images from all directions, with a complete scan volume of 180 x 180 x 180 mm. You have the option of using any photogrammetry software or OpenScan’s own OpenScanCloud for processing the images.
To build the scanner, you can find all the 3D printed files, bill of materials, and documentation on OpenScan. If you don’t want to go through the trouble of sourcing all the components, you can either purchase the complete kit or customize it to include only the hardware you require. The base kit includes the Pi Shield, a Ringlight module, a motor, and power supply, while the Raspberry Pi, 3D printed parts, and camera are optional.
In the scanner’s latest update, OpenScan released a Raspberry Pi version that integrates a Pi Shield and adds tons of new functionalities, such as browser-based GUI control.
- Creator: OpenScan
- Project pages: OpenScan, Thingiverse, Printables
- Key components: Raspberry Pi 3B+ or 4, Raspberry Pi camera (Arducam), smartphone, or DSLR cameras also work), Pi shield, and stepper driver and motor
- Kit price: ~$100
FabScan Pi
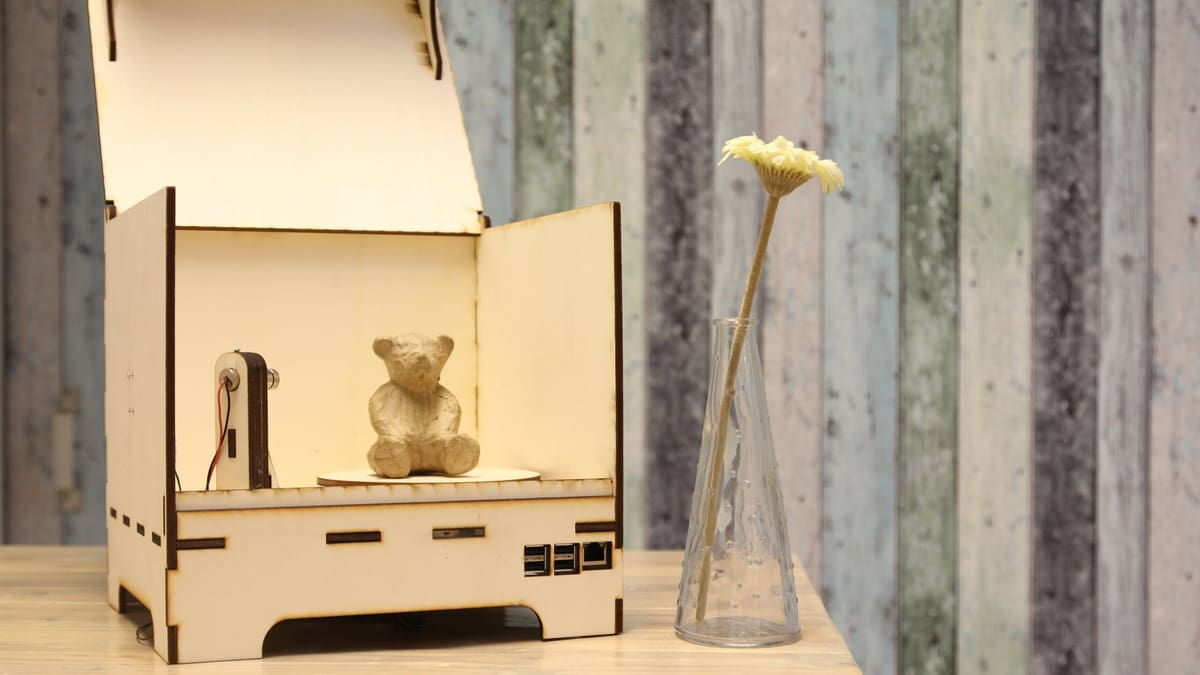
The FabScan Pi is the latest version of the open-source FabScan project. It started out as a bachelor’s thesis from Francis Englemann, and users have been improving on it since.
On the project page, you can find the directions for building the complete FabScan Pi for free, but there’s no need to stick to them entirely. You can freely improve upon its design and build. Alternatively, you can buy the laser cut parts (saving time on laser cutting the parts yourself).
The built-in Raspberry Pi computer lets you take advantage of any Wi-Fi connection, its high-quality camera, and the leaps of advancement since the last FabScan model. Truly a product of DIY collaboration, the scanner has its own subsections in the FabScan forums dedicated especially to its construction, use, and helpful adjustments.
- Creator: Mario Lukas
- Project page: Hackaday
- Key components: MDF case, Raspberry Pi and camera module, laser module, and stepper motor
- Kit price: ~$200
OpenScan Mini
OpenScan Mini is another 3D scanner from OpenScan that shares similar hardware to the OpenScan Classic. The major differences, which include its compact design and a smaller scan volume of 80 x 80 x 80 mm, makes it ideal for smaller objects and models.
You can find the Mini’s 3D printed files, list of components, and complete documentation on OpenScan. You can either build it yourself or purchase the customizable kit, which lets you buy the whole kit or just the parts and hardware you don’t have on hand. In the kit, OpenScan has included some essential components, such as the power supply, a motor, and some miscellaneous small parts. Optionally, you can add the Raspberry Pi, the camera, a polarizer module, and the 3D printed parts to your kit.
With the Raspberry Pi in the Mini, you can use either the Pi camera or the Arducam, but unfortunately, you won’t be able to use your smartphone to capture images.
You can also check this tutorial on how to scan with your OpenScan Mini and OpenScanCloud (photogrammetry web API).
- Creator: OpenScan
- Project pages: OpenScan, Printables
- Key components: Raspberry Pi 3B+ or 4, Raspberry Pi camera or Arducam, Pi shield, and stepper driver and motor
- Kit price: ~$100
DIY Only
These are great do-it-yourself projects, with some unique and interesting open-source scanners among them. There are some that can scan objects as small as ants and others that can scan as large as their volume allows.
Turntable
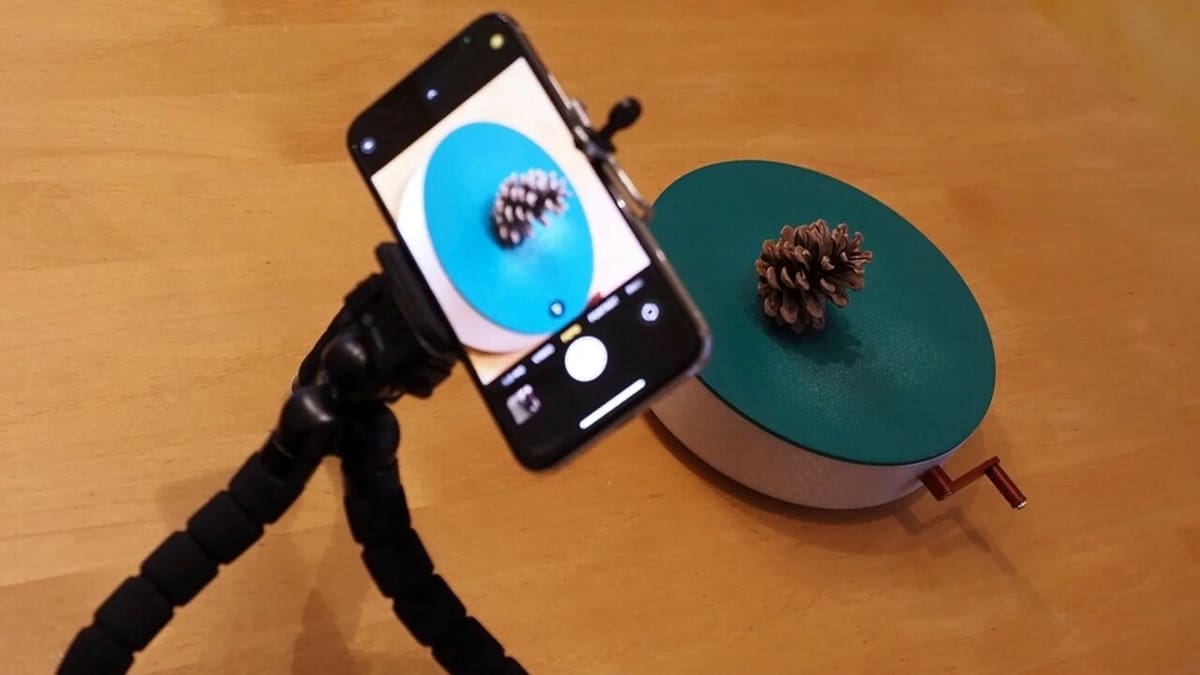
The maker of this turntable designed it with true DIYers in mind since it uses a mobile phone as the 3D scanner camera. It employs photogrammetry instead of triangulation, which means it takes a series of photos of the object in different lighting conditions.
First, you set your smartphone to camera mode and put it on a tripod, then you put your object on the turntable’s circular base, which you’ll need to crank manually as your smartphone takes the photos to show different angles of the object.
Your smartphone will be able to translate these photos into a 3D scanning program with the help of Regard3D. This is an open-source structure-from-motion software that lets you convert photos to a 3D object. There are a lot of 3D scanning apps available, but Regard3D is one of the only ones that has stayed free and open-source, so we highly recommend this combo for those looking to turn their smartphones into a functioning 3D scanner.
The best part of this turntable is that you don’t have to pay for any of it except the materials it will take to 3D print.
- Creator: René
- Project page: Printables
- Key components: Smartphone, 3D printed parts, screws, and nuts
AASCan
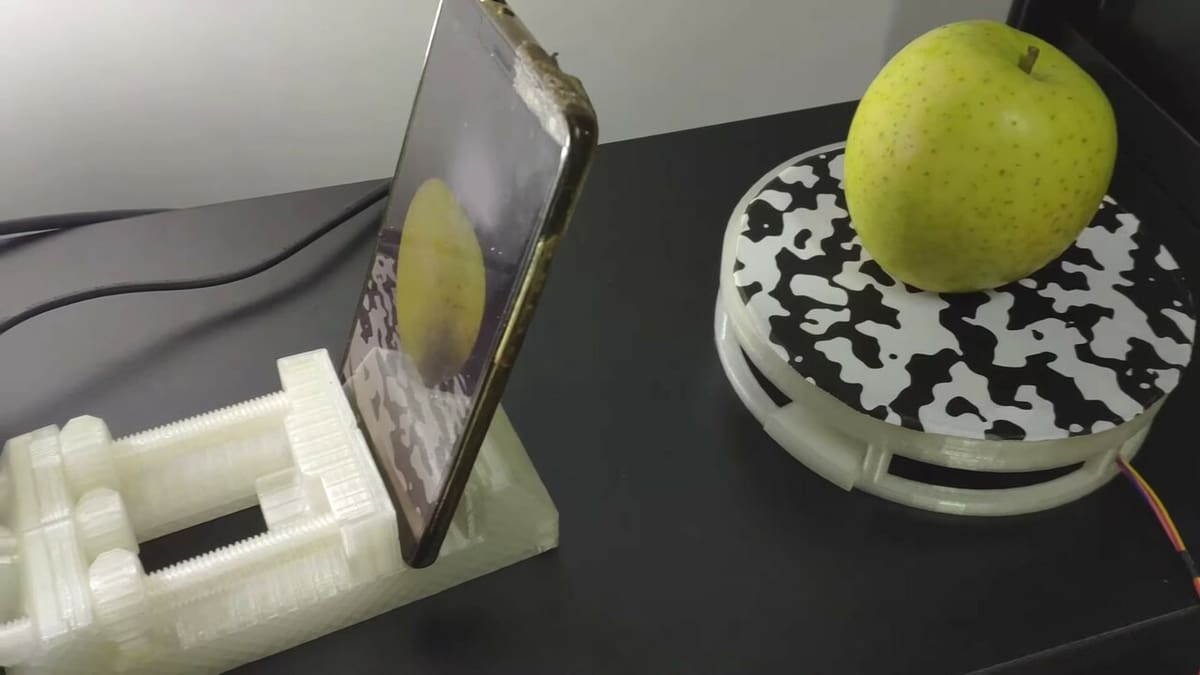
AAScan is a minimal Arduino-based 3D scanner that is completely automated and can use any Android device to scan objects. All you have to do is place your model on the scanning plate and let the scanner do its magic!
The build and components of AAScan are simple; you can find all the information in Thingiverse and set things up in no time. Alternatively, you can follow the comprehensive guide by Dr. Peter L. Falkingham to set up your scanner, which also features AAScan’s 3D scanning capabilities.
Finally, to get the most out of your scanner, you can use Meshroom, an open-source photogrammetry software to process all your images and create a 3D model.
- Creator: Qlro
- Project pages: Thingiverse, GitHub
- Key components: Android phone, Arduino Uno, and stepper driver and motor
scAnt

Scanning and getting an exceptional 3D model of small objects can be quite the task, but you can easily achieve this with a scanner specifically made for scanning tiny objects, particularly insects, with a fitting name – “scAnt,” a blend of scan and ant.
Originally, the creators used a FLIR Blackfly camera to scan the insects, but you can easily substitute it with a DSLR camera. To make this work, you will need to use digiCamControl and scAnt’s GUI, which will grant you control of your scanner through your computer, as well as Meshroom for photogrammetry. All of this software is incomplete without the hardware. To build your scanner, you’ll need a few 3D printed and laser-cut parts along with the essential electronics – you can find the complete list of components on Thingiverse.
The creators have uploaded a good collection of various insects’ digital models that were scanned using the scAnt to give you an idea of how well this scanner works.
- Creator: EvoBioMech
- Project pages: Thingiverse, GitHub
- Key components: DSLR camera, LEDs, Pololu USB stepper driver, and motor
Desktop CT & 3D Scanner
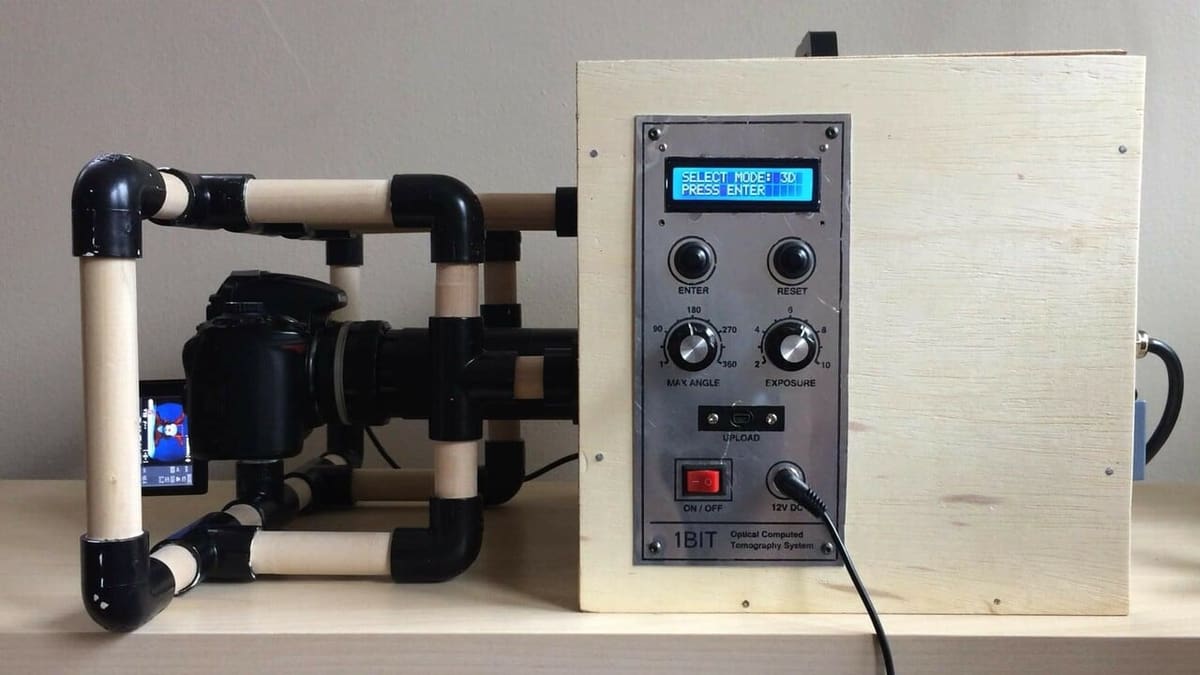
Maker jbumstead has taken inspiration from many sources and projects to build his own desktop computed tomography (CT) and 3D scanner, which is powered using an Arduino.
Instead of using X-rays to scan objects like any traditional CT scanner, this setup uses a technique called “Optical CT,” the main components of which are a DSLR camera and a LED array. However, this technique only works well for semi-transparent objects. For other objects, you can use the same setup as optical CT to capture and 3D scan the object using photogrammetry.
For this project, an elaborate guide on Instructables shows how to set up the light box, the camera mount, the assembly of all the components, and how to scan the objects.
Once your desktop scanner is ready, you can use MatLab to process the raw images from a CT scan or use Metashape for photogrammetry. To see what’s possible with this project, check out a few of the amazing scans shared by the maker!
- Creator: jbumstead
- Project page: Instructables
- Key components: DSLR camera, Arduino Nano, H-Bridge, LCD screen, stepper motor, and potentiometers
License: The text of "The Best Open-Source 3D Scanners" by All3DP is licensed under a Creative Commons Attribution 4.0 International License.