3D Printed Stencil: How to Make Your Own

Leave your mark on the world by making your own 3D printed stencil. Follow along as we walk you through the process!
Stencils are an easy and creative way to put a 2D image onto practically any surface. Whether you use them as crafts or to start an advertising business, stencils can be a fun and useful tool.
Typically, stencils are created by cutting material from a board or a piece of paper, just like subtractive manufacturing removes material from a stock piece to create a manufactured part. Scissors, drag knives, and even laser cutters are all used to create stencils. However, 3D printing opens the door to a whole new way.
As stated, stencils are a convenient and affordable way to express creativity. But what if the creative process could be enhanced by creating stencils with complex geometries or more elements? You may argue that digital art and laser cutters already make this possible. However, a laser cutter is relatively expensive and there are still problems with bridging the stencil islands, which can lead to undesired discontinuities in the natural geometry of the design.
3D printing provides a solution. With a 3D printer, you can use 3D bridges – instead of 2D ones – that won’t interfere with the stencil’s design. This allows you to successfully portray the entire image on the surface, without leaving those tiny but noticeable marks.
So, grab your computer, pick your favorite filament, and get ready to leave your mark on the world using a 3D printed stencil. With the help of a couple of open-source (free) programs and a 3D printer, you’ll be able to convert the image you have in mind into a stencil. Don’t worry, we’ll guide you through the process step by step, so you can easily create your own 3D printed stencil!
And if your 3D printer isn’t up to task for the last step, consider Craftcloud. With manufacturers all over the world and a wide variety of materials available, you’ll have 3D printed stencils delivered to your doorstep in no time.
Setup

There are three main steps that we’ll follow to make our stencil:
- Selecting the image and creating the 2D design
- Transforming the 2D design into a 3D object
- 3D printing the stencil
The first step consists of selecting the right image for your stencil and converting it into a simpler version, in the form of an SVG (Scalable Vector Graphics) file. You can use any image you find on the internet, but just keep an eye out on copyright. Alternatively, you can use an image of your own creation. Keep in mind that the simpler the image, the easier it will be to create the stencil. Then, we will use an open-source vector drawing program called Inkscape to convert the image into a 2D design.
The second step will involve using a web-based computer-aided design (CAD) program called Tinkercad to convert the 2D design into a 3D object. It’s free, very easy to get started with, and only takes creating an account to use it. The outcome of this step will be an STL file.
In the last step, we’ll use UltiMaker’s Cura, a slicing program, to open the STL file and prepare the 3D object for printing. However, you can use the slicer of your choice in this step. Of course, the very last step consists of 3D printing your stencil.
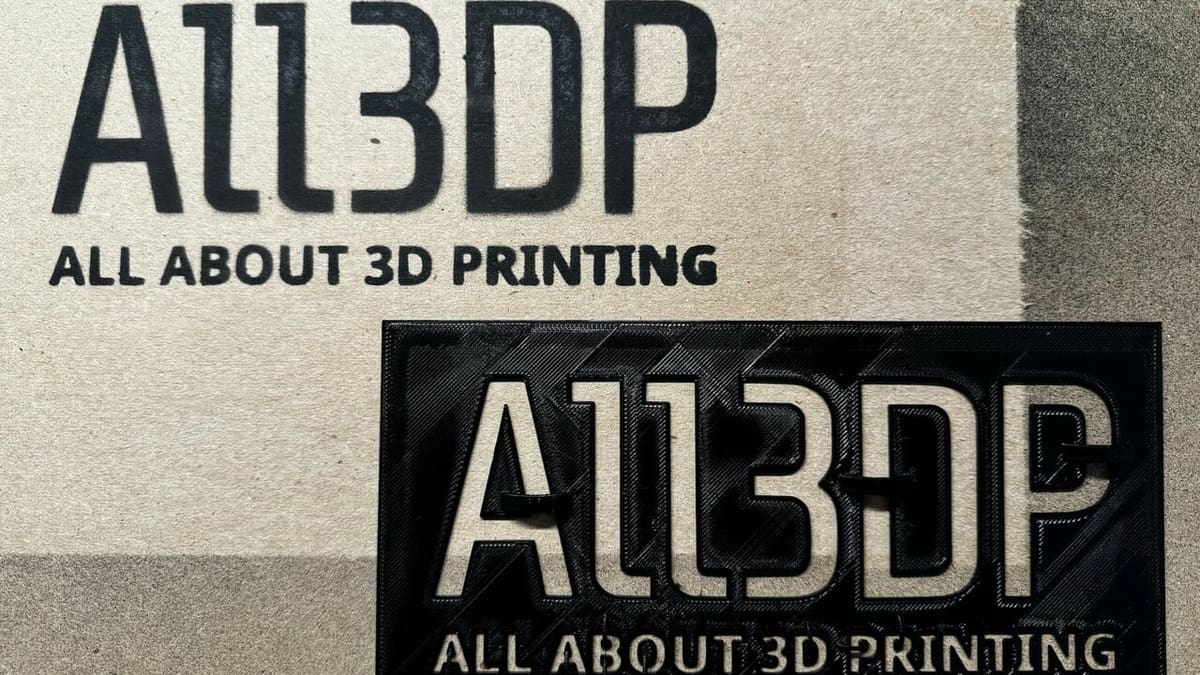
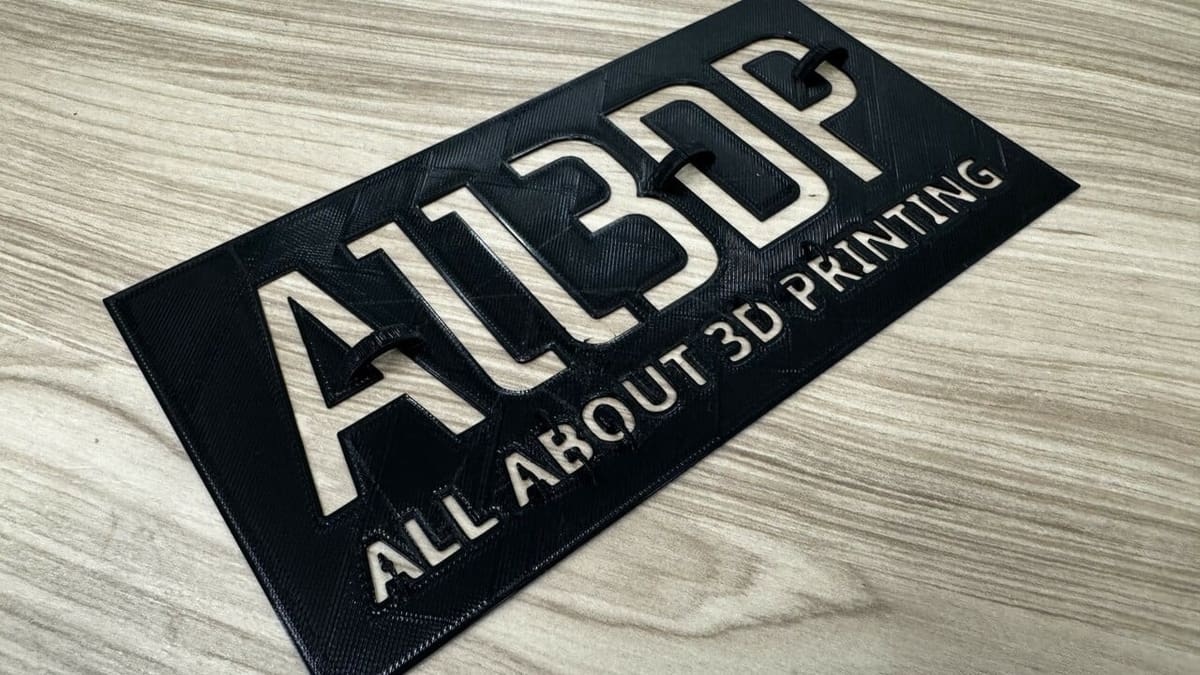
To guide you through these steps, we’ll create our own All3DP stencil. Let’s get started!
Step 1: Creating Your Image
Once you’ve selected your image, open it in Inkscape. We’ll go over two different methods to create a stencil image using this program.
The first one consists of using Inkscape’s Trace Bitmap tool to convert the original image into paths that can be easily bent and manipulated. The downside of this method is that it may not be useful if the image you chose is too complex.
If this is the case, we can use a second method based on tracing a set of curves over the image. This method relies on the Freehand draw (Pencil) tool or the Bezier curve tool. You can easily access them by hitting the ‘P’ or ‘B’ keys on the keyboard, respectively.
Let’s start by trying the first method.
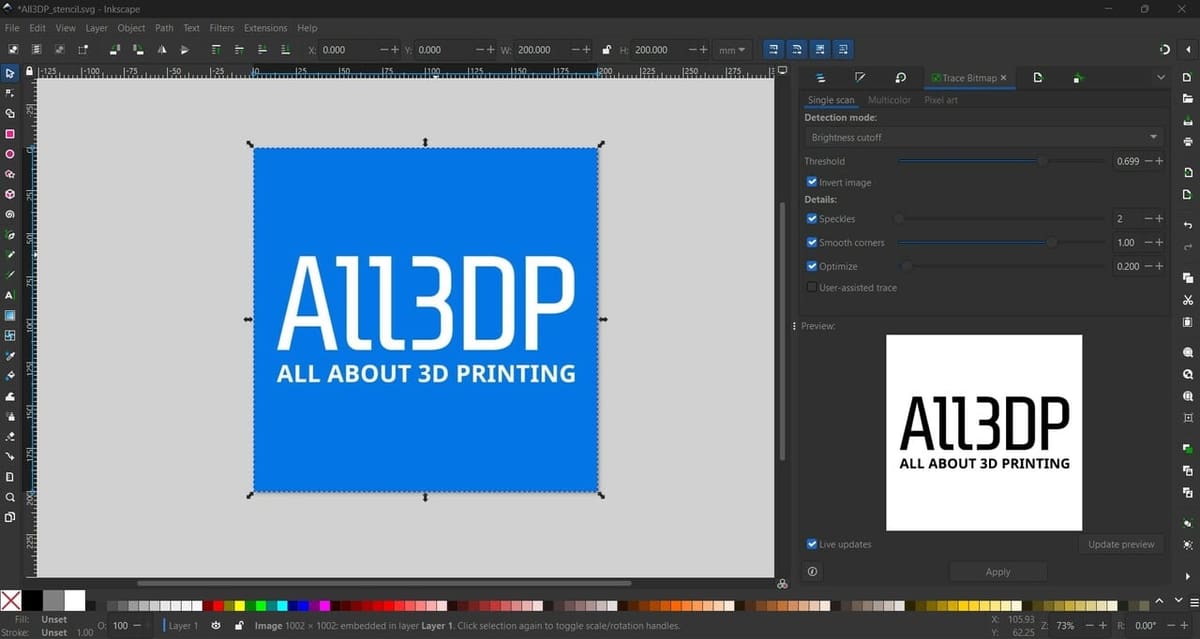
Converting an Image
This first method relies on Inkscape’s Trace Bitmap tool to create lines based on the threshold you define. This feature will generate an outline of the image, but chances are you’ll want to make a few changes. You can learn more about bitmap tracing on Inkscape’s website. Here are the steps to follow:
- Import the image going to “File > Import”.
- Scale the image to match your printer’s build volume or the desired stencil size, by going to “Object > Transform > Scale”.
- Resize the canvas to fit the image, by choosing “Edit > Resize Page to Selection”.
- Select your image.
- Generate an outline expanding the Path menu and select Trace Bitmap.
- Select “Brightness cutoff” from the Detection mode menu and adjust the Threshold value until you get a satisfactory result. To better see the result, you may want to hide the original image’s layer.
- Since the black region is the one that will be used later, you may need to check the Invert Image box to obtain the desired result.
- Click “Apply”.
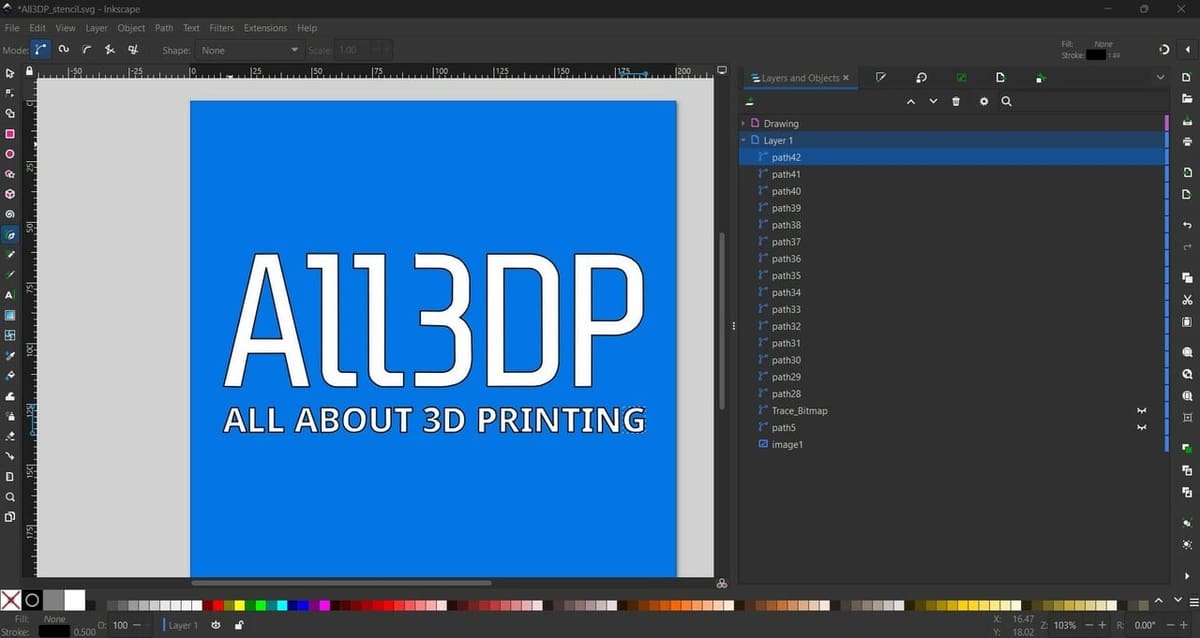
You can move segments of the lines using the “Node tool”, located on the left toolbar. Additionally, you may want to add things like normal bridges or connectors. If so, you can add them the same way you would draw any image. We’ll go over how to do this in the next steps.
Drawing an Image
In this second method, we will use our image as a canvas. Then, we’ll draw lines and curves over it to create a set of paths that will serve as our stencil shape. Follow the next steps in Inkscape:
- Import the image going to “File > Import”.
- Get into the Layers and Objects window by clicking “Ctrl + Shift + L”.
- Add a new layer by clicking on the ‘+’ icon located at the top left corner of the Layers and Objects window.
- Trace the shape of your stencil by using the “Pencil Tool” (P) for freehand lines or the “Pen Tool” to draw straight lines or Bezier curves.
- Connect any loose gaps between lines by selecting segments with the Nodes tool and then joining the selected nodes.
While drawing, be aware of any gaps and try to close in all the shapes. If there are any gaps, you’ll have to close them by manually joining their end nodes. These nodes define the shape of a line. You can check out Inkscape’s tutorial to learn everything you need to know about nodes and drawing.
Regardless of which method you use, you need to be constantly aware of the end result. This may mean avoiding something with heavy detail or too many islands at first.
Once you’re happy with the result, export the stencil as an SVG file. To do so, simply go to “File > Export”, and make sure to select the .svg file extension.
Step 2: Adding a Third Dimension
Now that we’ve converted our image into a 2D design, let’s jump into Tinkercad. The steps that we’re about to follow apply to most (or all) CAD programs or 3D modeling software, so you can use any alternative you prefer or that you’re more familiar with.
To convert our 2D design into a 3D object, we must first decide how 3D-ish we want it to be. In other words, how thick we’re going to extrude it (extend it upwards). This thickness value will highly depend on how rigid and strong you want it to be. A thicker stencil will provide a stronger structure and, hence, a more resistant stencil that may last longer. On the other hand, a thinner stencil will be more flexible and could be a better option if you want to imprint over non-flat surfaces. Last but not least, the printing time will be strongly affected by the thickness of the stencil. We suggest any value between 0.4 and 1.2 mm.
Also, keep in mind the outer surface of the stencil. You may want to leave enough of a border to avoid spilling whatever sort of paint you’ll be working with. If a large border is necessary, consider extending it with something else afterward, such as cardboard. Either way, be conscious of the build area of your 3D printer.
Before we start, it’s worth mentioning that, by default, Tinkercad provides a workspace with dimensions of 200 mm x 200 mm. Usually, these should be more than enough. However, this might be an issue if you’re planning to use a larger 3D printer to print a bigger stencil. To overcome this problem, just change the dimensions of the plate in Tinkercad by clicking on the Settings button located at the bottom right corner of the workspace. A new window will appear. From the Presets section, you can easily modify the width and length of the plate, as well as define the units of your choice.
Let’s now bring your 2D design to 3D life!
Extruding Your Stencil
- Start by creating a new design from your Tinkercad dashboard.
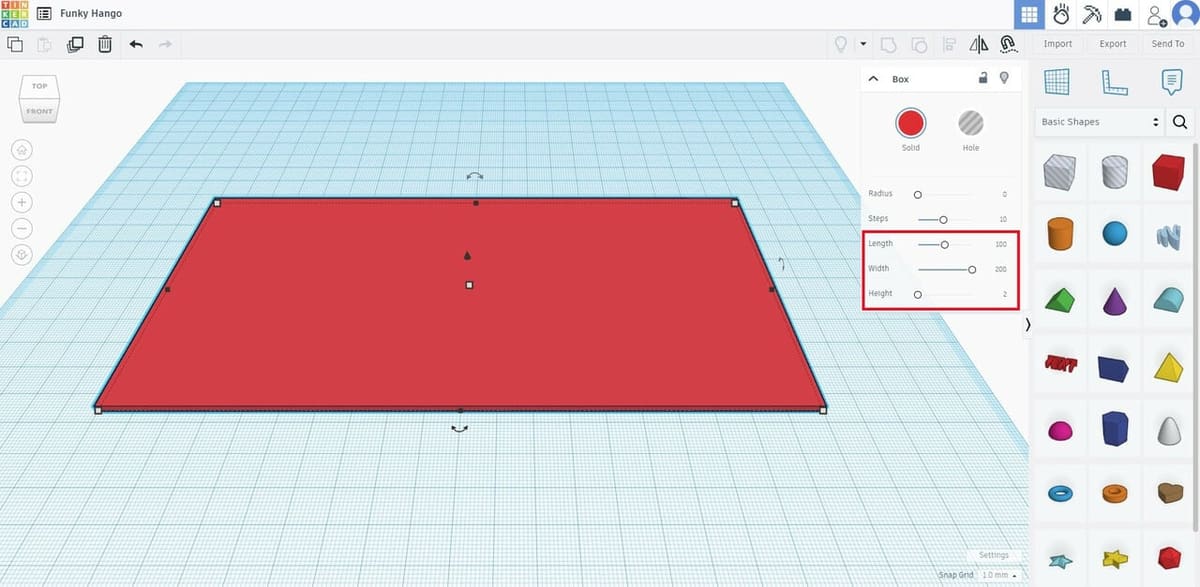
- Select the cube shape and place it in the work area. You can click and drag it into the workspace or you can click on it and then click on the workspace (the cube should appear shadowed when you hover over the workspace).
- Set the desired dimensions by selecting the cube and using the shape editing panel. You can use the sliders or type in a specific value in the box next to them. For example, we set a length of 100, a width of 200, and a height of 2.
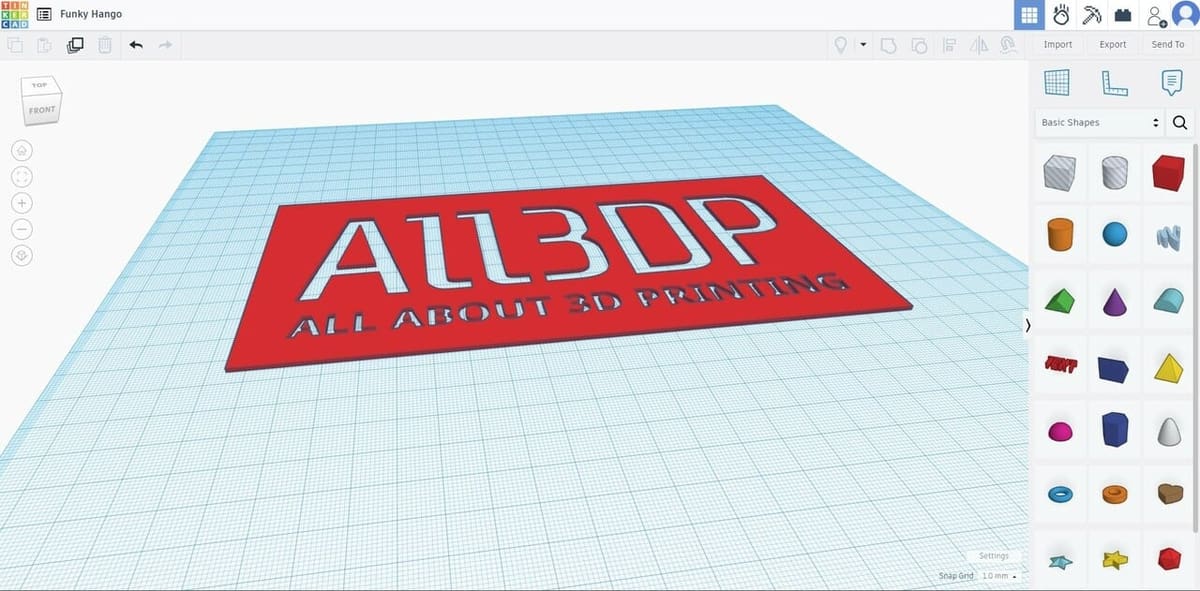
- Import your SVG file by going to the top of the shapes menu on the right and clicking on “Import > Choose a file”.
- Resize it to fit inside the reshaped cube, but extend it past the height.
- With the image selected, click on the “Hole” option on the pop-up menu to the right (instead of “Solid”), to cut out the shape.
- Select both objects by holding down the Shift key while clicking on one and then the other.
- Group the objects by clicking on “Ctrl + G” or select the “Group” tool from the top right of the workspace (next to the lightbulb symbol).
By completing these steps, you should’ve created a shape with your stencil image drawn through it. If the image you chose is simple enough, this is the basic stencil design and is good enough to print. However, if your stencil happens to have separated regions – islands – you must connect them to avoid misplacements and keep the original shape. Here is where bridges come into play.
Next, we’ll show you how to create 3D bridges in Tinkercad. This process should be practically the same for any other CAD or 3D modeling program you may be using.
Creating Bridges
As mentioned before, creating bridges takes your stencils to the next level. If you decide to use these bridges (we will), you’ll no longer have to deal with those pesky bridge gaps that other stencils suffer from. This is perhaps the biggest advantage of 3D printed stencils over traditionally made 2D stencils.
While you create them, don’t worry about using exact dimensions, since this won’t affect the stencil’s shape. More important is to not leave any single island alone. Make sure you connect all of them by following these steps:
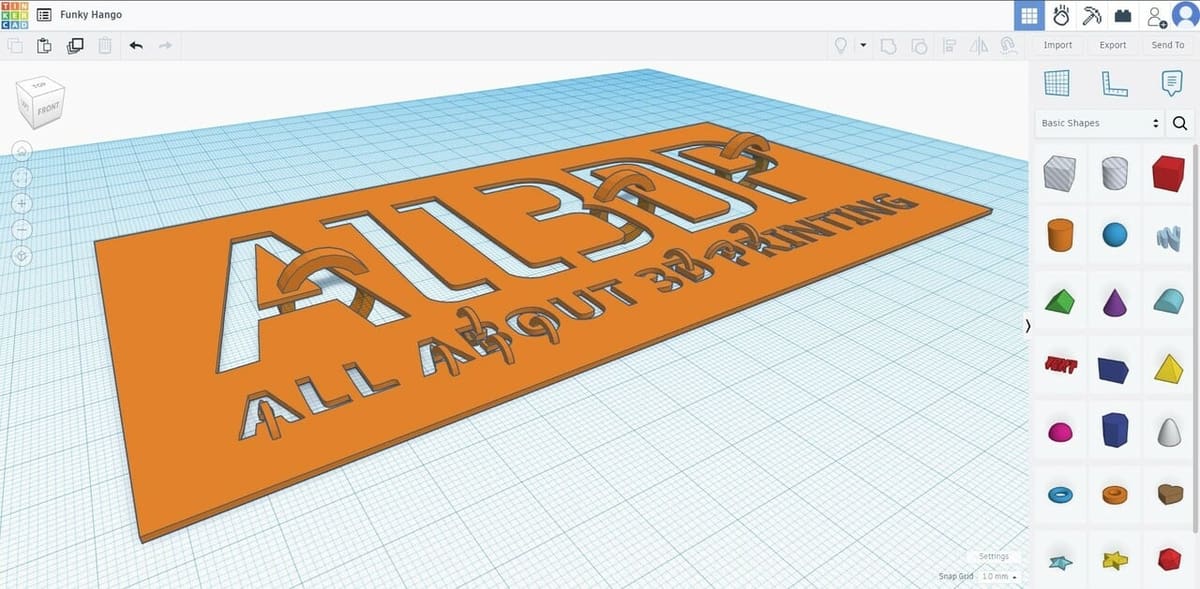
- Select the orange tube from the Shapes menu.
- Place it in such a way that it connects the two parts of the stencil you want to join, as you can see in the image above.
- Modify its size and shape, as well as its orientation. You can do so by using the different arrows and nodes. Make sure that they’re not too close to the surface of the actual stencil, otherwise you’ll risk their affecting the final painted design.
- Place as many bridges as needed.
- Repeat steps 7 and 8 from the previous section to group all the bridges and the stencil together.
- Export your stencil by going to “Export > For 3D Print > STL”.
You may have noticed that there are parts of the bridges that are lying below the stencil’s bottom face. While you can use a “Hole” cube shape of the size of the stencil to remove them (by placing it below the surface and then grouping them), there’s no need for that. As long as you properly place the stencil on the slicer’s build plate, they won’t be sliced and, hence, the print will start from the flat bottom face of the stencil. In the next section, we’ll show you how to properly place the 3D stencil into your slicer.
Step 3: Printing Your Masterpiece
Before we get into the printing part, if you aren’t familiar with slicer settings or need a refresher, take a look at our article on the slicer settings for best prints.
If you opted to remove the bridges from underneath the stencil in Tinkercad, then the stencil will be automatically placed in the right position and orientation in the slicer, and you can ignore step 2 below.
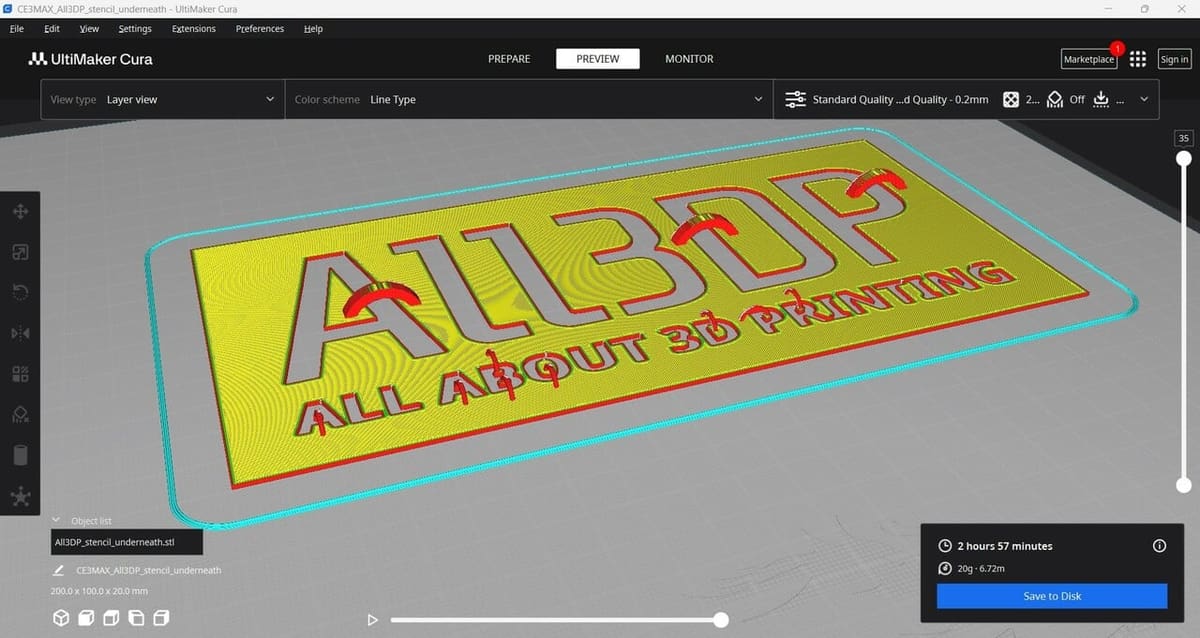
- Open your model in your favorite slicer.
- Move the stencil downwards until the flat bottom face of the stencil touches the plate. You can check if it’s properly placed in the preview once you slice the model.
- Use the layer height of your choice (0.2 mm is a good starting point). If you have a thin stencil, you’ll need to be careful to ensure you have at least two layers, but preferably three or more. That’ll make sure your stencil does its job and stops any paint from bleeding through when you use it.
- If you have a thicker print, you can add infill and define the top and bottom thickness with your usage in mind.
Since a stencil usually has few layers and a quite big printing area, there’s an even greater focus on the first layer than normal when it comes to printing it. You’ll have to pay extra attention to your bed leveling and check for good adhesion and a flat perimeter. If models tend to stick too well to the bed, you might want to plan ahead for how you’re going to remove the stencil without damaging it. Perhaps use a trusty removable build plate?
Unless you have a good reason, there shouldn’t be any rafts or supports. However, using brims (especially Cura’s new “Smart brim”) could help ensure the first layer sticks to the build plate. Don’t worry about the 3D bridges. They should print fine as overhangs without supports. Remember, they don’t have to look pretty!
Just the Beginning!
Congratulations! You’ve made your very own stencil. If you want some inspiration or to try something new, you can also look into making a custom tee, create a stencil to decorate your coffee foam, use checklist stencils for post-it notes, and you can create a spray can attachment to go with your stencils.
With this new tool in your DIY belt, have fun stenciling your world!
3D Printable Stencil Sites
Lastly, if you’re not feeling particularly creative or don’t want to go through the struggle of editing an image, you can always download an existing stencil from different sources:
- Free Stencil Gallery: With a large and varied selection, Free Stencil Gallery claims to be the number one website for free stencils. Every single stencil on this site is free, and they’re organized into easy-to-navigate categories, so you can find the one you’re looking for.
- SVG SILH: On SVG SILH, popular stencils are displayed on the home page, and you can view them in different colors. Stencils are organized into different categories at the bottom of the page, including animals, letters, and school. All of the designs are free to download and use.
- Rapid Resizer: With Rapid Resizer, you can enlarge your drawings, craft patterns, and access a library of free designs. The site offers several helpful tools, including a vectorizer, letter and picture stencil maker, and a designer, where you can add text, draw, and combine images. However, you’ll need to pay for a subscription.
License: The text of "3D Printed Stencil: How to Make Your Own" by All3DP is licensed under a Creative Commons Attribution 4.0 International License.