3D Printed Light Box: How to Make a Lithophane Lamp

A 3D printed lithophane lamp is the perfect way to display your favorite photos. Check out how you can 3D print one yourself!
Did you know that there are plenty of creative ways to showcase your treasured photographs with 3D printing? Whether it’s a family member, beautiful sunset, a famous building, or a holiday memory, you can turn any picture into a lithophane with a 3D printer. 3D printed lithophanes are popular among enthusiasts and aren’t as challenging to make as you may think.
The word lithophane is a combination of the French words litho, meaning stone, and diaphane, meaning ethereal or transparent quality. While lithophanes can be traced back to 11th-century China, they became popular in the 1820s in Europe. Originally, they were either carved or “stamped” into translucent porcelain, and a light source revealed the image in all its detail.
Nice examples of antique lithophanes and modern designs can be seen all over the world. The largest collection is on display at the Blair Museum Of Lithophanes in Toledo, US. The lithophanes we’re interested in, however, are a combination of photographic and 3D printing technology. Let’s take a look at how you can make your own 3D printed lithophane lamp!
What Is It?

To view a lithophane in all its beautiful detail, turn it into a lamp! A lithophane lamp is a cool way to display family photos or other personalized images and makes a beautiful addition to any home. It’s also a chance to express your imagination and creativity.
The construction of a lithophane lamp is fairly simple. The main features include the following:
- Lithophane: This can be flat, curved, cylindrical, spherical, or a combination of shapes.
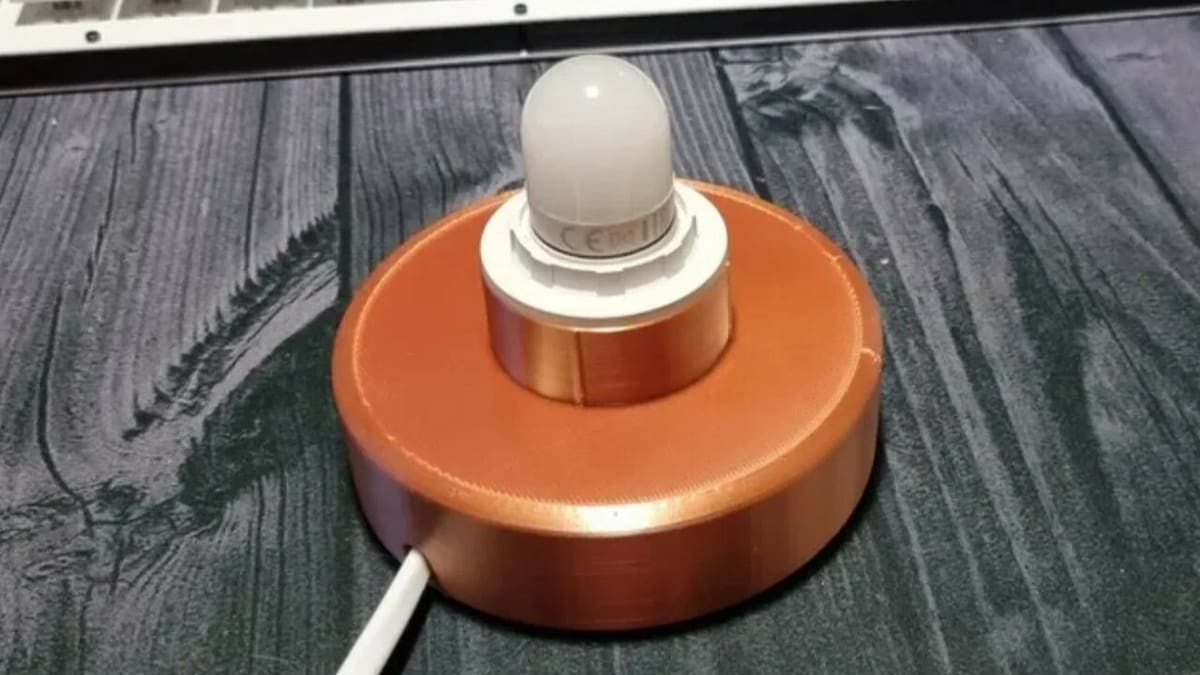
- Lamp base: This part holds the lithophane in place and may also be combined with the lamp or light holder.
- Light source: The light can be a single bulb, a set of LED strips, an electric candle, or another source.
- Power supply: This typically comes from a standard cable and plug but, depending on the light, may also be a USB or battery.
Other materials such as glue, screws, or clips depend on your specific design. In the following sections, we’ll discuss these components in more detail, then give you a few examples to show you the many different possibilities out there.
Lithophane vs. Shadow Box
While both lithophanes and shadow boxes are beautiful pieces of decor to have around the house, they aren’t quite the same concepts.
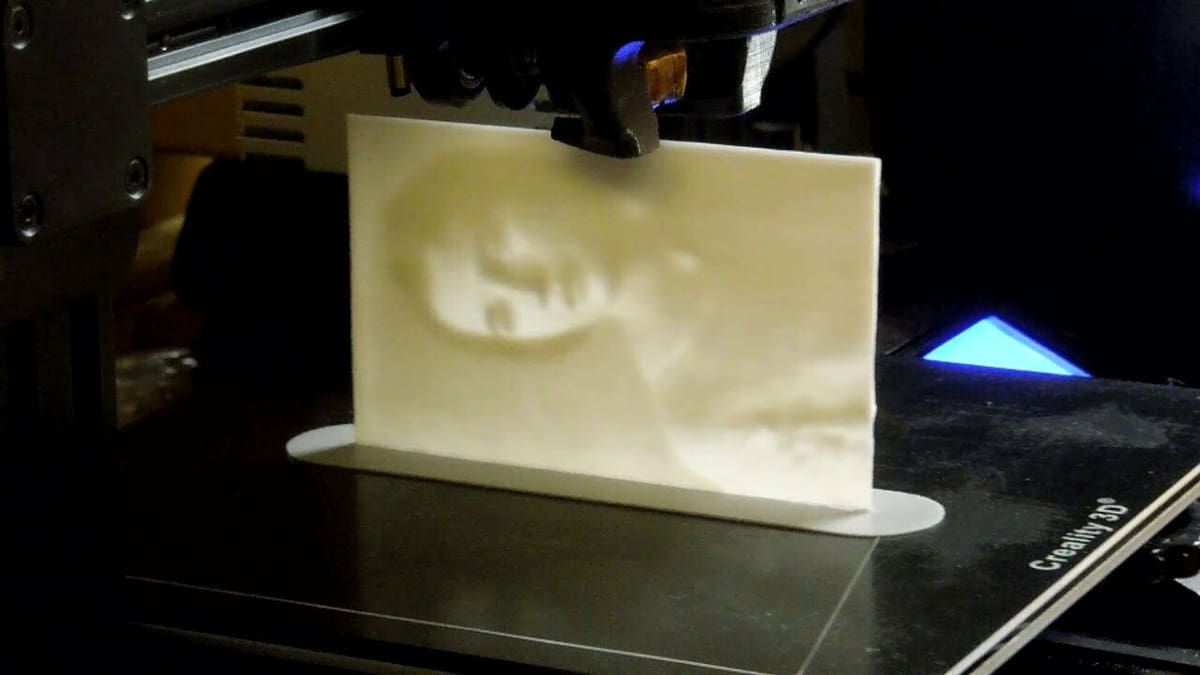
Lithophanes, also known as light boxes, are made of a single sheet of varying thickness. The amount of light that can pass through the sheet depends on the thickness of a given region, allowing one to portray depth on a mono-color, flat plane.
On the other hand, shadow boxes use multiple layers of sheets stacked together to build a complete image. The objects of each layer are typically cut out so one can also see the objects in the preceding layers. Sometimes, each layer uses a distinct color, creating further depth in the compiled image.
Designing Your Lithophane

The main feature of a lithophane lamp is of course the lithophane itself, which you’ll need to design and print. The first steps are selecting an image and deciding on the shape of the lithophane.
Image Conversion
To produce a 3D printed lithophane, you ‘ll need to convert it to a 2D image for printing. There are several different software and online conversion sites that will do this for you. For example, ItsLitho is a free online tool that lets you upload your image and convert it to a printable STL file. Another easy-to-use online tool is Image To Lithophane.
Another option is to use a 3D slicer such as Cura or a CAD program like Blender. Users of the Creality Cloud app and website can also try their Lithophane Maker tool.
Of course, not every image is suitable for converting to a lithophane. You should ensure there’s a clear definition between the subject and background – the best images feature high contrast. If the photo itself isn’t good, odds are it won’t look any better as a lithophane.
Shapes
Here’s a closer look at the different lithophane shapes you can print for your lamp:
- Flat: As the name suggests, flat lithophanes have the same orientation as the original image. For a lamp, it works best to have four images in a square with the light source at the center. This illuminates all four images at the same time. The base can be static or moveable, so you can rotate the images by hand or with a motor.
- Curved: This lithophane shape is printed on its edge and slightly curved. The easiest way to showcase this shape is by placing a single curved lithophane on a stand with the lamp or light source behind it. For a more complicated design, form a circle with multiple curved lithophanes around the lamp, similar to the flat versions.
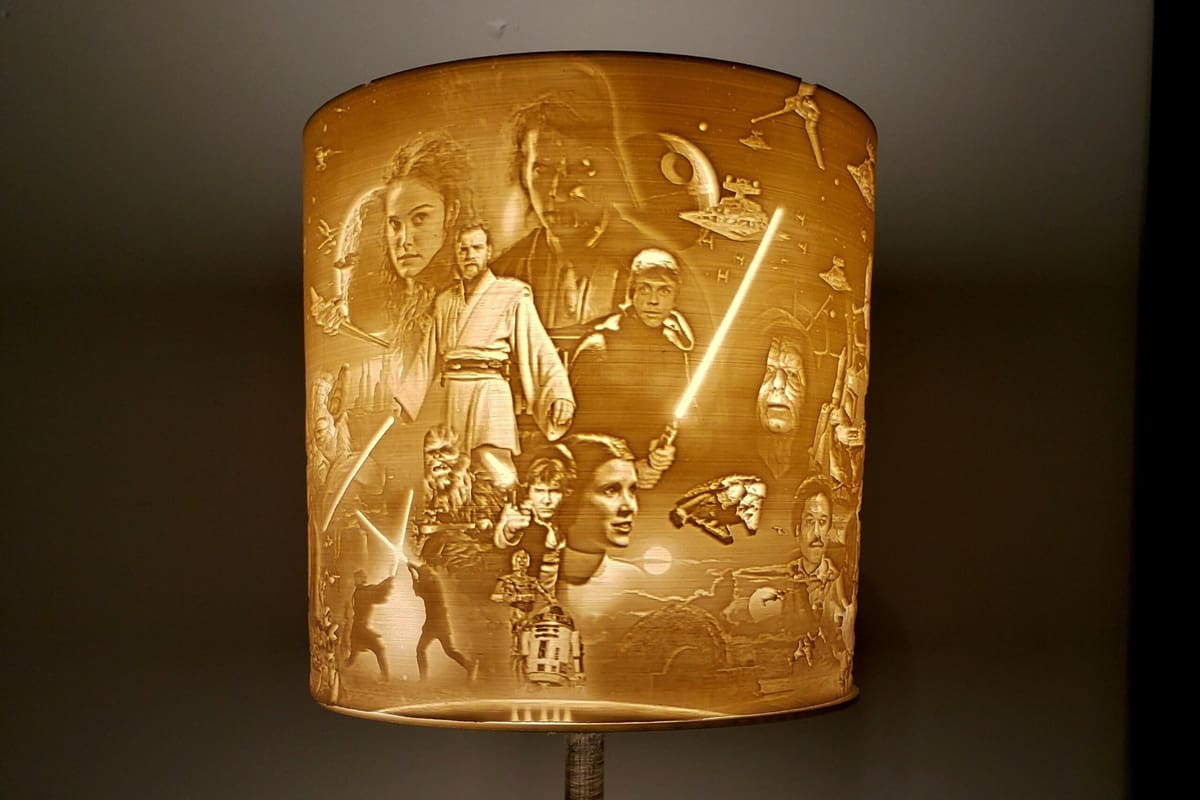
- Cylindrical: This shape works best with a continuous image that goes around a cylinder. The cylinder is added to a lamp base with the light at the center. Again, this could be fixed in place or rotated by hand or a motor.
- Spherical: Printing a lithophane globe, planet, or moon? Show it off in style by printing a spherical-shaped lithophane. The lamp should be able to hold the sphere securely in place.
3D Printing Your Lithophane
Once you’ve decided on the image and shape, the next step is to print your lithophane. Typically, lithophanes are printed in PLA filament on a fused deposition modeling (FDM) 3D printer. Of course, you can use a resin printer, and the results will vary between the two methods.
To get a better idea of which type of printer to choose for your lithophane, let’s look at a few considerations for each. As with anything, it comes down to trying things out and seeing what works best for you.
FDM
With an FDM printer, you’ll be printing the lithophane with 3D printing filament. Its material and color are important considerations. PLA is the most common and easiest to use. ABS and PETG will also work, but these have a tendency to cause stringing, which can be difficult to remove in post-processing.
While it may seem obvious, it’s best to use a light-colored filament, preferably white, to achieve the best results. Dark-colored filaments simply won’t let light through sufficiently.
- Pros: Easy to set up and slice the print, uses minimal filament, cost-effective, and large print area
- Cons: Not always defined details and can “stick” to the build plate
Resin
Again, color is one of the most important considerations. As with PLA filament, white resin will always provide the best result.
The added advantage of using a resin 3D printer is the detail. Anyone who has printed miniatures with resin printers will be aware of the minute, quality detail you can obtain. Since the same results are possible with lithophanes, resin may be the way to go.
- Pros: Easy to slice, well-defined details, and stronger end product
- Cons: More expensive 3D printing material and limited size
Settings
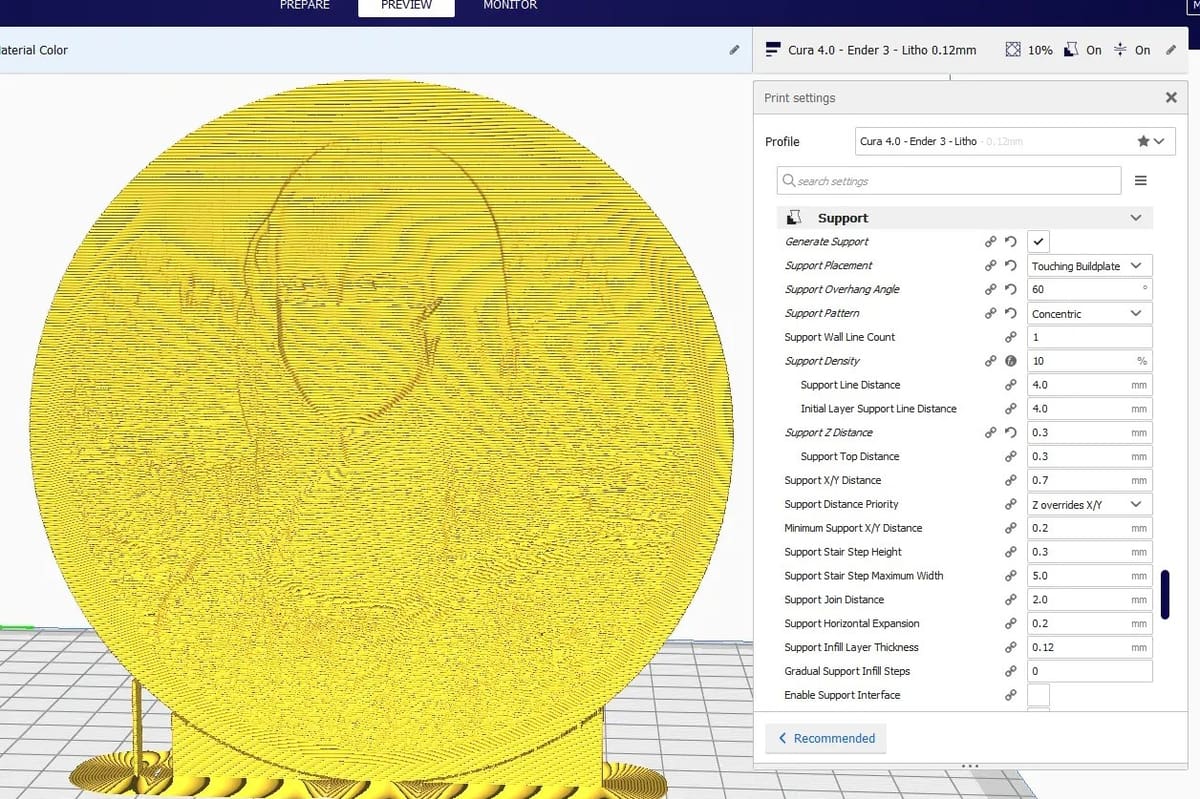
Once you’ve converted the image to an STL file for printing, it’s important to use the right printer settings. These will depend on your printer, but the lithophane will typically only need to be about 4 mm thick. If you’re using Cura to slice the file, you can select the “Darker is higher” option. This means that the darker areas of the picture will be thicker and let less light shine through.
The orientation of the print depends on the shape of the lithophane, but printing vertically will produce significantly better results. As the lithophane will be very thin, you will need to use a raft for your build plate adhesion method.
Of course, you could always print the lithophane flat to the build plate, but this might not provide high-quality results. If using this method, you should avoid rafts. Supports are only necessary for spherical lithophanes. Be careful to align these with the point where the lamp will enter the sphere.
Other Lamp Components
Now that you have your 3D printed lithophane, it’s time to find a light source to illuminate it and a base to keep the lamp stable. You’ve got a few options: You can purchase a lamp, LEDs, or any other lighting method.
Purchasing a lamp as a base is one of the most straightforward options. A good example of a suitable base for a spherical or cylindrical lithophane lamp is this one at Amazon for around $10.
Depending on the shape of your lithophane, LED display bases are great for bright light and ease of control. Some setups are designed so that flat lithophanes can be easily inserted into a display base. Circular or square LED display bases may be a better bet for non-flat lithophanes.
You can also use LED strip lights, but you’ll still need to make or buy a base for the lamp. LEDs start at a few dollars for battery-operated sets and go up to $10 to $20 for USB or app-controlled options.
Unless you plan on printing a cylindrical or spherical lithophane, you might also need a frame for the lithophane. The easiest path for this is to 3D print one customized to the size you need. You can find many 3D models on repository websites as a starting point.
As you can see, the cost of producing a lithophane on your 3D printer is minimal. Depending on your design, the total cost should be no more than $20. Budget-conscious shopping can reduce this cost considerably.
Removable Lithophanes
While it’s important to ensure that the lithophane panels are securely in place, you may want to make them removable so you can switch to different designs. For instance, you may want to remove a seasonal wintry scene when summer rolls around.
For this option, you’ll have to construct a frame to hold multiple lithophanes in place and decide on a light source. The best shapes for removable lithophanes include the single-curved or four-paneled square.
Safety

When constructing your lamp, it’s important to consider whether the materials are appropriate and safe. Since you’re dealing with electricity, it’s best to exercise caution.
While PLA is probably the best filament to use for a lithophane, the material’s heat resistance presents some concerns. Take care that the lithophane doesn’t come into contact with the light source, since this could lead to melting or even burning. It’s also not a good idea to use a candle or other open flame as your light source because they pose a fire hazard.
Design Examples
Searching for some inspiration for your lithophane lamp? A fully formed project or tutorial might be the way to go for your first attempt. If that’s the case, you might want to check out our article on 3D printing a rotating lithophane box. It’ll walk you through the entire process.
Other designers and makers can be a good source of inspiration for your projects, and you can always find hints and tips along the way. Here are some cool designs you can try at home!
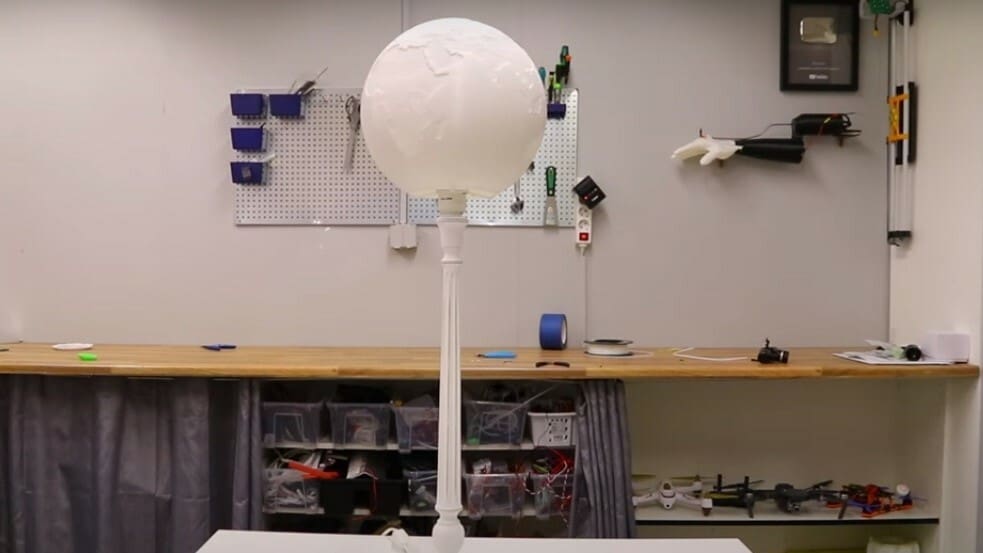
Globe Lamp
This is a great project showcasing a printed lithophane globe. The designer, RCLifeOn, is quite popular on YouTube, and this in-depth project is fairly typical of his work.
The video takes you through the design and printing of the globe. Due to its size, it ends up with some flaws. However, after some repairs, the end product still looks pretty good. The lithophane took 94 hours to print using white PLA filament. It was printed using a Creality CR-10, which was ideal for printing a globe of this size, thanks to the CR-10’s larger build plate. The video explains that the globe takes up the entire build area of 300 x 300 x 400 mm.
The globe itself was designed using Autodesk 3ds Max, but you could use other design software. The settings are explained in the video, but the overall thickness of the globe is no more than 2 mm. While this makes it fragile in places, this thickness allows the light to shine through. The light source comes from a standard table lamp, but a similar light would suffice. You can also design and print your own holder.
Revolving Lamp
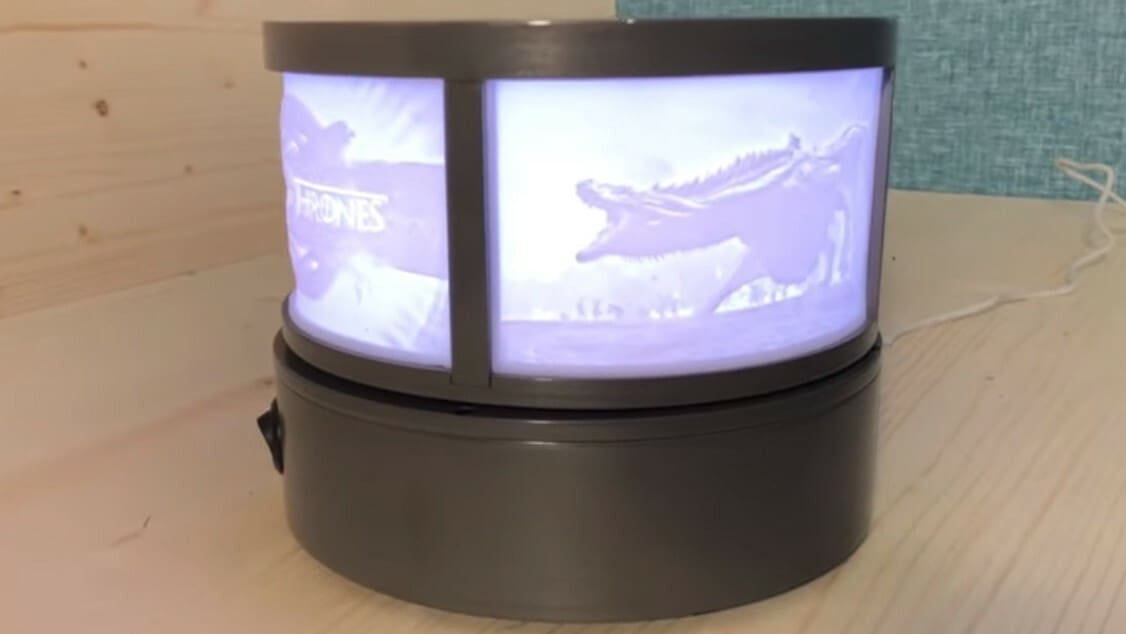
This project by 3D Maker Noob is a bit more advanced, but the stunning results are worth the extra effort and cost.
Watch the YouTube video for a closer look at creating the lithophane panels. In this case, they’re printed individually with resin. The main difference in this design is that the lamp base and frame are 3D printed using PLA with a steel additive. This gives the lamp more strength and heat resistance but adds to the overall cost.
While the other projects use a single light bulb, this lamp features a set of app-controlled LED lights as the light source. This is a great addition, allowing you to remotely change the color, brightness, and movement of the lights.
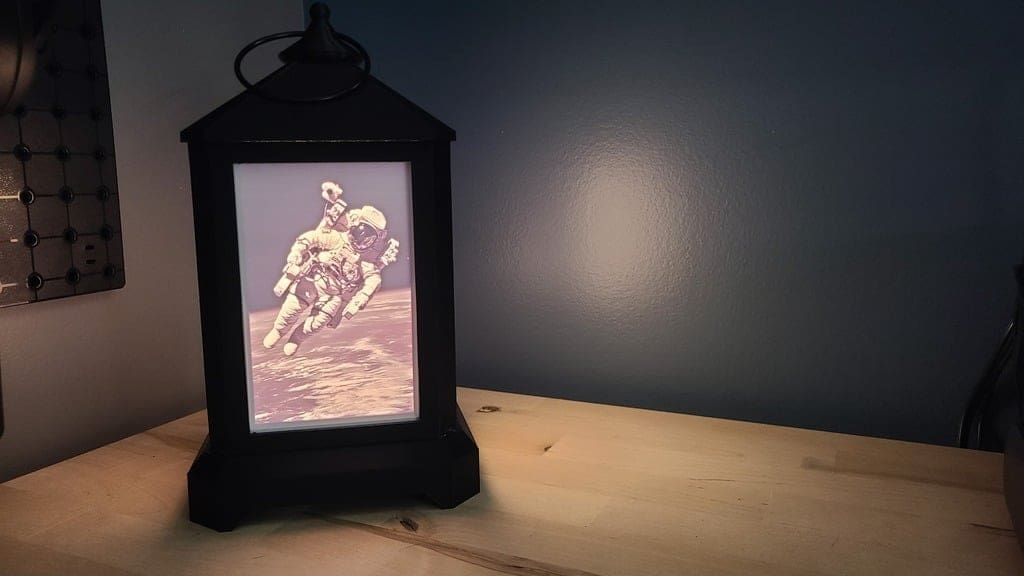
Lantern
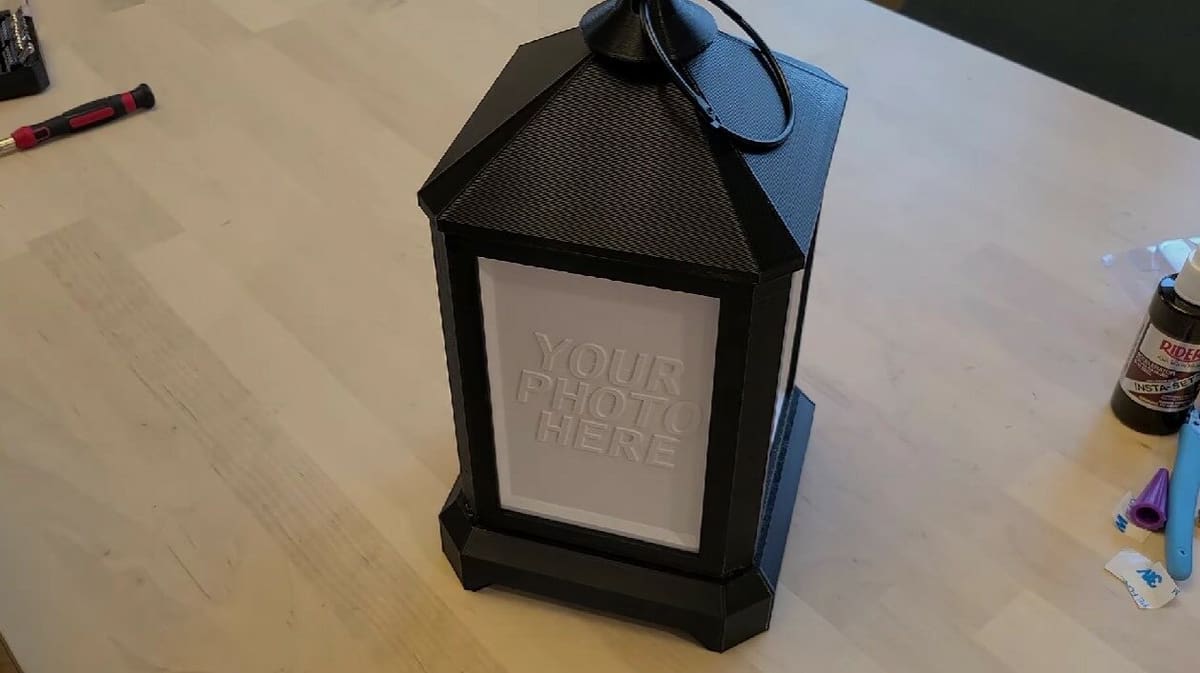
This fun take on a lithophane from FLA Labs uses a lantern-style frame designed with Fusion 360 to display the printed plates. There’s a complete project walkthrough on YouTube as well as an Instructables page for quick reference.
The creator used Lithophane Maker to create the image plates and included all of the relevant settings on the project page. The most important thing you’ll need is the width, height, and depth of 100, 150, and 7.5 mm, respectively, in order for your design to fit into the lantern frame provided on Thingiverse.
For the lighting, the creator used an LED strip wrapped around the central post for easy remote controllability. While some extra hardware (like screws) and assembly will be needed, the complete project looks quite professional and makes a great gift for loved ones!
License: The text of "3D Printed Light Box: How to Make a Lithophane Lamp" by All3DP is licensed under a Creative Commons Attribution 4.0 International License.