Print Big Parts on Small Plates: How to Split Your STL in Bambu, Prusa, Orca & Cura Slicers

Stop letting your build volume limit your creativity; master the simple "Cut" and "Split" tools to print massive, multi-part projects on any 3D printer.
Dividing a 3D model into smaller parts can make large prints feasible on small build plates, help reduce support waste, or make complex prints more successful — and you don’t need special software to do it. Right in your slicer is the option to cut an SLT file in two.
This updated guide covers the four most common slicers many makers use today: Bambu Studio, PrusaSlicer, Orca Slicer, and Ultimaker Cura. Fortunately, the first three work pretty much the same, while Cura requires a plug-in.
Don’t confuse the terms cutting and splitting. The cut tool in your slicer works just like taking a knife to a cupcake. It makes a clean, one-direction cut all the way through the print and divides your model into two parts. Splitting is a different function. When an STL file comes with multiple parts all included and bundled into one model, you may want to “split” them apart to arrange them on your print bed, for example, or only print some of them. We also cover the “split to objects” and “Split to parts” functions in these four slicers below.
Bambu, Prusa, and Orca not only make it practical and easy to break larger models into manageable sections, but they all offer optional connectors, like plugs, pegs, dovetails, or snaps, for assembling the resulting parts instead of having to glue them.
Why Split a Model?
Printing a large or complex model as one piece isn’t always ideal:
- The model may exceed your printer’s build volume.
- Large overhangs may require excessive supports.
- Multiple parts can be printed with different orientations or materials.
- Splitting lets you break down a model and print it in pieces, then assemble the final object.
Splitting models in slicers has become easier than ever, but each tool has its strengths.
Want More Complex Segmentation? You’ll Need CAD
Sure, slicers can split and segment STL models and effectively, too, but if your part model needs precise structural joins or complex splits, preparing or segmenting the model in computer-aided design (CAD) software, like OnShape or Blender, before slicing remains the most robust solution.
Splitting a model in CAD software offers more control, precision, and design flexibility than splitting in a slicer. In CAD, you can define exactly how and where a part should separate, add alignment features or tolerances for assembly, and create clean solid bodies that remain watertight after the split. This allows seams to follow contours or hidden lines, and helps ensure the pieces will fit comfortably after printing. Slicers, by contrast, generally focus on simple planar cuts, lack robust joinery tools, and work directly on mesh data, which can introduce artifacts or require repair. For quick or basic prints, a slicer cut is convenient, but for functional design, hidden seams, or multi-part assemblies, CAD tools are typically the more precise and practical choice.
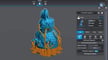
Rocket Model STL: The “Futuristic Blastoff Rocket for Space Enthusiasts” STL model we use throughout this guide is designed by Sculturissimo3D and available on MakerWorld.
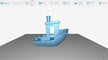
Split/Cut Models in Bambu Studio
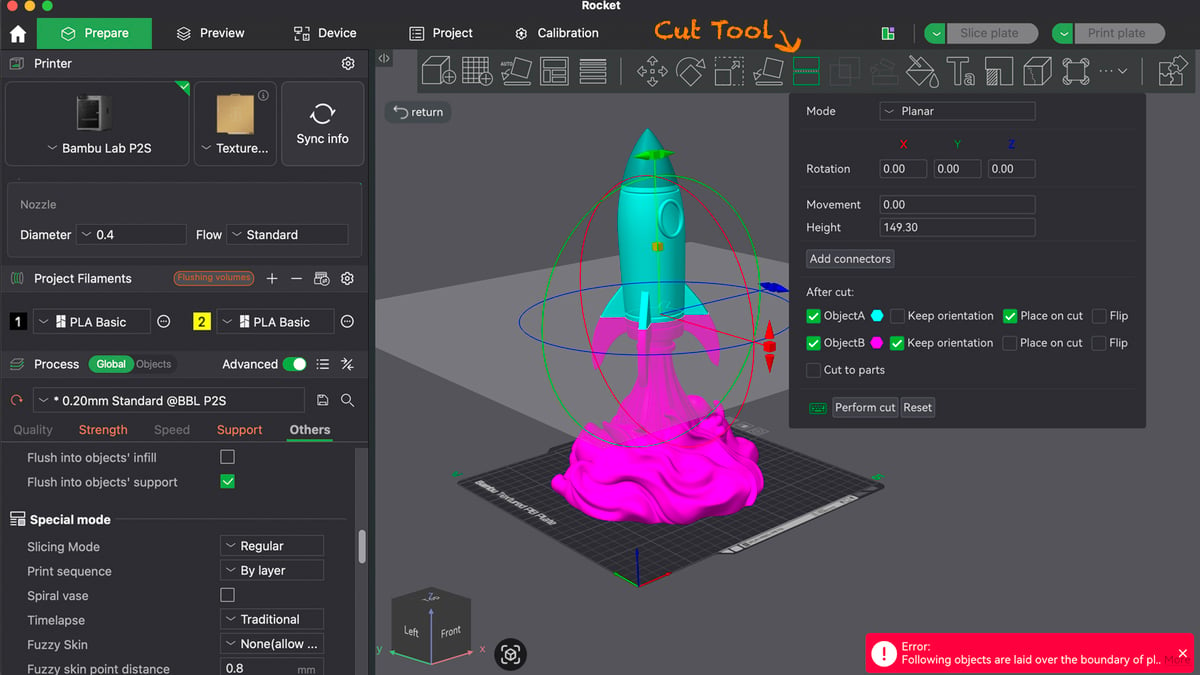
Bambu Studio (the slicer used for Bambu Lab printers) includes a Cut Tool and split-related functions for breaking up models within the slicer.
Cut Tool
Bambu Studio’s Cut Tool lets you define a plane across the model to divide it into two pieces. After executing the cut:
- You get two parts that can be printed separately or repositioned.
- You can often choose whether to keep both pieces or keep one and discard the other.
- This is useful when you need a straight planar split to fit large prints or reduce support.
Step-By-Step
- Import your STL/3MF
- Select the model
- Choose the Cut Tool and position the cutting plane where needed, or hold the shift key and drag to create a cut line.
- Execute the cut (“Perform cut”) to create separate pieces.
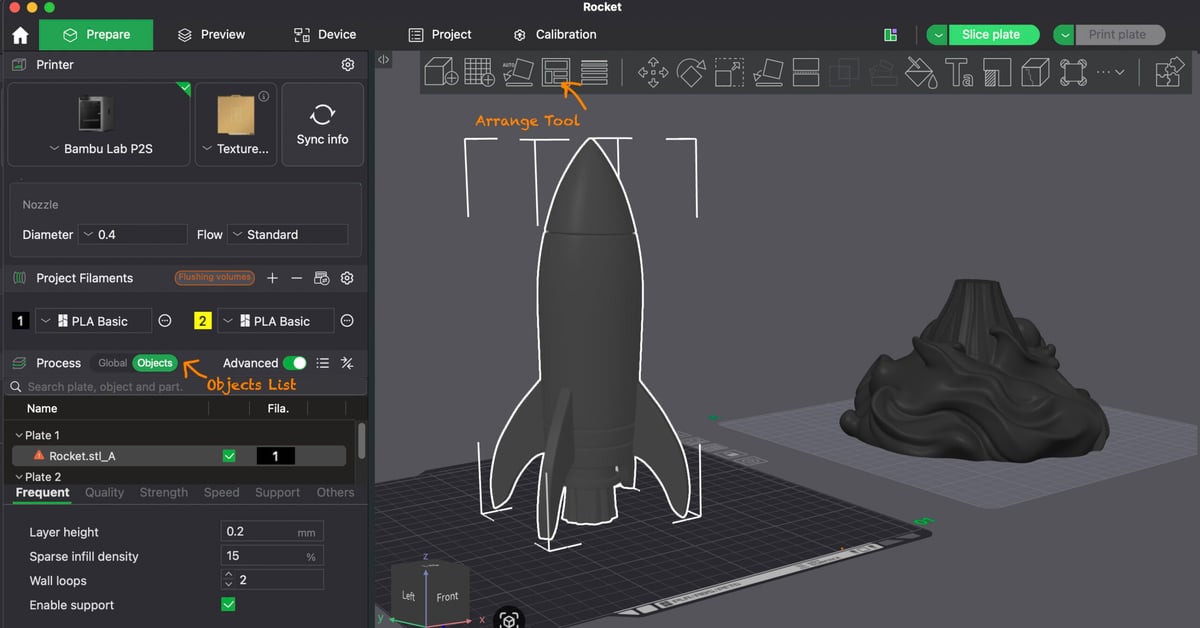
- If the pieces are both too big to fit on the plate or you want to print them separately, use the “Arrange” tool, which will move big parts to separate build plates.
- Use the objects list to manipulate or export the separate parts.
Options
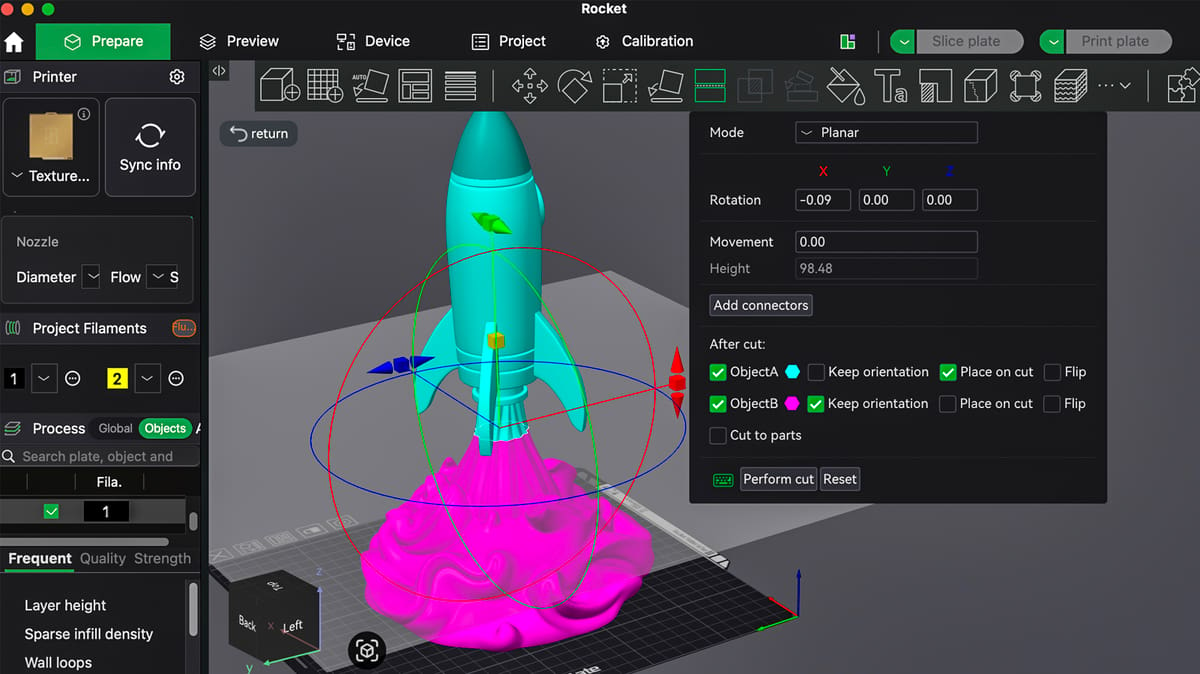
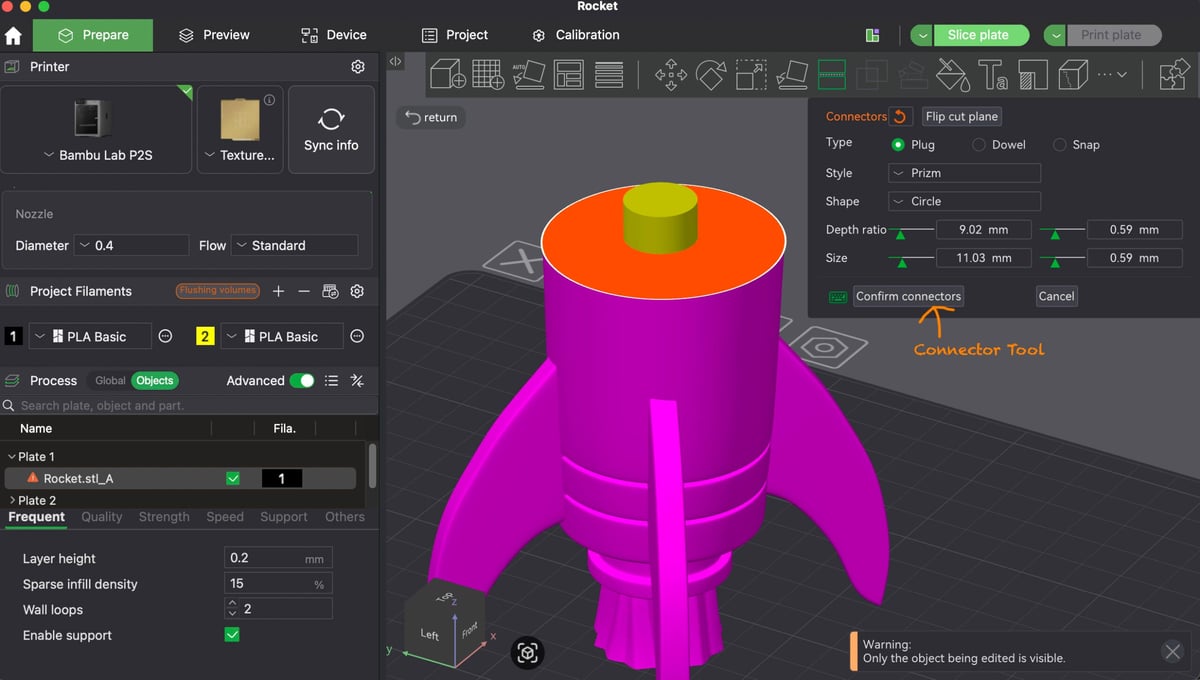
Add connectors if you want to easily snap your parts together after printing and avoid having to glue them. Bambu Studio offers a variety of connectors in the Cut tool under “Add connectors.” Once you click on “Add connectors”, use your pointer to click on the orange surface that was just cut to position your connector, whether it’s a plus, a dowel, or a snap connector. From there, you’ll see the connector and can adjust the size and depth of the connector.
Note that you can only cut a model in two. If you want to cut it into more pieces, you have to select another piece and cut that in two, and so on.
Split to Objects/Parts Menu
Bambu Studio also offers a way to break multiple parts of a model into separate objects in the “Objects” list if the imported file contains more than one mesh. In other words, if the STL file has multiple separate parts but imports as one “group” of parts, you can separate them into individual parts to arrange them or manipulate them with the “Split to Objects” command.
Split/Cut Models in PrusaSlicer
PrusaSlicer has a dedicated cut function just like Bambu Studio, with the same “cut” menu icon. Note that this slicer also has a “Split to objects” function, but this is used when you already have a multi-piece object that’s showing up in your slicer on one joined object. This “Split to objects” just makes those separate parts manageable individually. If you want to cut one solid part, use the cut tool.
Cut Tool
Prusa Slicers’ Cut Tool lets you define a plane across the model in any direction to divide it into two pieces. After executing the cut:
- You get two parts that can be printed separately or repositioned.
- You can often choose whether to keep both pieces or keep one and discard the other.
- This is useful when you need a straight planar split to fit large prints or reduce support.
Step-by-Step
- Import your model into PrusaSlicer and select it on the build plate.
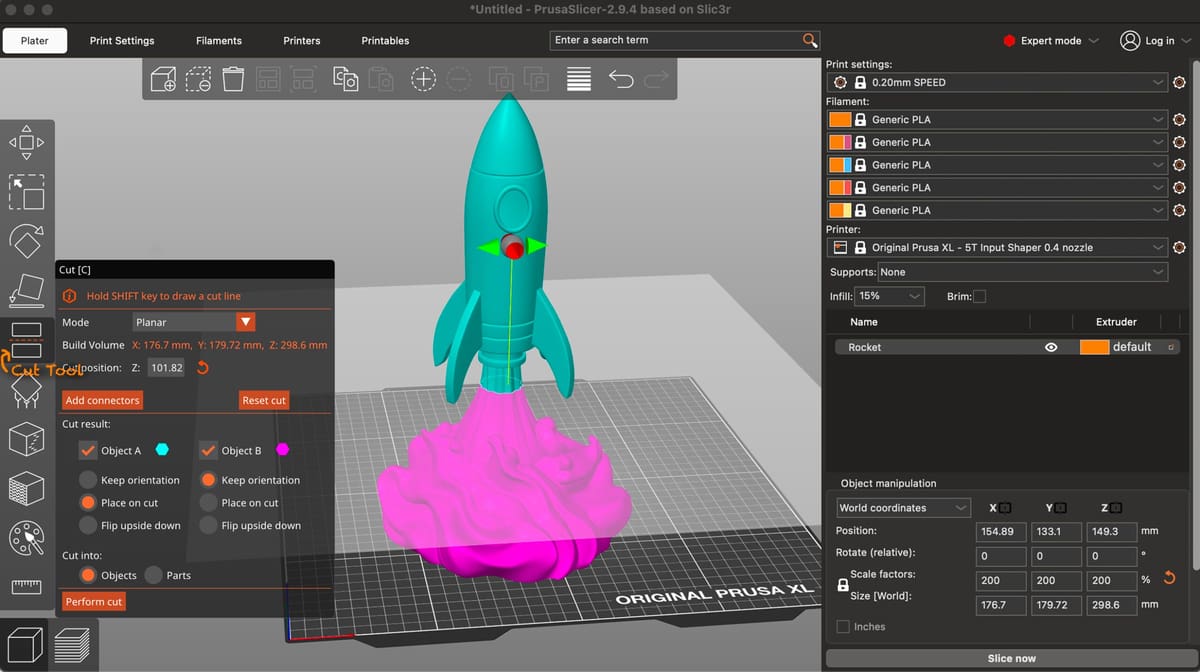
- Activate the Cut Tool by either pressing C on the keyboard or clicking the Cut icon in the left toolbar.
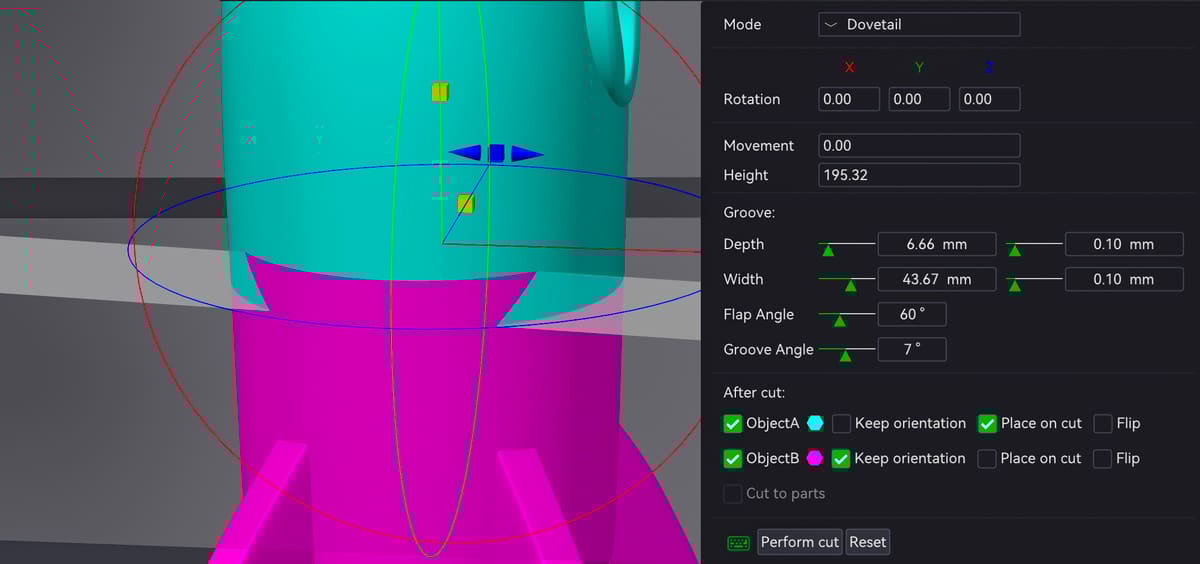
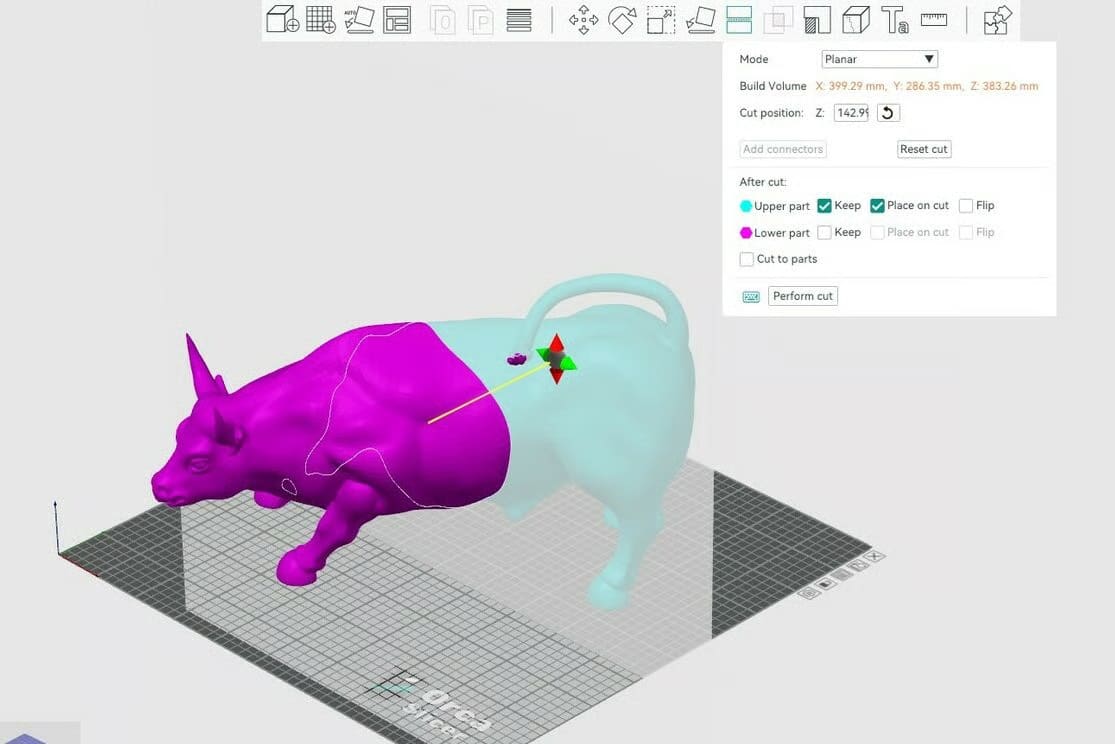
- A cutting plane widget appears on the model. In the panel on the left, make sure Planar mode is selected (unless you specifically want a dovetail cut).
- Move and rotate the cutting plane to where you want to split the model. You can drag the tool directly or type exact values for position and rotation in the panel for a precise cut, or hold the shift key and drag to create a cut line.
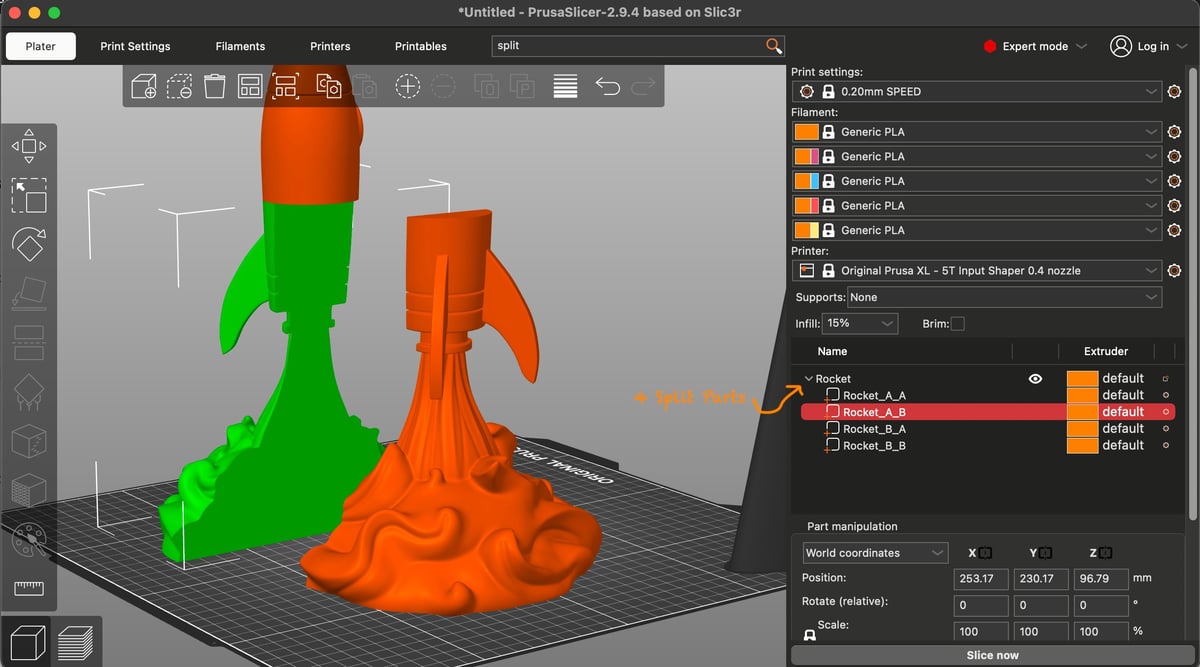
- In the Cut result section of the panel, choose Cut into objects (not “parts”, see below for more) so that the result will be two completely separate objects on the build plate.
Click Perform cut (or the equivalent apply/confirm button). PrusaSlicer will split the original model into two distinct objects that you can move, slice, and print separately.
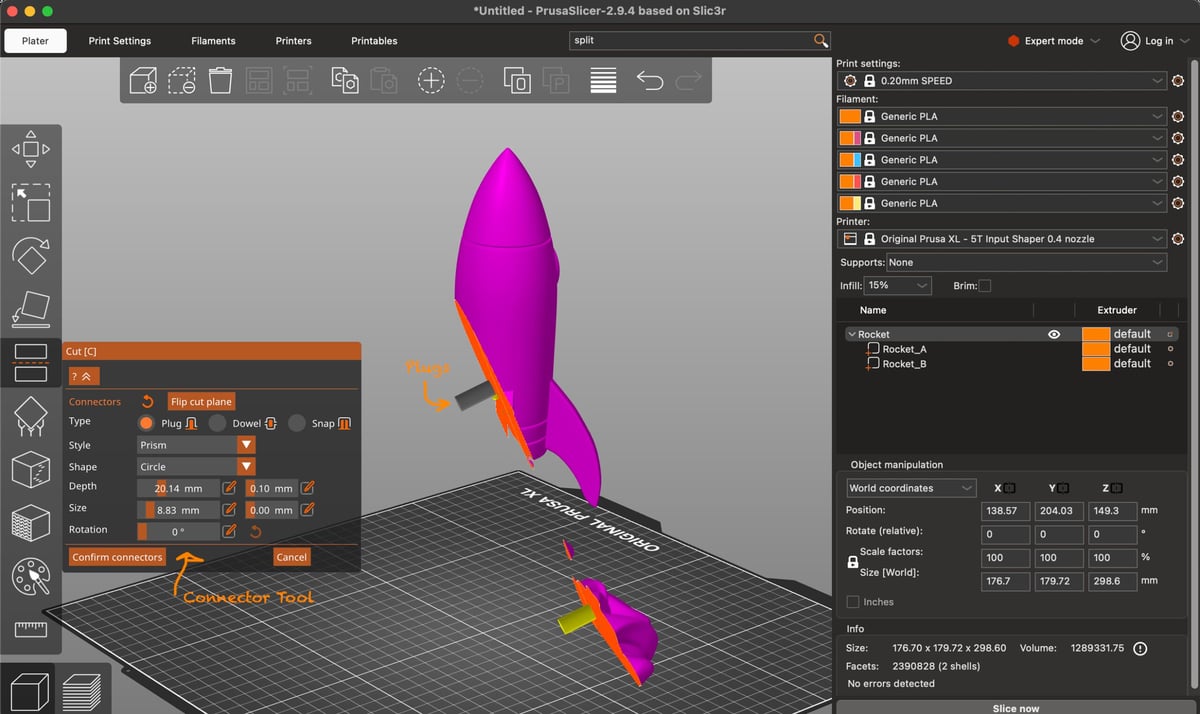
Optionally, enable connectors (plugs, dowels, or snap connectors) if you want pins or joinery between the two halves after printing.
In PrusaSlicer, the distinction between cutting into parts and cutting into objects is mainly about how the resulting pieces behave on the build plate.
When you cut into parts, both halves remain grouped as one “parent” model. They move, scale, rotate, and orient together as a single unit, and they slice as one object as well. This mode is useful for multi-material or multi-component prints where the pieces are meant to stay together, or when you simply want to expose different orientations or settings inside one logical model without turning them into independent items.
By contrast, when you cut into objects, the halves become completely separate models that you can move, rotate, duplicate, hide, or slice independently. This is the more common choice if the intent is to print the pieces separately, reorient them for easier printing, or combine them later during assembly.
So in short, cutting into parts keeps everything bound as one model for editing and slicing, while cutting into objects produces independent models that can be handled and printed on their own.
Split/Cut Models in Orca Slicer
Cutting a model into two in Orca Slicer is so similar to Bambu Studio and PrusaSlicer; by this point, we’re just repeating pretty much everything we’ve listed above.
Step-by-Step
- Select the model on the build plate.
- Activate the Cut Tool (toolbar icon or keyboard shortcut, depending on version).
- A cutting plane appears, which you can move and rotate—either interactively with the gizmo or numerically in the side panel.
- Confirm/apply the cut, and the model is divided into two pieces.
- The resulting pieces become independent objects you can reposition, reorient, or export separately.
Optional: Orca, like the other slicers we feature, also offers optional connectors (pegs/dowels/snap-type features) that can be added along the cut boundary before confirming, which is especially useful for assembly-scale prints.
Like other slicers, the “Split” function is tied to breaking a model into multiple parts that were already separate geometrically (like multiple shells in an STL), not cutting a solid object at an arbitrary plane. When the Split menu option is greyed out, it’s often because the model isn’t selected or doesn’t contain multiple sub-objects.
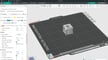
Split/Cut Models in Cura Slicer
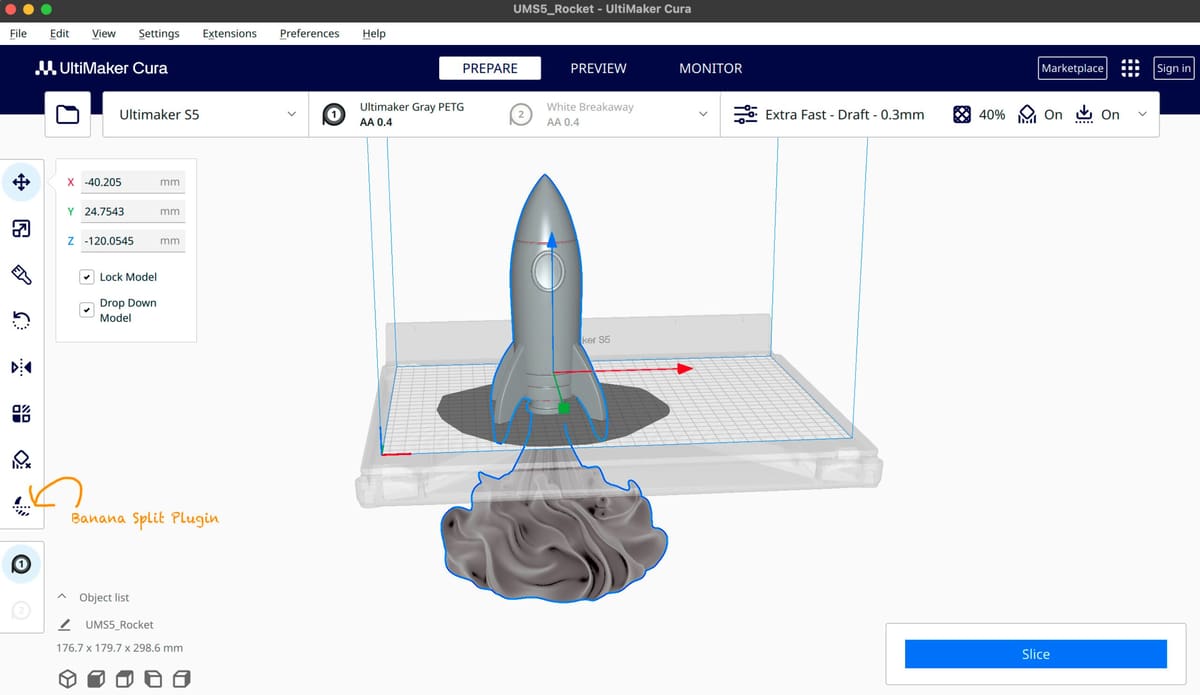
Cura is the slicer least like the three above and is not as intuitive to use (doesn’t have the same cut icon) and, in fact, it doesn’t natively include a simple “cut” functionality in the core software, but there is a plug-in.
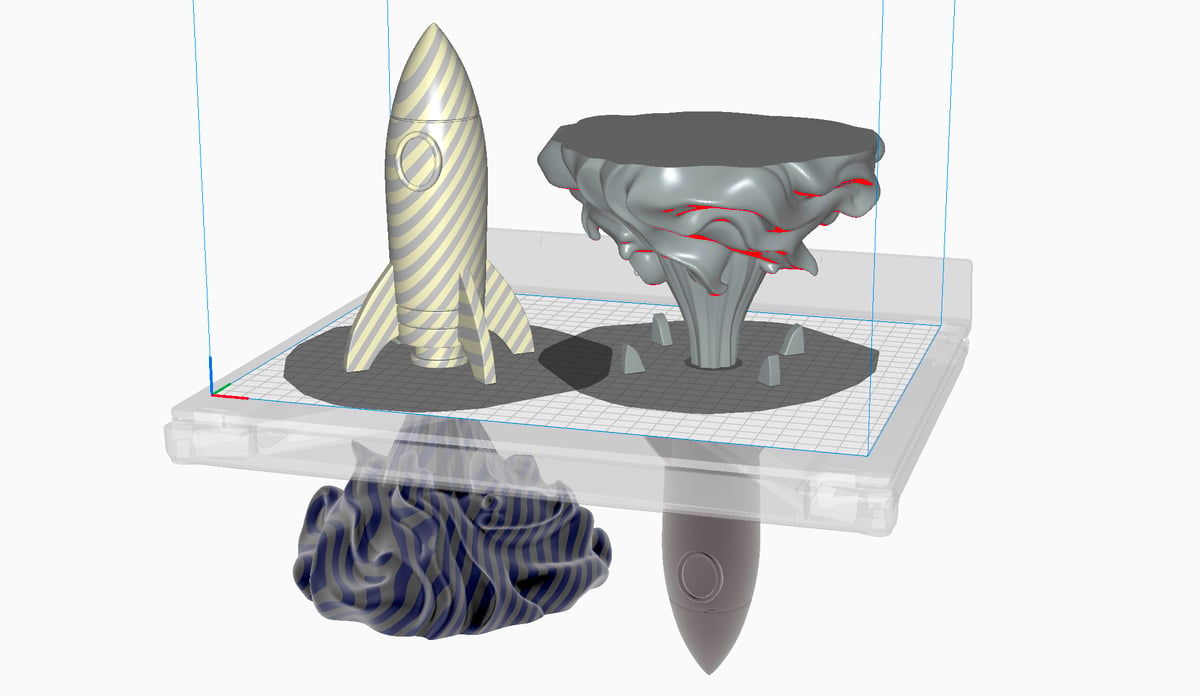
The reliable plug-in can be found on Cura’s Marketplace and is called “Banana Split.” It lets you position your model so part of it goes below the build plate and essentially disappears. When you click Slice, Cura only slices and applies supports to the section above the build plate plane. There are no options for connectors, and you’ll need to watch your measurement so that you can print the other half of your model effectively or save the split part to your clipboard.
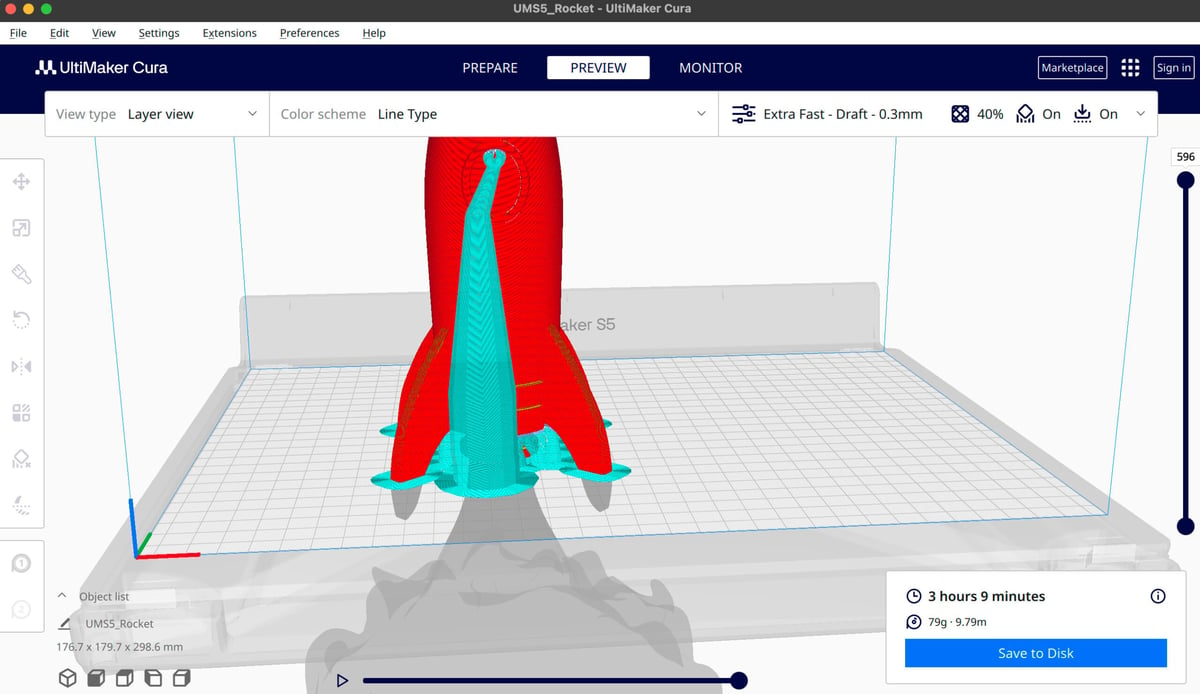
Even with plugins like BananaSplit available, Cura still doesn’t modify the mesh in the same robust way as other slicers. Where Orca or Bambu gives you a true planar cut that yields two separate mesh objects, Cura’s approach via plugin generally uses the build-plate plane as the reference and doesn’t create independent pieces in the same way — it’s more of a convenient print-time split than a full mesh operation.
In practice, most Cura users still find that external mesh-editing tools (like MeshMixer or Blender) or other slicers handle arbitrary cutting of a single solid mesh more reliably than Cura’s plugins alone.
Like Bambu, Prusa, and Orca, you can separate multi-mesh STLs into their parts, but again, Cura needs a plugin. The plugin is called Mesh Tools, and when installed, it adds a “Split model into parts” command that appears in the right-click menu if the model actually contains multiple separate bodies or shells already
You May Also Like:
License: The text of "Print Big Parts on Small Plates: How to Split Your STL in Bambu, Prusa, Orca & Cura Slicers" by All3DP is licensed under a Creative Commons Attribution 4.0 International License.