Z Hop: What Is It & How to Configure It in Cura

Supports falling off mid-print? Z Hop can help! Learn how to use this setting in Cura to improve your prints.
UltiMaker’s Cura is easily the most popular 3D slicing software for FDM 3D printers. The program is full of useful settings, from basic ones like nozzle temperature, to niche control options, such as adaptive layers.
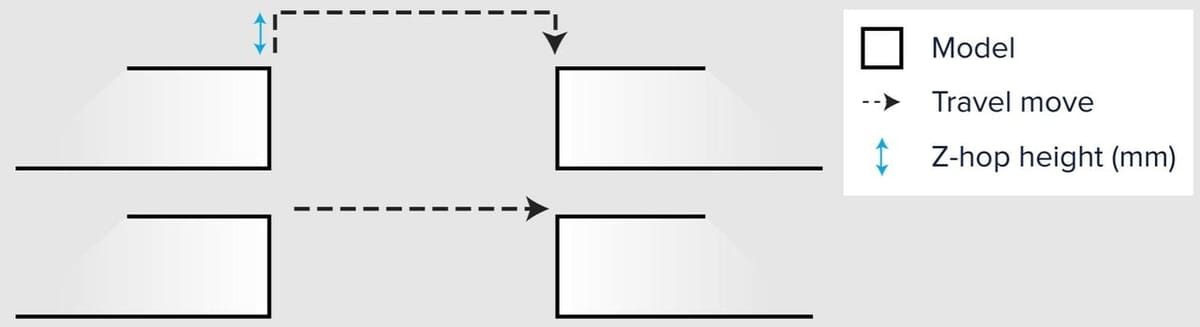
Z Hop is an extremely helpful slicer setting in Cura meant to reduce the chances of your model being knocked over mid-print by the printhead, but it can help with surface issues, too. When activated, Z Hop tells the printhead to move up, or hop, when it makes non-printing movements.
In this article, we’ll go over the Z Hop setting and how you can use it in Cura. It’s worth noting that Z Hop isn’t specific to Cura. For example, in PrusaSlicer, there’s a similar setting referred to as Z Lift, but we’ll specifically be using Cura for this guide. You should still be able to apply the information described in this piece to similar tools in other slicer programs.

What Is Z Hop?
The Z Hop setting was introduced a few years ago and has grown popular enough for a few slicer programs, such as Cura and PruaSlicer, to add it to their portfolio of control options. In short, it’s a special slicer setting that’s designed to prevent the printhead from knocking over an ongoing print and improve the overall print quality.
The setting works by moving the printhead up along the Z-axis when a retraction is made. As a reminder, retraction is the process of the extruder pulling back filament, and this happens immediately before the printer makes a travel move (a movement where filament is not extruded) greater than a few millimeters. This reduces stringing and other causes of accumulation in areas where filament should not be accumulating.
Z Hop can be helpful because it provides some clearance between the nozzle and the top layer of the print so that the two don’t collide. At the end of the retraction, the Z-axis motor reverses, bringing the printhead back down to its original position so that it can continue printing at the right height.
It’s also worth pointing out that, similar to adjusting the layer height (the distance the nozzle moves up after each layer), you can also control the Z Hop height in Cura. We’ll explain more about the Cura settings related to Z Hop in a bit.
Why Use Z Hop?
Z hop is useful for a variety of reasons, from falling supports to surface defects. Let’s go over some of them.
Avoid Knocking Over Prints
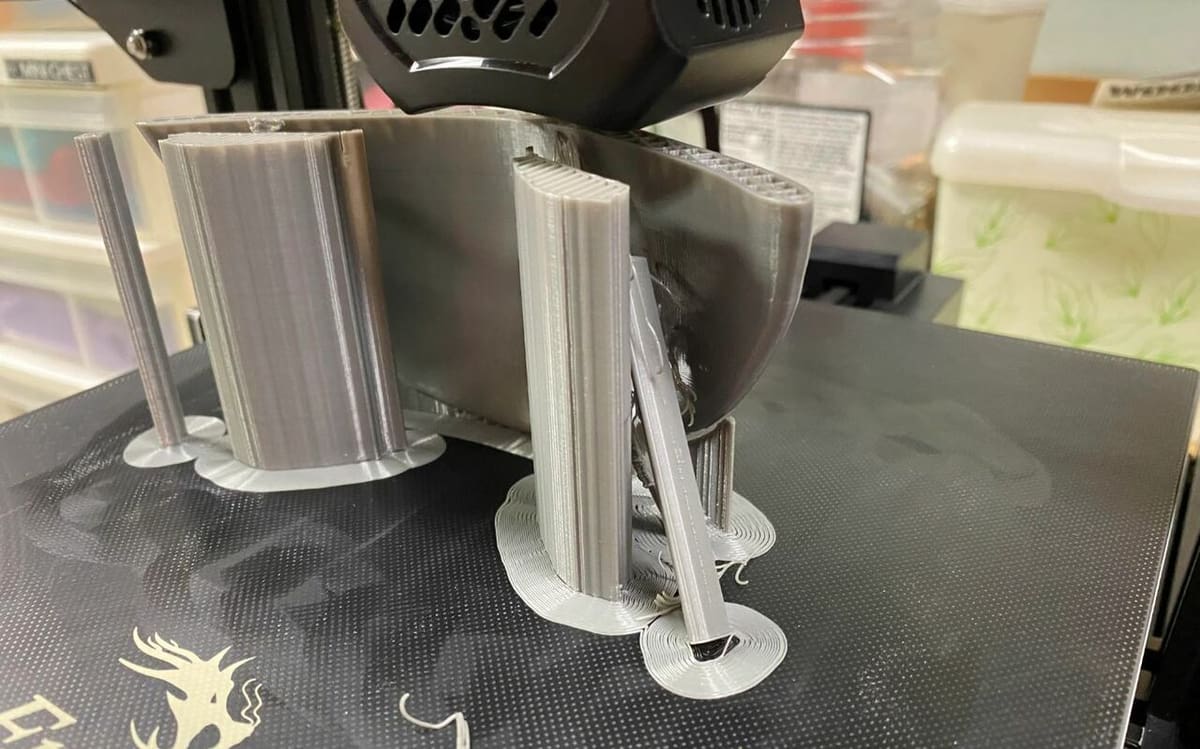
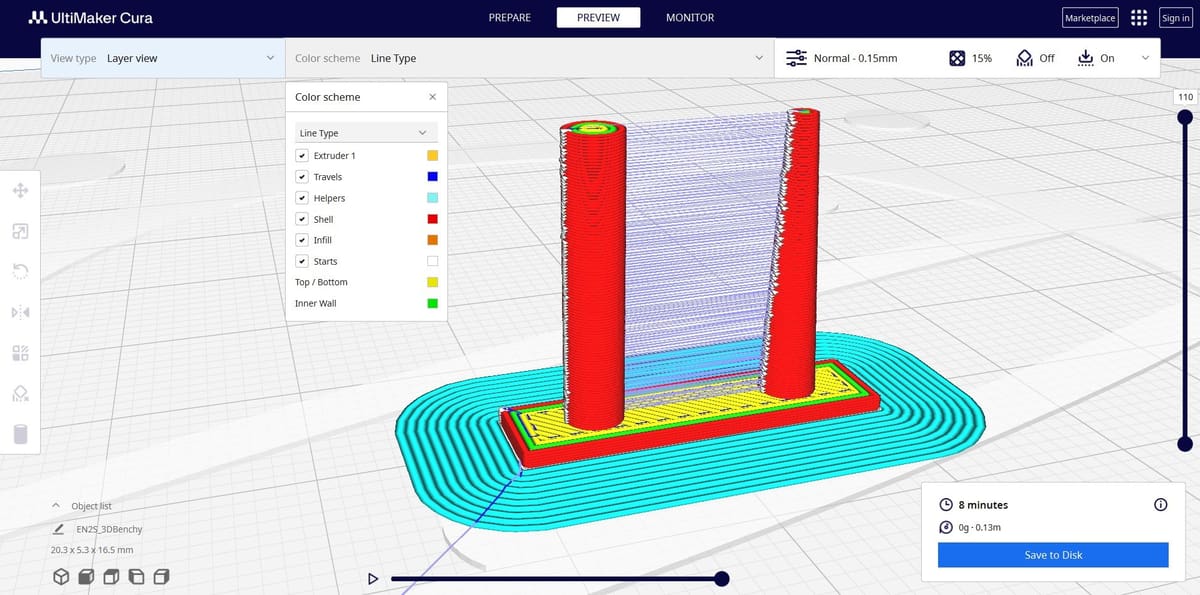
Z Hop is a great setting to use if you’re printing a model (or models) that are tall and skinny, as these prints don’t share a lot of surface area with the bed, and are therefore easy for the nozzle to push over with a travel move. In particular, thin overhangs have a tendency to curl upwards, putting their edges right in the path of the nozzle. By activating Z Hop, you’re giving these more fragile models some safety space from the nozzle just in case.
Besides actual prints, Z Hop is also useful for printing support structures. That’s because support structures are usually tall and skinny and often disconnected from the main body of a print, making them easy to knock over. As such, it’s a smart move to activate Z Hop and give these flimsy sections of your print clearance from the nozzle.
Avoid Scratching Prints
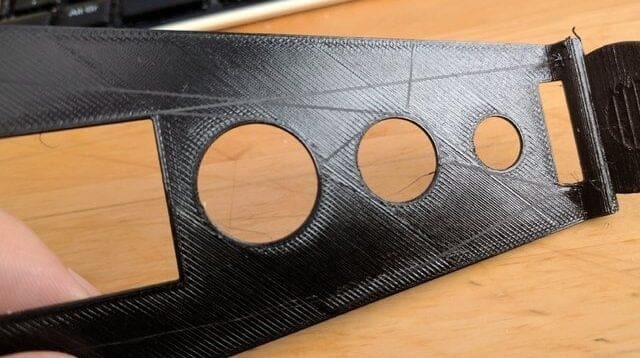
Another benefit of using Z Hop is that the exterior surface of your print will likely come out smoother. That’s because, without Z Hop activated, the nozzle can scratch the top layer of your print, particularly if your model has a large or flat top.
This scratching effect can occur when your print bed is not perfectly level relative to the printhead. This slight error can cause the nozzle to rub into the top surface (or side) of your print. Z Hop will eliminate scratching and yield a smoother top surface on prints. You might also want to check out Cura’s ironing feature if you’re striving for a smoother (flat) top surface on prints.
Avoid Undesirable Deposition
Additionally, Z Hop helps achieve smoother prints because it reduces excess melted plastic on your print by giving the nozzle some clearance. Of course, activating Z Hop won’t actually eliminate any plastic sticking to your nozzle (that’s from over-extrusion), but it will prevent the plastic from getting on the outside of prints.
Related Settings
It’s worth talking about how the Z Hop feature in Cura is different from other common settings within Cura.
Combing mode allows you to specify the allowed areas that the printhead must follow when moving from one section of a print to another. Only allowing the print head to move within printed areas of your model can prevent stringing and blobs on the surface.
On the other hand, the Avoid Printed Parts When Traveling setting in Cura tells the printer never to make a travel move that passes over an already-printed layer in a print job.
Coasting is an experimental setting that turns off the extruder feed a certain distance from a perimeter, allowing the molten filament already in the extruder to fill in the gaps. This is great for preventing stringing and blobs when working filaments that are particularly runny.
You can these settings alone or in combination with Z Hop to achieve a print with a high-quality exterior and reduced risk of surface defects. For reference, Cura’s default slicer profile keeps the combing mode set to “Not in Skin” with “Avoid Printed Parts When Traveling” turned on.
Downsides

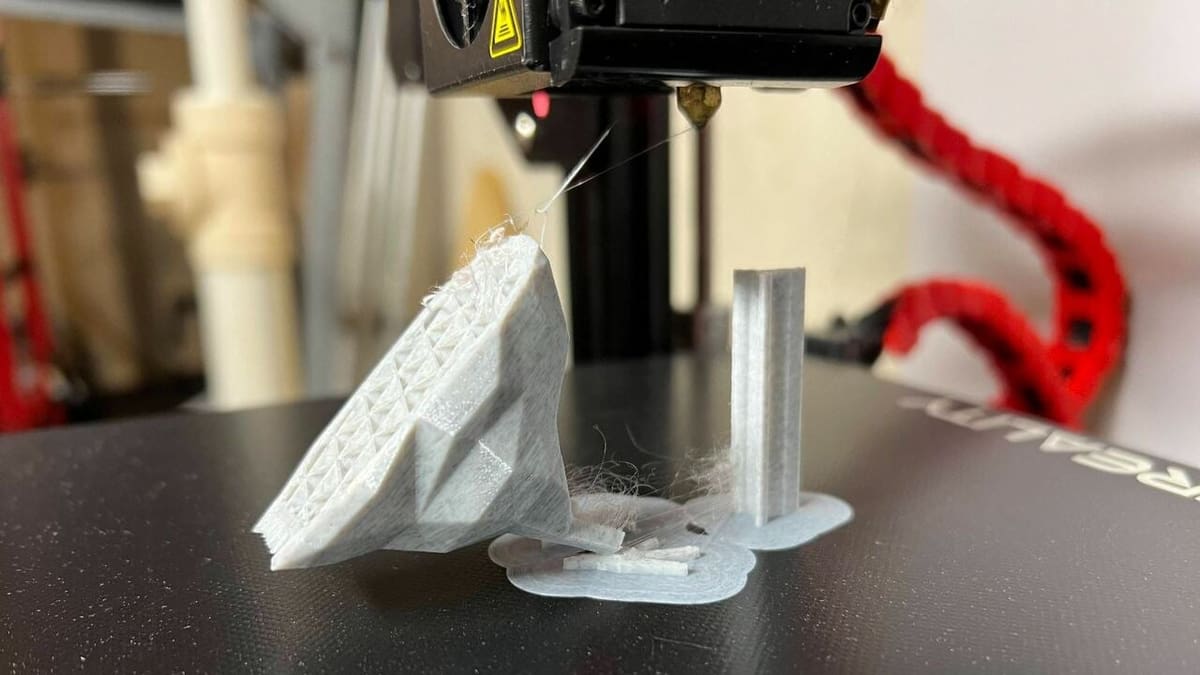
Sadly, Z Hop isn’t all good, and the feature is known to increase the amount of stringing on prints. In the worst cases, if your printer suffers from Z wobble, you could end up with quite a mess (as seen in the image above).
That’s because the extra travel needed to perform the Z Hop gives excess filament in the hot end a chance to ooze. But, if you still need to use Z Hop, you can always try combating the stringing issue by increasing your retraction distance or speed, as well as lowering the nozzle temperature.
Besides the increased risk of stringing, enabling Z Hop will increase your overall print time due to the additional movements. Some users also report extra noisy printing when using this setting.
Setting Z Hop In Cura
Now that you know about Z Hop, it’s time to get into how to activate the setting in Cura and control its parameters. As we mentioned, Z Hop is available in other slicer programs, but we’ll only be going over controlling the setting in Cura as this is the most popular slicer program. Luckily, the other slicers with Z Hop have very similar settings so the information should cross over pretty well.
To start, let’s go over how you can activate Z Hop in your slicer profile as it’s not always activated. You can follow these instructions step-by-step in Cura:
- Open UltiMaker Cura.
- Go to the Print settings tab and select “Show Custom” to see the more advanced settings options.
- Click the hamburger menu icon (three lines) at the top right of the Print settings tab, and select “All”.
- Scroll down to the Travel section of the settings list.
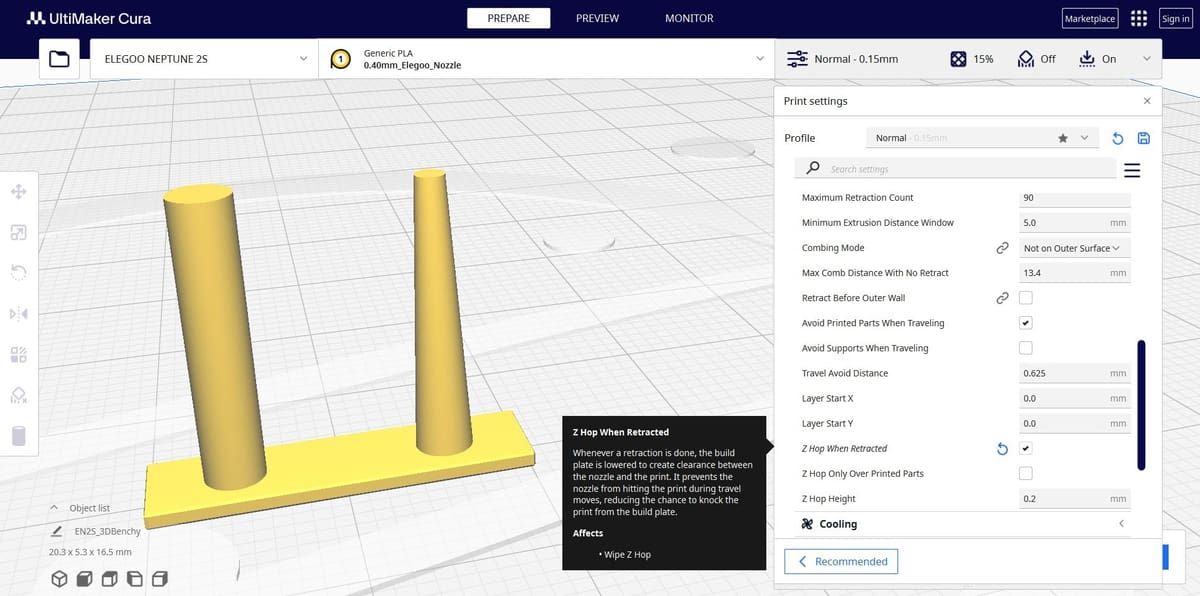
- Locate and check the Z Hop When Retracted setting if it’s not already turned on.
Once you’ve turned the Z Hop setting on, you should see a few related settings appear underneath the main setting. These control different aspects of the Z Hop feature, and we’ve briefly described and provided recommendations for each below:
- Z Hop Only Over Printed Parts: This setting is an optional mode for Z Hop that tells the printer to only use Z Hop for travel moves that go over printed areas rather than for every retraction move. Moreover, Z Hop won’t be used during regular travel moves unless the printhead is traveling over a separate model in the print space. By default, Cura has this setting turned off and we suggest keeping it this way.
- Z Hop Height: As the name suggests, this value controls how much the printer moves the nozzle up during each Z Hop occurrence. The higher this value, the more space you’re giving the print and the less likely the printhead will collide with the model. However, going too high could increase the print time significantly as well as put unnecessary stress on the Z-axis motor. Cura’s default value for the Z Hop Height is 0.2 mm, and this works well for most users.
- Z Hop Speed: Our last setting, found under the “Speed” tab of your print settings, controls how fast the Z-axis motor moves the printhead up. As this speed is for vertical movement, it should be kept pretty low as most 3D printers aren’t meant to move up and down as fast as they are moving across the X- or Y-plane. Furthermore, we suggest using Cura’s default Z Hop Speed of 10 mm/s and only adjusting if you start seeing problems.
License: The text of "Z Hop: What Is It & How to Configure It in Cura" by All3DP is licensed under a Creative Commons Attribution 4.0 International License.