
Why You Should Print a Temperature Tower & How-To in Bambu Studio, Prusa Slicer & OrcaSlicer

A temperature tower is quick, cheap, and useful. With one small print, you can learn a lot about how your filament behaves and dial in cleaner, stronger, more reliable 3D prints.
Few things are more frustrating than unboxing a fresh spool of premium filament, running a lengthy print, and discovering a brittle, stringy mess. While setting your nozzle to the exact middle of the manufacturer’s recommended temperature zone feels safe, it’s rarely the sweet spot for every machine. Here is how a tiny, multi-stage calibration test can save your next project from the scrap bin.
Whether you’re chasing cleaner overhangs, better layer adhesion, or less stringing, a temperature tower is one of the best and fastest ways to tune an individual filament specifically to your printer.
Because every filament has a temperature range at which it prints, say 190 – 230 ºC, setting your nozzle temp at the middle isn’t always the best bet. Sure, hotter is better for faster, thicker layers while cooler is ideal for thiner layers, but you want to hit the perfect temperature on your printer that doesn’t produce stinging (too hot) or poor layer adhesion (too cool).
A temperature tower is the only way to know for sure. It lets you print one model at several nozzle temperatures, making it easy to compare results side by side.
Temperature towers are especially useful when trying a new filament brand, switching materials, changing print speeds, or troubleshooting common issues like poor bridging, weak layers, blobs, stringing, and rough surfaces.
In this guide, we’ll explain what a temperature tower is, how to set one up in your slicer (Prusa, Bambu, Orca) and how to read the results once the print is done.
What Is a Temperature Tower & Where to Find One?
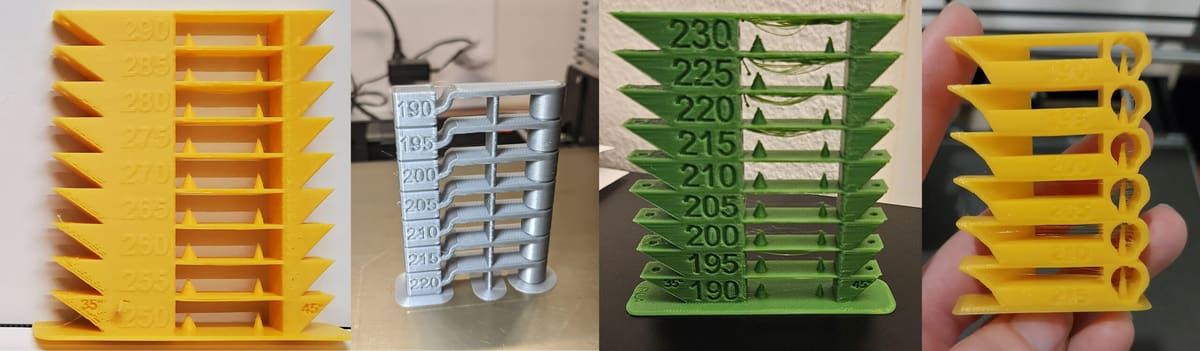
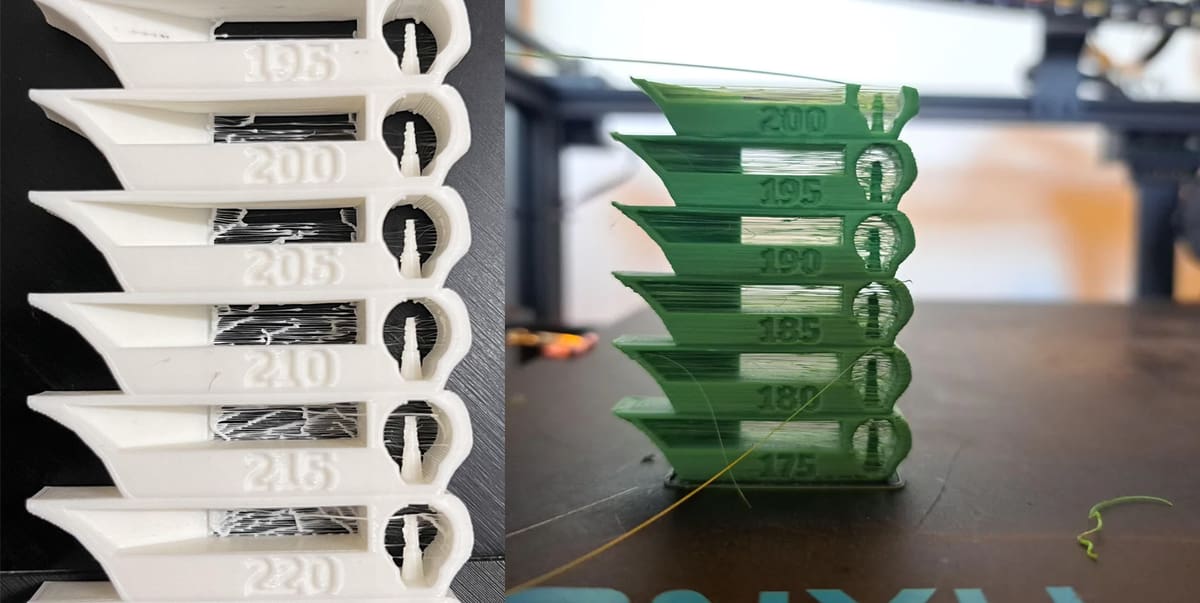
A temperature tower is a part printed as a calibration tool divided into several stacked sections. Each section is printed at a different nozzle temperature, usually in 5 °C or 10 °C steps.
For example, a PLA tower might start at 230 °C at the bottom, then drop to 225 °C, 220 °C, 215 °C, and so on as the print gets taller. Once the tower is finished, you can compare the different sections to see which temperature gives the best balance of strength, detail, overhang quality, surface finish, and stringing.
Although you could print practically anything, like a vase or a pencil holder, and change the temperature as you go up, temperature towers have specific features that test the filament’s behavior at various temperatures.
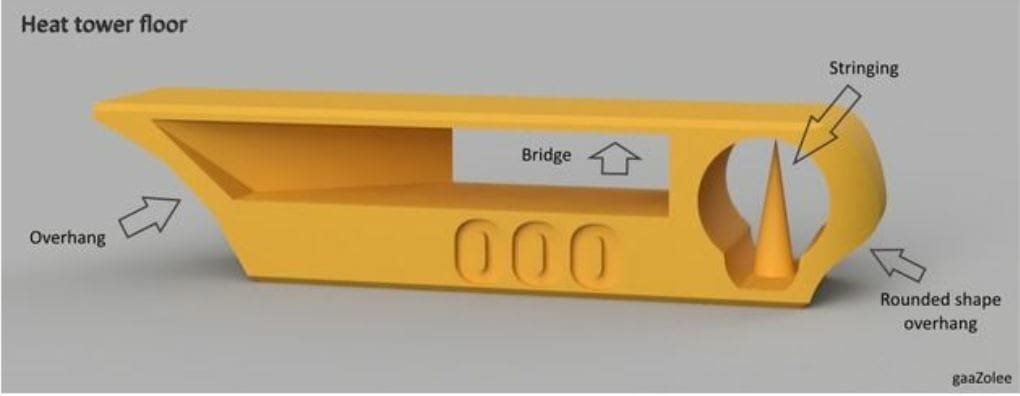
Most temperature towers include features such as:
- Bridges
- Overhangs
- Thin walls or pillars
- Small details
- Number labels
- Stringing tests
- Layer adhesion zones
Don’t print a temperature tower with supports. Turn supports off since one element of what you’re testing is how the material prints overhangs and bridges. Your slicer may throw up an alert over “long bridging extrusions” but ignore that and print the tower as is.
Some materials like PETG display various surface finishes depending on temperature, ranging from matte to glossy.
The goal isn’t always to find the prettiest section. The “best” temperature depends on what matters most for your print. Functional parts may need stronger layer bonding, while display pieces may benefit from cleaner details and less stringing.
Download a Temperature Tower Model
You can find a temperature tower STL or 3MF at any free model repository, such as Printables, MakerWorld, or Thingiverse. Some include presets for PLA, PETG, etc., but you’ll still need to manually change the temperature in your slicer as we describe below.
Before You Start

Use the filament manufacturer’s recommended temperature range as your guide. If the spool says 190-220 °C, your tower should test temperatures in or near that range.
A temperature tower doesn’t absolutely have to start with the hottest temperature, it can technically run in either direction, but it’s usually best to start at the hottest temperature and step down as the print rises. The hotter first layers improves bed adhesion and extrusion reliability, while the later sections still let you compare how the filament behaves at lower temperatures. Starting cool is possible, but it increases the risk of poor first-layer adhesion or under-extrusion before the tower is complete.
A good starting point is:
- PLA: 230-190 °C
- PETG: 250-220 °C
- ABS/ASA: 260-230 °C
- TPU: 240-210 °C
These ranges vary by brand, printer, hot end, nozzle, and speed, so always check the filament packaging first.
It’s also worth drying filament before testing, especially PETG, TPU, nylon, and other moisture-sensitive materials. Wet filament can cause stringing, bubbles, weak layers, and rough surfaces, which can make the tower results misleading.
Print the tower with the same settings you plan to use for real prints. Temperature depends on speed, cooling, layer height, nozzle size, and material flow.
Only change one major variable at a time. A temperature tower is for temperature. If you change retraction, cooling, and speed at the same time, it becomes harder to know what actually improved the print.
Write down the result. Once you find a good temperature, save it in your slicer filament profile so you don’t have to repeat the test later.
BambuStudio Temp Tower
Bambu Studio makes it relatively easy create a temperature tower. The workflow involves adding custom G-code at specific layers after slicing, but don’t worry, the slicer does most of the work. Bambu’s own filament profiles are often well optimized, but third-party filaments can still benefit from temperature testing.
First, download or import a temperature tower model. Choose a tower that matches the temperature range you want to test, or choose one with blank labels and make your own notes. Make sure the tower is printed with the same nozzle, build plate, and chamber conditions you normally use. This is especially important for high-speed printers, enclosed printers, and materials like ABS, ASA, and PC.
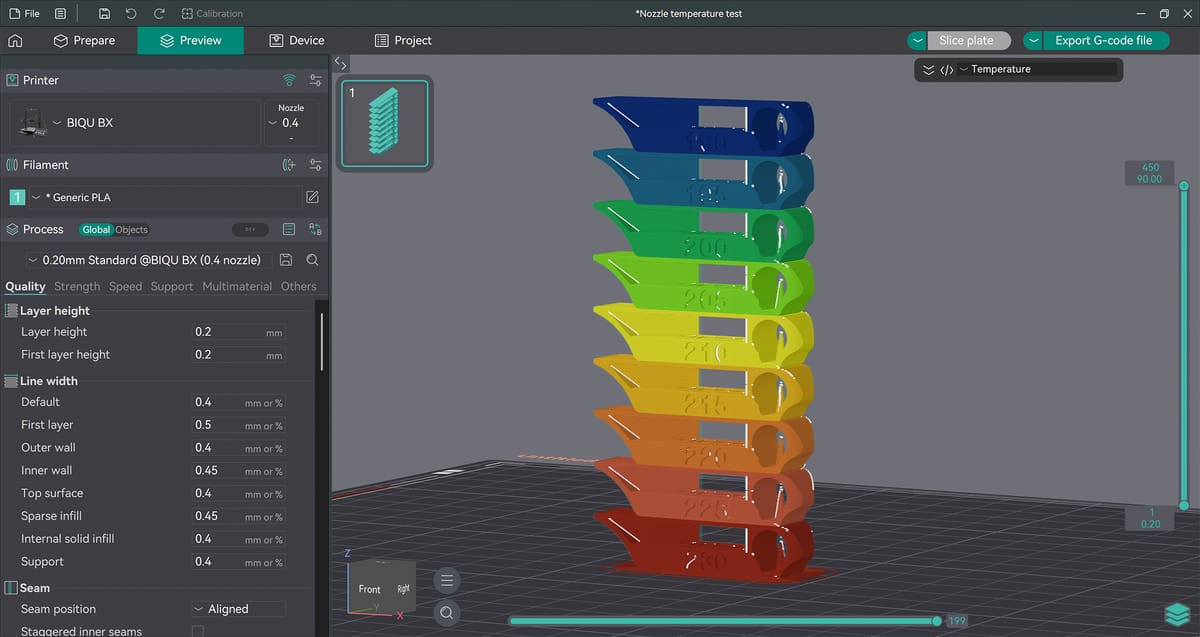
We chose a popular model by EleHazar 3DinPlastic from MakerWorld that features 55º and 45º overhangs.
- Open the model in Bambu Studio and select your printer, filament type, plate, and process profile. Our downloaded model already came with most of the perimeters set but you should adjust it to the kind of profile you plan to use for real prints.
- Set the filament’s initial nozzle temperature to the first section of the tower.
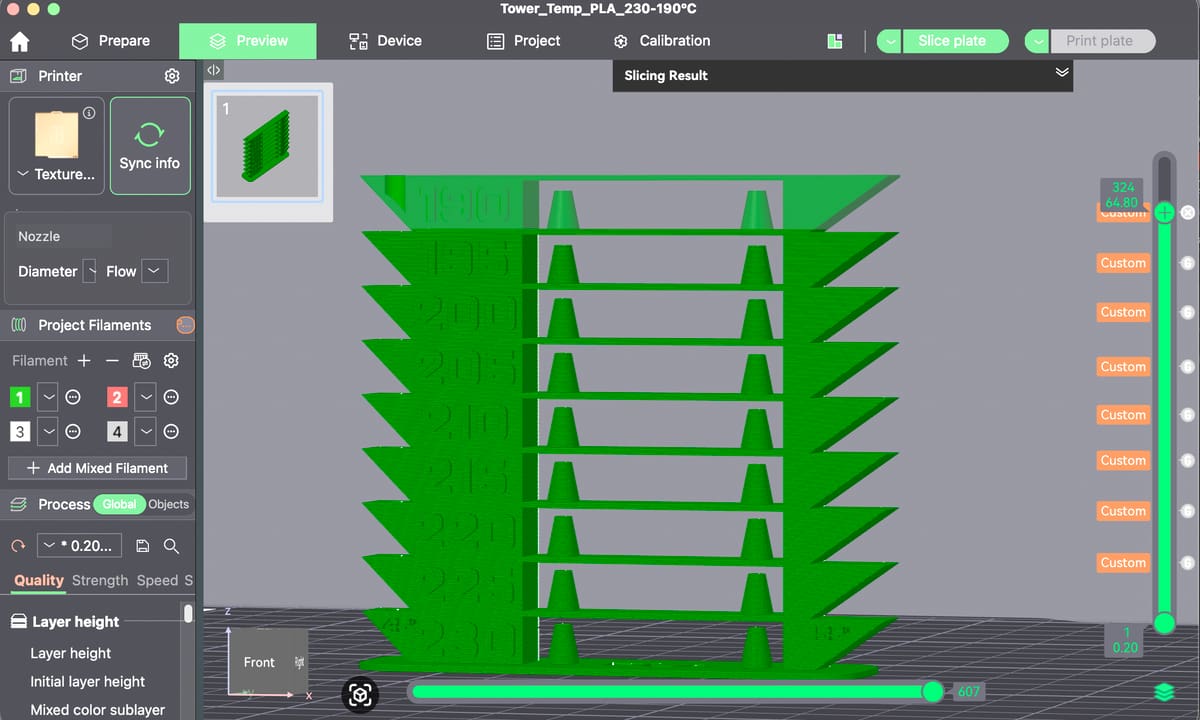
- Slice the plate and go to the preview.
- Use the layer slider on the right side of the screen to find the layer where the next temperature section begins.
- Right-click the layer marker or use the layer-specific menu to “Add Custom G-code.” Enter a nozzle temperature command to alter the temperature for the following section’s temperature down to be 225 ºC. The command to enter is “M104 S225”.
- Move the slider up to the next temperature section and repeat altering the G-code: “M104 S220”, “M104 S215”, etc.
- Print the plate as usual.
If you want the printer to wait until the nozzle reaches the new temperature before continuing, use M109 instead of M104. This may be the most accurate, but it does take longer. For most temperature towers, M104 is usually preferred because the printer keeps moving while the temperature changes gradually.
After your print is finished, determine which setting is best for your needs and create a custom print profile in your slicer for this filament.
Prusa Slicer Temp Tower
PrusaSlicer offers a lot of information about your print so it’s easy to create a predictable temperature tower. First, download or import a temperature tower model. Choose a tower that matches the temperature range you want to test, or choose one with blank labels and make your own notes. Make sure the tower is printed with the same nozzle, build plate, and chamber conditions you normally use. If you normally print PLA at 0.2-mm layer height and moderate speed, use those settings for the tower too. This is especially important for high-speed printers, enclosed printers, and materials like ABS, ASA, and PC.
- Import your temperature tower STL into PrusaSlicer.
- Select the printer, filament, and print profile you want to test.
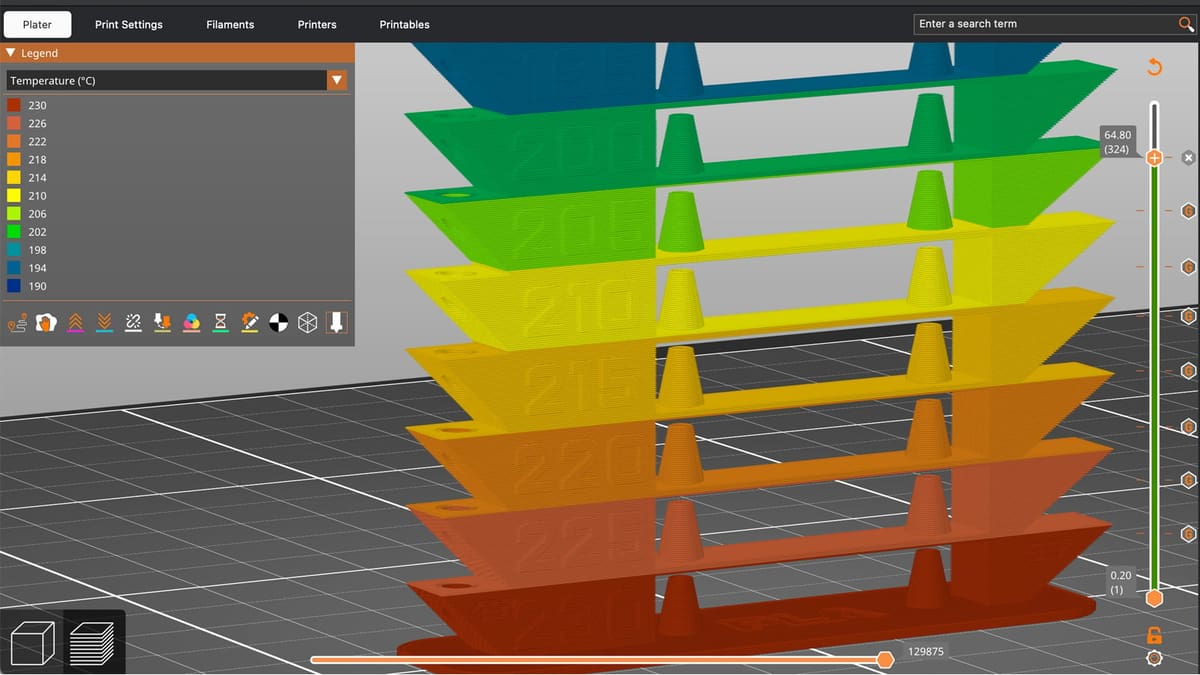
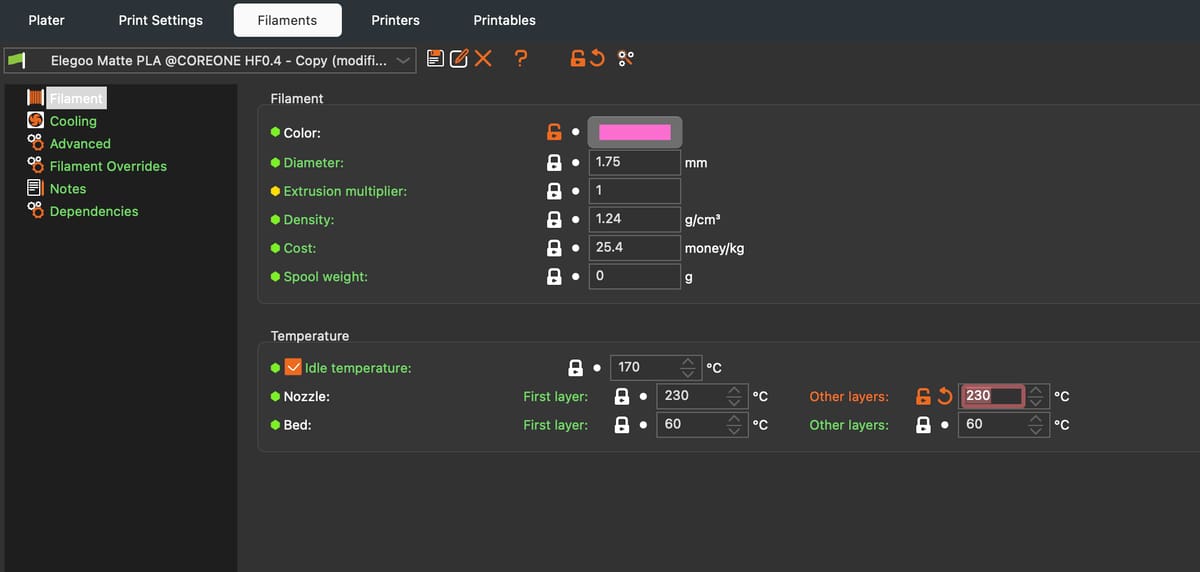
- Set the starting nozzle temperature in the filament settings. For a descending tower, this is usually the hottest temperature. For example, if you’re testing the Elegoo Matte PLA pictured above with a temperature range of 190 °C to 230 °C, set the filament temperature to 230 °C.
- Slice the model.
- Go to the Preview view. Use the vertical layer slider on the right side to move to the layer where the next temperature section begins, so right above the 230 ºC section. Then right-click the small plus icon on the layer slider and choose “Add custom G-code.”
- Enter a temperature “command” to alter the temperature for the following section’s temperature to be 220 ºC. The command to enter is “M104 S225”. This tells the printer to lower the nozzle temp to 220 ºC.
- Move the slider up to the next temperature section and repeat: “M104 S220”, “M104 S215”, etc.
- Export the G-code and print.
If you want the printer to wait until the nozzle reaches the new temperature before continuing, use M109 instead of M104. For most temperature towers, M104 is usually preferred because the printer keeps moving while the temperature changes gradually.
After your print is finished, determine which setting is best for your needs and create a custom print profile in your Prusa Slicer for this filament.
Orca Slicer Temp Tower
OrcaSlicer’s workflow for creating a temperature tower is very similar to other slicers. The process involves slicing the model first, then adding custom G-code at specific layers so the nozzle temperature changes as the print reaches each section of the tower.
OrcaSlicer’s built-in and community filament profiles are often a good starting point, but when ever you have new or third-party filaments, it’s still a benefit to run a proper temperature test.
First, download or import a temperature tower model. Choose one that matches the temperature range you want to test, or use a blank tower and make your own notes. Make sure the tower is printed with the same nozzle, build plate, enclosure, and general print conditions you normally use. This is especially important for high-speed printers, enclosed machines, and materials such as ABS, ASA, nylon, and PC.
Open the model in OrcaSlicer and select your printer, filament type, build plate, and process profile. If the downloaded tower already includes labels or section heights, check that the model matches the temperature steps you want to test. You should also adjust the print settings to match the kind of profile you plan to use for real prints.
- Set the filament’s starting nozzle temperature to the first section of the tower.
- Slice the plate and switch to the preview.
- Use the layer slider on the right side of the screen to find the layer where the next temperature section begins.
- Right-click the layer marker, or use the layer-specific menu, and choose “Add Custom G-code”.
- Enter a nozzle temperature command for the next section. For example, to change the nozzle temperature to 225 °C, enter: M104 S225
- Move the slider up to the next temperature section and repeat the process with the next value, such as: M104 S220, M104 S215, etc.
- Once all temperature changes have been added, send the file to your printer or export the G-code as usual.
If you want the printer to wait until the nozzle reaches the new temperature before continuing, use M109 instead of M104. For most temperature towers, M104 is usually preferred because the printer keeps moving while the nozzle temperature changes gradually, which better matches how temperature transitions happen during a real print.
After the print is finished, compare each section of the tower. Look for surface quality, stringing, overhang performance, bridging, sharp corners, layer adhesion, and any signs of under- or over-extrusion. Once you find the best-looking section, use that temperature to create or update a custom filament profile in OrcaSlicer.
For OrcaSlicer, there are a few extra points to keep in mind:
- Avoid changing too many other variables at once. Leave speed, cooling, flow, pressure advance, and retraction alone unless you’re specifically testing them.
- Make sure the temperature changes are added after slicing in the preview, not just by changing the filament profile.
- Check that the custom G-code markers appear at the correct layers before exporting or printing.
Cura Slicer Temp Tower
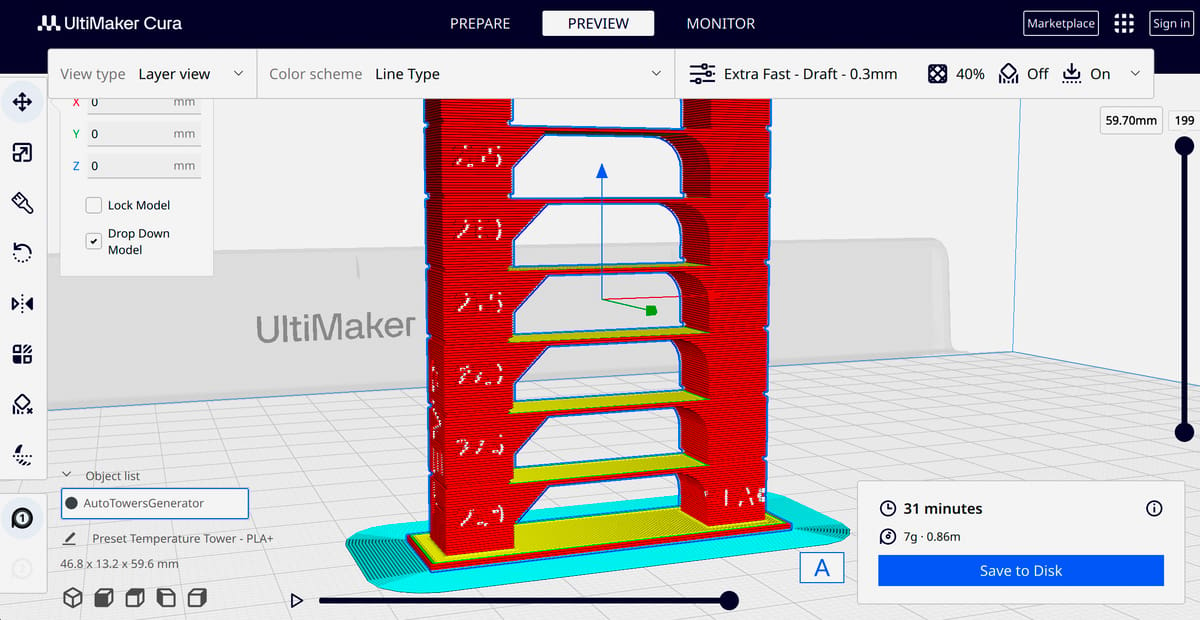
Cura users have a handy plug-in option to generate a temperature tower without even having to import an SLT. The AutoTowers plug-in method is the easiest because the temperature changes are handled automatically. It also reduces the chance of accidentally placing a temperature change at the wrong layer.
There is, technically, a manual Cura setup to change temperatures in a model but it’s so cumbersome, we don’t even recommend trying it.
Cura AutoTowers Plug-in
- Open Cura and go to the Marketplace. Search for “AutoTowers Generator”, install the plug-in, and restart Cura.
- Once installed, go to Extensions > Auto Towers and select “Temp Tower”.
- Chose a filament type preset for your temperature tower and Cura will generate the tower and automatically apply the temperature changes for each section.
Before slicing, check the plug-in’s settings. Depending on the tower, you may be able to adjust the material, start temperature, end temperature, and temperature step. Make sure the range matches your filament.
How to Read the Results
Once the tower is finished, inspect each temperature section carefully. Don’t just pick the cleanest-looking number at a glance. Look at strength, surface quality, overhangs, bridges, stringing, and layer bonding.
Layer Adhesion
Try flexing or breaking the tower by hand. Lower temperatures may look cleaner, but they can also produce weaker layer bonding. If a section snaps too easily between layers, the temperature is probably too low for strong parts.
For functional prints, layer adhesion is often more important than a perfectly smooth surface.
Detail Resolution
Look at small text, corners, points, and thin features. Higher temperatures can soften details and cause blobs, while lower temperatures can make corners sharper.
If the tower includes embossed or raised numbers, use them to compare detail quality.
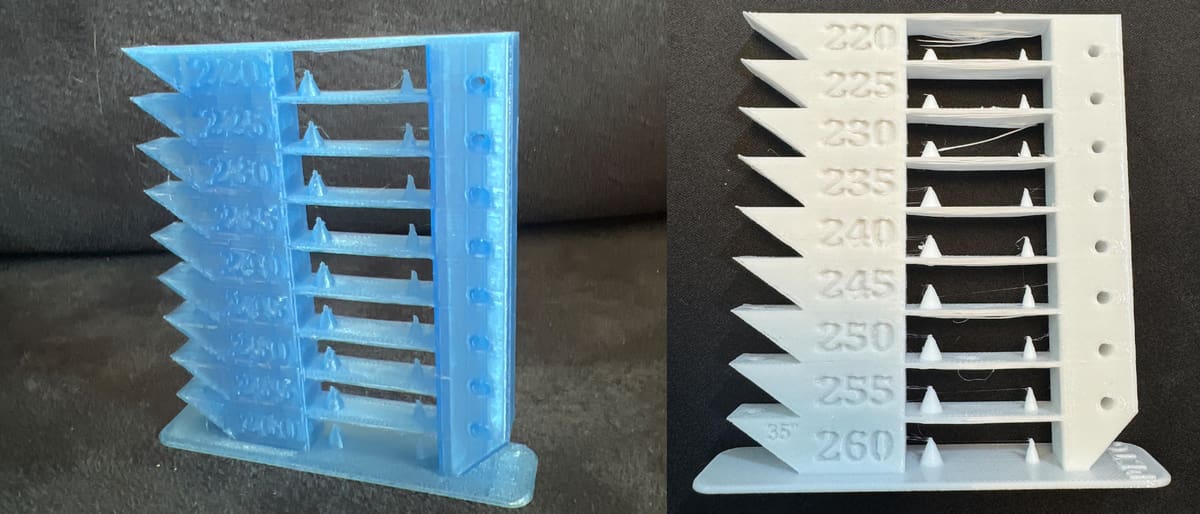
Stringing
Look between small towers, pillars, gaps, and open sections. Fine hairs or strands usually mean the nozzle is too hot, the filament is wet, or retraction needs tuning.
If stringing improves at lower temperatures without hurting strength too much, the lower temperature may be a better choice. For PETG and other string-prone materials, don’t choose a temperature only because it has the least stringing. If it’s too low, the part may become brittle or weak. It’s often better to choose a slightly warmer temperature and then tune retraction, cooling, and drying separately.
Bridging & Overhangs
Check the bridges and angled overhangs. If the underside sags badly, the temperature may be too high, cooling may be too low, or the print speed may not suit the material.
Lower temperatures often improve bridges, but going too low can cause weak extrusion or poor layer bonding.
Surface Quality
Examine each section for roughness, blobs, zits, gaps, dull patches, or inconsistent extrusion. A glossy or overly soft-looking surface can indicate excessive temperature, while rough or under-extruded sections can indicate the temperature is too low.
Dimensional Accuracy
Measure the tower if dimensional accuracy is important. Temperature can affect how cleanly corners form and how much material spreads after extrusion. This can matter for mechanical parts, snap fits, and tolerances.
License: The text of "Why You Should Print a Temperature Tower & How-To in Bambu Studio, Prusa Slicer & OrcaSlicer" by All3DP is licensed under a Creative Commons Attribution 4.0 International License.