In a few words, printing hollow objects can be boiled down to using 0% infill in your printing settings. However, depending on the printing method, the print settings, or the design method, there’s often more to be considered when printing hollow objects.
For example, a model can already be designed hollow, in which case printing at 100% infill would just mean having solid walls. Or a model can be designed solid, and using 0% infill and a certain wall thickness could achieve a very similar result.
Naturally, printing hollow objects can save on material or printing time, for example when printing models like figurines that don’t need to be strong. It can also be useful for achieving a certain translucence so that when LED lights are put inside, it shines. And it can even be necessary when you need your design to be lightweight or when you want it to float–because a hollow object will float more easily than a solid one.
There are many ways to play with hollow printing: You can design a hollow object and print it as is, you can design a solid object and print it hollow, or you can design a solid object and use patterns to reduce its mass. Additionally, the techniques also depend on the printing technology used: FDM or SLA.
In this article, we’ll cover all these possibilities, but before we do, let’s go over a few aspects of printing hollow designs.
Considerations
Beyond print settings, there are other aspects to consider in your design before, after, and during the printing process.
Resin vs FDM
When printing with resin (including such methods as SLA or DLP), printing hollow objects is the norm. Meanwhile, in FDM it’s more common to see variations between some percentage of infill and printing the design completely hollow.
Design for resin
During the printing process for resin 3D printing, the print bed is submerged in the liquid resin and thus, as the model prints, the liquid resin can become trapped inside. A good practice is to add drainage holes to allow the uncured resin a means of escaping and to avoid a difference in pressure between the inside and outside of the print.
Design limitations
The infill can serve as internal support, so having an infill helps certain curves, such as overhangs, happen further down the printing process without hassle. Printing certain shapes or angles can be complicated when printing hollow objects and it may hinder surface finish quality or even affect which shapes are possible to make. A good strategy can be to rotate the model to find an angle that works. For this, think of infill as support and imagine whether that model would need supports for different parts. If the answer is yes, no matter how you rotate the design, printing hollow may not be the best choice. For example, with an incremental curve like an arch, you wouldn’t need supports (infill), except in wide arches where supports become necessary, where it essentially becomes a bridging problem. In a similar manner, in drastic changes like the top wall of a cube, a lack of infill would result in poor bridging.
Shell thickness
In line with the previous point, having a hollow object with a thin shell can also contribute to a bad surface finish, it can affect the shape, and it may make parts appear disconnected, so in some cases, you may have to either increase the wall thickness or use a low-density infill to be able to unite disconnected parts.
Strength
The strength of your model depends on both the infill density and wall thickness, which makes certain objects unsuited for hollow printing. Similarly, if you print an object with 0% infill, it can be good to consider thickening the shell to increase its endurance.
Before we look at the specific settings in the slicers, let’s take a look at different ways of achieving hollow designs.
Design Methods
Printing hollow objects goes beyond simply setting a print at 0% infill. The process actually starts even before, when designing. The two go hand in hand and depending on how you design the object, it can affect how you print it–and depending on how you plan to print, your design can be affected.
Method 1: Solid Model–Hollow Settings
Instead of taking the time to model a hollow object, you can model a solid object and make it hollow–simply using the printing settings in your slicer. This method can be used for figurines or other models downloaded from repositories, but you can also keep this process in mind when designing your own models.
For example, if you’re designing a vase with this method, the design would be completely solid, but the real changes happen in the printing settings. You can remove the top layers, use 0% infill, and set it to have a thick shell. This is a good example of how hollow printing can influence the design process and actually save you time in designing.
A vase is a special case because you don’t have an upper structure to close, but you can still apply this method to other shapes, such as action figures, without removing the top part. In such cases, you simply set the infill to 0%, so long as the overhangs are incremental and you have a thick enough shell to support the subsequent layers.
Method 2: Hollow Model–Solid Settings
In contrast with the first method, you can also take the time to make the design hollow, meaning you can have a thicker wall, and in your printer settings, the infill percentage will refer to the infill inside those walls, in which case it should be greater than 0%. This object is also a hollow object, although the print is technically not a hollow print.
Note that having a solid shell, in which all lines are parallel to each other, as opposed to having walls with infill inside, will change the mechanical properties of your print (yield strength, torsion resistance, axial resistance, flection resistance, etc.) because how the material deforms when submitted to stress will depend on the geometry and on the union forces between layers.
Method 3: Patterned Walls–Solid Settings
In architecture history, they teach you that old buildings were mostly walls with very small windows, and this was the technique used to keep buildings (mainly churches) upright. Then they realized that columns supported loads just as effectively, and walls were able to become more decorative.
Something similar can be applied when designing for 3D printing. When using, for example, a beehive infill pattern, these lines can be considered girt and purlins of the structure, however, the outer wall is still attached to these and it’s still solid.
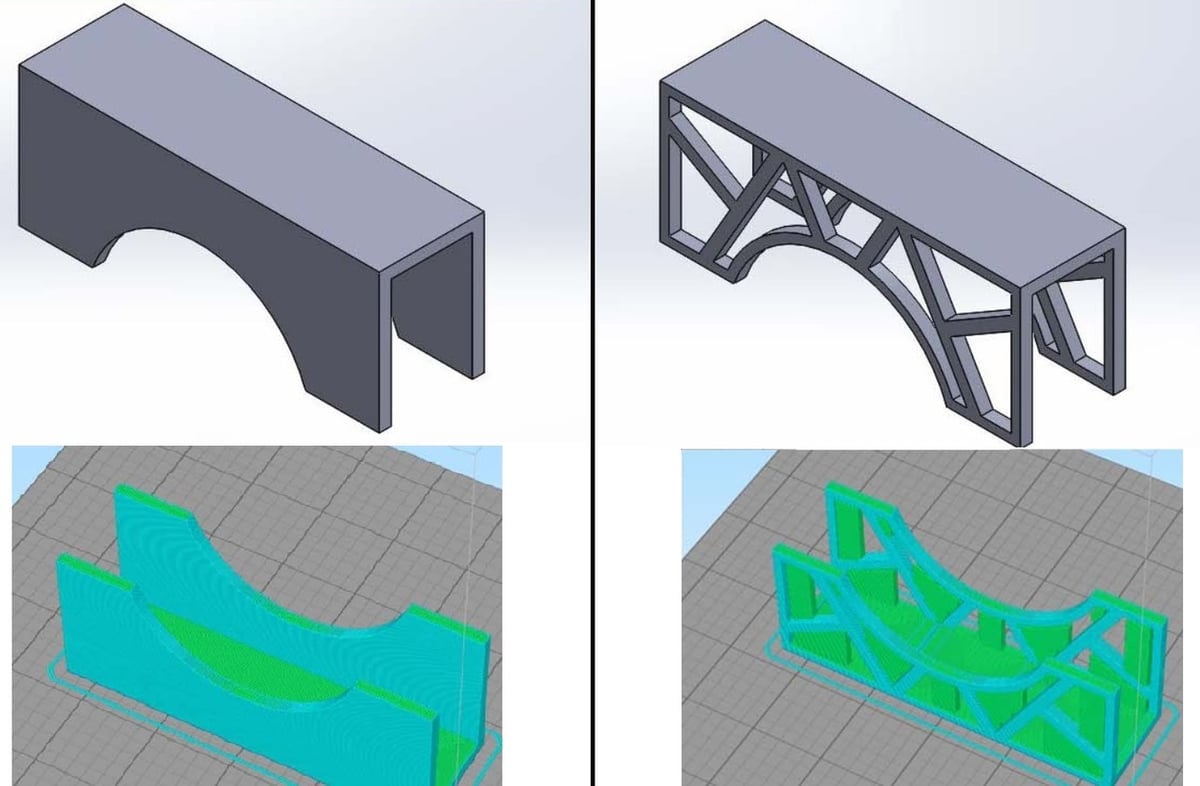
A different design method is to purposefully design walls with structural elements in mind, similar to what you see in bridges. This way, the printing settings are technically not hollow, but the design is, and it can have amazing advantages in the performance of the geometry and the material. It can reduce vibrations in a model and increase the maximum load it can hold, among other things. While you could use this method for action figures, for example, doing so would render the character unrecognizable; however, it can be done with vases, boxes, spheres, and any other decorative or structural print.
Next, we’ll focus on the recommended workflow for printing hollow objects using different slicer programs and with regard to the two printing methods, FDM and resin printing.
FDM Settings
In case you’re not very familiar, FDM stands for Fused Deposition Modeling, which, in general terms, means partially melting a plastic (usually a spool of filament), making it more malleable, and depositing this soft material in a specific position, layer by layer, to create a volume. Because the material is partially melted, the layers adhere to one another without adhesives.
We’ll be focusing on Cura and Simplify3D, as they are two of the most popular slicers out there, but if you have a different program, the settings shouldn’t differ too much.
Cura
There are a few options when it comes to Cura, depending on your design and how much you want to tinker with the print settings.
Standard Settings
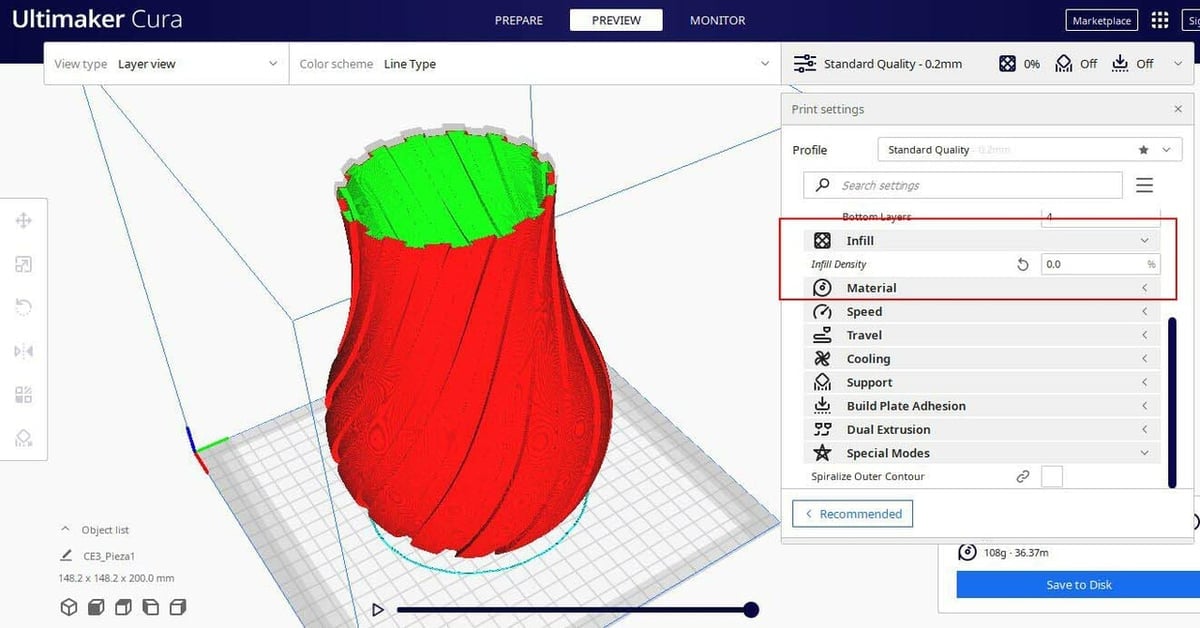
When you first open Cura, on the right, you’ll see the recommended Print settings. The easiest way to print a hollow object would be to slide the infill setting to 0%. However, there are additional parameters you can set up, such as outer shell thickness, supports, and brims, and to access these, you must click on “Custom” on the print settings.
Custom Settings
- Among the custom settings options, you can find a category called “Walls”. There, you can define the wall thickness in mm. This value will automatically be rounded to the nearest multiple of the outer wall line width (found under the “Quality” category), which will become the number of lines deposited.
- Alternatively, you can directly set the number of lines with Wall Line Count, which overrides the Wall Thickness setting.
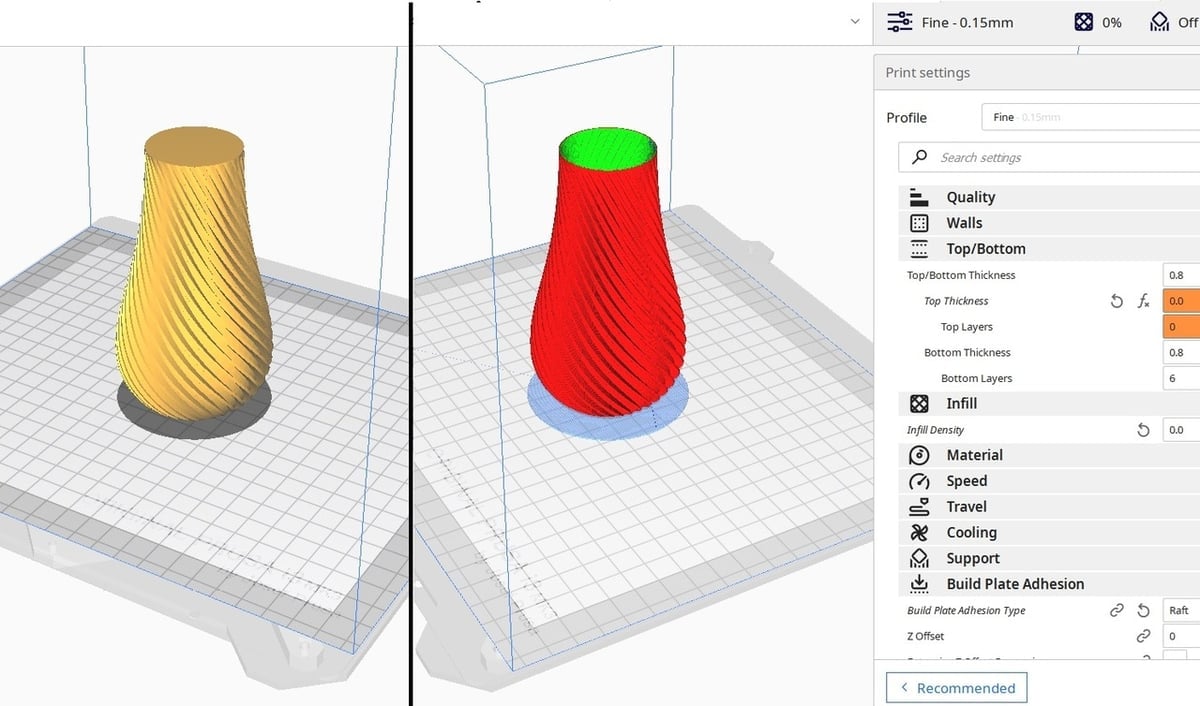
- The next category is “Top/Bottom”, and you can set the thickness of the top and bottom layers with the same method as above.
- In the case of the vase, for Top Layers, the value would be 0. This would differ depending on the model – such as a figurine or a design that requires a closed top.
- Finally, in the category called “Infill”, you would set it to 0%.
You can save these print settings by clicking on the “Profile” dropdown menu. Here, you’ll see a display of the various profile options. Next, select “Create profile from current settings/overrides”, which will create a print set up with the current settings.
Cura (Alternative Method)

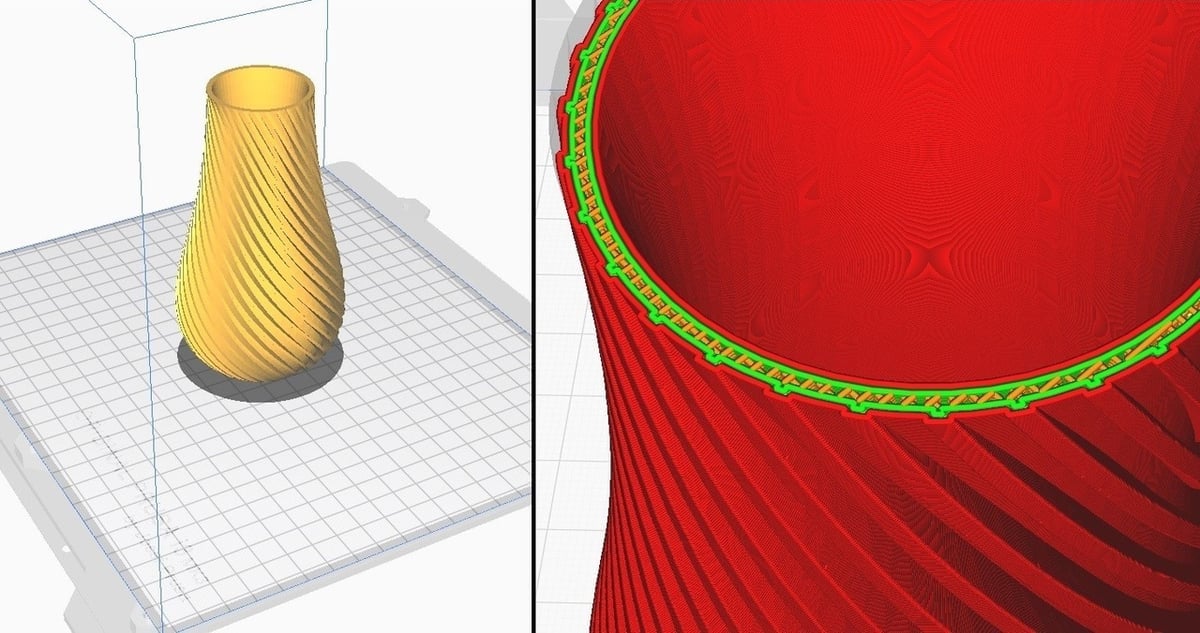
This procedure consists of using Cura’s “vase mode” tool. While vase mode is (of course) great for printing vases, it can also be useful for sculptures, rockets, or containers.
Note that “vase mode” is just the popular name used by the community (because it works particularly well for vases). In Cura, it’s not called as such. The settings we are looking for are actually called “Spiralize Outer Contour” and “Smooth Spiralized Contour”.
What this method does, and what makes it different from the previous one, is that it overrides all other settings regarding print thickness and such. It creates a hollow object with no infill and only one line of shell thickness. This last characteristic is something you especially have to consider if you want to print, for example, a vase. Depending on what you’ll be putting inside, if you use this setting the result may not be strong enough for what you want.
On a similar note, you also have to consider the geometry of your model, as some shapes may not be suited for this mode of work, which is mostly just used for vases, as their geometry tends to have curves that increment very slowly.
To enable this setting:
- Load your model into Cura.
- Open the Custom print settings.
- Select “Special Modes” and a menu will drop down.
- Special mode options don’t show by default, so if it’s the first time you use them, you’ll first have to enable them on the “Setting Visibility” menu.
- Open the complete list of settings and enable it along with the options “Spiralize Outer Contour” and “Smooth Spiralized Contour”. The complete list of settings can be accessed by hovering on the Special Modes section name, and a toggle menu icon will appear. Select it and the Preferences window of the settings will open.
- Now the options will appear in the menu, but they are not yet selected.
- Enable the “Spiralize Outer Contour” and “Smooth Spiralized Contour” options.
- Slice the model and you’re ready for 3D printing it! It’s that simple.
Simplify3D
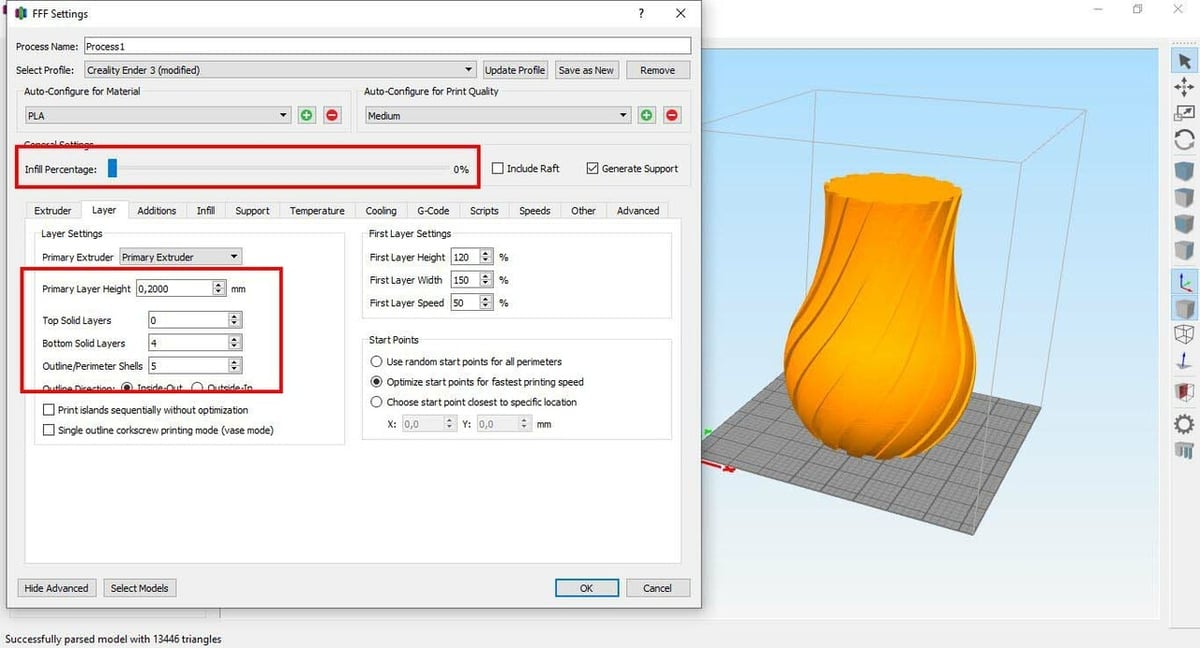
Similar to Cura, when using Simplify3D all you have to do is set the infill to zero and set up the wall thickness to what you’d prefer.
- Go to the processes window and double-click your process.
- If you’re in the default printing settings, simply slide the infill bar to zero, and that’s all you’d be able to do there.
- To customize your print settings even more, though, you can click on “Show Advanced” and going to the “Layer” tab, you can change the number of top solid layers, bottom solid layers, and the shell.
- To calculate your layers in mm, use the method already explained in the first method.
Resin Settings
As mentioned before, hollowing out resin prints is the norm. This is because it prevents liquid resin from accumulating inside the print, which in turn saves money because hollow printing greatly reduces how much material (resin can be quite expensive) is used.
Similar to FDM, in the following sections we recommend a workflow for resin slicing in two popular slicer programs, ChiTuBox and Lychee Slicer.
ChiTuBox
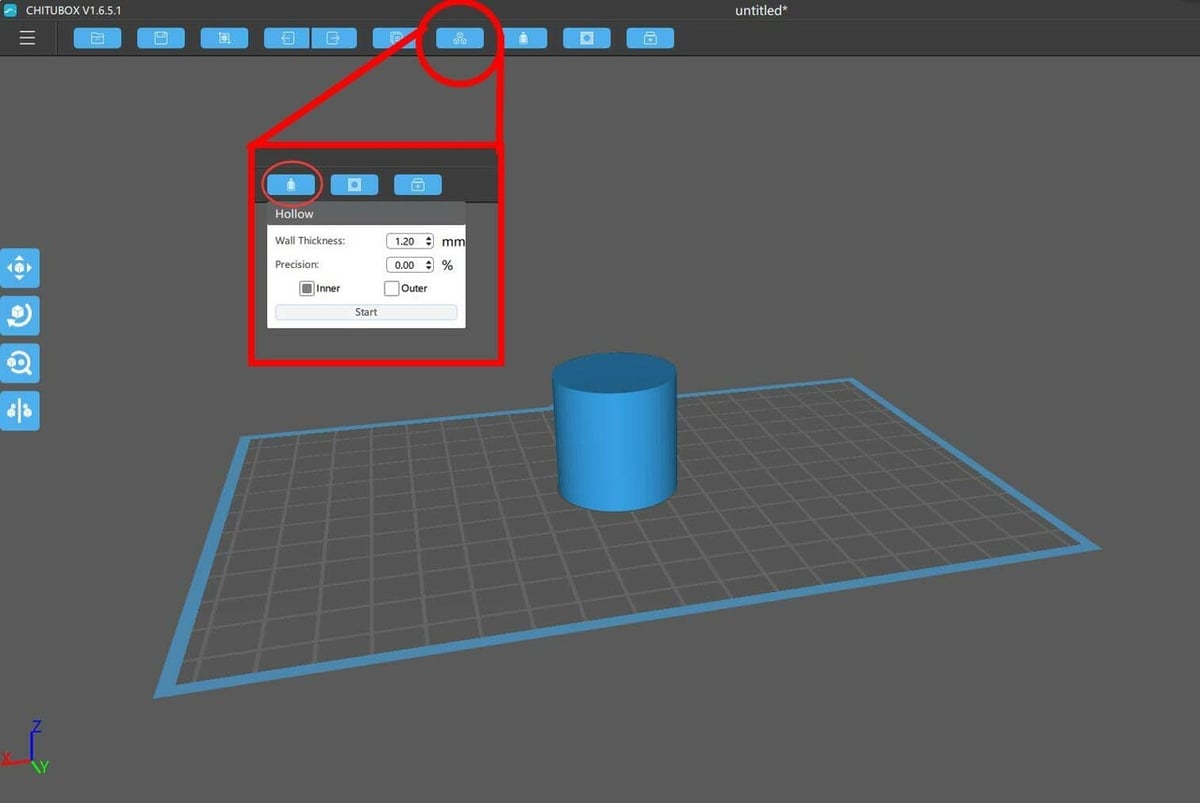
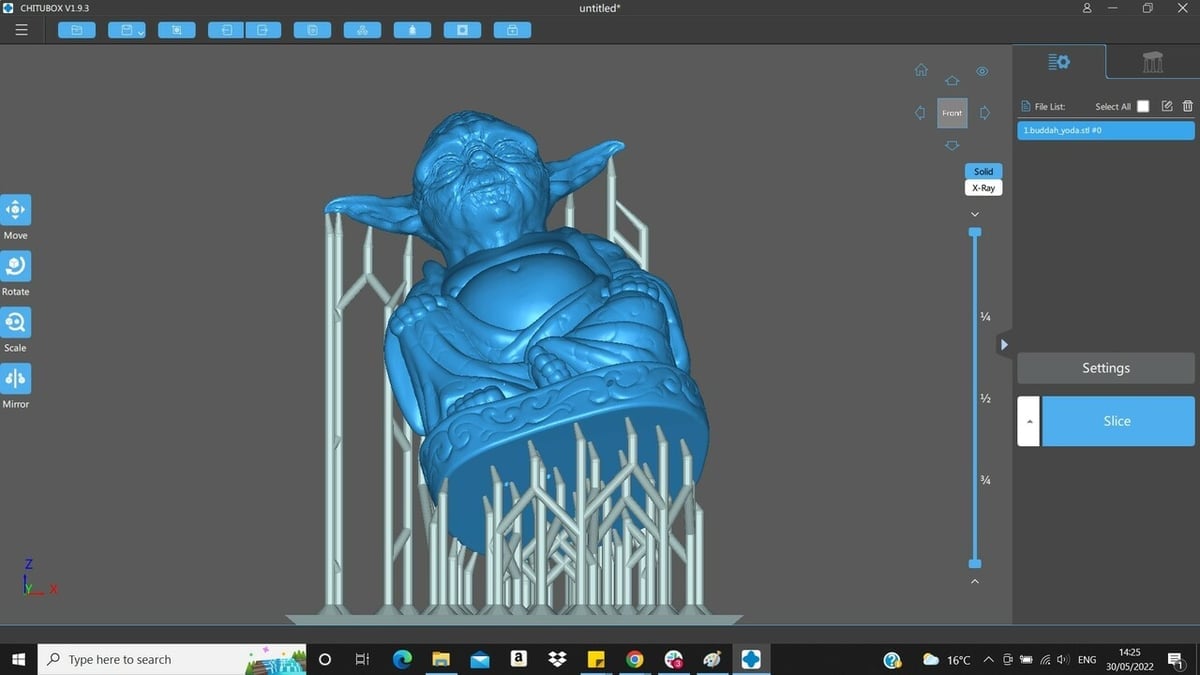
In ChiTuBox Basic, the process for hollowing out a model is even easier.
- ChiTuBox has an option on the top tool menu to hollow out models. It’s the 3rd option from right to left.
- Here, contrary to the previous methods, you directly set up how thick you want the walls to be in millimeters. If you intend to scale your model up or down, do it before setting the walls, as the allowed or necessary thickness of the walls will change once you scale it.
- You also have the option to run the hollow tool multiple times. For example, you can create an object with a shell 20 mm thick and then run the hollow tool again to make this object have two walls of 5 mm each.
- The precision percentage defines how similar your model will be to the original. The higher the precision, the smoother edges and curves will be.
- Additionally, you can export your hollowed object as an STL instead of as G-code, for later use.
Lychee Slicer
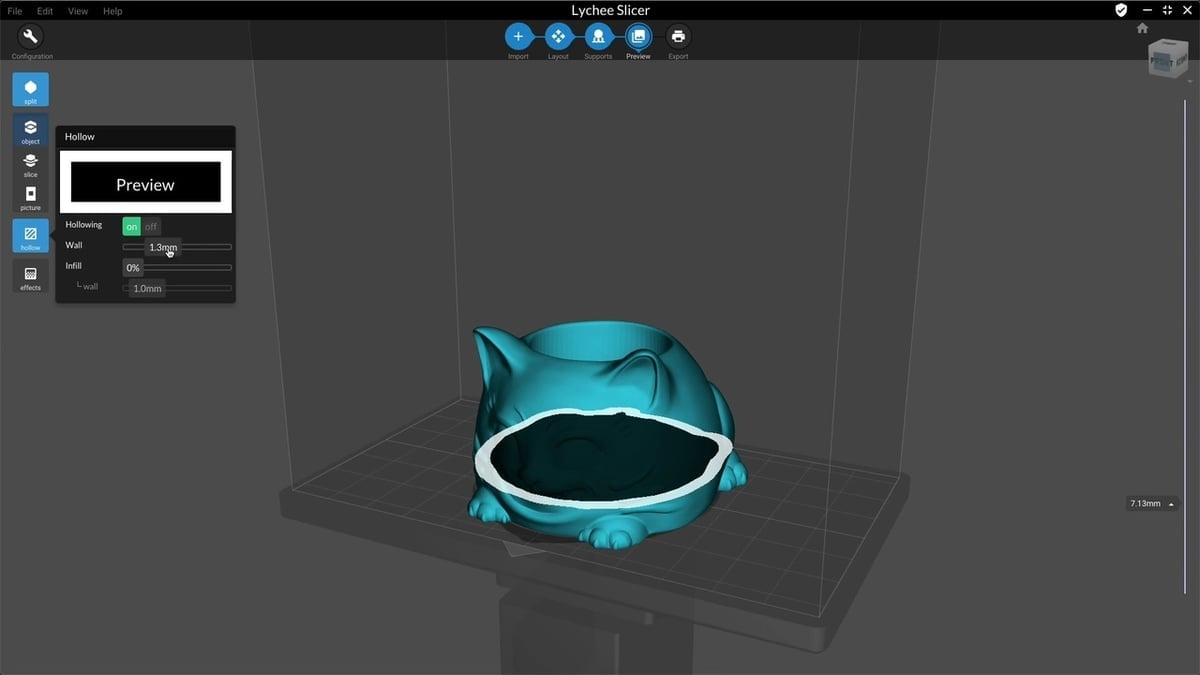
As an alternative to ChiTuBox, here’s how to hollow the designs if you’re using Lychee Slicer.
- After loading the model, on the left side of the screen, you’ll find the tool menu. The 4th tool from the top is the Hollow tool. There are two options: hollow 2D and 3D.
- Hollow 2D is like setting up an FDM printer, meaning that to get a hollow object you simply set the infill to zero, and select a thickness, which, in this case, is also given in millimeters.
- Hollow 3D works similarly to ChiTuBox, where you have to indicate the wall thickness and precision for smoothness.
And that’s it!
License: The text of "How to 3D Print Hollow Objects – Simply Explained" by All3DP is licensed under a Creative Commons Attribution 4.0 International License.