
Fusion 360: Import STL – 3 Easy Steps

Importing and converting STL files to CAD isn't always easy. Follow this tutorial to learn the fastest way in Fusion 360 to import STL files.
The STL file format is an old acquaintance to 3D modelers and 3D printer users alike. It’s informally considered the standard format for 3D printing, and it’s found on all the popular 3D printing model repositories.
The thing about an STL file is that it only contains information about the three-dimensional surface of a model. Once converted to this format, 3D models effectively lose any information related to dimensional units, color, and texture. This makes it much harder to go back to a CAD-friendly format.
However, there are a few ways to import and edit an STL file, and Autodesk’s Fusion 360 has a rather uncomplicated process to do it. Fusion 360 is one of the most popular CAD tools available, especially since it offers free versions for hobbyists, home users, students, and educators.
In this article, we’ll cover all the aspects related to importing an STL file to Fusion 360. First, let’s understand why this is sometimes needed.
A Few Good Reasons

There are many reasons why you might want to import STL files to a CAD program. First and foremost are customization and personalization.
While there are millions of STL models available online, it’s rather uncommon to find the exact model that perfectly suits your needs. This is especially true for functional models, as some adjustments are often required to make them work with a particular environment.
Although some 3D slicers offer basic tools like resizing, most model adjustments require 3D modeling software. For more complex changes and personalization, such as adding text or logos, a 3D modeling tool is the only way to make changes to your STL.

Another major reason for wanting to import an STL to a CAD program is reverse engineering. Most photogrammetry apps and 3D scanners output the captured data in a point cloud, which in turn is converted to a 3D mesh representation.
Since CAD is usually required for post-processing, not to mention closely examining the scanned models and repairing any errors, correctly importing and converting these files to CAD is crucial for reverse engineering.
No matter why you want to do it, there are a couple of different ways of importing an STL file into Fusion 360. Below, we’ll go through the three main steps of inserting a mesh directly onto a design. We’ll assume that you have a basic knowledge of Fusion 360’s UI and tools, but if you need a refresher, check out Fusion 360 Designing: How to Get Started Modeling.
Step 1: Inserting a Mesh

The Mesh workspace offers some excellent tools for repairing and processing mesh. In fact, these will come in handy for converting the STL to a solid body, as we’ll see in the next section. First, however, you’ll need to insert a mesh:
- Create a new design or open a design that’s in progress (you can add an STL model to an existing design).
- Go to the “Mesh” workspace on the top toolbar.
- Click on the first icon from the left, “Insert Mesh”.
- Select the STL file and click “Open”. The model will be loaded into the workspace with the position manipulators already active.
- Place the model as desired.
- In the “Insert Mesh” window, make sure that the unit type is set correctly and click “OK”.
Alternatively, you can click “Insert” on the toolbar, then select “Insert Mesh” from the menu.
While this should be enough for those who plan to modify a model with Fusion’s Mesh workspace, sometimes more complex transformations of the model are needed. The further steps for conversion to a CAD format (solid) will be covered in the next sections.
Step 2: Reduce the File

Converting the mesh body into a solid will allow you to use the many additional tools and features of Fusion’s Design workspace.
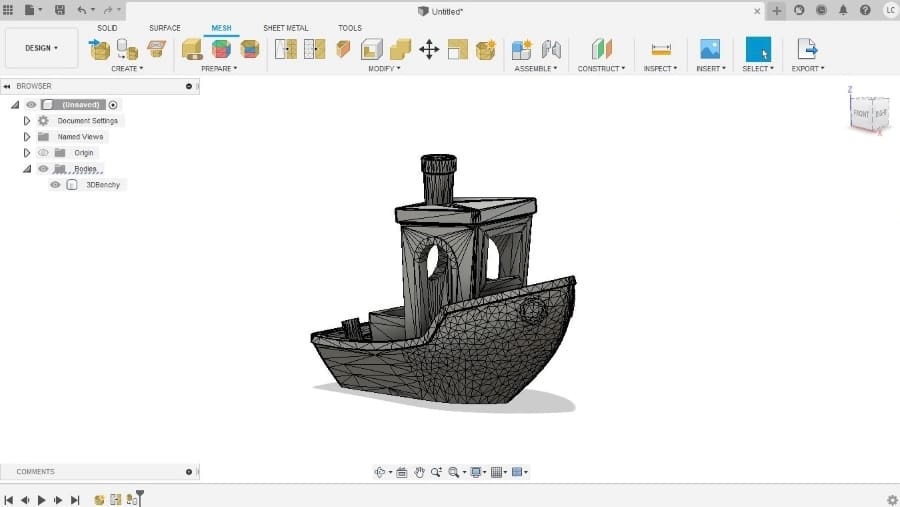
Fusion 360 has one of the easiest methods – the BRep conversion – to do this conversion, and it’s quite a straightforward method for models with less than 10,000 facets. (As a reference point, our good friend 3D Benchy has 225,154 facets.) For very simple models, you can skip ahead to the solid conversion instructions below (Step 3).
If you have a large file (more than 10,000 facets), you’ll be better off reducing the number of facets prior to the conversion. Note that some of the small details might be lost, since this is a simplification of the surface. In most cases, however, the amount of information lost is minimal.
While this simplification process can be done in other software, such as Meshmixer, it can also be easily done in Fusion 360. Here are the steps:
- While in the Mesh workspace, go to the “Reduce” tool (under “Modify”) and make sure to select the entire mesh body.
- Enter a value for the “Proportion” parameter. It defines the percentage of the original number of facets to include in the new mesh. For our Benchy example, we’ll use the value of 4, which will bring the facet count below 10,000.
- Click “OK”. The model should be reloaded with fewer facets.
- If you need to reduce it further, you can simply repeat steps 2-5 or edit the “Reduce” feature recorded in the Design History timeline.
Step 3: Convert a Mesh to a Solid

Now, let’s get onto the last step: the conversion to solid.
While still in the Mesh workspace, do the following:
- Click on “Modify”, then select the “Convert Mesh” tool from the drop-down menu.
- Select the mesh body.
- Keep the “Operation” parameter as “Parametric” and the “Method” as “Faceted”.
- Click “OK” to start the conversion.
That’s it! You should have your mesh body fully converted to a solid.
Note that the Design History is still enabled and has recorded every operation. You can edit each performed feature (reduce, convert mesh) by right-clicking on the icon and selecting “Edit Feature”.
Good as New
Fusion 360 sometimes emits a warning that the conversion might result in slow performance. Although it explicitly says that the conversion is not recommended, it’s unlikely to break anything if the program still allows the conversion to take place. It might just require some (or a lot of) patience.
In some cases, the conversion creates a solid model that’s larger than the original mesh model. This is understandable due to the fact that the STL format doesn’t carry any dimensional unit information. After conversion, be sure to check if the model is the appropriate size. If not, simply scale it by clicking “Modify” on the toolbar, then selecting “Scale”.
Finally, if the model has the appropriate number of facets, the new solid body will be created in the Bodies folder. Now, you’re free to edit away! Should you need more help, there are some handy video tutorials available online, including videos from Product Design Online and thehardwareguy.
License: The text of "Fusion 360: Import STL – 3 Easy Steps" by All3DP is licensed under a Creative Commons Attribution 4.0 International License.