G-code is the programming language used to instruct machines like 3D printers and CNC machines to follow commands. G-code uses individual commands with a starting letter such as ‘G’ or ‘M’, followed by a number to specify the command and value.
Commands can also be formed with a series of these combinations to account for multiple axes. As a simple example of G-code, “G0 X15” will move the printer’s X-axis 15 mm in the positive direction.
Slicers are another element in 3D printing, used to turn a 3D model file (STL, OBJ, 3MF, etc.) into a G-code script. While you may download a 3D model in the STL format, for a 3D printer to print it, a slicer has to convert your file into a G-code script.
Start and end G-code are the sets of instructions a 3D printer follows before and after every print. Unlike the G-code for the actual printing of a model, start and end G-code scripts stay the same for every print unless you change them.
Typically, slicers come with pre-set basic start and end G-code scripts that are designed to work with most printers. Usually, the start script ensures that the hot end and bed are the correct temperatures, and the printer homes all axes before printing. It might even include a test line to prime the hot end and extruder. The end script cools down the hot end to prevent heat creep after the print finishes and turns off the motors and other components used for printing.
Now that you know the basics, we’ll go over why you might want to tweak your start and end G-code, how to do it, and what changes you may want to make.
Why Change It?
Your slicer probably has a default start and end G-code script around the parameters you initially plugged into the slicer (bed dimensions, offsets, etc.) to work with your printer. These default scripts are pretty basic and universal so that most 3D printers can follow them with ease.
Although the default script may not be bad, you may want to change it to add special scripts like:
- Adding a Z-axis probe for automatic bed leveling
- Printing a test priming line to prime your extruder
- Alert noises (for example, a loud beep or chirp when a print finishes)
- Cooling down your printer after it finishes
- Auto-part-removal sequence
If your printer doesn’t have an onboard memory (EEPROM), you also may need to use your start G-code script to remind your printer to follow certain parameters. These prompts might tell the printer to incorporate settings into the printing process such as Z offsets, probing offsets, PID tunings, and more.
Making Changes
To change your start and end G-code scripts, you’ll have to use your slicer. In this section, we’ll go over how to do this in Cura. However, if you use other slicers, this process should be very similar.
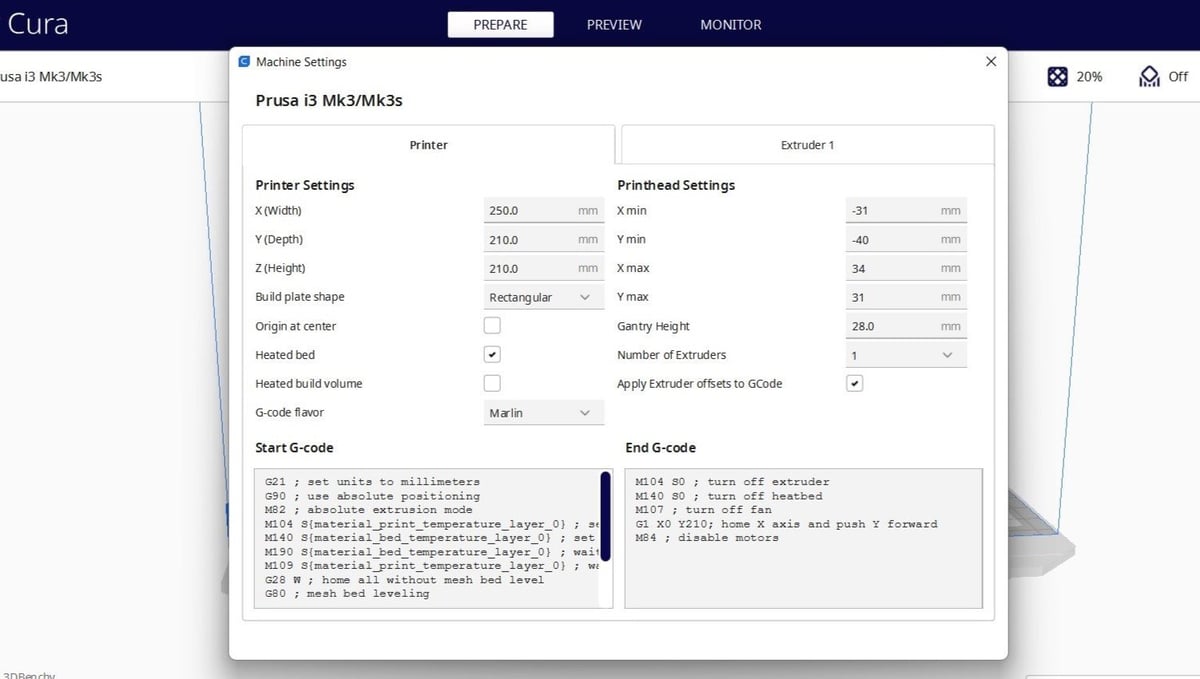
- Open Cura (or your slicer of choice) and navigate to your machine settings by clicking the “Settings” tab.
- After opening up the settings bar, click “Printer”, and then “Manage Printers”.
- Click “Machine Settings”, and you’ll see the start and end G-code scripts in the two boxes on the bottom of the pop-up screen.
- Edit these G-code scrips to whatever you like by copy-pasting existing scripts or writing your own.
- Once you’re done editing your scripts, click out of the text box to save your new start and end G-code scripts.
You can always refer to our guide to G-code commands to find what you want to adjust.
Common Commands

Below we’ve listed some common commands (not entire scripts) and what they do. We’ve used the symbol “[x]” in places where you’ll need to use a custom value for your machine (e.g. bed size, offset, etc.).
- G92 E0: Resets the extruder and prepares the printer for a new print. We recommend using this in your start G-code script.
- G28: Homes all axis; this puts your printer into its home position.
- G1 X[x] Y[x] Z[x] F[x] E[x]: Moves the printhead and sets the feed rate. Typically, this command is followed by a variation of the same command and used for printing a test line.
- G1 Z[x]: Moves the Z-axis. This ensures that the printhead doesn’t scrape across the print bed when moving to the print’s starting position and doesn’t scrape across a print after it finishes.
- G1 F[x] E[-x]: Instructs the printer to retract or pull back filament using the extruder. It’s often used after a print finishes.
- M106 S[x]: Sets the cooling fan speed to cool down the hot end or turn off the cooling fan after a print finishes.
- M104 S0: Turns off the hot end (by setting the temperature to 0 °C). We recommend using this command at the end of your end G-code script.
- M84: Turns off all the machine’s motors. We also recommend using this at the end of your end G-code script.
License: The text of "Start G-code & End G-code: All You Need to Know" by All3DP is licensed under a Creative Commons Attribution 4.0 International License.