Cura: Pause at Height – Simply Explained

With Cura, filament change operations and mid-print insertions are easy. Find out how to use the Cura pause at height feature!
Say you have a single-nozzle 3D printer but would still like to print some multicolor objects, or maybe you want to insert an object inside your 3D print. You could change your whole printing setup and get a multicolor 3D printer, upgrade your setup with a splicing machine, or adjust some settings in your slicer.
UltiMaker Cura is one of the most widely used slicers in the 3D printing community, with lots of amazing built-in features that enhance the 3D printing experience. One such feature is “Pause at height”, which, as its name suggests, lets you pause your ongoing 3D print at the desired height. The primary reason you might use this feature is to do multicolor printing, since it enables you to swap out your filament midway through a print.
Of course, there are other reasons as well, so let’s take a look at how to use the pause feature in Cura as well as explore other methods of pausing your print midway.
Where to Find It
Before getting started, it’s worth noting that the feature doesn’t work with all printer firmware. Compatibility may also be dependent on the version of Cura you’ve got installed as well as the version of your machine’s firmware. For example, users have encountered issues with Creality’s firmware and RepRap firmware.
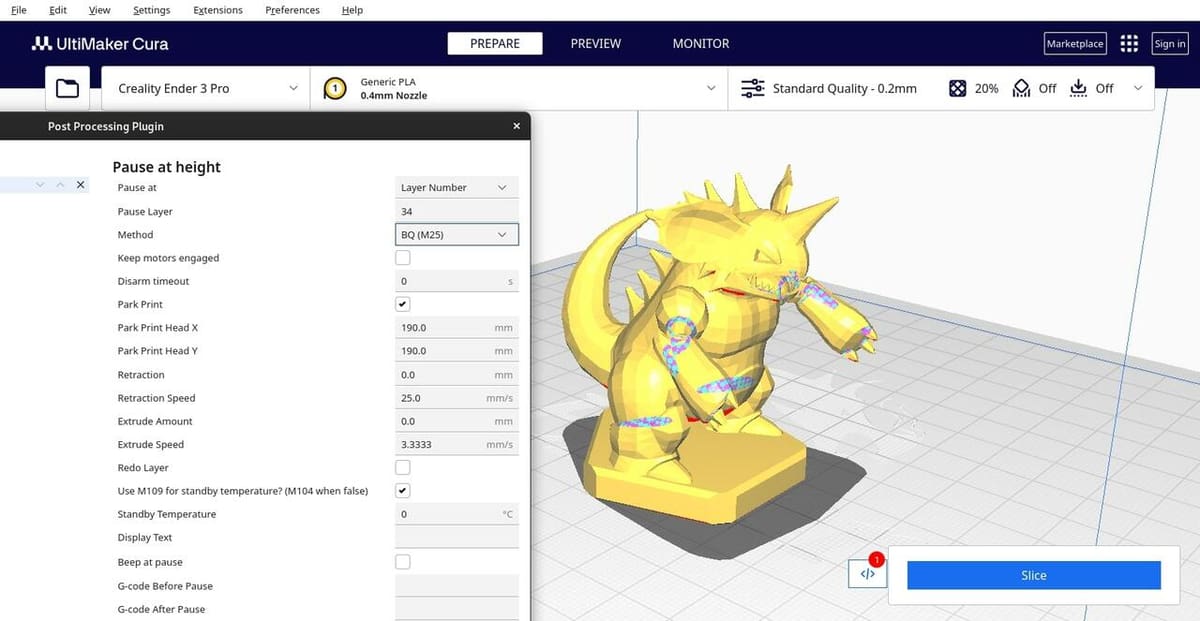
In any case, the pause at height feature in Cura is hidden in the user interface of the slicer, since it’s actually a post-processing plug-in. It can be used before slicing your model, but the more effective way is to use it once you’re sure about your primary slicing settings.
The steps to enable this feature are as follows:
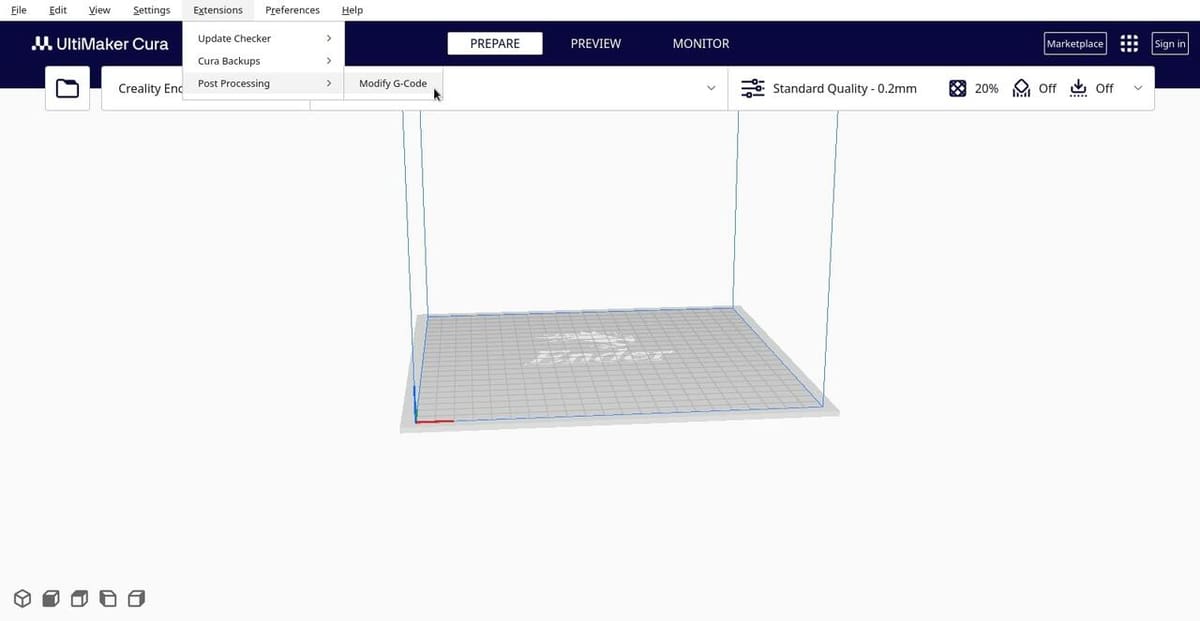
- Open the “Extensions” menu.
- Select “Post Processing”, then click on “Modify G-Code”.
- In the new window, click on “Add a script”.
- Select “Pause at height” from the various options in the menu.
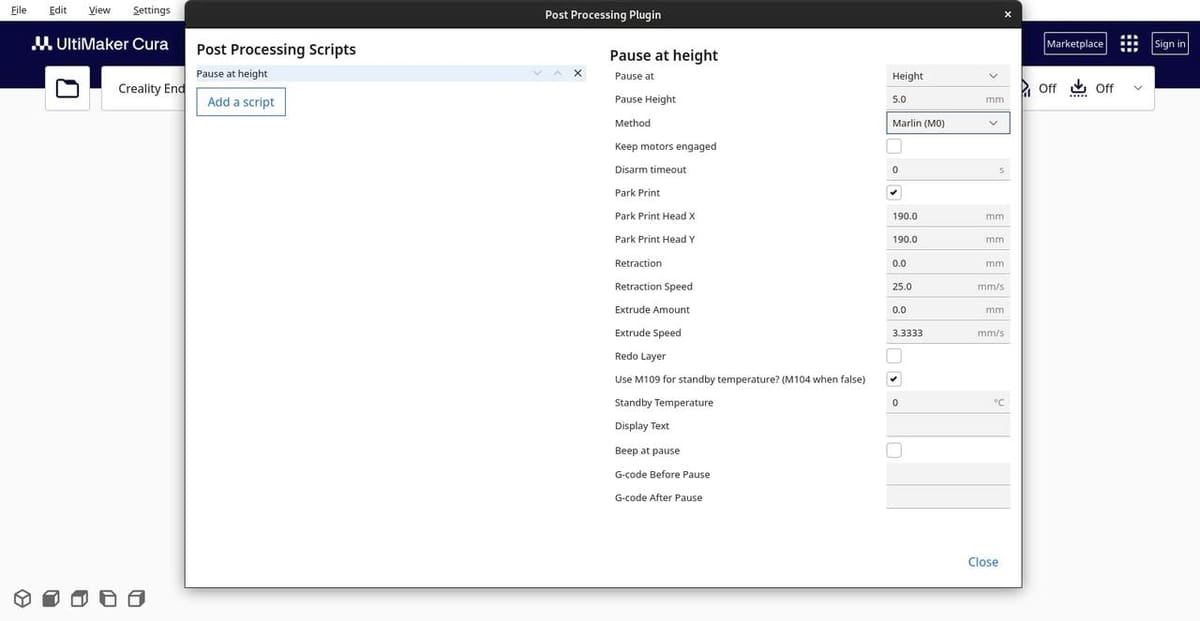
Once selected, you’re presented with a range of settings that you need to set to use this feature. In the next section, we’ll take a look at the most important settings you should know.
Compatibility
In Cura’s latest version (5.7.1 at the time of writing), officially compatible options are Marlin, Griffin, BQ, RepRap, and Repetier with OctoPrint. However, it’s possible to use the feature with other firmware as well.
The “Method” option changes the G-code command that the plug-in outputs, such as M0, M25, etc., which differs based on your printer and firmware. Many Marlin-based printers (such as many Creality printers), especially newer ones, will recognize the M25 command (called BQ in this case) rather than the M0 command, which bears the Marlin name in the dropdown menu. Klipper-based printers can be made compatible using a custom macro.
If the printer doesn’t recognize the G-code command, it will either ignore the steps or it may do something completely unexpected, such as performing only a temporary pause. It’s always good to keep an eye on your machine as it’s working or make a small test print to ensure the pause command functions as expected before printing larger models. If something doesn’t work as it should, doublecheck which pause G-code command your firmware supports or try one of the alternative methods that we’ll present later in this article.

Settings to Tweak
While there are various settings that you can alter, the following ones will help you entirely control the pausing of your print:
- Pause at: This lets you decide whether you want to pause the print at a particular height or at a specific layer, affecting the next option.
- Pause Height/Layer: The height (in mm) or the layer number at which you would like your print to be paused.
- Method: The G-code command that will be used for the pause, which will depend on the 3D printer and the G-code flavor.
- Keep motors engaged: This keeps the stepper motors engaged and at the correct height during the pause. When this box is checked, the “Disarm Timeout” automatically sets to 1 hour. If it’s unchecked, you can enter the time in seconds.
- Park Print Head X and Y: Resting position of your nozzle when the print is paused.
- Retraction: Retraction amount during the pause period. This and the following speed setting may be useful to adjust if you’re experiencing blobbing when the printer resumes.
- Extrude Amount and Speed: Amount of material to be extruded when the new filament is reloaded, and how fast.
- Redo Layers: You can redo any previously completed layers to increase adhesion. In many cases, this won’t be needed, and it may in fact cause problems if material is unable to leave the nozzle and tension builds up.
- Standby Temperature: The temperature of the nozzle while in pause mode.
Part of the fun is discovering the settings that suit your personal needs the best, especially as different filaments, like PLA, PETG, ABS, and TPU, have different optimal settings.
Words of Advice
Note that if you’re using layer number (rather than height), you need to select the number of the layer coming before where you want the pause to occur. In other words, the pause will happen at the end of the selected layer number.
Regardless, it’s always a good idea to do a test run with a small “dummy” print to ensure that your settings are working exactly as you want them to. This is also useful to practice the act of switching filaments if you’re wanting to use the pause to do multicolor printing; you’ll want to be confident in your ability to make the swap without moving anything around (e.g. the gantry), as your printer won’t do any position correction when it resumes printing.
On a related note, some have found that printers don’t properly advance to the next layer after resuming. If that’s the case, you may have to further fiddle with settings or adjust the raw G-code.
Alternatives
Cura offers one of the easiest ways to pause printing midway, but it’s not the only one!
First of all, if you’re using a printer that uses Marlin firmware, there is a “Change Filament” option in the “Tune” menu. Additionally, there’s also an option to pause the print entirely. These two perform the same function of pausing a print midway, though their execution differs slightly:
- “Change Filament” runs an entire script, where it will park the nozzle and unload the filament for you. It also waits for you to load the new filament, purges the new filament, and resumes printing.
- The “Pause Print” option pauses the print instantly, wherever the printhead is (which will likely not be between layers, unless your timing is unbelievably good).
Apart from using Cura and Marlin, the next best thing is to play around with G-code, but this is a more in-depth option.
As you can see, there are several ways to pause prints, whether to switch colors or embed objects inside your models. Whichever option you choose, don’t expect it to work perfectly right away. And again, it’s always a good idea to do at least one practice round.
License: The text of "Cura: Pause at Height – Simply Explained" by All3DP is licensed under a Creative Commons Attribution 4.0 International License.