Arachne in Cura, Orca Slicer & More: The Basics

In Cura, Arachne allows for variable perimeter widths, conferring benefits like reduced print time. Read on for more about this innovation!
The Arachne slicing engine is undoubtedly an amazing innovation in fused deposition modeling (FDM) 3D printing. It dynamically adjusts the line width of extrusions to fill in spaces more efficiently than previous methods could. The innovation is thanks to UltiMaker and Tim Kuipers, one of their software engineers who published a paper on an alternative perimeter generation technique. UltiMaker decided to implement the technique in Cura and brought us to where we are today.
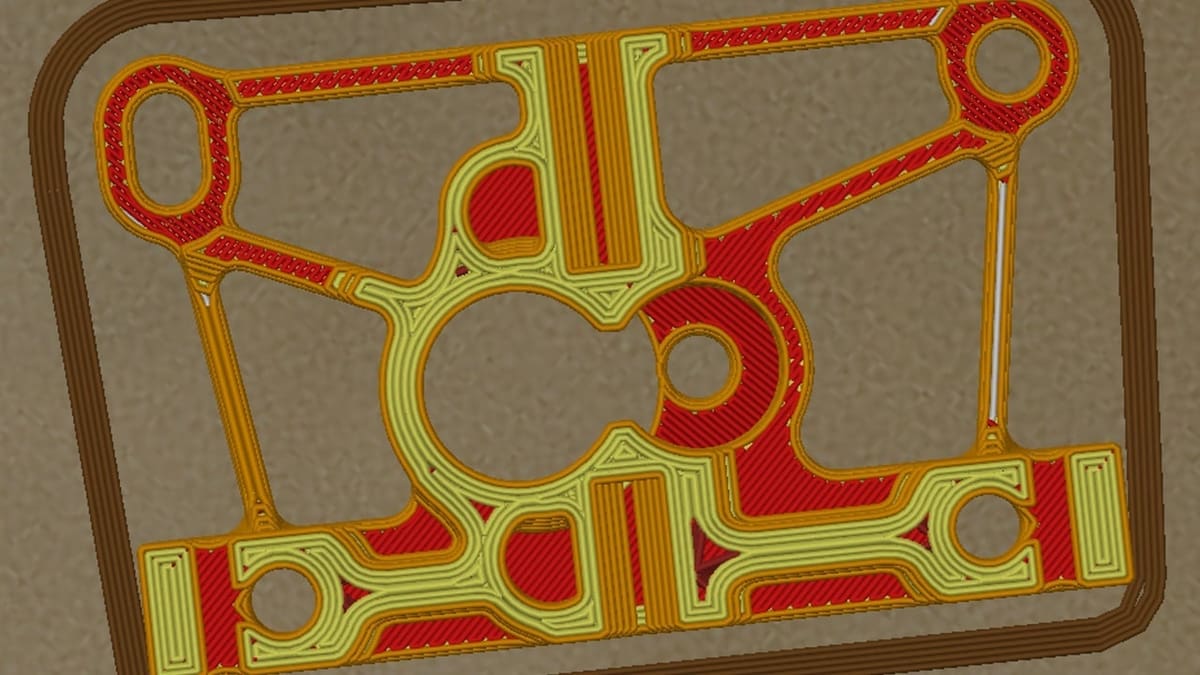
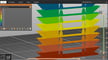
Before Arachne, classic perimeter generation could only resolve details that were one line thick (and whatever the layer height setting). Any details significantly smaller than that would not be printed. Depending on the thickness of the model and the Wall Thickness settings, most likely, the printer would fill the gap using a gap fill print move, which would be slower than avoiding this completely. Thanks to the variable line width possibilities of Arachne, more details are preserved during slicing and the thickness of printed perimeters can vary to meet the needs of the model.
This innovation soon caught the attention of the folks at Prusa Research, who ported the feature from Cura. Even Orca Slicer, a relatively new slicer based on PrusaSlicer and Bambu Studio, includes the feature. In this article, we’ll discuss the Arachne slicing engine in more detail, then show you how to set it up in Cura, PrusaSlicer, SuperSlicer, and last but definitely not least, Orca Slicer.

How It Works
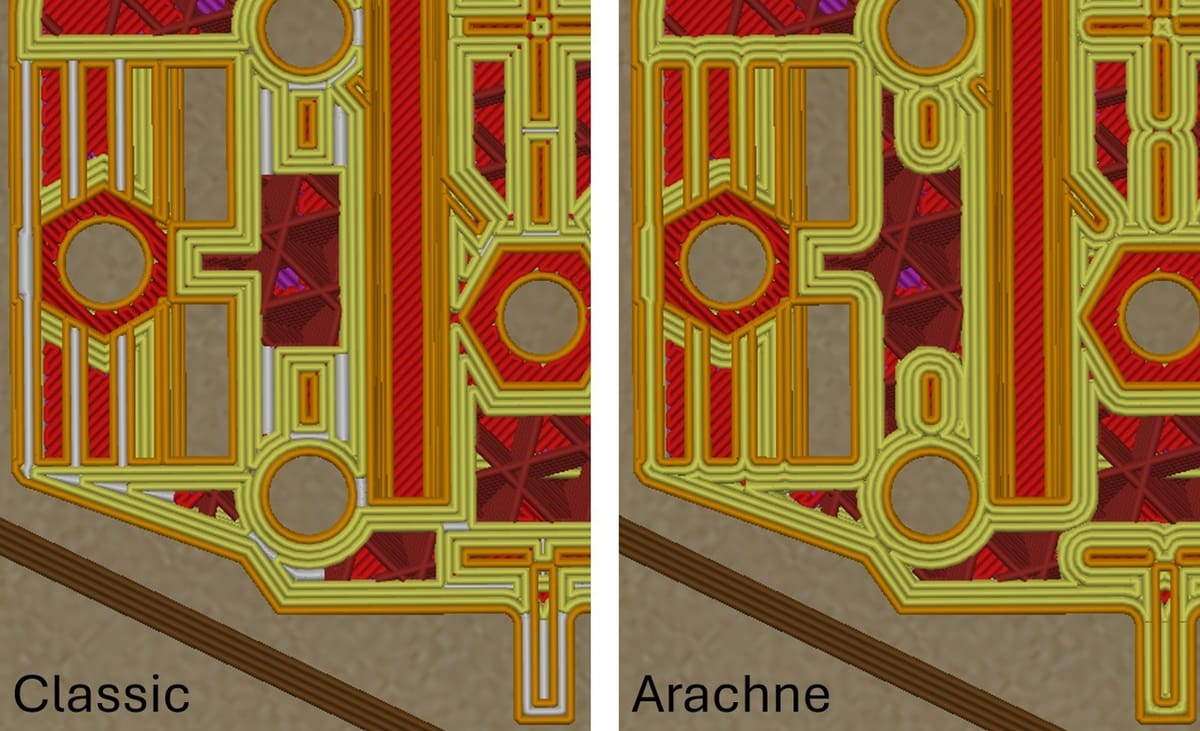
As mentioned above, Arachne uses variable line widths – in other words, the width of the perimeters printed can be changed. Normally, perimeters and other features can be printed if the model’s wall thickness divides evenly with your extrusion width. However, if the printer has to print, say, one and a half wall thickness, the slicer will instead print perimeters as defined in the slicer and fill in any gaps with a separate printing move, which is slow.
The implementation of this feature depends on the slicer. Generally, the slicer will calculate, depending on your nozzle size, how much the printer can widen or shrink lines to print parts of the model in as few lines as possible while simultaneously avoiding gap fill.
For example, a 0.4-mm nozzle can print lines as wide as 0.7 mm, which allows for speed improvements when combined with Arachne. Further reductions in print time can be achieved by tweaking other settings like infill depending on the function and intended use of the print.
Pros & Cons
As with anything, there are pros and cons to using Arachne. On the pro side, it reduces print times by eliminating extra internal lines (gap fill) and proceeding with regular print moves. Additionally, being able to vary line width gives the printer the means to preserve finer details.
To give an example, with Arachne, you could consider switching to a 0.6 mm nozzle instead of a 0.4 mm for most prints. As Arachne can shrink perimeters smaller than the nozzle size, you could still print most details that typically can be achieved with a 0.4 mm nozzle on classic perimeter generation mode. This can save time on your prints.
As for cons, Arachne can occasionally produce strange artifacts in the G-code. This is why it’s important to manually check the G-code preview in the slicer. Also, if your printer isn’t tuned properly, Arachne could cause over- or under-extrusion depending on the combination of settings and nozzle.
Based on the above, we could summarize Arachne’s strengths and weaknesses as follows:
Pros
- Better details
- Faster print times
- Strengthened parts
Cons
- Strange artifacts in the printing process
- Possible over- or under-extrusion
Knowing a bit more about Arachne, let’s take a look at how to enable it and what settings can be worked with.
Using Arachne
Among the many slicers out there, Cura, Prusaslicer, SuperSlicer, and Orca Slicer are standouts – Arachne can be enabled in all of them. That said, each of these programs has a slightly different method for enabling the slicing engine. Below, we’ll show you how to enable Arachne in all four.
Please note that the following sets of instructions are aimed towards Windows users and assume you know how to extract files and install programs not from an app store.
Cura
The team behind Cura has made it easy to use Arachne. It’s simply there, part of the slicing engine. As of the time of writing, you can’t turn Arachne off, but you can modify certain settings related to it.
The only catch is that Arachne is integrated into Cura version 5.0.0 or above. If you have any previous version, you can update it through their GitHub or download page.
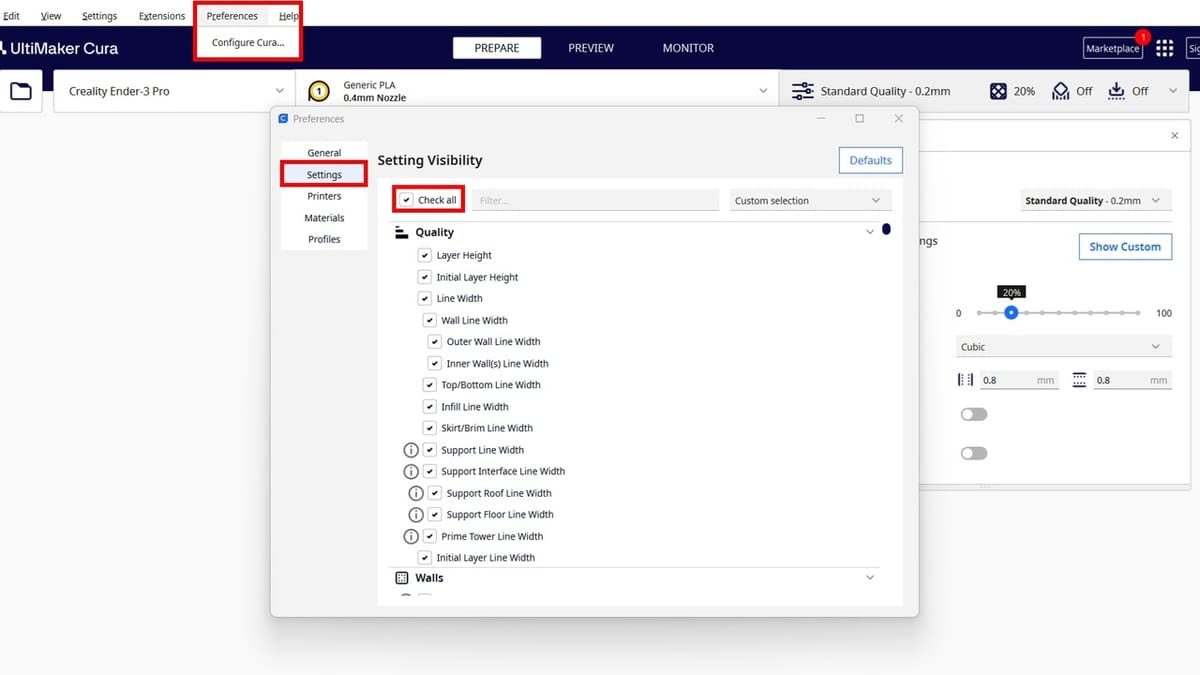
To modify any of Cura’s Arachne-related settings, all of the settings must be visible, which is pretty easy to do:
- Click “Preferences” on the top bar, then “Configure Cura”.
- Click on “Settings” on the left side of the new window.
- Check the “Check all” box.
You’re done! Now, you can see and modify settings related to Arachne as needed.
Arachne-related Settings
You won’t find the terms “variable line width”, “Arachne”, or any references to a new form of perimeter generation within the slicer, but rest assured, it’s there and working. There are, however, a few settings that let you modify certain aspects of Arachne’s perimeter generation. To see these:
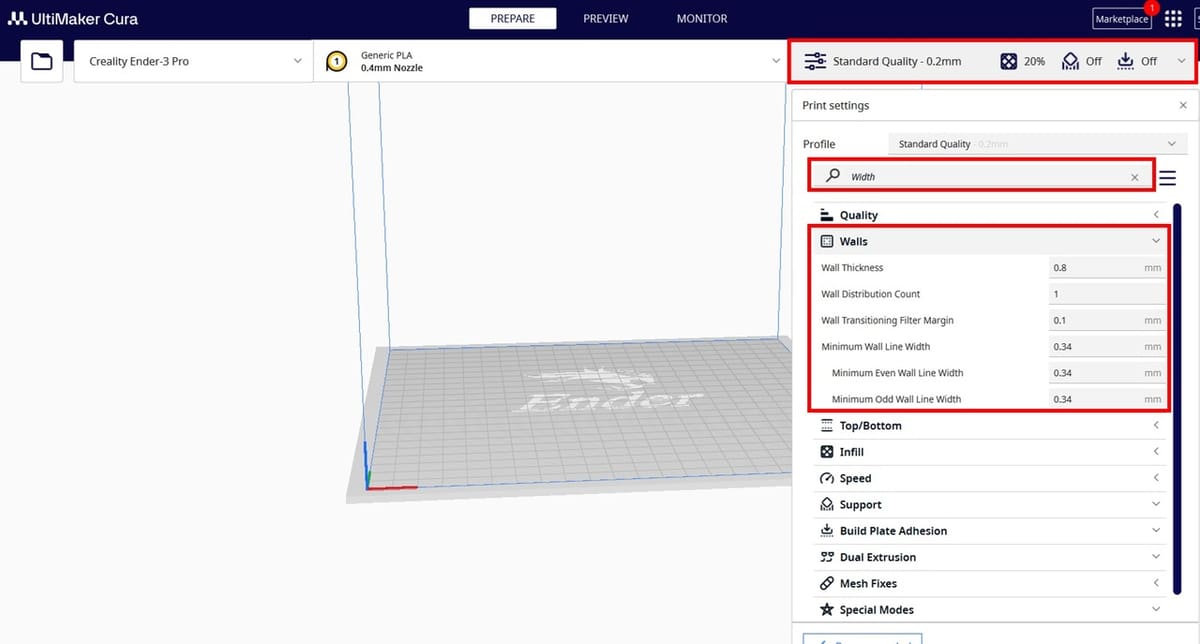
- Under the rightmost tab (on Print Settings), scroll to and click the “Walls” section.
- Type “Width” into the search bar and close every other section other than the “Walls” section.
- The settings you can still see allow you to adjust how much control Cura has over making your perimeters thicker or thinner.
Note that you must turn off “Print Thin Walls” in Cura, as Arachne is supposed to replace this. It should be disabled by default. To check, clear the search box, then type in “Print Thin Walls”. Make sure it is unchecked, and you’re well on your way to using Arachne in Cura.
PrusaSlicer
Enabling Arachne in PrusaSlicer is a piece of cake. First, make sure you have PrusaSlicer 2.5.0 or higher installed; versions 2.4 and below don’t have Arachne.
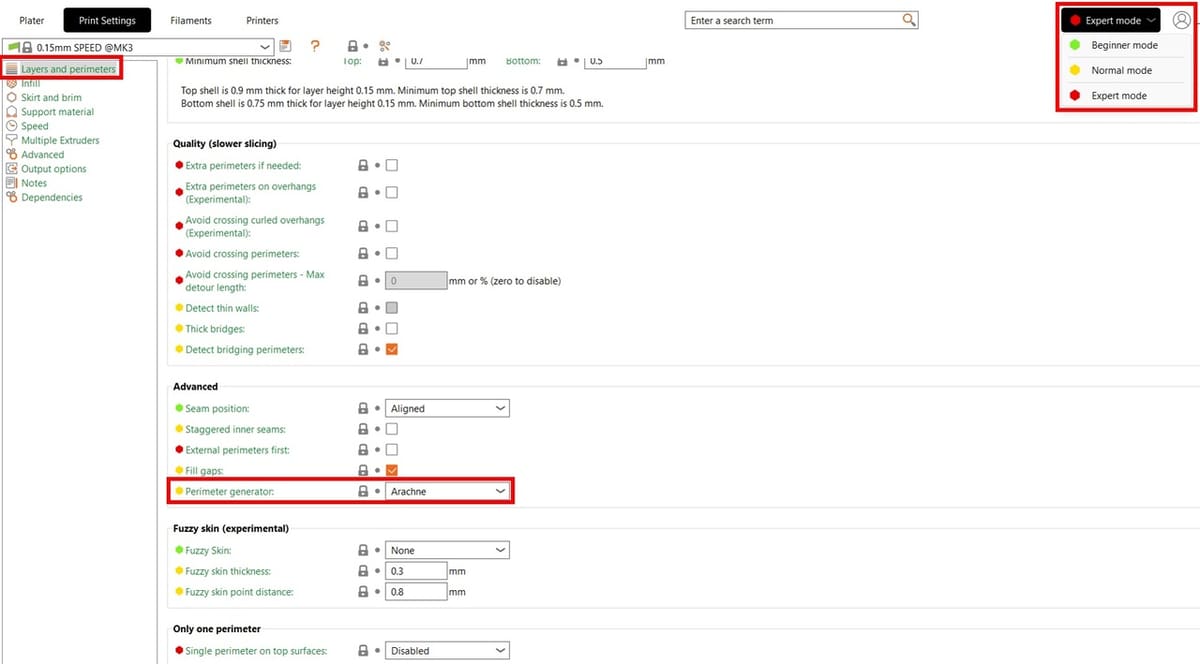
Once you’ve installed PrusaSlicer and configured it to your liking, make sure you have enabled the “Normal” or “Expert” modes to select Arachne mode. Note that, to change Arachne settings, you will need the Expert mode.
- To enable Normal or Expert mode, click the difficulty box in the top right hand corner, then select the “Normal” or “Expert” button.
- In the “Print Settings” tab, go to “Layers and perimeters”.
- Scroll to the “Advanced” section; under “Perimeter generator”, select “Arachne”.
Arachne-related Settings

If you want to change settings for Arachne perimeter generation, you can follow a couple of simple steps to do so:
- In the “Print Settings” tab, go to “Advanced”.
- Scroll down to the “Arachne perimeter generator” section. Here, you can find all the relevant settings.
Again, make sure you are in Expert mode to see the settings!
SuperSlicer
Enabling Arachne in SuperSlicer is even more convenient. First, ensure you have a version of SuperSlicer that supports Arachne – that is, release 2.5.59.2 or above. You can find all the SuperSlicer releases on its GitHub releases page, where release 2.5.59.13 is the latest stable version (at the time of writing).
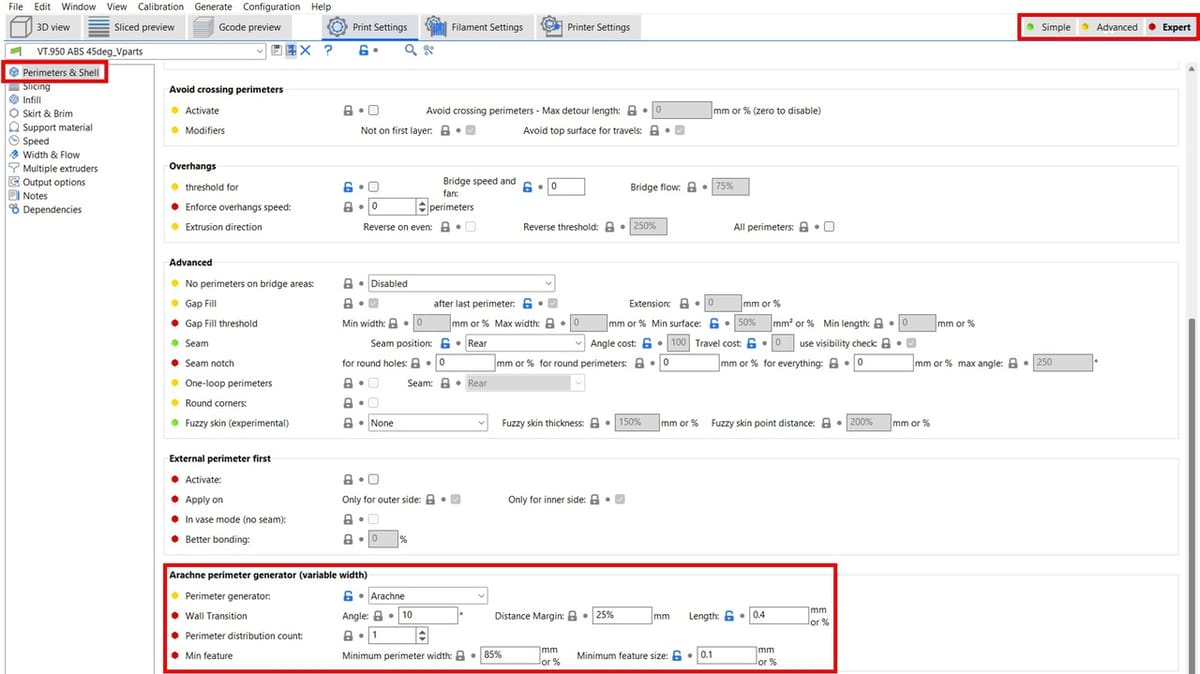
Arachne is also fully supported in SuperSlicer. Again, selecting Arachne is only possible in the “Advanced” or “Expert” modes, and Arachne settings can only be seen in the latter. Unlike PrusaSlicer, SuperSlicer conveniently puts all Arachne-related settings in the same section.
To enable, view, and change Arachne settings, a few steps need to be followed:
- Enable Advanced or Expert mode by clicking on the appropriate setting in the top right hand corner.
- In the “Print Settings” tab, go to “Perimeters & Shell”.
- Scroll to the “Arachne perimeter generator (variable width)” section.
- To enable Arachne, change “Perimeter generator” to “Arachne”. You can also change all the other Arachne-related settings here!
Orca Slicer
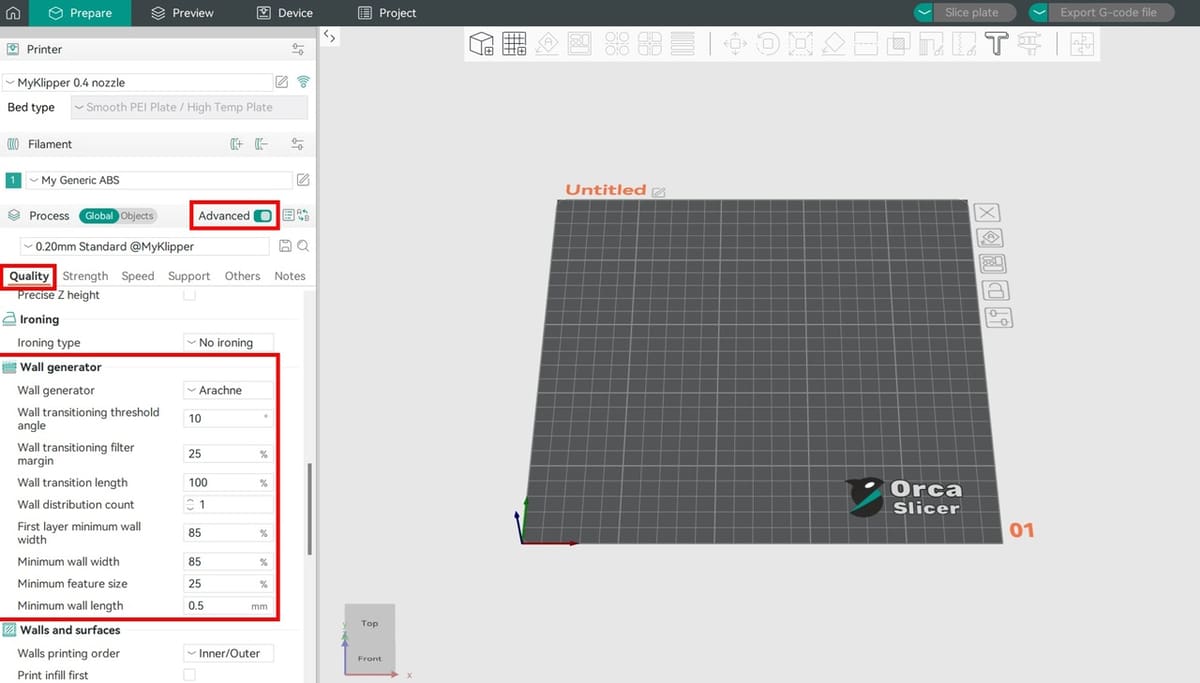
In Orca Slicer, which is based on Bambu Studio, PrusaSlicer, and SuperSlicer, Arachne is available in all versions as it is a very modern slicer. You can find all of its releases here, but as usual, we recommend the latest stable release.
Selecting Arachne or changing its settings can only be done in the “Advanced” mode. Similarly to SuperSlicer, Orca Slicer opts to put all Arachne-related settings in the same section.
To enable, view, and change Arachne settings in Orca Slicer, follow the next steps:
- Toggle the “Advanced” button to enable the mode, under “Process”.
- In the “Quality” tab, scroll to the “Wall generator” section.
- To enable Arachne, change “Wall generator” to “Arachne”. You can also change all the other Arachne-related settings here!
License: The text of "Arachne in Cura, Orca Slicer & More: The Basics" by All3DP is licensed under a Creative Commons Attribution 4.0 International License.