Fix Anything Around the House With These 25 3D Printed Tools

Stop buying tools you can make yourself. Here are incredibly useful 3D printed tools that will save you time and money on your next project.
That half-finished project is sitting on your workbench, waiting for one specific tool you just don’t have. Before you make another trip to the hardware store, what if the solution was already sitting on your desk? A 3D printer is more than a hobby machine; it’s a personal factory for an incredible range of genuinely useful tools. From custom wrenches for tight spots to specialized clamps for delicate work, this isn’t about printing toys — it’s about building a functional workshop, one layer at a time. We’ve curated 25 essential, road-tested tools that will save you time, money, and that frustrating trip to the store.
Of course, functional hammers and chisels can’t be made on a desktop plastic-printing 3D printer. However, you may be surprised by the long list of functional tools and tool parts you can print.
If you’d like to try out a new material or printing method that’s out of reach, you don’t need to change your setup – simply try Craftcloud. There’s no minimum order necessary, just upload your files and make your selection between a variety of manufacturers, 3D printing technologies, and materials. Your designs of choice will be delivered to your doorstep.
Now, let’s take a look!
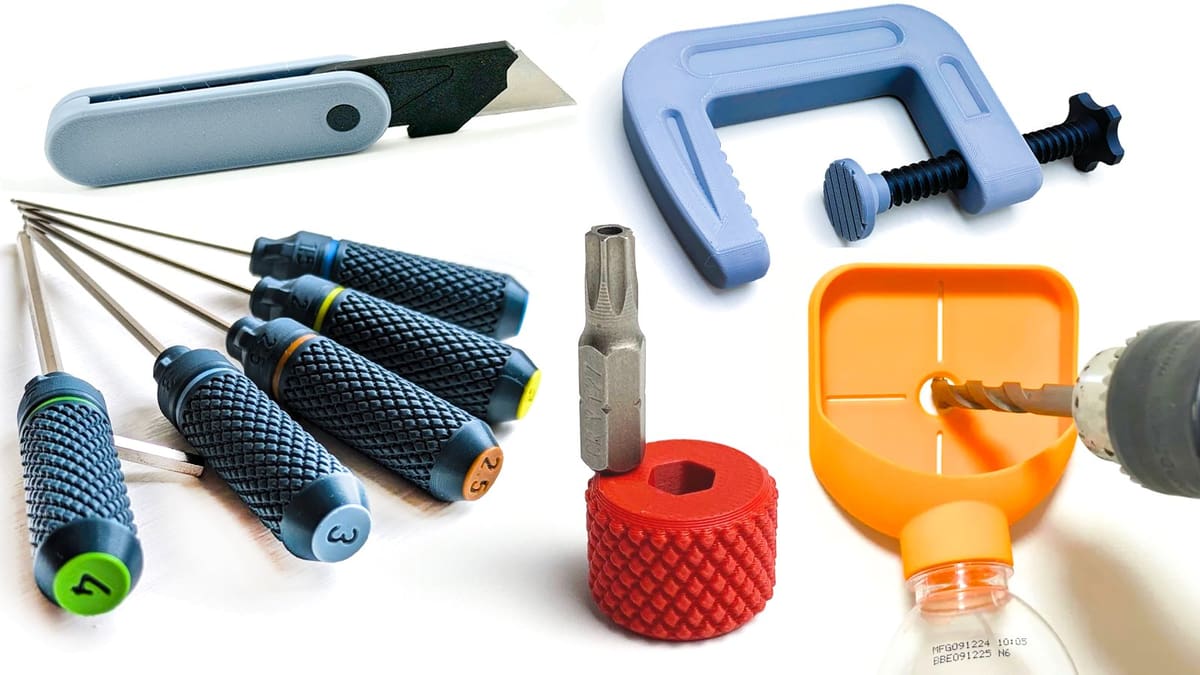
Hand Tools
Wire Stripper
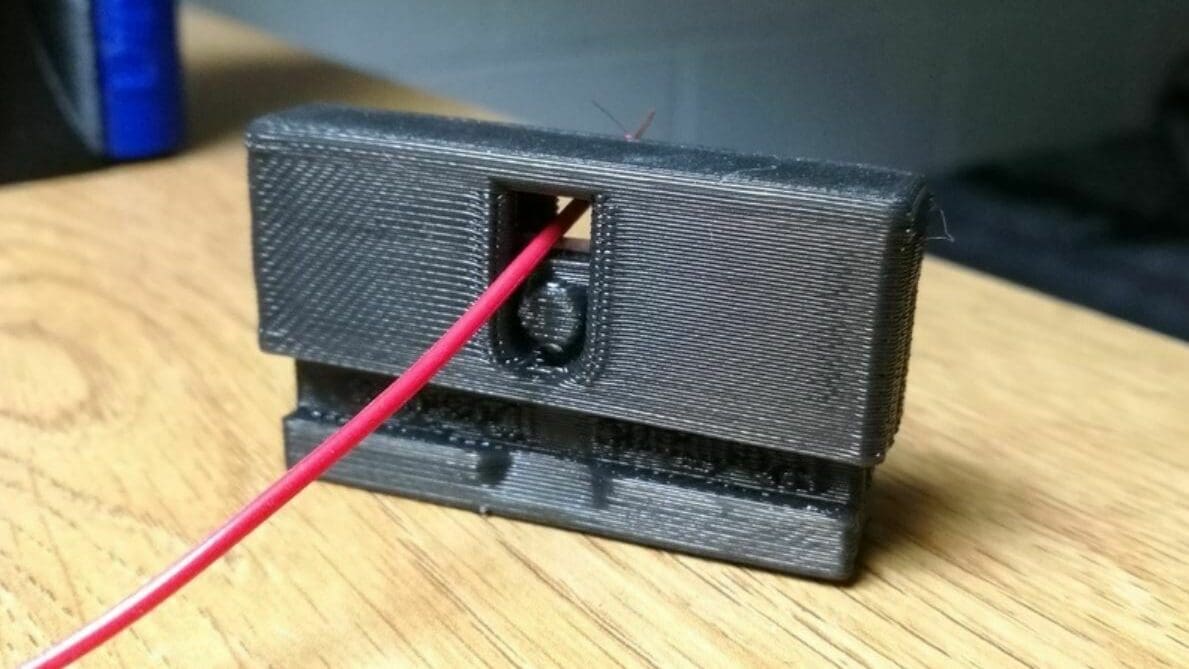
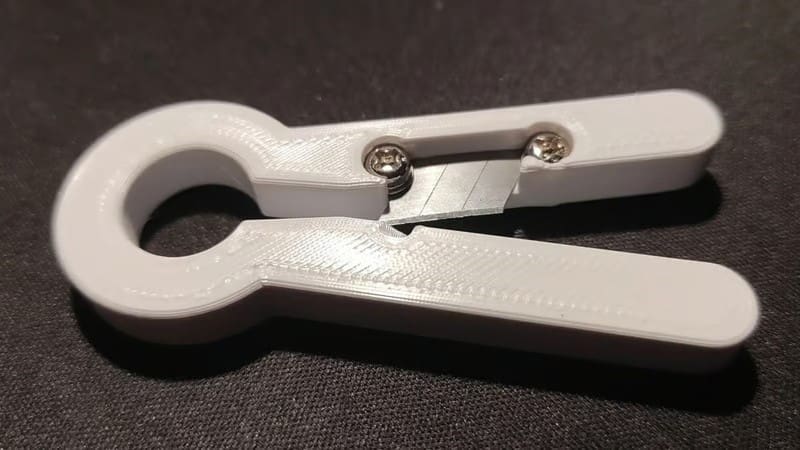
Stripping a wire removes its rubber covering to expose the internal copper strands. This makes it much easier for tasks such as soldering. If you don’t have a specific tool, it can be difficult to strip wires, but this DIY wire stripper is a great alternative. The assembly uses a single-edged industrial razor blade and two printed parts to create a child-safe wire cutter with no openly exposed blades.
To use the wire stripper, simply slip your wire through the opening in the assembly, then press the top part down. Next, hold the wire, rotate the assembly around, and pull it away from the wire to rip off the rubber covering.
- Who designed it? Pentland Designs
- How popular/printable is it? This wire stripper tool design has over 6,255 views with more than 519 downloads.
- Where to find it? MyMiniFactory
Workshop Buddy
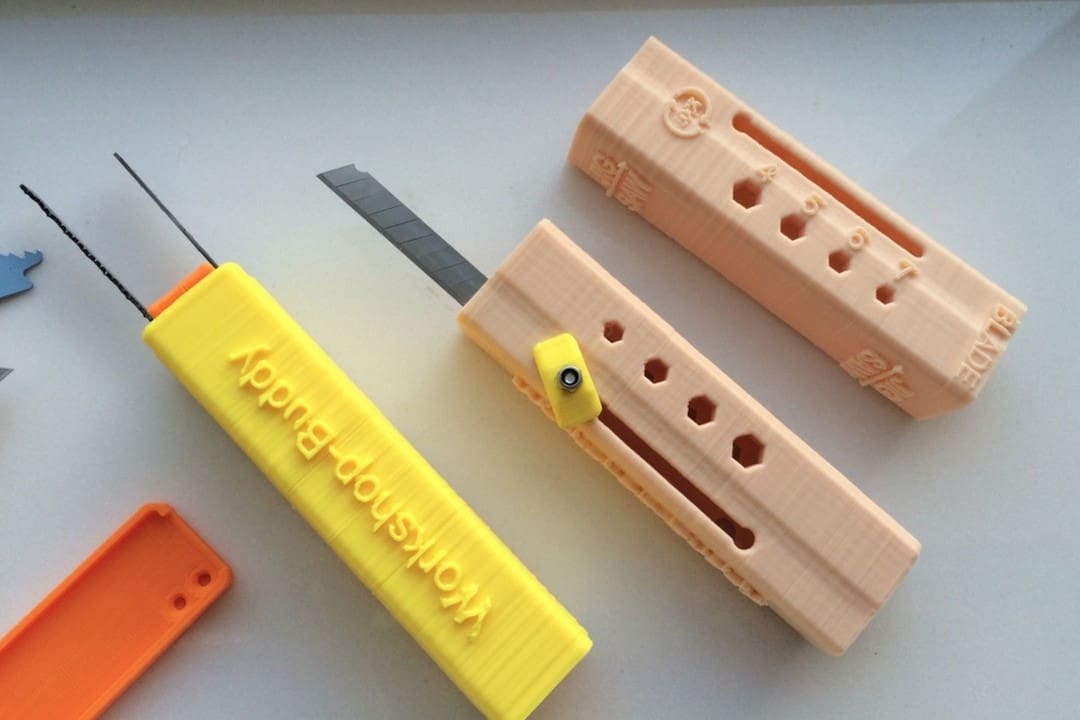
The Workshop Buddy is a 6-in-1 multitool that covers a wide range of uses around your workshop. You will find everything from a saw blade holder to a hex bit holder on this thing. Truly a versatile tool!
This is the perfect print to have around the workshop and can make a great gift for friends with a workshop. You can even print out multiple tools and color-code them so you know exactly what tools you are picking up.
Pump Hand Drill
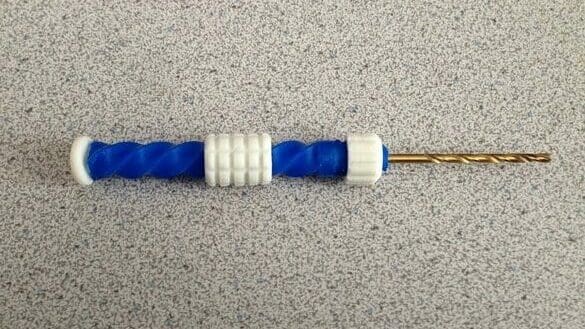
This pump hand drill is an amazing four-piece model that actually works! Granted, it doesn’t rival the electrically powered counterpart that you’d find in your local hardware shop, but it’ll definitely prove useful when you need to make holes in light materials.
- Who designed it? speedy777
- How popular/printable is it? 77 users have posted makes of this model on Thingiverse, which usually comes printed in various materials and with a high percentage of infill. There are also 12 remixes. The original has been printed over 88,000 times!
- Where to find it? Thingiverse
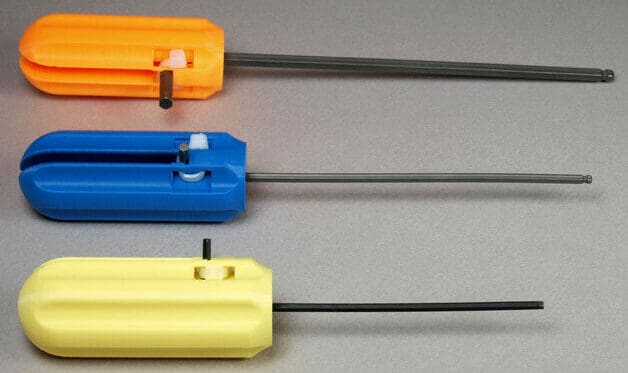
Ratchet Screwdriver
This print-in-place screwdriver will drastically reduce the pain of cranking small screws for what seems like an endless amount of time. The internal ratcheting system makes screwing much easier and more efficient, and the user never has to reposition their hand. This means they can turn the screw much faster.
This model is a pretty straightforward print, even with the print-in-place mechanism inside. It requires no supports, and with a good amount of infill, it should be able to withstand plenty of handy work. The designer recommends either PLA or ABS, but for a more useful and reliable print, ABS is the superior option.
- Who designed it? johlink
- How popular/printable is it? With multiple makes, 225 downloads, a print video, and an Instructables guide, this model is very well-documented and easy to print with a high infill percentage and a calibrated printer.
- Where to find it? Pinshape
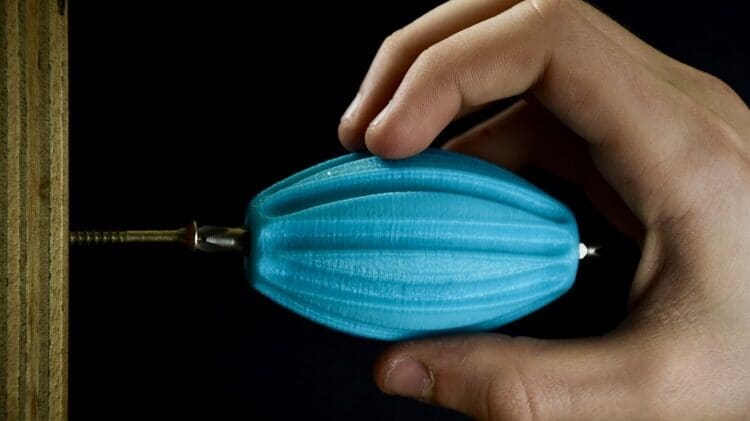
Finger Wrench (Digit Spanner)
Makers are constantly forced to work around tight corners and hard-to-reach places. But with this ingenious finger wrench, tightening a nut in such areas is made much easier! This 3D printable model will help you tighten up every nook and cranny, even in those spots where a typical wrench won’t do.
- Who designed it? francfalco
- How popular/printable is it? Close to 800 users have downloaded this model in a number of materials with a high infill percentage.
- Where to find it? MyMiniFactory
Customizable Sanding Stick

This customizable sanding stick is an invaluable tool when working on certain projects. Thingiverse user mightynozzle has included four sample sticks that you can print. And, if none of those fit your needs, you can also just find or make your own, then secure sandpaper to it with the nifty printable screws.
The model doesn’t require any support material and has been printed in a variety of materials at a 50% infill or greater.
- Who designed it? mightynozzle
- How popular/printable is it? 274 Thingiverse users have posted a make of this model, and there are a whopping 683 remixes, not to mention the almost 350,00 downloads!
- Where to find it? Thingiverse
Fully Assembled Wrench
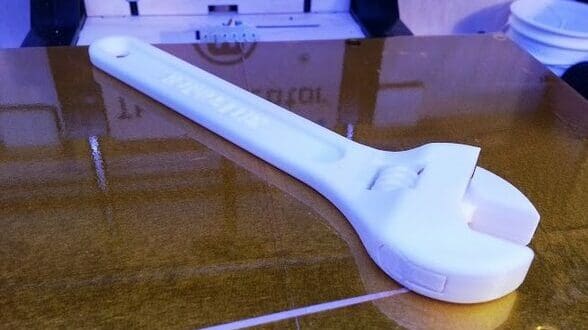
This 3D printed wrench definitely has limits in regard to functionality, but it’s simply too cool to be excluded from our list of 3D printable tools.
This wrench prints in one fully assembled piece, and although you can’t do much tinkering with it, it’ll still show off what your 3D printer is capable of.
- Who designed it? barspin
- How popular/printable is it? 496 makers have printed this model in a variety of materials, with plenty mentioning the use of support structures. Plus with 35 remixes and over 339,000 downloads, I’d say this tool is pretty popular.
- Where to find it? Thingiverse
Bicycle Tool

Anyone who rides a bike knows that taking good care of it is important for safety and comfort, and you can’t always find everything you need in your local shop. This tool helps clean the cassette and prevent its parts from becoming damaged. It’s light, practical, and very welcome in a bike maintenance kit. On the model page, you can also find more tips on how to carry out the entire cleaning process in detail.
This tool is available in six different thicknesses ranging from 2 mm to 3.25 mm in 0.25 mm increments. Many comments show makes in PETG, but you can also print it in PLA. The important thing is to print it with 100% infill. Even then, it will be quick to make, taking less than 2 minutes to print in some cases.
- Who designed it? SteveJohnsen
- How popular/printable is it? This friendly tool has over 144 likes, more than 550 downloads, and 18 shared makes.
- Where to find it? Printables
3D Printing Tools
Caliper
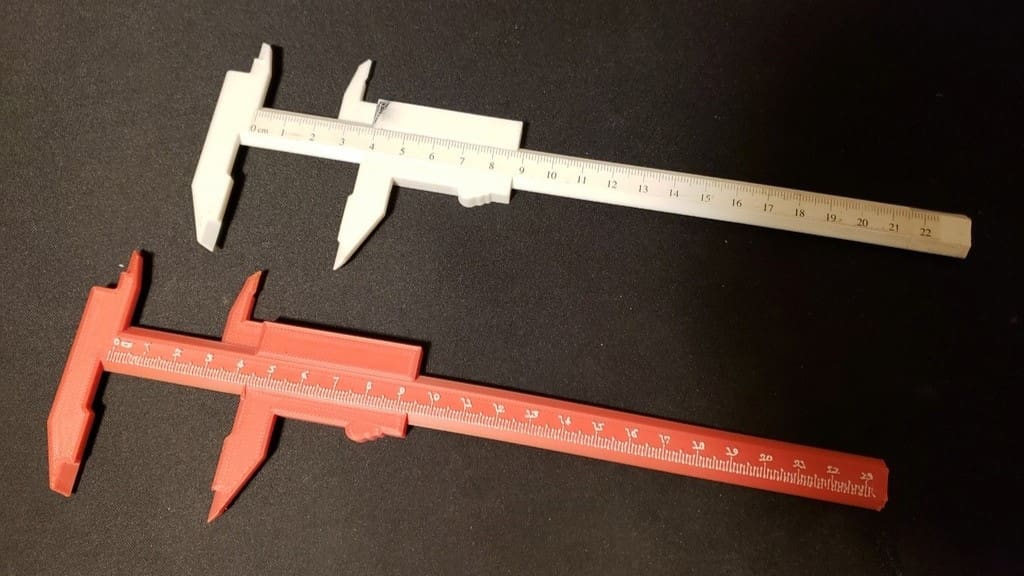
Whether you enjoy 3D modeling or need to troubleshoot your slicer settings, everyone with a 3D printer should have a set of calipers around. Calipers are useful tools for checking filament measurements and making accurate parts in CAD software. These 3D printed calipers utilize a very simple two-piece slide and groove design.
The original file measures 23.5 cm long. If you’re working with a smaller print bed, a shorter size file is available since you can’t scale this model type. You can either print the model with the units or print a blank slate and then print the units out on a piece of paper and glue them to the model. The .pdf file with the units can be found in the model’s description.
- Who designed it? Bedrock_
- How popular/printable is it? Over 27,000 people have downloaded these calipers, with 15 sharing their makes!
- Where to find it? Thingiverse
Fan Dust Rake
After hours and hours spent printing, your 3D printer fans are bound to gather a lot of dust and debris. Using your hands to clear out the dust can only do so much. This nifty little print will give you a better grip so you can get clumps of dust out that you normally couldn’t reach.
The print comes with a small built-in brim at the end to prevent the teeth from curling. The designer recommends makers cut off this brim with their flush cutters. Peeling the brim off could potentially bend or break the rake teeth.
- Who designed it? MattBoyer
- How popular/printable is it? This is a very popular print, with over 8,800 downloads and 567 makes shared by the community.
- Where to find it? Printables
Nozzle Swapping Tool
This simple tool makes swapping nozzles on your 3D printer much easier, eliminating the need to align a wrench and ensure the nozzle doesn’t fall on your hand while it’s hot. This print makes use of any bits you already have that fit your nozzles, giving them a good grip for fast nozzle swapping and replacement.
The designer recommends printing in PETG, as PLA may warp when facing the temperatures that the nozzle can output. If you’re having a hard time getting your bit to fit in the handle, try warming the handle up with a heat gun to slightly soften the material before inserting the bit.
- Who designed it? AndersK
- How popular/printable is it? 464 people have already downloaded this model. You will find 4 shared makes as well!
- Where to find it? Printables
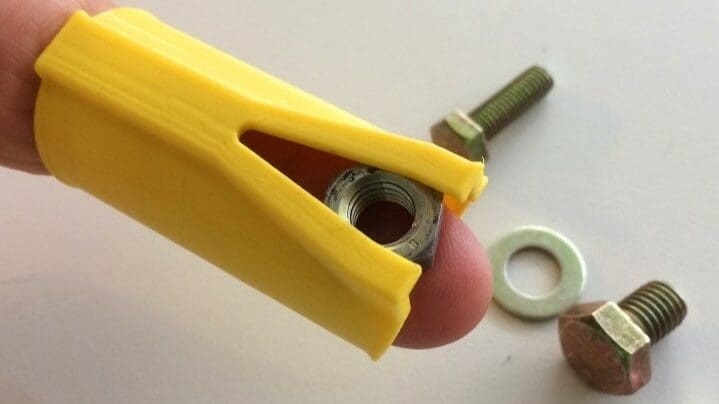
Filament Cutter
If you have a filament printer, this is a must-have tool. Whether you want to swap the filament or need to insert a new roll, it’s always easier if the end of the filament is cut at a 45-degree angle so that it’s pointed and resistant.
There are many successful makes posted on Printables, including cutters in different materials like PLA, PETG, and even ABS. It will just take a few nuts, screws, and washers with a blade for you to assemble this useful tool.
- Who designed it? PhilippHee
- How popular/printable is it? This handy tool has almost 750 likes, more than 2,600 downloads, and 79 makes.
- Where to find it? Printables
3D Printer Tool Stand
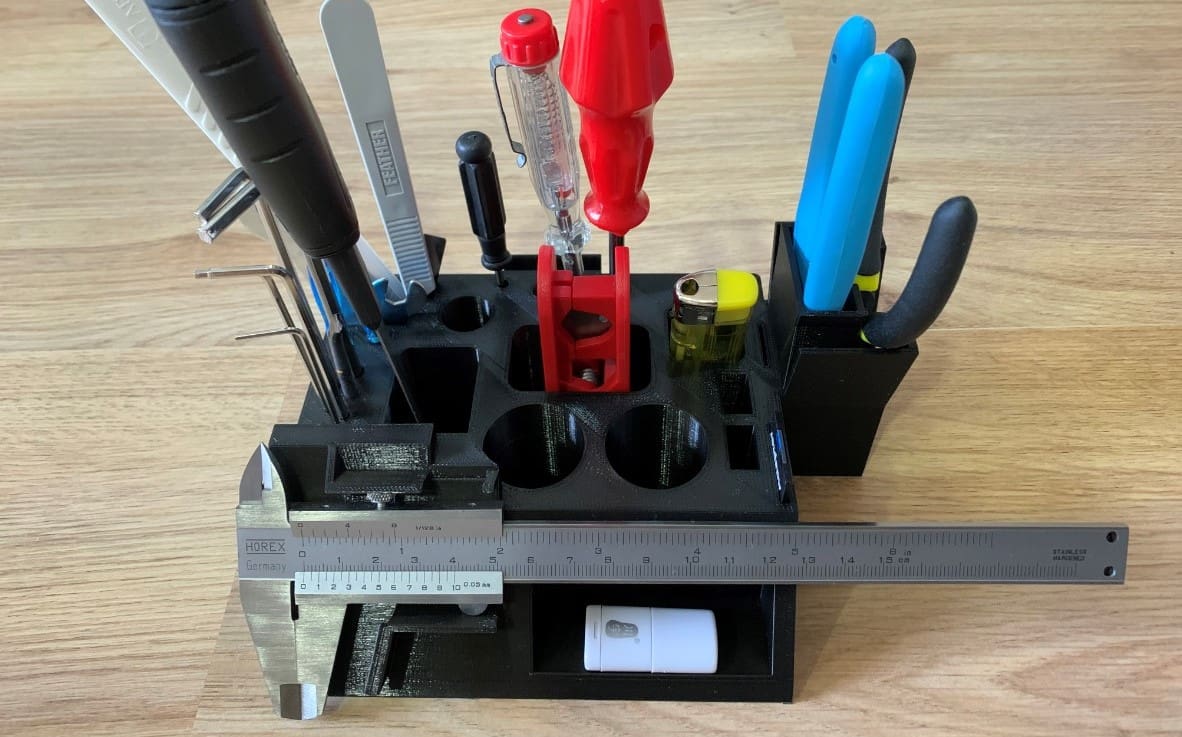
Every maker or handyman knows that the organization of tools is key to a successful project. This 3D printer tool stand is a great model that will help tidy up your workstation. So, the next time you need those pliers or a wrench, you know exactly where to find them.
The designer advises printing this model at 0.2-mm layer height and 10% infill without any supports.
- Who designed it? Stig_
- How popular/printable is it? With more than 74,000 downloads, 164 makes and 14 remixes, this model has helped many makers organize their 3D printing tools.
- Where to find it? Thingiverse
Deburring Tool
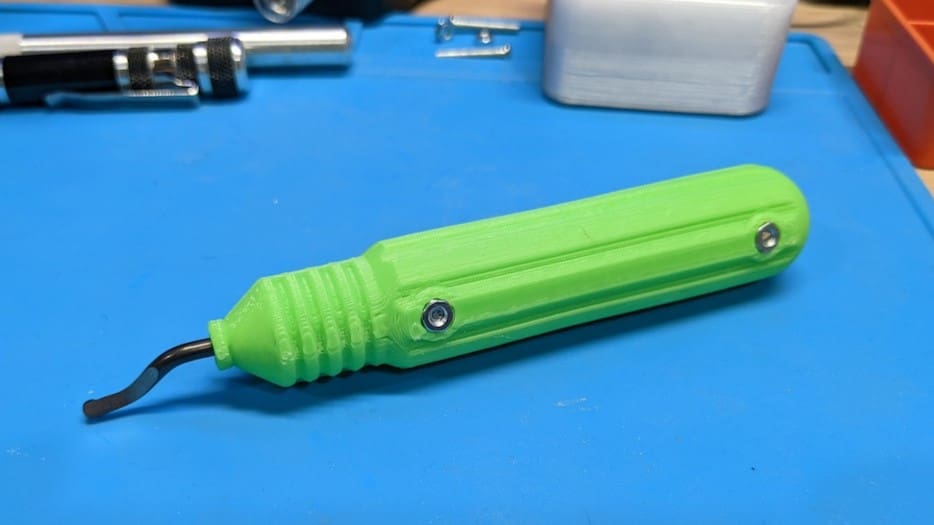
The deburring tool is a great model to have around your 3D printer, as it’s often used to remove brims and elephant’s foot from prints. This replacement handle is the perfect solution for those who have either lost or broken their deburring tool handle.
Makers who do not already have a deburring tool can print this handle and purchase a pack of deburring blades to save on buying the entire tool. The handle prints in two halves and is held together with two M3x20 mm screws with nuts. The designer has left a link to the exact hardware needed in the description.
- Who designed it? Lehaiver
- How popular/printable is it? This tool is loved by many, with over 1,700 likes and 12,837 downloads!
- Where to find it? Thingiverse
Tool Accessories
Handle for Hex Key
What’s better than a handle for a hex key (also known as an Allen key or wrench)? Well, a customizable handle for a hex key sounds pretty nifty!
Regardless of the size you need, simply enter some specs into Thingiverse’s Customizer app and print it for your go-to tools.
- Who designed it? JohnSL
- How popular/printable is it? 36 makers have printed this model in various materials, and 480 have posted remixes. The original file has over 33,000 downloads from users.
- Where to find it? Thingiverse
Drill Guide
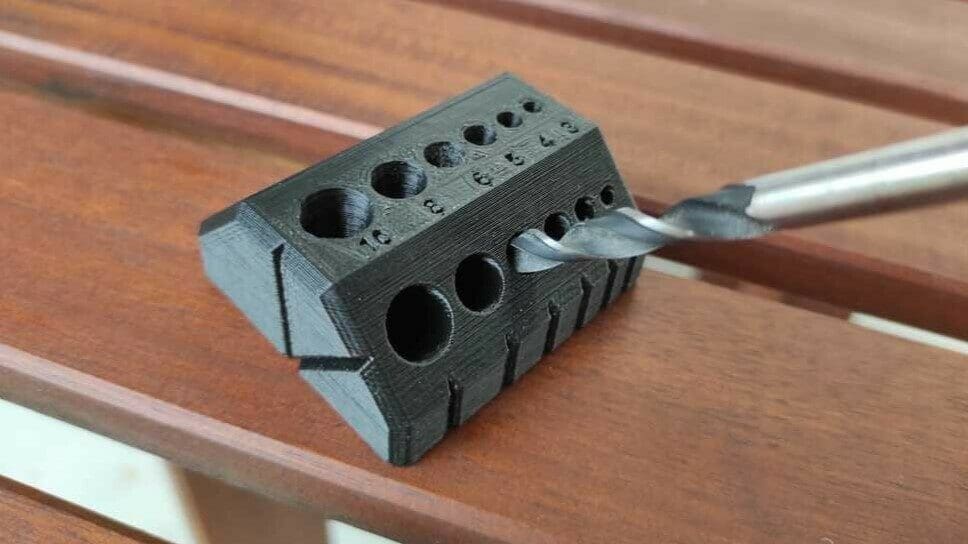
This handy guide will help you to drill holes accurately at either a 90- or 45-degree angle. With two sets of differently sized holes at the two angles, this should work for most hobby-sized drills and remove the guesswork when drilling angled holes.
For this print, it’s important to use multiple perimeters and a high infill percentage to ensure that it’s strong enough to withstand the actual wear of the drill. Makers of the part also state that good cooling is necessary to ensure that the 45-degree holes print cleanly with no drooping.
- Who designed it? Helasius
- How popular/printable is it? With close to 5,000 likes and 8 documented makes, 1 remix, and almost 13,000 downloads, this much-loved model should be easy to print with good cooling and a high infill percentage.
- Where to find it? Thingiverse
Wall Drilling Guide (& Dust Collector)
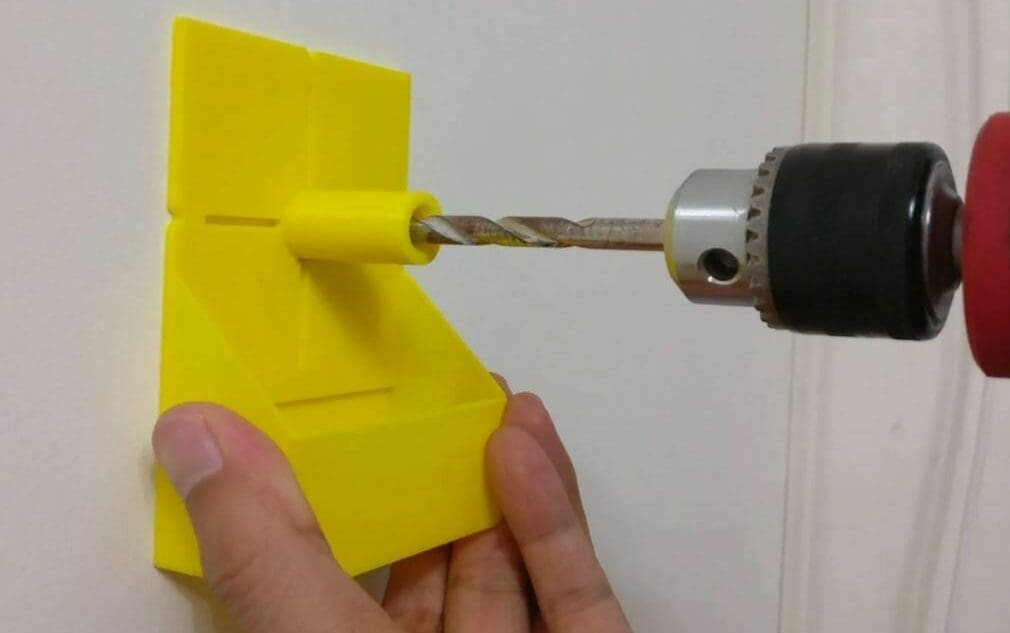
Drilling into a wall can create a mess, as it tends to generate a lot of dust and other debris. This tool can be used to collect dust while you’re drilling into a surface, especially a wall. The design contains a hole for a drill bit and has a bucket-like container beneath the bore to catch dust and debris.
As seen in the image above, the whole model has a flat surface, making it easy to align on a wall. While drilling on a perpendicular surface is made easy, this tool isn’t the best for angled drilling jobs.
There aren’t any available printing tips to help you make this drilling gadget. For this reason, you’ll have to come up with your own slicer settings.
- Who designed it? aleung
- How popular/printable is it? This drilling guide design has over 5,800 views, more than 1,300 downloads, and 3 shared makes.
- Where to find it? Printables
Center Finder
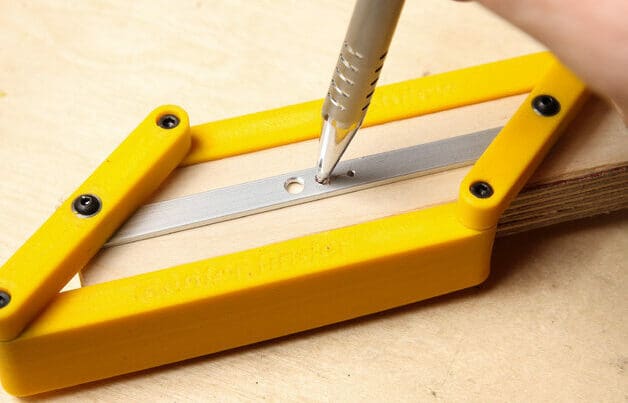
One thing many makers have in common is a desire for perfection. This 3D printable center finder can help you achieve that. With the help of simple geometry, this 3D printed tool finds the exact center of whatever board or beam you’re working with.
While the creator doesn’t specify many printing tips, comments from other makers state that opting for four walls will lead to a sturdier model.
- Who designed it? Mobilow
- How popular/printable is it? 22 Thingiverse users have posted makes of this model in various materials and printer settings. So far this print has had 9 remixes and over 45,000 downloads.
- Where to find it? Thingiverse
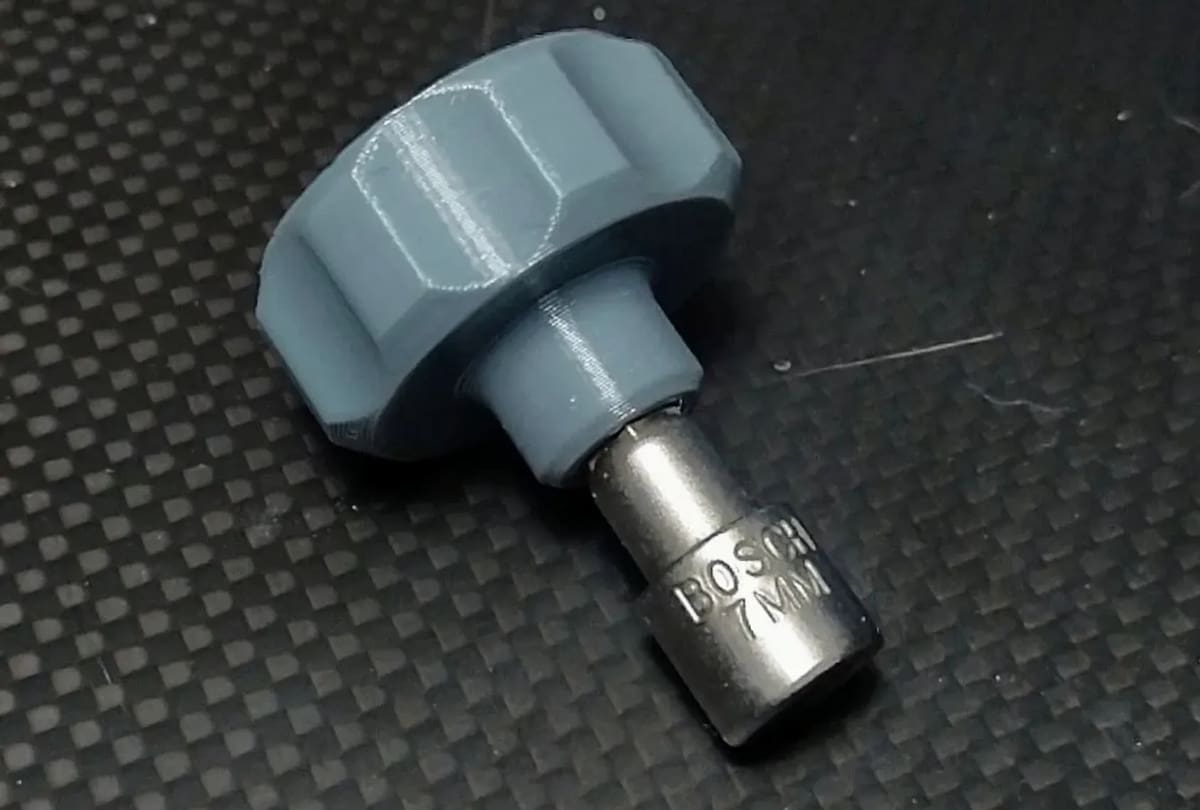
Tool Handle
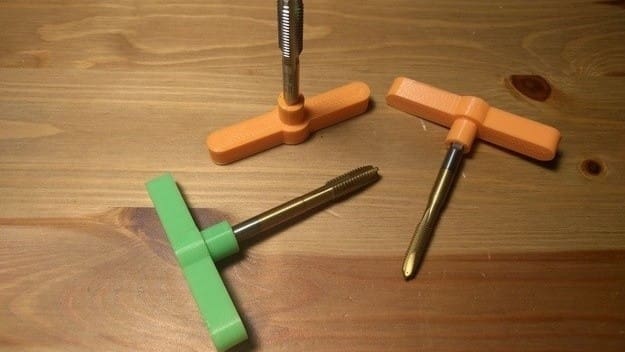
To make threads in metal and similar materials, it’s necessary to have the right adapter tool to manipulate the turning. This printed part may look simple and flimsy, but don’t be fooled. It can save you a lot of time and money if your adapter is lost, broken, or loose, but you still have the ends. It can also be useful for other tools with different tip types from 1 mm to 7 mm, such as the hex, for example.
One advantage of this material is that it’s lighter and softer to the touch, making it more comfortable in some cases. In the printing recommendations, the author notes that the tool can be printed with 40% infill, without additional supports or adhesion.
Gripping Tools
Cross Tweezers
Remixed from another model to adjust the sizing and tip, this design is a set of tweezers that can be printed in place, thereby requiring no assembly. Featuring a cross in the structure of their tongs, these tweezers leverage the filament material’s natural rigidity to squeeze an object.
Unfortunately, there are no available print settings that you can use to slice this model. For this reason, you’ll have to come up with your own, which shouldn’t be too hard. Make sure you use a high infill density and layer height to ensure the tweezers come out strong. After printing, be careful when removing the raft, brim, or other support material so as not to damage the tweezers.
- Who designed it? Hedo3D
- How popular/printable is it? This design of 3D printable tweezers has 33 makes, 1,170 downloads, and over 3,660 views.
- Where to find it? Printables
PCB Workstation with Articulated Arms

This is an ingenious model that deserves its featured status on Thingiverse. It’s a PCB workstation that comes equipped with articulated arms, making it perfect for when you’re working with electronics. So, if you’re working on a PCB and need an extra hand (or eight), be sure to print this essential tool!
- Who designed it? giufini
- How popular/printable is it? Five people have printed this model, and eight others have made remixes and it’s been downloaded by Thingiverse users over 37,000 times.
- Where to find it? Thingiverse
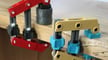
Yet Another Machine Vise
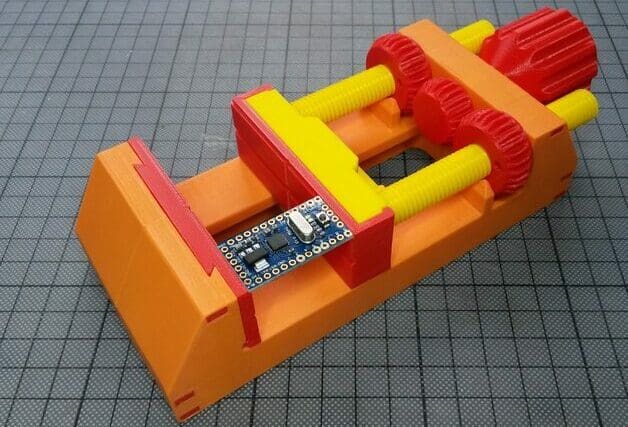
This fully 3D printable model is a perfect addition to any maker’s workshop! By simply turning the big knob in the back, you can clamp down and hold on to whatever it is you might be working on. Keep your DIY projects in your grasp with this machine vise.
While there are many different suggestions from the creator and makers alike, to maintain rigidity, in addition to considering the material and infill percentage, it may be useful to look into the strongest infill patterns.
- Who designed it? TheGoofy
- How popular/printable is it? This popular model has 867 makes, 54 remixes, and close to 300,000 downloads!
- Where to find it? Thingiverse
Hand-Screw Clamp
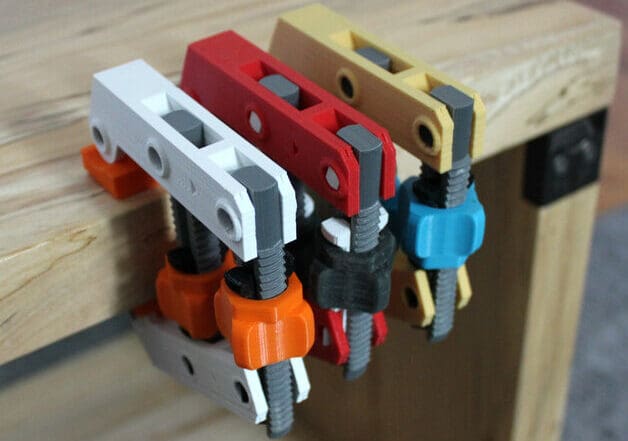
The hand-screw clamp is a popular model on Thingiverse for good reason. While its durability obviously doesn’t match that of a standard wood-working clamp, it does demonstrate 3D printing’s capabilities, and it’s extremely fun to build and do some light clamping with.
This model requires zero support structures, so after printing, no post-processing is needed before hopping into the assembly. Admittedly, this clamp can’t handle very much stress or strain, especially when printed in PLA. So, to put it in the designer’s own words, “Don’t get too crazy with it!”
- Who designed it? jakejake
- How popular/printable is it? 281 Thingiverse users have posted makes of this popular model, which is usually printed in multiple colors, while 19 have shared remixes, and over 412,000 users have downloaded the files.
- Where to find it? Thingiverse
Fractal Vise
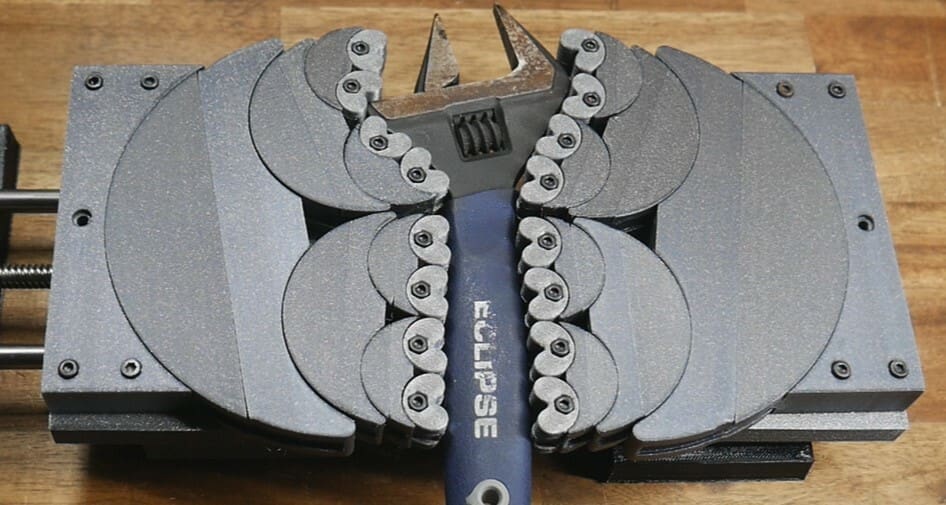
This complicated-looking model is a perfect addition to any project that requires a steady part to work on. The compound gripping mechanism, which is made of many smaller rotating parts, allows the vise to grip any oddly shaped part with ease and creates a steady base to work on.
The parts for this model are pretty simple to print and can be done in your material of choice, as long as the mechanical properties can withstand what you’re throwing at the vise. As with most of the models on this list, key points for a successful print are having a high infill percentage for strength and making sure that there’s little to no elephant’s foot, given that the extra material will change the tolerances for the moving parts.
- Who designed it? TeachingTech
- How popular/printable is it? With over 12,000 likes, 26,000 downloads, and 38 documented makes, this model should be easy to print with a high infill as it requires no support and is made of mostly basic shapes.
- Where to find it? Thingiverse
Bench Mountable Vise
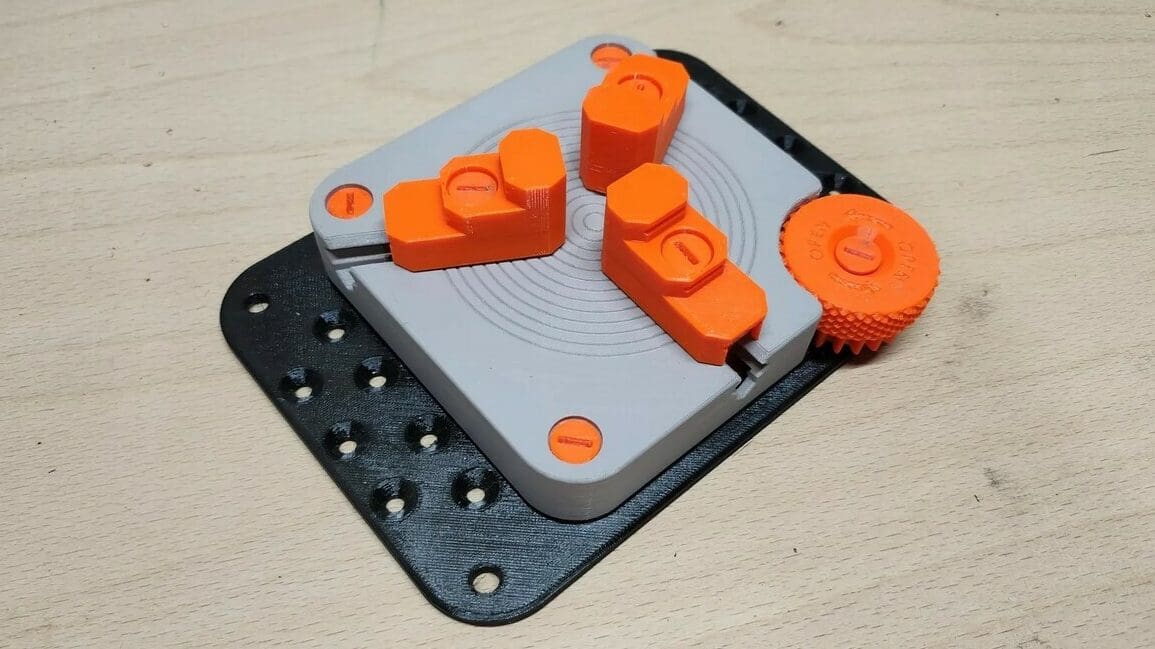
Certain projects demand that pieces be well-fastened or fixed in place. For this purpose, this model can help a lot. Composed entirely of printed parts, you won’t need anything else to make this vise. You’ll just need some filament and a 3D printer.
There are models available with two, three, and four jaws. The creator recommends using PETG and PLA for accuracy and ease of printing. The assembly requires aligning the jaws, which can be done with another alignment tool included in the kit. It’s also recommended to lubricate with oil at the end to ensure everything operates smoothly.
- Who designed it? Sneaks
- How popular/printable is it? With close to 20,000 likes, 45,486 downloads, and almost 450 makes, you can definitely make this project for yourself.
- Where to find it? Printables
License: The text of "Fix Anything Around the House With These 25 3D Printed Tools" by All3DP is licensed under a Creative Commons Attribution 4.0 International License.