Bring Your 3D Prints to Life: 30 Fun Arduino Projects That Move, Blink, and Think

Upgrade your 3D printing projects by adding an Arduino! Check out these Arduino 3D printer projects suitable for all skill levels.
Arduino is the beating heart of the maker community. The open-source boards are the go-to platform for turning code into real-world applications, enabling you to build devices that sense and work in the physical realm. When paired with 3D printing, possibilities multiply. Together, they allow you to manufacture professional-grade projects right from your desktop.
A vast number of innovative Arduino projects can be found on Instructables, hackster.io, or the Arduino blog. Since the range of Arduino projects online is vast, we’ve selected projects that you can create with a 3D printer, varying in difficulty and utilizing a range of popular Arduino boards.
No 3D printer? No problem. You can still build these prints by ordering professional-quality parts through Craftcloud, shipped straight to your door.
Robotics
Whether you’re a sci-fi fan or enjoy cool autonomous mechanisms, you can build your own robot with an Arduino as the brain and 3D-printed parts for the body.
SMARS
SMARS stands for Screwless/Screwed Modular Assembleable Robotic System, and these robots require fewer components that are easily assembled. They also perform a set task, such as following a drawn line or avoiding obstacles, with different sensor add-ons.
The SMARS modular robot was first published on Thingiverse in 2017 and soon earned a legion of fans. The simplicity of the SMARS has led many users to design and share their own models and add-on modules.
- Difficulty: Beginner
- Designer: tristomietitoredeituit
- Project page: Thingiverse
- Core components: Arduino Uno, motor shield, mini 150-RPM motors; SMARS electronics kit (alternative to buying individual components)
Super Bot Gears
Starting with Arduino can be daunting for a beginner, particularly if you’ve never seen a line of code. Here comes this cute and funny bot set that will help you start your journey in the Arduino world. It includes five projects of increasing difficulty, so you’ll be able to approach electronics with fun and grow your skill set as you move forward.
All the code and wiring diagrams were published by the creator, together with a video that shows some examples of how to use the various bots; for instance, you can’t miss the blinking project and the following potentiometer experiment.
Not all design options are robot arms, but as a starting point for learning and moving toward one or two, this is a great project.
- Difficulty: Beginner
- Designer: bzqp
- Project pages: Printables, Hackster, Arduino Project Hub
- Core components: Arduino Nano, HW-504 joystick, breadboard, 5-V LED, SG90 mini servo
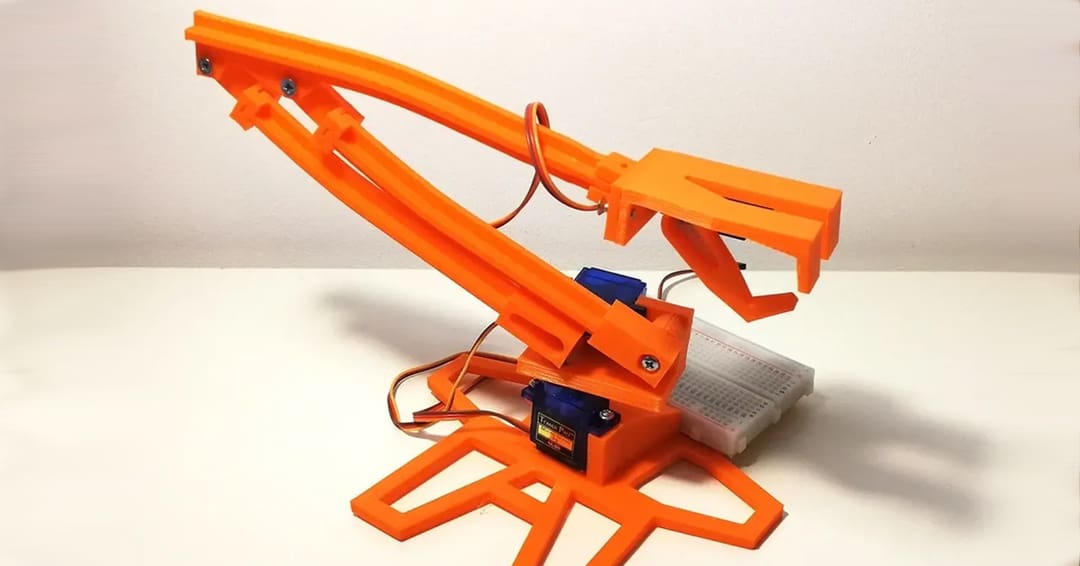
Robotic Arm
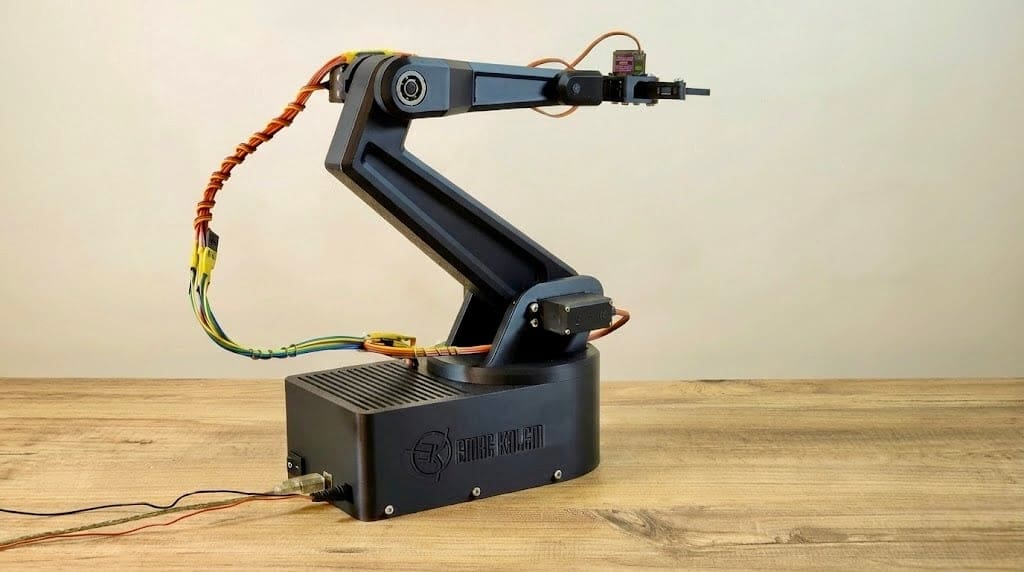
Robotic arms are a staple of advanced manufacturing, but they usually cost a fortune. This project by Emre Kalem brings that industrial-cool factor to your desk at a fraction of the price. It’s a 4-axis robotic arm that uses powerful standard servos for the heavy lifting and smaller micro servos for the gripper, giving it enough dexterity to pick up and place objects with surprising precision.
The design is chunky and robust, using 608 bearings (the kind found in fidget spinners and skateboards) to ensure smooth rotation at the base and joints. It’s controlled by an Arduino Uno or Mega, and the creator has provided code that allows for manual control via potentiometers or pre-programmed sequences. The community feedback highlights its sturdy build, though you might need to tweak the servo mounts slightly depending on the exact brand of motors you use.
It’s an excellent bridge between 3D printing and mechatronics, offering a tangible way to learn about kinematics and servo control.
- Difficulty: Intermediate
- Designer: Emre Kalem
- Project page: MakerWorld
- Core components: Arduino Uno, servos, bearings
Cyborg Hand
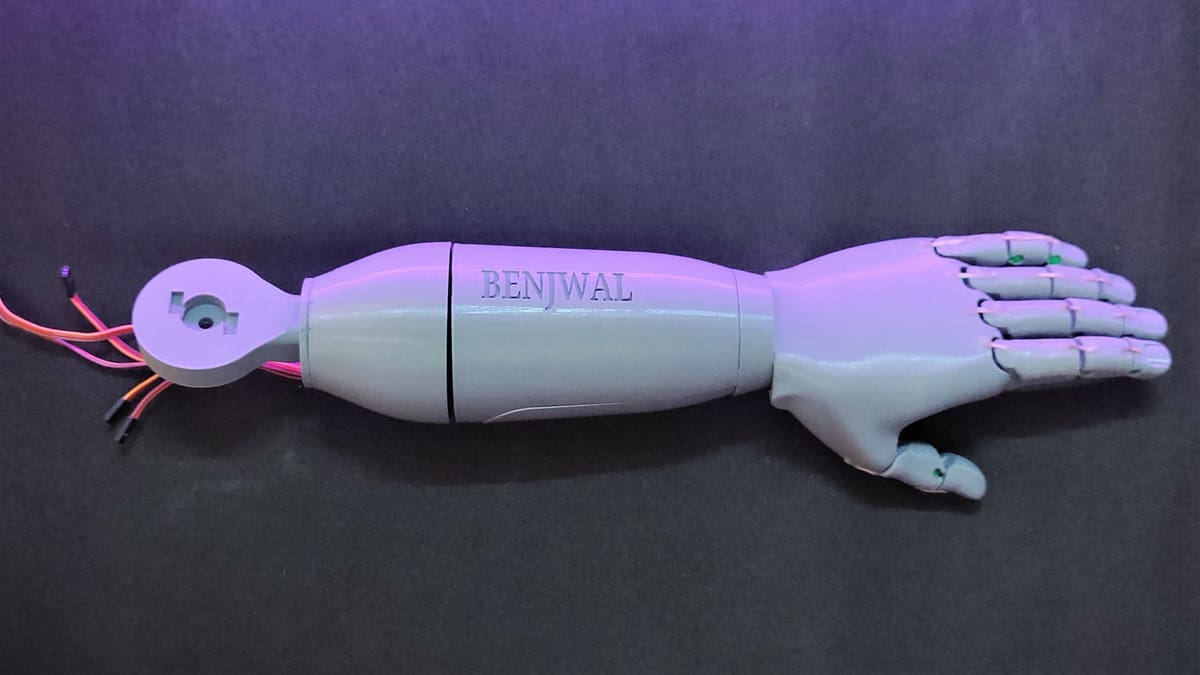
Inspired by sci-fi movies and a couple of open-source projects, engineering student Tanmay Benjwal created a life-sized cyborg hand platform for various applications. The project was designed in Tinkercad and Fusion, and is composed of 3D printed parts and electronics.
Finger and wrist movement is driven by five MG995 servos via string-and-pulley mechanisms, with an Arduino Uno controlling the entire assembly. The hand itself can be controlled in different ways, including simple potentiometers, VR gloves, and even direct coding (the author provides an example).
- Difficulty: Expert
- Designer: TanmayBenjwal
- Project page: Instructables
- Core components: Arduino Uno, wires, breadboard
PyBot SCARA

SCARA stands for Selective Compliance Assembly Robot Arm. It can extend and retract the arm using polar coordinates in the horizontal plane. For vertical motion, it uses an additional motor attached to a lead screw. Note that, unlike other types of robotic arms, SCARAs are always horizontally mounted, although they can also move vertically.
They can be adapted for different uses, and this case includes a clamp. The moving principle remains the same, and you switch applications by changing the toolhead.
This was chosen over other SCARAs out there because it’s an open-source project that aims to make it easily replicable and offers detailed documentation and 3D printable parts that aren’t hard to print.
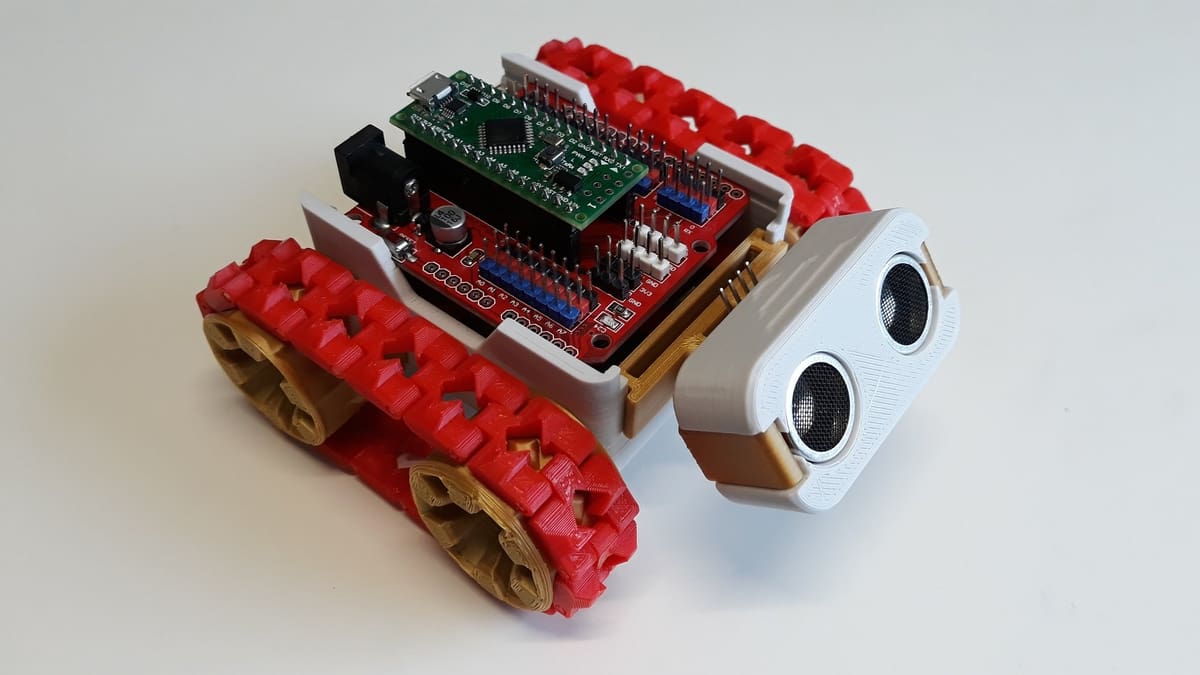
FPV RC Tracked Car plus Remote
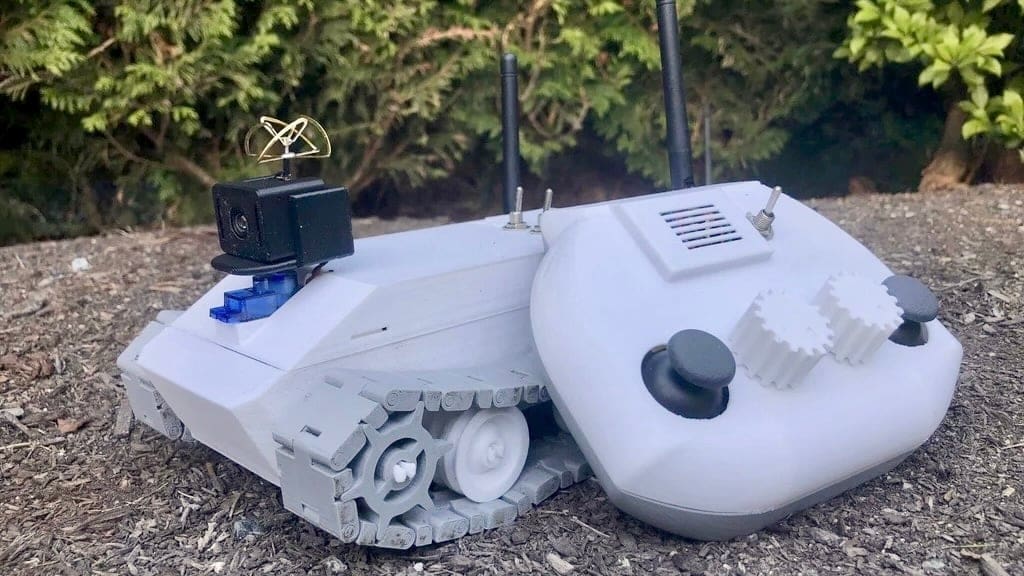
Ever wanted to drive a tank from the driver’s seat? This project lets you do just that, scaling the experience down to a desktop-sized rover. By combining 3D printed tank tracks with an FPV (First-Person View) camera system, user Morrisl4 has created a rugged little explorer that sends live video feedback to your laptop or phone.
The build is a comprehensive robotics lesson that requires you to assemble a custom remote controller using an Arduino Nano and joystick modules. At the same time, the tank is controlled by an Arduino Uno. The tracked system is designed to traverse rough terrain that wheeled robots might struggle with. The designer explicitly recommends using ABS for the FPV camera case to dissipate heat, while PLA is suitable for the chassis and tracks.
It’s an ambitious project that rewards you with a highly capable machine. The custom controller design is also versatile enough to be reused for future RC projects, making the effort even more worthwhile.
- Difficulty: Expert
- Designer: Morrisl4
- Project page: Instructables
- Core components: Arduino Uno, Arduino Nano, motors, FPV camera kit
Rover Robotic Arm

The Rover Robotic Arm is a super cool project for everyone entering the robotics world. You can make this impressive machine perform all sorts of tasks, as it’s essentially a tiny computer on wheels that can follow and help you.
The designer has included step-by-step instructions, 3D-printable files, and the Arduino code, so you don’t need to program anything, but you can customize the code if you know how to write it.
This cool robot uses different gear systems to drive its wheels and arms, and it can be controlled via Bluetooth! You can follow the creator’s tutorial to use it.
- Difficulty: Intermediate
- Designer: ProfBoots
- Project pages: Thingiverse, GitHub
- Core components: Arduino Nano, HM-10 Bluetooth module
Household / Fun
There’s no shortage of interesting IoT (internet of things) projects for your home or entertainment. Read on for our favorites!
Simon Game
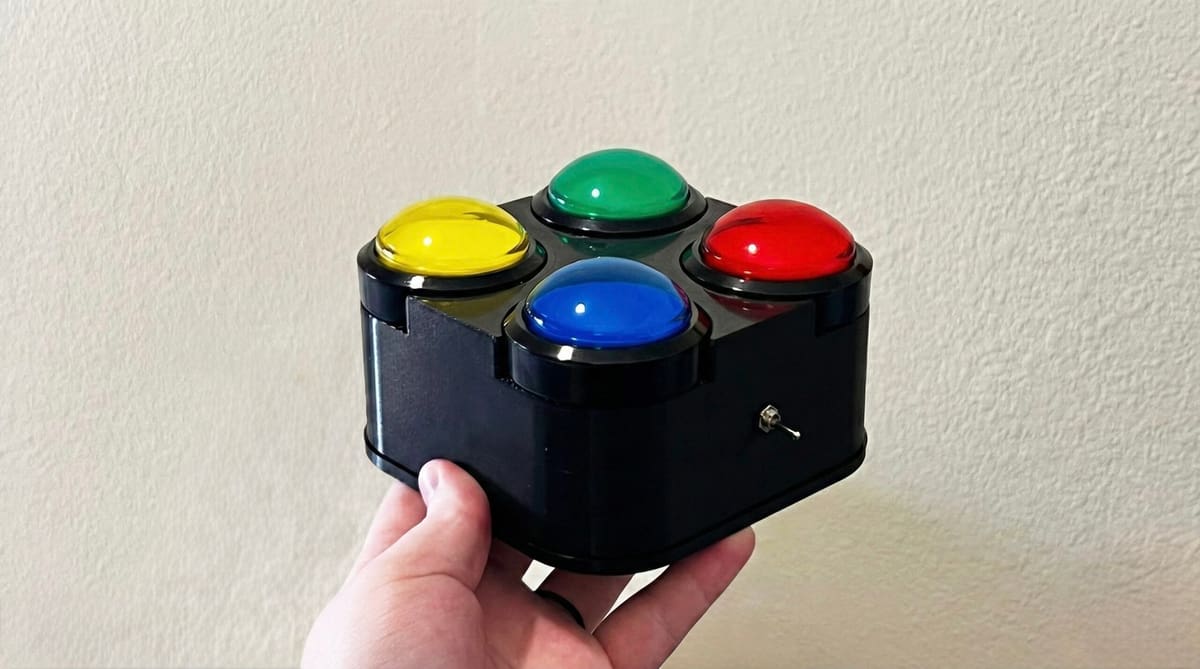
Do you remember the game Simon? It’s the classic short-term memory game where you have to repeat an ever-growing sequence of lights and sounds. It’s addictive, frustrating, and incredibly fun.
Instructables user christophersfactory has brought this nostalgia trip into the modern maker era with a robust, handheld version that you can build yourself. This project isn’t just about flashing lights; it’s a great deep dive into electronics. While an Arduino Nano handles the logic, the design cleverly ICs and transistors to ensure the big, satisfying arcade buttons light up both when the game plays a sequence and when you press them. The creator provides a custom PCB blueprint to keep things tidy, but you can also wire it up on a breadboard if you’re feeling brave.
The casing is 3D-printed in PLA and designed to be durable enough to withstand player frustration from button-mashing. The guide is exceptionally detailed, breaking down complex wiring into manageable steps, making it an ideal project to level up your soldering and circuit-building skills.
- Difficulty: Intermediate
- Designer: christophersfactory
- Project page: Instructables, YouTube
- Core components: Arduino Nano, 60mm LED arcade buttons, 2n222 transistors, small speaker
Macro Keyboard with e-ink Display
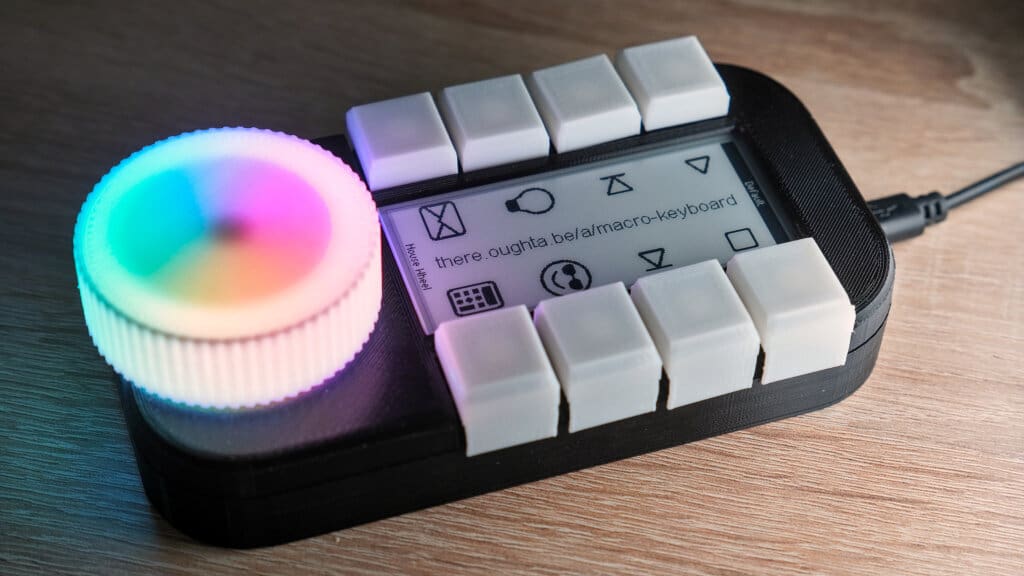
If you’re doing the same tasks over and over again, DIY macro keyboards can save you time. What differentiates this DIY project is the addition of context-based key configuration. In simpler terms, the actions triggered by the keys can be configured differently depending on which application you’re using.
For example, if you’re working in Autodesk Fusion, you could set the keys to trigger Fusion-specific keyboard shortcuts. And if you’re designing PCBs in KiCAD, you can set the keys to perform functions specific to the program. The best part is, you even get to see which key is assigned for what on the e-paper display!
In terms of documentation, this is among the most impressive projects in this article, as it includes plenty of helpful illustrations and detailed instructions, available in both video and text formats. Check it out if the idea of such a macro keyboard excites you.
- Difficulty: Advanced
- Designer: Sebastian Staacks
- Project pages: YouTube, There oughta be…
- Core components: Arduino Pro Micro (5-V version, not 3.3 V), E-paper display, Cherry MX switches, rotary encoder, RGB LEDs
SpaceMouse
Many 3D modelers swear by their SpaceMouse – and that’s totally fair, it’s an amazing accessory for CAD work. There have been many attempts to make open-source versions of the SpaceMouse, and this remix of Space Mushroom basically takes the best part of each design and combines them.
Even if you’re not planning to build it, the video is worth watching, as the creator goes through the journey of designing and building the first version in depth.
It’s not a particularly challenging project, but it’s worth noting that the wiring can be a bit tricky, as you will need to fit a lot of components in a small space.
- Difficulty: Advanced
- Designer: Teaching Tech
- Project pages: YouTube (V1), Printables (V2)
- Core components: Arduino Pro Micro, Arduino-compatible analog joystick, fasteners
Filament Maker
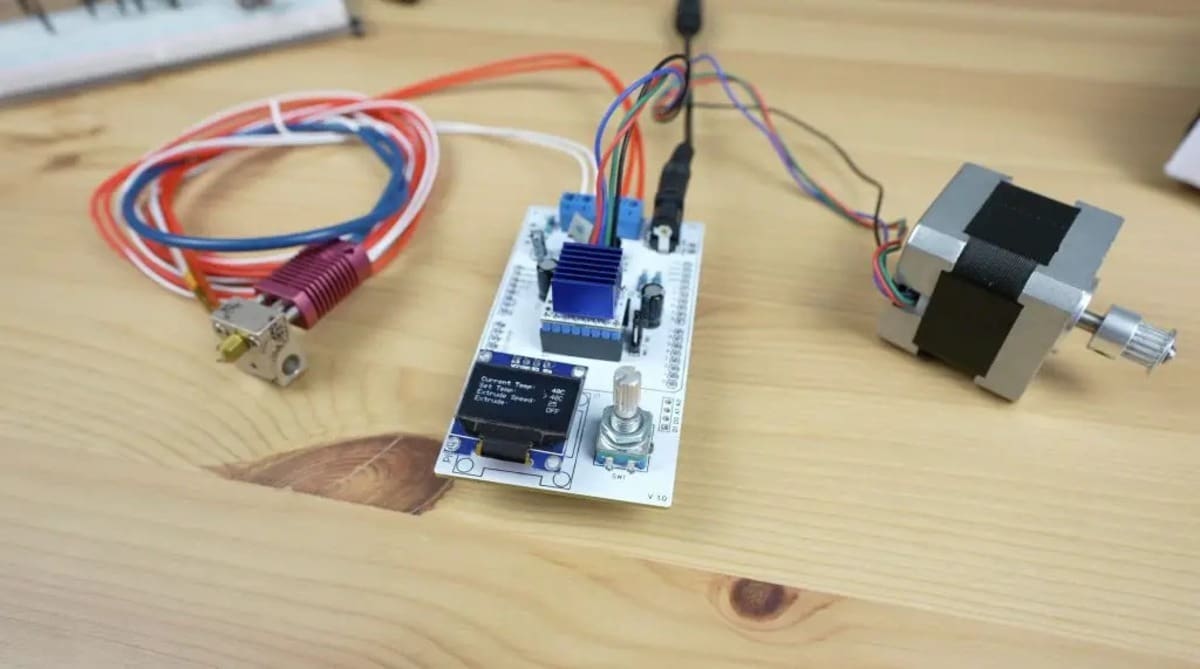
Upcycling old plastic bottles to PET-G filament you can 3D print with has become a thing in the community. The principle is straightforward. You melt a strand of a used plastic bottle in a nozzle and wind it on a spool for further use. The Arduino controls the stepper motors.
Michael Klements’ project is neatly documented and perfect for beginners who would like to try something slightly more challenging. The author has also prepared a PCB design for it, so if you want to make a more permanent version, you can order the PCB from an online vendor and solder the components yourself.
- Difficulty: Medium
- Designer: Michael Klements
- Project pages: YouTube, GitHub, The DIY Life
- Core components: Arduino Pro Mini, IRFZ44N power MOSFET, OLED display
Reusing 3D Printer Electronics
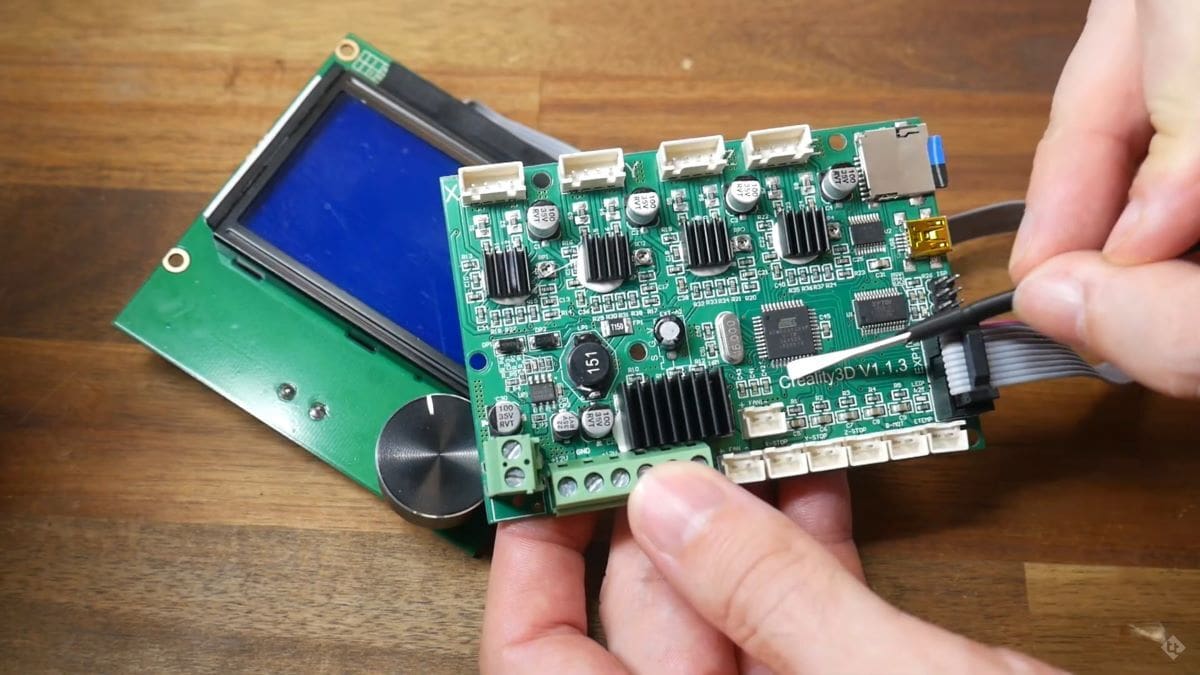
This is a problem 3D printing hobbyists can face: as they upgrade their machines, they eventually end up with stock electronics too good to throw away. A common example would be stock inferior 8-bit motherboards with noisy stepper motor drivers – you wouldn’t really want to reuse them for another printer. But why throw away something that works?
That’s where this guide comes in, showing you how to repurpose your 3D printer electronics for other projects, like running custom code on the controller board and even recycling the display.
3D printer controller boards are essentially Arduinos on steroids, with numerous 3D printer-specific electronics onboard. However, that doesn’t mean you can’t run Arduino on them and use them for other projects. All you have to do is flash the bootloader on the controller board, as shown in the video. As you can guess already, the display could be controlled with custom Arduino code, too.
A possible use case for this could be robotics projects that require stepper motors. Since the controller board already has the stepper motor drivers, it’s a great all-in-one solution.
- Difficulty: Advanced
- Designer: Teaching Tech
- Project page: YouTube
- Core components: Leftover 3D printer electronics
Lamps
While these are part of your household, you can also have them in your workspace. We decided to have them in a category of their own, to really let them shine.
Minecraft Lantern
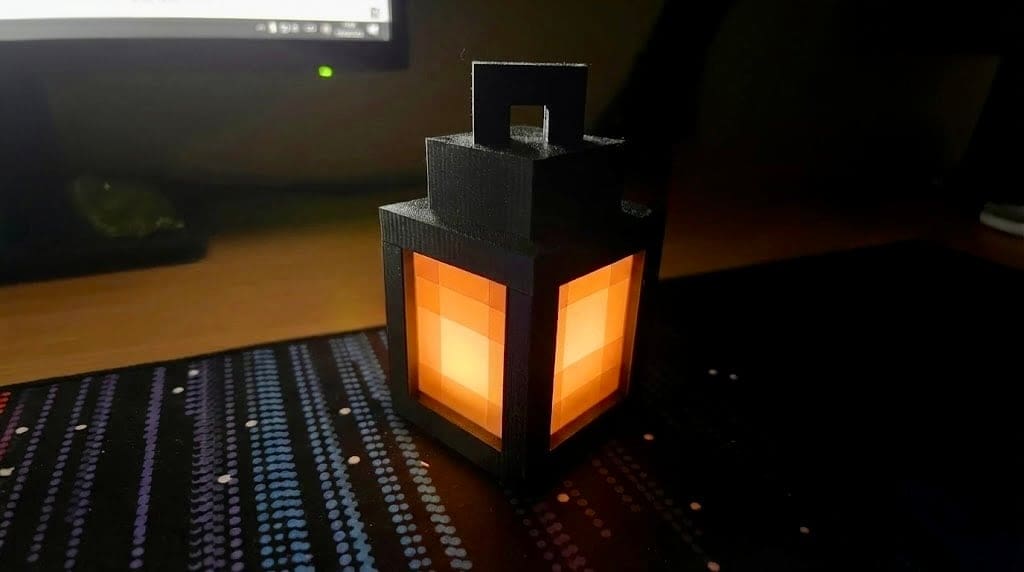
Bring a piece of the Overworld into your real life with this pixel-perfect replica of the Minecraft lantern. While there are many static props available, this project goes a step further by integrating an Arduino. Powered by a Wemos D1 mini and running WLED software, this lantern can be controlled via Wi-Fi, allowing you to change colors or set effects directly from your phone or Home Assistant setup.
The designer rebuilt this model from the ground up to improve tolerances, ensuring the parts fit together without breaking. The inner diffusers are printed in white to soften the glow of the NeoPixel ring inside, creating a convincing torchlight effect.
Best of all, the software side is surprisingly easy; the creator provides a web-based installer for WLED, so you don’t need to write a single line of code to get it running. It’s a fantastic weekend project for gamers who want to add some interactive flair to their setup.
- Difficulty: Intermediate
- Designer: iZboxo
- Project page: Printables
- Core components: Wemos D1 mini (ESP8266), LED ring or strip, wires
Mood Lamp
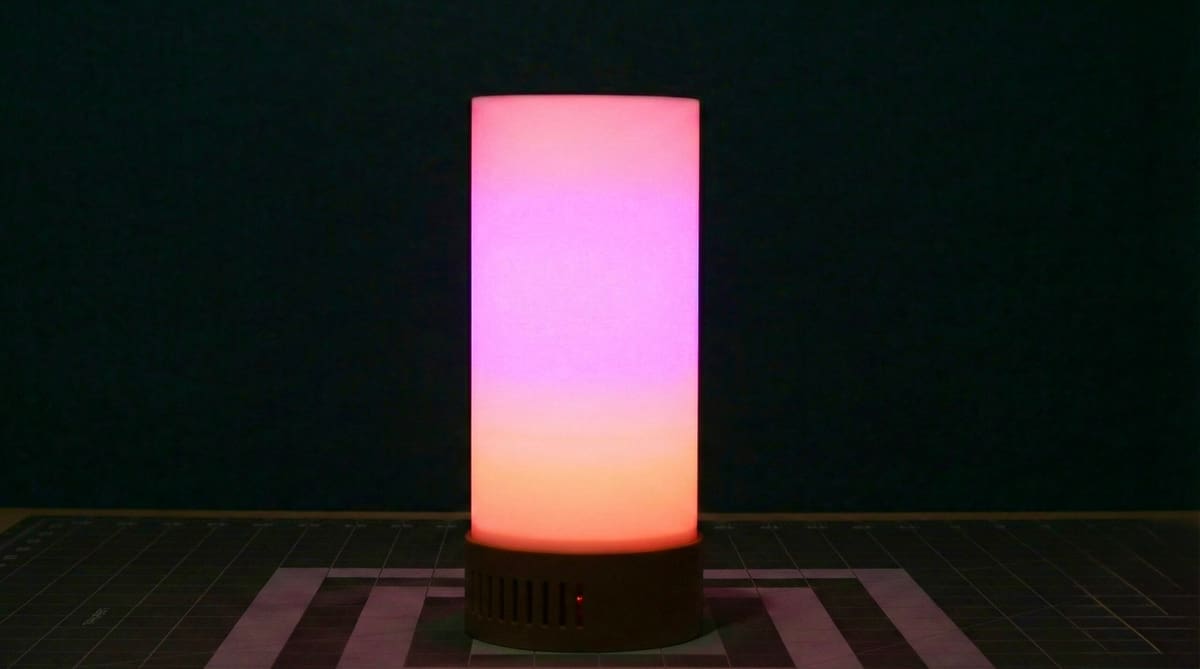
Lighting can completely change the feel of a room, and this 3D printed mood lamp is designed to do just that with style. Unlike standard lamps that use a single bulb, this project wraps a 2-meter strip of WS2812B LEDs around a central column, creating a seamless, spiraling tower of light. The outer shell is printed in a transparent or white filament to diffuse the individual LEDs into a soft, glowing gradient.
What makes this project special is its “standalone” nature. It doesn’t rely on an app or Wi-Fi; instead, it features a neatly integrated tactile button in the base. A simple press cycles through various pre-programmed lighting effects, from calming color shifts to energetic patterns.
The build is well documented for beginners, using an Arduino Nano to drive the logic and a DC-DC converter to handle power safely. The creator even included an optional cooling fan in the design, just in case you want to run those LEDs at full brightness for hours on end.
- Difficulty: Beginner
- Designer: BreaksnMakes
- Project page: Instructables, Printables
- Core components: Arduino Nano, LED strip, Step-Down converter, tactile button
Dino Night Light

Not all knowledge needs to be used for grown-up things. You can also have pretty awesome dinosaur lights controlled by an Arduino that can shine in different colors. This project is a perfect excuse to introduce your kid to your workshop.
These lights aren’t super hard to do, making it a great project to show off your beginner Arduino skills. You won’t need much, only the Arduino Nano, the 3D printed parts, and the LEDs, as well as a cover, like an acetate sheet. In addition to the STLs, the creator also provided the code files in the project’s download section.
- Difficulty: Beginner
- Designer: renevandeneertwegh
- Project page: Thingiverse
- Core components: Arduino Nano, WS2812B LED strips
Cube Light
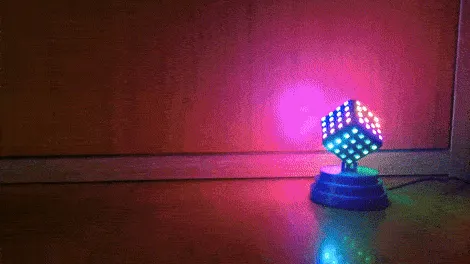
If you want to build a cool lamp, this model by Neeraj Rane might be just the right project. It’s driven by an Arduino that’s programmed to put on incredible light shows.
The lamp is made of individual LEDs that can change color independently, providing all the colors for the show. However, it does require a custom PCB in addition to the Arduino for mounting the LEDs. Still, all the schematics are shared, and maybe you could even design your own PCB.
- Difficulty: Expert
- Designer: indoorgeek
- Project page: Instructables
- Core components: Arduino Nano, 6x PCBs, 96x WS2812 LEDs, power supply
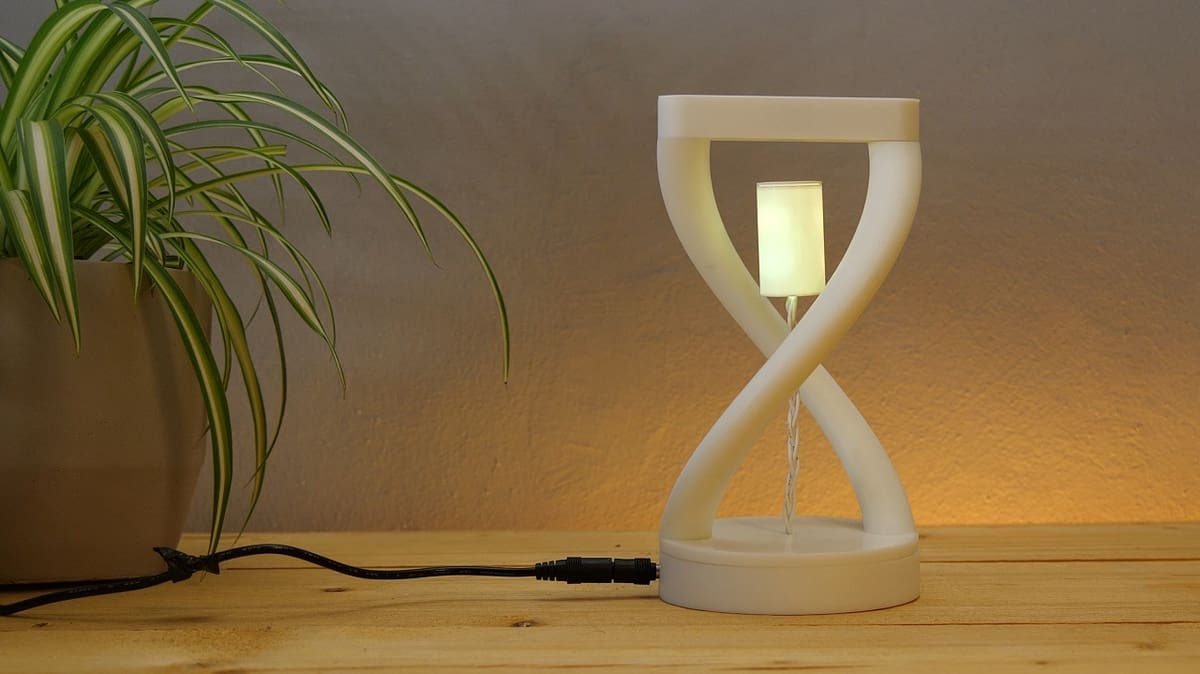
RGB Double Helix

Next up, this lamp dazzles, not just because of the changing lights, but also because of its spiraling shape. The good news is that, even if it looks intricate, it was designed to be an easy print, so you only need to follow the instructions.
Supports aren’t needed, while a brim can come in handy for some parts (though the maker notes they still managed without it). They opted for glow-in-the-dark filament for the diffusers, yet a clear option seems to have done the trick for some makers too.
Instead of a specific code, the creator refers to FastLED, so that those who choose to recreate the project can easily access a variety of LED chipsets and platforms, as well as different color, light, and power controls.
- Difficulty: Beginner
- Designer: Hedo3D
- Project pages: Printables, Thingiverse, YouTube
- Core components: Arduino Nano, 2x WS2812B LED strip, micro switch
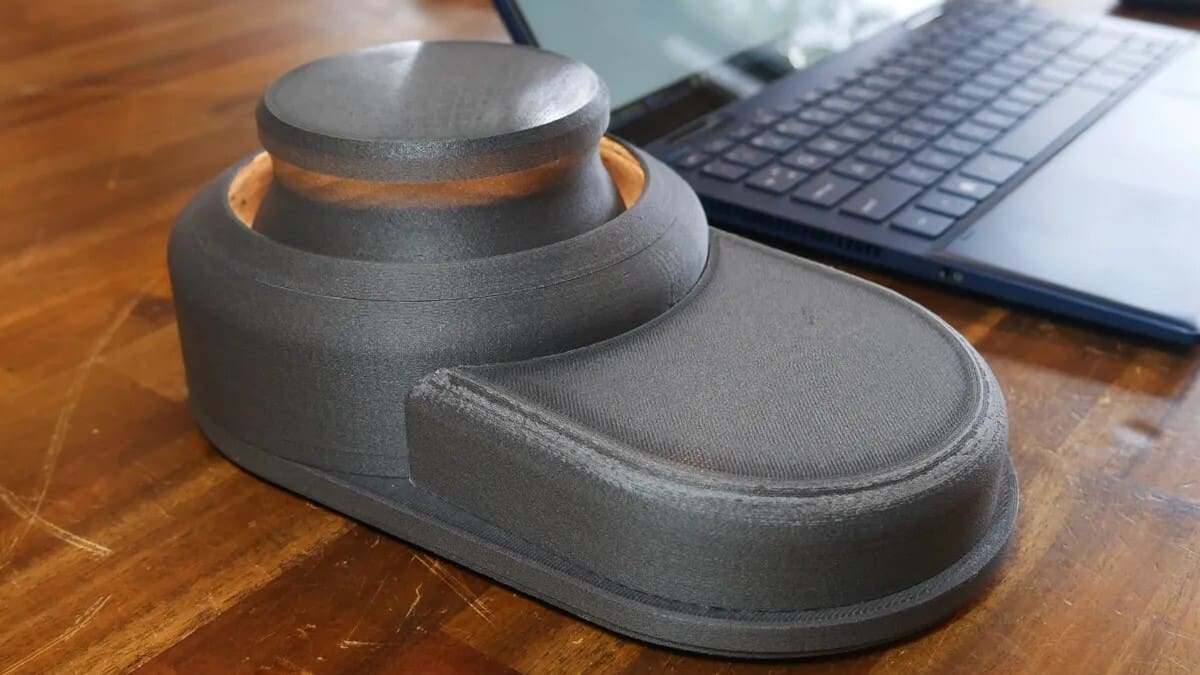
Magnetic Levitating Lamp
This simple yet mesmerizing lamp uses magnetic force to make its light float in the air. This project by TomoDesigns is aimed at beginners. The tutorial itself is well documented, though there’s a bit of soldering involved.
The lamp is made of 8 3D-printed parts, a few small magnets, and a handful of electronics, like LEDs, flexible silicone wiring, and, of course, an Arduino Nano. There’s also an optional magnetic switch feature that turns off the lamp when the light is removed from its floating position.
- Difficulty: Beginner
- Designer: TomoDesigns
- Project page: Instructables
- Core components: Arduino Nano Every, WS2812B LED strip, magnet, magnetic switch
Cool Machines
In this next category, we’ll bring you some projects that can solve some niche issues (if you can consider them that). Whether super useful or not, they’re cool nonetheless. After all, maker projects should be fun as well as functional!

Rotating Display Table
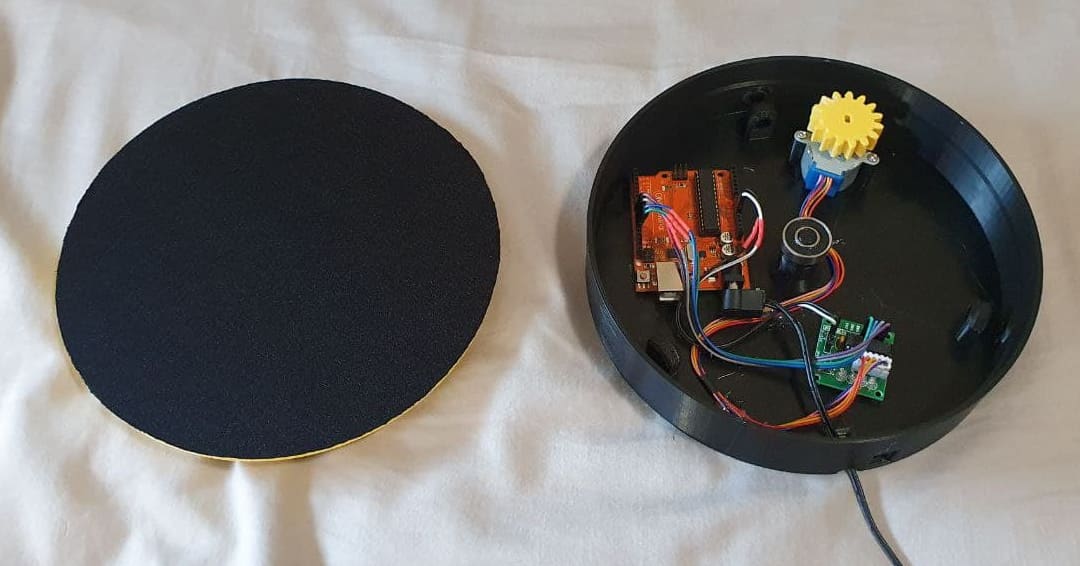
This motorized turntable can be useful for a variety of things. In particular, it helps you with your shots if you’re a photographer or a videographer, but it can also be used for 3D scanning. In fact, turntables can be life-changing when you’re using a 3D scanner because they allow you to be more precise and constant in the scanning process.
The design is simple and uses only four 3D-printed parts, all in PLA. You can use a low infill, such as 10%, and no supports are needed. Assembly is easy: all the components fit inside the base. You’ll need an Arduino (the creator opted for a Nano) and a stepper motor that will rotate the base, thanks to the gear that will attach to it.
- Difficulty: Beginner
- Designer: Basement_Creations
- Project page: Thingiverse
- Core components: Arduino Nano, stepper motor, stepper motor driver, power supply
MIDI Controller
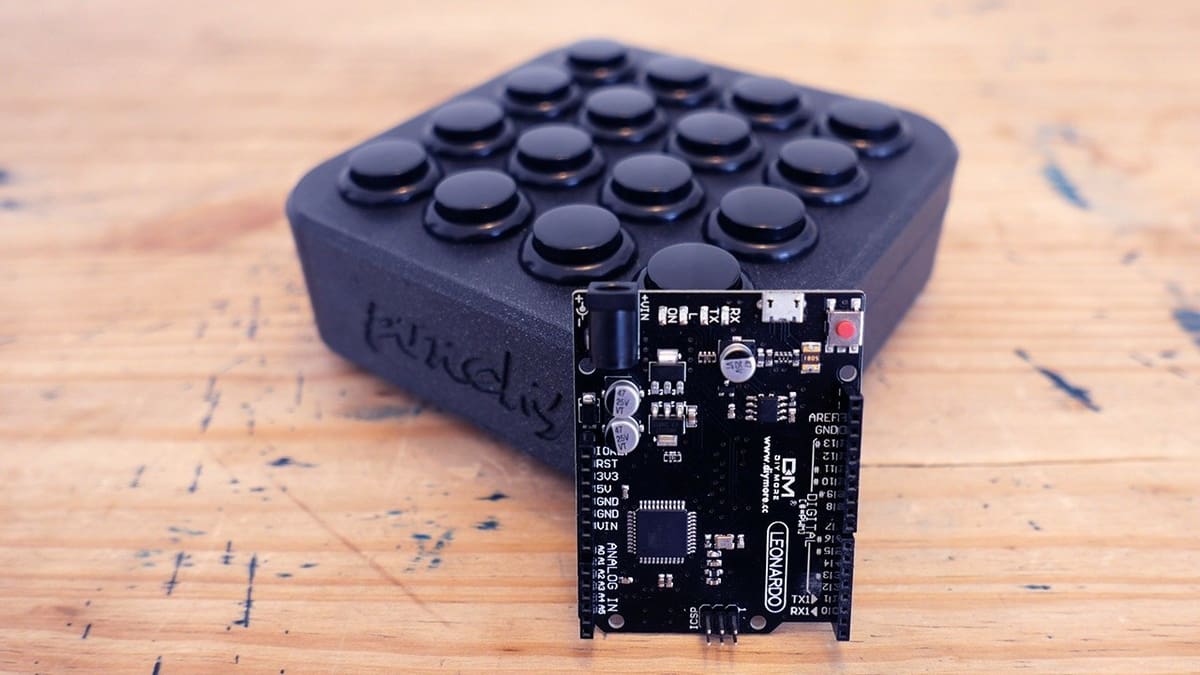
This one’s for music lovers: You can build your own MIDI controller with an Arduino and arcade-style buttons!
For those who aren’t familiar with the term, MIDI connects instruments, phones or computers. You can then trigger or control sounds via your computer or smartphone to make music. The difference between a traditional electronic instrument and a MIDI instrument is that MIDI controllers can control sounds on your computer, but they don’t generate any sound by themselves.
Since this one is a 4×4 button controller, you don’t even need to learn how to play any instrument in order to play it. Use it to make beats or control various software synthesizers. It’s a super fun project that’s not that complicated to put together. Definitely consider giving it a shot if you like making music!
- Difficulty: Medium
- Designer: Leandro Linares
- Project pages: Leandro Linares, YouTube
- Core components: Arduino Leonardo, 16x Arcade-style buttons
Motorized Camera Slider
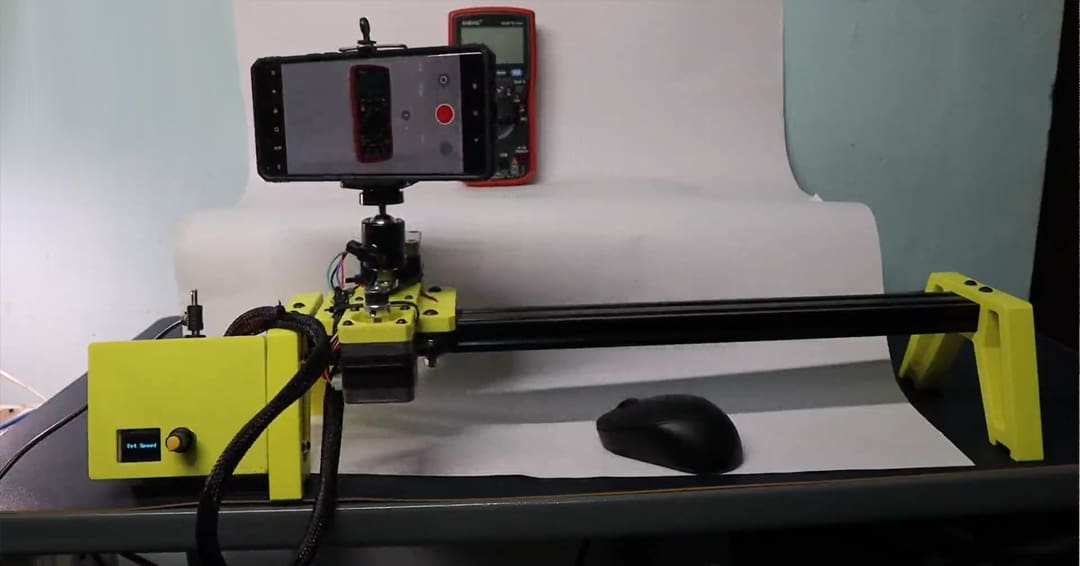
If you like filming videos, you’ve probably heard of camera sliders. These structures are used for cool camera movements and are usually done on professional hardware. Manual rigs can be cheap, while motorized ones are more expensive. So, why not take advantage of your own 3D printing and Arduino knowledge and build a motorized camera slider yourself?
This slider will use two stepper motors and a limit switch controlled by an Arduino Nano to move the camera setup. In this way, you’ll be able to slide the camera but also to pan it for even more complex videos, controlling the whole system directly from the slider of the machine – no PC or smartphone required. And you’re not limited to a specific device; you can go for a smartphone, DSLR camera, or even an action cam, depending on the setup you’re after.
- Difficulty: Intermediate
- Designer: Jobit Joseph
- Project pages: CircuitDigest, YouTube, GitHub
- Core copmonents: Arduino Nano, 2x NEMA N17 stepper motors, OLED display, limit switch, rotary encoder module
High-Speed Pen Plotter
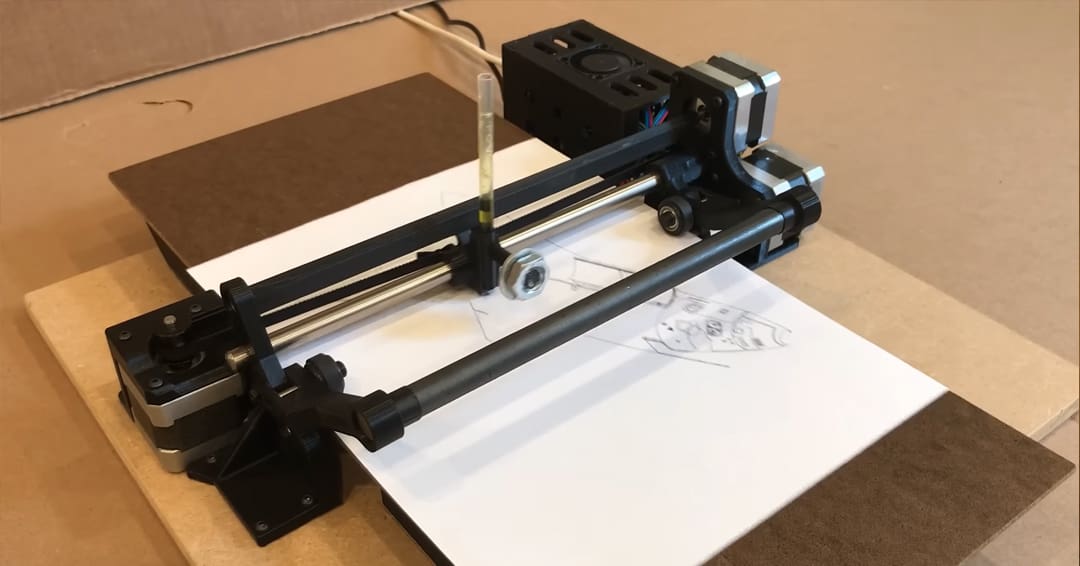
If you’re not very good at drawing but love art, you can still create drawings with this cool project. A pen plotter is a type of drawing machine that uses pens or markers to create intricate designs on paper and other materials.
This pen plotter model uses a grit roller system to move the sheet along the Y-axis, a mechanism common in vintage machines that enables high speeds. It’s fascinating to watch in action.
On the software side, the project creator mentioned they used Inkscape to generate G-code from a vector image. This G-code is then sent to the Arduino running on GRBL.
- Difficulty: Expert
- Designer: IVProjects
- Project page: GitHub
- Core components: Arduino Uno, CNC shield V3, 3x A4988 stepper drivers
PC Volume Controller
While all operating systems have an integrated volume controller, nothing beats the convenience of having a physical volume controller within reach. It can be handy for gamers, streamers, or creators, and, in addition to the elegant case, it also features illuminated application icons for the corresponding knobs.
The documentation includes the 3D print files and the Arduino code. The video shows how to assemble the device from scratch. We especially recommend this for beginners because the project requires no soldering: all connections are made with jumper wires.
Since it’s super easy to build one, why not make a couple and gift them to your streamer friends?
- Difficulty: Beginner
- Designer: SNR Tech Bytes
- Project pages: Thingiverse, YouTube, GitHub
- Core Components: Arduino MKR Zero, rotary encoders, 5x NeoPixel mini buttons
Toys
And if you thought that the previous projects were fun, these offer even more entertainment!

Bluetooth Nerf Turret
In this project, you’ll find out how to make a 3D printed Bluetooth-controlled turret that can shoot Nerf darts. The turret moves via two servo motors, and the shooting mechanism comprises two DC motors that drive the rollers to launch the dart. To control the turret, you can either use the PC software or the mobile (Android) app.
The site includes everything you’ll need to make the turret, including the software. While the creator states that it’s not an especially complex project, given the variety of parts and connections required, some background knowledge may be beneficial.
Either way, it’s a fun weekend project for beginners looking to level up or for those looking to build together with their kids and share their knowledge.
- Difficulty: Intermediate
- Designer: LittleFrenchKev
- Project pages: GitHub
- Core Components: Arduino Nano, DC motors, Bluetooth module, servo motors
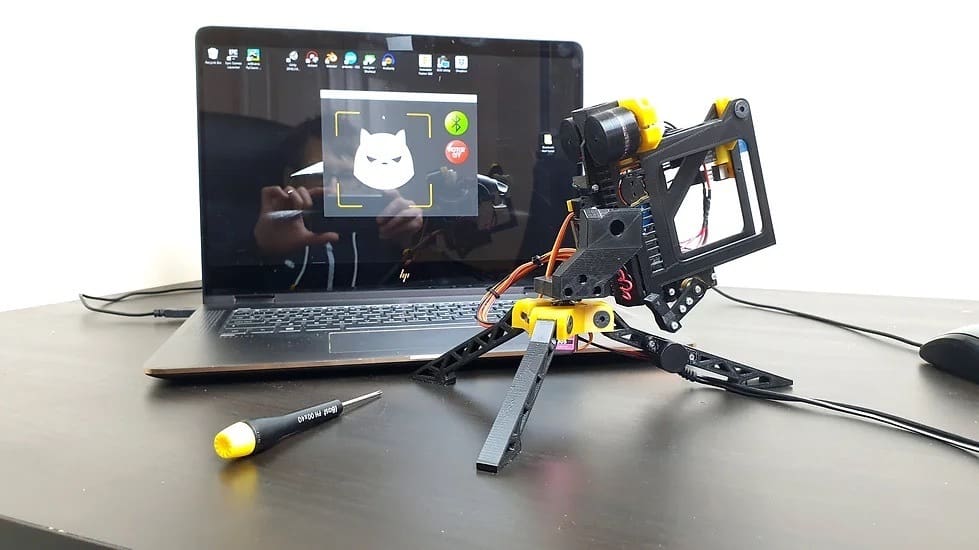
Animatronic Eyes
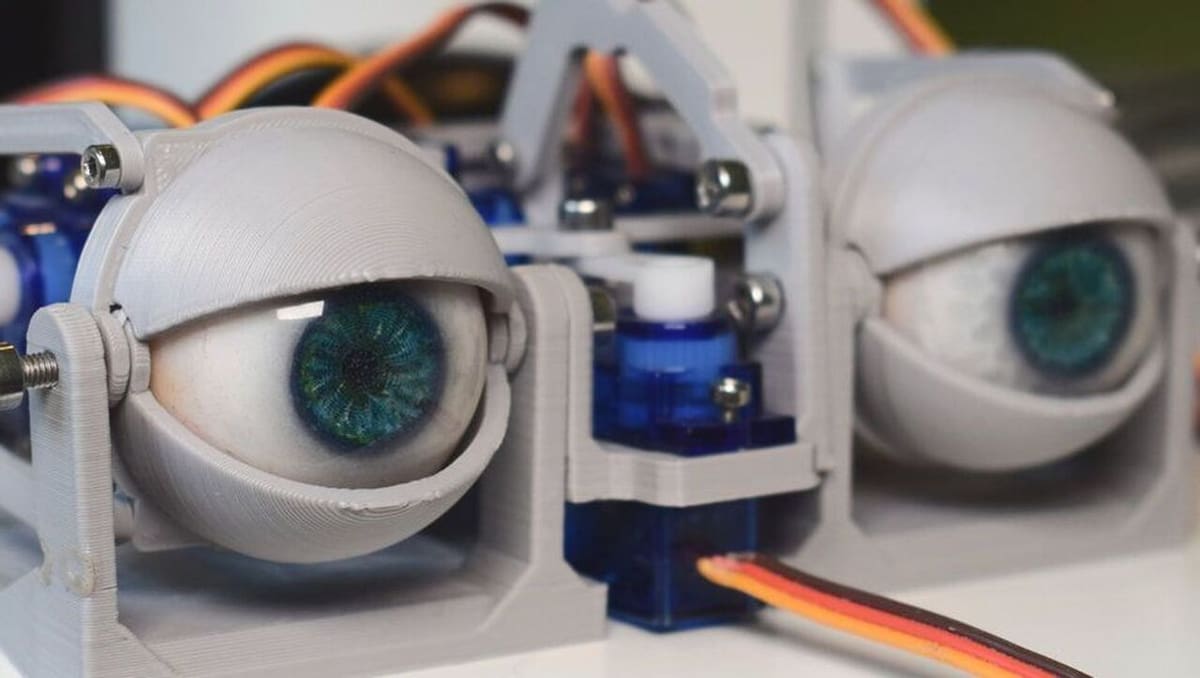
Want to get started with robotics? You definitely can’t say no to these googly eyes that you can control with your Arduino! This simple 3D printed animatronic eye mechanism is an example of how you can do some very cool stuff with a few components.
The project may look a little intimidating, but it’s basically just printing the files provided and assembling all the components. The movements of the eyeballs are controlled by six servos, driven by a 16-channel servo driver (an 8-channel servo driver would work as well).
The author provides a thorough, step-by-step walkthrough of the assembly process, along with mechanical diagrams, a circuit schematic, and example code, all available on the website.
All in all, this is a pretty fun project that can also double as a spooky Halloween decor!
- Difficulty: Medium
- Designer: Will Cogley
- Project pages: YouTube, Nilheim Mechatronics
- Core components: Arduino Uno, 6x micro servo, 16-channel servo driver, joystick
Drone
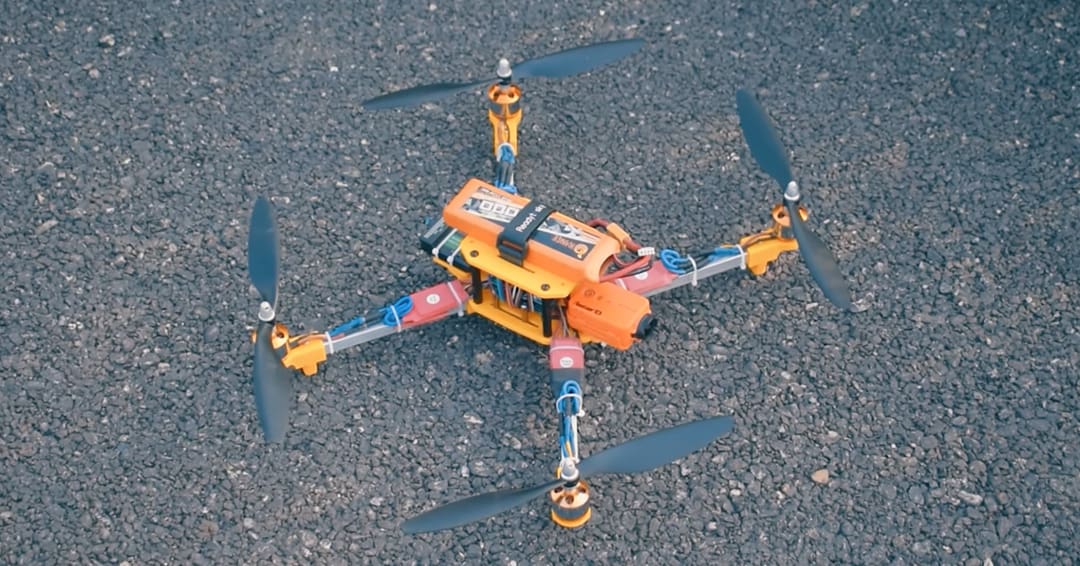
Drones have revolutionized the way we capture aerial footage for cinematography and photography. They’re used across many industries, including real estate, tourism, and filmmaking. If you want to enter this tech world, you’re in the right place: with a bit of filament and an Arduino Uno, you’ll be ready to go.
The creator provides the 3D parts, the Gerber files, and the schematics on Cults for around $6. They have also created detailed videos about the project, one regarding the electronics and the other on the design. Since this drone will fly outdoors, it’s best to choose PETG over PLA.
Clocks
There are many ways to visualize the current time, and the maker community has naturally explored them. Let’s dive into a few creative Arduino-based clocks you’ve probably never seen before.

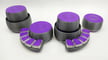
Analog Digital Clock
This is one of the most mesmerizing clock projects you will ever see. Inspired by the high-end ClockClock 24 art piece, this build uses 24 individual analog clock faces to display the time digitally. The hands of the clocks rotate not just to tell time in the traditional sense, but to form the shapes of digital numbers across the array.
We won’t lie to you, it’s a massive undertaking. The project involves printing 24 custom clock modules, each driven by its own Arduino Nano and stepper motors, all coordinated by a master Arduino. The creator, ihart, calls it a “reincarnated” project, having rebuilt the documentation after it was lost—and the result is an incredibly detailed guide. You’ll learn everything from custom PCB assembly (essential for managing 48 motors!) to master-slave I2C communication.
While the bill of materials is higher than average (around $500) and the print time is measured in weeks, the result is a museum-quality kinetic sculpture that you built yourself.
- Difficulty: Expert
- Designer: ihart
- Project page: Instructables
- Core components: 25x Arduino Nanos, 48x stepper motors (28BYJ-48), custom PCBs
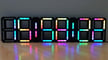
Lazy Grid v2
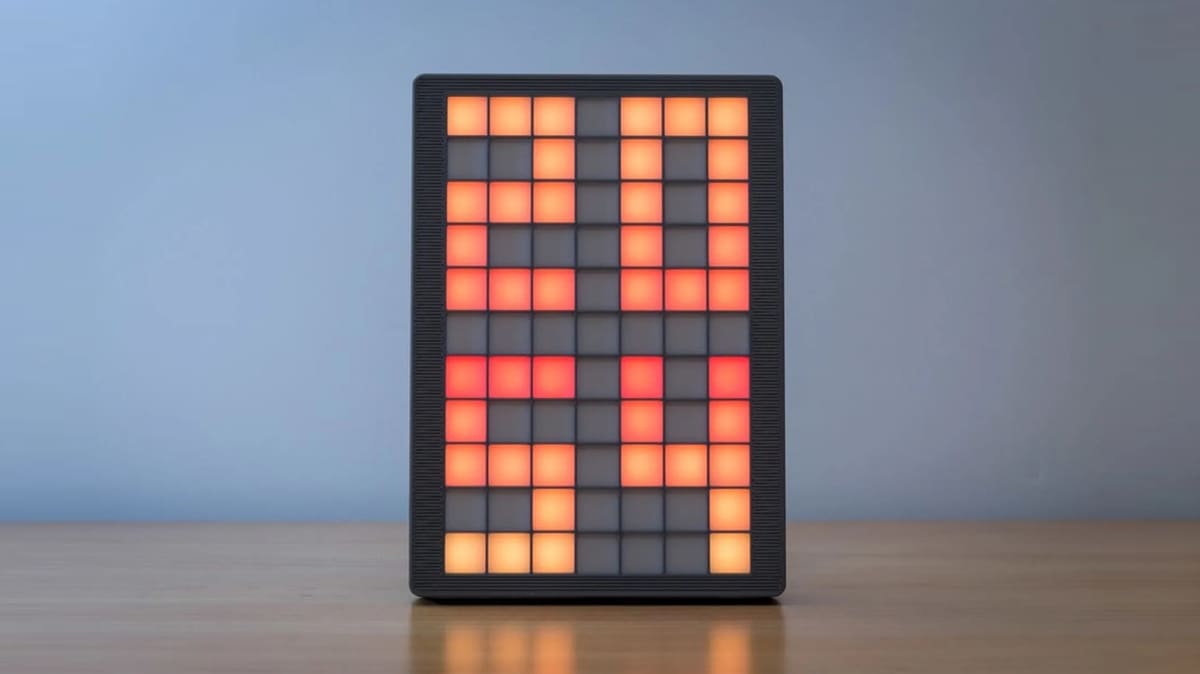
The Lazy Grid Clock v2 is the latest version of a colorful digital display programmed and controlled by an Arduino. It’s a slick, modern clock that not only helps you keep tabs on the time, but will also be a conversation piece when you’ve got guests over.
The color and brightness can be adjusted using the two buttons, as can the time display format (12h or 24h). The 3D printing part of the project is easy, and assembly is not too complicated, as it requires only a handful of screws in addition to the electronics hardware.
- Difficulty: Intermediate
- Designer: parallyze
- Project pages: Printables, Instructables
- Core components: Arduino Nano or Arduino Pro Mini, DS3231 RTC module, 83x WS2812B LEDs, 2x push buttons
Hollow Clock

This unusual design has become a classic for a good reason: it seems magical. The lancets of this hollow clock appear to be floating in the air. If you love this project, good news: you can build one with your 3D printer and an Arduino Nano!
An Arduino Nano drives a mechanism moved by a stepper motor and magnets, and the mechanism is enclosed in 3D-printed parts. The wiring isn’t complicated, but it’s a bit tricky to route everything in the case, so be careful when doing so. And as for coding, you don’t need to worry about writing it if it isn’t your strongest suit, as the code is precompiled.
On the other hand, for skills that’ll come in handy for setting everything up, you’ll need to solder and assemble the components.
- Difficulty: Intermediate
- Designer: Shiura
- Project page: Instructables
- Core components: Arduino Nano, 28BYJ-48 stepper motor and driver board
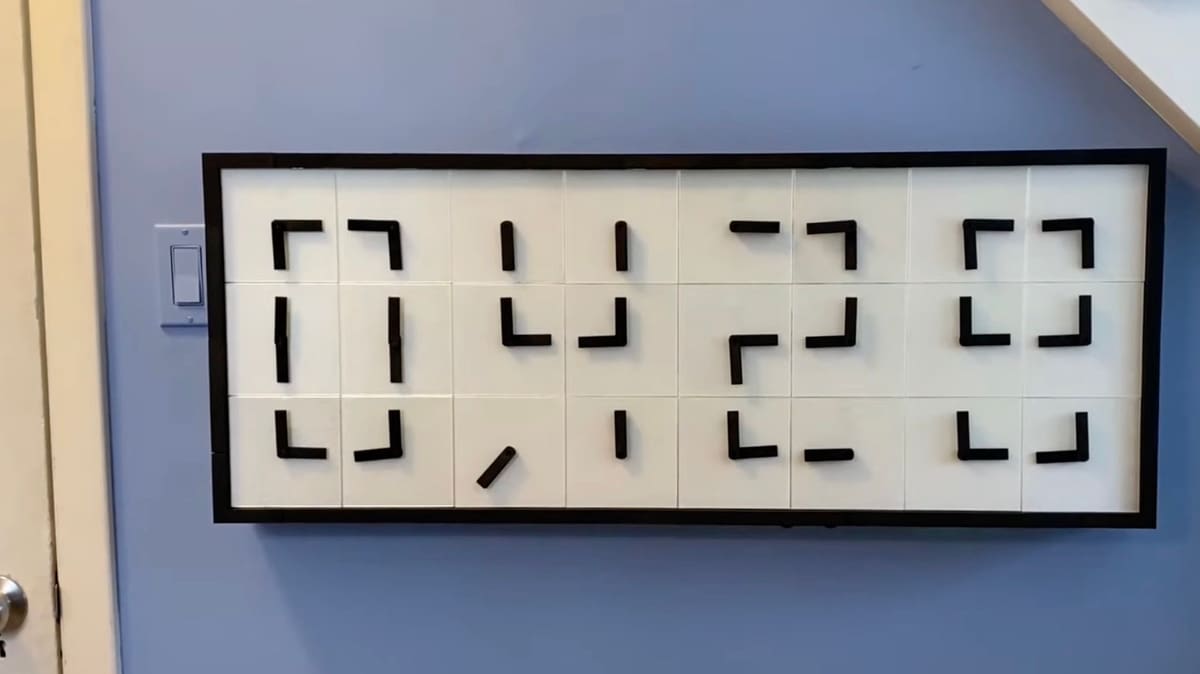
Kinetic Digital Clock
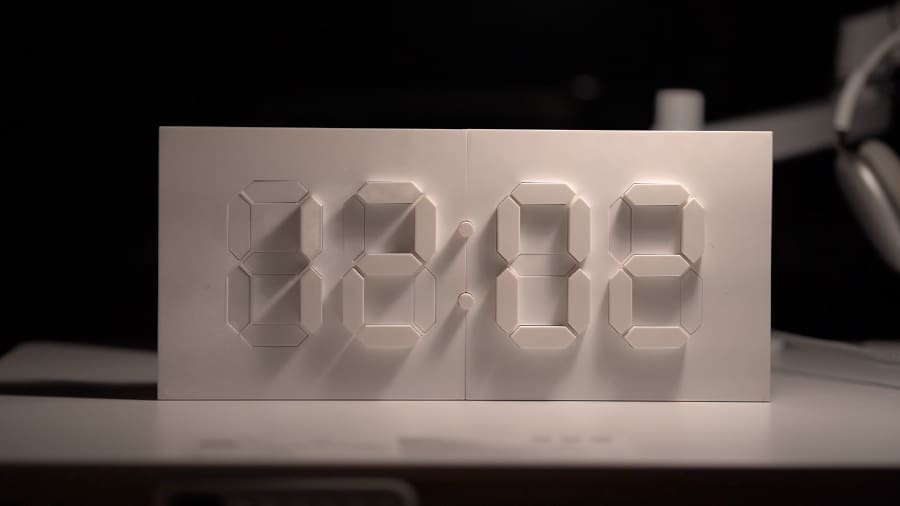
This project combines the analog and digital worlds. The Kinetic Digital Clock uses a seven-segment display, but with moving segments instead of LEDs or electronic displays to accurately tell time.
You might already have come across this concept online, but Instructables user alstroemeria has perfected it. The project uses an Arduino Mega as the control brain and a sensor shield to control all 30 servos that move the segments.
It’s undoubtedly a challenging project, but it’s definitely worth the time and effort.
- Difficulty: Expert
- Designer: alstroemeria
- Project page: Instructables
- Core components: Arduino Mega, sensor shield, 30x servos, DS3231 RTC module
License: The text of "Bring Your 3D Prints to Life: 30 Fun Arduino Projects That Move, Blink, and Think" by All3DP is licensed under a Creative Commons Attribution 4.0 International License.