We’ve seen a number of examples detailing how additive manufacturing is revolutionizing the space exploration industry, specifically when it comes to the rockets and satellites we launch into outer space. It turns out you don’t need to be a rocket scientist to shed light on a spacecraft.
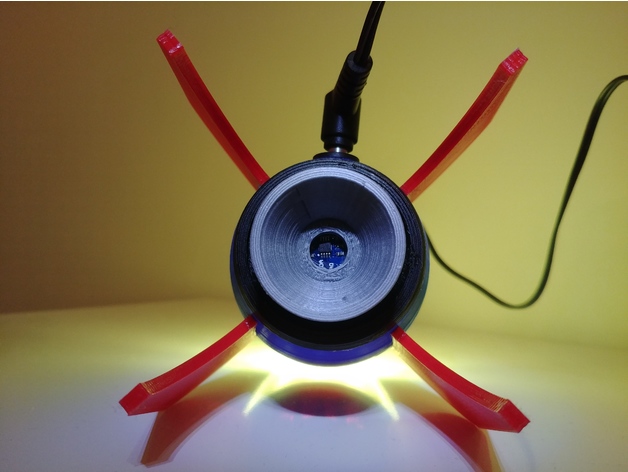
No, you won’t be able to watch this 3D printed Retro Rocket LED Lamp lift-off far beyond the Earth’s atmosphere, but you can use this little rocketship to light up your room and read the temperature of the surrounding environment.
Created by UK-based engineer and maker Vahe Agababian, this 3D printing project is ideal for intermediate to expert-level makers that have a 3D printer and some basic soldering experience. The designer was inspired by a popular room temperature thermometer/nightlight and decided to create his own lamp in Fusion 360.
Quickly becoming a popular project on Thingiverse, we decided to take a closer look at how to build this Retro Rocket LED Lamp on your own.
What You Need & How to Build it
The STL files for the Retro Rocket LED Lamp can be downloaded from Thingiverse. Keep in mind that the designer has issued a warning that the LED rocket lamp is just a novelty item, and that you should carefully make and use it at your own risk.
Agababian states that all five of the parts should be 3D printed with support structures. For the nose cone, which is where the light will emanate from, you should use transparent PLA with 3 wall thickness and no infill.
Aside from the 3D parts, you’ll also need a handful of other components. Here’s the checklist:
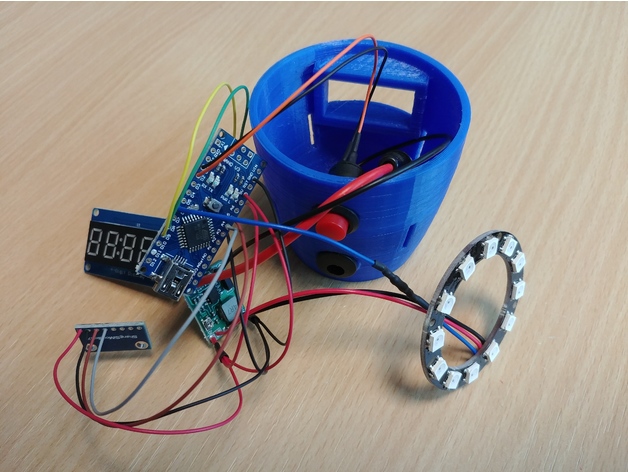
- Arduino Nano v3
- Buck Converter
- 12-bit WS2812 LED Ring
- TM1637 4 Digit 7 Segment Display
- MCP9808 Temperature Sensor
- SPST NO Momentary Button
- DC Power Socket
- 5 x 20 mm Inline Fuse Holder
- 5 x 20 mm 500 mA Glass Fuse
- 470Ω resistor
- Heatshrink
- Kapton tape
- Hot-melt Glue
- Superglue
As you might have inferred from the parts list, there will also be some soldering involved in this project. The designer shared the circuit diagram on Thingiverse for you to follow along with.
The lamp itself is powered by the Arduino Nano v3 and the 12-LED NeoPixel ring. Using the MCP9808 temperature sensor, the ambient temperature is detected and showcase through the TM1637 4-digit 7-segment display. In order to access different lighting modes or brightness levels, the maker added a momentary push button.
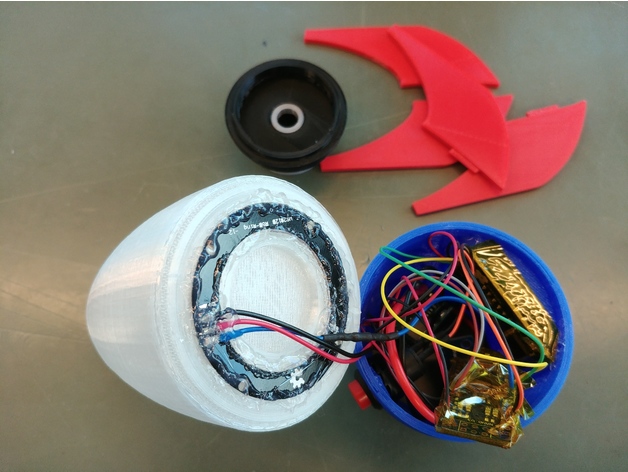
For the assembly, use superglue to attach the fins to the body of the rocket and the thruster to the base. The designer opted to use a couple of drops of hot-melt glue to the nose cone so that it could be opened up again if necessary.
The electronics will require a tight squeeze into the base of the rocket, so the header pins should be removed from the boards and wires soldered in place before putting it all in place. Use the Kapton tape or another type of insulation material to cover the boards and prevent shortages.
The designer behind this project seems to be tweaking it a bit, and some additional instructions may be needed to complete this rocket. Feel free to contact Agababian via Thingiverse if you have additional questions.
License: The text of " Keep it Cool With a 3D Printed Retro Rocket LED Lamp/Thermometer" by All3DP is licensed under a Creative Commons Attribution 4.0 International License.