Hydro Dipping & Hydrographics: All You Need to Know

With hydro dipping and a splash of creativity, make your 3D prints extraordinary – one dip at a time. Read all about it in this tutorial!
Hydro dipping (or hydrographics) is a decorative technique that transfers floating paint patterns onto objects through immersion. Widely used in DIY communities and industries like automotive design, this method has gained popularity for its ability to produce unique designs with basic tools.
For 3D printed objects, hydro dipping offers a practical way to enhance aesthetics. The process can conceal layer lines, add protective coatings, and enable detailed customization for applications such as prototypes, decorative models, and functional parts.
In this tutorial, we’ll demonstrate spray-can hydro dipping, a method that requires only aerosol paints, a water container, and standard safety gear. It’s ideal for hobbyists and makers seeking to experiment without specialized equipment. Alternative methods, such as film-based hydro dipping (which uses pre-printed designs for intricate patterns), are better suited for industrial workflows.
The guide will cover preparation, execution, and finishing steps, supported by practical tips to ensure consistent results.

Techniques Overview
Hydro dipping methods vary in complexity and equipment. Here’s a brief comparison of the three most common approaches.
Film Hydro Dipping
Film hydro dipping involves submerging pre-printed films into water, releasing the design onto the water’s surface. When an object is dipped, the pattern adheres to its contours, making it ideal for transferring intricate, repeatable designs such as camouflage, wood grain textures, or branded logos.
Spray-Can Hydro Dipping
Spray-can hydro dipping uses aerosol paints sprayed directly onto a water surface to create organic, freeform patterns, such as marbled effects or abstract swirls. This tutorial focuses on this approach due to its minimal equipment requirements – primarily spray paints and a water container – and its accessibility for beginners. With no specialized tools or chemicals needed, it’s an affordable, low-barrier entry point for customizing 3D prints, making it ideal for hobbyists experimenting with small-scale projects.
Professional Systems
Professional hydro dipping systems employ industrial-scale equipment, including large immersion tanks, automated activator sprayers, and specialized hydrographic films, to achieve consistent, high-volume production of coated objects. These systems are commonly used in manufacturing sectors like automotive (e.g. motorcycle helmets, interior trim) and sporting goods (e.g. bicycle frames, golf clubs) to apply durable, complex patterns at scale. Professional setups prioritize precision and repeatability, requiring controlled environments and technical expertise, which further limits accessibility outside industrial contexts.
What You'll Need
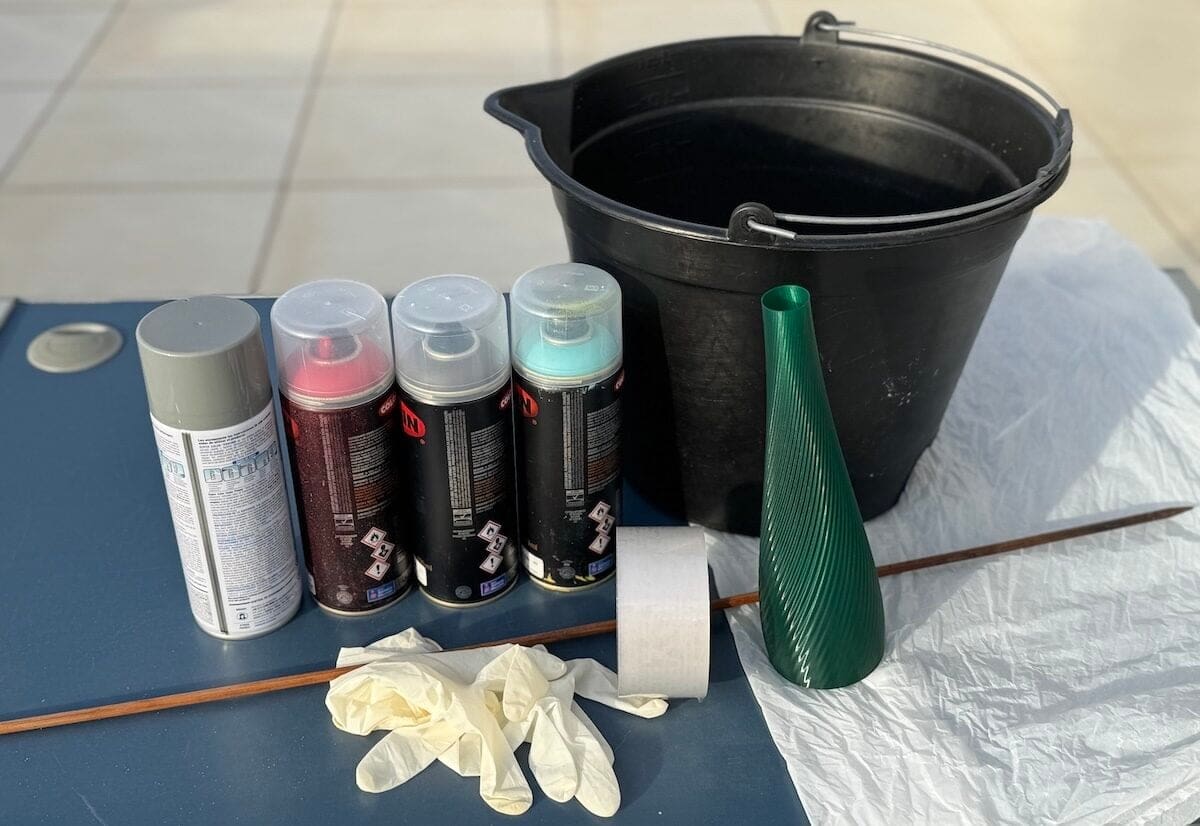
Before starting, gather all the materials and equipment you’ll need. Because the process is meant to be fast due to the drying time of the paint, things can get messy if you need to leave everything to grab a tool.
- 3D printed model: Should be prepped by sanding (220+ grit), cleaned with isopropyl alcohol, and fully dried.
- Spray paints: Depending on the goal, 2–4 colors should do the trick. Use oil-based spray paints to ensure that the paint floats and adheres properly. Avoid water-based paints, as they may dissolve during the process.
- Optional: Fast-drying acrylics for hydro dipping (although you’ll want to test these first to make sure they provide the results you’re after).
- Large container: A plastic tub or bucket 2-3 times larger than your model for full submersion.
- Safety gear: Nitrile gloves, an N95 respirator mask, and safety goggles to protect against fumes and splashes.
- Base coat spray: Matte white or gray primer to improve paint adhesion.
- Clear sealant: Matte or gloss spray to protect the final design.
- Accessories: Stir sticks (for pattern manipulation), paper towels (for cleanup).
Last but not least, you’ll want to make sure you’re working in a well-ventilated space (if possible outdoors, or near an open window).
Step-by-Step Tutorial
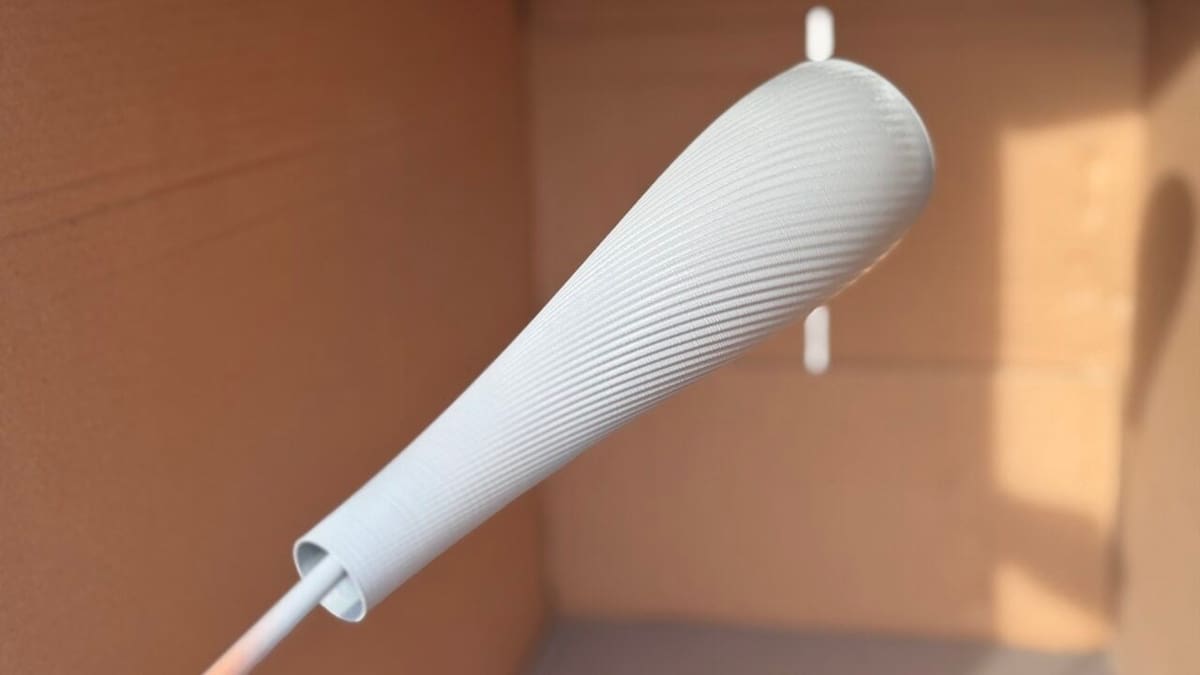
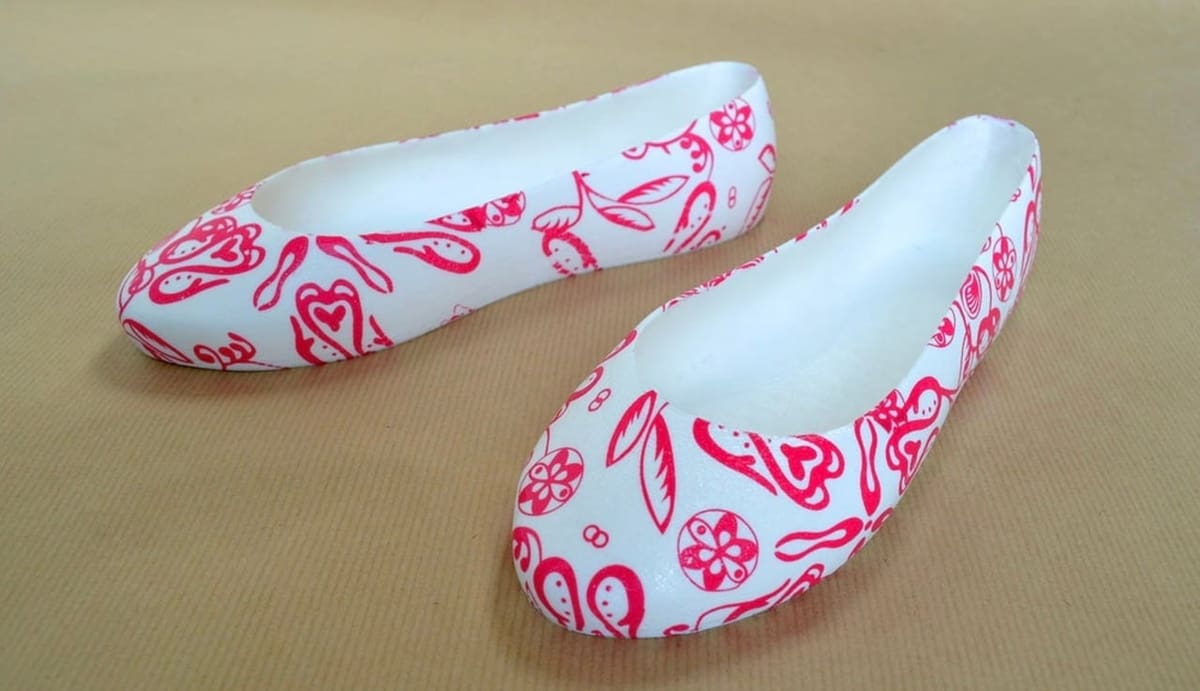
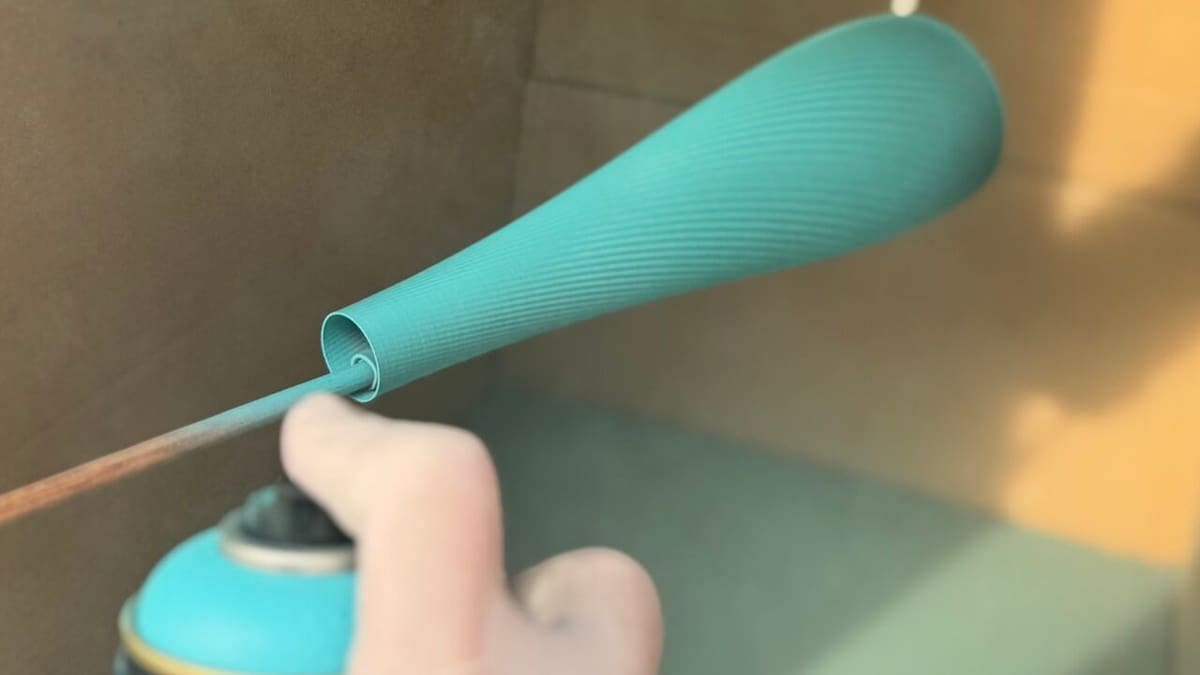
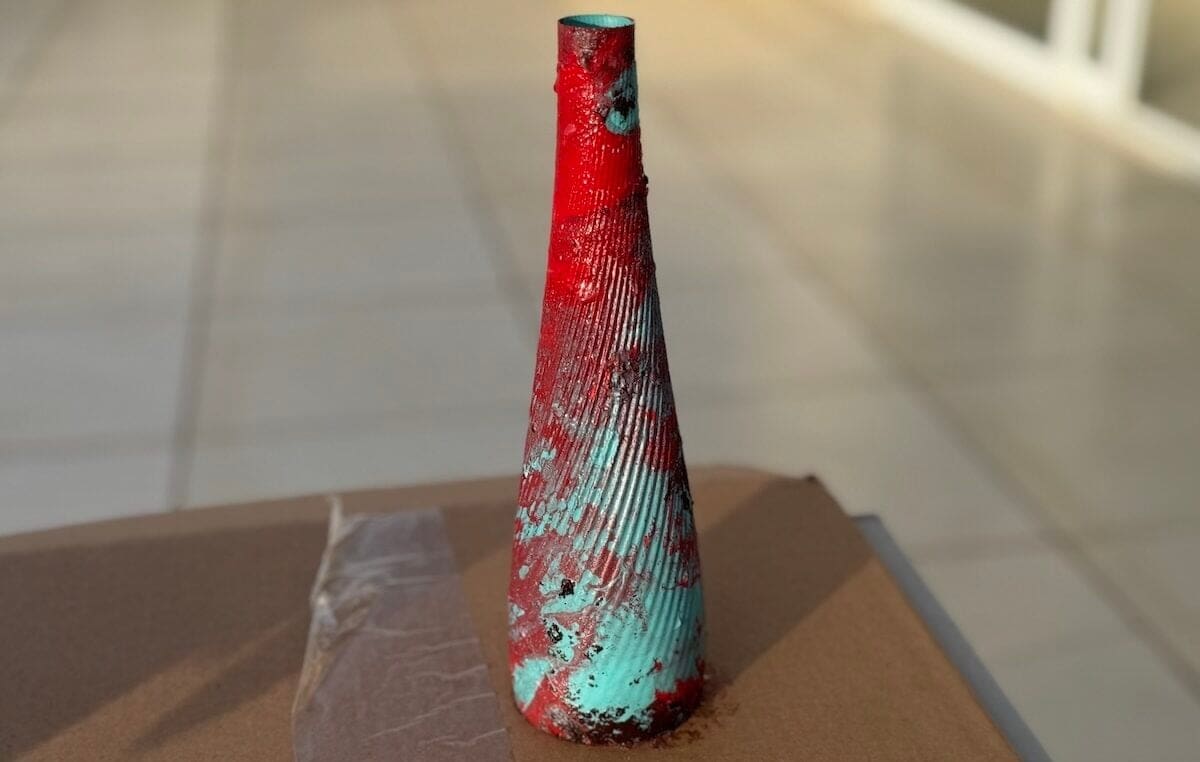
As mentioned, in this tutorial we’ll walk you through hydro dipping a 3D printed object using the spray-can method. For our example, we’ll use the Crease Vase B model – a textured vase ideal for showcasing marbled patterns. The process involves five key stages:
- Preparing the 3D print: Sanding, cleaning, and priming the model.
- Setting up the workspace: Organizing materials and ensuring ventilation.
- Spraying paint onto water: Creating floating color layers or swirls.
- Dipping the model: Submerging the object to transfer the pattern.
- Drying and sealing: Finalizing durability with a clear coat.
Each step includes specific instructions, safety notes, and troubleshooting tips. While the tutorial uses a PLA 3D printed model, the method applies to most filaments, such as PETG, ABS, or resin prints (watch out for water-washable resins, though). Naturally, you can customize colors and patterns to suit your project. Depending on the intended use for your model, you might also want to read about how to waterproof it.
Step #1: Prep Your 3D Print
Proper preparation helps ensure that the colors adhere smoothly to the hydro-dipped design and last longer. Follow these steps:
- Sand the model: Begin by sanding all surfaces of the 3D print with 220+ grit sandpaper to eliminate visible layer lines and create a slightly rough texture for better paint adhesion. Focus on high-detail areas, but avoid over-sanding delicate features to prevent distortion. For resin prints, use finer grit sandpaper (400+) to preserve intricate details.
- Clean with isopropyl alcohol (IPA): After sanding, wipe the model thoroughly with a lint-free cloth dampened with isopropyl alcohol to remove dust, oils, or residues from handling. Allow the model to air-dry completely for 5-10 minutes in a clean, dust-free environment.
- Apply a base coat (primer): Spray a thin, even layer of primer (e.g. matte gray or white), ensuring full coverage. Let the primer dry for 1-2 hours in a well-ventilated area. Priming not only improves paint adhesion but also neutralizes the filament’s original color, ensuring your hydro-dip patterns appear vibrant.
- Add a base color (optional): For added pattern consistency, spray a base color that matches your hydro-dip palette (e.g. black for dark marbling, white for pastels). This step helps disguise minor imperfections or gaps in the final design.
Step #2: Set Up the Workspace
A well-prepared workspace ensures safety and efficiency during hydro dipping. Follow these guidelines:
- Choose a ventilated area: Work outdoors or in a well-ventilated space (e.g. near an open window) to minimize exposure to paint fumes. Cover nearby surfaces with newspaper or a disposable tarp to protect against overspray. If possible, place your water container on a stable, elevated surface to simplify dipping.
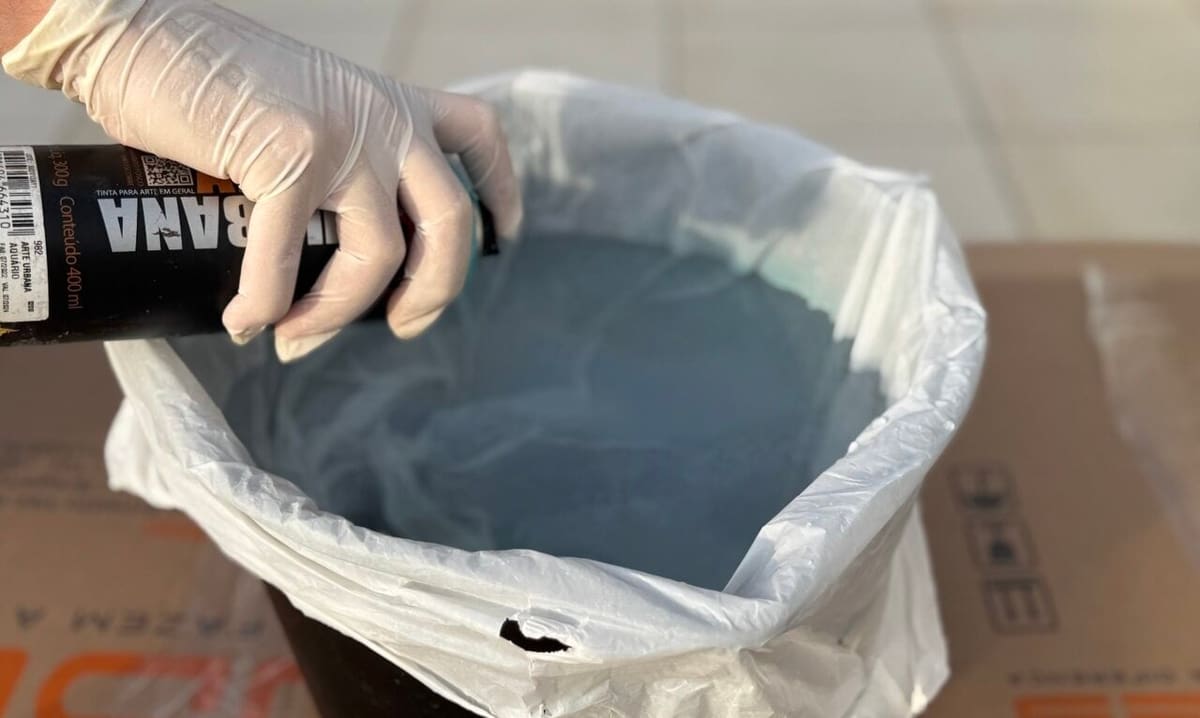
- Prepare the water container: Fill a plastic tub or bucket with water (20-25 °C or 68-77 °F) to optimize paint spreading. Water that’s too cold slows paint activation, and if it’s too hot, it may cause premature drying. Tip: Line the container with plastic wrap before pouring in the water – this allows you to peel away leftover paint residue afterward, keeping the tub clean for future use.
- Organize the materials: Keep spray paints, stir sticks, and paper towels within easy reach. Double-check that the safety gear (gloves, respirator, goggles) are properly fitted before proceeding.
Step #3: Spray Paint onto Water
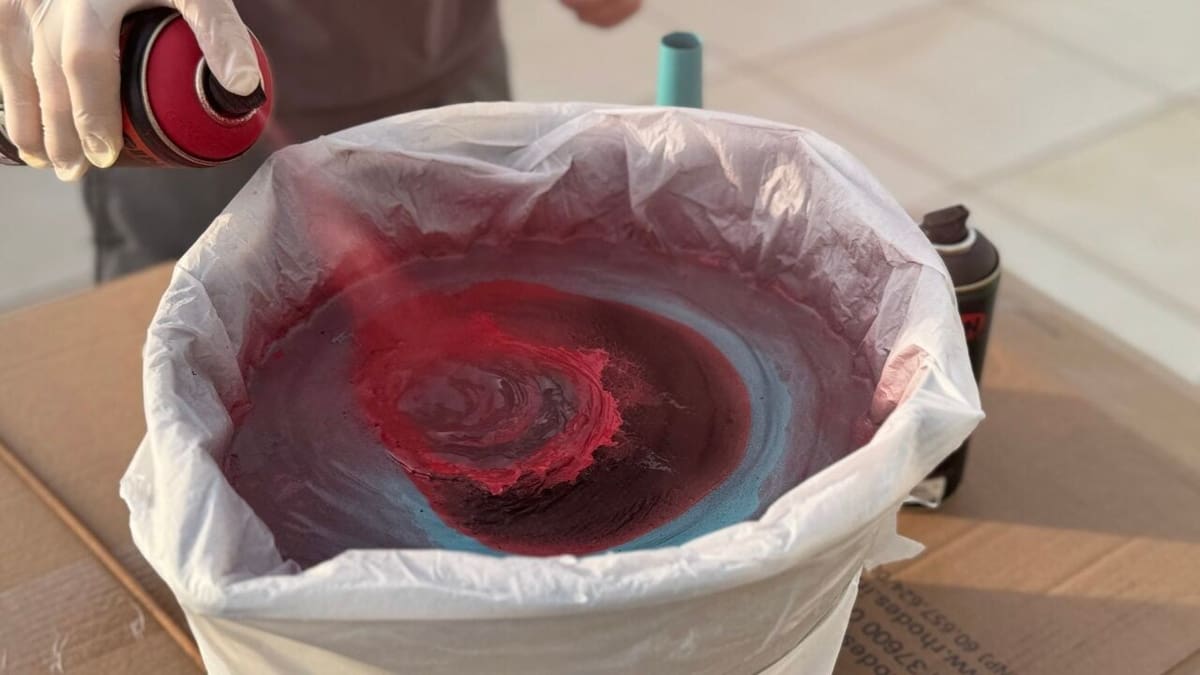
This step determines the final pattern. Before starting, make sure you’re wearing the gloves, goggles, and respirator to minimize exposure to the fumes. Keep in mind that you’ll want to complete spraying and dipping within 30–60 seconds to prevent the paint from hardening, so an organized workspace with everything you need nearby is of the essence.
Follow these instructions to create vibrant, consistent designs:
- Shake and test the spray paints: Shake each spray can according to instructions provided by the manufacturer to ensure pigments and propellants are fully mixed. Before spraying onto water, test the nozzle on a scrap of paper to confirm a smooth, even spray pattern. If the paint sputters, clean the nozzle with a pin or replace the can.
- Apply paint to the water surface: Hold the can 8-12 inches (20-30 cm) above the water and spray in quick, controlled bursts. Apply 2-3 thin coats per color and keep in mind that using an excessive amount of paint may make it sink or form thick globs. Use one of two techniques:
- Layered approach: Spray one color at a time, allowing each layer to spread slightly before adding the next. Start with lighter colors (e.g. white, yellow) for better pattern definition.
- Swirl method: Alternate colors in a circular motion, overlapping sprays to create blended, organic effects.
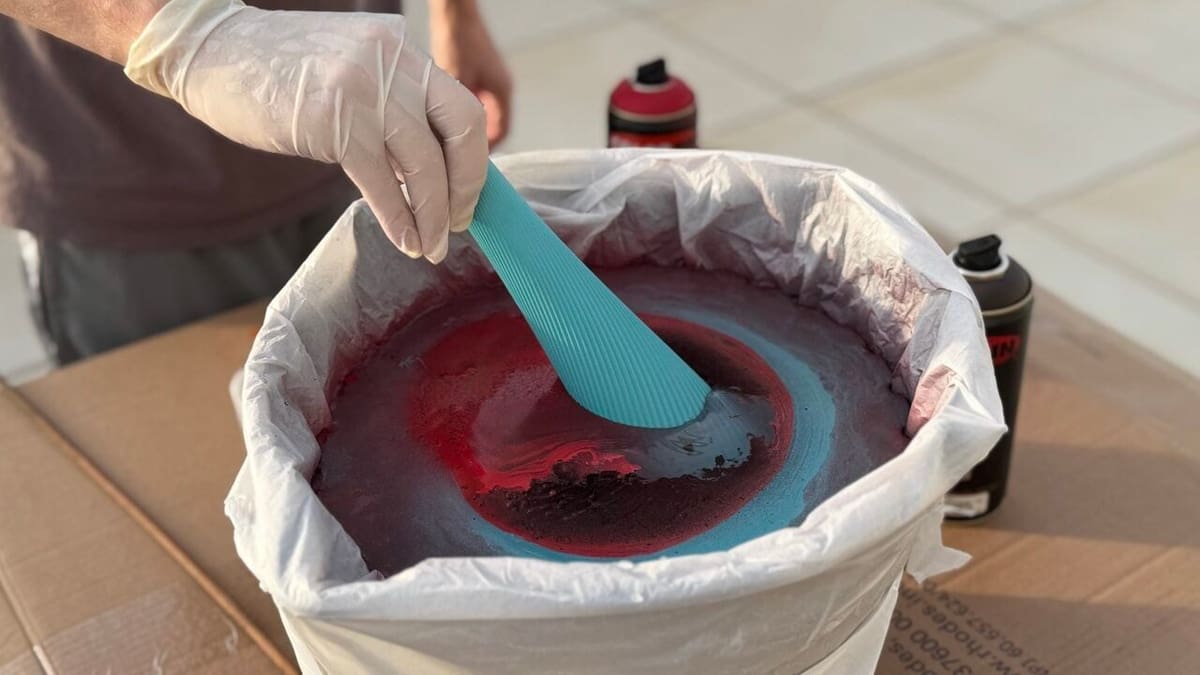
- Manipulate the Pattern (Optional): For marbled textures, gently drag a stir stick or toothpick through the floating paint. Make short, deliberate strokes to avoid overworking the paint, which can cause clumping or premature drying.
If the paint sinks, increase the spraying distance or switch to lighter, fast-drying acrylics. For troubleshooting, refer to the Tips & Tricks part further below.
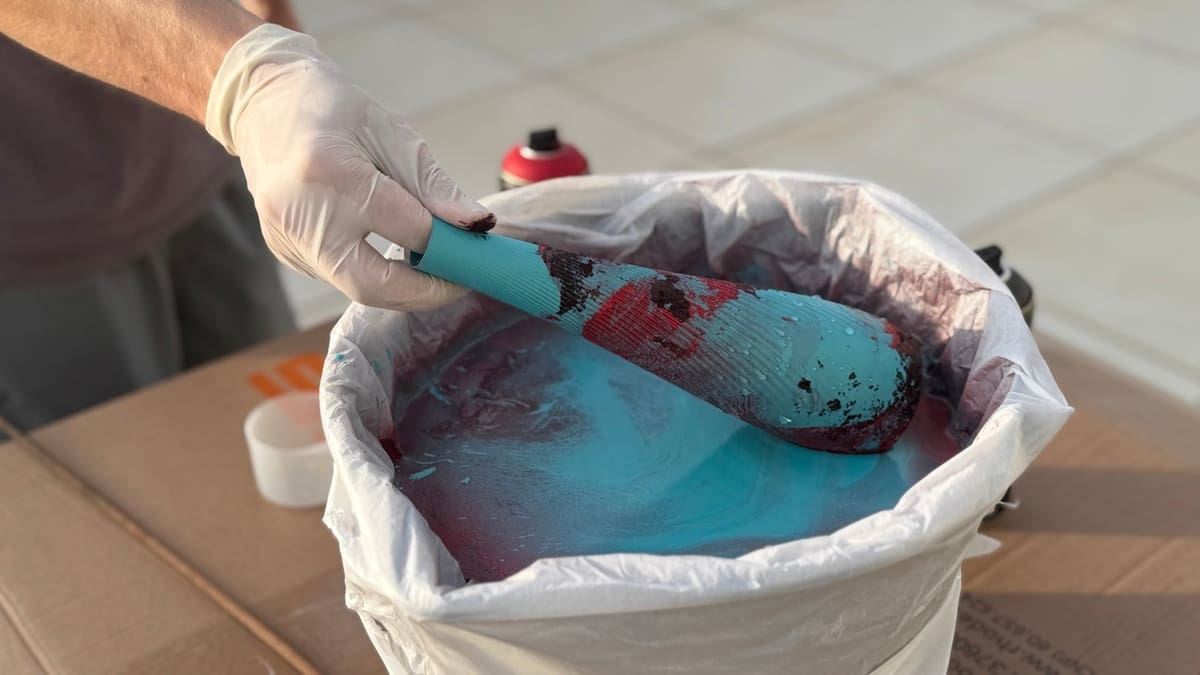
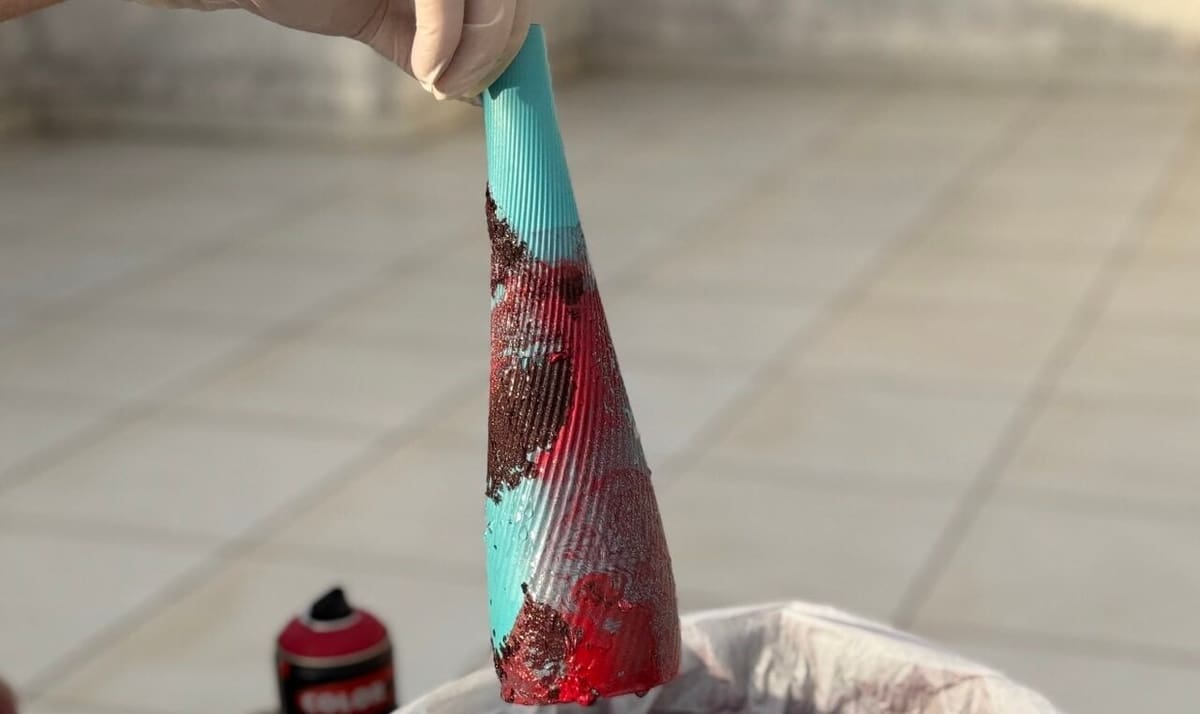
Step #4: Dip the 3D Print
Next, we’ll look at how to transfer the floating paint pattern onto the model. Precision is critical to avoid imperfections like air bubbles or smudging. Again, you should be wearing all the protective gear.
- Position the model: Hold the 3D print at a 45° angle to ensure even coverage. Tilting the model helps the paint wrap around curved surfaces and reduces trapped air. For complex shapes, identify a “starting edge” to submerge first (e.g. the rim of a vase).
- Submerge smoothly: Lower the model into the water in one steady motion, maintaining the 45° angle. Avoid hesitating mid-dip, as this can disrupt the paint layer, and have in mind that 3D prints usually float on the water, so hold it tight to submerge it. If air bubbles form, gently tilt the model underwater to release them before fully submerging.
- Remove and rinse: Slowly lift the model out of the water, keeping it parallel to the surface to preserve the pattern. As an option, you can try to immediately rinse it under running water (20-25 °C or 68-77 °F) to wash away excess paint. Avoid scrubbing – let the water flow gently over the design.
To refine your technique, practice the dipping motion with an unpainted object beforehand. For large or bulky prints, submerge half the model at a time and rotate it to cover all sides. Always wear gloves and goggles during rinsing to protect against paint splashes. If the pattern smudges or adheres unevenly, re-sand the affected area and repeat steps 2-3. Persistent issues may require adjusting paint viscosity or water temperature, as detailed under Tips & Tricks.
Step #5: Dry & Seal
Once you’re satisfied with the pattern, it’s time to let the model dry.
- Place the rinsed model on a clean, elevated surface (e.g. wire rack or cardboard) in a dust-free area.
- Allow it to air-dry for 2–3 hours without handling it. Even light contact can smudge the design before it sets.
Applying Clear Sealant (Optional)
While not a must in the process, sealing the paint application can help protect against scratches from handling, moisture affecting the coat, and UV fading (especially if exposed to direct light because the model is placed outside or by a window). On the aesthetic side of things, a clear sealant with a matte finish can help hide imperfections; on the other hand, a glossy sealant can enhance color vibrancy.
Sealing for Durability
- Once fully dry, apply 2–3 thin layers of clear coat (matte or gloss) from 8–10 inches away.
- Let each layer dry for 15–30 minutes before adding the next.
Tips & Tricks
Although the hydro dipping technique isn’t difficult, it might require a bit of practice to optimize results. Here are a few tips to ensure a good start path.
- Consider color layering: Begin with lighter colors (e.g. white, yellow) as your base layer to ensure darker shades retain their vibrancy and patterns remain distinct. Light colors prevent muddying and help define intricate details. Follow with mid-tones and finish with darker hues for depth.
- Eliminate bubbles: Air bubbles can disrupt your design during submersion. Before dipping, gently drag a stir stick across the water’s surface to release tension or lightly mist the water with a spray bottle to create ripples. If bubbles form mid-dip, tilt the model underwater to dislodge them before lifting.
- Multi-dip for complex designs: For layered patterns, mask sections of the model with waterproof painter’s tape after each dip. For example, dip the lower half of a vase first, let it dry, then mask it and hydro dip the upper half with a contrasting pattern. Ensure each layer is fully dry before reapplying tape to avoid peeling.
- Keep safety first: Ventilation, protective gear, and cleanup are key, which is why we’ll repeat them once more. Work outdoors or near an open window to avoid inhaling aerosol fumes. Wear nitrile gloves, an N95 respirator, and safety goggles to protect against chemical exposure and splashes. Dispose of paint-contaminated water responsibly – avoid pouring it directly into drains.
- Look at paint and water compatibility: As mentioned, use oil-based spray paints exclusively, as water-based formulas dissolve on contact. If paint sinks, check the water temperature (20-25 °C or 68-77 °F is ideal) or switch to lighter, fast-drying acrylics. For stubborn issues, revisit Step #1: Prep Your 3D Print to ensure proper priming.
Experimentation is key. Test patterns on scrap prints or plastic spoons to refine your technique before tackling complex models.
License: The text of "Hydro Dipping & Hydrographics: All You Need to Know" by All3DP is licensed under a Creative Commons Attribution 4.0 International License.