We Found Six STL Repair Tools That Really Work

Slicing software can patch most minor issues in your STLs, but it can't reconstruct missing geometry, resolve deep structural faults, or handle tangled meshes. Here's what you need.
Not all STL models will actually 3D print. This is a problem that’s even more common today for two big reasons.
First, AI tools. As we found in our recent exploration of free text-to-3D model AI generators, they make amazing visual models, but anything complex is typically not printable even if it exports as an STL. AI-based tools lower the barrier to entry for 3D modeling, which is great! But, many of these tools can produce models with hidden errors or imprecise geometry. Not all of them are unreliable, of course, and they’re getting better, but it’s fair to say human oversight — in the form of STL repair — is still required, as we found.

The second reason we’re seeing more unprintable 3D models is more accessible (i.e. cheaper and better) 3D scanners. These tools have democratized the creation of digital models from real-world objects. Yet, many novice users generate scans with holes, noise, or incomplete data, which can produce STL files that are difficult or impossible to print without repair. Sure, there’s a growing ecosystem of software tools for post-processing scanned data, but many lack the intuitiveness and automations new users need to quickly and easily get a 3D printable file from a scan.
Minor mesh errors are automatically fixed inside slicing software like Cura, Bambu Studio, or Simplify3D. Often, you may not even know that your slicer is fixing the model files. Other times, your slicer can close tiny gaps and correct minor issues when configured to do so, like the command “Remove all holes” in Cura, or “Close and Heal Segments” in Simplify3D.
However, slicer software cannot fix everything.

Quick Guide: What Gets Fixed vs What’s Broken
If the error is too big for your slicer, you’ll need to call on a fuller STL repair tool. We took our unprintable chameleon models from our recent AI text-to-3D model experiment to see if we could fix them.
Common Errors in STL Models
Before we jump into the fixes, it pays to understand a little be about the problems. What is a non-manifold edge anyway?
A typical STL file may contain tens of thousands of tiny triangles that make up the mesh and many different ways in which these triangles can be misrepresented (from a manufacturing perspective).
First, there are simple holes. These are when triangles have edges that aren’t connected to their neighbors. Printable 3D models need to be enclosed or have a “watertight” volume, with all of its vertices connected. For a few missing triangles, your slicer will fill in the space, but for a lot of missing triangles, the slicer can’t interpret the shape the fix should take.
Almost opposite of holes are triangles that meet edges with more than one triangle. This is a non-manifold edge, or an edge of a triangle that’s shared by more than two triangles. When more than two faces meet at the same edge, the mesh can confuse slicers and 3D printers because it’s unclear what is inside or outside the model.
Some STLs, particularly those generated from 3D scan data, can contain floating triangles that shouldn’t be there. This is called “noise” and it can render your entire model unprintable if the slicer or software doesn’t know where or how to connect the noise to the model.
Complexity itself can render a model unprintable even though there are technically no errors, like described above. There’s a thin line between an STL that has actual errors in its mesh and one with a correct mesh that describes something that’s hard or impossible to print, such as a detail smaller than a your printer’s resolution or a wall too thin to be printed practically. Fixing these types of issues is better described as an optimization step rather than a repair, although both are often handled by the same software.
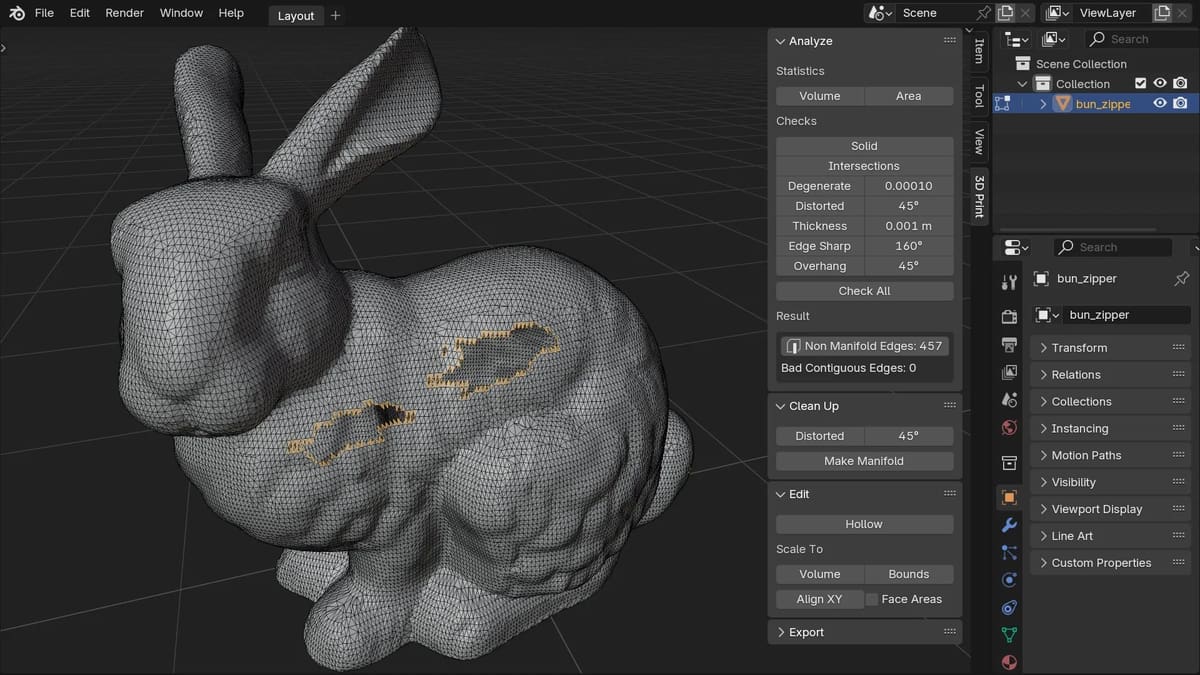
These aren’t the only STL errors and bad digital models can slip through your slicer and end up as a failed print. Too avoid surprises on the print bed, pre-check your mesh in a tool like MeshMixer (or others mentioned below). Rely on your slicer’s repair features only as the final safety net, not as a crutch.
Free Automated Tools for STL Repair
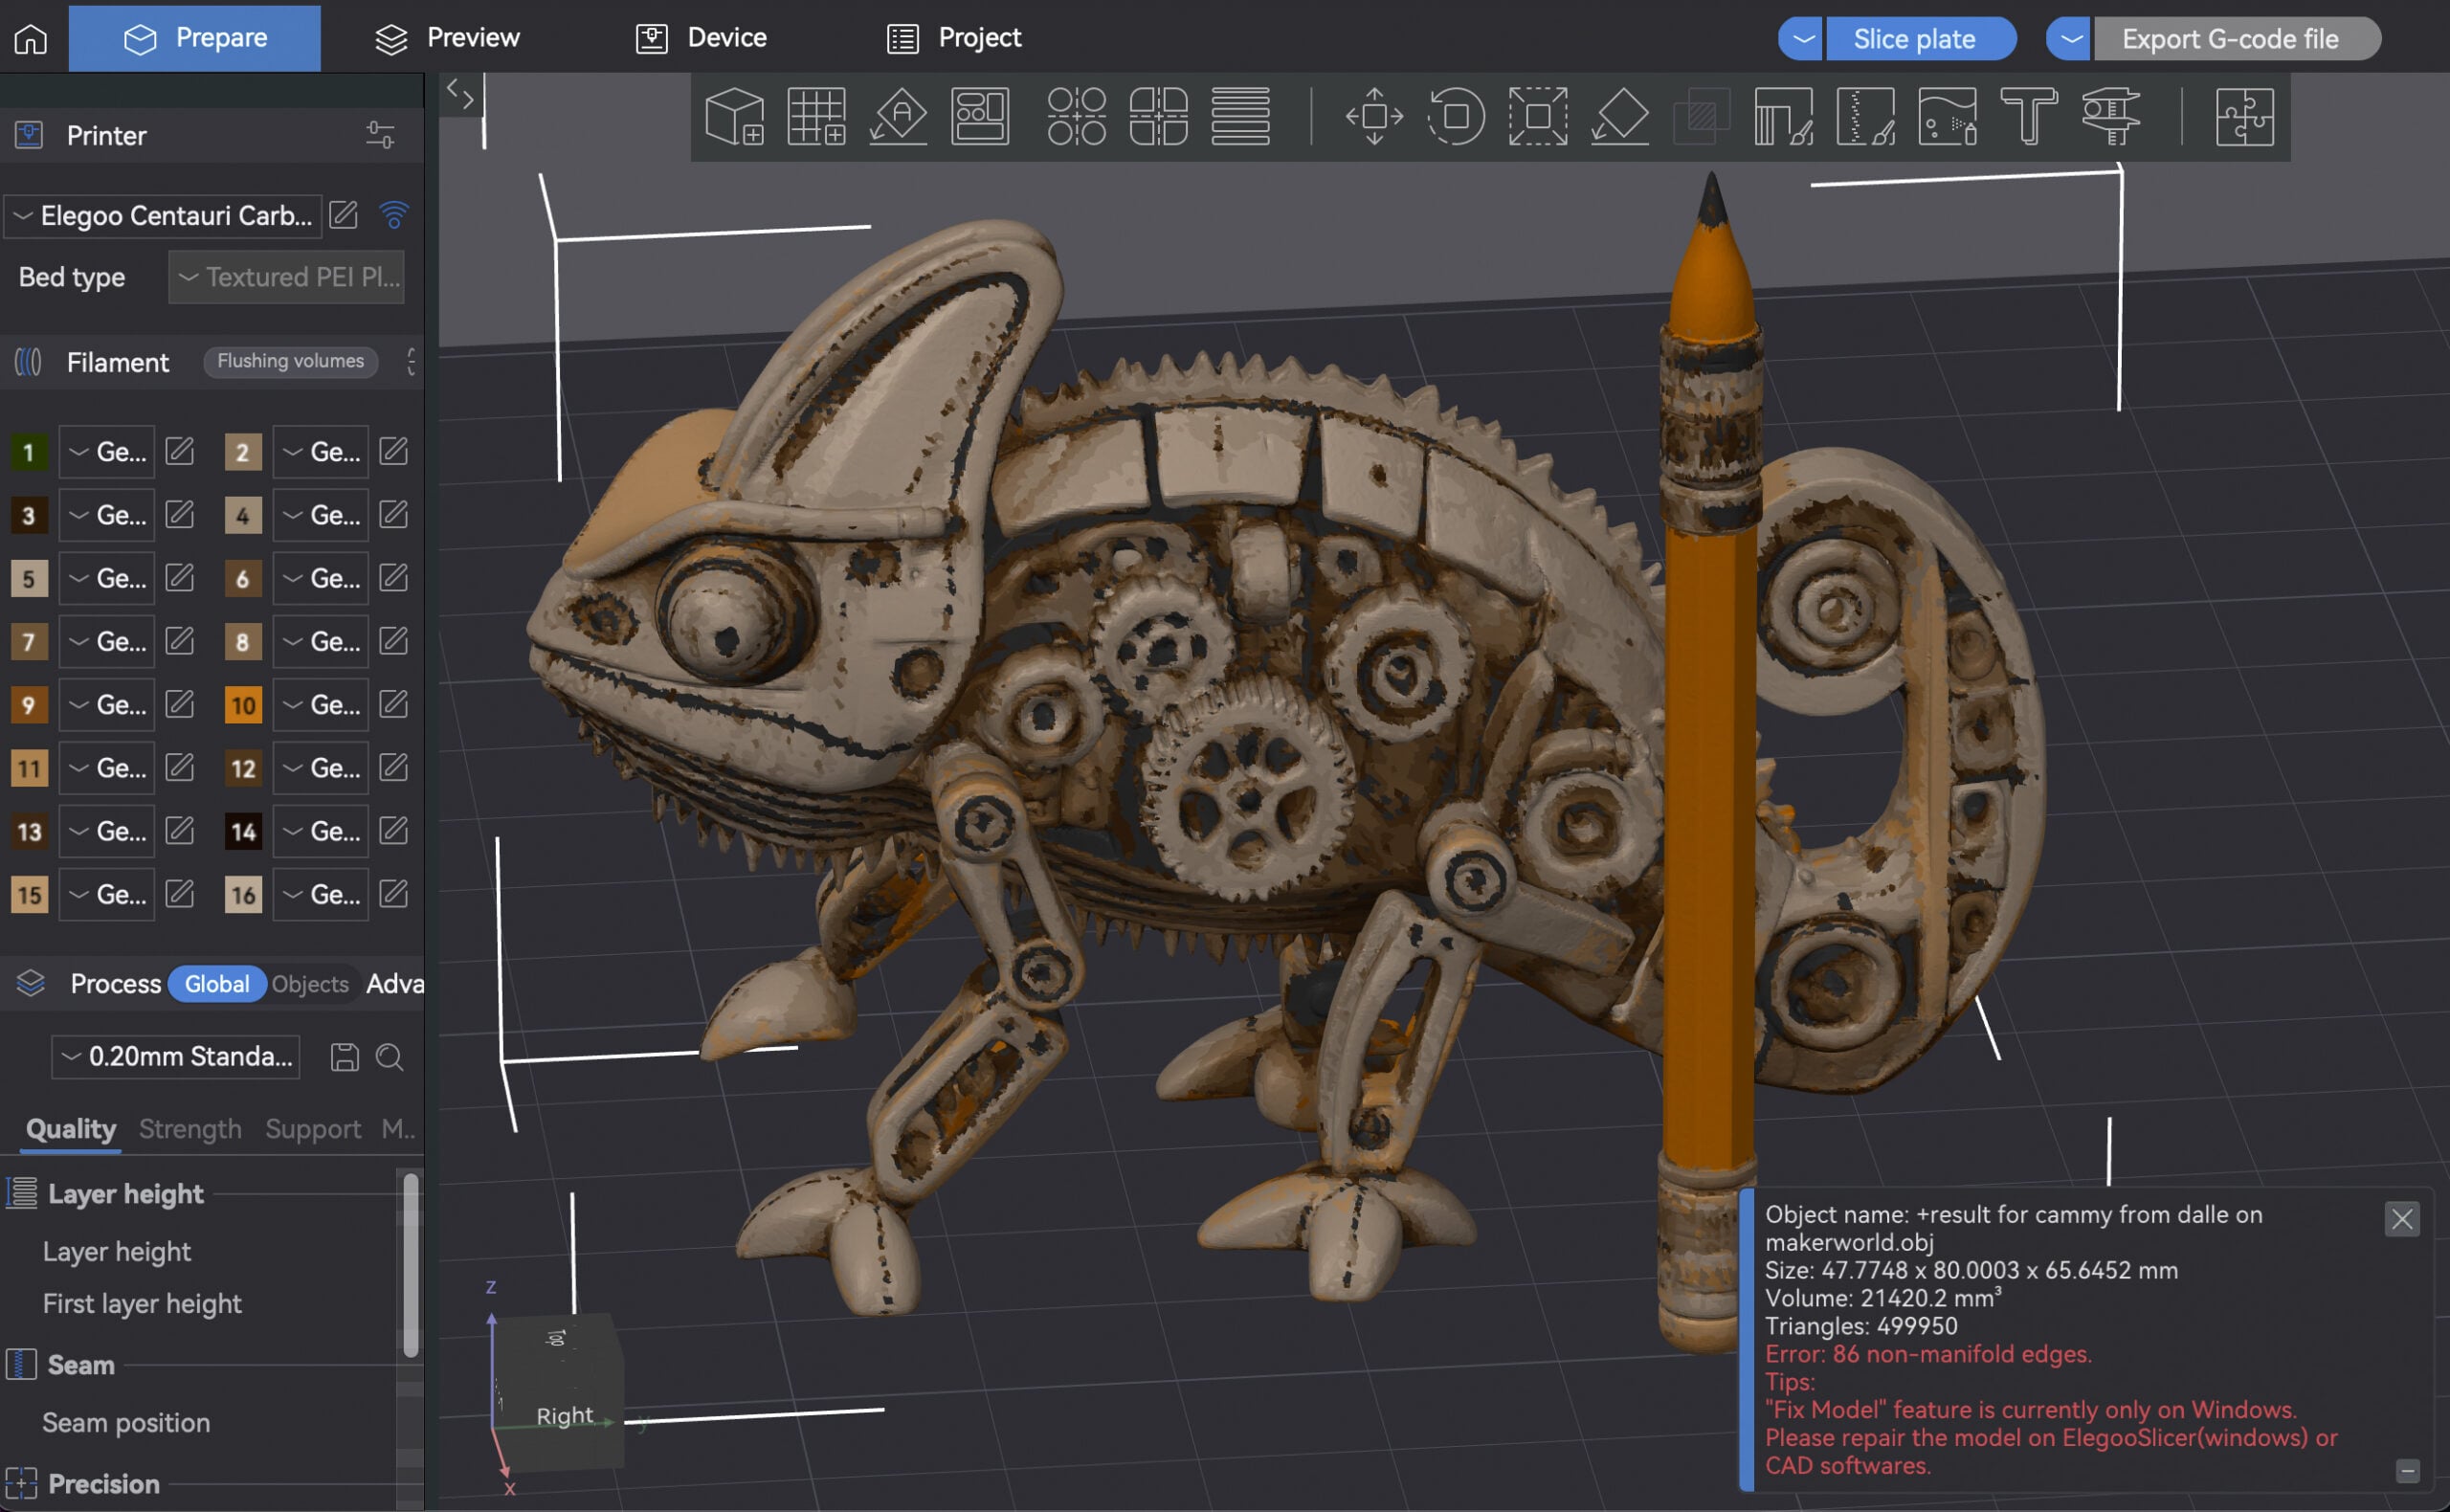
Cura, Bambu Studio, Prusa, and Elegoo slicers all found numerous holes and mesh errors in our mechanical chameleon files that they couldn’t repair. Elegoo slicer found 86 non-manifold edges and there are obvious holes. So we put this file into the more powerful STL repair solutions below.
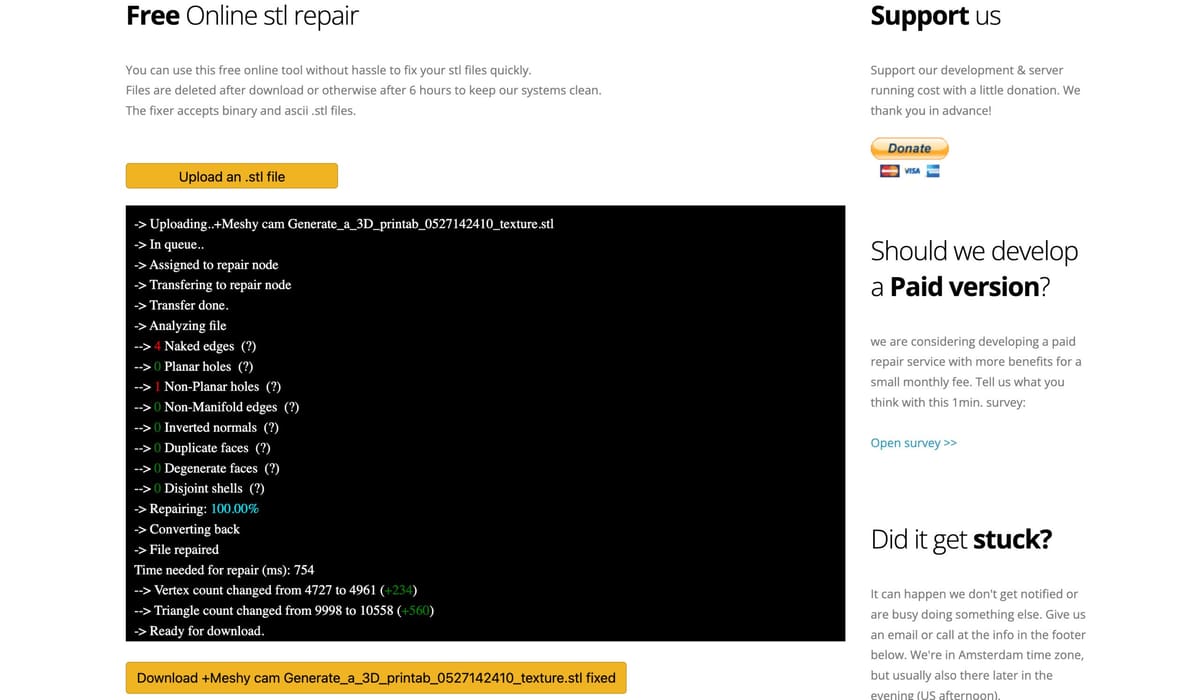
Aspose
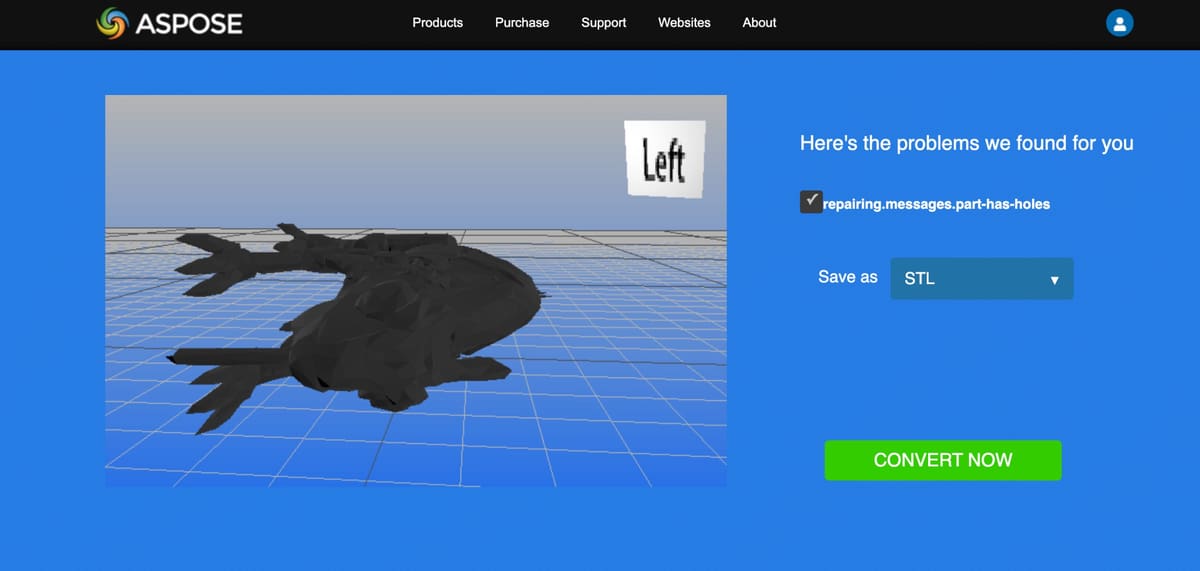
Aspose (free and browser based) is as quick and easy as it gets for no-fuss SLT repair. The company makes a lot of file apps, so look for the one called Aspose.3D Repairing. It’s a cloud-based tool that fixes corrupted or invalid 3D mesh files directly in your browser, without needing to install software. Just drag-and-drop your .stl file (there’s a limit to the size) and click on “fix”. If you have an OBJ you can convert it to an STL with another Aspose tools called OBJ to STL converter.
It didn’t identify the errors or issue a detail diagnostics report, it just fixed them. When we uploaded the results into our slicer, it didn’t flag any errors like the non-manifold edges it had before.
Formware
Formware is another quick and easy one-click, browser-based repair tool. Unlike Aspose, it let us know how many naked edges and inverted normals we had, which was interesting, yet useless information. Formware can be quick to fix files with few errors, or you can wait a while for more complex files. You can only upload and download STLs, which is fine. Once Formware fixed our file, it uploaded to our slicer with no errors detected.
Meshmixer
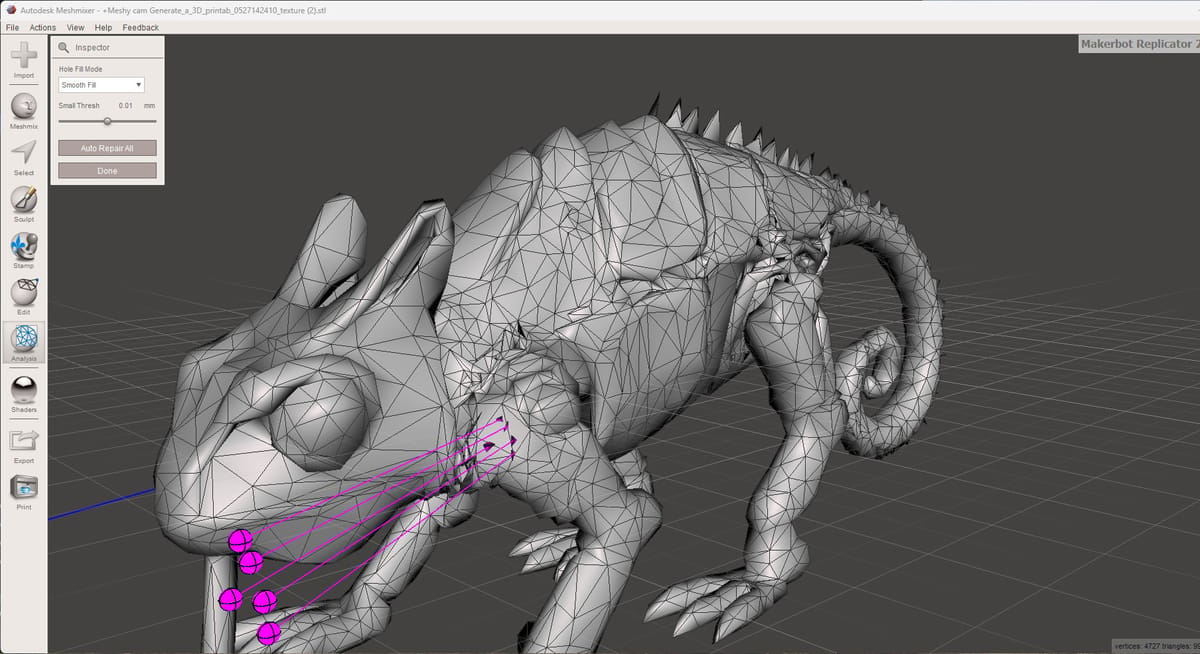
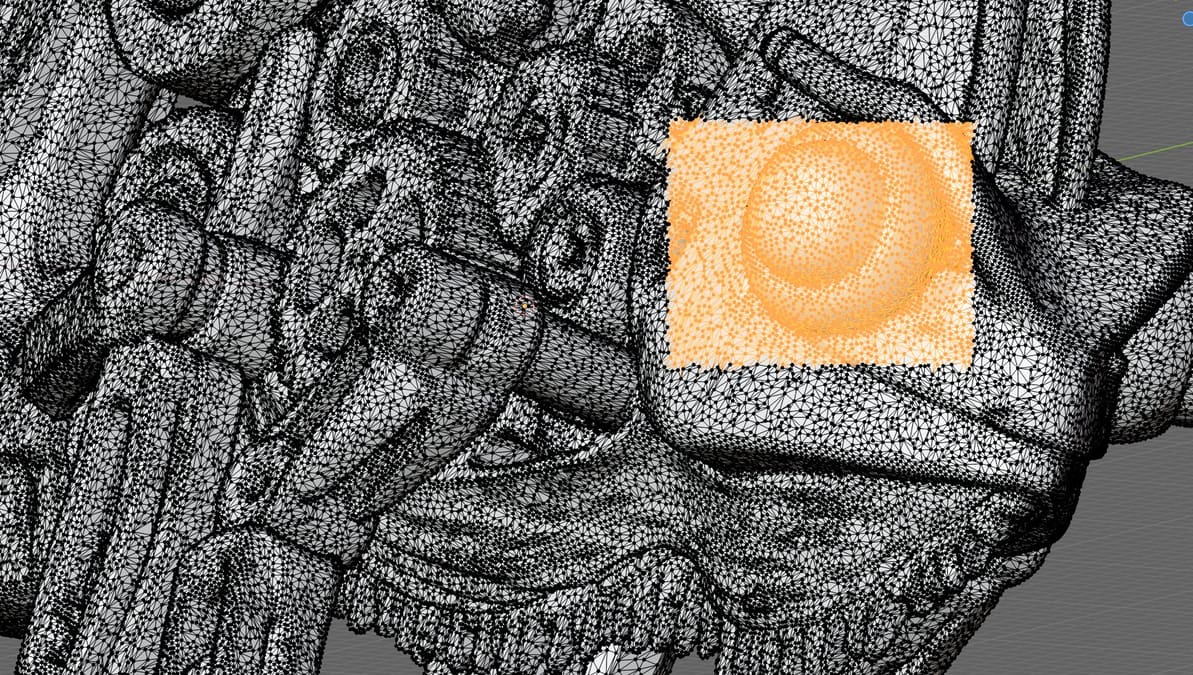
Meshmixer from Autodesk (is free but unfortunately Windows only) and actually not maintained by Autodesk anymore, but as a legacy tool, it’s still useful. It has a very streamlined yet user-friendly feature for STL repair called the “Inspector” tool, which analyzes and automatically repairs common mesh problems.
Meshmixer will scan the STL file and highlight errors, including holes (open boundaries as shown in pink above), disconnected components, and non-manifold edges. The problem areas are marked with colored spheres and you only have to click “Auto Repair All”. Tool aims to fills gaps while maintaining the shape of your model as much as possible. There were three shape option and we selected smooth.
Meshmixer also has a host of manual tools, for fixing files.
MeshInspector
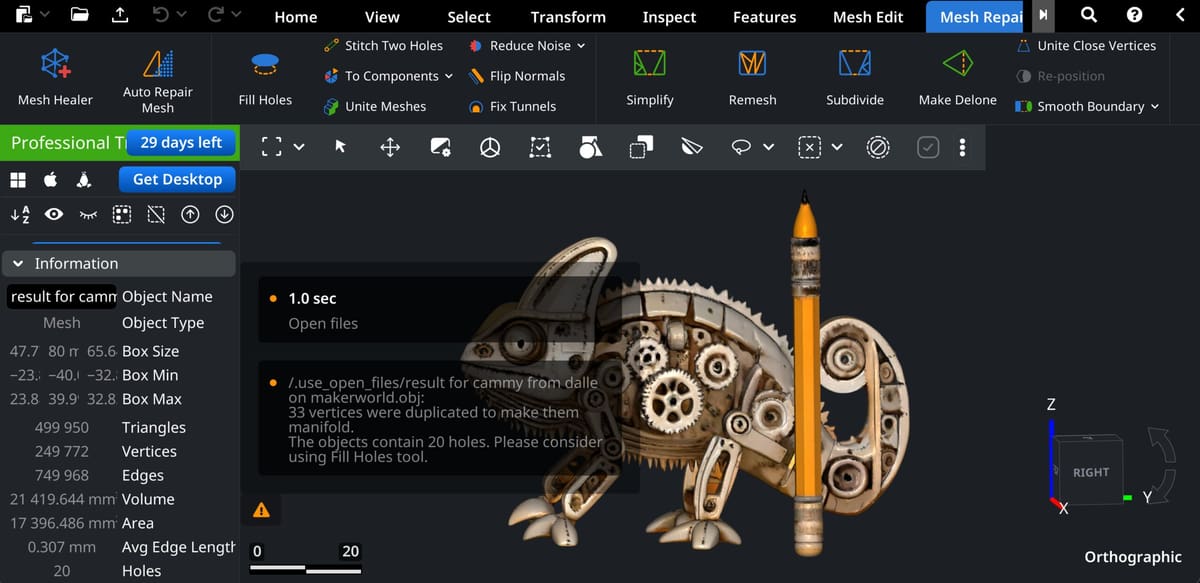
MeshInspector (browser based + desktop, basic version is free) fixes files with one click, it says, but we found it did so much more. First though, we uploaded our unprintable chameleon file.
It first auto-repaired the non-manifold edges but flagged some holes it said we should repair. For more accurate and detailed repair we could have fixed them individually and manually but opted for the “Auto Repair Mesh” button. Again, our holes were fixed and the file loaded nicely into our slicer.
If you’re looking for more than an auto-repair or if the auto-repair takes detail out of your model that you need, MeshInspector has a very user-friendly interface for learning the basics (and some advanced methods) of fixing models in the most accurate way possible. It’s not free, though. A basic version that has just limited tools, is free, and you can try the advanced version with all the repair tools free for 30 days (we used this option), but after that, you’ll need to subscribe: $300 a year for advanced mesh editing, then a pro version for $790 that includes 3D scan data to meesh, CT and MRI data to mesh and more.
FreeCAD
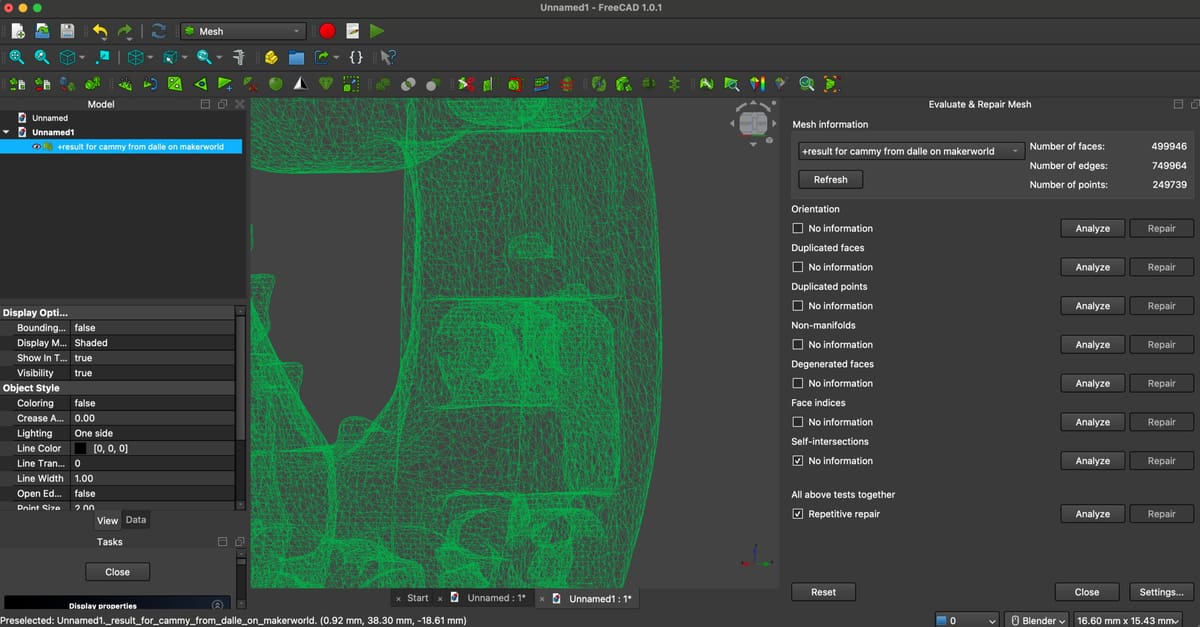
FreeCAD is a sophisticated CAD tool with mesh repair included. It’s not that intuitive if you’re unfamiliar with CAD tools.
After you download the free software, open your STL. You’ll want the Mesh Workbench, which you’ll find under View > Workbench > Mesh. Then go to Meshes > Analyze > Evaluate & Repair Mesh, which opens up a window to locate then repair issues. Unfortunately, the tool only found one non-manifold edge even though our slicer identified dozens of non-manifold edges. We clicked repair and downloaded the file as an STL but our slicer indicated that the non-manifold edges were still in the file. I’m sure after a few FreeCAD tutorials we could uncover what went wrong, but if you want a quick upload and repair tool, this isn’t it.
Blender + 3D Print Toolbox
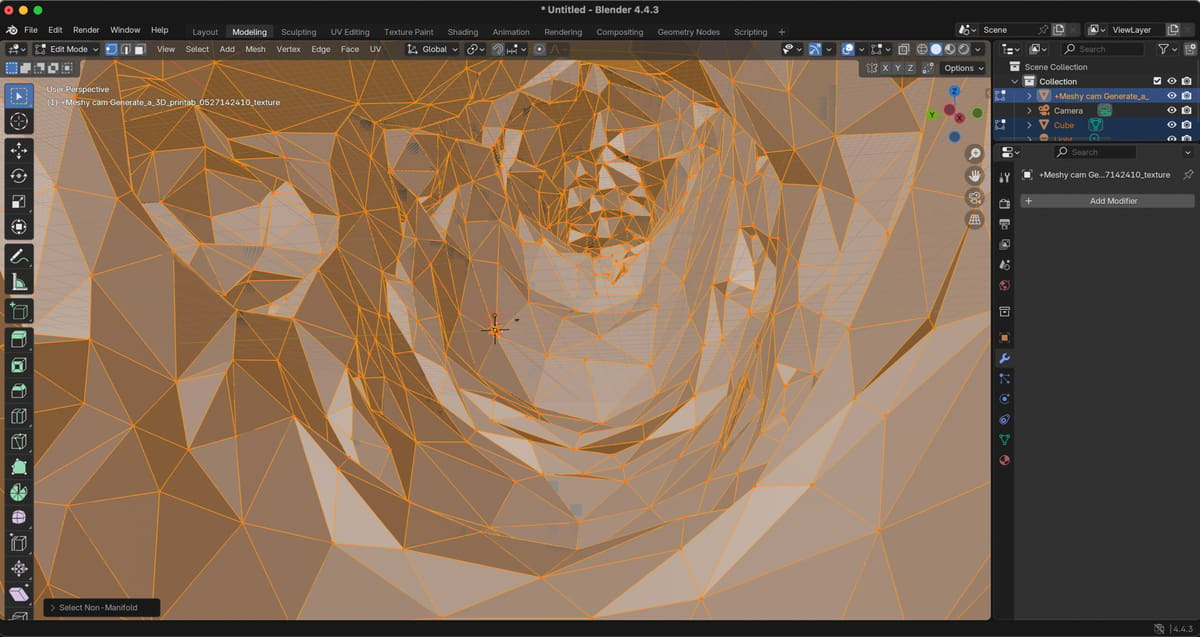
Blender, (free, desktop based) while primarily a 3D modeling and animation tool, also includes powerful features for manual mesh repair and cleanup, making it suitable for fixing STL files before 3D printing — if you’re familiar with Blender. It’s not as automated as some dedicated tools, but offers a high level of control and precision. For a bit of automation, download the free 3D Print Toolbox.
If you’re one of those people who has always been impressed by Blender but intimidated when it comes to using it, this will not be your tool of choice for STL repair. Blender doesn’t have a single “analyze mesh” button like Meshmixer, but you can use several methods to identify issues with impressive precision. It gave us an absolutely fascinating view of our mesh chameleon even showing some geometries inside the model (those 86 non-manifold edges!) that weren’t visible with any other tool. Ultimately, though, we abandoned it as a repair tool because of the steep learning curve. Blender for STL repair will certainly be an article for All3DP in the future.
Yes, There Are Other Tools
As you can see, so far we’ve gone from simple and free one-click tools and have slid into more free but sophisticated tools. When it comes to mesh editing, there are many more paid and sophisticated tools available inside and adjacent to CAD software, such as Autodesk Netfabb, Autodesk Fusion, Siemens NX, PCT Creo + Reverse Engineering Extension, Dassault Systèmes Solidworks + ScanTo3D, and more.
AI — for as much of a cause of bad STLs that it is — is being incorporated into CAD software to help streamline fixing meshes, so we expect more easy-to-use STL repair tools to come.
License: The text of "We Found Six STL Repair Tools That Really Work" by All3DP Pro is licensed under a Creative Commons Attribution 4.0 International License.