The Best Octolapse/OctoPrint Time-Lapse Settings

Looking for the best OctoPrint time-lapse settings? If you want to achieve the perfect Octolapse, check out this simple guide.
If you haven’t heard of it by now, OctoPrint is one of the most versatile and popular upgrades for 3D printers. OctoPrint is open-source software that makes it easy to host your own 3D printer remote control server off a single-board computer (SBC) like a Raspberry Pi.
Over the past couple of years, OctoPrint has greatly expanded its functionality, and one of the main reasons for this is the available plug-in repository. The OctoPrint Plugin Repository offers free, open-source programs that you can download and attach to your OctoPrint server to add more features.
One of the most popular plug-ins to date is Octolapse, which uses a connected webcam through OctoPrint to make a unique time-lapse (also known as an Octolapse) of your 3D printer in action. Octolapses look much better than a normal time-lapse of a 3D printer while it’s printing, which tends to be very blurry due to the printhead’s constant motion.
But Octolapse doesn’t work perfectly right after you click “Install”. To achieve the best Octolapses, you have to tune some settings based on your OctoPrint setup and slicer profile. In this article, we’ll go over the different settings for Octolapse and how you can use them to make the coolest Octolapses.
What Is Octolapse
Before we dive into the settings, it’s important to go over the Octolapse plug-in and how Octolapses differ from regular time-lapses. As we mentioned, Octolapse is a plug-in for OctoPrint servers that uses a camera connected to the OctoPrint computer to generate unique time-lapses of your machine 3D printing a model.
The program was originally developed by FormerLurker, an active 3D printing and OctoPrint enthusiast, and was first released in early 2018. While the development of Octolapse was halted in late 2020, the program is still very popular among new OctoPrint users.
What makes Octolapse unique is that the Octolapses (time-lapses) that it generates are made up of stand-still photos of the 3D printer at each layer rather than photos at specified time intervals like a normal time-lapse. Additionally, each photo is taken when the printhead is in the same position, eliminating the chance of blurry movement in the Octolapse, which can ruin a normal time-lapse of your 3D printer.
Now that you know a little about the program and how it works, let’s dive into the setting!
Installing Octolapse
The first step for achieving the best Octolapses is actually installing the program on your OctoPrint server. To do this, you’ll, of course, need to have an OctoPrint server connected to your 3D printer. Making your own OctoPrint server can be done with just a Pi board (e.g. 3B+) and a few other components.
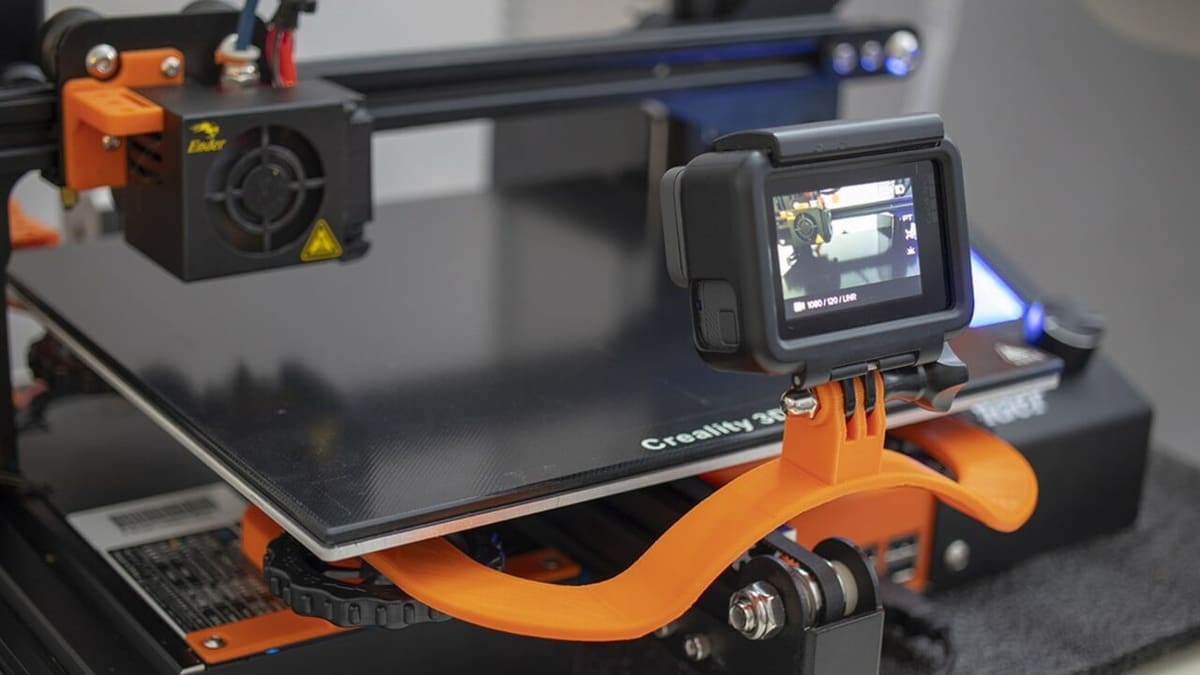
On top of the base OctoPrint server, you’ll also need a camera, such as a Logitech webcam, connected to the host computer. Many cameras are compatible with OctoPrint, and connecting the camera to OctoPrint is also a fairly simple procedure.
Once you’ve got all the hardware set up, installing the Octolapse plug-in is a breeze.
- Open your OctoPrint web interface by entering the host computer’s IP address in a web browser on a separate device (e.g. laptop, PC).
- Click the wrench icon in the top right corner of the OctoPrint web interface to open the settings menu.
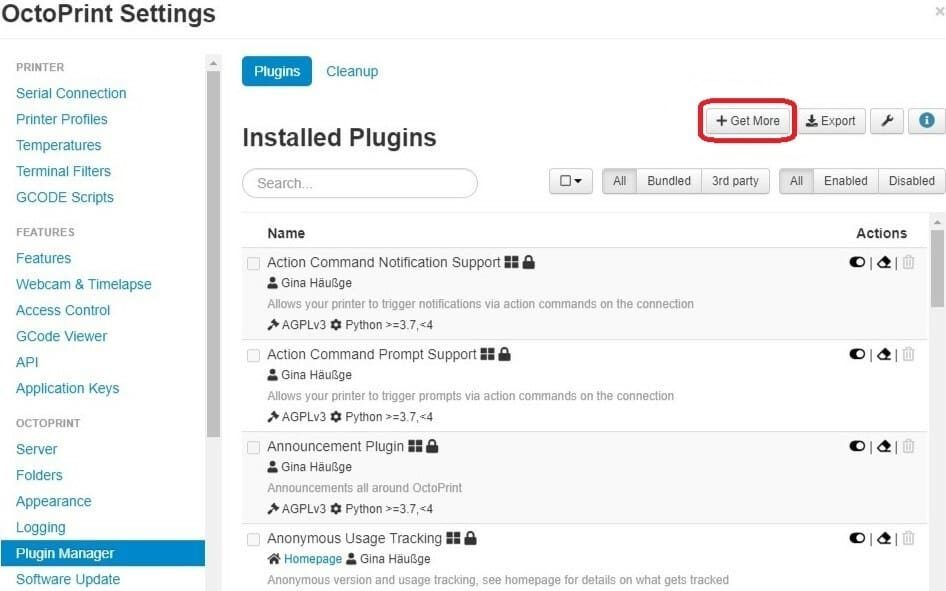
- Select “Plugin Manager” from the left-hand side of the settings menu.
- Click “+Get More” and search the plug-in repository for “Octolapse”. The Octolapse plug-in should be the only result.
- Click “Install” on the Octolapse plug-in. This will add the latest stable version of the Octolapse plug-in to your OctoPrint server. It’s worth noting that this guide will be based on Octolapse V0.4, which is the latest version of the plug-in at the time of writing, and it’s been the latest release since December 2020.
- Wait for the pop-up dialogue box to say “Done!” and then, when prompted, restart your OctoPrint server so the Octolapse plug-in can be properly added.
Congrats, you now have Octolapse installed. When you reload the OctoPrint web interface, you should see a tab for “Octolapse” alongside the other tabs like “Temperature” and “Timelapse”.
Before going further, make sure that you’ve properly connected your camera to your OctoPrint server. You can check this by going to the “Control” tab in your OctoPrint web interface. If you can see the video feed from the camera, then it’s working.
Printer Configuration
Now that you’ve got the plug-in installed on your OctoPrint server, you need to configure the program for your connected 3D printer and slicer profile.
- On your OctoPrint server web interface, click the “Octolapse” tab to access the Octolapse-specific settings.
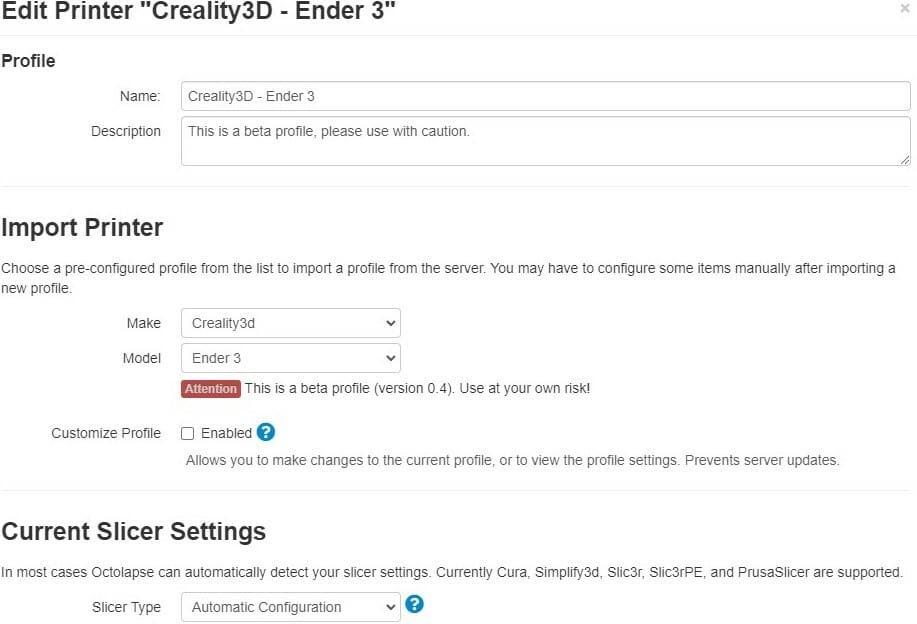
- Find “Printer” and click the “+” symbol to the right of the text box, as we’ll be setting up your first printer profile.
- In the “Profile” section, give your printer configuration a name. To make things easy, you can simply name the profile after the printer you have (e.g. Creality Ender 3). The “Description” section is optional.
- In the “Import Printer” section, select the make and model of your specific printer. For example, if you have a Creality Ender 3, select “Creality3D” in the “Make” section and choose “Ender 3” in the “Model” section.
- If your 3D printer isn’t one of the options from the list, you will have to add in the custom parameters for your machine (e.g. dimensions).
- A pop-up box will appear asking if you want to “Update Profile From Server”. Click “Ok” to allow Octolapse to import the custom settings based on the make and model of your printer.
- In the “Current Slicer Settings” section, choose “Automatic Configuration”. This will tell Octolapse to automatically detect what slicer settings you’re using so that you don’t have to manually add them.
- Click “Done” at the bottom to finish your printer configuration.
Configuring Cura
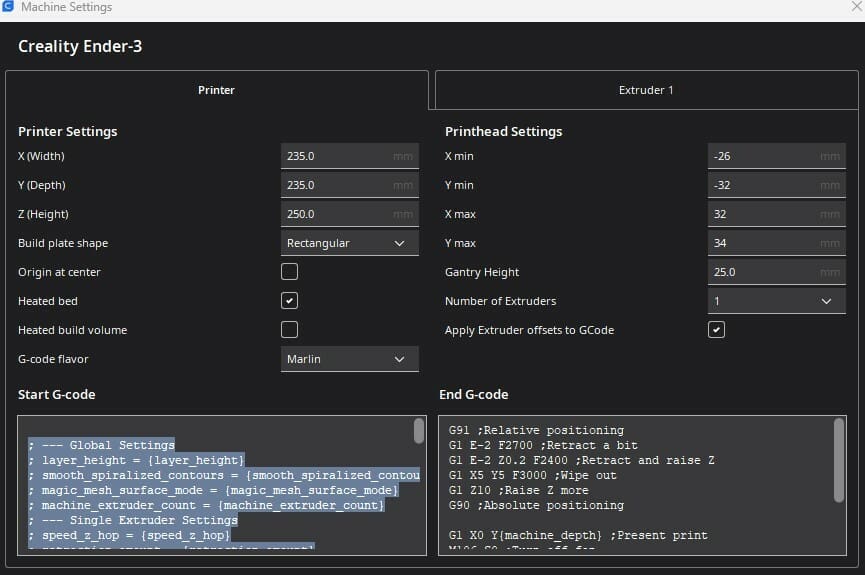
For most 3D slicers, including PrusaSlicer, Slic3r, and Simplify3D, choosing the “Automatic Configuration” option for the “Current Slicer Settings” in your printer profile is all you need to do. However, as mentioned by the developers, if you’re using Cura, you’ll need to make additional changes to make the slicer compatible with Octolapse and the G-code commands it adds.
Specifically, you’ll need to change the start and end G-code scripts that Cura generates for your printer. Here’s how to do it:
- Open Cura on your computer (e.g. laptop, PC).
- Click the “Settings” tab from the top toolbar.
- In the drop-down menu, select “Printer” and then “Manage Printers…”.
- Choose the printer you’re working with from the list of options.
- Click “Machine Settings”.
- Locate the text boxes for “Start G-code” and “End G-code”.
- Import the proper start and end scripts in front of the existing G-code scripts that Cura has generated for your printer. What script you should insert is based on what version of Cura you’re using, as stated on the Octolapse Github page. The different scripts include:
Changing these G-code scripts in Cura will set a few settings that Octolapse requires.
Configuring Other Settings
The printer and slicer configuration make up a bulk of the initial configuration process for Octolapse. However, there are a handful of other settings that you need to set and adjust.
Camera Selection
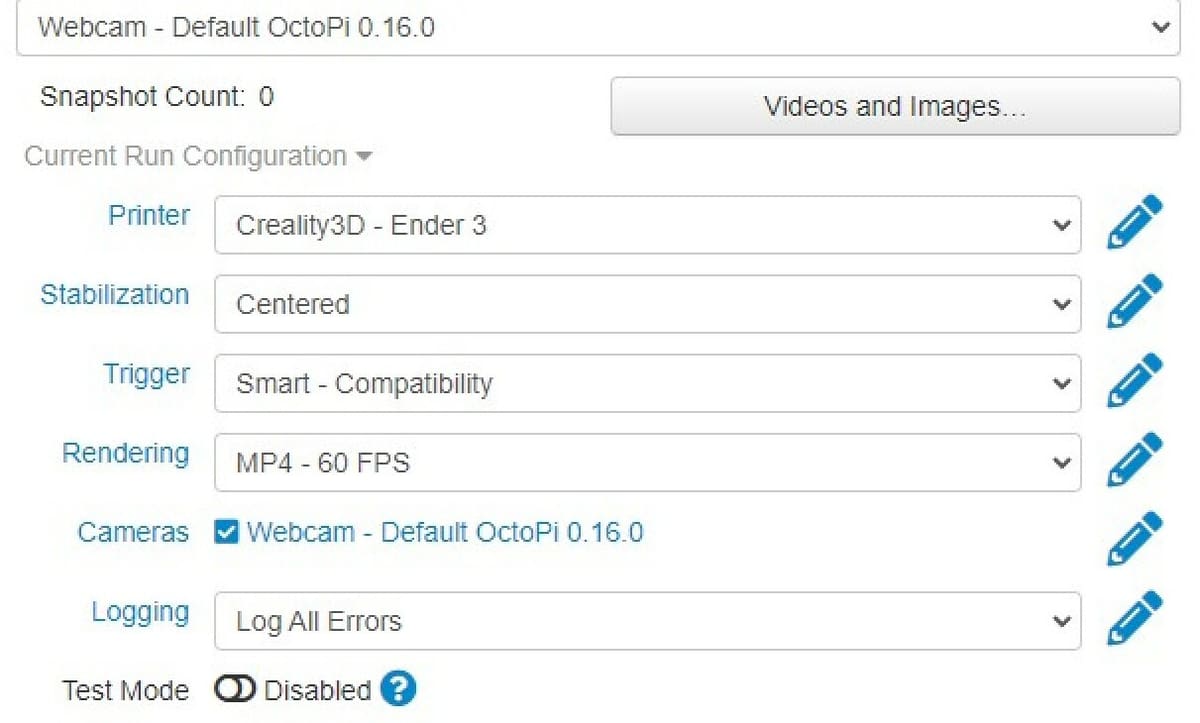
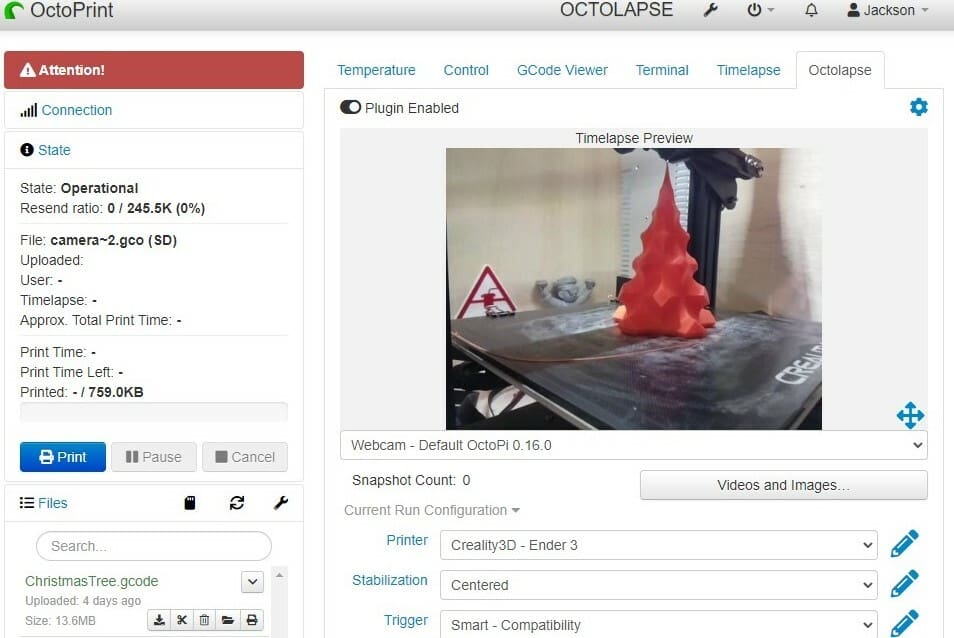
At the top of the Octolapse tab in your OctoPrint web interface, you’ll see a drop-down menu for choosing what camera you want Octolapse to use. If you’re using a webcam, the name of the camera will be something similar to “Webcam – Default OctoPi 0.16”. Select this option and leave it at the default settings; we will configure the settings for your camera later.
Stabilization
The “Stabilization” setting in Octolapse controls where your machine’s printhead moves during the snapshots that Octolapse takes. There are a few options for this setting, including “Centered”, “Back Left”, “Back Right”, and “Animated – Orbit”. We suggest using the “Centered” option as this will keep the printhead in the center of the print bed, which looks very nice during the Octolapses.
Trigger
The “Trigger” setting controls when each snapshot of your printer is taken during the print job. There are four default “Classic” options for this setting, including “Layer”, “Height”, “Timer”, and “Gcode”.
The “Layer” option tells Octolapse to take a photo for the time-lapse at each layer, while the “Height” option triggers photos every certain distance along the Z-axis. The classic “Timer” option triggers a snapshot after a certain period of time, and the “Gcode” trigger tells Octolapse to take a photo every time it reads a certain G-code command in your print job G-code file.
You can also use “Smart” triggers. These were one of the latest features added to Octolapse, and they give the program more information to use to determine when to take each photo. The two current smart triggers are “Layer/Height” and “Gcode”. For each smart trigger, there are a handful of options you can choose, which you can read more about on the Octolapse GitHub page.
Rendering
Rendering is essentially stitching the individual images together into a continuous video. We suggest leaving the “Rendering” setting in Octolapse at its default value unless you know your connected camera can handle a different rendering profile.
For example, let’s say Octolapse defaults the “Rendering” setting to 30 frames per second (FPS), but you know that your connected webcam can handle 60 FPS. You can click the “Rendering” tab in Octolapse and add a new profile that runs at 60 FPS, and then switch to this rendering profile.
Logging
The “Logging” setting in Octolapse controls how the program creates a log file, which is a record of the plug-in’s operations. We suggest leaving this setting at its default profile, which should be “Log All Errors”.
Other Settings
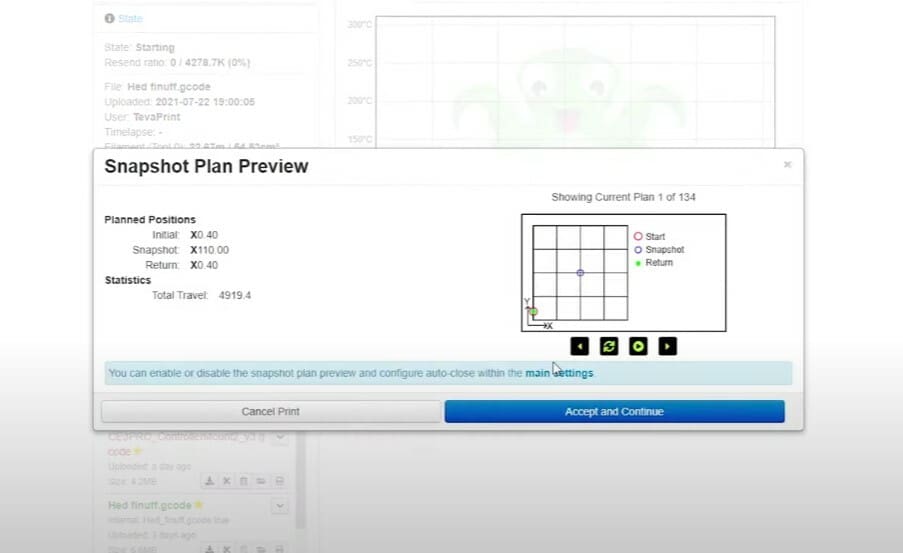
Beneath the “Logging” setting in the Octolapse tab, there are a few other settings and options that you can adjust. We recommend turning on the “Snapshot Plan Preview” and “Snapshot Plan Info” options.
Turning these snapshot planning settings on will provide you with information about the printhead’s positioning right before you start an Octolapse-enabled print. This is helpful for checking that your printhead is moving to the right place. In the snapshot, there’s even a little visual diagram of the printhead’s different positions.
Main Camera Settings
Setting up a camera with Octolapse is very easy due to the program’s auto-detection feature that will automatically recognize and use a connected camera. However, the default hardware settings might not reflect the true capabilities of your camera.
For example, Octolapse might only be running your camera at 30 FPS, even if it can run at 60 FPS. Familiarize yourself with the maximum video resolution and frames per second of your camera. You can usually find this information on the product page for the device.
Once you know the specs of your camera, follow the steps below to adjust the main camera settings for Octolapse:
- Power off your OctoPrint server and remove the MicroSD card from the device.
- Insert the MicroSD card device into your computer (e.g. laptop, PC).
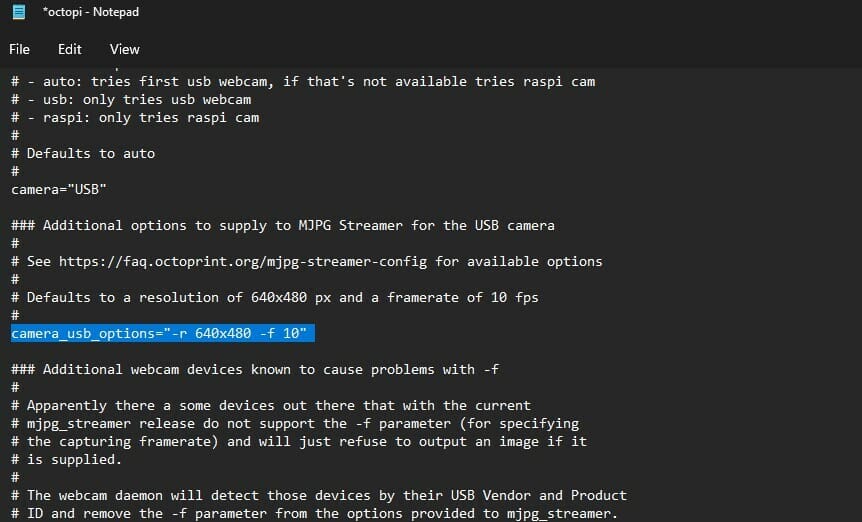
- Find the “octopi.txt” and open it in Notepad or a similar text editor application (just not Wordpad per OctoPi guidelines).
- If you’re using a USB webcam, find the phrase “
#camera="auto"” and change it to the following:"camera="USB"- It’s important that you remove the “
#” to uncomment the line of code.
- Find the line that begins with “
#camera_usb_options” and change it to the following:"camera_usb_options="-r <insert maximum camera video resolution> -f <insert maximum video frame rate>"- So, if you were using a USB webcam that can run 1080p video quality at 60 FPS, the line should look like this:
"camera_usb_options="-r 1920x1080 -f 60"
- Click “File” and save the updated file.
- Eject the MicroSD card from your computer and insert it into your Raspberry Pi board.
- Power on the board and let the OctoPrint server reboot.
What you’ve done is changed the maximum hardware settings for Octolapse. However, these aren’t the only camera settings you can change. Next, we’ll go over how you can adjust snapshot and time-lapse settings like “Brightness”, “Sharpness”, and more.
Camera Profile Settings
To fine-tune the camera settings, you’ll have to adjust the camera profile in your OctoPrint Octolapse settings. Luckily, fine-tuning the camera settings is nowhere as difficult as it used to be, thanks to the latest Octolapse interface. Here’s how to add your own Octolapse camera profile and adjust the settings:
- Open your OctoPrint web interface and go to the Octolapse settings tab.
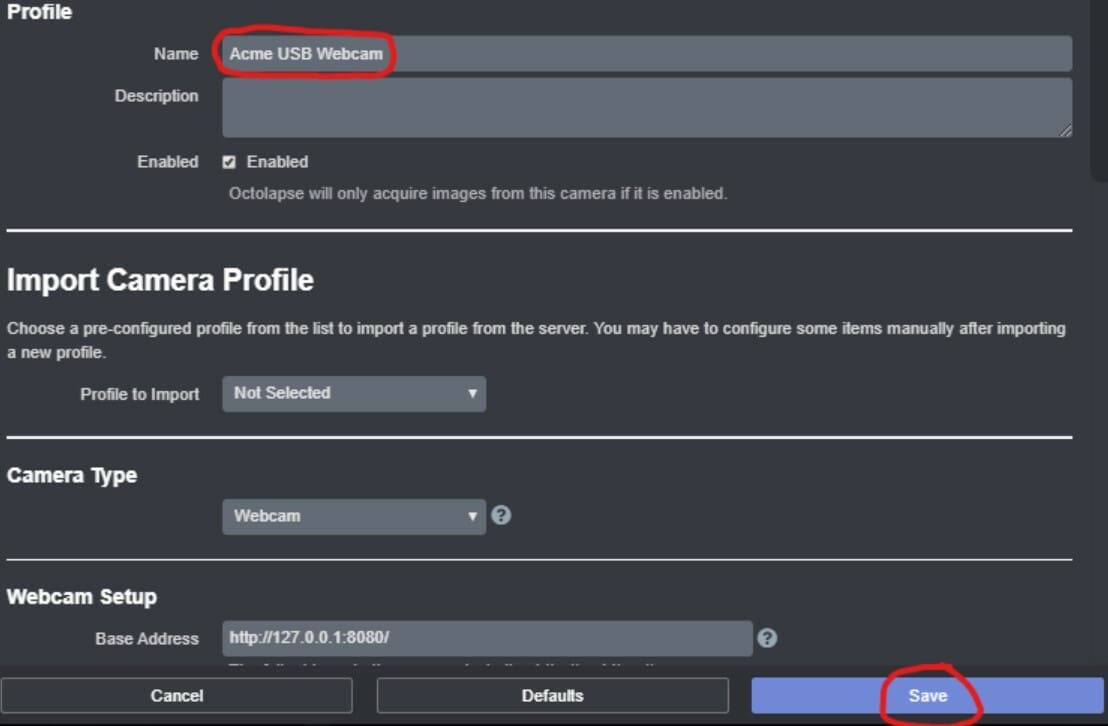
- Locate the “Cameras” setting and click the edit icon.
- Click “Add Profile…” and name the new profile after your camera.
- Make sure the “Profile to Import” is set to “Not Selected” and the “Camera Type” is “Webcam” if you’re using a webcam. Then select “Save”.
- Check that your new camera profile is an option in the “Cameras” Octolapse setting.
- Click the edit icon on the new camera profile you made.
- Find the “Test webcam” icon and click it to check that your webcam is recognized. If it’s not, check that the “Base Address” and other settings in the “Webcam setup” section are correct.
- Go to the “Custom Image Preferences” section and enable the “Custom Image” feature.
- Check all three of the options that should have appeared once you enabled the “Custom Image” feature. These include “Apply Preferences at Startup”, “Apply Preferences Before Print Start”, and “Apply Preferences When Camera is Disabled”.
- Click “Save” at the bottom of the camera profile page.
- On the Octolapse main menu, change your camera profile to the new one you just made at the top of the menu (right above the “Snapshot Count” line).
- Click the edit icon right next to the camera profile you just selected in the previous step. Beneath the live feed of your connected camera, you will see a handful of different settings, such as “Brightness” and “Contrast”, as well as dials to adjust each setting.
From here, you can make all the adjustments to the camera image quality that you need to achieve the perfect Octolapse. And in the bullet points below, we’ll go over what each of the settings does and what effect it will have on your Octolapse.
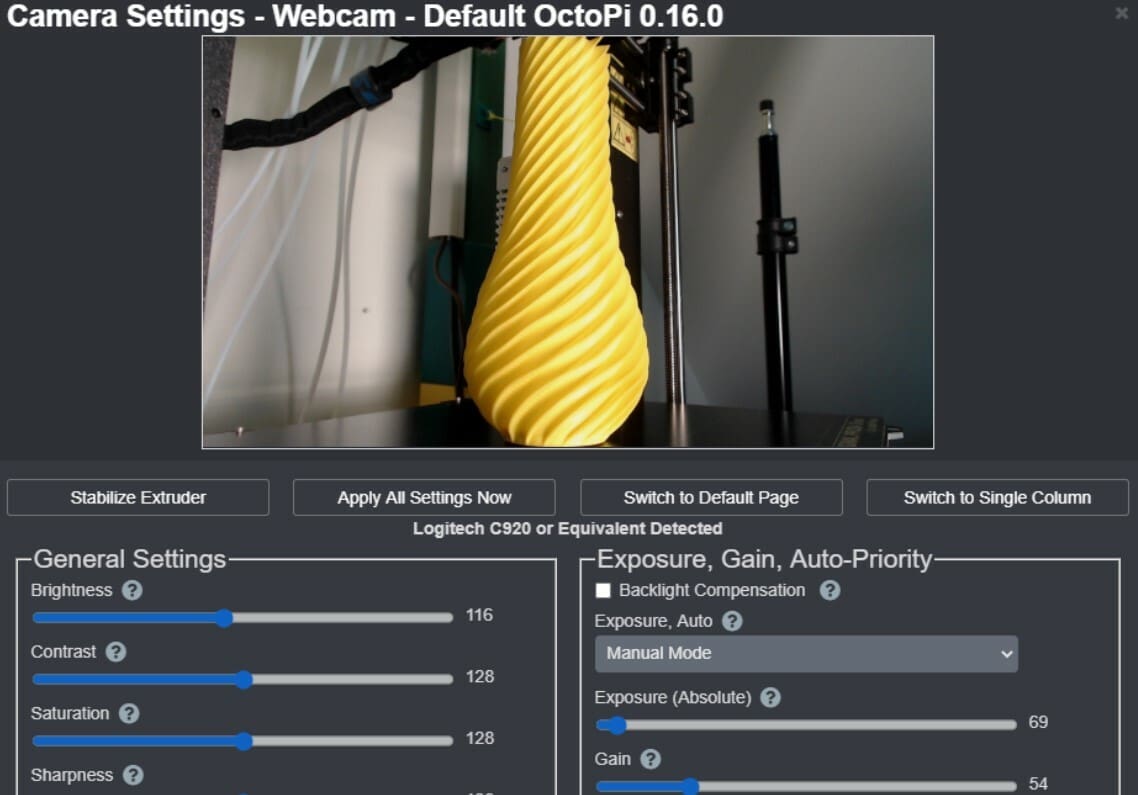
- Brightness: A higher value will over-expose the image, and you would be losing details. Better to start with a slightly lower value and go up from there.
- Contrast: This defines the difference between blue and black. A higher contrast results in a darker image, so set the contrast to a lower value as a start.
- Saturation: This lets you control how saturated you want the colors to be. A higher value will give you more vibrant colors, but you might lose color accuracy. You want this value to be somewhere in the mid-range, representing a color that is close to the actual color of the object.
- Sharpness: This setting sets the crispness of the image. The higher the value, the sharper the video. At higher values, the video tends to get grainy. A mid-value should suit just fine.
- JPEG Quality: Without a doubt, this should be set to the highest value. This ensures you get the best image. 100 is the default highest value.
- White Balance: This is enabled automatically by default, and you don’t need to change it.
- Exposure and Gain: The default settings work just fine. You can leave them as-is.
- Pan, Tilt, and Zoom: This would change the orientation of the image taken. It’s easier to do by just moving the camera physically – no need to change these settings.
- Focus: This is an important one; you should always disable autofocus. By doing so, you have complete control over the focus of your camera. Set the value so that you can see the layer lines of your print.
- Powerline Frequency: Depending on your country, the power grid runs at either 50 or 60 Hertz (Hz). You need to change the value to apply to your location, which will reduce the flicker in your final video.
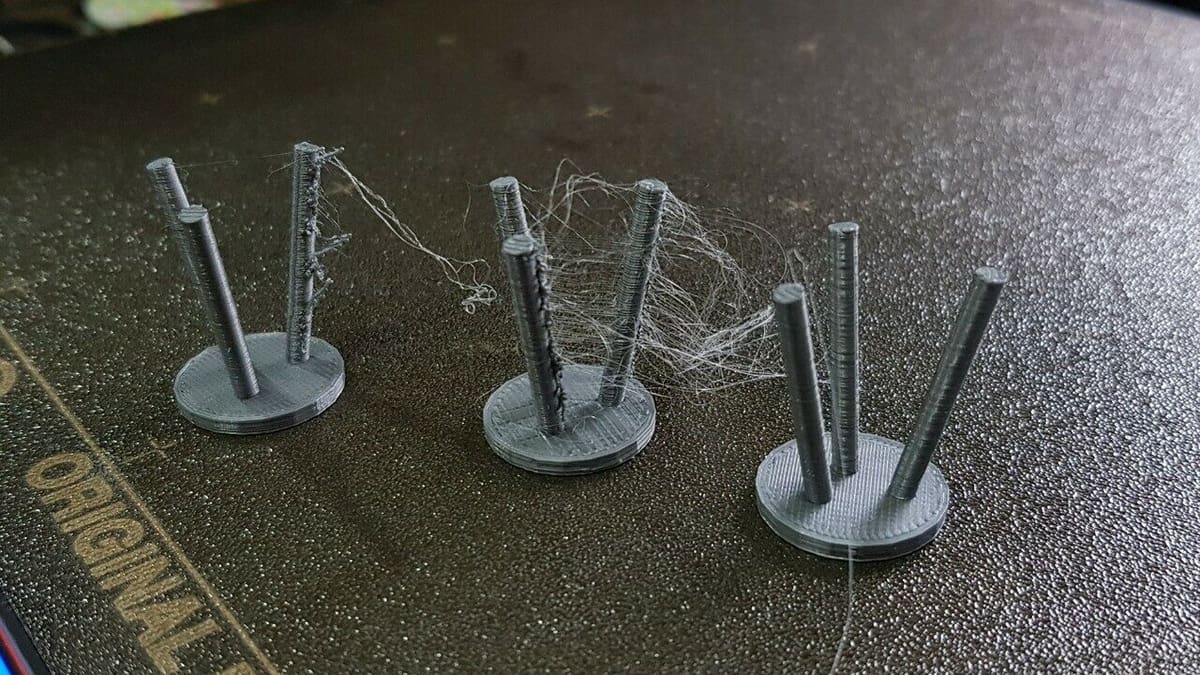
- Snapshot Delay: Unlike the other settings, the “Snapshot Delay” setting is found in the “General Options” section. The snapshot delay sets the length of time before an image is taken, and increasing this value is a good way to make your Octolapse seem less wobbly. However, note that a higher snapshot delay might lead to more stringing; we recommend starting with a value of 100 ms and going from there.
Starting Prints
Now that you’ve properly configured your Octolapse instance for your printer, slicer, and camera, it’s time to get printing! It’s worth noting that if you want to generate an Octolapse for a print, you’ll need to start the print job from OctoPrint’s web interface. Below, find the steps for starting an Octolapse-enabled print:
- Import your 3D model into your slicer program and slice the model. Download the G-code file to your computer (e.g. laptop, PC).
- Open your OctoPrint server’s web interface on a computer.
- Upload the G-code file to your OctoPrint server by clicking the file icon on the left-hand side of the interface. Octolapse won’t work with G-code files stored on your printer’s SD card.
- Click the print icon on the specific G-code file that you want to print. Once you click this icon, Octolapse will start to pre-process the file and insert the necessary G-code commands (triggers) into the file.
- Next, if you turned on the snapshot planning features, a pop-up box displaying some important information about your Octolapse print will open. Here you’ll find a visualization of your printhead’s positioning as well as the exact coordinates and other information. Click “Accept and Continue” if everything looks good to start your print job.
And that’s it! Now let your printer and your OctoPrint server do their thing, and in no time, you’ll have a very cool Octolapse to share!
Tips & Tricks
While Octolapse is pretty easy to use once you have the plug-in up and running, the setup and tuning processes can be a little complex. To help you with your installation of Octolapse as well as how you use the plug-in, we’ve gone over some tips, tricks, and common issues (with solutions) below:
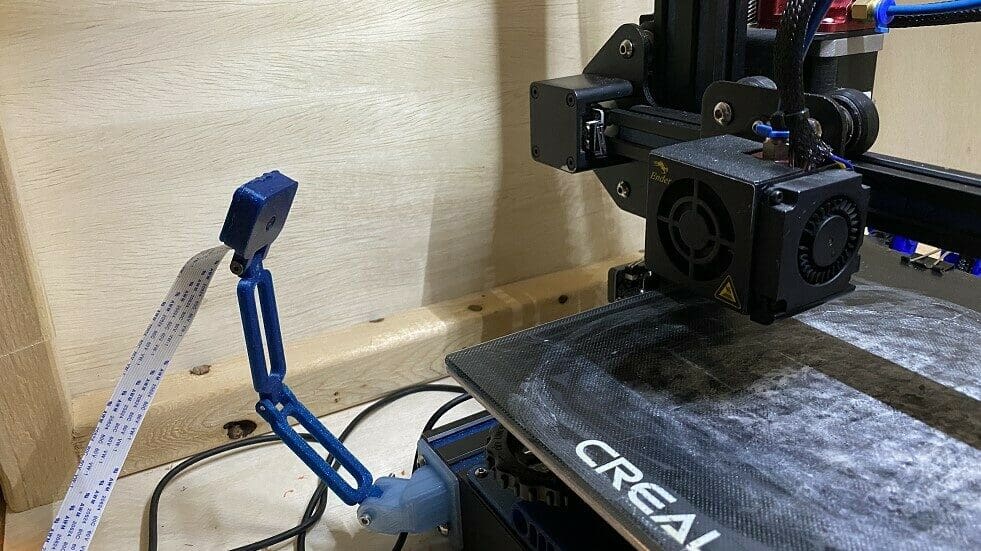
- Using a Raspberry Pi camera: A Raspberry Pi camera module is another type of camera that works on Pi boards. While Raspberry Pi cameras are compatible with Octolapse, they require a slightly different configuration than traditional USB webcams. This is for a few reasons, including their use of a ribbon cable (instead of a USB port). Check out the developer’s guide for setting up a Raspberry Pi camera if this is the type of camera you’re using.
- Printer is running different firmware: When you set up your printer profile for Octolapse, the default options, such as the Creality Ender 3, are meant for the printer in its stock form. If you’ve changed the firmware from the original version shipped with the printer (e.g. switch to Marlin 2.0), the default printer profile might not work. If this is the case, you’ll have to create an Octolapse profile for your printer manually.
- Using a special slicer: Octolapse’s “Automatic Configuration” feature will try to detect what slicer and what slicer settings you’re using for a given G-code file. However, if you’re using a special slicer, such as a specific fork of Slic3r (e.g. SuperSlicer), then Octolapse might not be able to properly read your G-code files. If this is the case, then you’ll need to choose a specific slicer from the list of compatible options (not the “Automatic Configuration” option) and manually insert the slicer settings you’re using.
- Flipped or rotated image: If you see that your video or image is flipped, there’s a small setting that you’ll need to change. Go into the camera tab and click “Snapshot Transposition Options”. Select the correct orientation here. This won’t take effect immediately, but you’ll notice the change in your next Octolapse.
- Stringing in prints: This is due to filament oozing from the nozzle when it moves into position for taking the snapshot. To reduce this, you’ll need to fine-tune your retraction settings and have the lowest possible snapshot delay. This will reduce the blobs and stringing in your prints.
For any additional issues that you might be facing, there’s a troubleshooting guide that may help.
License: The text of "The Best Octolapse/OctoPrint Time-Lapse Settings" by All3DP is licensed under a Creative Commons Attribution 4.0 International License.