Klipper: Start G-code – All You Need to Know

Klipper can improve your printing workflow using customized start G-code macros. Keep reading to learn all about Klipper start G-code!
Start G-code in the context of 3D printing is a series of instructions in G-code format that are run after the beginning of a print job and before the actual print commences. The scope of these instructions is to prep and calibrate the printer for a print.
Usually, the start G-code is a field included in the slicer’s printer profile or settings that’s integrated at the beginning of the .gcode file that is created. This makes sense for a printer running on Marlin firmware, but if you’re working with Klipper, things work a bit differently, as we’ll see later.
Regardless of the firmware installed on your 3D printer, writing the start G-code is always daunting. One might be tempted to copy and paste a few lines found online, even if intended for a different printer or use case. However, having a start G-code tailored to your machine allows you to minimize failures by creating a standardized baseline to build upon.
In reality, writing your own G-code is not as complicated as it sounds, as long as you clearly define its purpose. And today, we’re here to help you with that journey! We’ll go through how to write your own start G-code for Klipper, but first, let’s go over the differences between G-code in Marlin and Klipper.
Klipper vs. Marlin
To avoid any confusion down the road, let’s briefly go over the relevant differences between Marlin and Klipper firmware, though more details can be found in our dedicated article on the topic.
Marlin is the default firmware that powers most of the printers on the market. It doesn’t require additional hardware to run and natively supports 99% of the printers in existence. To apply most changes, it’s necessary to recompile and reflash the firmware.
Klipper works in cooperation with an SBC (like a Raspberry Pi). It’s flashed on the board once, and all the subsequent changes and upgrades are applied through a web interface. Klipper boasts a set of features that are aimed at reaching higher speeds while minimizing quality loss.
These differences mean changing the start G-code in Marlin requires re-slicing of your files, which can get tedious. Klipper makes this easier because the start G-code is usually defined on the firmware side with the use of macros. Let’s take a close look at how these work.
G-code Macros
In Klipper, macros are a set of command instructions that can be executed automatically and in order, with a single action from the user. They’re effectively part of the configuration file, so they can be adapted and changed rapidly like the rest of the parameters. If the concept of macros is totally new to you, we suggest reading our dedicated article on Klipper macros, then coming back here afterward.
The constituting principles of a macro are really simple. These actions comprise both G-code commands like G1, G28, or M84, as well as other Klipper-specific command templates with parameters (e.g. BED_MESH_PROFILE LOAD=mesh1). You can then articulate the instructions with full-fledged coding syntax that includes if loops, variables, and actions.
All you have to do in the slicer is include the name of the macro to have it executed automatically in your .gcode file. Additionally, like any other macro, you can map it to a button in the web interface or execute it via the console.
This of course changes the workflow we’re all used to with Marlin – often for the best:
- There’s no need to re-slice a print to change the start parameters. Simply edit the .config file and restart.
- You can create conditional clauses that can activate only under certain circumstances (e.g. different bed temperatures for PLA and PETG).
- The included instructions can operate at a higher level, even interacting with the Pi and possibly its surroundings (e.g., by switching lights on and off or other IoT devices on the network).
From Marlin to Klipper
If you already have a start G-code that works in Marlin, you can import much of it into a Klipper macro. With some minor tweaking, it can still be functional, as long as the hardware configuration hasn’t changed. Klipper natively supports only some of the Marlin commands, while some functions can be called with different names. You can swap the unsupported G-codes for their equivalent and solve the issue.
So now that we have the basics covered, let’s get into writing your own start G-code for Klipper!
Write Your Own
Creating your own personalized macro is easier than you might think! For the sake of simplicity, we’ll focus on the most common and handy operations:
- Homing the printer
- Leveling the bed and initializing the bed mesh
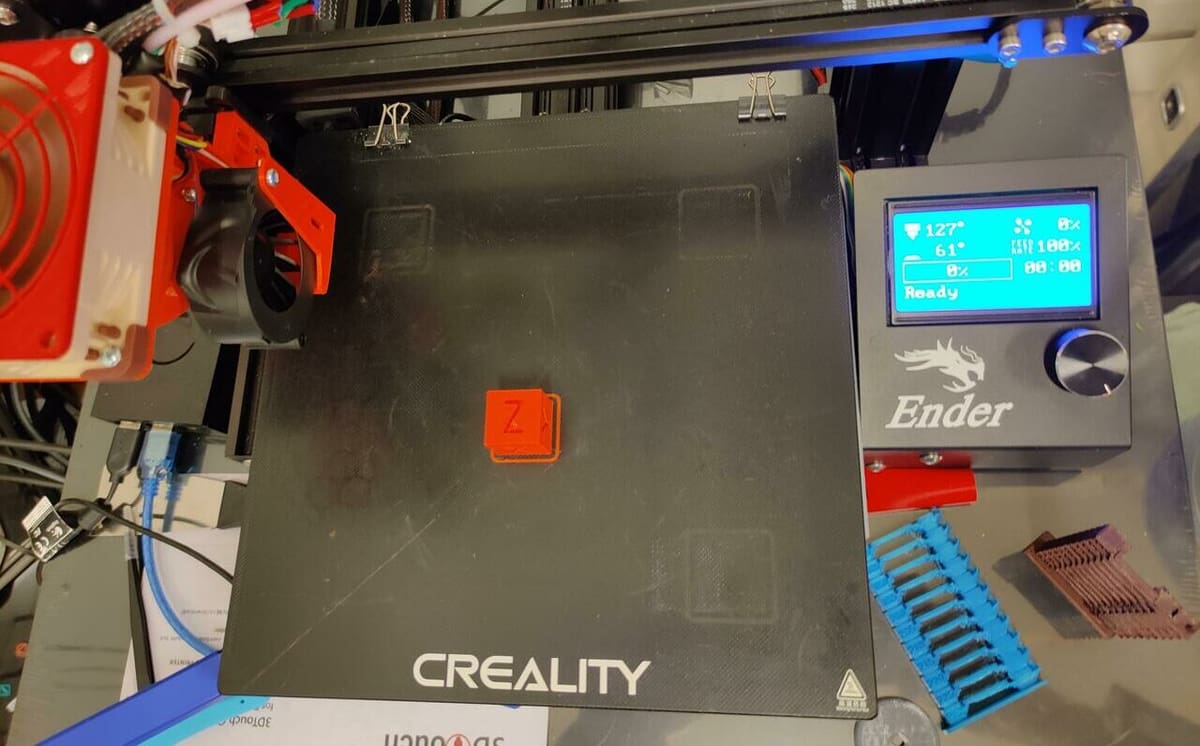
- Getting the hot end and bed up to temperature
- Purging the nozzle
- Moving the printhead to a wait position
There are many more possibilities, but for the sake of brevity, these are the ones we’ll cover in detail. It’s always possible to check the official documentation for more in-depth customization.
All of the steps presented here are intended to be sequential, but you can skip selected ones if they do not apply to your setup.
Step by Step
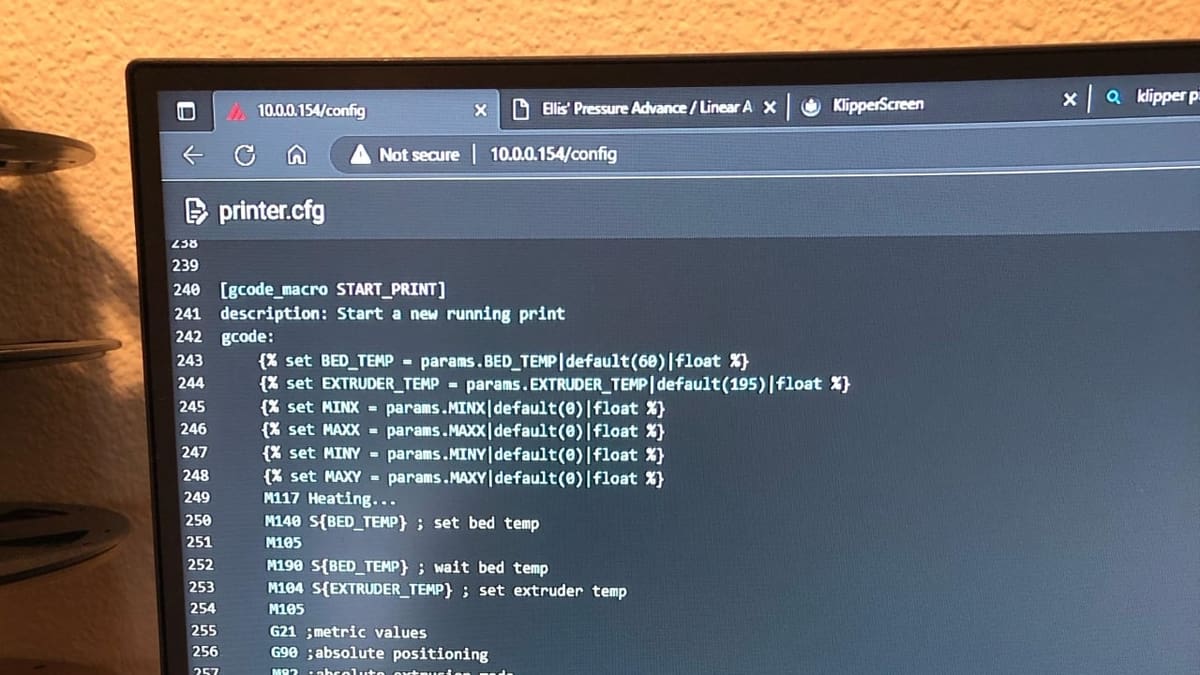
First, create a new macro in the .config file with a name that reflects its purpose. Then, we specify a few initial parameters to get started:
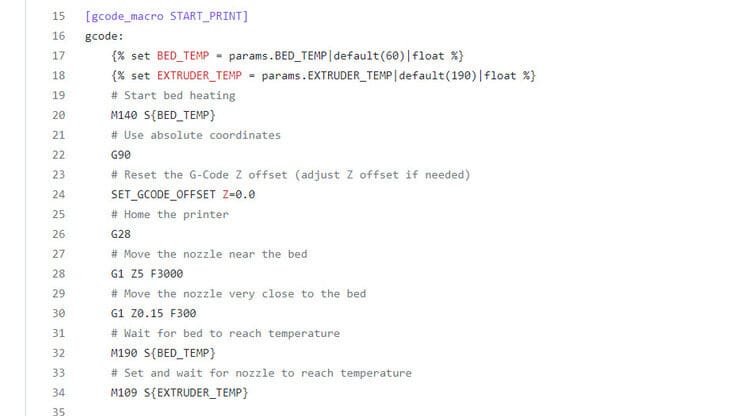
[gcode_macro START_PRINT]
gcode:
      # Use absolute coordinates
      G90
      # Home the printer
      G28
      # Reset extruder
      G92 E0
Once all the axes are homed, we can start heating up the bed to the desired temperature with M190 S<temperature>. This will also make it wait after the target is reached. For 60 °C, the command would be:
     # Heat the bed and wait
     M190 S60
If you wish to probe the bed each time, you can do so after heating. If you already have a mesh saved, simply load it with the second command:
     BED_MESH_CALIBRATE PROFILE=mesh1 METHOD=automatic

     BED_MESH_PROFILE LOAD=mesh1
Please note that Klipper recently introduced a change that requires a bed mesh profile to be loaded before printing, so make sure to include the command in your macro.
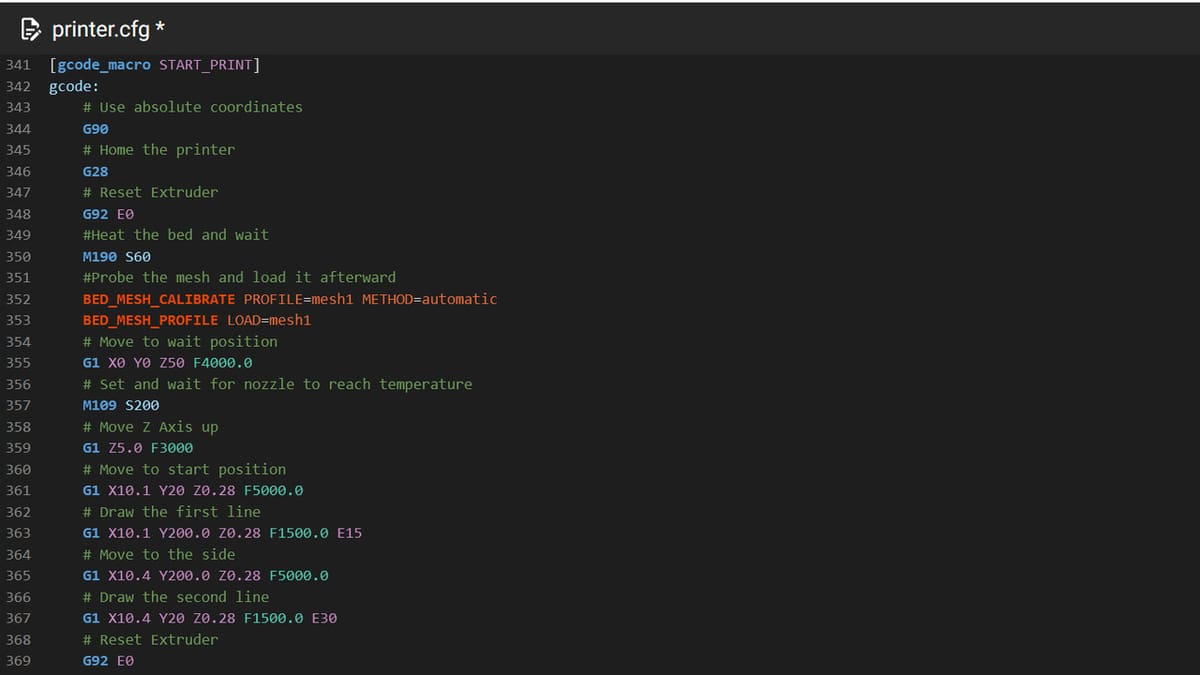
Before heating the nozzle, you’ll want to move the printhead away from the print area to avoid oozing onto it. This location varies from printer to printer, so check what suits your setup before executing it:
     # Move to wait position
     G1 X0 Y0 Z50 F4000.0
     # Set and wait for nozzle to reach temperature
     M109 S200
Once everything is set, you can purge a line of material to prime the nozzle. Remember that these dimensions might not fit your printer, so make changes to the distance as necessary. We’ll be resetting the extruder after this procedure is complete:
    # Move Z axis up
    G1 Z2.0 F3000
    # Move to start position
    G1 X10.1 Y20 Z0.28 F5000.0
    # Draw the first line
    G1 X10.1 Y200.0 Z0.28 F1500.0 E15
    # Move to the side
    G1 X10.4 Y200.0 Z0.28 F5000.0
    # Draw the second line
    G1 X10.4 Y20 Z0.28 F1500.0 E30
    # Reset extruder
    G92 E0
Finally, you can add START_PRINT (or your name for the macro) in the start G-code field of your favorite slicer to have this new macro included in the .gcode file!
Now that we’ve set the baseline, let’s see how to include more advanced parameters and automatize the process in the slicer of your choice.
Slicer Setup
Some users frequently switch between materials with very different required temperatures, so adapting the macro every time would be annoying at best. Luckily for us, we can set up the slicers to communicate with Klipper and send this type of information automatically. If you wish to skip this step, it’s sufficient to add only the macro to the start G-code field.
To pass the slicer temperature information to Klipper, the start G-code field must include a few extra parameters, and the macro must be able to read them. What is required from the slicer side of this will depend on which slicer you’re using, while the Klipper side will remain the same.
In Cura, under Machine settings, add the following to the start G-code field:
; M190 S{material_bed_temperature_layer_0}
; M109 S{material_print_temperature_layer_0}
START_PRINT BED={material_bed_temperature_layer_0}
HOTEND={material_print_temperature_layer_0}
In Prusaslicer or SuperSlicer, under “Printer Settings > Custom G-codes” add the following to the start G-code field:
M104 S0
M140 S0
START_PRINT BED=[first_layer_bed_temperature]
HOTEND=[first_layer_temperature[initial_extruder]]
Remember to include the name of the macro first!
For Klipper to implement these values, we’ll have to add the parameter definitions at the beginning of the macro and change the M109 and M190 commands:
[gcode_macro START_PRINT]
gcode:
    {% set bedtemp = params.BED|int %}
    {% set hotendtemp = params.HOTEND|int %}
    M190 S{bedtemp}
    M109 S{hotendtemp}
Additionally, you can pass other parameters, such as the material type or nozzle size, and have Klipper act accordingly. Since that goes a little beyond the scope of this guide, we refer you to the excellent macro written by rootiest on GitHub.
Finally, remember to always test your macros before executing them!
License: The text of "Klipper: Start G-code – All You Need to Know" by All3DP is licensed under a Creative Commons Attribution 4.0 International License.