G-code Converter: How to Convert From & To G-code

Learn how to go to and from G-code using a G-code converter or a slicer. It's a vital part of the 3D printing workflow!
If you’re someone who has been 3D printing or following updates from the 3D printing community, you’re likely already familiar with the terms “STL” and “G-code”.
STL stands for “Standard Triangle Language” or “Standard Tessellation Language”, and is one of the common file standards used for describing the surface geometry of three-dimensional models. It’s also the go-to file standard for most 3D printing applications. STL files are devoid of any color or texture information and hence take up less space to store 3D model information and are quick to process.
G-code, or geometric code, is the programming language used to drive computerized manufacturing machines. The format helps convert 3D models to machine-readable commands and operations, based on which the physical objects are produced. In G-code files, you’ll find commands for movements, homing, and heating that printers can interpret to form printed models.
Learning to convert STL files into G-code and vice versa can come in handy at times. Read on to find out more about the two types of files and how you can convert one format into another!
What Is G-code?
As you can imagine, G-code conversion is a vital step in the 3D printing workflow. There are two kinds of conversion: turning a file into G-code, a necessary step in 3D printing, and turning G-code into a different file format, a much less common process.
Let’s start with the most important one: conversion to G-code. This process turns your 2D and 3D files into executable instructions for your printer, thereby realizing your designs. Without this critical step, you typically can’t make the jump from a digital model to a real-world print; as such, you should expect to become quite familiar with this process.
Converting from G-code, on the other hand, is a much less common and practical skill. G-code instructions are printer- and material-specific, so most file sharing and editing occur at the 2D or 3D file stage. That being said, if you do end up with a G-code file on hand, converting that code back into an STL file is a handy way of extracting the original model. It’s not a trick that you’ll have to use often, but it’s a useful one to know.
In this guide, we’ll run you through the basic tools for G-code conversion, regardless of your use case. First, we’ll take a look at converting to G-code, a process known as slicing, and then we’ll explore how you can turn that G-code back into a 3D model. Let’s get started!
Converting to G-code
First up, we have the most common and important conversion: turning a file into G-code. As we mentioned, this process converts 2D and 3D files into a format that your machine can understand and print.
Typically, this conversion is achieved by a process known as slicing, wherein digital designs are turned into tool paths for the printer or other machine. The programs that do this are known as slicers, and they’re an essential component of the 3D printing workflow. Several slicers exist, supporting different file formats for conversion to G-code. Below are some of the more popular options, along with their natively supported formats.
- UltiMaker Cura: 3MF, STL, OBJ, AMF, DAE, ZAE, CTM, PLY, GLB, GLTF, BMP, GIF, JPEG, JPG, PNG
- IdeaMaker: 3MF, STL, OBJ, OLTP
- PrusaSlicer: 3MF, STL, OBJ, AMF
- Slic3r: STL, OBJ, AMF, POV
- Simplify3D: 3MF, STL, OBJ
Note: Some slicers offer additional import options via third-party additions. Cura’s extensive plug-ins are a prime example, opening access to SVG imports and more.
If your file isn’t supported by these slicers (e.g. IGES, STEP, DWG, SAT, etc.), you’ll have to convert to one of the supported formats. This typically occurs when you have a CAD file from the design stage that’s not directly printable. Fortunately, most CAD and 3D modeling software have options to export your files as STLs, or there are plenty of STL converters, either of which should get you on your way.
Online Alternatives
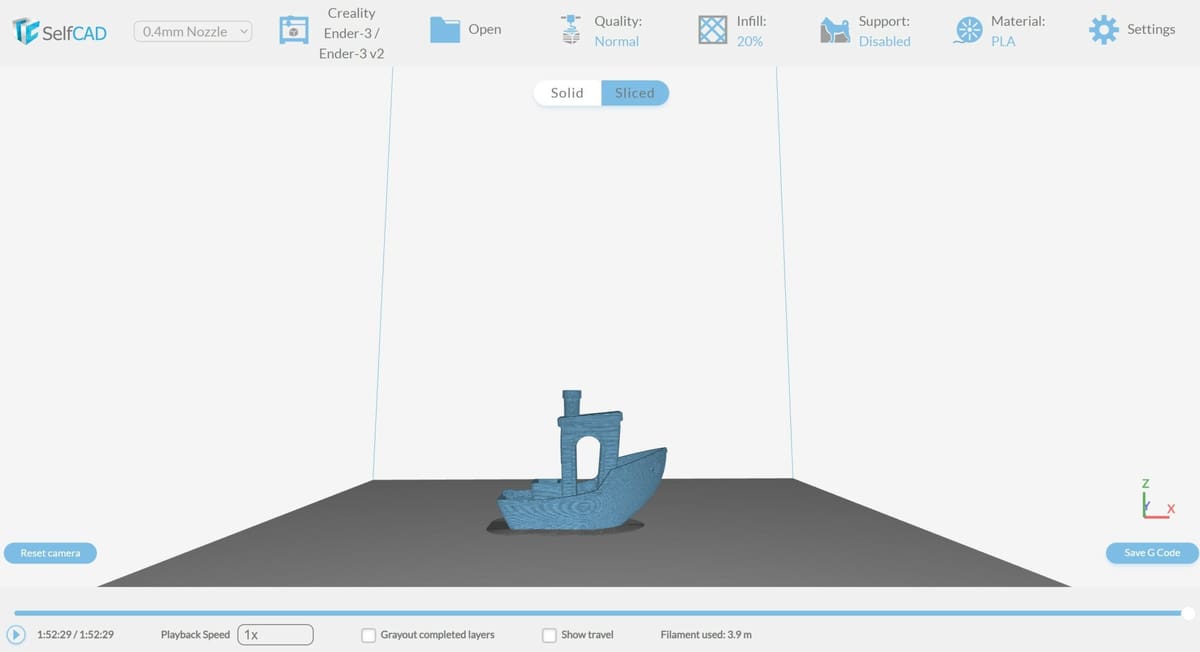
You can also overcome the hassle of having to download and install a slicer or CAD software by using online tools. For example, SelfCAD and AnyConv currently offer STL to G-code converter file conversions.
SelfCAD is a free online CAD and 3D modeling tool. The free version of the online editor offers drawing and sketching tools, an in-app STL slicer, and direct file export and import. The slicer offers the ability to prepare G-code for certain default 3D printers and also provides with the functionality to fine-tune the layer settings for commonly used 3D printing filaments. The paid versions of SelfCAD offer further tools for mesh modeling, sculpting tools, image-to-3D conversion, and 3D sketching.
AnyConv, on the other hand, is an online tool that offers multiple file type conversions. STL to G-code is one of the options, which is, at time of writing, in Beta testing mode. Unlike SelfCAD, a generic G-code conversion is offered, and there’s no possibility of tweaking the slicing parameters. That said, it’s a fast and straightforward enough method that might just be enough, depending on your needs.
Converting from G-code
Conversion of G-code files into STL files is infrequent in the 3D printing world. It’s quite possible that you’ve never needed to carry out such a conversion and that you never will.
However, there have been instances where certain creators only make the G-code file available for 3D printing. But what if you wanted to make changes to that model before printing it directly? Or what if you lose the 3D model file for an object that you’re trying to print again after ages, and you only find the G-code file stored on a USB stick that you used to transfer files to your 3D printer? Been there!
In any case, it’s handy to know how G-code to STL conversion works and could be a cool hack that you could show your friends. Since the conversion of G-code files into STL files isn’t prevalent, there exist only a handful of options to convert G-code files into STL files.
Gcode2l and Voxelizer for Fab are software that provide such functionality. GCode2l is an online platform that solely provides one single function: Convert G-code to STL. We cover the features of the GCode2l platform in another article.
The other option is Voxelizer for Fab, a free offline slicer made by ZMorph for their line of printers. Voxelizer is unique because it splits 3D models into small cubes, or “voxels”, for manipulation.
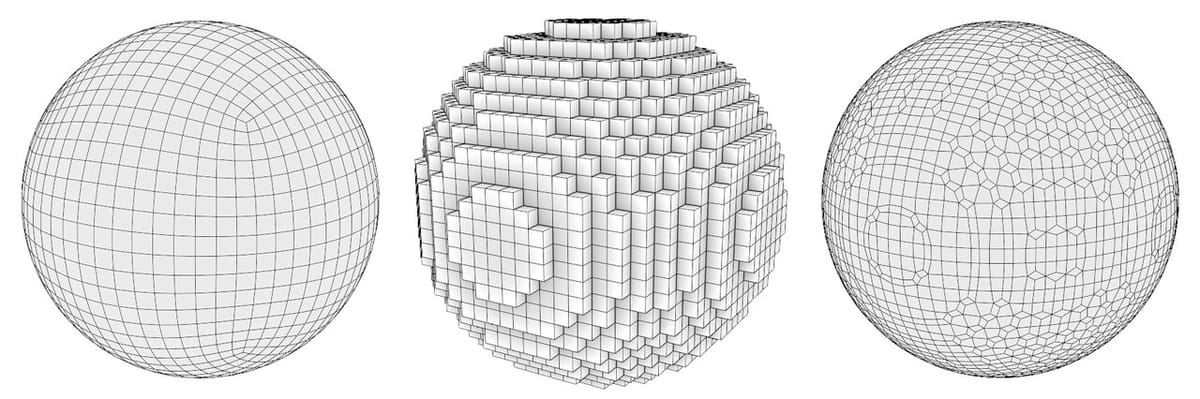
A sphere with Quad tessellation (pictured left) is representative of an STL file. The sphere on voxelization is broken down into small volumetric cubes and the geometry is estimated (pictured in the middle). Voxelized geometries can later be smoothed out to estimate the initial geometry (pictured right).
Similarly, when you import a standard mesh, Voxelizer for Fab begins by breaking it into small volumetric cubes. From there, the software allows you to adjust your slicing settings, based on which a G-code file is generated.
Fortunately for us, this process can also run in reverse; namely, it can take a G-code input, break it into small cubes, and then re-export the file as a mesh. This does, however, come with a slight quirk: Your model will still look “voxelized”. Here, smaller cubes indicate a higher resolution, resulting in an output that looks closer to the original model.
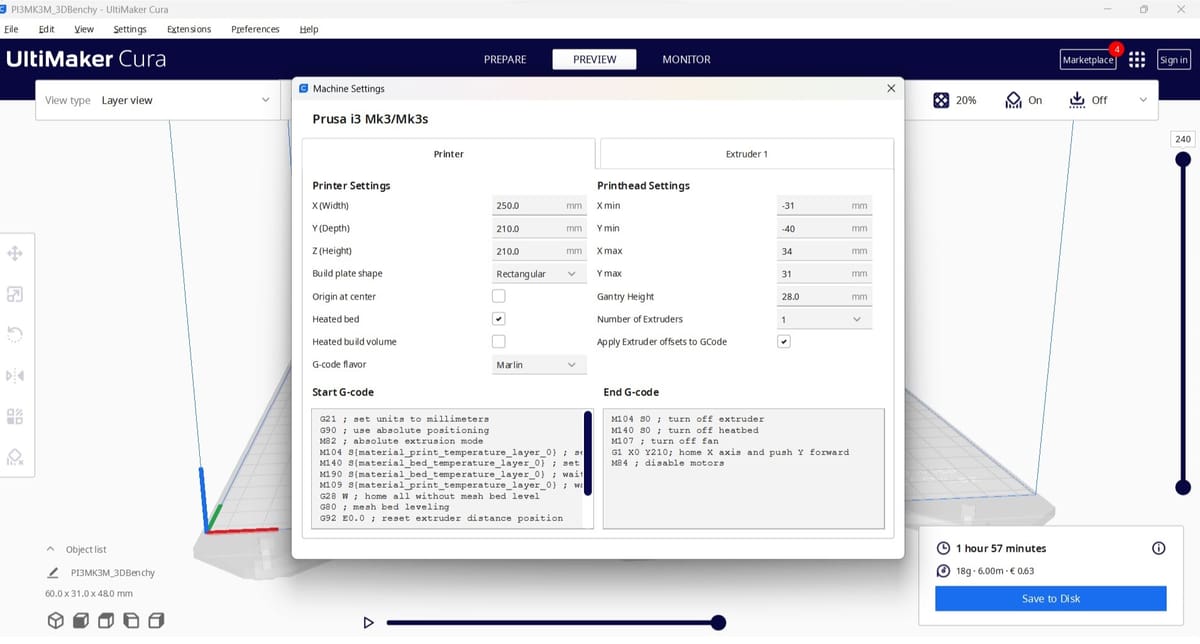
Few other slicers, such as the likes of Cura and PrusaSlicer, offer G-code to STL and OBJ file conversions respectively. But in our tests, Cura in most cases exported broken or unusable STL files, while in the case of PrusaSlicer, the OBJ model still had the layer information. Hence, Voxelizer for Fab might be your best solution for converting G-code to STL!
Voxelizer for Fab
G-code to STL conversion is one of the many features that Voxelizer for Fab offers. What sets Voxelizer apart from other slicers for 3D printing is the fact that it uses voxels to estimate the geometry. This provides users trying to convert G-code to STL files with the additional ability to perform volumetric operations on the voxels.
Such operations can be used to remove artifacts such as supports or a brim or raft from your G-code files, and can also be used to delete or modify certain features natively within the slicer before exporting the file in STL format.
Let’s dive deep into the Voxelizer for Fab workflow to convert G-code files into the STL format.
G-code to STL Workflow
First things first: setting up the Voxelizer for Fab slicer on your PC. For this, head over to the ZMorph3D’s software downloads page. Scroll down to find Voxelizer for Fab and download the ZIP file. The slicer is currently available only for Windows users, with Mac users promised the program later this year.
Installation is as straightforward as it gets. Once the slicer is set up, follow the steps below to convert your G-code files into STL:
- Head over to “File > Import > G-code (.gcode)”. Locate the G-code file stored on your PC in the window that pops up and open the file.
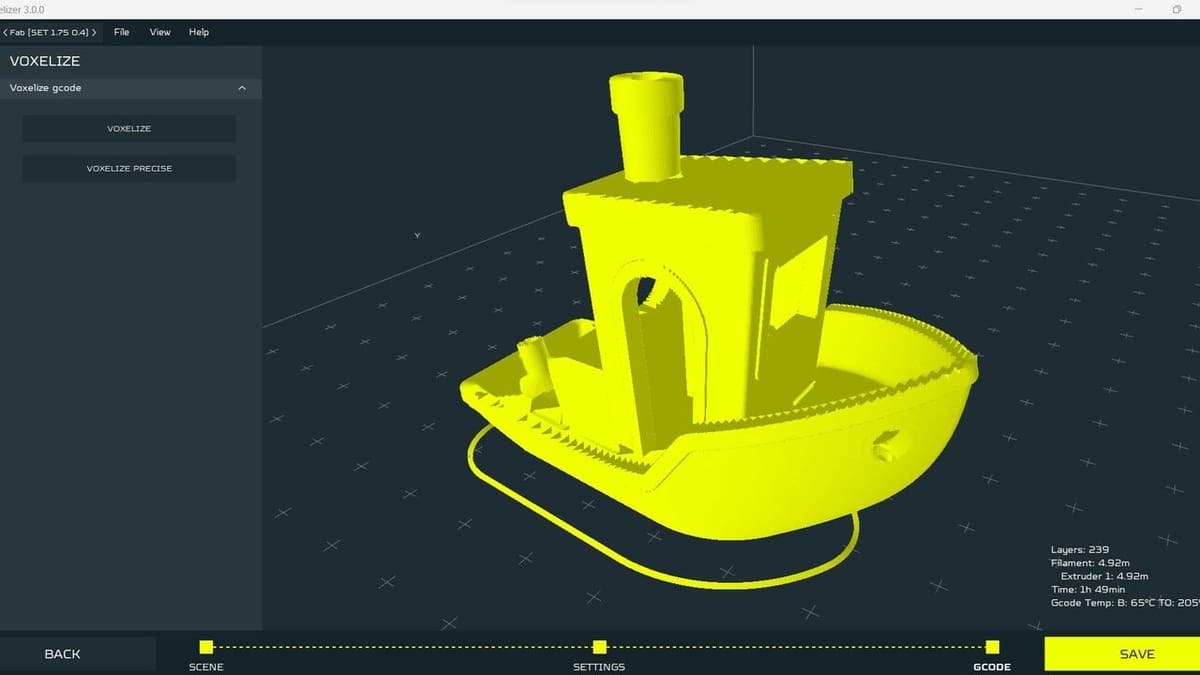
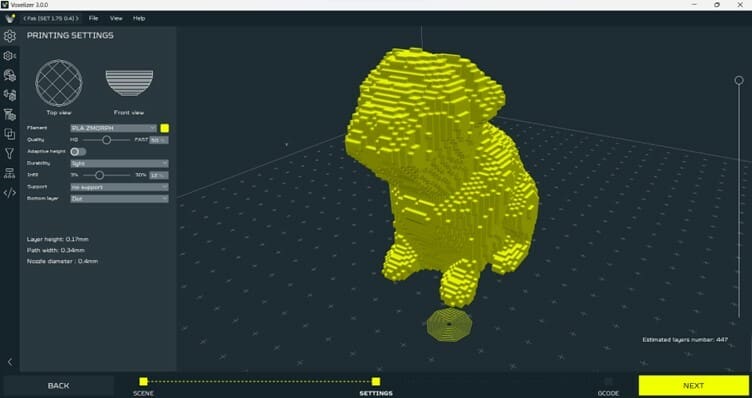
- Your model should now be set up in the virtual print bed. On the sidebar of the slicer are a few drop-down menus that are used to adjust your G-code and slicing settings for print. The last of the drop-down menus is “Voxelize”, which offers two different functions, namely “Voxelize” and “Voxelize Precise”.
- “Voxelize Precise” is the best solution if your model has intricate features such as holes or sharp contours, which will be retained as is. In the case of “Voxelize”, the geometry will be smoothed out and in most cases, holes or cavities are sealed. This also means that “Voxelize” uses lower computing resources for the voxelization process.
- Set a voxel size for the voxelization; 0.1 mm is set here by default. The size can be set higher or lower based on the complexity of the model and on how fine the STL file needs to be generated.
- Once the voxelization is complete, the “Printing Settings” menu should be visible in the left sidebar. The model is pretty much ready to be exported as an STL file, although some G-code files may contain additional information, such as a brim, raft, or support data, which need to be removed before exporting the file.
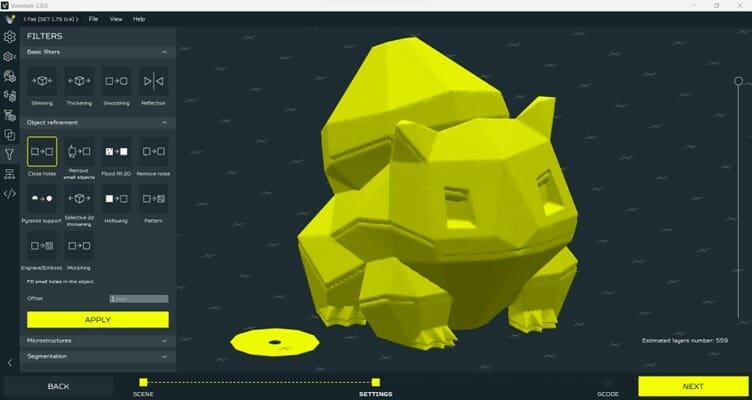
- For this, head over to the “Filters” menu in the sidebar, where you’ll find various voxel operations to modify the 3D model. In the first menu of “Basic Filters”, you can find options to increase or reduce wall thickness, smooth contours, and mirror the model along an axis. Under “Object Refinement” are two features that are quite handy, “Close holes” and “Remove small objects”. “Close holes” is used to fill in small holes within the object. “Remove small objects” can be used to remove brims or rafts and also supports in some cases. You can specify a minimum threshold volume, and all volumetric features below this value will be removed from the model.
- Once you’re satisfied with your 3D model, head over to “File > Export > mesh (.stl)” and save the STL file. Voilà, your STL file is now ready!
The volumetric and voxel operations require a lot of PC resources, so make sure you have enough capacity on your PC to carry out such operations. Voxelizer for Fab can currently process only a single G-code file at a time, which means that 3D models can’t be combined into a single STL file if this is desired.
With that, you have our full guide on converting to and from G-code. For additional tips and tricks with this essential file format, don’t forget to check out our guides on G-code editors and G-code viewers. Happy printing!
License: The text of "G-code Converter: How to Convert From & To G-code" by All3DP is licensed under a Creative Commons Attribution 4.0 International License.