Ender 3 V2 Firmware Update (Marlin): 6 Simple Steps

You can do Ender 3 V2 firmware updates using just a MicroSD card! Read on for a step-by-step walkthrough on how to install Marlin.
The Ender 3 V2 3D printer – Creality’s update to their successful Ender 3 – has a few improvements over the original model, including attached belt tensioners, an extruder knob, a full-color touchscreen display, and more. An upgraded 32-bit mainboard is another distinctive feature. It ships with the Creality V4.2.2 mainboard, but you also have the option of upgrading to the V4.2.7 (silent) mainboard.
Most boards for the V2 now come with a version of Marlin 2.0 firmware installed, which the older 8-bit boards were incapable of handling. Known for its reliability and frequent updates, Marlin is one of the most popular firmware options. The firmware runs in C++, works with many 3D printer upgrades, and has safety features like thermal runaway protection (although you have to make sure that it’s activated).
In this article, we’ll explain how to install Marlin firmware onto your Ender 3 V2. This guide can also be used for original Ender 3 printers that have either a V4.2.2 or V4.2.7 mainboard installed. The steps for updating the LCD firmware, however, won’t be needed for the original Ender 3.

The Old, the New, and the Future
In the past, Creality’s mainboards haven’t been very stable and tended to malfunction. As they were 8-bit boards with less storage, Creality’s first-generation (V1.X and Melzi) mainboards couldn’t handle Marlin 2.0 with all of its features activated. Installing new firmware on those boards was also a bit more complicated: The process required a bootloader (an Arduino Uno, for example), Cura, or an ISP to USB cable.
The new V4.2.2 and V4.2.7 mainboards, however, have more space, a 32-bit processor for faster operation, and a pre-installed bootloader, so the installation process is simpler. With these new features, you can upload new firmware by using the MicroSD card slots, and the V2 has two: one on the mainboard and one on the LCD.
The boards are fairly new so there aren’t many firmware options specifically for them yet, but more will come with time. The V2 comes with stock Creality firmware, which is an altered version of Marlin. In the meantime, Marlin has already released configurations for the V2 and older Ender 3s that have been upgraded with the V4.2.2 or V4.2.7 mainboards.
The new process for updating your Ender 3’s firmware involves using a BIN file on a MicroSD card and flashing the new firmware to both the board and the LCD. In this article, we’ll focus only on the process for uploading Marlin firmware, which might not work for other flavors of firmware like RepRap or Repetier.
Why Upgrade?
Although Creality’s stock firmware might be more stable than the newer firmware options, the newer versions of Marlin have more printing features. The stock firmware also has some Marlin 2.0 features deactivated. An example is linear advance, which predicts the build-up of pressure in the hot end to achieve higher-quality prints with less under- and over-extrusion.
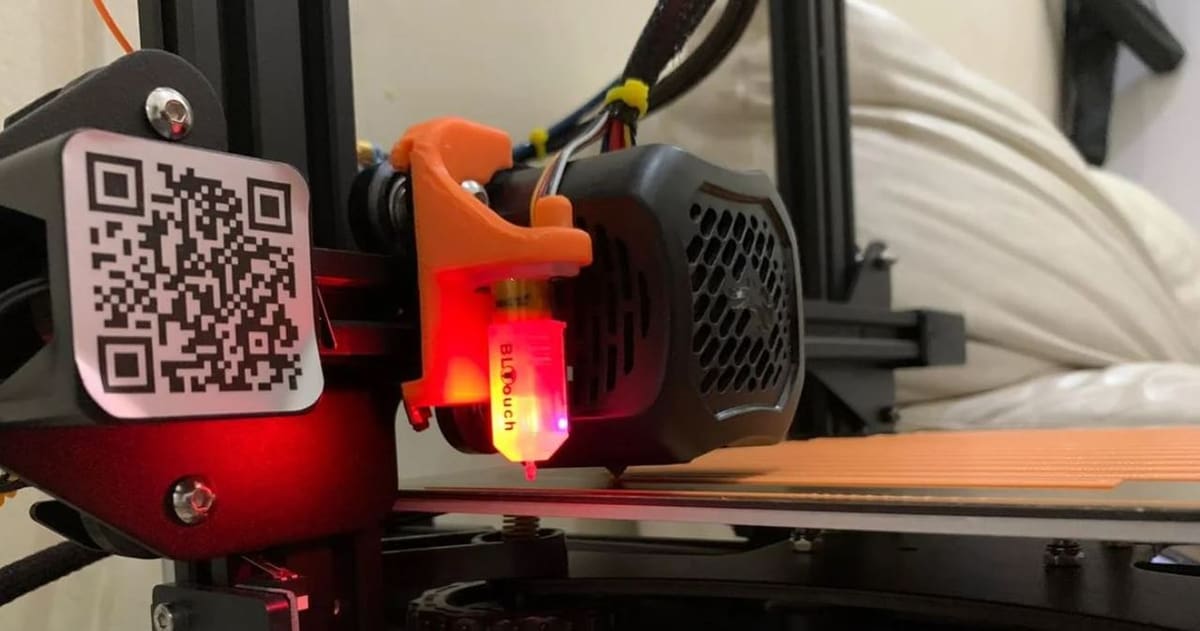
You also may want to change the stock firmware if you want to use upgrades on your Ender 3 like a BLTouch, filament runout sensor, a geared extruder, among others. That’s because some upgrades like a BLTouch or filament runout sensor require certain features to be activated in the firmware.
One of the latest versions of Marlin (2.1.2) added features like input shaping for an even more streamlined setup. At time of writing, the latest stable release is 2.1.2.4.

What You'll Need
Thanks to the new mainboard on the Ender 3 V2, you won’t need much to update its firmware:
- A MicroSD card (FAT32-formatted with a “4096-byte” allocation size), at least 4 GB.
- Ender 3 V2-compatible firmware.
- A device, laptop, or computer with a couple of programs, including a file archiver program, such as 7-Zip, and Microsoft Visual Studio Code (VS Code).
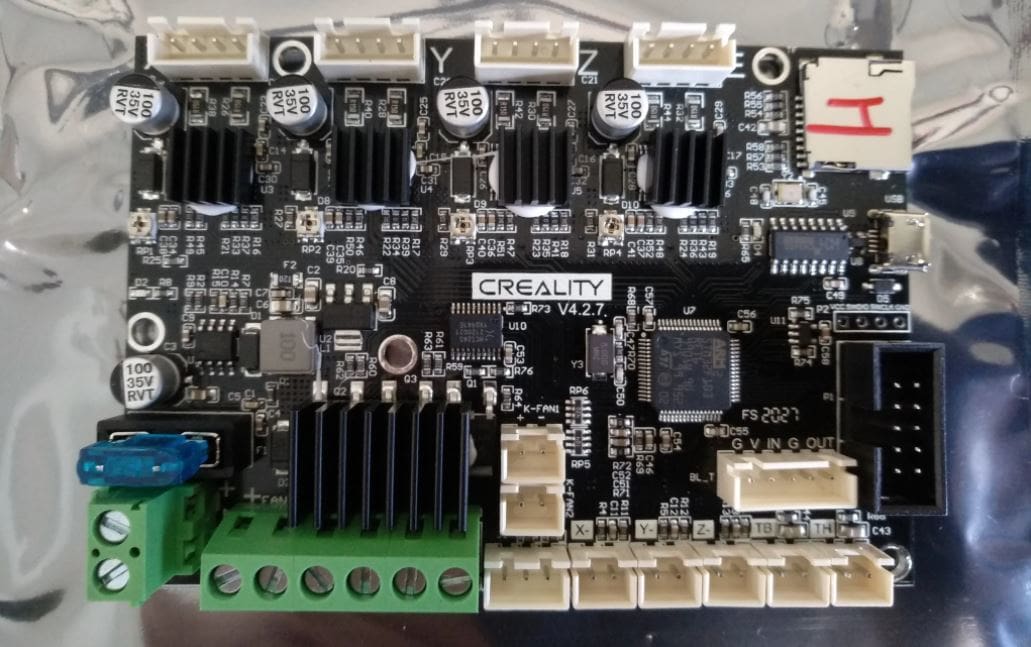
- The handwritten letter on your SD card slot and your processor chip’s inscribed model number; these can be found by opening the printer’s bottom cover. The processor is the largest chip on the motherboard.
The file archiver program is only necessary if you use a pre-configured firmware file that downloads as an RAR file. 7-Zip is a free, open-source file archiver program that can unzip RAR files.
Please note that current versions of Marlin do not support chips that start with GD32. If you have identified your chip as this model, it is safest to only use Creality’s pre-configured code for this chip found on their website. Note that the installation process is the same, the key difference is the configuration of the firmware. (The source of the code is still Creality’s website.)
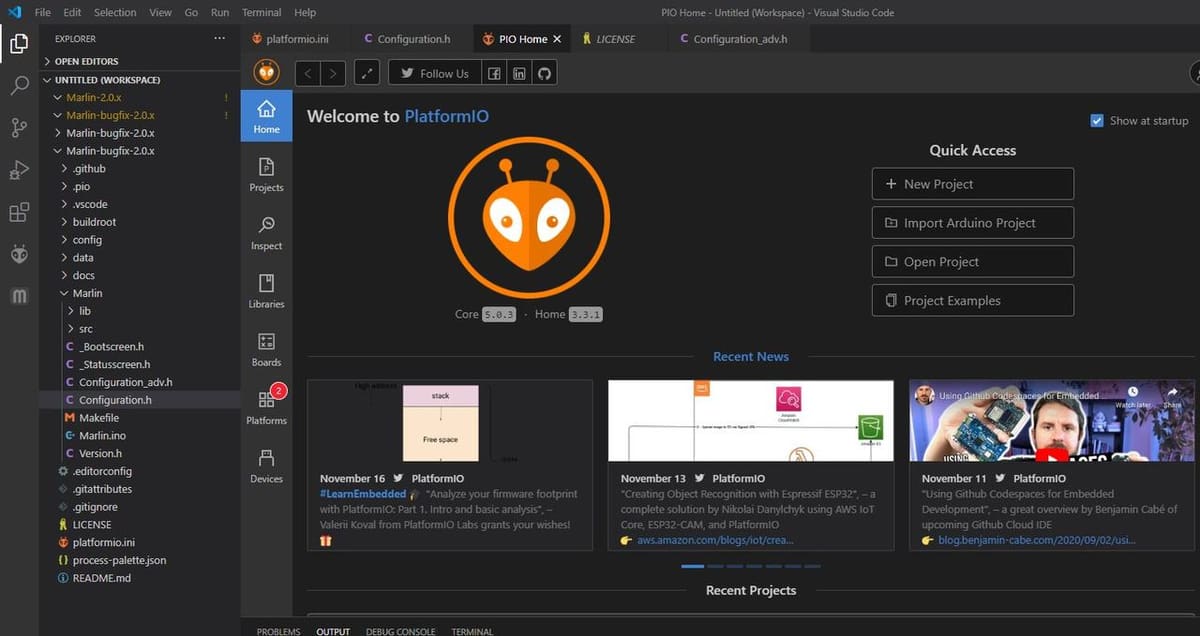
You’ll only need VS Code if you plan to manually edit the firmware’s code. This is advisable only if you have sufficient knowledge of coding. If you’ve got the skills and are up for the challenge, make sure you also download the PlatformIO and Auto Build Marlin plug-ins on VS Code. The SD card letter will be used later while coding.
Now that you have everything you need, let’s get started!
Step 1: Download Your Base Firmware

First, we need to prep the machine for the update by downloading either a pre-configured or self-configured firmware, as well as organizing your folders:
- Turn the printer’s power switch off, unplug the power cable, and remove the mainboard’s MicroSD card.
- On your device, create a folder labeled “Ender 3 V2 Firmware” or another easily recognizable name.
- Download a firmware option for your Ender 3 V2. Now, you have two options:
- You can download Creality’s pre-configured firmware on their website, or
- You can download the self-configured firmware (source code) from the Marlin GitHub or Marlin homepage.
Creality’s Pre-configured Firmware
If you don’t need to tweak your firmware, we recommend using Creality’s. They occasionally change the file types offered on their website, so you’ll either have a BIN file or a RAR file with the BIN file compressed inside. If you’ve downloaded the BIN file, make sure you also download a folder labeled “DWIN_SET”.
With pre-configured firmware, you won’t need to configure the source code files, so you can skip ahead to Step 4.
Self-configured Firmware
If you need to alter your firmware for upgrades, bug fixing, adjusting offsets, or other reasons, you should go with the self-configured firmware. Make sure to download the entire “Marlin-2.1.x” and “Configurations-release-2.1.x.x” zip folders. After you’ve done that, proceed as follows:
- Unzip and extract both the “Marlin-2.1.x” and “Configurations-release-2.1.x.x” zip folders.
- In both of the extracted folders, locate the second-degree folder with the same name as its origin folder.
- Copy each of the second-degree folders (not the origin folders!) one at a time and paste them into your newly created “Ender 3 V2 Firmware” folder.
For the sake of conciseness, we’ll refer to the “Configurations-release-2.1.x.x” folder as the configurations folder in the following steps.
Step 2: Configure Marlin
Next, we need to configure the base Marlin firmware for the Ender 3 V2.
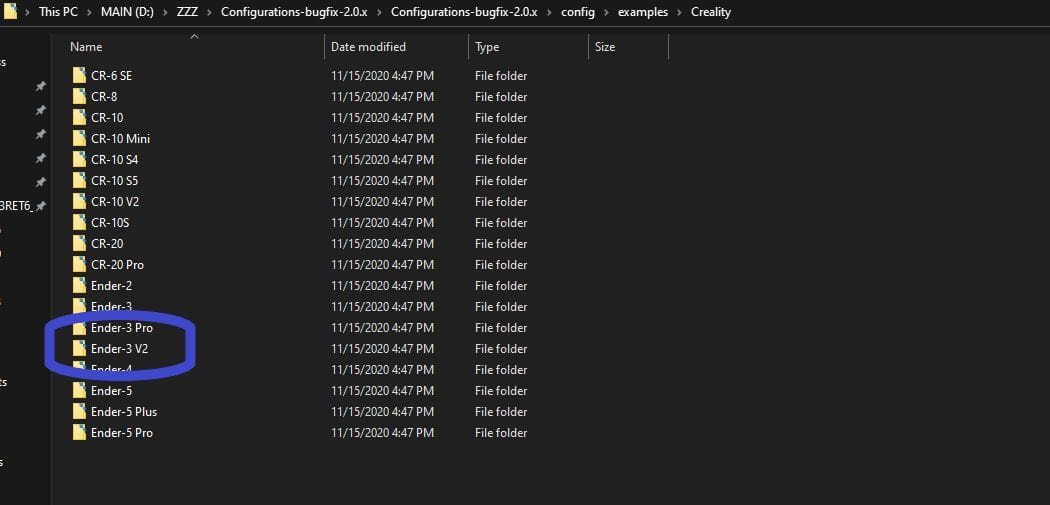
- Open the configurations folder, then open the “config” folder.
- Open the “examples” folder, scroll down, then open the “Creality” folder.
- Locate and open the “Ender-3 V2” folder. In the latest release (2.1.x), you’ll see folders for two mainboard options: “BigTreeTech SKR E3 Turbo” and “Creality V422”. For the purposes of this tutorial, let’s assume you have the latter.
- Open the “Creality V422” folder. Again, you’ll be presented with two options (both related to the user interface): “CrealityUI” and “MarlinUI”. For the purposes of this tutorial, let’s go with the latter, as it’s more popular.
- Open the “MarlinUI” folder, then copy both files.
- Open the “Marlin-2.1.x” folder, then locate and open the “Marlin” folder containing the “Configuration” file.
- Paste the copied files into the “Marlin” folder.
- When prompted, click to replace the files that have the same name.
Step 3: Edit & Compile in Microsoft VSCode
With Marlin configured, the firmware must be edited and compiled in VS Code. Here, you can make personalized changes to the firmware before compiling and building.
- In Microsoft VS Code, open the PlatformIO plug-in and click “Open Project”.
- Open the “Marlin-2.1.x” folder containing the “PlatformIO” INI file.
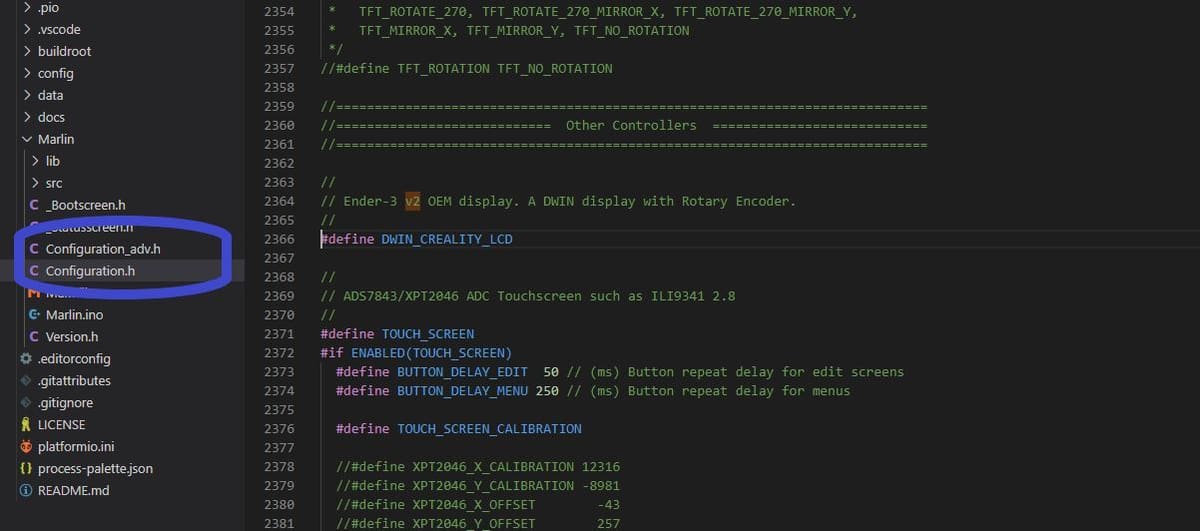
If you want to make tweaks to your firmware, here is the place to do it. Most alterations require changes in the “Configuration.h” or “Configuration_adv.h” files.
To adapt Marlin to your specific Ender 3 V2, you will have to define your printer-specific stepper driver. Your Ender 3 V2 will have one out of five different stepper driver types. Using the letter from your SD card slot, your corresponding stepper motor type will be one of the following:
- C = HR4988
- E = A4988
- A = TMC2208
- B = TMC2209
- H = TMC2225
After identifying your driver type:
- Click on the “Marlin” folder and open the Configuration.h file in VS code.
- Press “Ctrl + F” and type “driver type” into the search bar.
- Define the variables in the block of code that appears with your driver type.
- Finish any other coding you may want to do.
After you are finished editing, the firmware is ready to be compiled.
There are two ways to compile the firmware. The firmware can be built as a BIN file in PlatformIO using either the Auto Build Marlin extension or the Auto Build Marlin panel. We recommend using the Auto Build Marlin panel as it’s the more user-friendly of the two. Either way, you will need your processor chip’s model number you took note of earlier to choose the correct build environment.
Auto Build Marlin

Follow the steps below to configure Marlin using the Auto Build Marlin control panel.
- Find the block of code that assigns various ports in the Configuration.h file (again, use “Ctrl + F” and search “port define”).
- Make a new line and post “#define NO_AUTO_ASSIGN_WARNING” (without quotation marks) near the top in the port assignment area. Auto Build Marlin cannot finish building unless you post this.
- Click on the Auto Build Marlin Extension on the right toolbar and open the ABM control panel.
- Click on the “Build” button next to your processor chip’s model number. This is the build environment.
- Wait for Auto Build Marlin to open your BIN file in a new file explorer window.
- Once you’ve done this, skip to Step 4 below.
PlatformIO
Next, we’ll go over how to configure Marlin in PlatformIO.
- Assign your processor chip’s model number to the variable “default_envs” at the top of the PlatformIO code. Depending on what chip you have, the assigned variable might look like “default_envs = STM32F103RE_creality”.
- With the environment set, build the code by clicking the checkmark on the bottom terminal in VS Code to build the firmware using Auto Build Marlin.
- Wait for a green line to appear at the bottom of the terminal, stating that the build was successful.
Step 4: Find the Firmware Files
Now you need to find the BIN firmware file so you can upload it; no other file type will work for your mainboard’s firmware. This process differs depending on whether you used Creality’s pre-configured firmware or self-configured firmware.
Creality’s Pre-configured Firmware
In Step 1, you should have been able to download either a BIN or RAR file from Creality’s website. If you have the BIN file, simply proceed as follows:
- Copy the BIN file.
- Plug your mainboard’s MicroSD card into your device.
- Clear (delete or move) everything on it.
- Paste the BIN file onto the MicroSD card.
In order to update the firmware for the LCD display, you’ll also need to download the DWIN_SET folder from the Creality website. This folder can also be pasted onto the MicroSD card, then you can eject the card from your device.
If you have a RAR, you’ll need to use a file archiver program that can unzip RAR files. Before getting started, make sure you have downloaded 7-Zip or another file archiver program capable of unzipping RAR files. If you use another program, it should work similarly. In this tutorial, our instructions are based on the process with 7-Zip.
- Locate the RAR file, then right-click on the file name.
- Move your cursor over the 7-Zip option and click “Extract Here”. A new folder with the exact same name as the RAR file should appear.
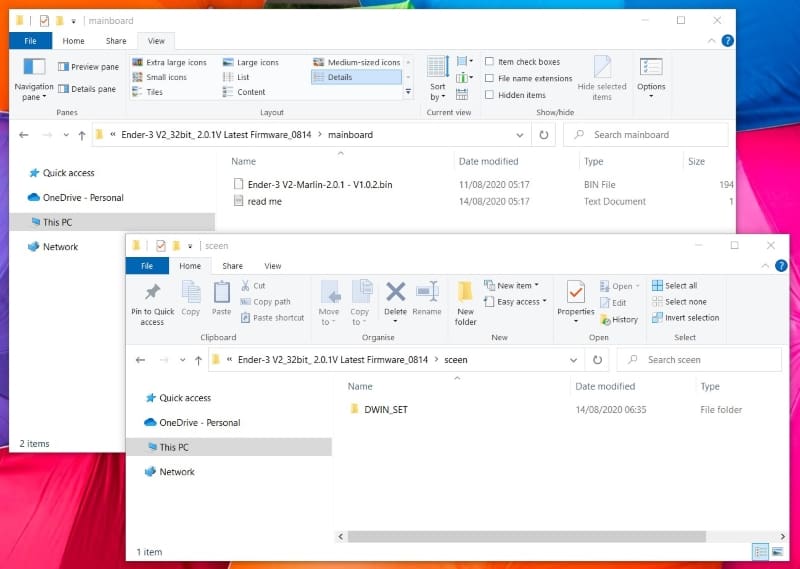
- Open the extracted folder, then open the folder labeled “Mainboard” and copy the BIN file.
- Insert your mainboard’s MicroSD card into your device.
- Clear (delete or move) everything on it.
- Paste the BIN file onto the MicroSD card.
For the LCD display, the DWIN_SET folder is also included in the extracted contents of the RAR file.
- Open the “screen” folder in the extracted RAR file, and you’ll see the DWIN_SET folder.
- Paste the folder onto the MicroSD card as well.
- Eject the card from your device.
Self-Configured Firmware
Make sure you’ve successfully compiled your firmware in VS Code. If the BIN firmware file produced by Auto Build Marlin is already open, skip to Step 6. Otherwise, proceed as follows:
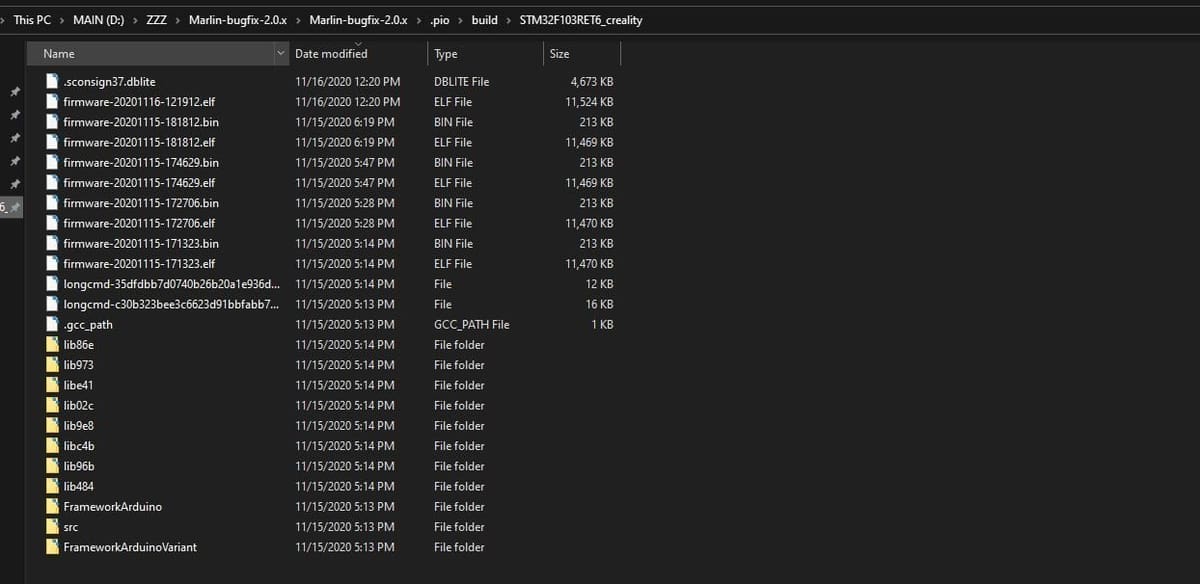
- Go to your “Marlin-2.1.x” folder, find and open the “.pio” folder.
- Open the build folder, then open the folder with a name beginning with “STM32” (names might vary depending on the mainboard).
- Find and copy the most recent (by time) BIN file. Make sure not to change the firmware’s name, as it won’t work if the name is changed.
- Insert your mainboard’s MicroSD card into your device.
- Clear (delete or move) everything on it.
- Save the BIN firmware file to the MicroSD card.
Now all you need is the firmware for the LCD display.
- Open the configurations folder that you saved in the newly created “Ender 3 V2 Firmware” folder on your device.
- Open the configurations folder, then open the “config” folder.
- Open the “examples” folder, scroll down, then select the “Creality” folder.
- Locate and open the “Ender-3 V2” folder, then copy the “DWIN_SET” folder.
- Paste the folder onto the MicroSD card.
- Eject the card from your device.
Step 5: Upload the New Mainboard Firmware

Now that you have the necessary files, let’s first upload the new firmware to the Ender 3 V2’s mainboard.
- Shut off the printer and unplug the power cable from the printer.
- Insert the MicroSD card into the mainboard’s MicroSD card slot.
- Make sure all cables and electrical configurations are connected and secured properly.
- Make sure your MicroSD card is securely inserted and oriented the right way.
- Power on the printer by plugging the power cable back into your printer and turning the power switch back on.
- Wait until you see the home screen on the LCD, then navigate the user interface to find and click the “Restore Defaults” button. While there shouldn’t be any non-default settings in the new firmware configuration, it’s always a good idea to restore defaults.
That’s it! You successfully installed new Marlin firmware on your Ender 3 V2 mainboard.
Step 6: Upload the New LCD Display Firmware
Now you need to upload the new firmware specifically for the Ender 3 V2’s LCD display screen. The firmware for the display is located in the DWIN_SET folder mentioned in Steps 1 and 4.
Regardless of whether you’re using pre-configured or self-configured firmware, you should have already found the DWIN_SET folder and saved it onto the MicroSD card in Step 4. The next step is simply uploading it to the screen.
Upload LCD Display Firmware
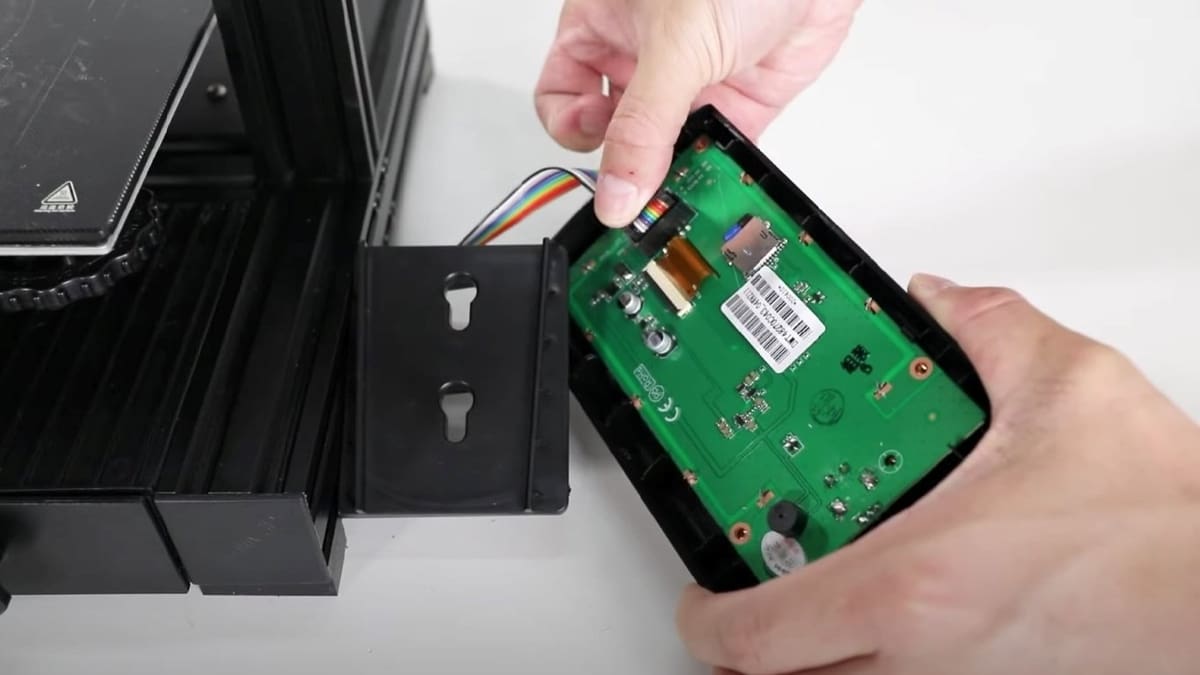
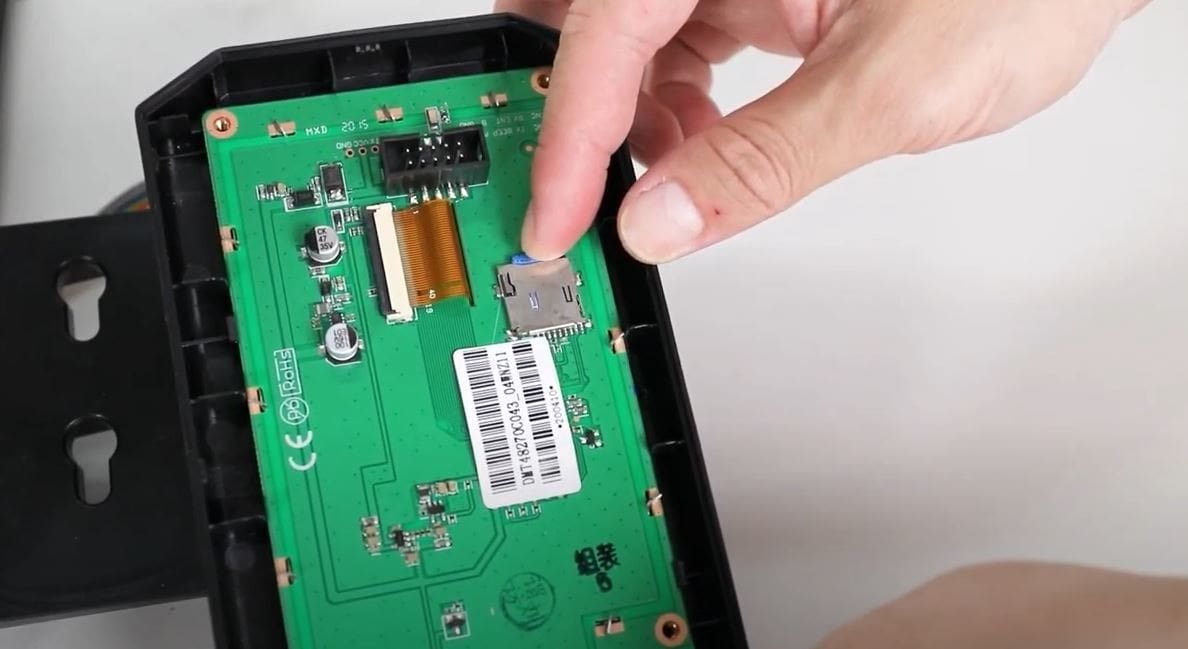
Since the other MicroSD card slot on the Ender 3 V2 is located in the display, you’ll need to disassemble the LCD:
- Shut off the printer.
- Remove the LCD cable and detach the screen from the mount.
- Unscrew the four bolts holding the casing together and locate the MicroSD card slot on the LCD’s circuit board.
- Insert the MicroSD card with the new firmware into your LCD circuit board.
- Reconnect the LCD cable and power on your printer but don’t reassemble it until you know your firmware works.
- Power on your printer, and ensure that the LCD switches from a blue to an orange-colored blank screen.
- After waiting about a minute on the orange LCD screen (just to be safe), power off the printer.
- Remove the MicroSD card from the LCD’s circuit board, and power on your printer again. The LCD should now load your firmware’s new home screen.
- Shut off the printer again.
- Reassemble your LCD screen and remount it on your printer.
Tips & Tricks
Below, we’ve listed some tips and tricks for installing new Marlin firmware on your Ender 3 V2:
- Use the most recent Marlin firmware: Sometimes, errors can occur if you use out-of-date firmware, so it’s best to use the most recent firmware version. We recommend using the official Marlin firmware if you can. You can also use the official bug-fix firmware versions, which can be found on the Marlin GitHub.
- Save the firmware: Although the firmware should automatically save to the board when installed, it’s always a good idea to double-check. To do this, use the LCD menu and click “Store Settings”. If you can, use a G-code terminal or sender and send the command “M502”, then send “M500” to save the firmware to EEPROM.
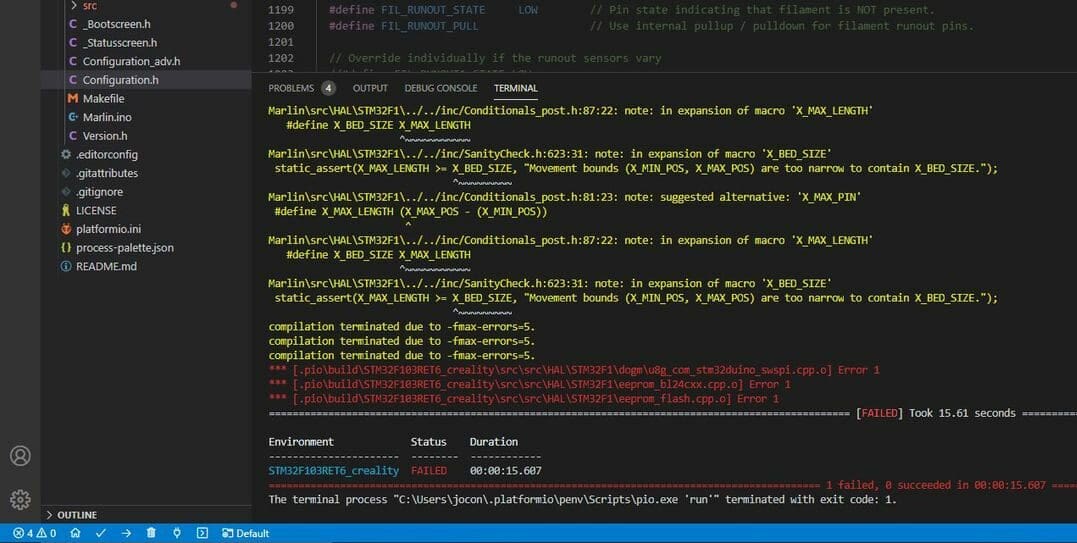
- Locate errors in the source code using VS Code: When building your Marlin firmware, the Auto Build Marlin plug-in will alert you if any errors occur in building the firmware. Errors will appear in yellow or red text in the VS Code terminal. They’re pretty self-explanatory, so you can usually locate and solve any issues pretty easily. If you’re unfamiliar with an error, you can always use the internet to help solve it. Again, this is only advisable if you have sufficient knowledge of and experience with coding.
- Always have stable firmware on hand: Although having the latest and greatest firmware can be fun, it’s always a good idea to have stable firmware on hand. You should try finding or building a firmware that you know works and save it somewhere, just in case you need it.
Happy printing!
License: The text of "Ender 3 V2 Firmware Update (Marlin): 6 Simple Steps" by All3DP is licensed under a Creative Commons Attribution 4.0 International License.