Ceramic 3D Printing: Clay 3D Printing Simply Explained

Ceramic 3D printing can be used for highly technical applications but also for pottery and decorative pieces. Read on to learn more about it!
Ceramic 3D printing has a myriad of use cases, thanks to several unique properties of ceramic materials. They’re hard, often smooth, and temperature resistant, among other characteristics. 3D printed ceramics are used for industrial applications such as medical parts or high-temperature aeronautical components, but you’ll also find them used for decorative purposes such as pottery and art.
Due to the material, a specialized 3D printer is normally used in the 3D printing process, and the prints must go through a pottery-specific post-printing process. It usually takes much longer to make the final ceramic piece than a regular plastic print, but the net result is a ceramic part with the same properties as a handmade pot.
In this article, we discuss how ceramic 3D printing is applied to pottery, the technologies used, and example machines so you can get started with your own ceramic printing.
Materials

What makes ceramic 3D printing unique is, of course, the material. In art circles, the terms “ceramic” and “clay” are often used interchangeably to describe different materials used to make pottery. Clay is indeed a type of ceramic, but not all ceramics are made of clay. In fact, ceramics encompass a wide range of materials that are hardened when heated at high temperatures, a process known as firing.
The following are the most common materials used in pottery 3D printing:
- Terra-cotta is a well-known ceramic that’s commonly used in plant pots because it’s porous and readily available. It gets its reddish hue from iron oxide that forms when fired in the kiln. Terracotta can be extruded in FDM systems and is tougher than most clay-based ceramics.
- Porcelain is a mixture of silicas and clay. It comes in three varieties: hard paste, soft paste, and bone china. Hard-paste porcelain is the variety used in fine china and is mostly made from kaolin clay mixed with quartz and feldspar. Soft paste has a similar composition, but it’s fired at a lower temperature so the final product isn’t as hard as hard paste. These days, bone china is made from bone ash, kaolin, and feldspar. Porcelain can be extruded with FDM. In the form of a ceramic photoresin, it can be printed with compatible resin 3D printers, or in powder form, it can be bound together with binder jetting.
- Earthenware is the oldest known material used in pottery production and is often finished with a slip, a highly liquid mixture of clay and water, before firing to improve the surface texture and make it watertight. It’s fired but not vitrified (turned glass-like) during the process, so it has a rougher finish than porcelain. Earthenware can be extruded. Wasp, one of the most well-known companies producing ceramic 3D printers, sells a red variety of this clay.
- Stoneware is a non-porous form of pottery that’s fired at high temperatures. Although it’s watertight, a glaze is often applied for aesthetic purposes. Stoneware is most commonly extruded in 3D printing.
Ceramic Filaments

In addition to the ceramic materials that can be directly extruded by special 3D printers, there are ceramic-based filaments that can be printed on regular FDM 3D printers. These filaments are typically composites of a polymer-based binder and the ceramic material. Like other filaments, they’re wound onto spools, but often, they’re much more delicate until they’ve been through the final heating stage.
During the firing process, the polymer is burnt off, leaving behind only the ceramic material. However, some filaments require a separate debinding process to separate the polymer from the ceramic material.
There are several companies making ceramic filaments including Spectrum filaments, LayCeramic, and Zetamix. These filaments tend to be much more expensive than standard pottery materials like earthenware. The LayCeramic costs about $140 per kilo in a 2.85-mm diameter, while Zetamix’s zirconia-based filament comes in at roughly $650 per kilogram in a 1.75-mm diameter.
Printing Pottery

There are a variety of ways that ceramic is 3D printed today, and each has its own strengths and weaknesses. The most cost-effective way ceramic is printed is via extrusion, but it also provides the least detail. Resin printing and binder jetting offer higher levels of detail but at a premium.
Extrusion
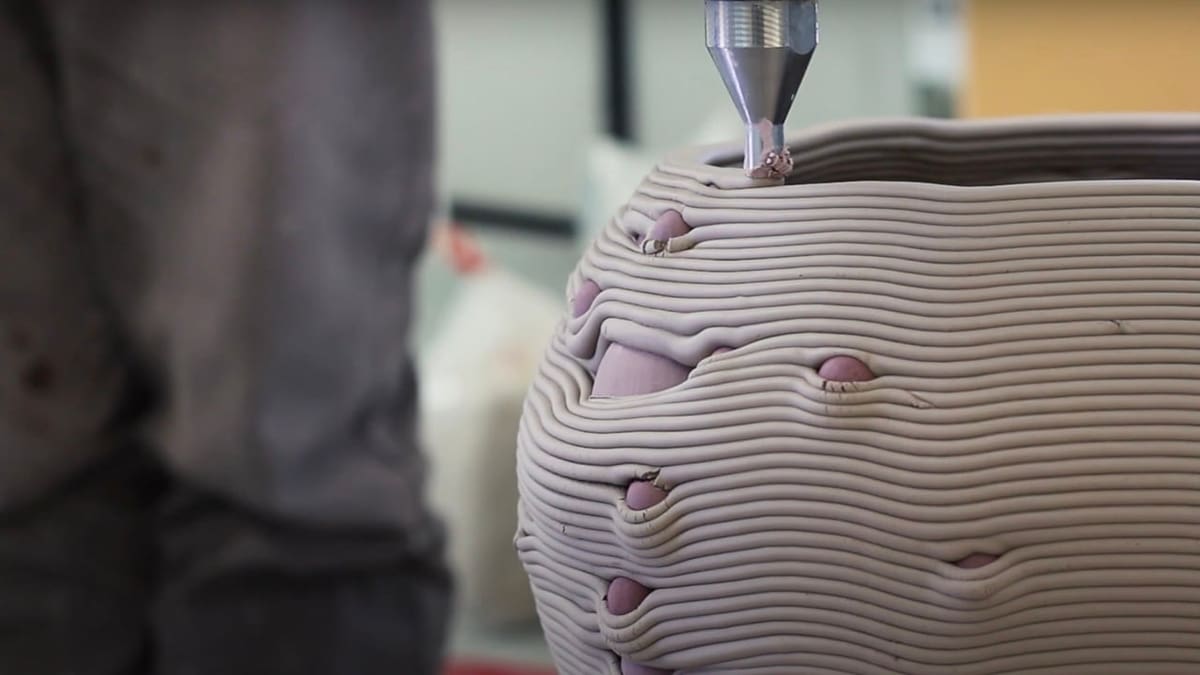
Clay extrusion-based systems are the most common way that ceramic parts are made for pottery applications. One of the most popular systems for extruding clay is Wasp’s series of delta clay printers. In these systems, pneumatics is sometimes used to push the clay out of the extrusion nozzle, but more often, a motor-driven auger is used.
The clay is typically a wet mixture to aid the extrusion process. Due to the characteristics of the clay, retraction can be challenging, though. Therefore, spiral vase-like structures are often printed with extrusion.
Thanks to ceramic filaments, regular FDM machines can also be used to print pottery. However, prints shrink significantly due to the debinding process. LayCeramic filament, for example, shrinks by up to a quarter when all of the polymer has been burnt away. Care must be taken when designing the geometry of the pottery so that it remains in one piece during this shrinking stage, and wall thickness must be relatively thick – Zetamix recommends 2 mm for their zirconia filament.
Wider nozzle diameters are normally preferred when working with these composites, and you may have better results using a 0.6-mm nozzle rather than a standard 0.4 mm. The nozzle should be hardened steel or one that can withstand abrasive materials.
Some ceramic filament manufacturers recommend that you print on glass and use an ultrasonic cleaning bath to remove the print. This may present some challenges, though, given the tank size limitations and the price of larger volume baths.
Other Methods

Ceramics can also be produced with compatible resin 3D printers and binder jetting systems. However, these machines tend to be used more for technical ceramic applications. That being said, it’s also possible to produce small, highly detailed, decorative pottery components with photopolymer systems. Here, a ceramic and polymer mix is used for the initial printing process. Examples include Formlabs’ ceramic resin and Tethon3D’s Porcelite.
The weight of ceramic resin can present some obstacles. It’s significantly heavier than most plastics, so it can be challenging to get parts to stay on the build plate.
There are binder jetting systems such as Kwambio’s ceramic printer that utilize a powder bed system to produce high-detail parts. A powdered ceramic is bound together layer by layer with a proprietary bonding agent to hold the form of the printed part, known as the “green state”, until it can be glazed and fired. Binder jetting ceramics is quite specialized and requires dedicated machines, so it’s not something every binder jetting printer can produce.
While pottery can be made with these 3D printing methods, the machines required are extremely expensive – often starting at five figures. Therefore, these methods are out of reach for the average consumer.
Post Processing

As extrusion is the most common way that pottery is 3D printed, it’s worth considering the steps taken after the part is printed. For extrusion systems that directly print ceramic material, prints are initially allowed to dry for one or two weeks depending on the material used and the size of the part. They must be completely dry prior to firing.
The dry prints are then fired in a kiln, a process known as bisque firing. Lastly, a glaze is applied, then the prints are glaze fired. Kilns are expensive, so many people choose to outsource the firing process. As the processes tend to be the same as firing any traditional ceramic, specialist kilns and glazes are usually not required.
For ceramic filaments printed with normal FDM printers, the post-processing is a bit more complex. Prior to firing the print, a debinding process is required for some filaments. For example, Zetamix’s zirconia filament requires a two-stage process after the part is printed. First, the part has to be placed in a chemical bath of acetone to dissolve the binder, then it’s fired in a powder-filled crucible to remove the remaining binder thermally. The whole post processing takes over two days.
It’s worth carefully reading the manufacturer’s instructions before you start working with ceramic composite filaments, as the usage can vary greatly depending on the specific material.
Food Safety
If you want to make food-safe pieces, you must use a food-safe glaze. A major aspect of making a print food safe is its smoothness. Some FDM materials are food safe in terms of their contact transfer of particles, but once you print them, the small grooves and indentations on the print make it not safe for prolonged food contact. There’s also the potential for contamination during the printing process.
The glazing on a fired ceramic print provides the smoothness required for food safety, but it’s not a guarantee. So, be sure that you’re happy that the print is fully coated with no cracks or grooves for bacteria to hide in.
Applications

Ceramic 3D printing has inspired a new generation of artists, sculptors, and architects attracted to the ornate and exceptionally detailed shapes that would be impossible or too labor-intensive using traditional ceramic processes. From pottery to architectural design applications, designers are finding new ways of crafting ceramics.
Ceramic artists, such as Jonathon Keep, Kate Blacklock, and Emre Can have been using 3D printing processes to create ceramic pieces for museum and private collections with stunning and unique results.
Keep creates his work with 3D modeling software, then 3D prints them in clay on a custom-made delta-arm 3D printer. After printing, the ceramic art is fired and glazed in the traditional way. The artist offers the free “A Guide to Clay 3D Printing” online with 78 pages of printing and material tips. Blacklock uses binder jetting technology to 3D print her work in her Providence, R.I., studio.
3D printers have been used in recent years to extrude terra-cotta to create unique roof tiles, artificial reefs, and even entire buildings. They’ve been used to print building facades, including the blue ceramic archway in the historic Dutch city of Delft, which is world famous for its white and blue porcelain, and a 3D printed ceramic pavilion by Ceramic Morphologies that explores the design opportunities and expressive potential of ceramic 3D printing.
Printing Service

As 3D printing and post-processing ceramics is quite an involved process that requires specialized machines and a knowledge of how prints will react in the kiln, it might be worth considering a 3D printing service. If you’re just trying out an idea and don’t want to commit to buying a complete set-up yourself, this would definitely be the way to go.
Kwambio is a dedicated ceramic 3D printing service. The company has developed its own ceramic 3D printer based on powder bed technology. They have a guide to ceramic parts design on their site, and their engineers will provide feedback to you before producing a part if there are any issues with the design.
You simply upload your files or sketches on their site, then receive your ceramic parts. The examples in their gallery look fantastic. It’s also a real advantage for people without 3D modeling skills that they accept a simple sketch of the part you want to produce.
Printer Options

As mentioned above, 3D printers can extrude everything from kaolin and porcelain clay to stoneware and terra-cotta. The following are a couple of options:
- Eazao Zero: This is a relatively affordable extrusion-based machine that’s ready to print straight out of the box. For just $899, the Eazao Zero can extrude most clays and doesn’t require an air compressor, so it’s perfect for desktop use. It has a build volume of 150 x 150 x 240 mm and can produce layers from 0.4 mm up to 1 mm. It can be operated with extrusion nozzles ranging from 0.6 mm up to 1.5 mm. Overall, it’s a very cost-effective way to start producing ceramic art yourself. They also offer an electric kiln for $1,099 if you want to do the whole pottery production process.
- Delta Wasp 2040: This well-known clay printer costs around $3,500 and can produce parts up to 40 cm in height. As it’s an open-sided delta bot, it’s possible to interact with the piece being printed during the printing process. This is nice for artists who want to modify the form as it’s being produced. The Delta Wasp 20240 can work with a variety of ceramic mixtures, such as porcelain and earthenware. Additionally, Wasp sells a red earthenware clay mixture for $16 (12.5 kg).
License: The text of "Ceramic 3D Printing: Clay 3D Printing Simply Explained" by All3DP is licensed under a Creative Commons Attribution 4.0 International License.