Blender & STL Files: How to Make 3D Printables

Blender is a great tool to make, fine-tune, and export 3D printable STL files. Read this simple guide to learn how to go from Blender to STL!
Blender is robust and adaptable 3D modeling software appreciated by artists and designers alike for its great features and capabilities. Major reasons to choose it include its open-source and free-to-use nature. Plus, its versatile range of tools cater to both novice and expert users.
You can use Blender for just about anything in the 3D workflow. In fact, it has become a go-to tool for 3D printing due to its ability to produce detailed and accurate 3D models. Whether you’re designing a prosthetic limb or a scaled-down architectural model, Blender’s wide range of modeling tools can help you create intricate designs with precision and control.
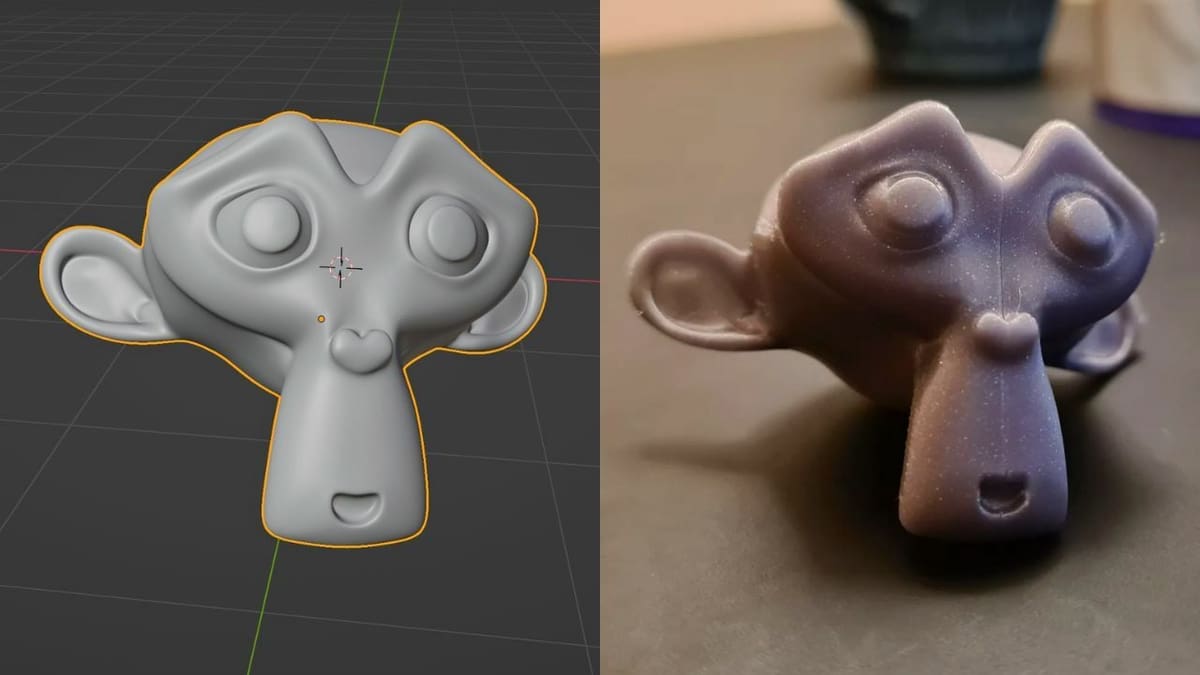
In this article, we’ll be exploring how to make 3D printables with Blender. While we won’t provide a step-by-step guide, we will share some valuable tips and tricks to ensure a seamless 3D printing process. Our focus will be on making a model watertight, error-free, and optimized for printing.
To follow along, you’ll need to download Blender 3.4. With that, let’s dive in and discover how to make the most out of Blender for 3D printing!
Setting the Units
The first step to creating a 3D printable model in Blender is to change the units to your desired measurement system. Setting the units correctly before importing or creating a 3D model will help you avoid any unexpected scaling issues that could potentially ruin your print.
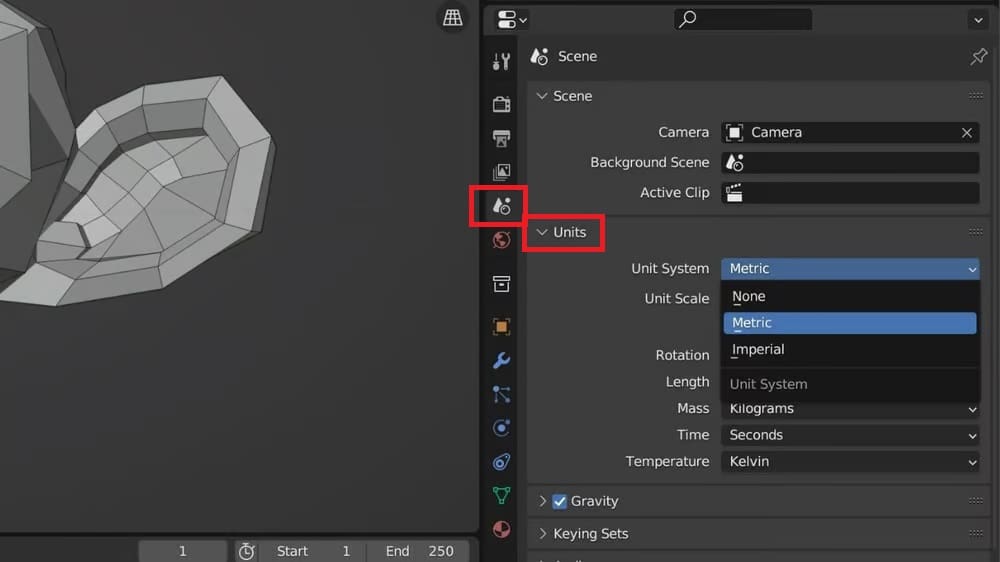
Blender provides two unit systems to choose from, metric and imperial. To do this, navigate to the Properties bar on the bottom right hand side, and select the “Scene” tab, followed by “Scene Properties”. You can then change the units to your system of choice under “Units”.
Once you’ve selected your unit system, it’s vital to set the scale correctly under “Unit Scale.” If the scale isn’t set properly, the 3D print may be distorted, oversized, or undersized, which can lead to unexpected results. For example, if you’re creating a miniature 3D model of a house, you might want to ensure that the scale is set to a smaller unit so the final print matches the scaled-down dimensions of the house.
Import & Modification
After you’ve set the units, you can either import an existing model or create one from scratch. The most commonly used 3D file formats for importing models into Blender are STL, OBJ, and Blender files (.blend). These files can be easily imported into Blender for editing and modification, even for commercial purposes, as long as the license complies.
Once you imported your model, you can start editing it using Blender’s robust set of tools and modifiers to ensure it’s 3D printable. Blender allows you to easily change an object’s geometry and manipulate the mesh for 3D printing purposes. In Edit Mode, you can use tools such as Extrude, Merge, Split, Symmetrize, and more under the Mesh tab. But more on specific tools later.
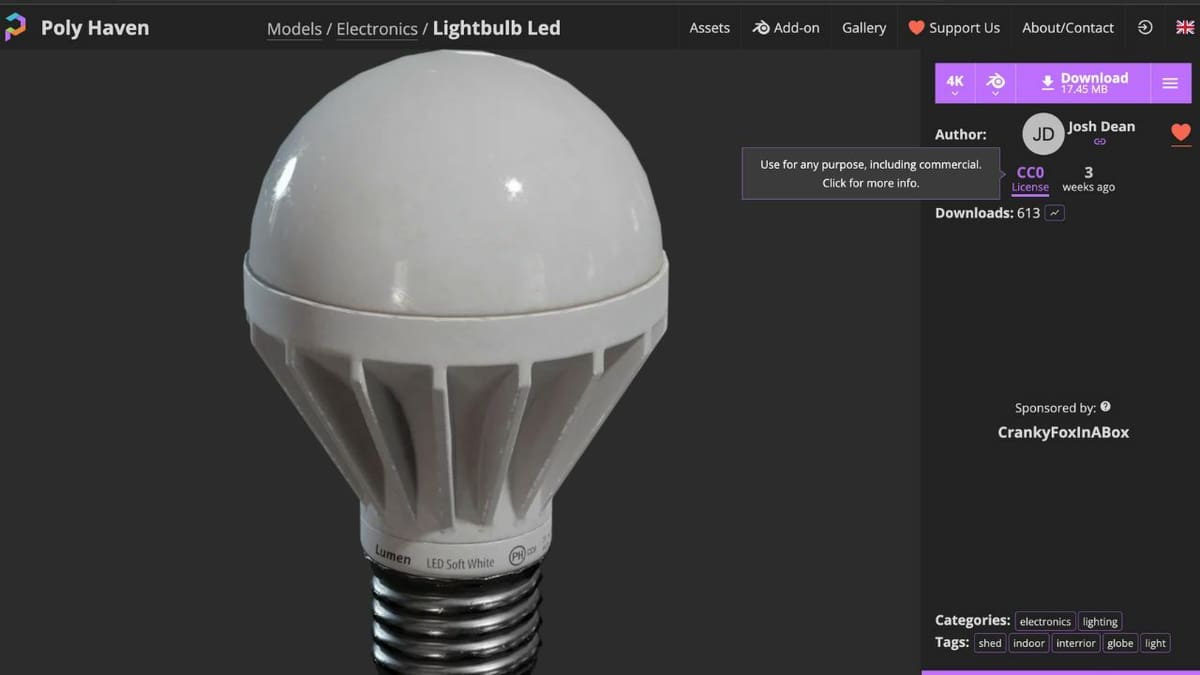
It’s important to note that not all models are free to edit or modify. The details of what you can and can’t do with a 3D model will depend on the license under which it’s released. The good thing is you’ll find a lot of models under CC (Creative Commons), which is a set of licenses that allow creators to share their work with others while retaining some control over how their creations are used.
Also, many free-to-use models are licensed under CC0 (No Copyright Reserved), which allows anyone to use them freely for any purpose, including commercial use, without attribution. Nevertheless, before starting to edit any model, check the license to ensure that you are within your rights to make modifications.
Making the Model Manifold

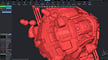
Non-manifold geometry refers to 3D models with structural errors that make them unsuitable for 3D printing. These defects can include intersecting faces, non-connected edges or vertices, and holes, all of which can’t exist in the physical world. Such issues can cause problems during 3D printing, such as generating unexpected gaps or incorrect slicing. A mesh needs to be watertight in order to slice properly.
Thankfully, Blender provides add-ons and modifiers to help make your models manifold. One such tool is the 3D-Print Toolbox add-on. You’ll first need to install it by going to “Preferences” from the Edit menu and clicking the Add-ons tab. Then, search for “Mesh: 3D-Print Toolbox” and check the box to enable it.
Once enabled, you can use the 3D Print Toolbox to perform a check and to clean up your model. If it isn’t visible, try toggling ‘N’, which should cause it to appear in the upper right corner of the 3D Viewport. The check tools in the toolbox are designed to identify various issues that can cause problems in 3D models, such as non-solid or intersecting parts, distorted faces, sharp edges, and non-manifold spots. After you click on “Check All”, the tool highlights these problematic areas under the “Results” section, allowing you to focus on specific areas that require cleaning up. Additionally, it’s possible to check for individual problems to ensure the model is as clean and error-free as possible.
The add-on also includes cleanup options to fix these issues, such as the ability to distort or make a mesh manifold in just one click by going to “Clean Up” (under “Analyze”), and selecting “Make Manifold”. However, it’s essential to use the cleanup options thoughtfully and carefully, as some tools can also inadvertently change the mesh’s geometry, which may cause issues down the line. It’s also a good practice to regularly check the mesh for issues throughout the modeling process and use the cleanup tools as needed to keep the mesh error-free.
Using Modifiers
Modifiers are tools in 3D modeling software like Blender that allow you to alter the geometry or appearance of an object in a non-destructive way. This means that the original object remains intact, while the changes made with modifiers can be easily adjusted or removed later on. As previously mentioned, modifiers in Blender can also help make your mesh manifold.
Modifiers can be more intuitive and less time-consuming than manually changing an object’s geometry. For example, a modifier like Subdivision Surface can automatically smooth out an object’s surface and add more detail, which would be time-consuming to do manually. The opposite of this is Decimate modifier, which reduces the number of vertices in a mesh while attempting to preserve its shape and topology.
Modifiers can also be applied to an object in a stack, with each modifier building on the previous one. Likewise, they allow for a wide range of effects, such as changing the shape of an object, adding or removing details, and altering the way it’s displayed or rendered.
Modifiers are especially beneficial when creating 3D printable models, as they can help ensure that your models are watertight and ready to print. Some of the most commonly used modifiers for creating 3D printable models include Remesh, Decimate, Solidify, and Boolean. We’ll now take a closer look at each of these tools.
Remesh for Topology
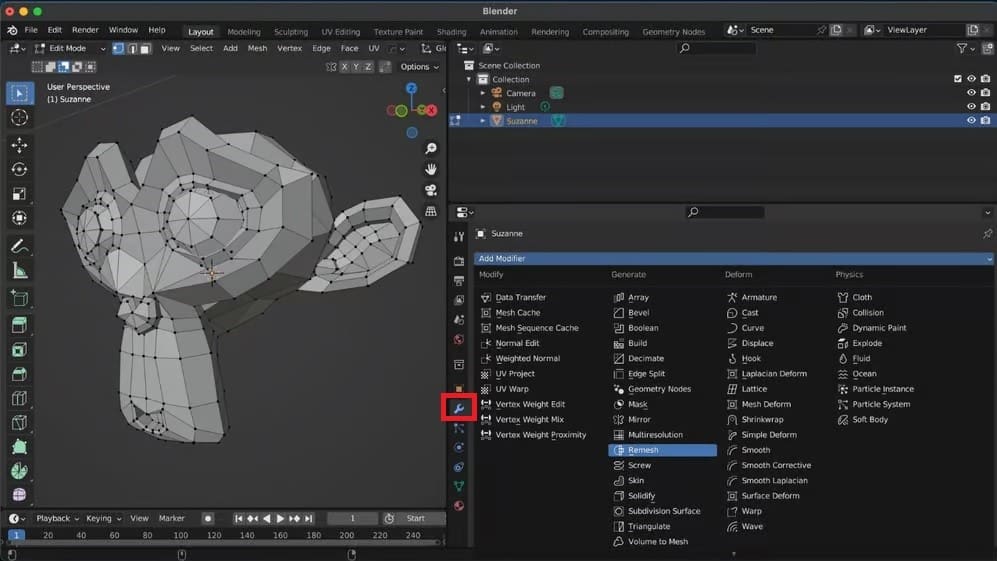
Have you ever imported a 3D model to Blender, only to realize that it has an absurdly high face count? Don’t worry! It’s time to try out the Remesh modifier. It helps you remodel the topography of an existing mesh and simplify how surfaces are represented.
By applying the Remesh modifier, you can manipulate the mesh count without losing the original geometry. One of the biggest advantages of using this modifier is that it can help to optimize your model for 3D printing by generating a new manifold mesh.
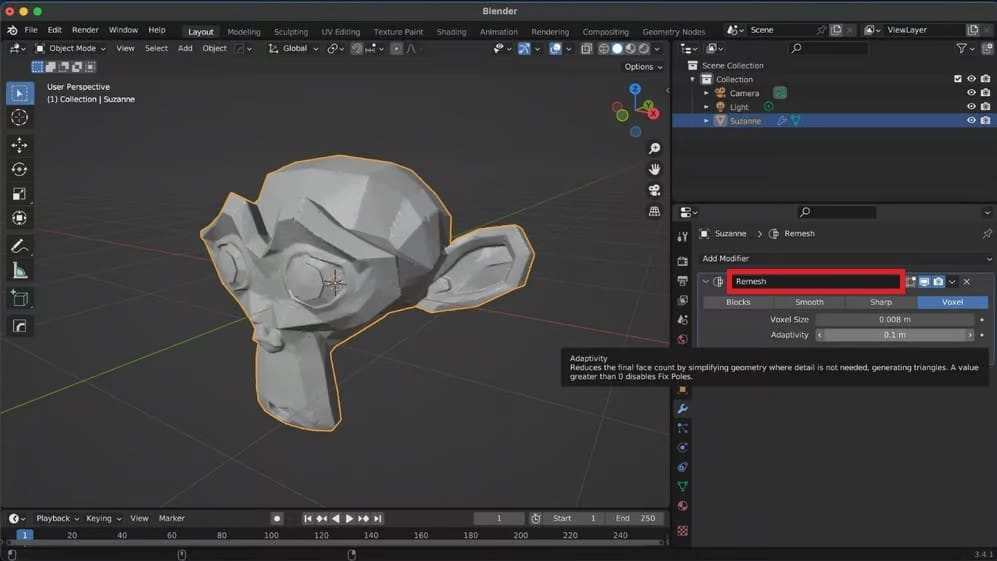
The Remesh modifier has four different modes to choose from, including Blocks, Smooth, Sharp, and Voxel. Blocks mode creates a mesh without any smoothing, resulting in a chunky appearance. Conversely, Smooth mode creates a mesh with a smooth surface, and Sharp mode creates a smooth surface while preserving sharp edges and corners. Each mode offers a different way of generating a new mesh, allowing users to choose the best one for their specific needs.
However, the Voxel mode, which uses OpenVDB, is particularly useful for this purpose. Not only does it make your model watertight, but it also lets you manipulate the mesh more efficiently. You can generate a larger or denser mesh by setting the appropriate values in the “Voxel Size” box, depending on your requirements. This way, you can create a new mesh topology based on the input mesh, making it easier to sculpt and manipulate the model.
Reducing Polygon Count
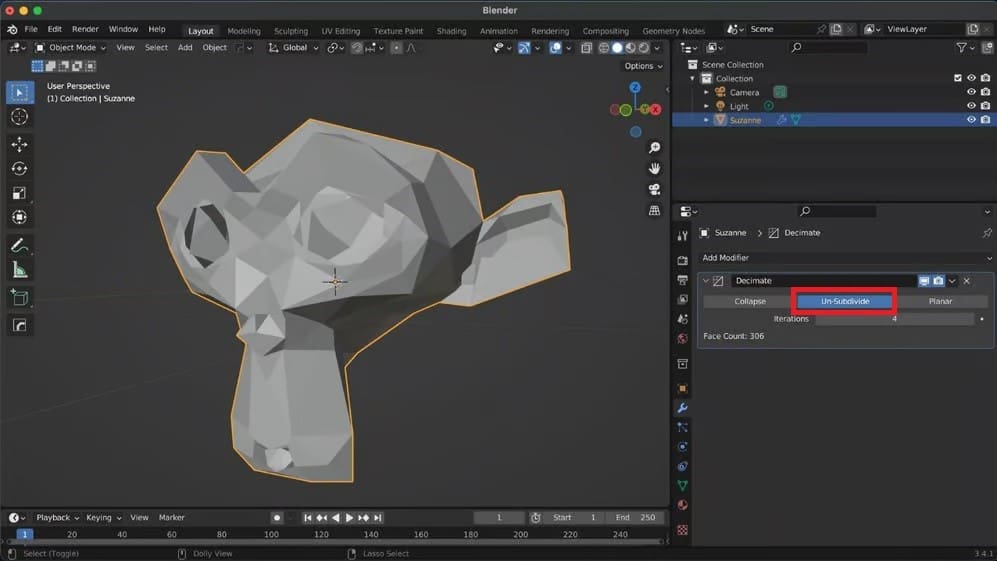
The Decimate modifier is a powerful tool that allows you to reduce the polygon count of a mesh, making it less complex and more efficient for rendering and 3D printing. By removing unnecessary vertices and edges, this modifier helps optimize the mesh without sacrificing the shape. When you have a model with too many polygons, it can cause issues during printing, making it difficult to process and print.
With three different modes to choose from, namely Collapse, Un-Subdivide, and Planar, you can customize the approach to fit your specific needs:
- Collapse: This is useful for merging vertices together in a way that considers the shape of the mesh. It’s progressive merging that can be used to reduce the number of polygons in the mesh while maintaining the overall shape and appearance.
- Un-Subdivide: This mode works in the reverse of the subdivide operation. It tries to remove edges that were the result of a subdivided operation, which is particularly helpful for meshes with a mainly grid-based topology. However, it’s important to note that unexpected results may occur if additional editing has been done after the subdivide operation.
- Planar: This option is ideal for reducing details on forms that are mainly comprised of flat surfaces, and it’s particularly helpful for reducing unnecessary details while maintaining the overall shape and appearance of the mesh.
By reducing the polygon count, you can create a more manageable file better suited for 3D printing. This modifier is particularly useful when you want to create a low-poly version of a high-poly model. However, it’s important to remember that this modifier can result in a loss of detail, so it’s crucial to experiment with different settings to achieve the desired result.
Solidify for Thickness
The Solidify modifier is like a magic wand that gives your models the power to exist in the real world. By adding thickness to the surface of a mesh, you can create 3D printable objects that aren’t just 3D models but are also tangible objects you can print and hold in your hand.
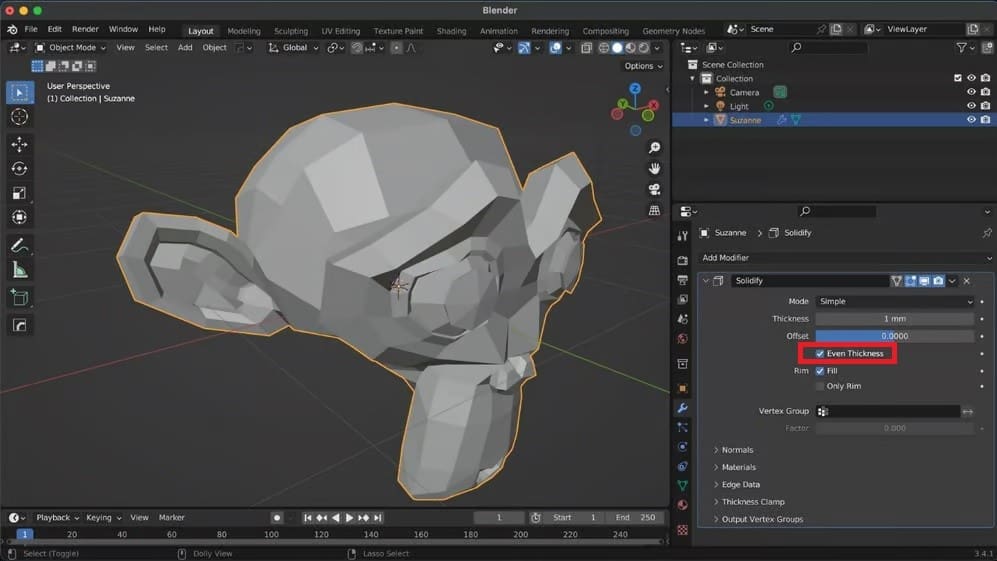
The Solidify modifier has two modes: Simple and Complex. The default Simple mode extrudes the geometry but doesn’t work well with edges with more than two faces. The Complex mode can handle any geometric situation and ensures a manifold output, allowing it to solidify shapes like Möbius strips and Klein bottles. However, it’s slower and unnecessary for simple cases. So, choose wisely based on your needs.
Also, keep in mind that it’s crucial to ensure that the object has enough thickness to withstand the stresses of the printing process and daily use. You don’t want your masterpiece to crumble to pieces as soon as you take it out of the printer! That’s why we recommend a minimum thickness of 1 mm for all geometries.
Using the Solidify modifier is an easy way to add thickness to any surface of your model. Simply specify the desired thickness in the units of your choice, and voilà! Your model is now ready to become a 3D printed reality.
Unifying Objects
Another modifier that will make the modeling process a breeze is the Boolean modifier. It allows you to unite, intersect, or subtract one solid from another. This can be especially useful for 3D printing because it enables you to create a unified object, which is much easier to print than a complex assembly of separate objects.
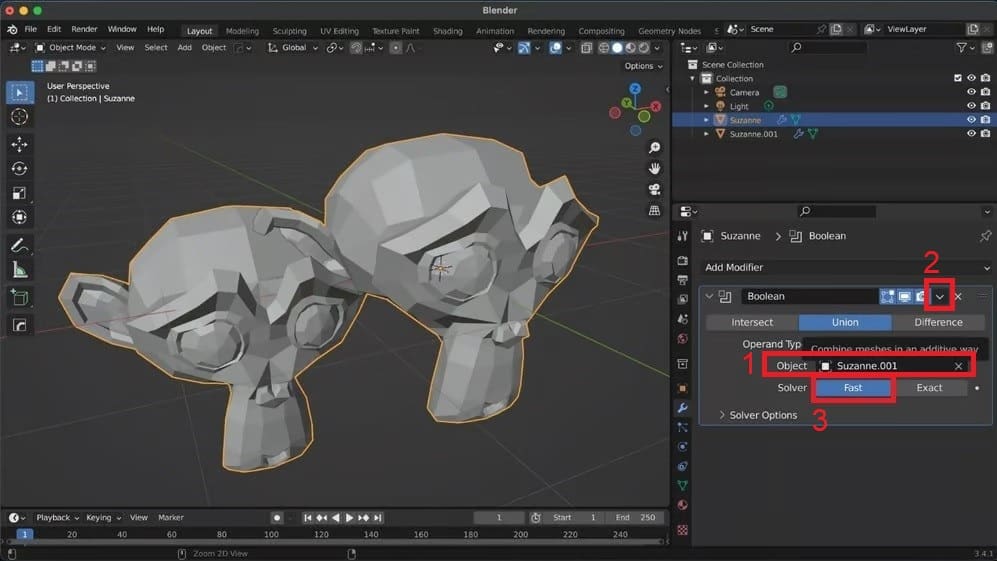
To ensure that your design is 3D printable, it’s essential to have a solid mesh. This means that all the components of your design need to be combined into one solid object. To achieve this, simply select one of the objects and apply the Boolean modifier.
Choose the “Union” operation and select the second object from the drop-down menu under “Object” (1). This will merge the two pieces into one. Once you’re satisfied with the result, click “Apply” from the drop-down menu (2) to make the changes permanent. This will simplify the modeling process and ensure that your design is 3D printable. And choose the “Fast” Solver (3) for optimal performance.
There are two additional options to choose from. The Intersect option is perfect for keeping only the inside of your desired mesh or all meshes in a collection. On the other hand, the Difference option allows you to remove the desired mesh while preserving the exterior faces in the modified mesh.
Exporting a Model
There are just a few more steps before you can bring your 3D model to life. The first is to clean up your model by removing unnecessary faces, edges, and duplicate vertices. A great way to do this is by checking for and removing doubles, which will help minimize the polygon count and simplify your model.
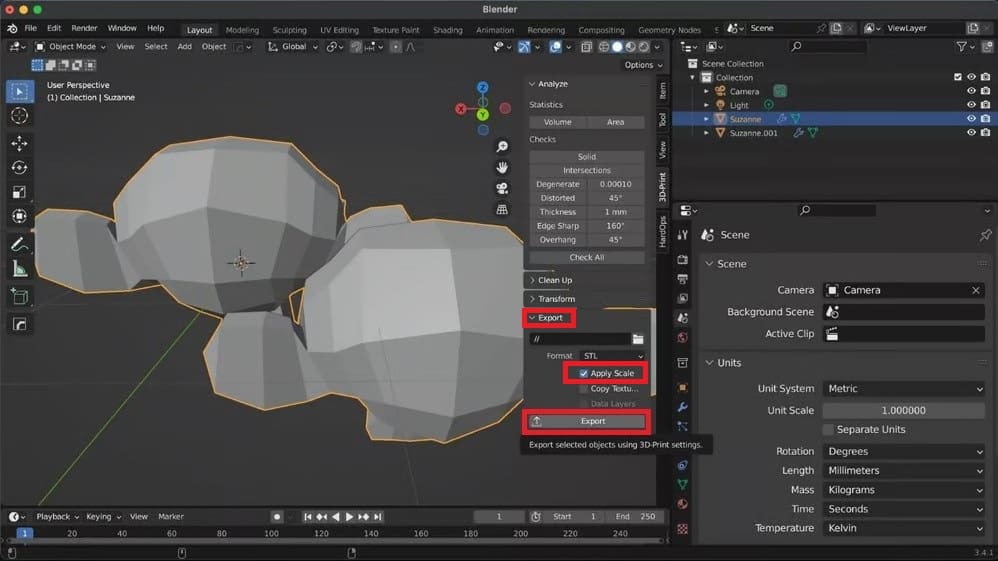
Additionally, if you want to take your model to the next level, consider using the “Mesh: 3D-Print Toolbox” add-on again. This powerful tool can provide valuable information about your model, including its volume and area, as well as alert you to any errors that need correcting. You can also determine if the thickness is correct and if there are any overhangs that could cause issues during printing.
Once your model is cleaned up, it’s time to export it as an STL file. This is one of the most prevalent formats used by 3D printing software. To do so, simply select “Export” from the File menu and choose “Stl (.stl)”. If you need to apply the scene scale while exporting, press ‘N’ to toggle the 3D Print Toolbox and check “Apply Scale” in the Export menu on the bottom.
Saving a file in Blender is a bit different than exporting one. When you save a file, you’re essentially saving the entire project, including all of the objects, settings, and configurations. This means that you can easily return to your project later and pick up right where you left off. You can save a file from the File menu, as in most programs, and it’ll be saved in the .blend format.
On the other hand, exporting allows you to save the object(s) in one of the various formats that Blender allows for, leaving them ready to be worked on in other programs.
By following these steps, you’ll be well on your way to turning your digital creation into a 3D object!
Tips & Tricks

Whether you’re just starting out or you’re an experienced 3D printing enthusiast, these tips and tricks can help you optimize your models for printing, ensure they’re watertight and manifold, and hopefully save you some frustration along the way.
Limited Dissolve
Limited Dissolve is a modifier that can remove excess mesh triangles from a model by dissolving vertices and edges. This is important for 3D printing because extra mesh triangles can sometimes cause printing errors by creating larger file sizes as well as producing overlapping and intersecting triangles that confuse the 3D printer and cause it to produce unwanted results. The increased file size of a model makes it more demanding to work with.
To use the Limited Dissolve tool, switch to “Edit Mode”, select the mesh you want to modify, and then navigate to “Mesh > Delete > Limited Dissolve”.
Extrude Shapes
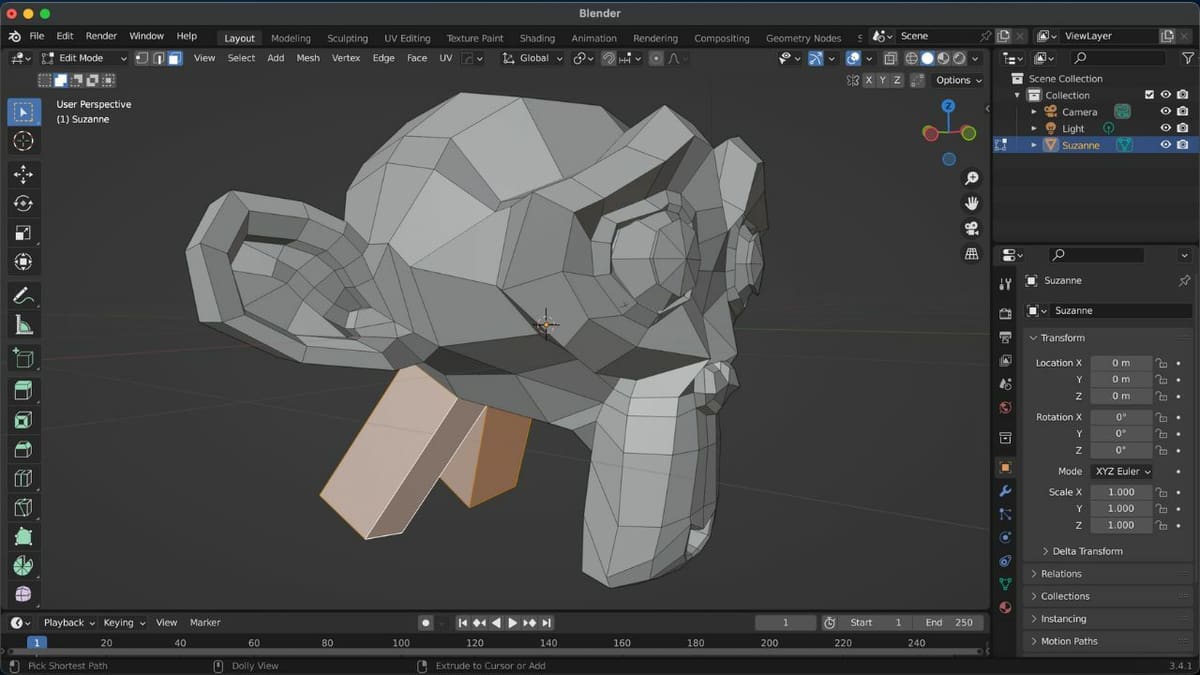
Extruding shapes from a surface instead of joining multiple shapes together can result in a cleaner and more efficient mesh for 3D printing. This is because extruding shapes adds depth and thickness to the model while retaining a continuous mesh.
To accomplish this in Blender, you can use the Extrude tool to create new geometry by pulling it out from an existing surface. Simply select the face or edge you want to extrude, press the ‘E’ key, and move the cursor to adjust the extrusion.
Add Supports
Support structures are essential for printing models with overhangs or bridges. They help prevent the model from collapsing or warping during printing. To add support structures in Blender, you can use various methods, including manually adding supports or adjusting the print settings of your slicer.
To manually add support structures in Blender, you can add separate mesh parts that can be used as supports in the “Edit Mode”. You can also use the “Add” menu to add different shapes, such as cylinders and cubes, to act as supports.
Use the Import-Export STL Add-On
Using the Import-Export STL add-on in Blender helps make a model 3D printable by enabling the user to easily import and export files in the STL format, which, as previously mentioned, is a commonly used file format in 3D printing.
This add-on allows for advanced operations such as scaling and orientation of the model, and it ensures that the exported model meets the requirements of 3D printing software and hardware. To use this add-on, go to “Edit > Preferences > Add-ons” and search for STL. Check the box to enable the add-on, and you’re good to go.
Note that the experimental STL importer is designed to replace the add-on. It’s a much faster tool, although it doesn’t currently support exporting. You can find it under “File > Import > STL (.stl) (experimental)”.
License: The text of "Blender & STL Files: How to Make 3D Printables" by All3DP is licensed under a Creative Commons Attribution 4.0 International License.