The Best Raspberry Pi IoT Projects

Raspberry Pi SBCs are ideal for projects with the internet of things. Read on for some great Raspberry Pi IoT projects!
The internet of things (IoT) has been a hot topic in recent years, especially with the release of the Apple AirTags. The internet of things refers to the network and connection of different devices with data-taking hardware (like sensors) that can exchange information. The point of the IoT is to allow individual devices to interact with each other and work together, providing you, the user, with the best experience.
Raspberry Pi boards are hugely popular single-board computers (SBCs) that are well suited to DIY IoT devices due to their small size and exhaustive capabilities. There are many different models of Raspberry Pi boards, with different combinations of ports and sensors.
In this article, we’ll go over a few different IoT projects that you can make with a Raspberry Pi board and a few other parts, in addition to the basic components of a MicroSD card, a power supply, and a network connection (Ethernet cable or Wi-Fi). These projects include different devices that you can use to connect to an IoT network or IoT device communication platform like Homebridge. Enjoy!
Inside
To get started, let’s take a look at some projects that’ll improve your home life.
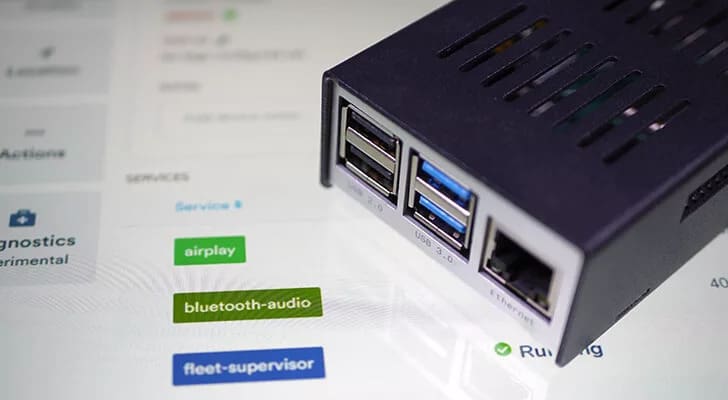
Smart Home Hub
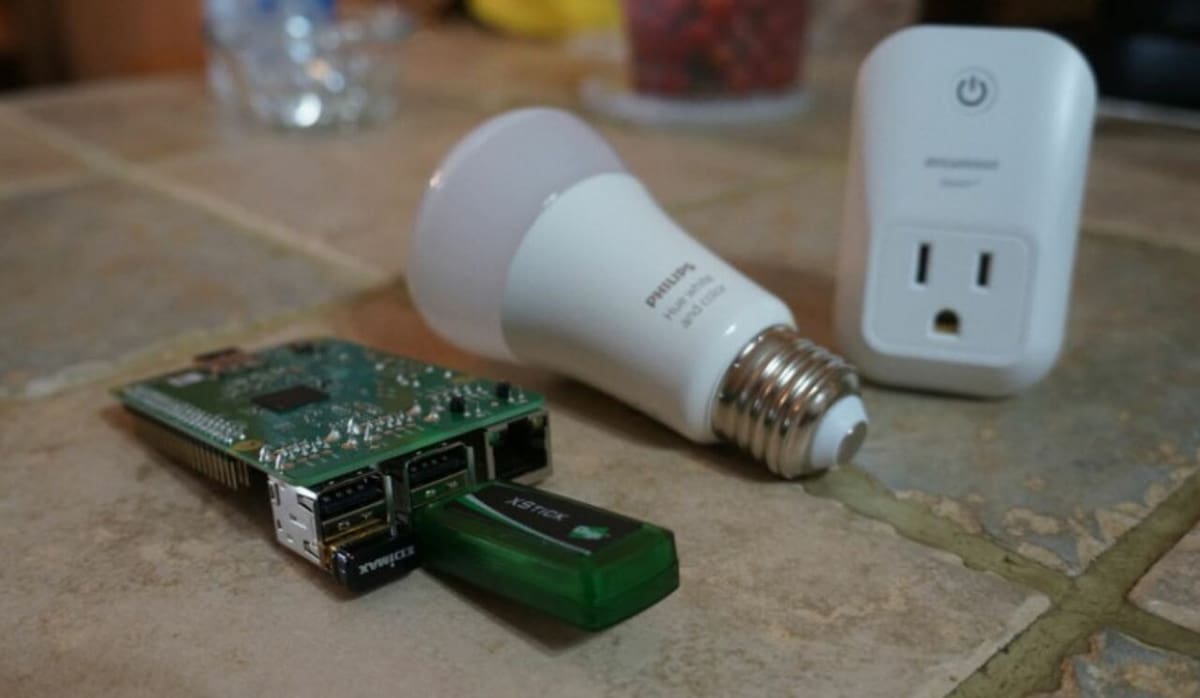
This smart home hub uses a Raspberry Pi board to allow you to control smart devices through the WebThings IoT gateway. Essentially, you’re using a Raspberry Pi to make your own version of Amazon’s Alexa, but it’s completely customizable (although it’s limited to operating your devices, and you can’t ask it questions).
The maker states that it’s preferred to have a Raspberry Pi 3 or 4 for this project, but it would likely work with other models – you might just need a Wi-Fi dongle. On top of a Raspberry Pi board, you’ll also need some cables, and of course, smart devices to connect with.
To find out which smart devices work for this project, you can check out the project’s GitHub page, which contains the complete list. Setting up your Pi-based IoT smart home hub should be pretty easy, and all you need to do is configure your WebThings gateway and add any devices, like a smart bulb or outlet, you want to control.
- Who designed it: David Ludlow
- Core components: Raspberry Pi 3 or 4, Zigbee USB dongle, smart home devices
- Difficulty: Easy
- Where to find it: The Ambient
Bluetooth Speakers
Have some old speakers lying around the house that don’t get much use? How about converting them into Bluetooth speakers with this fun Raspberry Pi project? Not only does this project allow for Bluetooth compatibility, but you can also hook them up to Apple AirPlay and Spotify to get your groove on.
This project uses the open-source Balena Sound, an audio streamer device, so it’s a straightforward and budget-friendly project. Balena Sound was specifically developed to allow old analog audio systems to get a revival.
To get started, you’ll need to open a free Balena account. From there, you’ll write the images to your Raspberry Pi and SD card. Once BalenaOS is running on your Pi, you’ll have several options to stream your audio. Overall, this is also a great choice for beginners looking to delve into the Raspberry Pi IoT world, as it’s fairly simple and rewarding.
- Who designed it: Emmet
- Core components: Raspberry Pi, Bluetooth adapter, MicroSD card
- Difficulty: Easy
- Where to find it: PiMyLifeUp
Picroft Voice Assistant
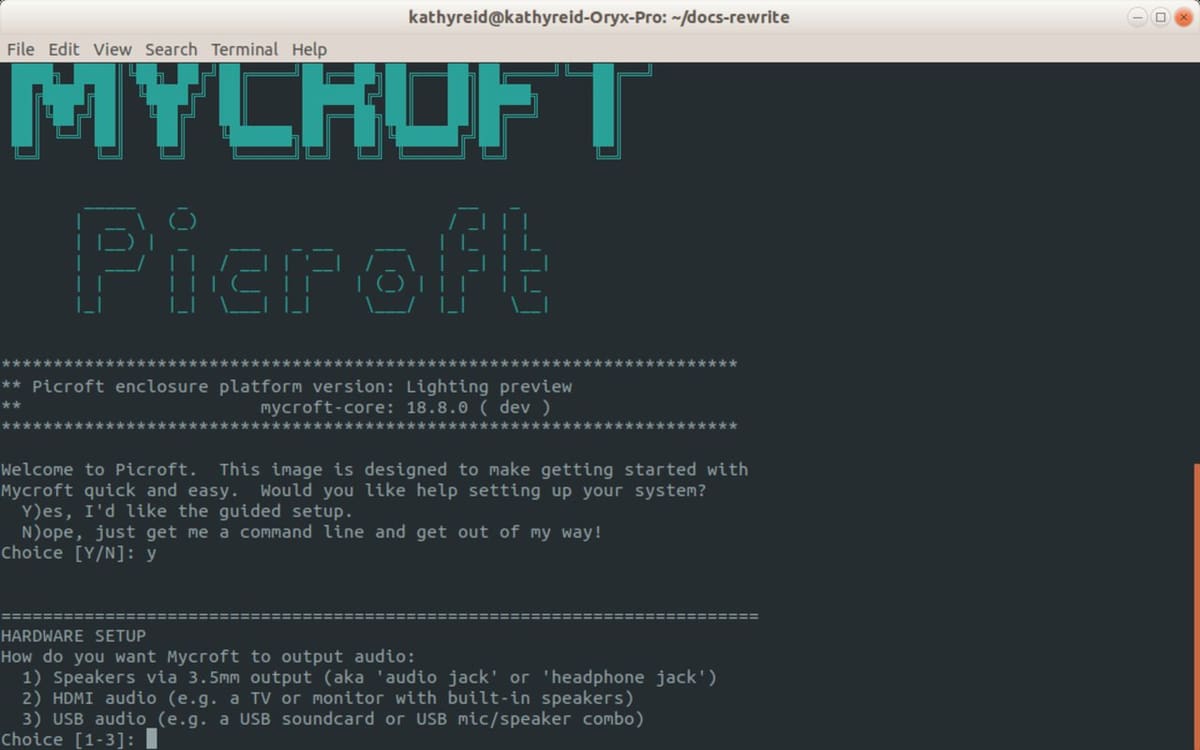
This voice assistant is designed with your privacy in mind. A Pi-based version of the popular Mycroft project, this comes with a disk image to write to your Pi’s SD card for simplicity. You can also interface the Pi’s GPIO pins with other devices to control them with your voice commands.
This project will give you a voice assistant that can tell you jokes, start timers, record notes, and more! As the project is open source, you’re free to modify the source code as you see fit for your implementation. You can even record your own voice for its text-to-speech function!
The Mycroft team maintains a list of tested hardware that’s compatible with the software. They also have excellent instructions on their GitHub page.
- Who designed it: Mycroft
- Core components: Raspberry Pi 3B, 3B+, or 4, 8-GB (or more) SD card, power supply, 3.5-mm audio jack speaker, USB microphone
- Difficulty: Easy
- Where to find it: Mycroft Documentation
Kid's Sleep Monitor
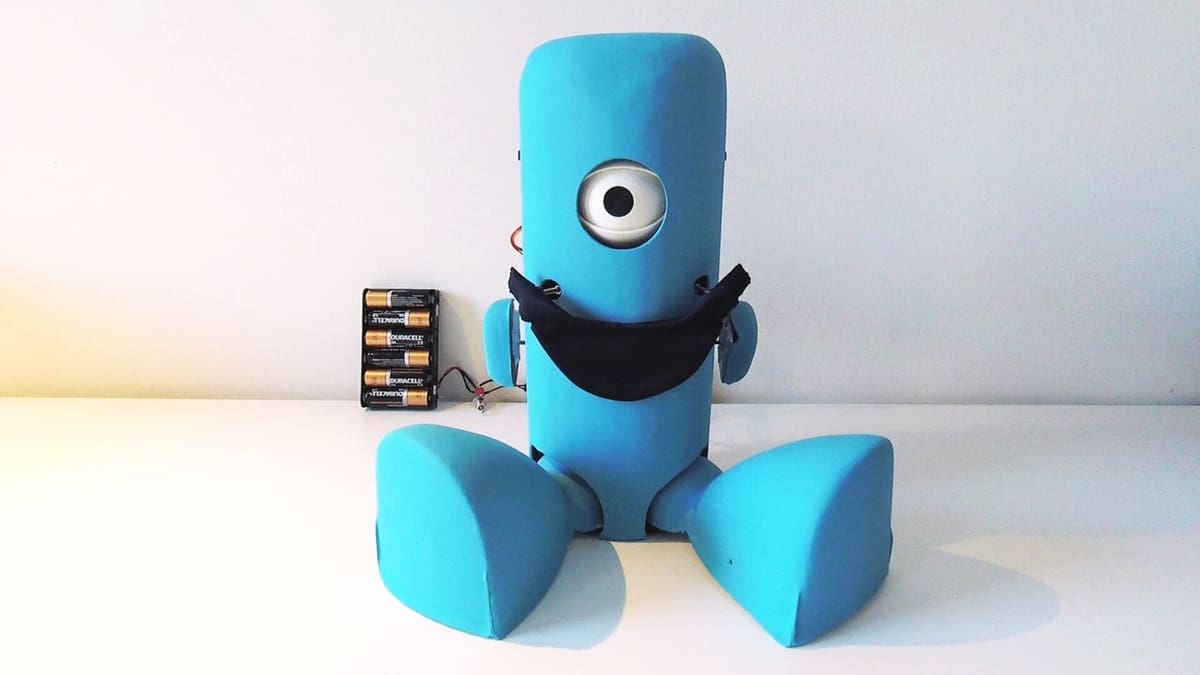
If you have kids, this personalized IoT child monitor is a fantastic project that involves a variety of skills, including thermoforming, 3D printing, and laser cutting. It’ll also require a fair investment in time and materials. However, most of this is to build the shell of the robot that will hold the IoT part of the project.
The interactive IoT part of this project was designed by a team at the University of Ghent in Belgium. Their research focuses on designing social robots for people to interact with. The full instructions to install this software on your Pi can be found on GitHub.
Ultimately, the IoT design at the heart of this project can be embedded in any suitable shell. The project instructions give you a clear guide to building your own if you want to replicate the designer’s work.
- Who designed it: Bert Vuylsteke
- Core components: Raspberry Pi board, 8-GB (or more) SD card, breadboard, polystyrene sheets, polyurethane foam
- Difficulty: Constructing the robot – Hard, IoT – Easy
- Where to find it: Instructables
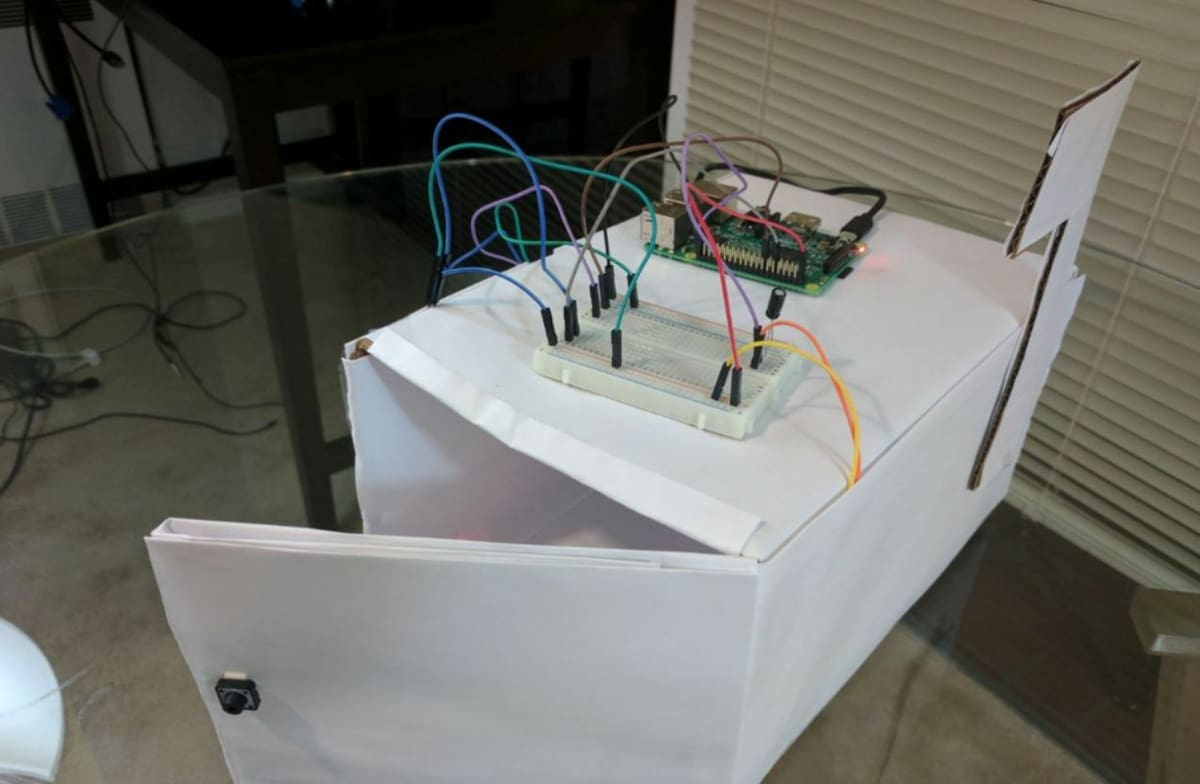
Attendance System
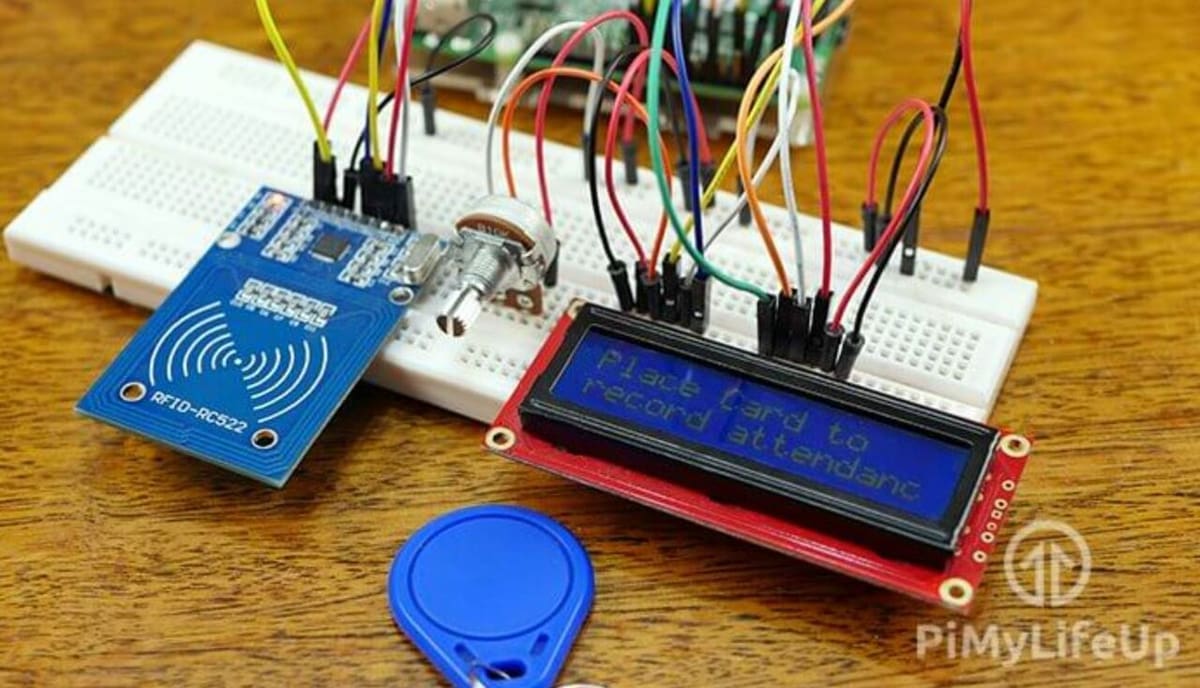
Next, this IoT device is a great way to take attendance using authentication devices to verify identity. This may be useful in workplaces and schools to tell who is attending an event and showing up on time.
This project requires a good amount of components, as seen in the image above, including radio frequency identification (RFID) tags, an RFID reader, a Raspberry Pi board, a breadboard, and some other equipment. The instructions indicate that this project works on a Raspberry Pi 2, 3, or 3 B+, though the comments indicate that other models will work, too.
Once assembled, you’ll be left with a useful IoT attendance system that tracks when a person used their RFID tag to sign in. You can also set up an online interface to check the users, attendees (people who signed in), and each user’s ID number. The guide for this project is comprehensive and goes over all of the wiring for the project, plus the code you have to type into your Pi to configure the program.
- Who designed it: Emmet
- Core components: Raspberry Pi 2, 3, or 3B+, breadboard, Dupont wires, RFID tags, RFID reader, 10-K Ohm potentiometer
- Difficulty: Medium
- Where to find it: PiMyLifeUp
Remote Healthcare Monitoring System

As anyone who’s managed health conditions for themselves or a beloved family member knows, sometimes it can feel overwhelming to keep track of everything, especially if you’re trying to keep tabs on someone’s health remotely. This next project is here to help ease the burden.
The project’s sensors send data to the Arduino Nano, while the Raspberry Pi collects cloud data, and the user can access the sensor information from the GUI. Different sensors measure heart rate, oxygen levels, and body temperature simultaneously. This data is then collected from the Arduino Nano, while data from the cloud is collected by the Raspberry Pi and displayed on the GUI. Project users can then see a better picture of long-term information about someone’s health trends over a prolonged period of time. This can also give you peace of mind for sick loved ones living far away.
The project creator has included all relevant codes and scripts, plus a YouTube video to help guide you through the project step-by-step.
- Who designed it: sananh2004
- Core components: Raspberry Pi 4, Arduino Nano, pulse oximeter sensor, temperature sensor, ECG sensor, PCB
- Difficulty: Medium
- Where to find it: Instructables
Water Level Sensor
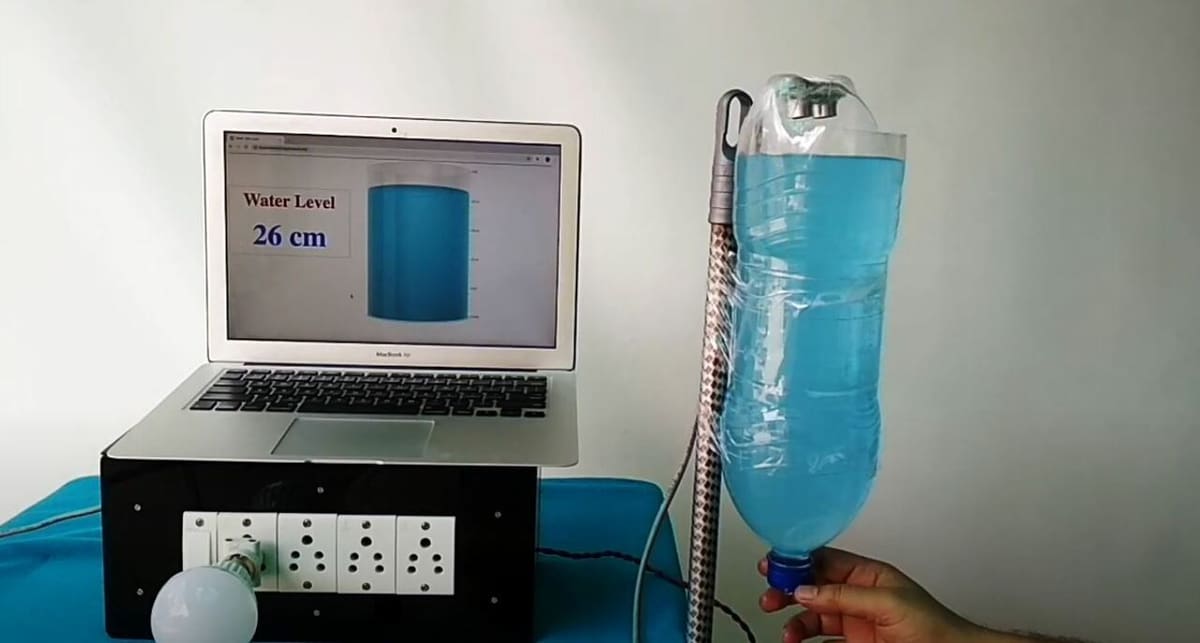
Another use for the internet of things is sensing the level of water in a container, which can be especially useful for pet owners to remember to fill up their pet’s water bowl. This IoT device senses how much water is in a given tank, and the creator of this project originally got the idea after they misjudged how much water was in their house’s water tank.
This project works using an ultrasonic distance sensor connected to a Raspberry Pi board, although the instructional video didn’t mention which boards work or don’t work. However, in the video, it looks like the user may be using a Raspberry Pi 3B+.
Once the necessary source code for the project is loaded onto the Pi, the device should be able to sense how much water is in a tank. When the amount is detected, the Pi transcribes this data into a graphical display on an accessible online interface. The guide goes over how you need to wire the Pi, and you can find the source code on the maker’s GitHub page.
- Who designed it: Jitesh helloworld
- Core components: Raspberry Pi 3B+, ultrasonic distance sensor, Dupont wires, relay board, case (optional)
- Difficulty: Medium
- Where to find it: YouTube
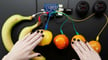
Fruit Detection System
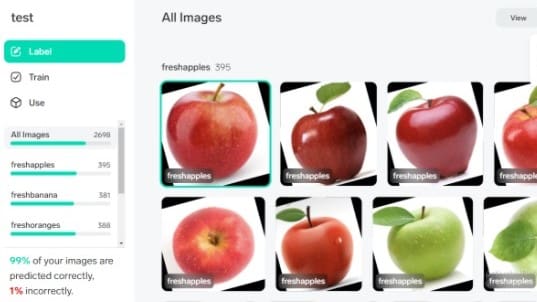
If you’ve ever had the annoying experience of buying delicious fruit only to have it go bad before you’re able to enjoy it, this innovative fruit sorting system is here to help! No more wasted produce and money. A nice aspect of this detector is that not many materials are required, so you can set it up for an affordable cost.
The first step is to collect datasets by taking pictures of fresh and rotten fruit, and then creating a machine learning model. You can opt to create your own dataset with pictures you take yourself, or download premade datasets. The project creator provided code to create the machine learning model, which makes your task easier. Once everything is set up, you’ll use a webcam to take video footage and the saved frames will be processed by the machine learning model to detect rotten fruit. A cool bonus is you can also utilize a servo motor (or an actuator if desired) to physically sort out any rotten fruit from the fresh pieces.
- Who designed it: Ashwini Slnha
- Core components: Raspberry Pi, Raspberry Pi camera, servo motor
- Difficulty: Medium
- Where to find it: Electronics For You
IoT fan
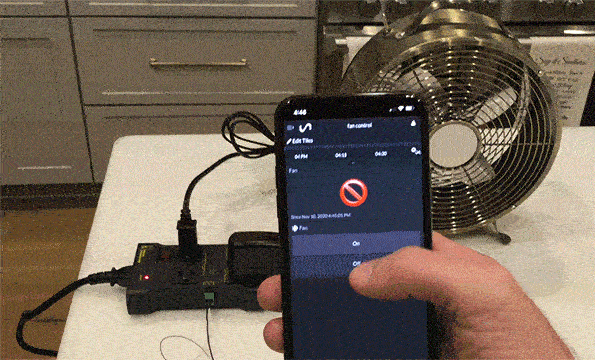
With this project, you’ll be setting up a Raspberry Pi to control a fan through a relay. This can be useful if you need to prevent something from overheating when you’re away, for instance, if you leave a pet at home while you’re out at work or if you’ve just sat down with nachos to watch a movie and don’t want to go through the hassle of walking up to the fan. And, with the addition of a temperature sensor, this project can turn on the fan in response to the temperature of the room.
You’ll first need to install an operating system of your choice, like Raspberry Pi OS (formerly Raspbian), and have enabled Wi-Fi. You’ll write a small Python script to control the fan with input from the InitialState website. This script will send a signal from the GPIO pin you specify to the relay, which will, in turn, switch the fan on or off.
While the creator doesn’t specify which board they used, the Zero is an option. The type of board will affect whether you need to buy a Wi-Fi dongle or not.
- Who designed it: Jamie Bailey
- Core components: Raspberry Pi board, 2-GB (or more) SD Card, IoT relay
- Difficulty: Medium
- Where to find it: InitialState
Smart Energy Monitor
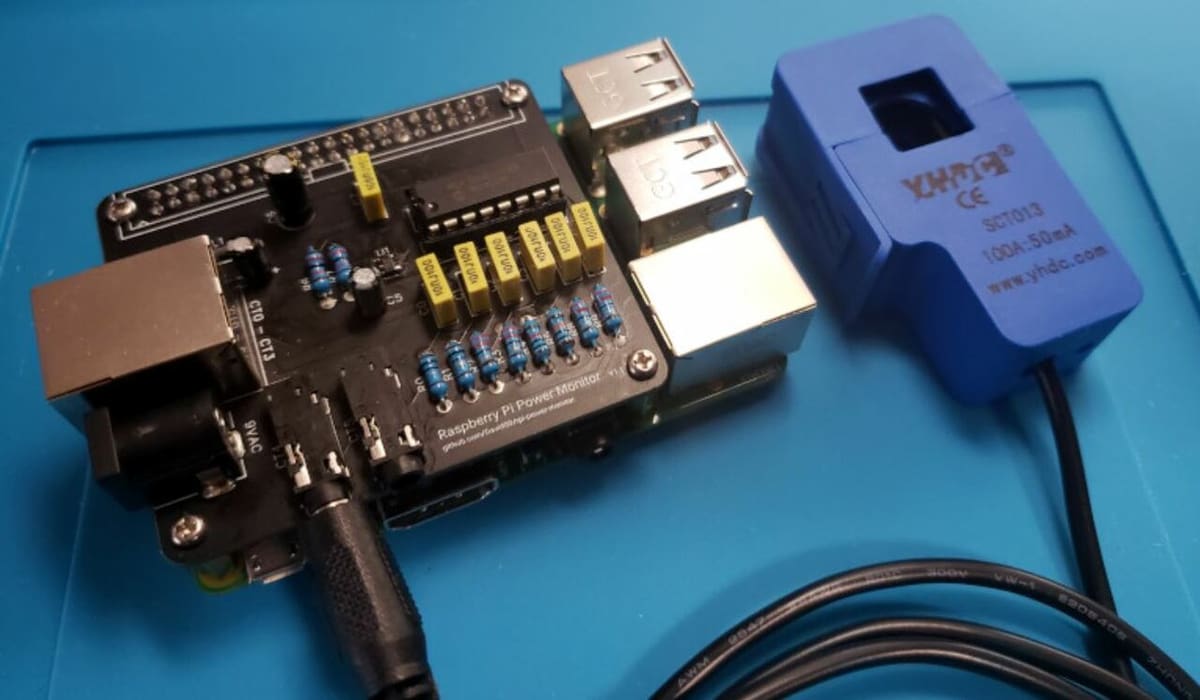
Next, you can use your Raspberry Pi board and a sensor to track the power consumption of your household. The project integrates the IoT by sending the data taken from the sensor to an online interface so you can monitor your energy consumption and make changes.
Based on the parts list in the instructions, this project is intended to operate on a Raspberry Pi 3 or 4 board, with a breadboard, current clamp, and a few other parts. As there are many components involved in this project, the creator provided a detailed instructional guide for setting up this IoT device.
The instructions go over everything you need: how to wire the electronics pieces, how and what programs to load onto your Pi, and how to interact with the device to monitor your energy usage. To make the device more sturdy, you may be able to 3D print a mount for the sensor, which will also mean you can choose how it looks!
- Who designed it: Emmanuel Odunlade
- Core components: Raspberry Pi 3 or 4, ADS1115 module, YHDC current transformer, breadboard, Dupont wires
- Difficulty: Medium
- Where to find it: Circuit Digest
Air Quality Monitor
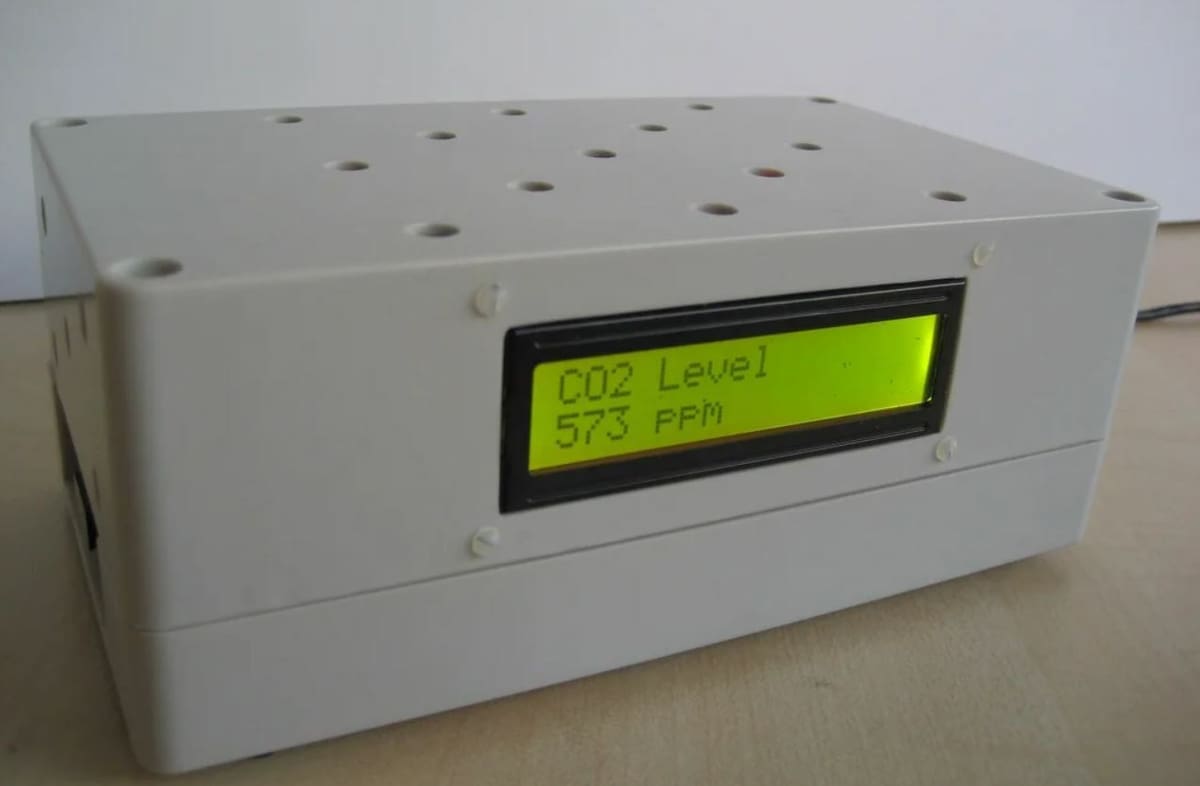
To add even more options to keep a smart living, this project combines a Raspberry Pi to make an IoT air quality monitor to check the purity of the air in your area. Using an assortment of sensors and a Pi-compatible display, you can create a device that will record the air quality in the device’s location.
This project involves a bit more hardware than other options, and you can either buy the sensors individually as a fully DIY project or get the pre-assembled kit to save yourself some soldering. The project is designed for the Raspberry Pi 2, 2B+, and 3. After flashing the OS to your Pi’s MicroSD card, you can use Jabber to interact with your IoT device and get status updates on the air quality.
You can also connect this device to an IoT communication platform, such as DeviceHive. Making this connection allows you to monitor the data alongside your other devices on the platform.
- Who designed it: LiV Raspberry Pi
- Core components: Raspberry Pi 2, 3, or 3B+, DHT22 temperature and humidity sensor, BMP 180 air pressure sensor, K30 CO2 sensor, 1602 I2C LCD screen, DS3231 RTC module, or buy the Liv Pi kit pre-assembled kit
- Difficulty: Medium
- Where to find it: Instructables
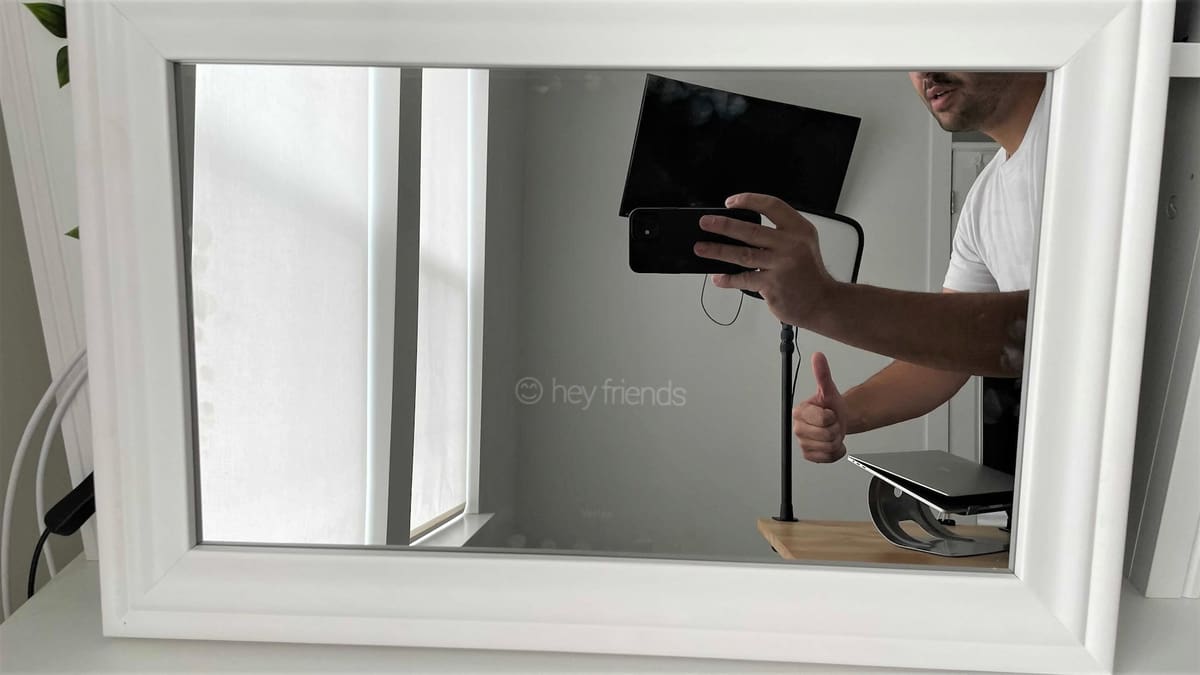
Smart Mirror
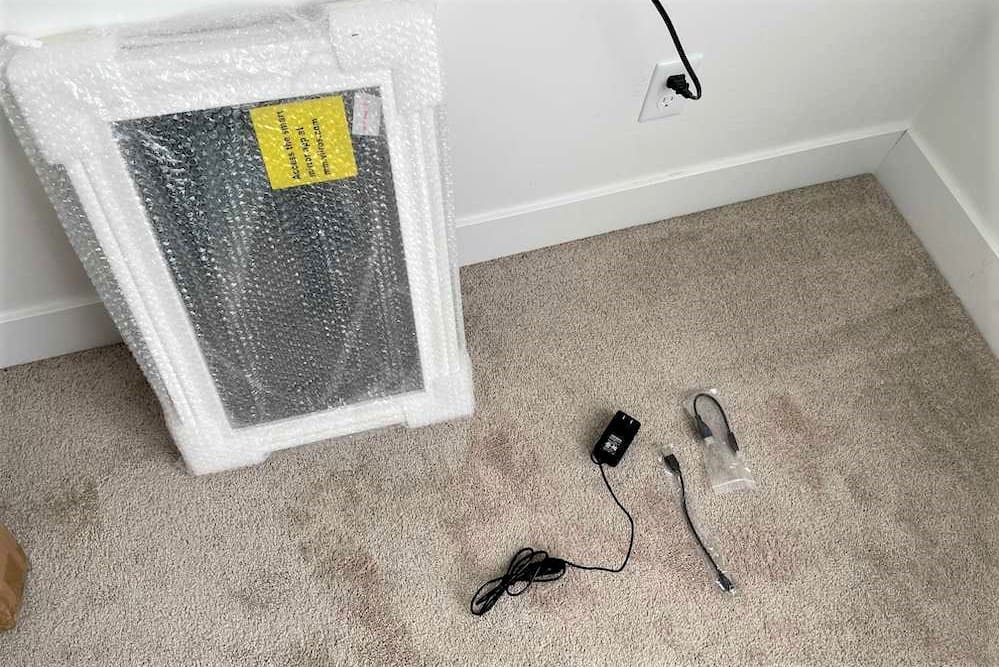
Digital smart mirrors have been growing in popularity and can be super useful for people who want to have a multi-functional mirror equipped with some of the coolest technology. Smart mirrors are essentially screens with a two-way mirror in front of the display. You can see yourself just like in a mirror, and you can also add features that project to the mirror, like a calendar, clock, or other programs.
According to the maker’s instructions, you’ll need a Raspberry Pi 3 or 4 for this project. To create it, you’ll need to connect a screen, like the one seen in the image above, to your Pi.
The physical assembly for this project is a little more intense compared to some of the others on this list because you have to work with a much larger device. Luckily, the maker’s guide goes over all of the programming and digital configuration needed to build the project. However, you may need to figure out some of the wiring on your own, as it’s not covered in much detail in the instructions.
- Who made it: Tyler Clark
- Core components: Raspberry Pi 3 or 4, HDMI cables, computer monitor or other display screen, screen frame, two-way mirror
- Difficulty: Hard
- Where to find it: Auth0
Outside
Next, these projects will add plenty of ease to your home’s surroundings and other outdoor applications.
Smart Doorbell
Smart doorbells have really boomed in recent years, with products like Ring finding a home outside many houses. Smart doorbells allow you to check who’s at your door whenever the device senses motion, and this is great for ensuring that your packages and porch are safe.
This smart doorbell project uses a Raspberry Pi board and Pi-compatible camera to give you a great DIY IoT-based doorbell. Pretty much any model of Pi that can connect to a camera will work for this, so it’s one of the more versatile projects on our list.
Once it’s set up, you’ll automatically receive an email with a picture of the person who pressed the doorbell. Building this project should be pretty easy, as the instructions cover most of the wiring and programming. The guide also goes over setting up your Google Mail security features to work with the IoT platform.
- Who designed it: IoT Design Pro
- Core components: Raspberry Pi board, Pi-compatible camera, push button, breadboard, Dupont wires
- Difficulty: Easy
- Where to find it: IoT Design Pro
Weather Station
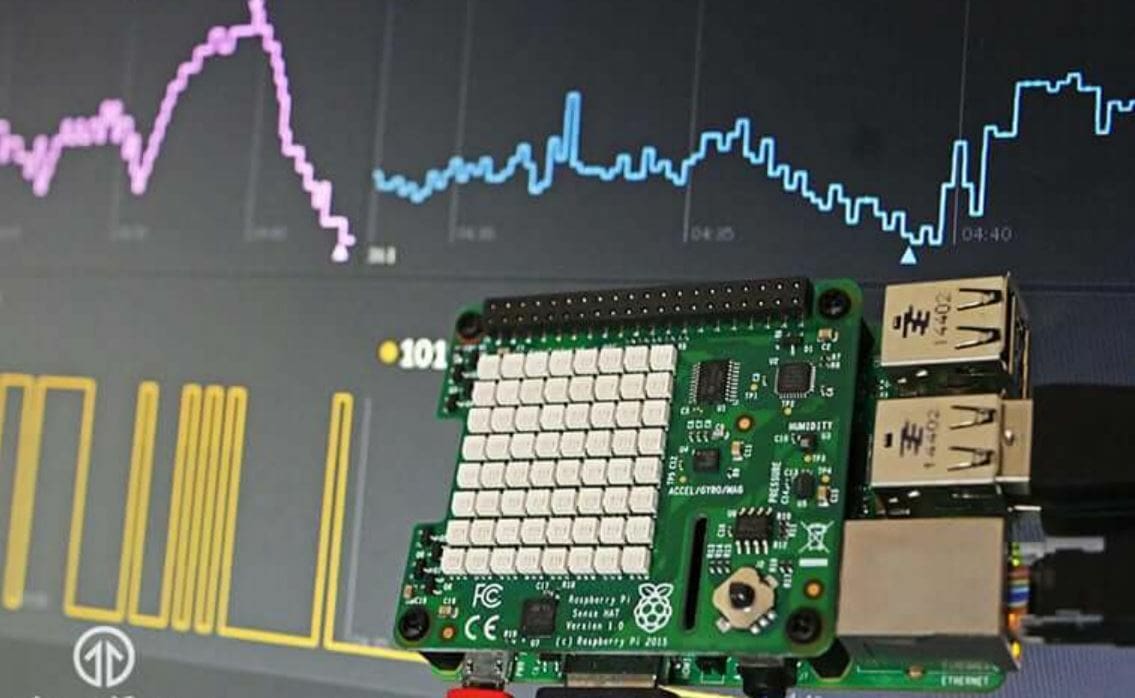
One of the most popular ways makers utilize IoT is to make weather-monitoring devices. This first project is a weather station that transmits data taken by the attached sensors. This project is useful for checking the weather in a nearby area to help you determine if you need an umbrella! It’s also a fun data-logging project.
The project is intended for a Raspberry Pi 2 or 3 board and also requires the Raspberry Pi Sense HAT, a sensor system that attaches to a Pi board. The physical assembly is pretty easy, and the guide goes over, in detail, the Python scripts used to set up the project. Also covered is how you can use the interface to view the data taken by your Pi and Sense HAT.
- Who designed it: Pi My Life Up
- Core components: Raspberry Pi 2 or 3, Raspberry Pi Sense HAT, case (optional)
- Difficulty: Easy
- Where to find it: PiMyLifeUp
Silo & Level Measurer
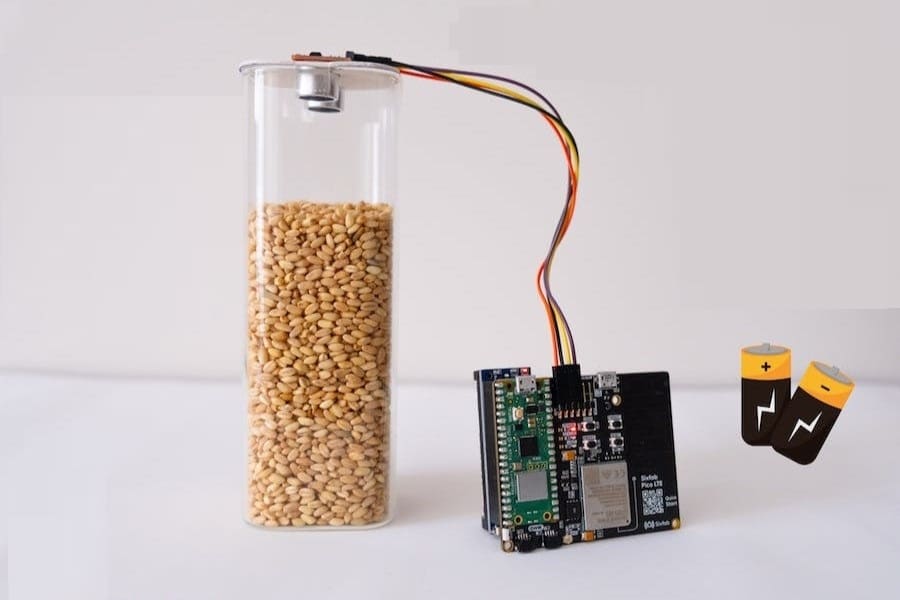
If you’re working in agriculture or simply want to keep track of grain storage at home, this is an excellent project that utilizes a Raspberry Pi Pico and the Azure IoT Hub from Microsoft. The Azure IoT Hub is a cloud-based service that connects, monitors, and communicates between an IoT application and connected devices.
Documentation for the project is provided via Sixfab, which you’ll use in conjunction with MicroPython firmware and other components to set up a battery-operated level meter for a grain silo or similar storage container. The first step involves registering your Pico LTE board, and you’ll need to also make sure MicroPython and LTE SDK are installed as well. Following this, you’ll need to connect the sensor and module to the Pico, and last but not least, integrate with Azure IoT. Prior knowledge of MicroPython is very practical for this project.
Utilizing the Azure IoT Edge together with the Pico LTE SDK gives users the ability to remotely monitor the contents of the silo with cellular connectivity. After setting everything up properly, the vacant space in the silo will be measured and sent to the dashboard on the Azure IoT Hub. This makes it convenient for silo owners to know when the contents of the silo are getting low, even from afar.
Since the data gets saved to the cloud with Azure IoT, another bonus is that you can keep long-term tabs on storage management and get a good picture of how much is being removed from the silo regularly.
- Who designed it: Ensar Karabuduk
- Core components: Raspberry Pi Pico W, Sixfab Pico LTE, ultrasonic distance sensor, UPS module
- Difficulty: Medium
- Where to find it: Hackster
School Bus Monitoring System
To provide peace of mind to schools and parents, Hackster user Nikhil put together a unique system that allows for real-time bus monitoring. Ideally, this system will help keep track of (and possibly prevent) delays, as well as monitor the safety of the school bus in terms of its functioning and driving capacities to give parents some peace of mind.
Once set up, the monitoring system is operated through a web application that enables users to either follow real-time bus tracking or the status and number of students riding on the bus. The real-time tracking can also provide temperature and humidity statistics of the bus using sensors. RFID tags belonging to students create a “beep” and blink when the tag is read by the system, which goes into the MQTT broker system. The IoT elements collaborate with the main system of the project in terms of the temperature and humidity sensors, and the camera can also take real-time images as well.
The project’s creator provides detailed schematics and code so you can set up the custom parts and circuit board systems. All links are included in the project, and there’s a demo video that shows the system in action.
Mail Detector
Ever want to find out if you got a package when you’re not there? This IoT device can detect if you got mail, which is perfect for ensuring that your packages arrive on time and make it safely into your mailbox.
This mail detector project is meant to work on a Raspberry Pi 3, and you’ll need a few other parts, including a breadboard, a laser, and a motion sensor. Once working, your Pi should be able to detect when the mailbox door is opened and an object enters the area. You can configure the device to send you a text message once your Pi’s motion sensor is set off.
The maker of this project explains the hardware assembly, including connecting the sensors and the necessary GPIO ports on the breadboard. The project transmits the taken data to other devices through Twilio, a cloud service provider.
- Who designed it: pauldeepakraj
- Core components: Raspberry Pi 3, breadboard, laser emitter, photo resistor, micro farad capacitor, PIR motion sensor, Dupont wires
- Difficulty: Medium
- Where to find it: Instructables
Garage Door Opener
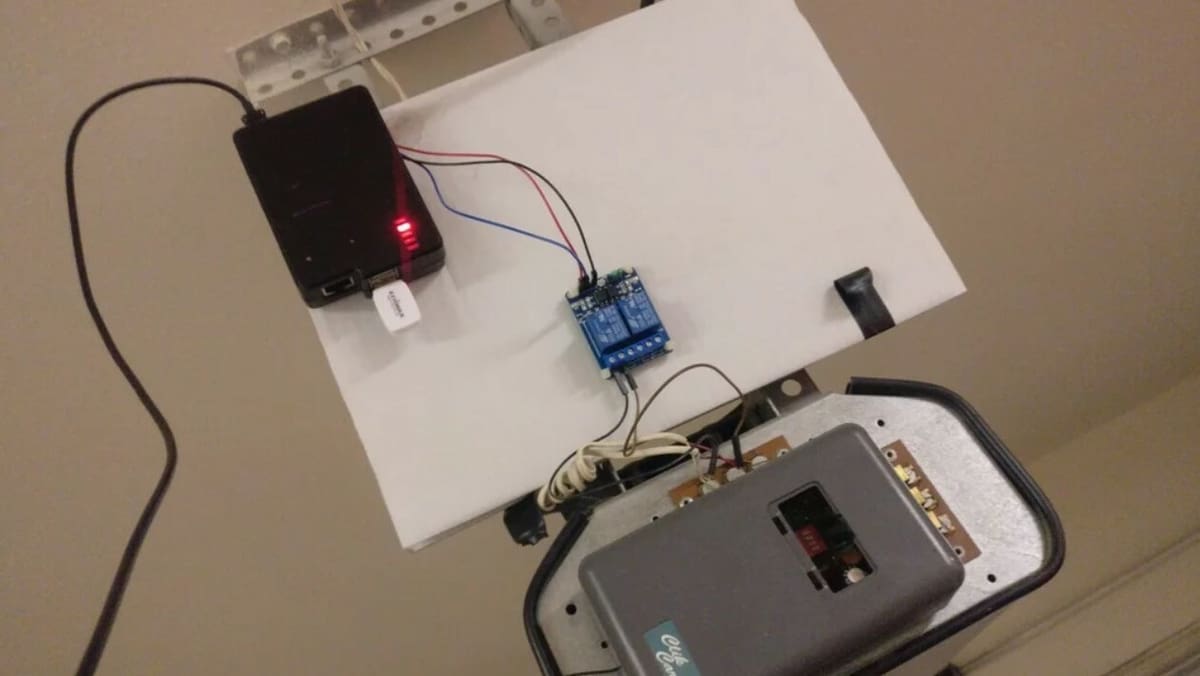
This project is a great first step into building your own smart devices. Here, you’ll be wirelessly linking a Raspberry Pi to a garage door opener to control it from your phone. This is a really fun project to explore interfacing the Pi with other devices. A part of the project also involves setting up a mini web server on the Pi – a great introduction to how the internet works!
You’ll need to link the garage door opener to the Pi’s GPIO pins. This will require you to use a relay to drive the door opener with the 5-V signals from the Pi. From here, you’ll write some shell script to prompt the Pi to open or close the door when you signal it from your phone.
Building on what you learn in this project, why not try to design a system to check if your garage door is closed remotely? This would involve adding additional sensors to the system to check if the door is closed. As a starter, you might use a very simple push button that would be in contact with the bottom of the door. When the door is closed the circuit is complete.
While the creator of this project used a Raspberry Pi model A, other models should work too, as the main difference between models has to do with the number of ports. At least one user, for example, has successfully recreated the project with a Pi Zero W.
Remote monitoring is fundamental to IoT, and this is a great way to get started!
- Who designed it: quartarian
- Core components: Raspberry Pi board, 5-V 2.5-A power supply, Wi-Fi adapter, 5-V relay, 2-GB (or more) SD card
- Difficulty: Medium
- Where to find it: Instructables
Smart Garden
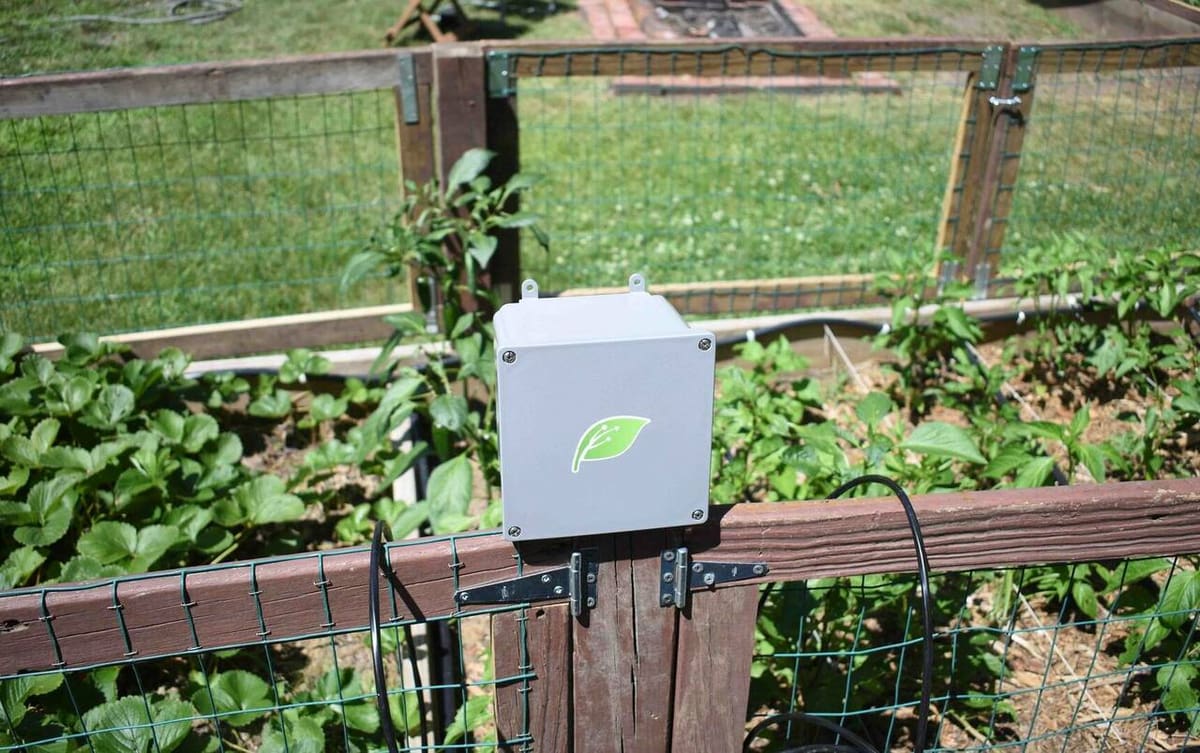
Always killing your plants? Going on holiday and no one wants to care for your garden? Automate a smarter garden with an IoT watering system!
With MudPi, you can connect your Raspberry Pi to many sensors to monitor your garden and ensure it’s healthy. By recording the temperature and humidity of the soil and air, your Pi can determine if your garden needs watering. MudPi can also monitor water levels within a water tank. From here, you can use this information to alert you if you’ll need to top up the tank or water your garden. The project can also control the watering of your garden using a solenoid to actuate a valve and release water into your irrigation system.
This project will vary in its requirements, complexity, and setup depending on the garden. With a vertical garden, you might want to monitor light intensity. In a large, open garden, your watering systems will likely be more complex. The beauty of MudPi is the flexibility to customize it based on your garden.
This fantastic project brings together a lot of different skills within IoT. You’ll gain experience in automating physical processes based on input from sensors, which is a fundamental part of IoT. There are more resources for this project available on GitHub, and there’s also excellent documentation on the mudpi website, including video tutorials!
- Who designed it: mudpi
- Core components: Raspberry Pi 3B, 3B+, or 4, 8-GB (or more) SD card, 5-V 2.5-A power supply, 2-channel relay, 12-V pump, waterproof box for the Pi, sensors
- Difficulty: Medium
- Where to find it: Instructables
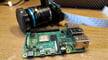
Surveillance Camera
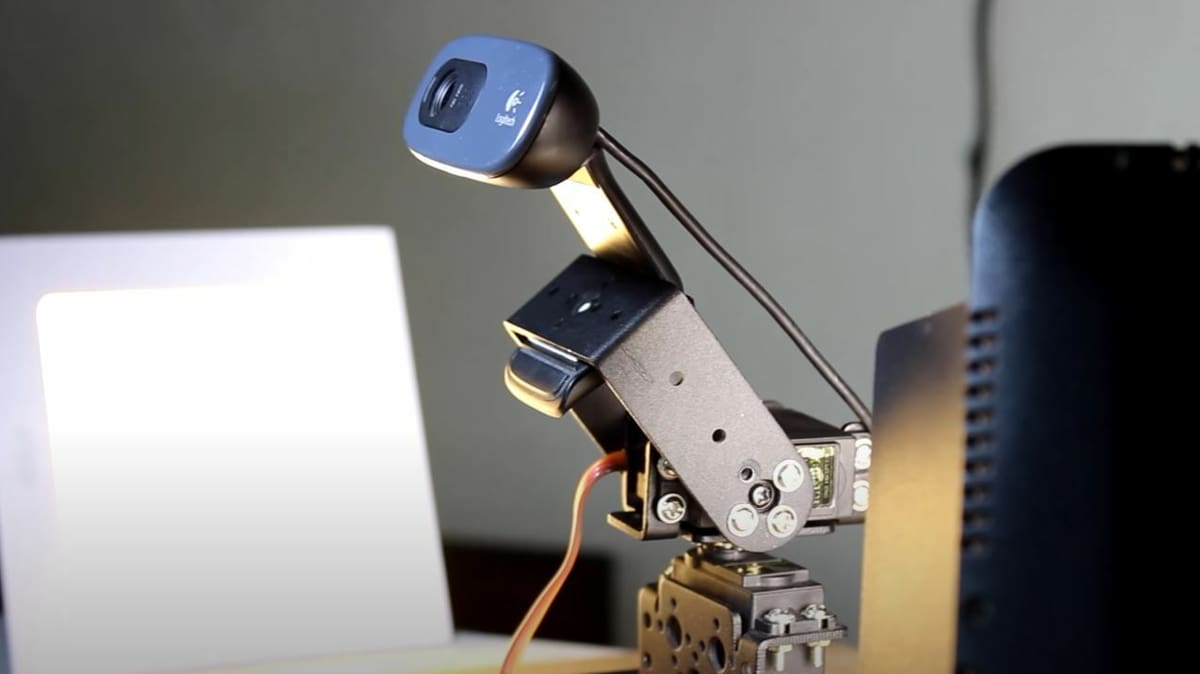
Security is another excellent way to use the IoT with a Raspberry Pi board. This project is a surveillance camera that transmits the feed to an online interface. You can use this surveillance camera to monitor your house, valuables, or even check up on your pets.
To give the surveillance camera more capabilities, the creator made this project a little more complicated, adding a movement system. The maker mentioned that they used a Raspberry Pi 3 to set this up.
On top of the Pi, you’ll also need a compatible USB camera, servo motors, and more. The video guide includes the wiring diagrams and goes over how to set up the interface to monitor the video stream.
- Who designed it: Being Engineers
- Core components: Raspbery Pi 3, compatible USB camera, servos, buck convertor, PWM driver, Dupont wires
- Difficulty: Hard
- Where to find it: YouTube, Instructables
License: The text of "The Best Raspberry Pi IoT Projects" by All3DP is licensed under a Creative Commons Attribution 4.0 International License.