3D Modeling with Maya: The Basics & Tools

Want to get started making more organic objects and characters? Follow along to learn about some helpful tools to use while getting started!
If you enjoy 3D printing, animation, or game design and have worked with Autodesk software before, you’ve probably heard of Maya. Having been available for over 20 years, Autodesk Maya has become a favorite for numerous animators, game developers, and 3D modelers alike. Maya has been used in Pacific Rim and Jurassic World: Fallen Kingdom for many of their animation needs as well as Lucasfilm’s Star Wars: The Clone Wars, Disney’s Wreck-It Ralph, and Sony’s Spider-Man: Into the Spider-Verse.
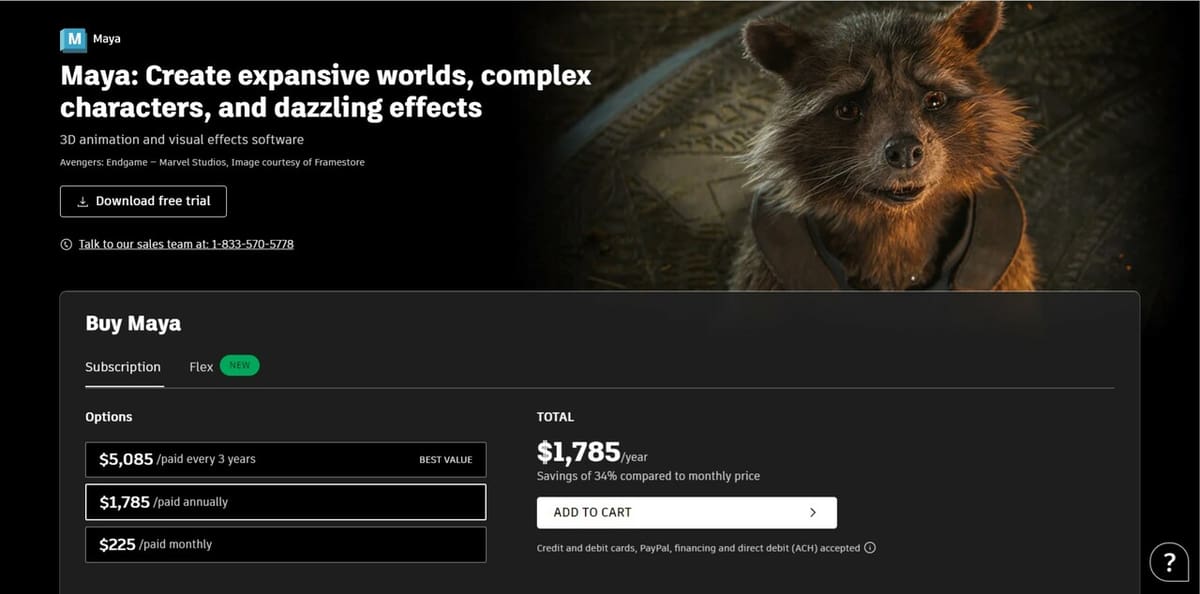
As far as software goes, Maya is rather complex, but learning to navigate and use it makes grasping other software easier. Not only is it great for getting your foot in the door with 3D graphics software but it can be downloaded for free with a student Autodesk account. Without an Autodesk student account, Maya will cost around $230 a month, $1,800 a year, or $5,100 for 3 years. Even if you’re starting from ground zero, having some experience with Fusion 360, SolidWorks, or Blender will give you a foundation of 3D modeling knowledge to build on.
If you’re intimidated by Maya but want to take your first steps toward learning this amazing software, this article’s for you. Here, we’ll teach you about the most common tools used for modeling in Maya.
What Is Maya?
Maya is a popular 3D computer graphics program used by both professionals and hobbyists alike. It is capable of animation, modeling, sculpting, simulation, and rendering realistic objects and characters, interactive scenes, and exciting effects. Maya can and is used by just about everyone, from game designers and 3D modelers to animators and VFX artists in franchises such as Lord of the Rings, Harry Potter, and Star Wars.
Since there’s so much that Maya can do, we’ve broken it into parts, starting with the installation and working our way through to useful tools, ending with a collection of resources and tutorials if you want to dive even deeper. In general, 3D modeling uses software to create three-dimensional objects such as buildings, machine parts, or characters for engineering, games, or animations. Usually, any given 3D modeling program might be geared toward only one of these professions, but as mentioned, Maya is capable of doing all of it.
There are a few other programs that are similar to Maya, such as Blender, 3ds Max, and ZBrush. Blender and Maya are quite similar, but Maya is supposedly more user-friendly. Some features in Maya, such as rendering and VFX, are more professional. Access to the programs themselves is also a point of difference: Blender is free while Maya has a price tag. ZBrush is one of, if not the most, popular and highly rated software used for digital modeling and sculpting. You’ll find the perpetual license for ZBrush to be nearly $1,000, while the monthly cost is about $30 – which is about seven times less than Maya’s monthly fee.
Now that we’ve covered the basics, let’s get started! We invite you to open up Maya yourself and follow along, as we explore the software.
Install
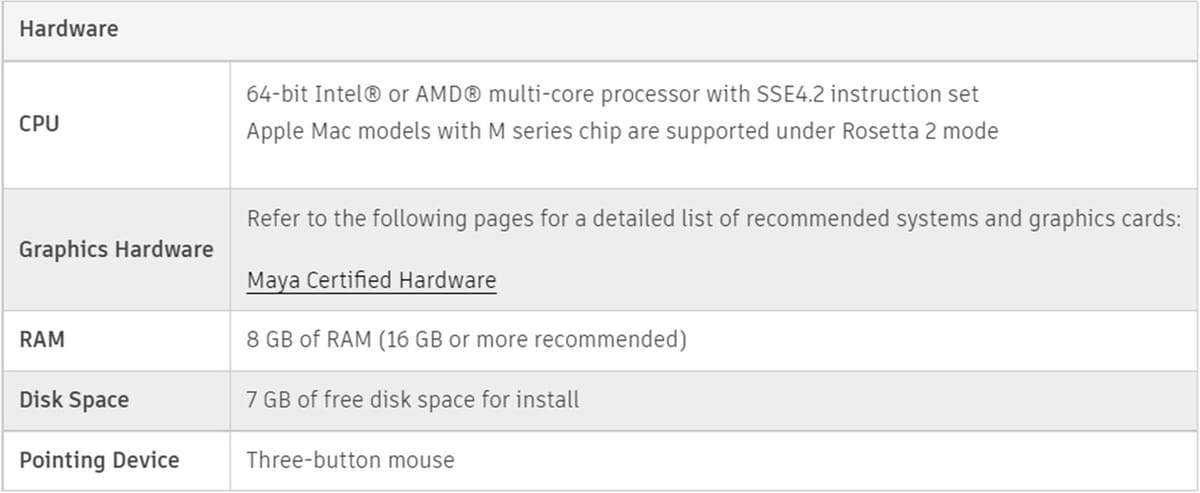
To install Maya, it’s best to have Windows 10, MacOS 10.13.x, or newer, with a minimum of 8 GB RAM, but more is recommended. A graphics card helps with rendering and having plenty of free space on your hard drive and a three-button mouse is the way to go – otherwise, you’d have to alter settings to get the same functionality and that will only be a hassle.
Downloading is as easy as going to the Autodesk website and signing up for a free trial, purchasing a subscription, or setting up a student account and downloading for your OS. Keep in mind that both of the free versions are only for personal, non-commercial use.
User Interface
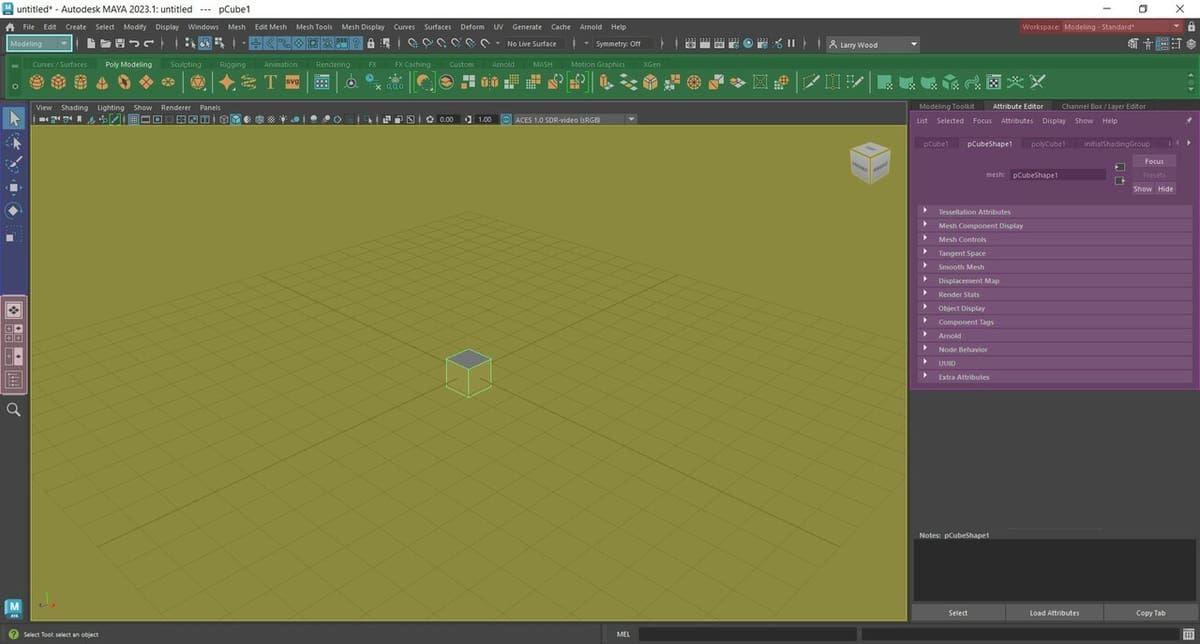
Once downloaded and opened, you can see that Maya’s interface has a wide selection of tools and View panels. At first, it can seem rather overwhelming with the sheer number of features and tools available in the main workspace, but we’ve broken the main components down below.
- Shelves (green): The shelf area is a customizable bar that contains tool icons for many of the most common tasks, and they’re organized into tabs based on various categories.
- View panel (yellow): The main view that the user sees when they start working, it’s your window that allows you to look around the scene that contains your model(s). It’s also known as the viewport.
- Menu sets (light blue): Based on this setting, Maya will show various menus, such as modeling or animation, that correspond with that mode.
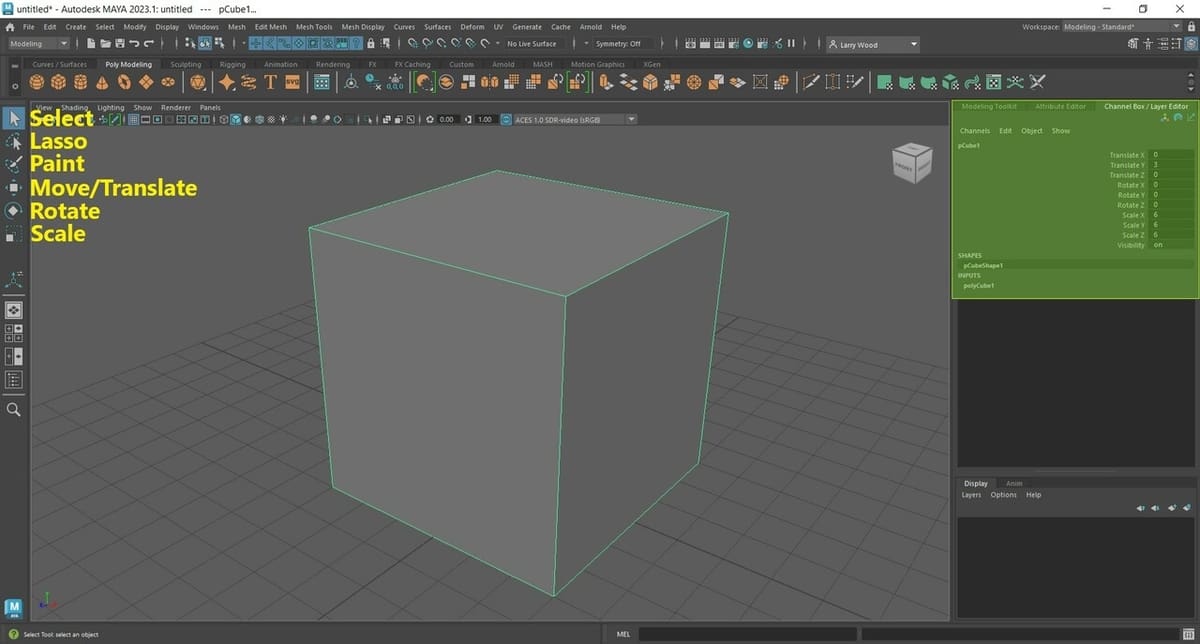
- Tool Box (dark blue): The Tool Box contains tools that are used all the time to select and transform objects in your scene. These are Select, Lasso, Paint, Move, Rotate, and Scale. We’ll cover these in greater detail later.
- Layout (light pink): Layout buttons can be used to change what’s shown in the main view; the default is a perspective view. You can quickly change the layouts with some buttons.
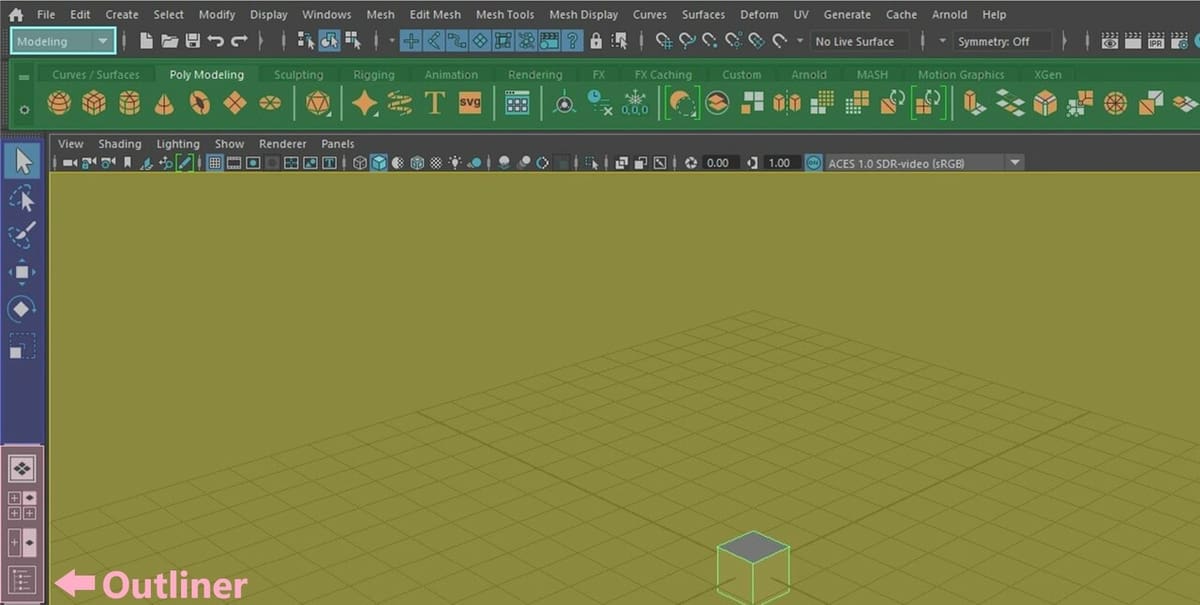
- Outliner (bottom button): One of the main scene management editors for Maya is the Outliner function, which shows a hierarchical list of all objects in the scene.
- Workspace selector (red): Here you can select a custom or predefined arrangement of windows and panels in your Workspace designed for your preferred workflow. The example above is Maya’s Modeling workspace.
- Attribute Editor (purple): This tab lists the attributes of selected objects. Tabs across the top of the Attribute Editor let you select nodes and further edit the object. This includes making adjustments such as the subdivision surface option for increasing the number of editable components.
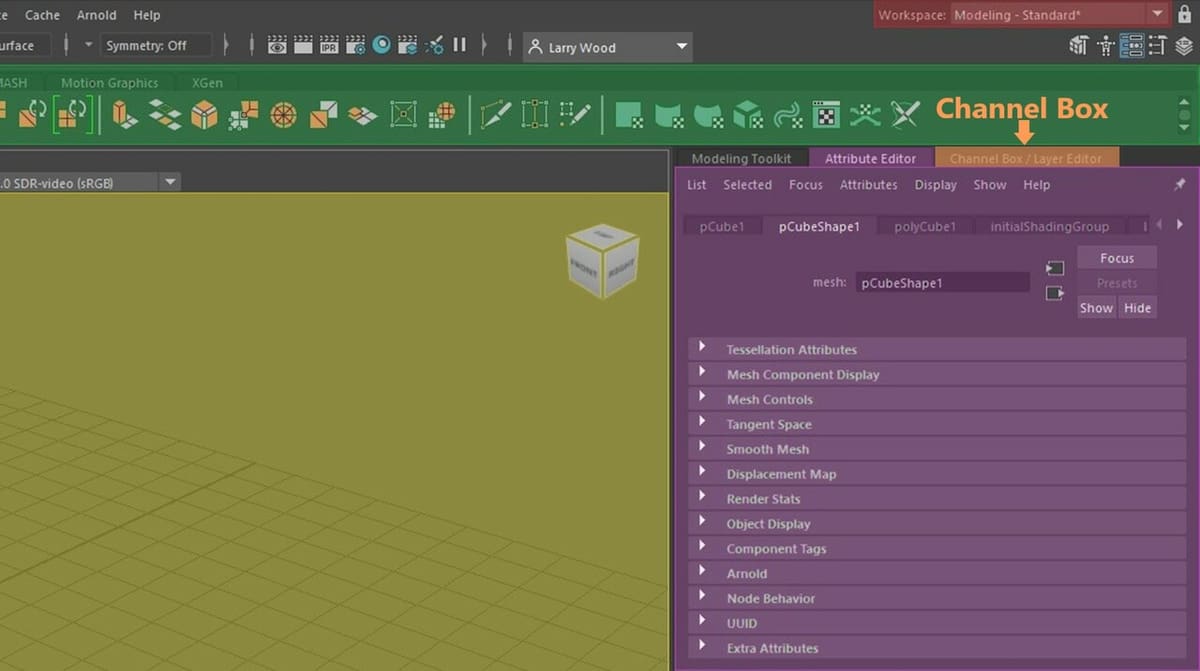
- Channel Box (orange): This panel lets you edit attributes and input specific values for selected objects. The default attributes are the ones that transform the object, but they can be edited to show any attributes you would rather have in the Channel Box.
Scene Navigation
Probably one of the most important abilities to learn right off the bat is how to navigate the viewport. As stated above, the viewport is like a window that you use to view and edit scenes and objects. It allows you to view the project at any angle, inside and outside objects, and toggle to other objects when needed. Below are the primary tools for using the viewport, involving a few keys and your mouse.
- Tumble (rotate): “Alt + left-click” and drag to rotate the scene about a selected object.
- Track (translate): “Alt + middle-click” and drag to freeze and shift the entire scene over in whatever direction you’re dragging.
- Dolly (zoom): “Alt + right-click” and drag, or scroll to zoom. With touchscreens, you can stretch and pinch two fingers to zoom in or out.
- Object Centering: Pressing the ‘F’ hotkey will center or frame the last selected object or component.
Using the tools above you can tumble, track, and dolly the scene to different points of view. If you zoom in enough you can even look inside an object and make edits from there. This is helpful with complicated or intricate designs where you may not have a good view from the outside. Be sure to occasionally focus on the model as a whole, or from a different view, when working on details to see the overall effects of your edits.
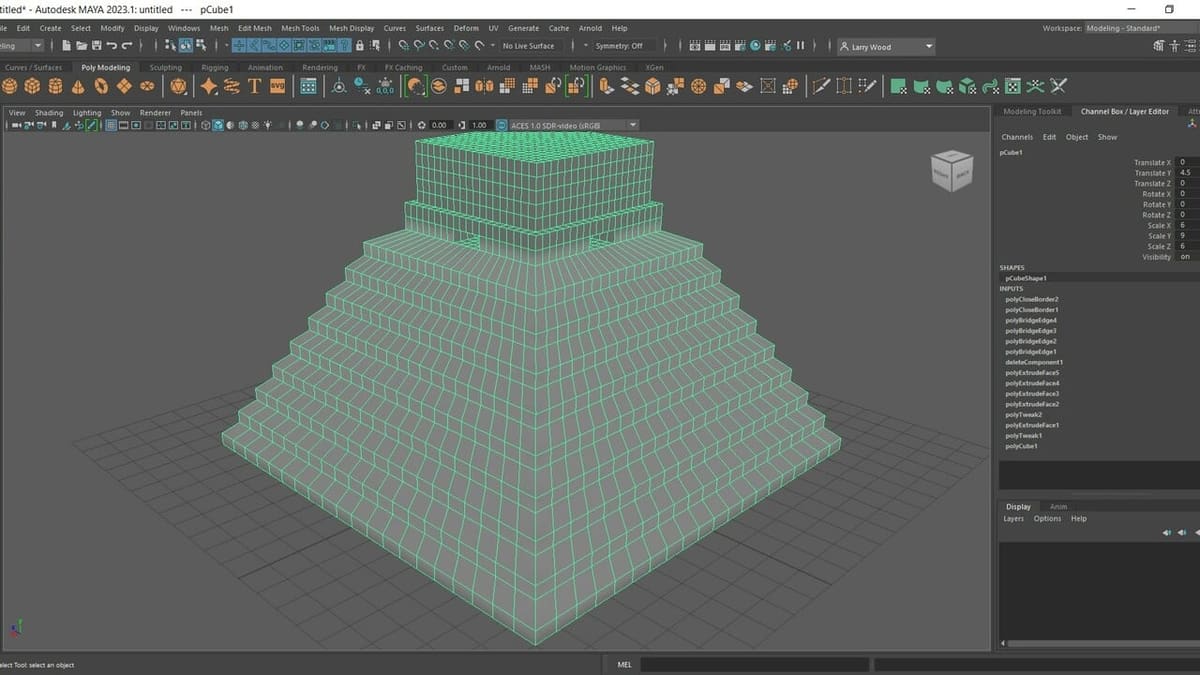
Now, being familiar with the user interface and how to move around, we can get started by inserting a 3D shape. In the tools shelf at the top left where there are a sphere, cube, cylinder, and cone icon, click on the cube polygon to automatically add a cube mesh to the center of the viewport. This is the first step toward creating characters and models with Maya!
Objects, Components & Their Modes
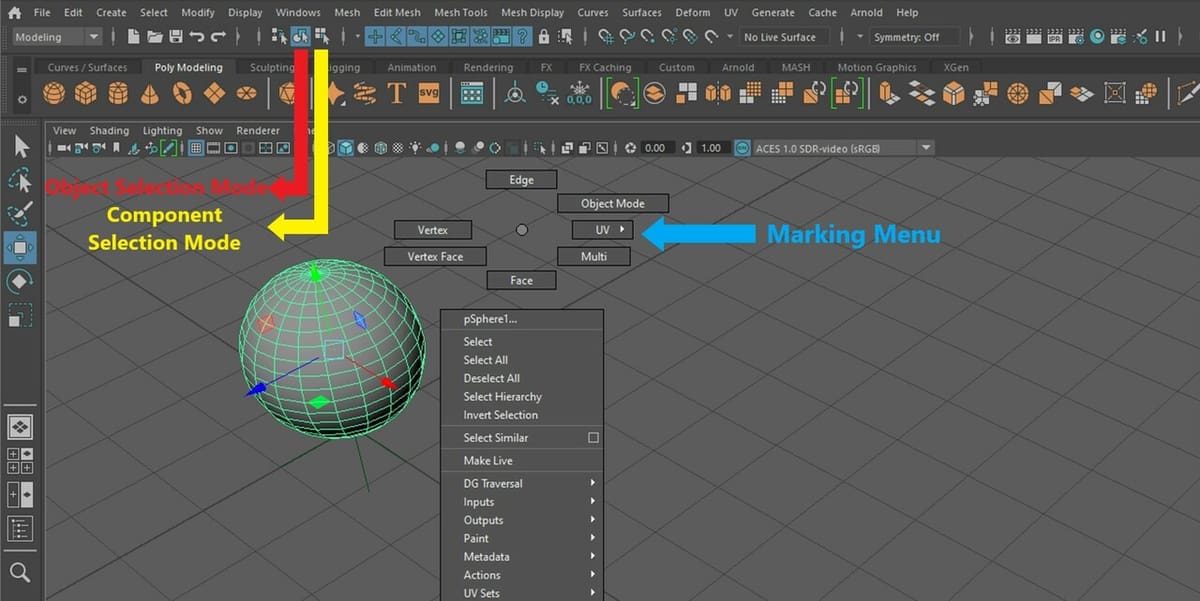
When a new object is created, it begins in the Object Selection Mode by default. This mode can be used for entire models or objects. To get another object back into this mode, click on the icon in the top toolbar, labeled above in red (it is a mouse pointer on top of a blue square, which is on top of a white circle). When selected, this mode turns the object green, meaning it can be moved or transformed as a whole.
The Component Selection Mode icon is labeled in yellow (the icon with three white squares, and one blue). This mode turns the object blue when selected and allows you to select and transform elements of an object, such as individual faces, edges, and vertices. These individual elements are also known as the “components” of the object. You can do some rough sculpting by clicking and dragging in this mode which is primarily used for cleaning up models.
You can swap between these two modes by pressing F8. You can also select a specific component, such as vertices with F9, edges with F10, and faces with F11. Another option for changing modes is pressing and holding the right mouse button. Doing so opens a marking menu of options, including vertex, edge, face, and object mode.
Object & Component Manipulation
Now that we can move around our working space and select objects, we can manipulate them. Manipulating objects and components is one of the core operations for modeling in Maya. Several of the tools are controlled similarly to scene navigation, but instead of moving the scene, these tools adjust the object or components. Many of these tools have hotkeys and learning them early on will help you to develop a strong workflow. Creating a “map” showcasing the most used hotkeys can help you learn and get used to using them.
- Select (mouse arrow icon): Used for selecting objects, vertices, faces, and others by clicking the left mouse button or using ‘Q’ as the hotkey.
- Lasso (mouse arrow icon with a dotted ellipsis): Used to select multiple objects, vertices, faces, and others by clicking and dragging the left mouse button to create a loop around them.
- Paint Selection (paintbrush icon): This lets you select components by clicking and dragging your cursor over them as if painting. Pressing ‘B’ and left-clicking and dragging up or down will adjust the paintbrush size.
- Move (square surrounded by triangles): To activate, press ‘W’ or select the move icon to drag selected objects or components to a different position in the scene.
- Rotate (arrow encircling the square): Pressing ‘E’ or selecting the rotate tool will let you rotate the object or components around the axes.
- Scale (square within dotted square icon): Adjusts an object’s or component’s size along an axis (by dragging along it) or as a whole (by dragging from the center). The hotkey is ‘R’ and the middle mouse button will automatically adjust whatever is selected.
- Channel Box (lime-green): Located in the top right corner under the lock icon, it allows you to translate, rotate, or scale selected objects by specific values.
While all components can be translated, only edges and faces can be rotated or scaled. Altering objects by scaling, translating, and deleting components can result in overlapping or missing faces, creating “impossible” shapes, or altering adjacent components in unexpected ways. Modeling isn’t always precise so many character designs are made with an artist’s eye, and mistakes will be made – but they can be fixed! (Don’t we all love “Ctrl + Z”?)
Useful Tools
We’ve now gone over the most basic tools. Now, we’ll go over tools for changing objects, such as combining or separating them in particular ways. Even with the tools below, there are still a great many we will have to leave out, but these are some important ones to try out first as you’re getting your bearings. You can find them in the tools shelf or, on the right side of the viewport, you can click on the “Modeling Toolkit” tab (instead of the Attribute Editor).
- Extrusion: Adds polygons to the existing mesh by telescoping polygon faces, edges, and vertices outwards. (Imagine the cylinder that is extruded from a toothpaste’s circular orifice.) The extrusion tool adds new components, which is different from the translate tool which simply pulls the face elsewhere.
- Extruded Cut: Just like the extrusion tool, but adds polygons to an existing mesh by telescoping polygon faces, edges, or vertices inwards instead of outwards. (The simplest example might be a drill, which removes a cylindrical portion from a material.) If the extrusion overlaps other components of the same model, it may create an impossible object.
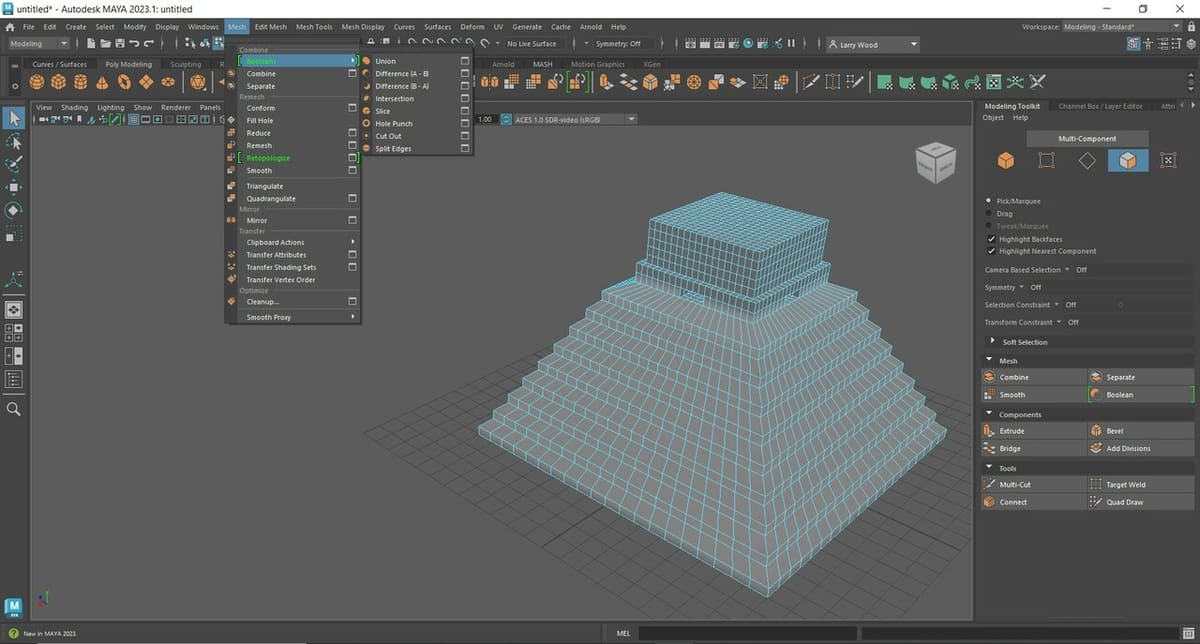
- Combine: As the name suggests, this is used to make two or more polygon meshes into one complete mesh. Overlapping sections are generally cut out or otherwise removed. Making complicated models can be simplified by creating smaller, easier objects and using the Combine tool to make the final model.
- Separate: The opposite of the Combine tool, the Separate tool can turn one mesh into two (or more) separate, editable, polygon meshes.
- Boolean: A useful option that can attach two objects or modify them about each other, such as deleting overlapping components. Without practice, the Boolean tool can be a bit unpredictable. We recommend trying out several configurations until you accomplish your goal, otherwise you might have more luck with simpler tools, such as Combine and Separate.
- Bridge: In the case of a hole in a mesh, you can create faces that bridge between one or more edges using the Bridge tool. To create such a face, two edges from the same polygon will need to be selected to have the face bridge across.
- Fill Hole: Similar to the Bridge tool, the Fill Hole tool will create a multi-sided face to fill an open area of a polygon mesh.
- Reduce: This lowers the number of polygons in an object’s mesh, decreasing its resolution. The Reduce tool is usually used when a mesh has too many components and can be edited more easily if there are fewer in the specific area.
- Smooth: The opposite of the Reduce tool, Smooth adds more components to a mesh to lower the sharpness of an object. Each pass of the Smooth tool will round the object and if the object can’t be any rounder, it will remove components or do nothing.
- Mirror: A handy tool if you want symmetry, the Mirror tool replicates any object across an axis.
Each of these tools can be found in the Mesh drop-down menu. Feel free to try each tool out to see how it works for your next project.
Resources & Tutorials
While in this article you’ve hopefully found the basics to get started with Maya, in case you want to learn more in-depth methods of modeling or you’re a visual learner, there are plenty of tutorials you can check out.
Additionally, there’s the official Maya Help site which has links to videos, support, and certification learning options. Other resources include Maya’s Learning YouTube channel, Area by Autodesk, and SimplyMaya for online training and community support. Above all, get started with a project, there’s no better way to learn Maya than by trying out the software!
License: The text of "3D Modeling with Maya: The Basics & Tools" by All3DP is licensed under a Creative Commons Attribution 4.0 International License.
CERTAIN CONTENT THAT APPEARS ON THIS SITE COMES FROM AMAZON. THIS CONTENT IS PROVIDED ‘AS IS’ AND IS SUBJECT TO CHANGE OR REMOVAL AT ANY TIME.