Einscan Pro 2X Plus Review: Value Pick 2020
Rating

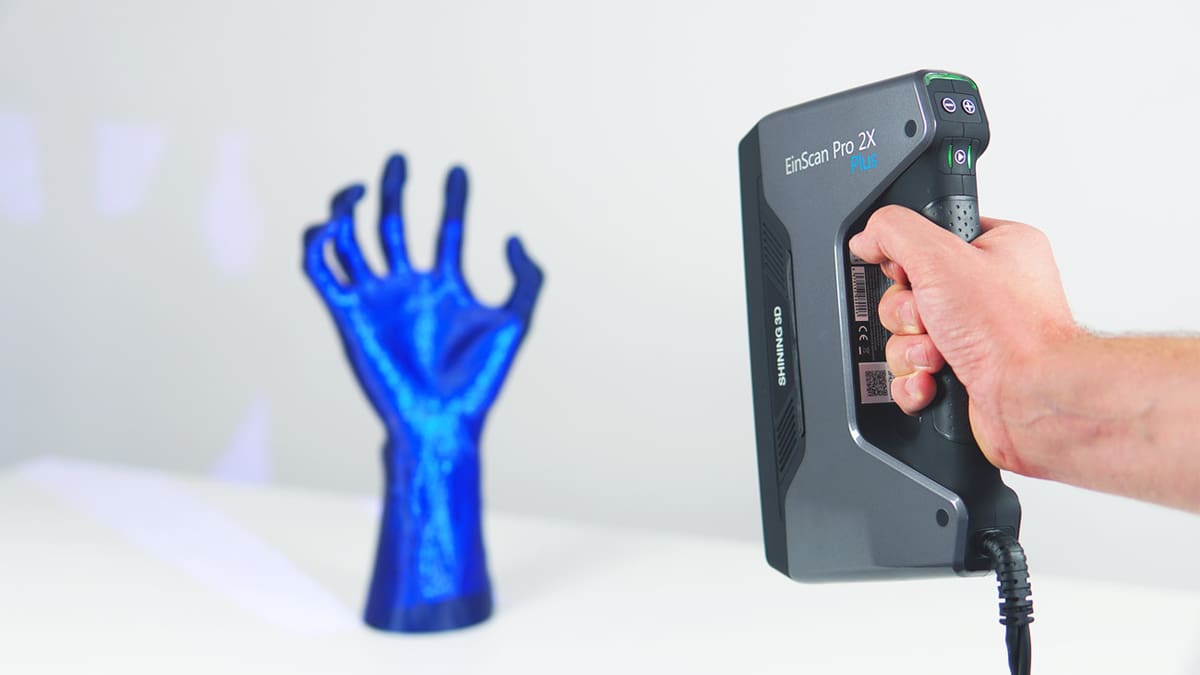
The Shining 3D Einscan Pro 2X Plus is our best value pick in summer 2020. Check out our full review to find out why.
Earlier this year, All3DP visited Shining 3D’s Stuttgart office to get to know more about its Einscan Pro 2X Plus 3D scanner.
The company is one of the pioneers responsible for the ongoing innovation in the field of 3D scanning technology. Founded in 2004, the 3D scanner manufacturer has become a tour de force on the global high-tech market, expanding outward from its roots in China and gaining a hefty presence in both North America and Europe.
Following in the footsteps of Shining 3D’s professional-grade 3D scanning product line, which includes the Einscan Pro and Einscan Pro+, is the Einscan Pro 2X Plus.
Priced around $8,500, this high-end 3D scanner is made for professional use, particularly for applications such as healthcare, education, design art, VR, and engineering.
Similar to the increasing affordability that has revolutionized the desktop 3D printer market, 3D scanning technology is undergoing a fresh transformation as these devices become easier to use, less expensive, and most importantly, more capable of capturing high-quality 3D images.
The Einscan Pro 2X Plus is one of these 3D scanners that — though not cheap — provides good value for money. Read on for our take of this impressive machine.
Verdict
Pros
- Scans extremely well
- Active community of users to share knowledge
- Reactive support from Shining 3D itself
- Very versatile — offers both handheld and fixed modes
- Pay for the features you need, don’t pay for the features you don’t need
- Price to quality ratio is good value
- ExScan Pro software is robust and straightforward
Cons
- The software does take up a lot of computer power. Be sure your computer is up to the task, and even when it is, be prepared to be patient
- Meshing software can miss the mark at times
- Like most scanners, it struggles with hair, shiny surfaces and also dark surfaces
This is an impressive machine. Simply put, it does what it’s supposed to do – and it does it well. The Einscan Pro 2X Plus picked up complicated geometries with relative ease, rendering them into its powerful ExScan Pro software. Using this scanner, we were able to reverse engineer parts with it – even a one-of-a-kind trophy – scan colleagues and more.
Where we did struggle occasionally was with the meshing software not filling in un-scanned areas correctly, however, if you’re using this in any kind of professional capacity, you’d likely finish the scan off in a CAD program after anyway. Other places where the scanner was less adept were, of course, shiny objects, some types of fabric, hair, lattice structures and the other standard structures 3D scanners typically find tricky. This is more an issue of the technology’s limitations than one with the Pro 2X Plus specifically though. And, of course, there are solutions around it.
Features
Compared to the original Einscan Pro 2X, the 2X Plus model offers better specs in certain areas, including quicker scanning speeds and improved accuracy.
The upgraded version provides a faster scanning speed for both Handheld HD mode (1,100,000 points/s) and Fixed Scan (Single Scan < 0.5s). The Einscan Pro 2X Plus also has a higher single scan range, point distance, and working distance, making it slightly more versatile than the basic 2X model. According to the spec sheet, the scanning accuracy remains the same between the two 3D scanners, as does the volumetric accuracy and depth of field.
The Einscan Pro 2X Plus is also compatible with the HD Prime Pack, which can not be used with the Pro 2X, but, enough about comparisons between this scanner and other models. Let’s dive into the features of the Pro 2X Plus.
Portable
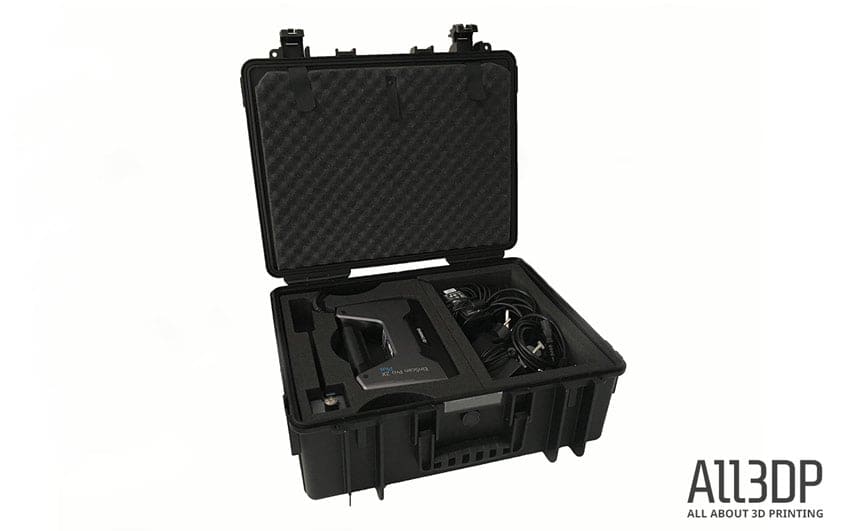
Similar to the other handheld 3D scanners designed by Shining 3D, the Einscan Pro 2X Plus is both lightweight and compact in size, making it portable and extremely versatile. Weighing in at just over 1 kg, you can take this 3D scanner just about anywhere, including outside (provided you bring along an umbrella), stretching the boundaries of what you can capture far beyond what a stationary system can offer.
Versatile
Because the scanner has three different modes: Handheld Rapid Scan, Handheld HD Scan, and Fixed Scan (both with or without a turntable), you’re relatively free in terms of what you can scan. This system is ideal for scanning small-to-medium-sized objects from 30 x 30 x 30 mm up to three or four meters in length. It also supports a range of alignment modes, including feature alignment, markers alignment, turntable coded targets alignment, and manual alignment.
Captures Detail
The Einscan Pro 2X Plus is adept at capturing fine details. When using the Fixed Scan mode, the scan accuracy is 0.04 mm. In Handheld Rapid Scan and Handheld HD Scan modes, the minimum point distance is up to 0.2 mm, which helps to generate high-resolution 3D data. You can also purchase the HD Prime Pack to increase speed and accuracy further.
Modular Design
With the Einscan Pro 2X Plus’ modular design, you can buy the tools you need, and not worry about paying more for features you won’t use. The scanner can be purchased along with a number of optional packs that can be added to enhance the 3D scanning experience. The Color Pack makes it possible to capture full-color textures alongside the object’s geometry. If you want to use a turntable and tripod to help automate the scanning process, you can do so by adding the Industrial Pack.
And, as mentioned, with HD Prime Pack, you can accelerate the scan speed by 30% and capture richer details. This add-on is ideal for applications like cultural heritage preservation, archiving, and restoration. Like the Einscan Pro model before it, Shining 3D has engineered the Einscan Pro 2X Plus to be modifiable depending on each user’s needs.
For the purpose of this review, we only used the Industrial Pack add-on and did not test out the Color Pack and HD Prime Pack.
Solid Documentation and Support
The folks at Shining 3D provide extremely thorough documentation for the Pro 2X Plus. The user guide takes you through all the processes and functions of the machine in a clear, easy to understand format. There are also videos that explain how some of the functions work and how to get your scanner up and running. The company also provides support itself, along with facilitating a Facebook group for owners called Einscan Experts, where the community helps each other out and shows off their scans.
ExScan Pro Software
Perhaps even more important than the new 3D scanner is the software behind it all. Shining 3D has developed ExScan Pro, a 3D scanning software with an intuitive user interface and workflow.
One of the paramount facets found in ExScan Pro is Operation Mode, a function that enables users to increase the speed of the scanning process during operation and set the resolution after that fact. It’s also compatible with a wide array of file formats, capable of outputting STL, OBJ, PLY, ASC, and P3.
Outside of the scanning software, Shining 3D has also collaborated with Siemens PLM Software to develop the Solid Edge SHINING 3D Edition software. We did not test this out in our review, but it’s equipped with some incredible design tools, including reverse engineering, generative design, convergent modeling, synchronous modeling, and simulation, fused with a versatile CAD tool all in one single platform.
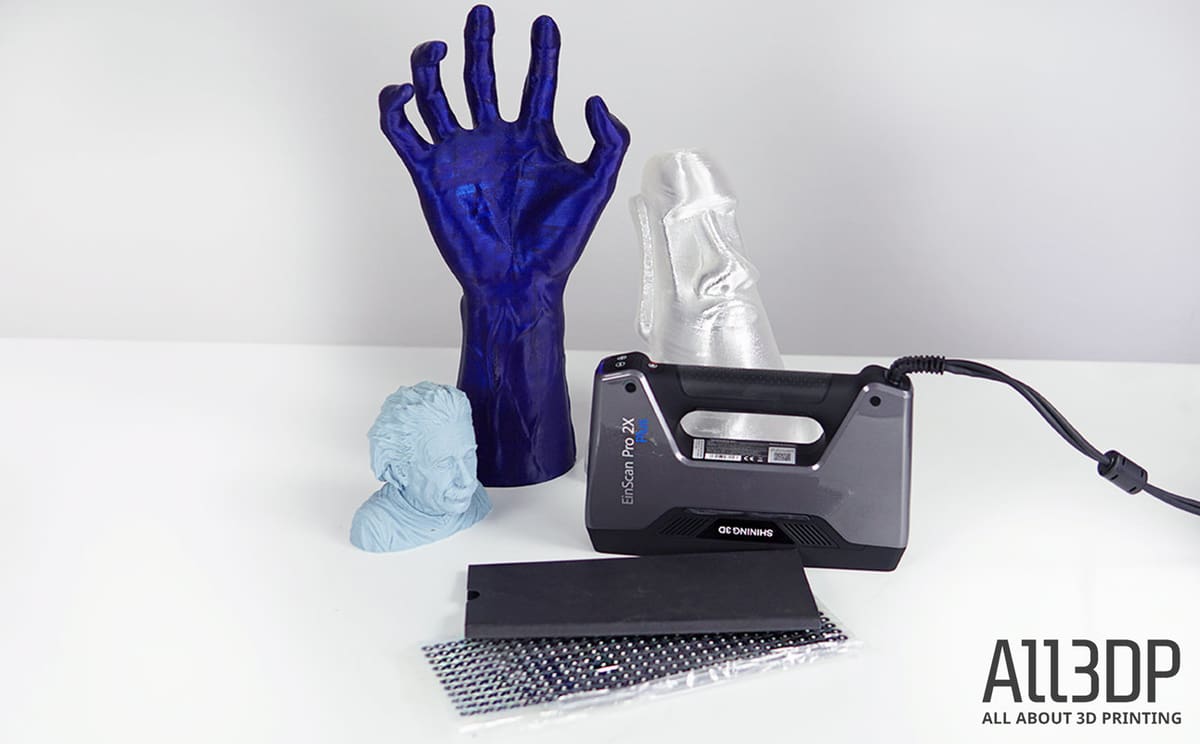
What It Comes With
Part of the beauty of the Einscan Pro 2X Plus is its modular design. If you need the scanner only to get the geometries of objects, and aren’t interested in the texture, you don’t need to buy the optional Color Pack. Similarly, if you don’t plan on scanning small, detailed objects, you probably won’t need to buy the Industrial Pack, which comes with a tripod and turntable. And lastly, if you’re not interested in collecting super high detail scans, you can skip the HD Prime Pack.
But, if you do need any combination of these abilities, you can purchase only what you need and can always upgrade your machine as the need arises.
Here’s what each of the packs come with:
Einscan Pro 2X Plus
- Scanner body
- Calibration board
- Calibration board support
- Power cable
- Power adapter
- Cable clip
- Marker remover
- Phone screen mount
- USB drive
- Dongle
Industrial Pack (optional)
- Turntable
- USB cable
- Power cable
- Power adapter
- Tripod
- Scanner head support
Color Pack (optional)
- Color module
HD Prime Pack (optional)
- HD prime module
Software
The Einscan Pro 2X Plus comes packaged with ExScan Pro, a software program that can output STL, OBJ, PLY, ASC, 3MF and P3 file formats. An Intel I7-8700 processor with an Nvidia GTX1060 or higher display card, over 4G of display memory and 32G or more memory storage (more on that in the tech specs) are recommended to run it.
Shining 3D says ExScan Pro is intended to greatly simplify the 3D scanning process. For the most part, it succeeds.
Pre-scanning
The software has a very clear interface that is easy to navigate and become familiar with, thanks to an option called “Help Mode”, which gives information on all the functions. If you run into major issues — which we did not during the course of this review — there’s also an option called “Teamviewer” which lets customer service remotely access your computer for online tech support.
ExScan Pro keeps you updated on helpful information, like when your last calibration was (and you, fortunately, don’t need to calibrate very often, though the process is simple, but more on that later), which device is connected, and which mode you’re scanning in.
Before you scan, you can either begin a new project or continue working on an older one. You then select how you want to align your scan, either by using markers, features or a hybrid of the two, then select whether you’d like a texture scan or a non-texture scan (if you have the texture camera plugged in).
You’re also able to select the detail and resolution you’d like. The higher the detail you want, the more time the scan will take and the more graphics card memory it will use up. This is something to keep in mind because if the amount of detail you need isn’t crucial, you’re better off reducing this to as low as possible.
Scanning
Once you start scanning, the software lets you pick the bright sensitivity and shows you the data you collect as you go. You can preview the scan before starting, and once you’re on your way, it also informs you if you’re too close or too far away from the object using a color scale from red to blue and if the tracking has been lost.
While scanning, you can still adjust the brightness with plus and minus buttons on the scanner if the camera image on the software is showing up as too dark or too light. You have the option to do as many pass-throughs as you need to collect all the necessary data. You’re able to remove unnecessary data each time.
When you scan with markers, these are handily shown in the software as red dots, while the green is the scan. Older scans of the same object are grey.
After each scan, you can select and deselect data to remove it.
We didn’t really run into this issue, however, if what your scanning is misaligned, the software also gives you the option to manually fix this by selecting a few points on the scan.
Once you’re happy with your work, you can generate point clouds. The software gives you an option to either prioritize speed or quality, with quality naturally taking up more time to complete. This is the one frustrating aspect of the software — certain functions can take a lot of time. This is, however, the nature of 3D scanning and can’t really be avoided.
Post-processing
Next, comes post-processing. Though ExScan Pro doesn’t have all the post-processing tools for your needs, it does offer a few that are super useful. You’re able to sharpen the scan, smooth it, simplify it so it uses up less data, fill the holes in the mesh manually or automatically have the software do it for you, and — if you used markers — have it automatically fill in those small circles.
You can also automatically upload your file to get it 3D printed by an external service, similar to Craftcloud. This is all part of streamlining the workflows within the software to require as little extra effort as possible.
Overall, the software is fairly easy to use and get accustomed to. The post-processing tools it offers are able to smooth out a number of imperfections that can crop up, but is still basic enough that you may need a more powerful post-processing program after.
If you’re using this for any type of professional purpose, it’s likely you’ll already have AutoCAD or another CAD software you’re familiar with that you can use in conjunction with ExScan Pro. However, depending on the complexity of the object you’re scanning and what you plan to do with it, it’s also possible the power of the scanner combined with the software will be enough for your needs.
Scanning
Scanning with the Einscan Pro 2X Plus, as mentioned, can come in three main forms.
In Handheld Rapid Scan mode, the scanner is capable of processing up to 1,500,000 points per second (30 fps). The Handheld HD Scan mode is a bit slower with processing, but the scanning accuracy is up to 0.05 mm and, lastly, Fixed Scan mode, which is used when the scanner is stationary and has accuracy of up to 0.04 mm.
Calibration
Calibration is very simple and you only have to recalibrate if you’re changing your scanning mode, if it becomes less accurate, if you’re plugging in the texture camera or if you’ve just subjected the machine to a bumpy ride. Other than that, it only needs to be calibrated once every 15 days.
To do so, the process is explained on the software in quick videos as you go from step to step. Essentially, you hold the scanner over the calibration board and pull it away upwards at a 90-degree angle five times, moving the board around each time. The whole procedure is clearly explained by the software as you do it — it guides you through the process – to make it seamless.
However, it’s not completely foolproof. It can fail if there are scratches on the board or if the lens isn’t clear, for example. And if you’re concerned about how well the scanner is picking data up — maybe you’re getting a lot of tracking lost notifications while scanning, you can run an accuracy test to make sure everything’s in tippy-top shape.
Markers
The Einscan Pro 2X Plus comes with a stack of markers that you can stick onto objects you’re scanning so the scanner knows where it is. This is an option instead of using just the features of an object. You have to use the markers for Handheld HD Scan mode, but they’re optional for the other modes. In the Handheld Rapid Scan mode you can also opt for a hybrid alignment that uses both features (for the areas where there are a lot of features) and markers (in the more plan parts).
The markers are easy to use, but very time consuming to peel off and stick on. You need to use a lot of them — more than you’d expect — so that there are always at least four in the camera at any one time.
Reflective Surfaces
Not every surface is easily scannable. For example, hair can be super tricky to get because it tends to be very shiny. Other reflective surfaces, like metals, are also tough. To get around this, there are a few sprays and coating materials you can dull them with
For hair, dry shampoo is a great option. We used this when scanning people to help the scanner pick up locks, but found we needed to use a lot, emphasis, a lot to get it to work. Even so, there never seemed to be enough.
Shining 3D also recommended a few other materials to reduce the shine of items, like Helling 3D Laser Scanning Spray, which is specifically designed for 3D scanning and is easy to remove.
However, not all surfaces can be easily sprayed down. The scanner was unable to scan the black felt bottom of a trophy because it just couldn’t pick it up. There are always workarounds, and in this case we taped some paper to the bottom, but then the tape showed up in the scan and the base wasn’t perfectly flat.
Scanning People
If you’re considering investing in this to scan people, it works, but it’s a little trickier given the fact that people move and their hair is shiny. All this makes it a little more time consuming to scan them over an object. We encountered a lot of notifications saying the tracking was lost, but there are ways to get around it — for example, by sticking markers on someone’s face and the back of their head (it’s not as easy as it sounds though).
Your subject has to stay extremely still, which is a difficult feat given the LED projector flashing in their face. Though the scanner is fast, it still takes some time to complete an entire scan of a head, so it’s not exactly the quickest process.
And, as mentioned earlier, dry shampoo is a must, though it is (temporarily) aging.

Once your subject is sufficiently sprayed down, the scanner should be able to pick up their hair. However, if you’re hoping to use a texture camera to do this, don’t buy the white color dry shampoo, but rather one that has a color (they come in blond, light brown and dark brown shades).
In order to really take advantage of the handheld scanning mode, Shining 3D recommends downloading the app AnyDesk to your phone for free and then syncing it to your PC. The 2X Plus comes with a handy phone screen mount you can hook onto the scanner itself so you can make sure everything is going smoothly without having to constantly look back and check your PC screen.
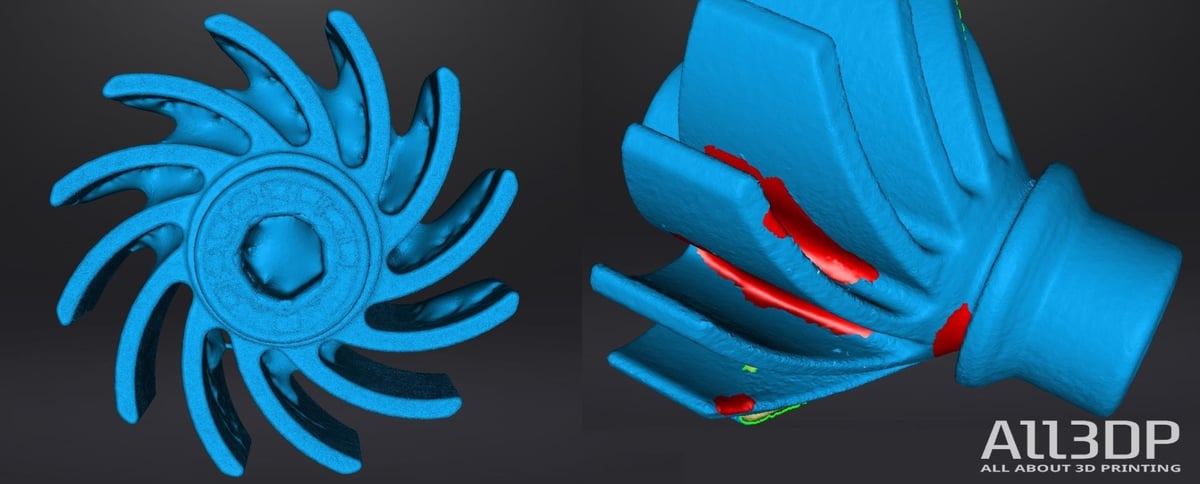
As you can see in the below scan, which has been meshed in the non-watertight mode, there are some areas that are missing. Unfortunately, the software wasn’t able to identify some of the places where there are holes, and instead thought they were intentional. You can see the areas that are fixable using the manual fill tool in green and the areas that have already been manually filled in red.
We found this tool to be useful, but not perfect. Though you can pick between three different fill options: Flat, Tangent and Curvature, they don’t always get the curvatures right. If you plan on doing some post-processing outside of the software, this is not an issue, but if you’re counting on it for all your needs, you may at times get frustrated by its limitations.
As you can also see from the image, in the Rapid Scan mode, the scanner also had trouble picking up the sweater material Matt was wearing. Depending on the fabric, and if you’re also planning on doing a texture scan, spritzing some dry shampoo on it may not be the best solution.
Scanning Objects
Similarly to the issues we had picking up Matt’s sweater, we also struggled with some objects that were very dark. In these cases, we just spritzed them down with dry shampoo and then had no further problems.
We especially enjoyed re-engineering parts, like the one pictured above. The scanner wasn’t able to pick up the original part (the black one) in Fixed Scan mode, but after spraying it with dry shampoo, it had no problem. We printed out the re-engineered part in PLA with no supports just to see how it compared in the flesh.
The results were impressive. Measuring the parts and comparing them to one another, we found a discrepancy of o.2 mm — the reengineered part was ever so slightly bigger.
Similarly, we also re-engineered this turbine-type part, which was originally printed in alumide. We did this in Fixed Scan mode as well. The scanner was not able to get into the deepest crevices of the object, nor could it get much data from the hollow center of it, however, with very careful adjustments we were able to make some of the creases better than others.
(We printed this in PLA on a Prusa MK3S, which is why it doesn’t have the perfect, smoothed edges of the original.)
To take this back a little, with the two options of scanning a watertight and non-watertight model, the non-watertight one was the way to go. The watertight model was a little too heavy-handed for this part, as you can see in the first picture below. Meanwhile, while using the Tangent setting to manually fill in holes, we were able to get some perfect tips. The ones that weren’t perfect unfortunately didn’t have enough data for the software.
Overall, however, scanning, though it could sometimes get a bit tedious for some of the more crevasse-y pieces, was very effective.
Final Thoughts
Put plainly, this is a really cool 3D scanner. It’s intuitive, it’s fun and it’s simply good at what it does. But more importantly, it offers professional workflows that streamline the entire process.
The modular design gives you the flexibility to only invest in the features you actually need, so you don’t waste money on features you’ll never use. The software itself is powerful and offers some post-processing tools that — though not perfect — can be sufficient depending on what you scan.
And, of course, the scanner itself is solid, easily sweeping over objects (and people!) with its LED projector, efficiently collecting data and churning it out into 3D form.
If you’re looking at a scanner for your business or workplace that offers professional workflows at a reasonable price, this machine may have everything you need.
Tech Specs
Depending on which mode is being used on the Shining 3D Einscan Pro 2X Plus, the capabilities of the 3D scanning system will differ significantly. Here’s a roundup of the technical specifications:
- Model: Shining 3D Einscan Pro 2X Plus
- Scan Modes: Handheld HD Scan, Handheld Rapid Scan, Fixed Scan with turntable/Fixed Scan without turntable (Industrial Pack Add-on Required)
- Scanning Accuracy
- Handheld HD Scan: up to 0.05 mm
- Handheld Rapid Scan: up to 0.01 mm
- Fixed Scan: 0.04 mm (single shot accuracy)
- Volumetric Accuracy: 0.3 mm/m (Markers Alignment)
- Scan Speed
- Handheld HD Scan: 20 fps; 1,100,000 points/s
- Handheld Rapid Scan: 30 fps; 1,500,000 points/s
- Fixed Scan: Single Scan < 0.5s
- Point Distance
- Handheld HD Scan: 0.2 mm-3 mm
- Handheld Rapid Scan: 0.25 mm-3 mm
- Fixed Scan: 0.24mm
- Single Scan Range: 208*136 mm——312*204 mm
- Depth of Field: ±100 mm
- Working Distance: 510 mm
- Light Source: LED
- Align Mode
- Handheld HD Scan: Markers Alignment
- Handheld Rapid Scan: Markers Alignment, Feature Alignment, Hybrid Alignment
- Fixed Scan (with turntable): Turntable Coded Targets, Feature, Markers, Manual Alignment
- Fixed Scan (without turntable): Markers, Feature, Manual Alignment
- Texture Scan
- Handheld HD Scan: No
- Handheld Rapid Scan: Yes (with Color Pack add-on)
- Fixed Scan: Yes (with Color Pack add-on)
- Outdoor Operation: Set up a shelter or cover to avoid direct sunlight
- Special Objects for Scanning: For the transparent, highly reflective or some dark objects, spray powder before scanning
- Printable Data Output: Able to export watertight 3D model for 3D printing
- Output Format: OBJ , STL , ASC , PLY , 3MF, P3
- Scan Body Weight: 1.13 kg
RECOMMENDED PC CONFIGURATION
- Processor: Intel I7-8700
- Display Card: Nvidia GTX1060 or higher
- Display Memory: >4G
- Memory Storage: 32G
- USB: At least one USB 3.0
- Screen Display: 1920 x 1080 DPI: 100%; 125%, 3840 x 2106 DPI: 100%, 200%
Where to Buy
You can request a quote for the EinScan Pro 2X Plus below.
Alternate Scanners
You may also be interested in the following 3D scanners:
Peel3D Peel 2
The Peel 2 may offer everything you need at a similar price point. This scanner is essentially Creaform’s old Go!Scan 50 and, priced at $7,490, it aims to hit that sweet spot of professional users along with hobbyists and creatives.


Artec Eva
If you’re looking for something a little more professional and established, with powerful software and a relatively accessible price point to boot, the Artec Eva may fit the bill. Though it came out in 2012, the Eva has stood the test of time, thanks mostly to the powerful Artec Studio software, which is constantly improving to give you full control over your data. However, keep in mind that due to its age, the Eva is a little clunky.

Artec Eva Lite
If you don’t need texture scanning capabilities, the Eva Lite is an excellent (and cost-conscious) alternative. It costs €7,000 (~$7,630 USD) less than the full-fledged Eva and at $9,800, it’s significantly cheaper, but with the same high-quality geometry capturing abilities. Plus, if you ever change your mind and decide you do want texture scanning, it’s an easy fix – just pay the difference between the Eva and Eva Lite and Artec will unblock the texture scanning capabilities.
Artec Leo
In terms of specs, the Artec Leo is very similar to the Eva, with one big difference: it offers complete wireless functionality and onboard processing, effectively removing a laptop or computer from the equation. This gives you complete scanning freedom with no wires tethering you to a workstation. The Leo also improves upon its predecessor with such features as 2.3 mp HDR color textures, constructing models at 80 frames per second with a data acquisition speed of 4-million points per second and a 173,000 cm-cubed capture zone.

Creaform Go!Scan Spark
The Creaform Go!Scan Spark is designed for all kinds of tasks, from reverse engineering, prototyping, and VR to quality control, maintenance, digital archiving, and inspection. At just shy of 35,000€ (~ $37,960 USD), the Spark isn’t cheap, but if you’re looking for a scanner that you can rely on for professional and industrial use, it’s certainly worth considering.

License: The text of "Einscan Pro 2X Plus Review: Value Pick 2020" by All3DP Pro is licensed under a Creative Commons Attribution 4.0 International License.
CERTAIN CONTENT THAT APPEARS ON THIS SITE COMES FROM AMAZON. THIS CONTENT IS PROVIDED ‘AS IS’ AND IS SUBJECT TO CHANGE OR REMOVAL AT ANY TIME.