Enhancing an old workhorse with the E3D Ultimaker 2 Extrusion Upgrade Kit is a tantalising prospect. Read our detailed test and review.
Don’t Miss:
The Ultimaker 2 has long been one of the best fused filament fabrication (FFF) 3D printers available, but now its been superseded by the Ultimaker 3. The old single head design is looking decidedly dated.
Despite being an ageing printer, the Ultimaker 2 still has an excellent reputation, and it’s easy to see why with its superb print quality and filament support. The only real issue is that hardware customization options are very limited. In the past this hasn’t been a problem, but now with the latest materials this inability to swap nozzles can drastically limit the use of the printer.
The potential to modernize the Ultimaker 2 is obvious and has of course been done with the 2+ update and upgrade. But the guys at E3D have also seen room for improvement and developed their own UM2 extrusion upgrade kit.
You may already be aware that there is already an upgrade kit from Ultimaker for the Ultimaker 2, and it covers many of the updates that the E3D upgrade offers. The upgrade from Ultimaker directly updates the machine to the Ultimaker 2+ and is designed for the Standard and Extended versions.
The upgrade has all of the 2+ benefits but comes in a substantial cost, so E3D have produced their own solution that promises to match the quality and extend the functionality — and all for a fraction of the cost.
E3D Ultimaker 2 Extrusion Upgrade Kit Review: Pros
- Vast range of interchangeable nozzles and sizes
- Easily replaceable parts
- Excellent extruder
- Greater hotend temperature
- Kits for 1.75mm or 2.85mm filament
E3D Ultimaker 2 Extrusion Upgrade Kit Review: Cons
- Takes a few hours to fit and update firmware
- Customised profiles required for all filaments
- Cura software require setup for each change in quality
- Designed for intermediate and advanced users only
E3D Ultimaker 2 Extrusion Upgrade Kit Review: Verdict
The new kit is aimed at the intermediate to advanced user and will provide UM2 and UM2 Extended owners the ability to upgrade their old machines with a new extrusion system. The benefits of the kit once installed on a UM2 are significant, with the ability to swap and change nozzle sizes, and increased print speeds. The kit also features an extruder that all but stops filament slip
For UM2+ and 2+ Extended users the advantages are less obvious. The + upgrade already incorporates interchangeable nozzles and a much improved extruder anyway. However the Ultimaker upgrade for UM2 owners costs £359 plus VAT, which is more than double that of the E3D upgrade. The price difference will make this kit very appealing.
Installing the new hotend, extruder and swapping over the wiring is all easy enough as long as you have some previous experience, and the set-up from beginning to end should take no more than a couple of hours. There’s also a handy guide online that walks you through each stage of the upgrade from the hardware installation to the software updates and configuration.
Creating a system that is as good if not better than the original is certainly a challenge, but E3D’s UM2 extrusion upgrade kit is exactly that. It doesn’t just aim to match the print quality of the original extrusion system, but pushes the quality and the ability of the printer further. The kit also offers you a few more options as E3D have also developed two versions; 2.85mm (as you’d expect) and 1.75mm.
The kit is an obvious purchase for UM2 owners but not so much for UM2+. Unless you need the volcanic hotend temperatures supplied by the V6.1, these are rated at some 40º higher than the original, or you want to swap to a 1.75mm filament system.
Once completed, the E3D upgrade does require a little more tinkering than Ultimaker’s 2+ upgrade, so if you liked the plug-and-play nature of the UM2 and the quick select options for materials and print quality settings then this upgrade might not be for you.
If you’re confident enough to dismantle your Ultimaker 2, then the long term rewards of the E3D Ultimate Extrusion Upgrade for Ultimaker 2 are definitely worth it.
E3D Ultimaker 2 Extrusion Upgrade Kit Review: The Long Read
E3D has grown fast — even in terms of other 3D printing companies — and was started by two technology teachers and a nuclear engineer just three years ago.
Since then the company has evolved at speed; leaving the Isle of Wight where it was first formed and moving to far more impressive premise in Oxfordshire. It has also gone from a core of three to a growing staff of 25.
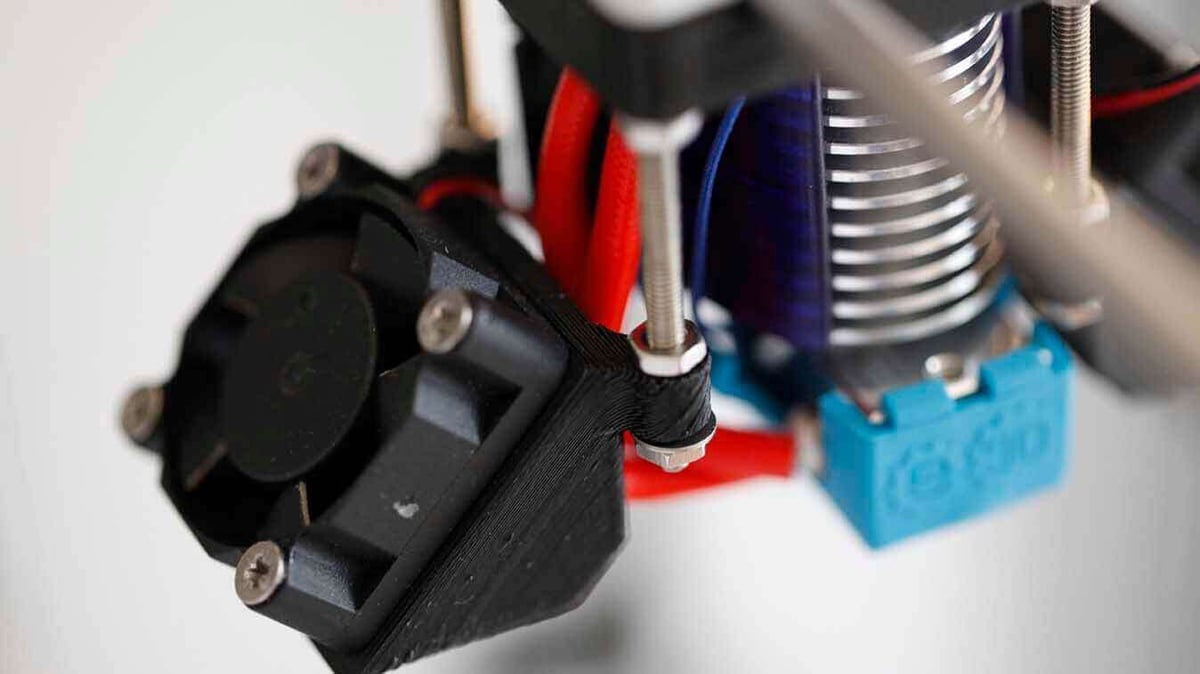
The V5 was the hotend that changed things for the company, and its success was quickly followed by the E3D-V6, the V6.1 is the hotend used in this E3D Ultimaker 2 Extrusion Upgrade kit.
Showing just how far the company has come in a short time, Prusa Research have now opted to supply every new MK2 machine with the E3D-V6 hotend. And it looks like more manufacturers are set to do the same in the near future.
The E3D V6 Hotend has a proven track record and is equally matched in this kit by the company’s Titan extruder.
E3D Ultimaker 2 Extrusion Upgrade Kit Review: Design and Features
One of the big reasons to upgrade the Ultimaker 2 extrusion system is the ability to swap the nozzles, and this kit is supplied with a good selection. As well as those in the box you can also purchase additional specialist nozzles from the E3D website, like hardened steel so you can take advantage of the latest Carbon fill materials.
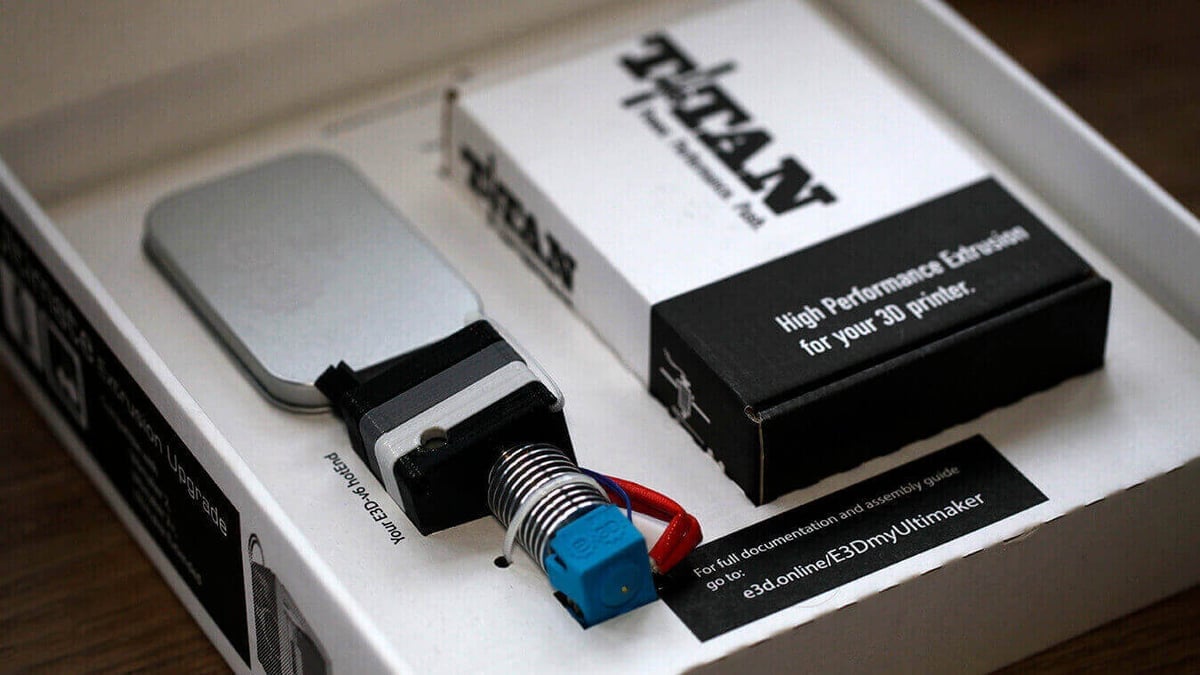
The kit itself includes the Titan Extruder and E3D V6.1 Hotend and arrives with everything you need to get started, including the 0.4mm nozzle already installed. Alongside the standard nozzle is a small tin that contains six further nozzle options — 0.25mm, 0.3mm. 0.35mm, 0.5mm, 0.6mm and 0.8mm — giving you plenty of flexibility over the control of both quality and speed once installed.
When it comes to filaments, the V6.1 is compatible with a huge range, in part due to the ability to swap nozzles but also due to the incredible temperature range which sees a top temperature above 300º. On the E3D site they actually quote that the hotend is compatible with any 3D filament you can find, and will reach temperatures of 300º and above.
The other option that will appeal to many is a 1.75mm kit. This is a different kit to the 2.85mm and doesn’t mean that you can simply swap between filament diameters, but it’s there for those who want to.
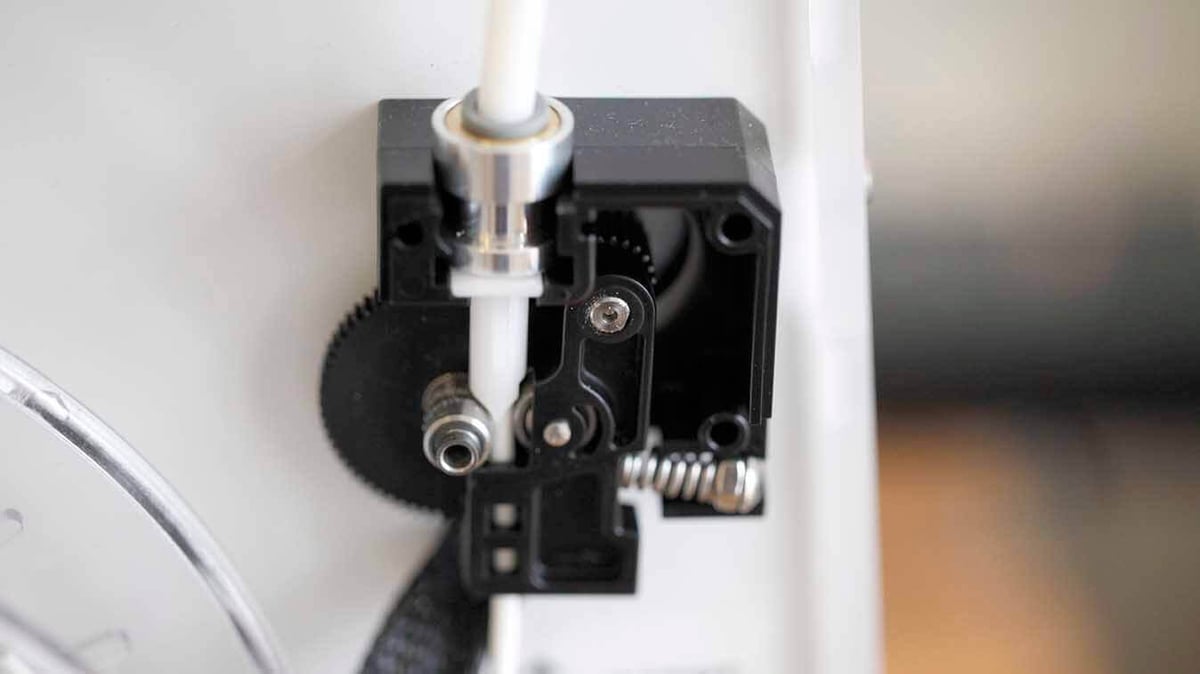
In the box along along with the V6.1 is the Titan extruder; for anyone used to the standard Ultimaker 2 extruder the difference between the original and the Titan is huge, in as far as it will actually grip every material you feed it without the need for adjustment.
E3D Ultimaker 2 Extrusion Upgrade Kit Review: Unboxing and Setup
Getting started with the kit requires a good couple of hours for installation and testing. To help you along the way there’s a full online step-by-step guide of the process, along with a video to walk you through.
Overall the guide is clear enough and directs you in the right way. Some of the steps feature photos to show you where connectors should fit; some of these images aren’t as clear as they could be, but in the end it does all make sense.
Following the steps you start with the hotend replacement. This is a quick straightforward swap and replace, with the new assembly borrowing the fans and bearings from the old head. Once in place, the four longs screws around the fan mounts can be adjusted to make sure the flow of air across the print is correct. And this can obviously be adjusted at any point after the installation if it needs a tweak.
As the nozzle is being installed, it’s important that attention is paid to its orientation, especially as the heatsink fan is being installed. At times this part of the assembly can get a little fiddly, but as long as you have enough space and some good light it’s all easy enough.
With the hotend in place it’s now time to install the Titan extruder on the back of the printer. Again, once the stepper casing is removed from the inside of the printer, the new motor and extruder assemble is simply slotted in place and bolted on tight. The only adjustment you’ll need to make is to the tensioner once the filaments in place.
Finally, it’s on to the cables and electronics and this were things do start to get a little complicated, especially if you’re not experienced with tinkering.
This process requires that you strip out the old wiring for the hotend and extruder and replace it with the new. This all starts with flipping the printer onto its side and releasing the protective plate over the control board. Once done you unbolt the four screws to release the board, and once free you can then access all the connectors.
The guide shows you exactly where all the new connectors go, but it’s not just a simple case of swapping the old cables out for the new. Some such as the heatsink cables link to connectors that were previously unused. After disconnecting the wires and before connecting the new, you need to carefully re-route all the wires before routing in the new.
Reconnecting needs to be done as neatly as possible, especially when it comes to the cable layout as once you start to reinstall covers the space becomes pretty tight.
Installed and back together, its time to prime the new system. This requires that the UM2 is flashed with the new firmware from E3D. Again, instructions on where to get the firmware file and how to install are all clearly laid out in the online guide. Quite simply, the firmware is installed by connecting the Ultimaker 2 to your computer and downloading through an option in the Cura software; all very straightforward.
Once done you can then run the SpoolWorlks Edge filament test sample through the printer to make sure that everything is installed and setup correctly. The Edge filament has its own profile that again needs to be downloaded and quickly run through the printer.
As when using any software other than Cura with the Ultimaker, you need to confirm that you’re using your own settings rather than Cura’s own before you print.
Once you’ve finished with the Edge sample you’re free to print whatever materials you wish.
E3D Ultimaker 2 Extrusion Upgrade Kit Review: Filament
E3D have been producing a decent range of hotends and nozzles for a few years, and now produce their own SpoolWorks filament range. It really comes as no surprise that the upgrade kit ships with a small amount of the Edge filament so you can give it a go when testing the calibration of the new system.
What E3D have also done is to produce two versions of the upgrade kit and this is where it gets really interesting for many users. Ultimaker’s series of printers have always traditionally been 2.85mm filament compatible, so this option will appeal to some who prefer the characteristics of a 1.75mm system.
E3D are going to be shipping both a 2.85mm and 1.75mm upgrade kit, so if you want to make the swap to 1.75mm filaments then you can. This is something that of course isn’t an option with the official upgrade.
The other significant advantage when it comes to filaments is that the nozzle is swappable. You can happily use some of the latest more advanced materials in your machine without the worry of the nozzle getting damaged and requiring an expensive repair. Now a new nozzle can be purchased and installed as needed.
E3D Ultimaker 2 Extrusion Upgrade Kit Review: Performance
Once the upgrade kit is installed and ready to go, you quickly realize that the upgraded Ultimaker is very different from the original.
Primarily, the biggest difference is in the quality of the Titan Extruder. It works every time, gripping all filaments we threw at it and never shredding, slipping or shearing. It just does exactly what an extruder is supposed to do. Adjustment of the tension bolt is extremely easy as well, although during our test the initial setup seemed to be spot on so no adjustment was required.
The E3D V6.1 hotend — as with the extruder — already has a proven track record. So really, not a surprise that the two work in tandem exceptionally well, producing decent prints and increasing the overall print success rate over the original.
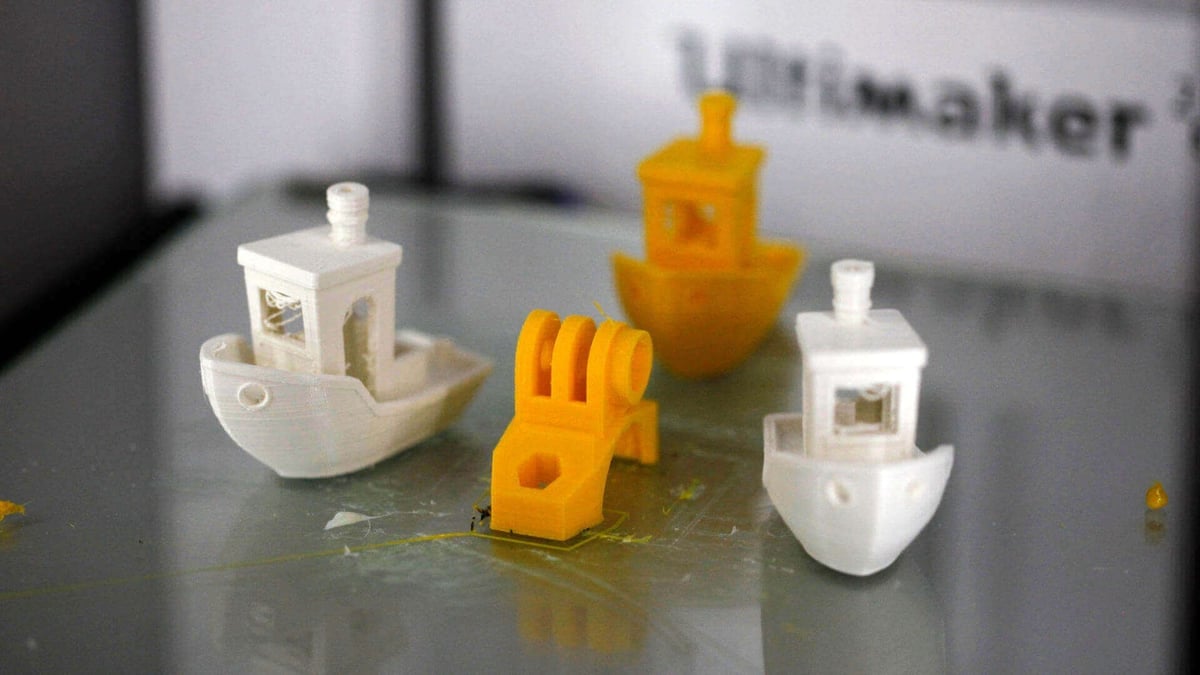
In our test we ran a variety of materials through the 0.4mm, 0.25mm and 0.6mm nozzles. They all had the same reliability and pleasing quality and speed, especially from the 0.6mm nozzle. In all cases the flow of material was excellent, and there were no problems with blockages, build-up, over-or-under heating of the filament itself.
Although the quality of the prints is good, however, don’t expect any real increase in quality of the final print when compared with the standard Ultimaker system. What you’re getting is reliability and the flexibility to change nozzle diameters and increase the hotend temperature beyond 260º when needed.
E3D Ultimaker 2 Extrusion Upgrade Kit Review: Software
The biggest difference is the ease of use is with Cura and filament support. Whereas the Ultimaker ecosystem is fully integrated with the Cura software, the upgrade kit requires a little software tinkering with the print settings to get things right.
Firstly in Cura itself you need to adjust the different print quality settings, because the quick quality selection won’t get you the best results. But after a short time customizing Cura, you should find yourself back to the usual easy workflow that you originally had.
Likewise on the printer itself when it comes to loading filaments, each must be setup as a new filament type. This is because, again, the standard settings will all be slightly out for the new system. Therefore unlike the previous quick selection of PLA and ABS, you’ll need to configure Custom 1, Custom 2 etc. But again as with Cura once you have these setup then it’s no real hardship.
If you prefer to use Simplfy3D, then the whole print process becomes a little more tricky and you’ll need to experiment extensively to get a decent print. In our test we stuck with using Cura.
E3D Ultimaker 2 Extrusion Upgrade Kit Review: Conclusion
After installing and using the E3D Ultimaker 2 Extrusion Upgrade Kit, it’s easy to see why it exists. The UM2 is one of the world’s best selling and best performing 3D printers. Although it went through an upgrade to the UM2+, there are still many UM2 units out there that are perfectly primed for this update.
When it comes to making the choice between the E3D upgrade and Ultimaker’s own, then it really comes down to the type of maker you are. The official upgrade costs almost double the amount of the E3D version, and is fully integrated with the Ultimaker ecosystem. The E3D version is cheaper and gives you a few more options, but requires manual software adjustment and set-up. When it comes to the end results there’s very little in it either way.
The quality of the hotend and extruder are excellent, and it’s easy to see why E3D has made such universal inroads across the 3D printing industry. The kit itself is nicely set out, and as long as you enjoy a bit of hands on with the inner workings of your 3D printer then the actual fitting of the kit isn’t too much of a challenge. Most of the time taken during installation is running the firmware update and making sure that you setup your filament profiles and quality settings rather than actually installing and configuring the hardware.
When it comes to the hardware, the quality of parts is excellent — with the head block being 3D printed just for good measure. When this is fitted we did find that it was important to check that the 3D printed parts sat together perfectly, as any flash of plastic that prevented a perfect fit would affect the smooth motion of the head across the X / Y axis.
As when building any printer, a quick check by gently moving the head back and forth along each axis quickly highlights any sticking points which can then normally be easily resolved.
Aside from some slightly fiddly bits with cables, and the odd shim and washer, the rest of the installation process is straightforward and should be achievable by anyone with a basic knowledge of tinkering.
Both the E3D and UM2+ upgrades will produce prints of similar quality. So really, although with the E3D upgrade you need to setup custom profiles and settings as an overall solution, it would seem an obvious and well-priced choice for breathing new life into your UM2.
If you have an UM2 or 2 Extended then the E3D Extrusion Upgrade kit will enhance the performance of your machine and at a fraction of the cost of UM2+ upgrade option. If you own an UM2+ or 2+ Extended then the upgrade benefits are limited and will really only appeal if you need the extra hotend temperature, want to swap to 1.7mm filament, or you need a cheaper replacement.
License: The text of "E3D Ultimaker 2 Extrusion Upgrade Kit Review: The Ultimate Ultimaker 2 Upgrade?" by All3DP is licensed under a Creative Commons Attribution 4.0 International License.