3D Printing Architecture Models – A Beginner’s Guide

3D printing architecture models have become an interesting alternative. Learn how to easily 3D print your architectural models.
Model building has helped architects represent their projects for as long as we can think. The initial draft is transferred into a scaled architectural model.
Typically, architectural models are made of cardboard, wood or other moldable materials. Architects need models to study the aspects of their design. It is often changed in order to get a perfect concept of their idea. Whether it is just an ad-hoc model or a fully developed project, all this can be displayed with a 3D printer. Due to the stored files, it is possible to change digital structures easily and print the model again. Also, the architect can convince his customer thanks with a faultless and precise model.
You can alter your digital model, try out variations on the fly and visualize problems easily. Once you start designing in the digital domain, the benefits of 3D architectural models are pretty clear:
- save time and effort, thanks to pre-scaled models
- build more accurate models with homogeneous surface structures
- produce a cost-effective model
- create complex designs
Whether you’re a student, working on your own or have an office with 20 assistants, 3D printing can definitely increase your productivity and lower the cost of material. By the way, most materials used in 3D printers are recyclable, so you don’t have to worry too much about the environment if you use PLA or PET instead of ABS filament.
The following tutorial will guide you through the process of 3D printing architectural models. Without getting out your model-building material, you’ll be able to quickly visualize your idea. It will definitely be more laid back than building your model by hand. Please be advised, that 3D printing an architectural model takes on average around 3-9 hours. The most complicated part is to get the architectural models converted for 3D printing – but we got you covered here.
The beauty of 3D printing is: You don’t even have to own a 3D printer to get to a great architecture model – you can always resort to 3D printing services (get the best price here).
The most complicated part is to get the architectural models converted for 3D printing – but we got you covered here.
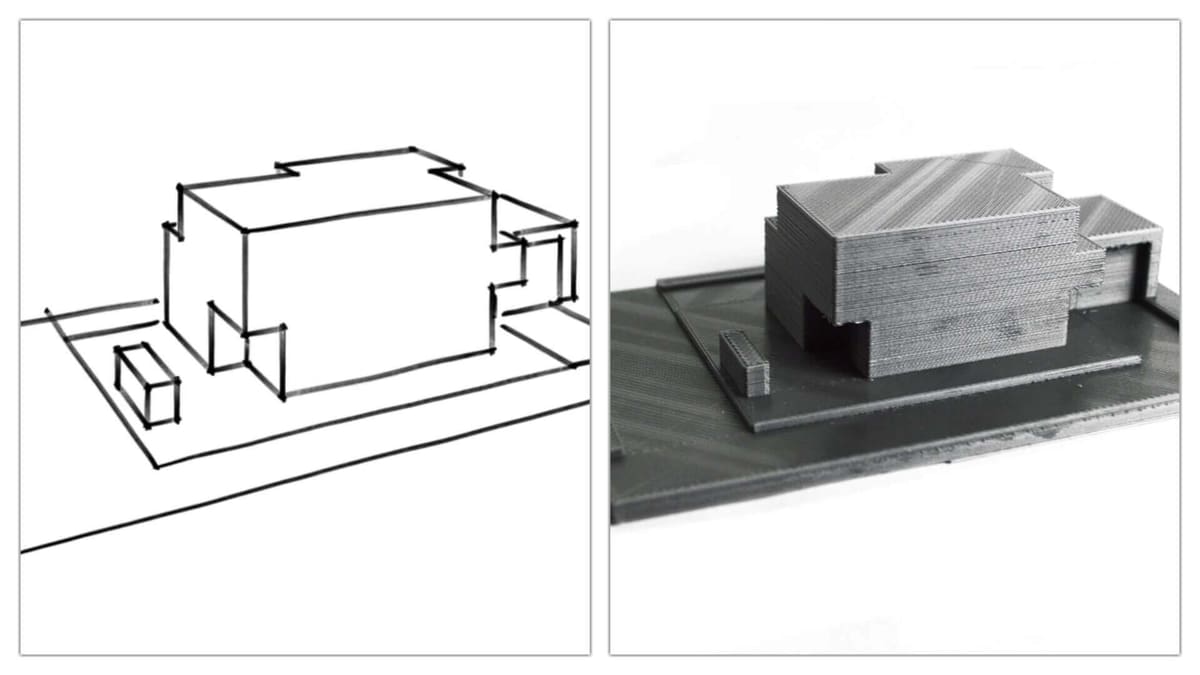
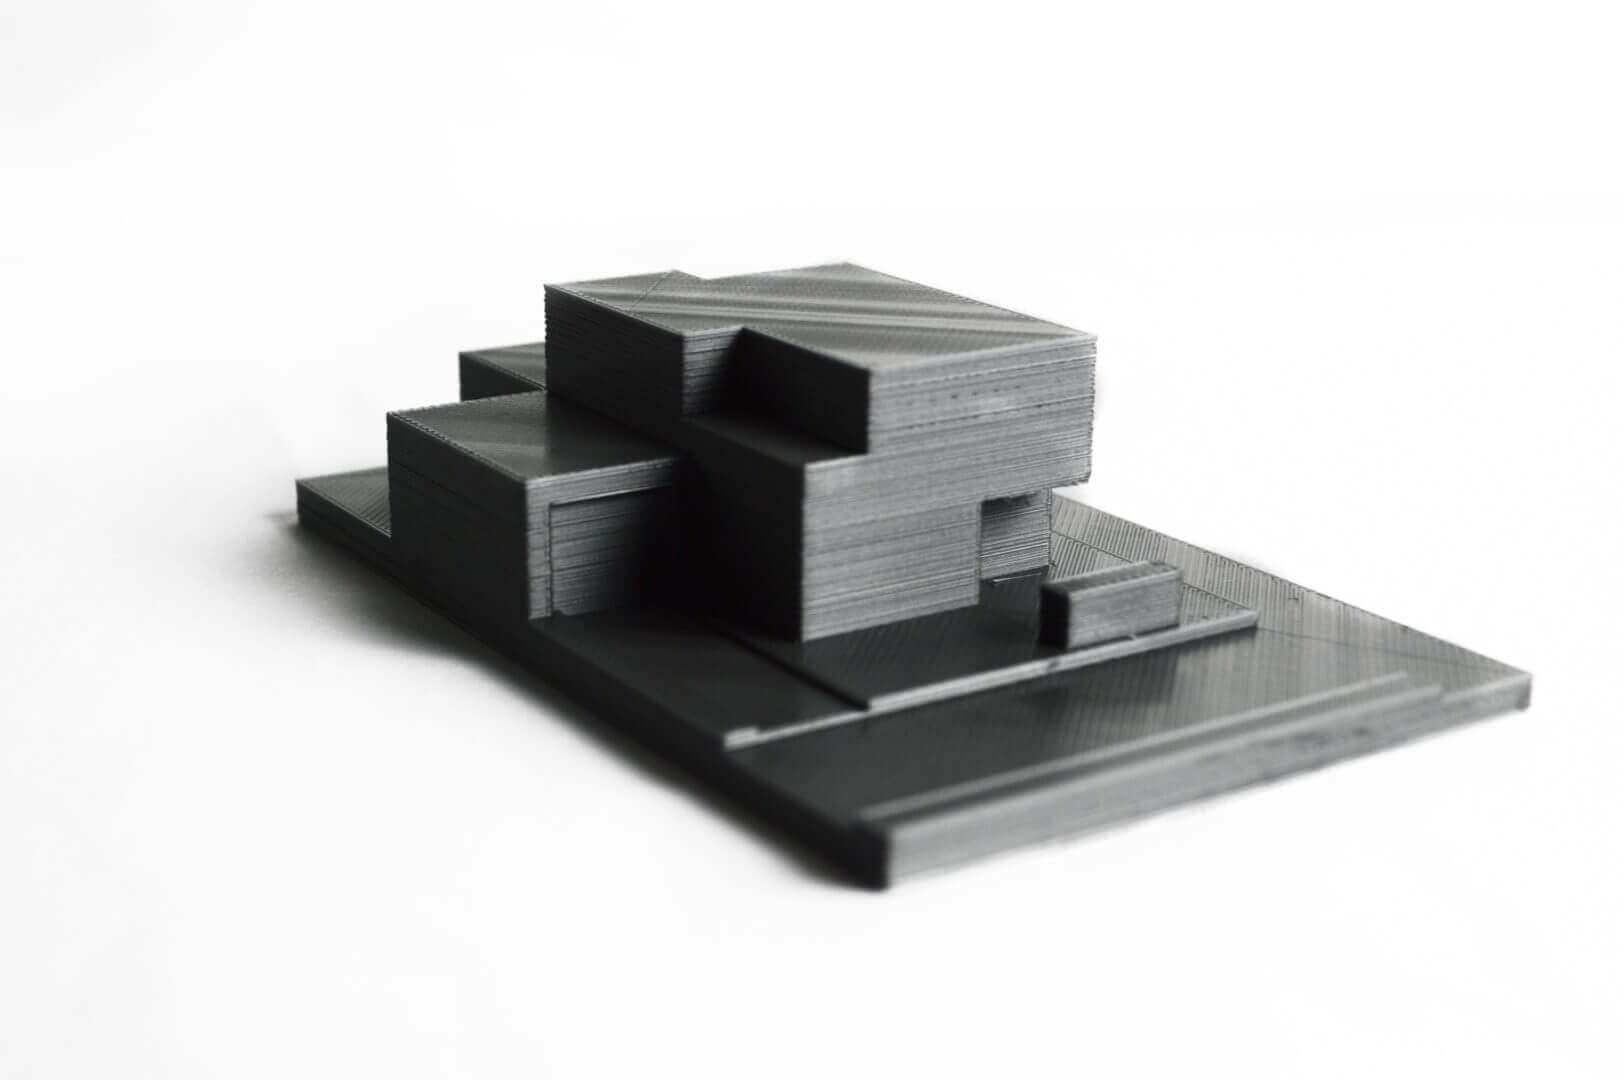
3D Printing Architecture Models #1: What the Result Looks Like
Whether it’s a chair or an enormous building complex, all architectural ideas are possible to 3D print. As an example, we used a simple apartment building with a couple of indentations in order to show you the possibilities of 3D printing architectural models. Watch the video to see how the result of our 3D printed model will look like.
3D Printing Architecture Models #2: Create your 3D Model
It really is up to you which programs you use to create your vision. For this tutorial, we have designed our 3D printable architecture model in SketchUp Make.
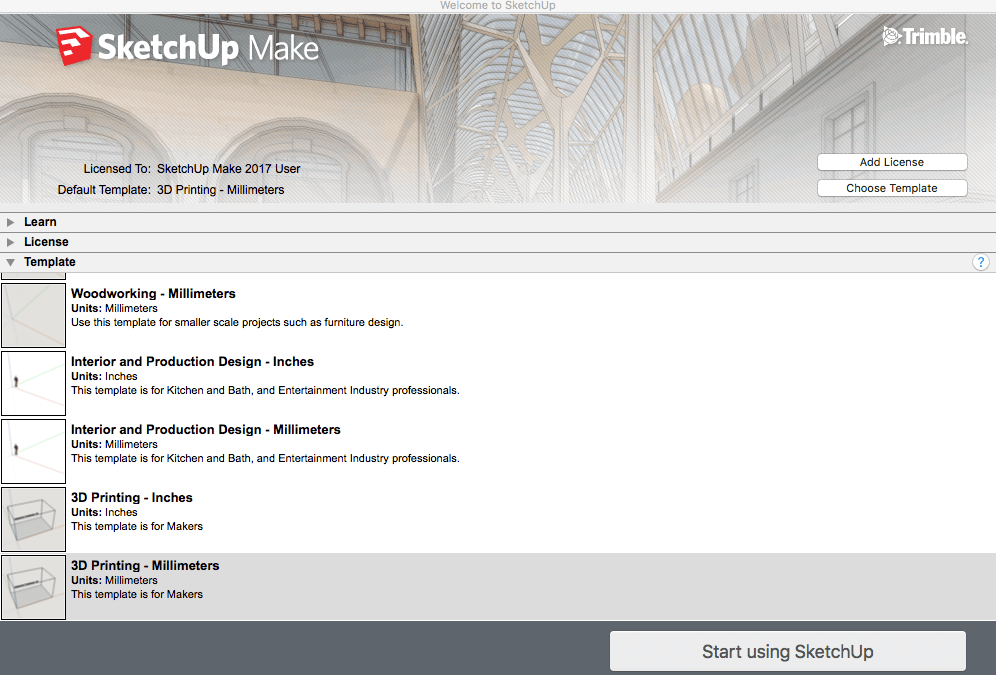
Before creating your 3D printable architecture model with Sketch-Up you’ll want to choose the template “3D Printing” (see above) in either inches or millimeters. That way you will have your basic scale set up. Don’t mind that the Makerbot 2 is preprogrammed in the template, you can use whatever 3D printer you want.
Most of the architectural students already have some experience with Sketch-up or similar CAD software. If not, look at our quick tutorial on SketchUp.
Although you might be familiar with the software, there are some important things to watch out while creating your 3D printable architecture model:
- Do not double your lines! Otherwise, the slicer (that’s the software that makes your file 3D printable) will not recognize your model as a volume.
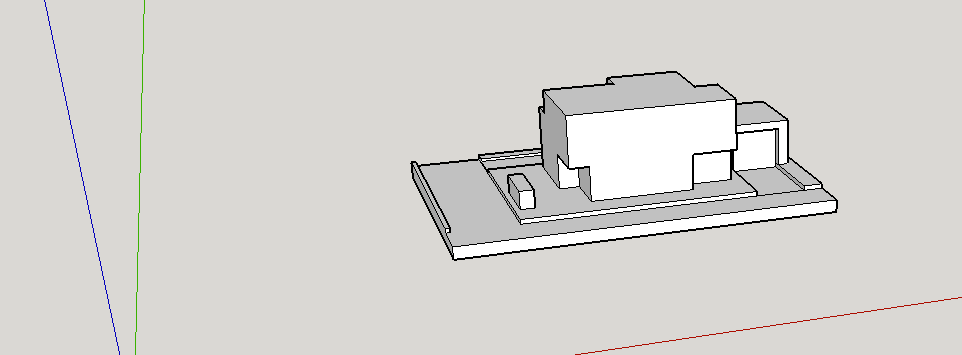
- Before you convert your model, delete the Makerbot Box around your planned model, so all you see is the model itself, as in the picture below.
3D Printing Architecture Models #3: Convert your 3D Model into a .dae File
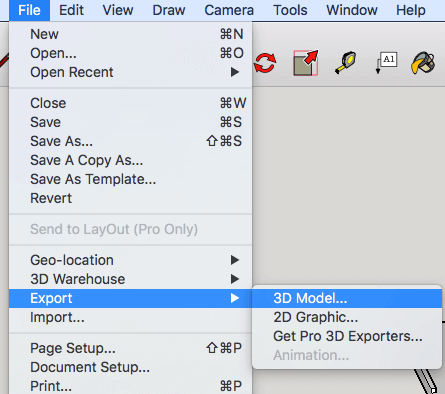

We have converted our SketchUp 3D model into a .dae file by exporting it as a 3D model and saving it as COLLADA File (*.dae). You can achieve this by clicking on the file and choosing Export > 3D Model > Export.
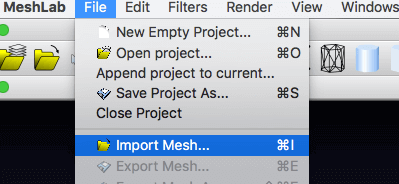
3D Printing Architecture Models #4: Turn Your 3D Model into an STL File
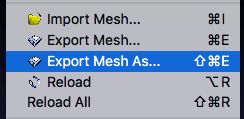
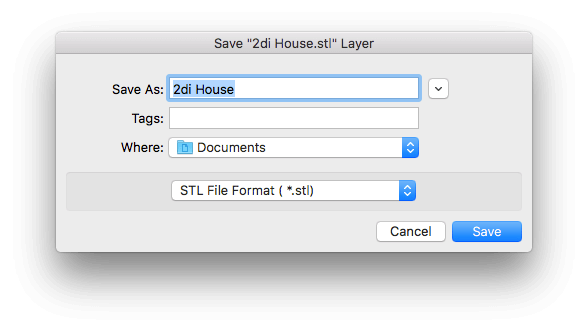
The next step is to turn your 3D architectural model into an STL file, which is the right data for any 3D print job. To do this, please download Meshlab. It‘s open source system for processing and editing 3D triangular meshes.
It provides a set of tools for editing, cleaning, healing, inspecting, rendering, texturing and converting meshes – exactly what we need for our 3D architectural model.
Import your file into the software. Click on the file. Export Mesh as… -> Save as an STL File Format (*.stl). And we’re done here.
Now, there are two options for you to continue with your 3D printable architecture model:
- 3D Print with a professional 3D printing service. All you need now is to upload your generated STL file to the service and choose the material. To get the best price available, go here.
- 3D Print your architecture model by yourself – that‘s what we‘ll show you.
If you already own a 3D printer or have the possibility of using one, please continue with the following steps.
3D Printing Architecture Models #5: Prepare the 3D Printing Process
STL files are somewhat like a generic blueprint for every 3D model, not only 3D printable architecture models. Unfortunately, this means you have to prepare it for the 3D printer you want to use for the job. In order to get your architectural 3D model 3D printed, you need another piece of software. Now you’ll want to install the free software Cura and start it up.
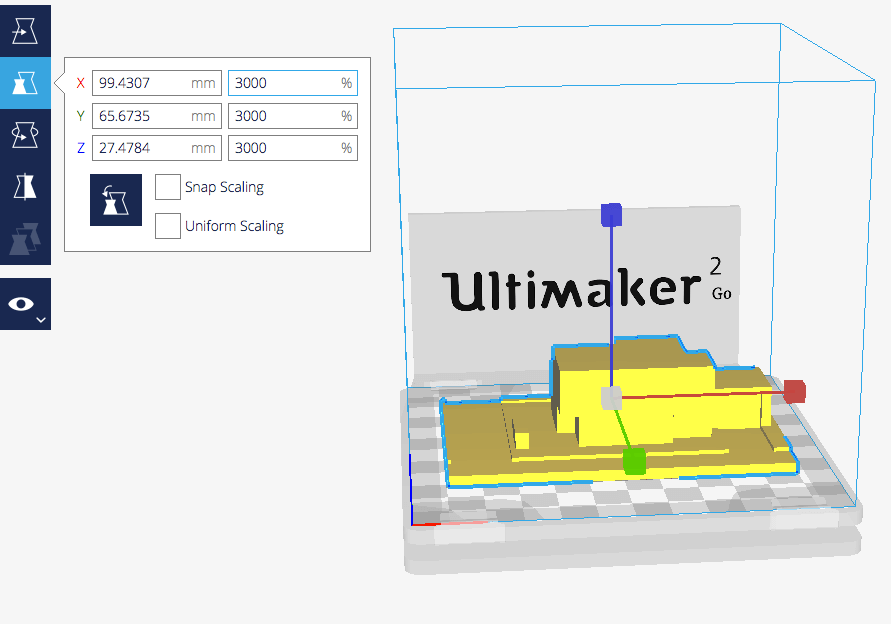
Cura is a great little program provided for free by 3D printer manufacturer Ultimaker. It slices your STL file into many layers, so the printhead can follow the path laid out by the software. First, you will have to set up the printer profile and choose the data for the material you want to print your architectural 3D model with. For questions regarding Cura just take a look at our quick guide here – it’s not very complicated.
After uploading or dragging your architectural model into Cura it might appear as a very small dot on the simulated print bed. That’s not a problem at all. Simply select your tiny model and then press the feature scaling. You’ll need to experiment around, depending on how big you want your model to be.
3D Printing Architecture Models #6: Start 3D Printing
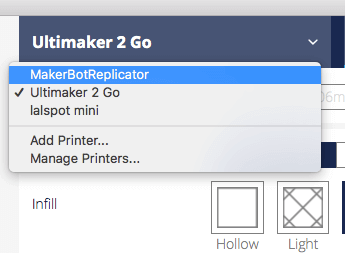
Simply select the 3D printer you are going to use, by clicking in the right corner of Cura. In this case, we used an Ultimaker 2 Go to 3D print our architecture model. Get your 3D printer ready and load it with the desired filament. ABS is the most common material used in the architectural model building due to its good price-performance ratio. If you are interested in other materials, check out our 3D Printing Material Guide.
Now you’ll have some preparations to make before you start 3D printing your architectural model:
- Unless you know what you‘re printing with, prefer PLA to ABS – it‘s less complicated to print with.
- To get good results, apply some glue stick or spray on the print bed. Otherwise, the corners might be “warping”, which doesn’t look nice or professional.
- Use a “raft”, if you don’t want the first layers to stick to the print bed.
- You don’t need to fill your whole model with the material – an infill of 20 percent should be sufficient.
- If you have any overhanging parts in your model, you will have to add supports. That means, lighter material will be printed under the model, since there is no way to print in thin air.
Now put an SD card into your computer and it will immediately show in Cura. Add your file to your Printer and start the printing process (see video below)
3D Printing Architecture Models #7: Remove the Supports

By using pliers or a knife, you can remove the support structures that were 3D printed. Just take a look at the architectural model before and after picture.

3D Printing Architecture Models #8: Enjoy your Model!
Hopefully, this short tutorial could convince you to 3D print your architectural models. 3D printing is not only more cost-effective but also a good piece of technology that will help improve your productivity as a creative designer. Structures that would never be possible through traditional model building can now be represented by 3D printing architectural models. In general: Ideas, which have long been in mind, can now also be realized in a model.
If you have some comments, please feel free to add them below.
License: The text of "3D Printing Architecture Models – A Beginner’s Guide" by All3DP Pro is licensed under a Creative Commons Attribution 4.0 International License.