
What Is E-step Calibration? – Simply Explained

Don't be confused by E-step calibration. Read on to learn exactly what it is and how calibration of your printer's E-steps works!
Extruding Information
3D printers can be great machines. They are easy to use (at least a majority of them), multi-purpose, and relatively cheap. However, just like any other machine, they must also be calibrated now and then to ensure accurate results.
This brings us to E-step calibration! It can be confusing for a novice user to know what E-step calibration means. To break down the term, the “E” refers to the extruder and the “step” refers to the steps of the extruder stepper motor. So, instead of saying the entire phrase, the 3D printing community has adopted the term “E-step”.
In most cases, E-steps will mean the number of steps a stepper motor takes to extrude one millimeter of filament.
A poorly calibrated extruder will result in inaccurate prints, under- or over-extrusion, and some very unpleasing results. Sometimes, there’s no obvious indication that the cause of the problem is a poorly calibrated extruder.
This is what we’re here to solve. You’ll get a clear picture of what exactly E-steps are and why proper calibration is important. Let’s get started!
One Step at a Time
Before even diving more into E-steps, let’s first make sure that we have our basics down.
The most basic and essential component in this process is the stepper motor. Many users may not be familiar with the workings of a stepper motor, although few might be.
How Stepper Motors Work
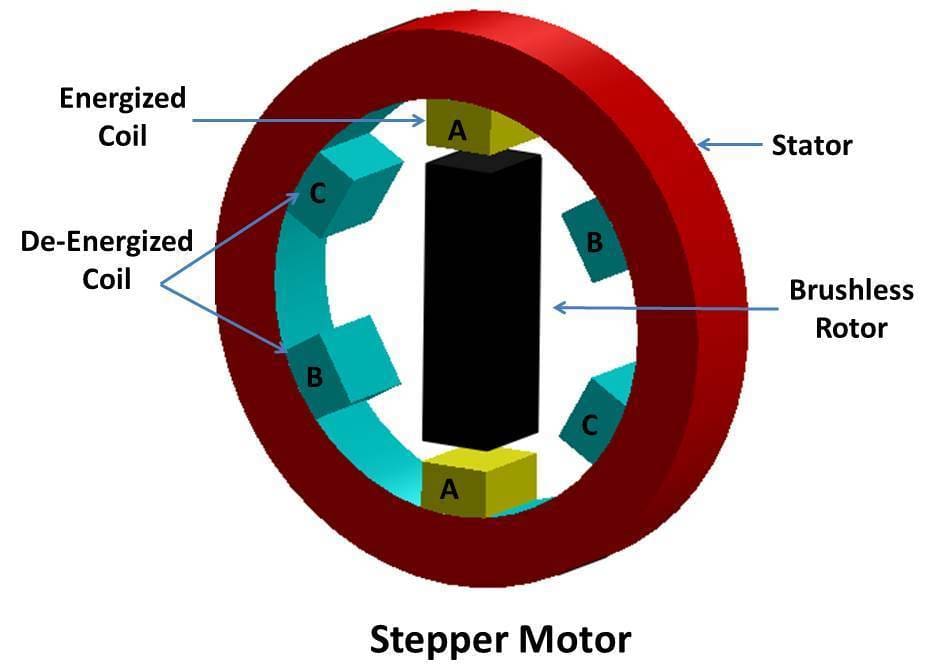
A stepper motor, in its most basic form, is a phased electric AC motor. It’s brushless and the main advantage (and most important quality) is that this motor rotates in defined increments, or steps.
These steps are set positions and the rotor shaft will primarily turn to be in these positions. The rotor shaft, or rotor, contains a permanent magnet, which is surrounded by electric coils that are fixed to an outer stator. These coils are activated in a particular sequence, creating a magnetic field around the rotor. Thus, the rotor will rotate to align to the magnetic field, and the sequencing of the coils can make it continue to rotate as needed.
More simply put, the rotor shaft, which is a magnet, is made to spin using a set of electromagnets, which are activated in a pattern. The pattern will determine the speed and position of the rotor shaft at any given point in time. This is the basic operation of a stepper motor.
Stepper Motors in 3D Printing
The average stepper motor used in a 3D printer has a minimum resolution of 1.8 degrees. Using some simple math, we can determine that in order to complete a single rotation of the shaft, the stepper motor needs to take 200 steps. The higher the number of steps, the greater is the accuracy of the stepper motor.
The ability to precisely control the position of the rotor shaft is why we use stepper motors for 3D printers, and in terms of the extruder, it gives us more control over the extrusion of our filament. Now that you have a basic understanding of how a stepper motor operates, let’s get into how E-steps work.
E-stepping Time
Now that we know how stepper motor functions, it’ll be easier to understand what E-step calibration means and how to do it.
A standard stepper motor, as we now know, needs 200 steps to complete a single rotation. But, when in operation, especially when used as an extruder motor, there are more variables to consider. The filament might slip, the current might not be proper, the opposing force might be too high, and the gear that grips the filament can be a variety of sizes.
To ensure that the right amount of filament is being pushed into the hot end, extruder calibration, and furthermore, E-step calibration, is important from time to time.
When we say extruder calibration, it simply means checking whether or not the extruder is extruding the right amount of material during its operation. E-steps are the number of steps the extruder needs to make to extrude one millimeter of filament, and when you calibrate the extruder, you will need to change this value to make sure that it is set correctly.
Let’s consider a 3D printer that’s just rolled out of the factory. In the firmware, it has been set to take 93 steps with the extruder stepper motor to extrude 1 millimeter of filament. Now, even though this 3D printer is calibrated in the factory, over time, the accuracy begins to fade as parts wear out. An E-step calibration thus ensures that the steps the stepper motor is taking and the filament being extruded correspond to each other, and are accurate.
How To Calibrate
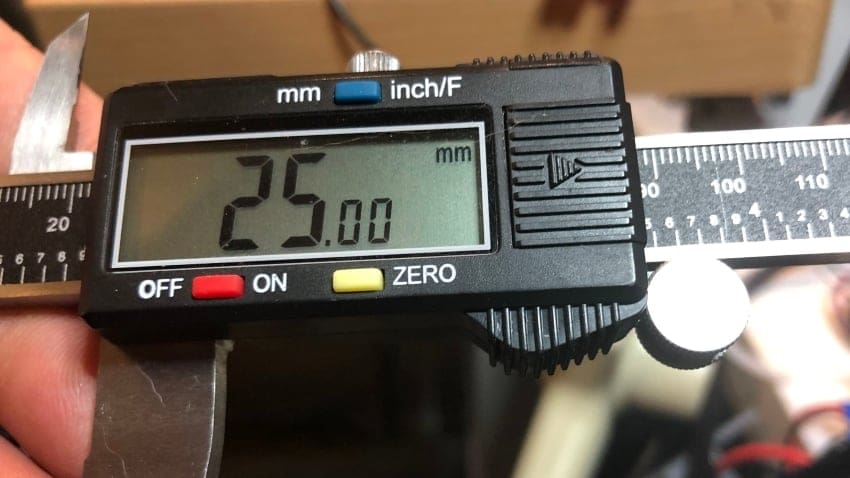
The E-step calibration is not rocket science, and you also don’t need a lot of things. To determine accuracy, all you have to do is give the printer command to extrude 100 mm of filament.
Measuring the actual length of filament that got extruded, you may find that the length isn’t accurate. It might be 95 mm, or it might even be more than 100 mm. This is a clear indication that now you need to calibrate your extruder to get accurate and improved printing results.
Lead image source: shadowfashadow via Reddit
License: The text of "What Is E-step Calibration? – Simply Explained" by All3DP is licensed under a Creative Commons Attribution 4.0 International License.