The Strongest Infill Patterns for Maximum 3D Print Strength

We compiled tests of popular 3D printing infill patterns to reveal which geometries offer the best strength and structural integrity.
When it comes to functional 3D printing, the line between a part that performs and a part that fails is often hidden inside the print itself. Material choice and wall thickness matter, of course, but when those are locked in, the real game-changer for strength is your infill pattern. Far from being just “empty space filler,” infill can make the difference between a component that withstands real-world stress and one that cracks under pressure.
Your slicers offers more than a dozen infill patterns because they affects strength, weight, print time, material use, vibration, and even how a part fails. No single pattern is “best” for every job.
The default infill on most slicers is a grid or lines because it’s the fastest to print, and for most parts it’s just fine. You’ll only want to alter your infill pattern if you want a particular strength or wall support.
In a nutshell, for maximum strength parts, you'll want a cubic, gyroid, or triangles infill at 15% - 25%.
Gyroid is often the favorite for strength since it is strongest infill for a given amount of plastic and it doesn’t have any weak “hinge” points or intersections like cubic and triangle. A 30% gyroid part is often as strong as or stronger than a 40% – 50% grid part, while using less material. Note that the starting and stopping printhead motion required to construct gyroid can give your printer quite a shake.
In this guide, we dive deep into the industry’s most popular infill patterns, including options from Bambu Studio, Cura, and PrusaSlicer, to reveal which structures truly deliver strength. We don’t just look at how they fill volume; we evaluate how they handle real loads, comparing performance under both tensile and compressive forces.
Here’s a quick overview:
To help explain what the results mean for your print, we’ll first discuss the infill density and pattern settings in more detail.
All About Infill
Essentially, infill density refers to how solid the inside of a 3D print is. This is usually expressed as a percentage: 100% would be completely solid, while 0% would be hollow. The infill pattern, then, is the form or shape of the infill’s structure inside the print. In your slicing software, you can select both the patter and the amount (percentage) of infill.
Typically, the higher the infill percentage, the higher the strength (as well as material consumption, weight, and print time) and the lower the flexibility. But the infill pattern can also affect strength depending on how the structure and layout of the lines disperse forces internally. In this way, just like other settings (e.g. layer height), different patterns are useful for different applications.
For example, if you want you part to withstand impact you may want to choose a different infill pattern than if you want your part to withstand compression.
Best Infill Patterns by Load Case
There are many infill patterns available across different slicing platforms, but only some are meant to produce high-strength components. Most of them – like the lines, zig-zag, and cross patterns – are meant for regular prints that won’t face much physical stress but still need to be somewhat durable.
While desktop FDM slicers typically give you one option for infill, Prusa, Bambu, and others also offer some “adaptive” infill that enable you to place denser infills near the walls, top, or bottom of your part.
A promising start-up called SliceDog is working on a piece of software that works with desktop slicers, such as Prusa slicer and Bambu Studio, to enable to you to stress-test your part and generate multiple infill types in one print.
Picking the Right Infill
To evaluate which infill pattern yields the strongest parts, there are a couple of important considerations. The first is the directional strength of an infill pattern, and the second is the type of strength measured in testing.
Directional Strength
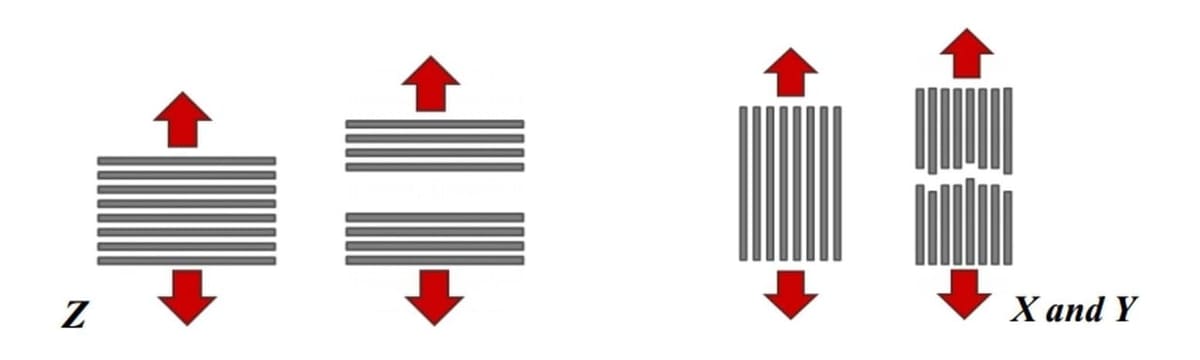
Not all patterns provide the same strength across all three axes (X, Y, Z), and many are more suited towards certain planes. For example, the grid pattern offers great strength along the Z-axis (perpendicular to layer lines) but is weaker throughout the XY-plane (parallel to layer lines).
There are also 3D patterns that provide strength more balanced across the three axes. As a tradeoff, the individual axis strength is reduced. For example, the gyroid infill pattern provides mostly balanced strength in all three directions, but is not always the strongest pattern along the Z-axis.
Types of Strength
The second key factor in choosing an infill pattern is what kind of strength you actually need. In this article, we’ll focus on how common infill patterns perform in two main types of strength tests: tensile (pulling apart) and compression (being squished).
A tensile test stretches a sample by pulling on both ends until it breaks—similar to tugging on a plastic zip tie. A compression test, on the other hand, presses inward on a part—like standing on a foam block to see how much weight it can handle before collapsing.
Both tests are useful because real 3D-printed parts rarely experience just one type of stress. In everyday use, most objects are subjected to a mix of pulling and squeezing forces at the same time.
A simple way to visualize this is bending a rod until it snaps. As you bend it:
- The outer side stretches and cracks (tension).
- The inner side gets crushed together (compression).
This is exactly what happens to many real 3D-printed parts, such as:
- Phone stands that flex slightly under weight
- Tool holders that bend when loaded
- Snap-fit enclosures that are squeezed and stretched during assembly
Tensile
A tensile test helps us understand how well an infill resists being pulled apart. This is especially important for parts that need to flex, snap, or hold tension.
Good real-world examples include:
- UAV frames and arms
- Big handles/grips (tool grips, mobility aids, camera rigs)
- Prosthetic orthoses, wearable exoskeleton components (movie props)
Standard tensile testing uses a “dogbone”-shaped sample pulled in a straight line. However, 3D-printed parts are anisotropic—meaning they don’t have the same strength in every direction.
This matters because:
- Pulling along the printed layers (XY direction) requires breaking solid lines of plastic.
- Pulling between layers (Z direction) mainly separates layers from each other, which is usually much weaker.
That’s why most tensile tests pull in the XY direction, where printed parts tend to be strongest.
Compression
A compression test shows how well a part can handle being pressed or loaded from above without collapsing.
This is especially relevant for:
- Shelf brackets
- Table legs
- Wall mounts
- Tool racks
- 3D-printed stands
- Load-bearing feet or spacers
In a typical compression test, a rectangular sample is placed upright between two plates and squeezed from top and bottom until it fails.
Like tensile strength, compression strength is also anisotropic in 3D prints. However, it depends much more on:
- The infill pattern, and
- How well that pattern spreads forces through the interior of the part.
For this reason, meaningful testing should look at compression in both XY and Z directions to truly understand how an infill behaves under real loads.
There are other forces, like shear (force in opposite directions), bend (mix of tension and compression happening at the same time), torsion (twisting), and impact (sudden shock load).
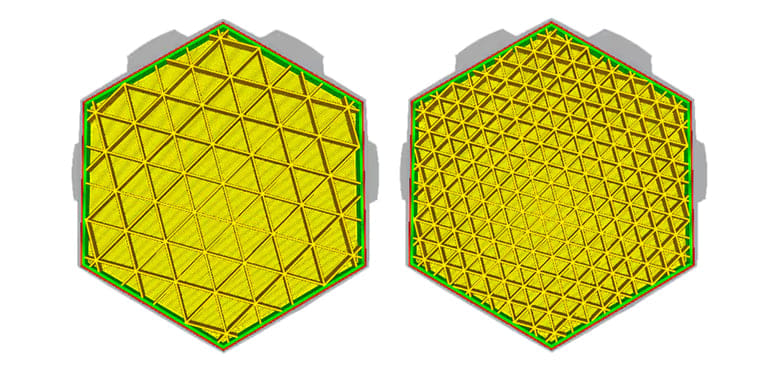
The Contenders
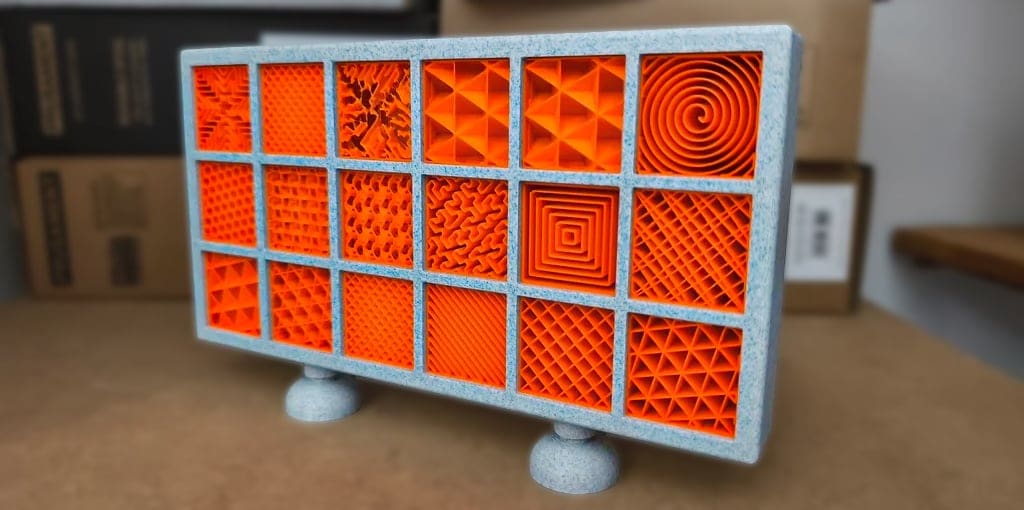
Now that you know a little more about infill and types of strength, it’s time to review the strongest infill patterns. Below, we discuss the eight strongest patterns that can be found in desktop slicers.
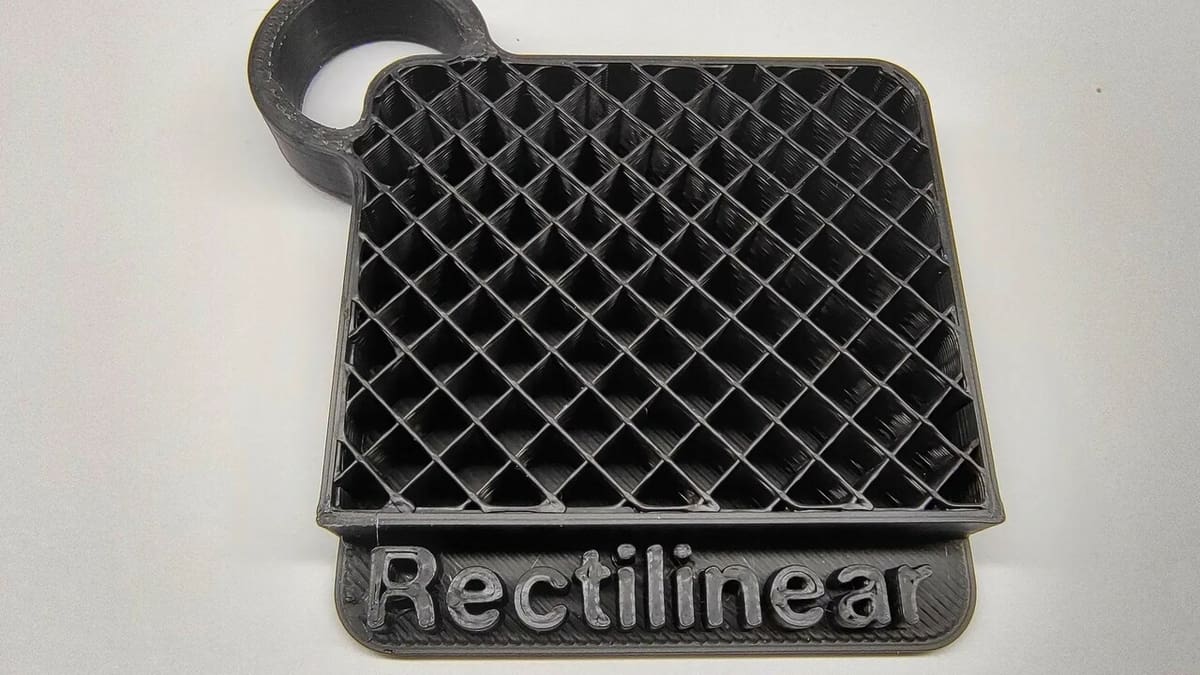
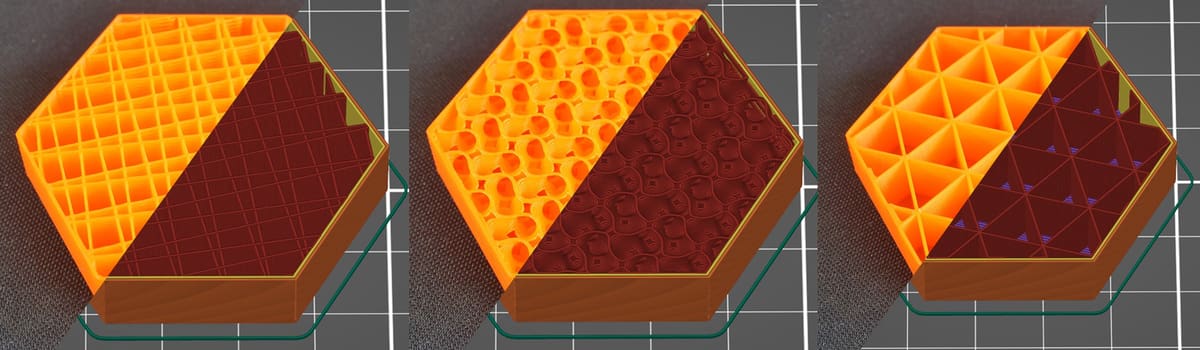
Grid
Grid infill behaves like a simple crisscrossed mesh — basically straight lines laid down in two directions that intersect each other in each layer.
In tension, grid is better than rectilinear but still quite direction-dependent. When a tensile load lines up with one of the grid directions in the layer plane, the strands can carry the load fairly efficiently along their length. Because there are two crossing directions instead of one, stress is shared a bit more than with zig-zag, so it feels less fragile than rectilinear in many cases. However, it is still largely a flat, layer-by-layer pattern, so it does very little to tie layers together in the Z direction. If the load tries to pull layers apart, strength mostly depends on layer adhesion rather than the infill itself. Overall, grid is decent for in-plane tension but still anisotropic and weaker than true 3D patterns when loads come from multiple directions.
In compression, grid is okay but not outstanding. The perpendicular strands help stabilize each other somewhat, so it resists collapse better than rectilinear. Still, because the pattern is mostly 2D within each layer, the structure tends to buckle or flatten rather than acting like a fully three-dimensional lattice. At low infill percentages it can deform unevenly, and under higher loads the crossing points can act like weak spots that start to fold or spread apart.
Overall, grid is a simple, reliable middle-ground pattern: stronger and more balanced than rectilinear, but still noticeably less capable in both tension and compression than more 3D infills like triangles, cubic, or gyroid.
- Tensile strength: Low
- Compression strength: Low
Rectilinear (Zig-Zag)
Rectilinear (zig-zag) infill behaves in a very straightforward, “line-based” way because it is basically a set of parallel strands that alternate direction each layer.
In tension, its performance depends heavily on the direction of the load. When the pulling force lines up with the infill strands in the layer plane (X–Y), rectilinear can feel fairly strong because the load is being carried directly along continuous lines of plastic. But if the force is at an angle to those lines, the structure doesn’t help much and the stress tends to concentrate on just a few strands. The bigger limitation shows up in the Z direction: because each layer is essentially a flat sheet of zig-zags, there’s very little structure tying layers together, so tensile loads that try to pull layers apart are mostly resisted only by interlayer bonding. In practice, this means rectilinear is fine for simple, aligned pulls within a layer, but quite weak and direction-dependent overall.
In compression, rectilinear is serviceable but not great. If the load presses straight down through the layers, the zig-zag strands mostly just get squished or bend sideways rather than forming a stiff, self-supporting lattice. The pattern can collapse or “splay out” rather than carrying the load efficiently, especially at lower infill percentages. Compared to patterns like triangles, cubic, or gyroid, rectilinear feels less stable and more likely to deform unevenly under pressure.
Overall, rectilinear is fast, simple, and predictable, but mechanically it’s one of the most anisotropic infills: decent when loads happen to line up with the strands, and noticeably weaker for off-axis tension or general compression compared to more three-dimensional patterns.
- Tensile strength: Low
- Compression strength: Low
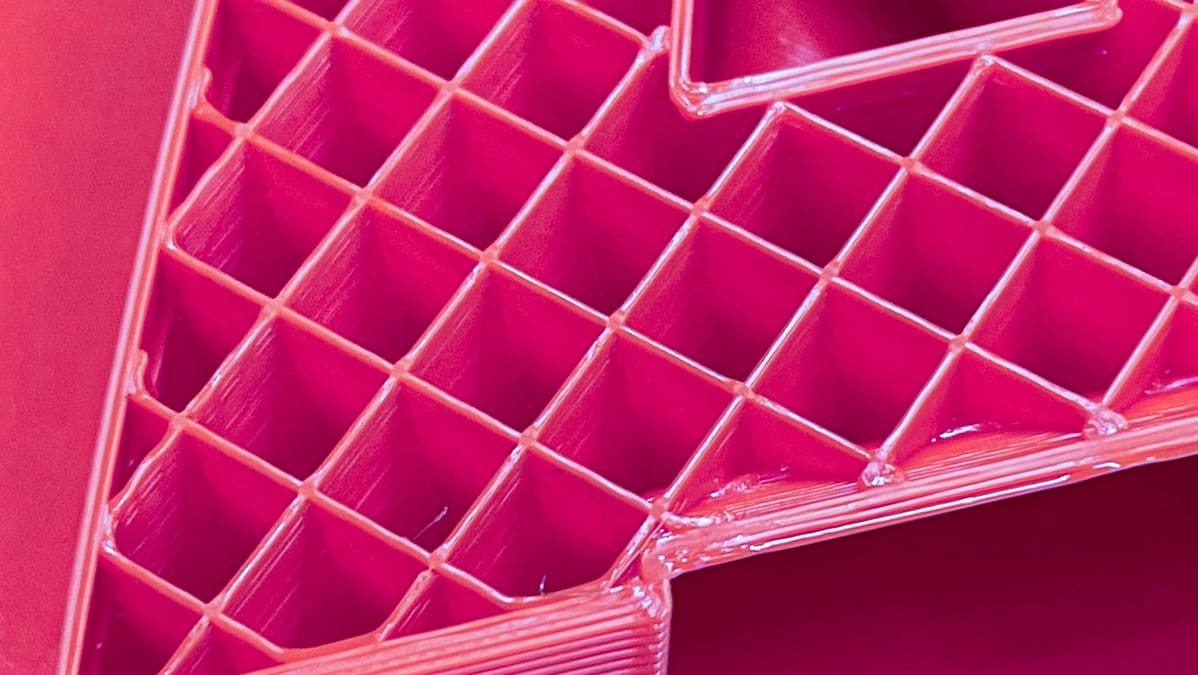
Triangles
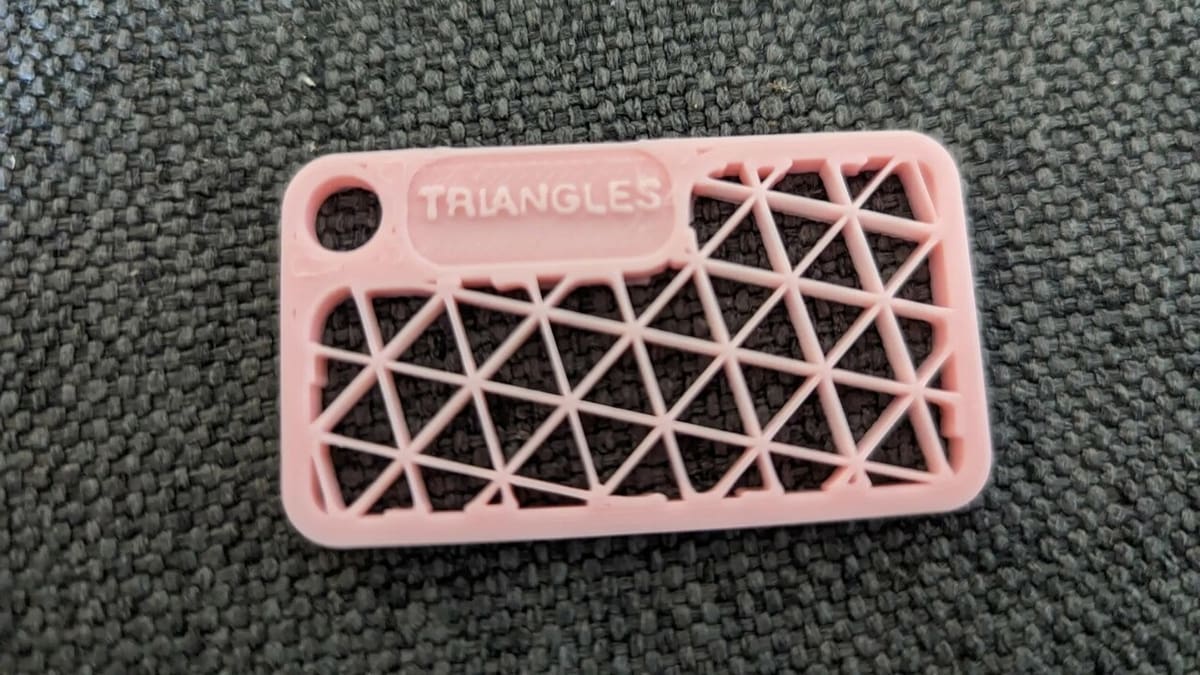
Triangle (or tri-hex) infill behaves the way you’d expect from a triangular structure — it’s pretty stable and tends to hold its shape well.
In tension, it does better than simple patterns like lines or grid because the angled struts can share the load instead of forcing everything along one direction. When you pull on a part within the layer plane (X–Y), the triangular network spreads the stress around, so it’s less likely to snap along a single weak line. That said, it’s still a mostly layer-based pattern, so if the pull is trying to separate layers in the Z direction, strength is more limited by layer bonding than by the infill itself. In practice, this means triangle infill is good for in-plane tension, but not as all-around strong as true 3D patterns like gyroid or cubic.
In compression, triangle infill works really well. The triangular shape naturally resists buckling, so instead of folding or collapsing easily, the structure supports the load more evenly. When it does fail, it usually deforms gradually rather than suddenly crushing, which is helpful for load-bearing parts.
Overall, triangle infill gives you solid compression strength and decent tensile strength in the layer plane, with its main weakness being the usual layer-to-layer limitation that all 2D-style infills share in FDM printing.
- Tensile strength: Medium
- Compression strength: Medium
Lines
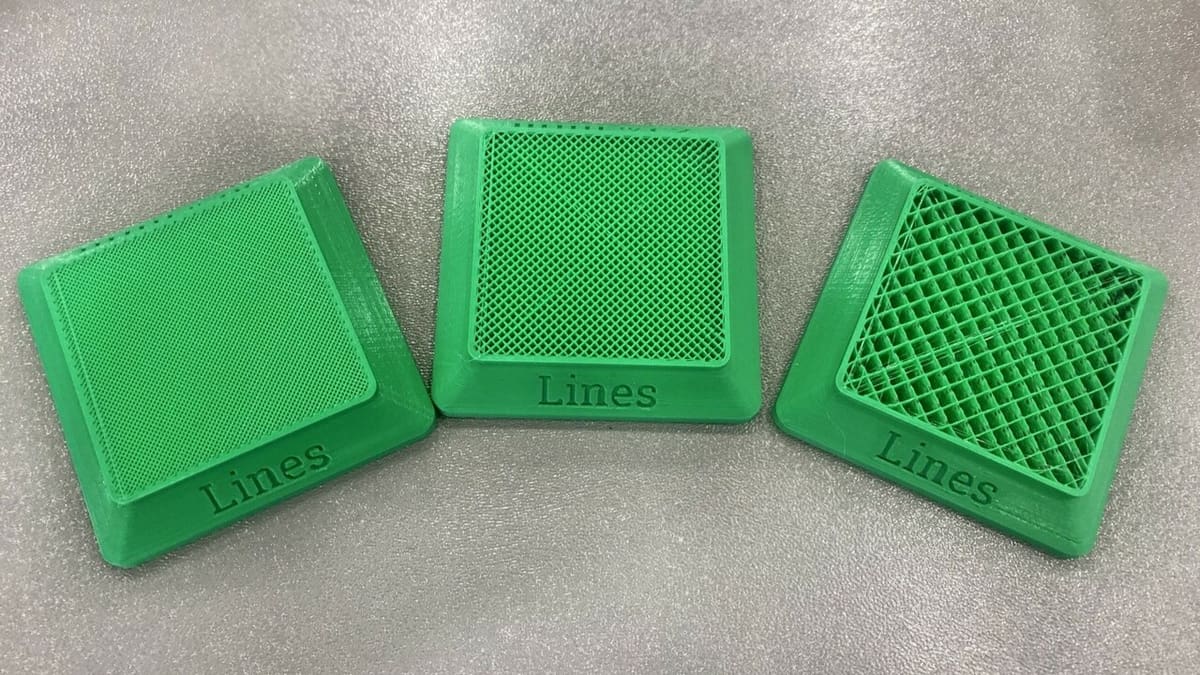
Lines infill behaves in a very simple and predictable way because it is just a set of parallel strands running in one direction per layer, with the direction alternating on each layer.
In tension, its performance is highly directional. If the pulling force lines up with the strands in the current layer, the plastic can carry the load fairly well along those continuous lines. However, as soon as the load is even slightly off-axis, most of the strands stop helping and the stress gets concentrated on only a few of them. Like other 2D-style patterns, lines infill does almost nothing to tie layers together in the Z direction, so any tensile load that tries to separate layers relies almost entirely on layer adhesion rather than the infill. In practice, this makes lines infill one of the weakest choices for general tensile strength — it can work in very specific, aligned situations, but it is quite fragile overall.
In compression, lines infill is also fairly weak. When pressed straight down, the strands tend to bend, buckle, or slide sideways instead of forming a stable structure. Because there are no cross-braces within a layer, the pattern can “splay out” or collapse unevenly, especially at lower infill percentages. Compared to grid, triangles, or gyroid, it feels much less stable and more likely to deform rather than support a load cleanly.
Overall, lines infill is fast and easy to print, but mechanically it is one of the most anisotropic and least robust patterns for both tension and compression. It works best for lightweight, non-structural parts where strength is not a priority.
- Tensile strength: Medium
- Compression strength: Medium
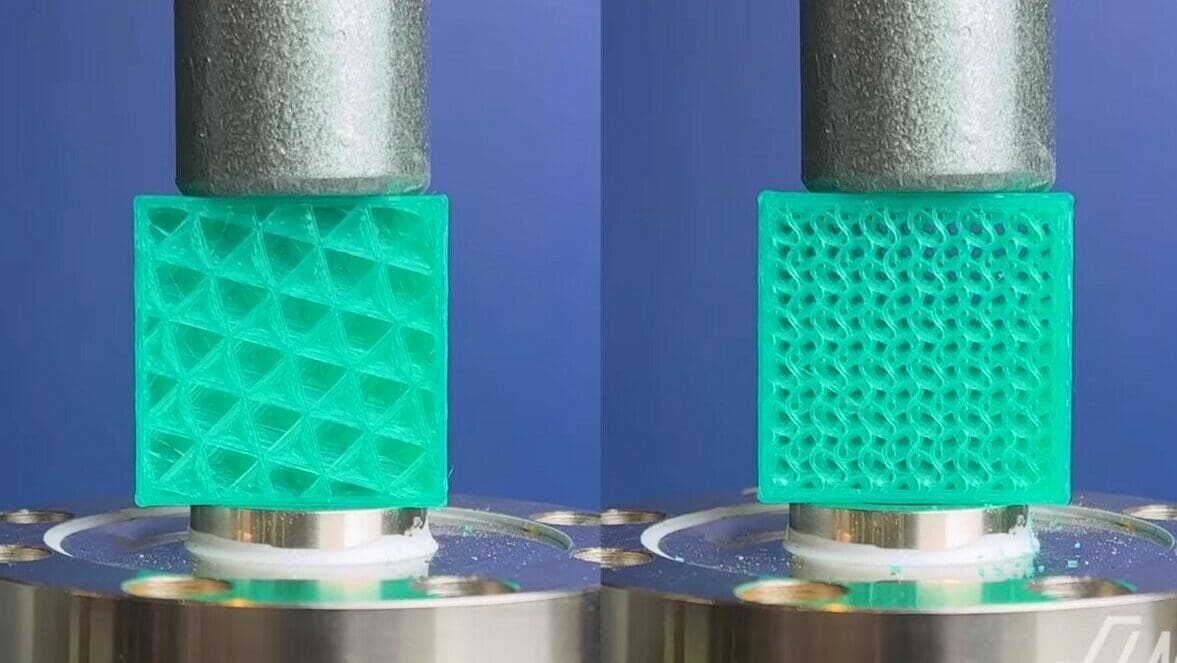
Gyroid
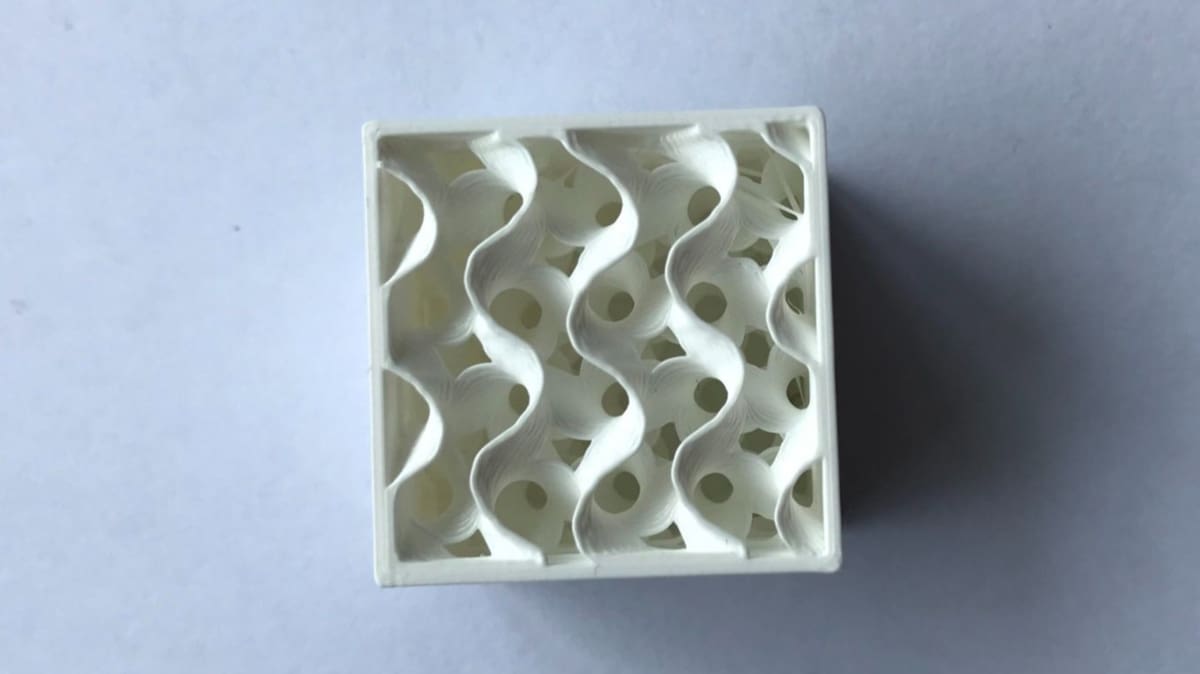
Gyroid infill behaves very differently from line-based patterns because it is a continuous, smooth, three-dimensional lattice rather than flat strands stacked layer by layer.
In tension, gyroid performs very well compared to most common infills. Because the structure weaves through the part in all directions, it provides load paths in X, Y, and Z instead of just within each layer. When a part is pulled, the stress gets distributed across many curved struts rather than concentrating along a single direction or a single layer. This makes it much less likely to split along layer lines than patterns like lines, grid, or rectilinear. Even when the tensile load acts across layers, the interconnected 3D geometry helps resist separation, so gyroid tends to feel tougher, more forgiving, and less brittle under pulling loads.
In compression, gyroid is also excellent. The smooth, repeating structure can compress and deform gradually rather than buckling or collapsing suddenly. Instead of individual struts folding or snapping, the entire network tends to absorb and spread the load through bending and shearing of many interconnected walls. This makes gyroid both strong and energy-absorbing, which is why it is often chosen for parts that need to withstand impacts or crushing without shattering.
Overall, gyroid is one of the most balanced and near-isotropic infill patterns available in typical slicers. It provides strong, predictable performance in both tension and compression and avoids the directional weaknesses that plague most flat, layer-based infills.
- Tensile strength: Medium-High
- Compression strength: Medium-High
Concentric
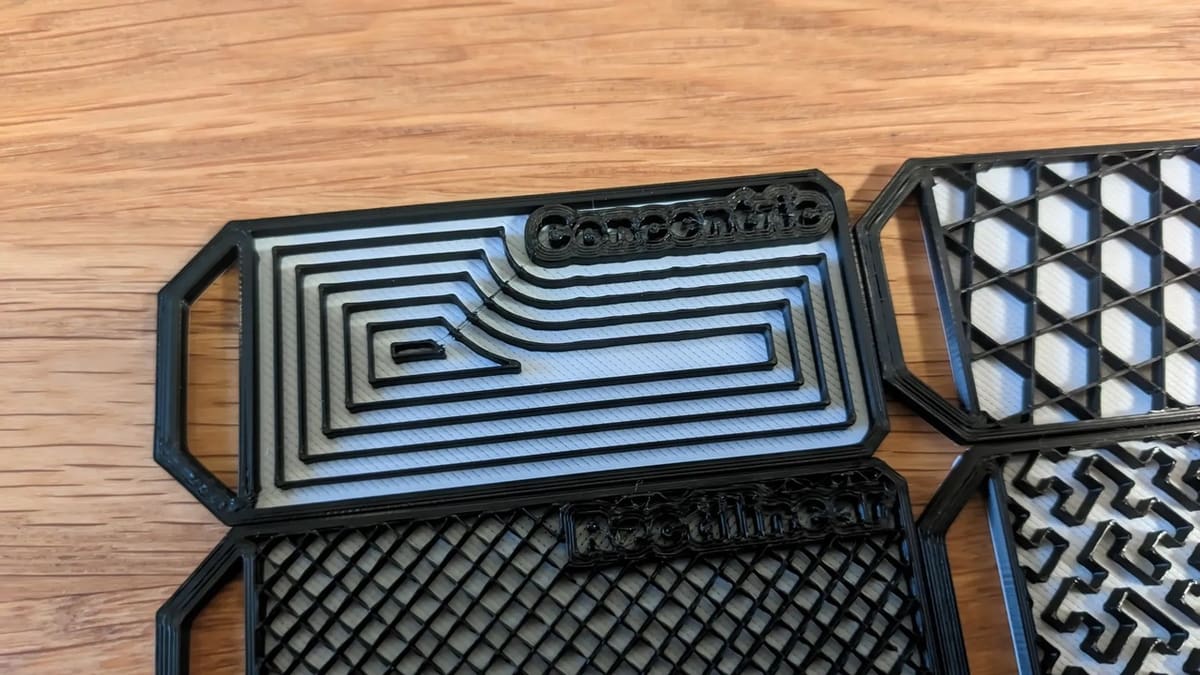
Concentric infill behaves more like a set of nested shells inside the part rather than a true internal lattice, since the strands follow the outline of the walls in repeated loops.
In tension, concentric infill is quite direction-dependent. When the tensile load acts along the direction of the loops, the material can carry load fairly smoothly because the strands are continuous and aligned with the part’s shape. However, if the pull is perpendicular to those loops, the pattern offers very little resistance and the load tends to concentrate on a few spots instead of being shared across the structure. Like other mostly 2D patterns, concentric infill does almost nothing to tie layers together in the Z direction, so any force trying to pull layers apart is resisted mainly by layer adhesion rather than by the infill itself. In practice, this means concentric can feel strong in very specific directions but weak and unreliable for general tensile loading.
In compression, concentric infill is usually mediocre. Because the pattern is made up of stacked outlines rather than interlocking struts, it doesn’t brace itself very well internally. When compressed, the layers tend to flatten or slide slightly rather than acting like a stiff, self-supporting structure. At lower infill percentages, the loops can buckle or distort unevenly, and the part can feel “squishy” rather than solid.
Overall, concentric infill is smooth, fast, and visually clean, but mechanically it is not a great choice for structural parts. It works best for lightweight or cosmetic prints where uniform interior appearance matters more than strength.
- Tensile strength: High (Z direction only)
- Compression strength: High (Z direction only)
Cubic
Cubic infill behaves like a three-dimensional lattice made of repeating box-like cells that connect in multiple directions through the part, rather than being confined to flat layers.
In tension, cubic performs quite well because it provides load paths that run in X, Y, and Z instead of mostly lying in the layer plane. When a part is pulled, the stress can travel through vertical, horizontal, and diagonal struts rather than concentrating along just one direction. This makes cubic much less prone to splitting along layer lines than patterns like lines or grid. Even when the tensile load tries to pull layers apart, the interlocking 3D structure helps resist separation, so cubic tends to feel tougher and more reliable under pulling loads. It isn’t perfectly isotropic, but it is much closer than most traditional 2D infills.
In compression, cubic is also strong and stable. The box-like cells act like tiny braces that support each other, so the structure resists buckling rather than collapsing easily. Under load, the struts tend to bend gradually instead of snapping all at once, which helps the part absorb energy rather than failing suddenly. Compared to flatter patterns, cubic feels more solid and consistent when squeezed or crushed.
Overall, cubic is a very good all-around infill. It balances strength, stiffness, and weight better than most simple patterns, providing solid performance in both tension and compression without the extreme directionality seen in line-based infills.
- Tensile strength: Medium-High
- Compression strength: High
Honeycomb

Honeycomb infill behaves like a regular hexagonal cell structure, similar to what you’d see in beehives or many engineered lightweight panels.
In tension, honeycomb performs reasonably well within the layer plane, but it is still fairly direction-dependent. If the tensile load aligns with the orientation of the hexagonal cells, the walls of the honeycomb can share and carry the load efficiently. However, if the pull is at an awkward angle to the cell layout, fewer walls participate in carrying the stress, and weak spots can appear along certain directions. Like most slicer honeycomb patterns, it is still built mainly as a series of flat layers stacked on top of each other, so it does little to actively tie layers together in the Z direction. This means that if a tensile force tries to pull layers apart, the strength is governed more by layer adhesion than by the infill itself. Overall, honeycomb is decent in-plane in tension, but not truly isotropic.
In compression, honeycomb is one of the better traditional patterns. The hexagonal cells act like tiny columns that brace each other, so the structure can carry vertical loads fairly efficiently. Instead of collapsing all at once, the walls tend to buckle and fold gradually, which makes honeycomb good at absorbing energy under crushing loads. This is why real-world honeycomb structures are widely used in packaging, panels, and protective cores. That said, its performance is best when the load is mostly aligned with the cell axis; off-axis compression can cause uneven deformation.
Overall, honeycomb is a strong, lightweight, and efficient pattern that shines in compression and works reasonably well in in-plane tension, but it still shares the layer-bonding limitations of most 2D-style infills in the Z direction.
- Tensile strength: High
- Compression strength: High
Slicer-Specific Infills
Our look into infill pattern strength is based on our sources at the end of this article but 3D slicer makers, like Bambu Lab, Prusa, and Cura, have slightly different evaluations of their own patterns, so we’ve included information from these companies below.
Prusa Slicer Infill Options Explained
Bambu Studio Infill Options Explained
Cura Slicer Infill Options Explained
More infill patterns, including Honeycomb, are available via a Cura plugin. You can also add your own custom infill patterns.
Sources
Before we go over the patterns, it’s important to review our sources. We’ve compiled data from the following six sets of tests to provide an unbiased and objective look at the best infill patterns:
- Investigation of Tensile Properties of Different Infill Pattern Structures of 3D-Printed PLA Polymers, Materials, 2022
- Compressive Strength Assessment of 3D Printing Infill Patterns, Procedia CIRP, 2022.
- Experimental Study of the Tensile Behavior of Structures Obtained by FDM 3D Printing Process, Polymers, 2024.
- A Tensile Strength Assessment of Infill Patterns, Applied Sciences, 2021.
- Compressive Performance of 3D-printed Lightweight Structures, Results in Engineering, 2025.
- Effect of infill pattern and infill density on mechanical behaviour of FDM 3D printed Parts, Materials Today Proceedings, 2022.
However, the problem with all of these studies is that they each take their own approach to the test, be it the non-standard sample geometry or the various infill percentages used across all studies. Clearly, a single, all-encompassing evaluation is yet to be produced, but a general, non-scientific, consensus can be found.
License: The text of "The Strongest Infill Patterns for Maximum 3D Print Strength" by All3DP is licensed under a Creative Commons Attribution 4.0 International License.