SketchUp 3D Printing Tutorial for Beginners

Using SketchUp for 3D printing is a breeze. Check out these steps for designing your first 3D printable model with SketchUp!
SketchUp is popular 3D software suitable for beginners and experienced users alike. Its main goal has always been to introduce people to 3D modeling as easily as possible, which is why it’s so simple to use.
The platform is popular in different industries including architecture, interior design, and product development. It’s also a handy tool for the maker community because it’s capable of handling large models as well as small objects.
SketchUp is also great for those who want to start creating their own parts for 3D printing but don’t have much knowledge about 3D modeling. It allows beginners to start creating within a very short time using its clean UI and straightforward toolset.
We will put this to the test with this tutorial. In this article, we’ll go over all the steps for you to create your first 3D model for 3D printing with SketchUp. But first, let’s learn more about this software and how to get it.
Licensing
SketchUp offers different licensing options for different types of users. At time of writing, the options include:
- SketchUp Free: A browser-based version of the software free for non-commercial uses. It offers basic tools, 10 GB of cloud storage, and limited file import and export capabilities. To gain access to this version, all that’s required is an account and a good internet connection.
- SketchUp Go: A paid subscription of ~$120 per year. This is basically the same as the Free license but with unlimited cloud storage and access to SketchUp for iPad, the latter of which can also be used offline.
- SketchUp Pro: Costs ~$350 per year. Besides the web-based and iPad versions, this license tier also comes with the full desktop version and access to the Extension Warehouse plug-in repository. It also enables the creation of 2D documentation from 3D models by the LayOut tool.
- SketchUp Studio: The top-tier subscription is set at ~$750 yearly. Besides all the capabilities and functionalities of all other versions, it includes point cloud visualization for 3D scans and the powerful V-Ray engine for photorealistic rendering. Note that this is a Windows-only license.
Setting Up
As a beginner, we recommend starting with the SketchUp Free version to get familiar with the user interface and its native tools.
Let’s first gain access to this web-based version by following these steps:
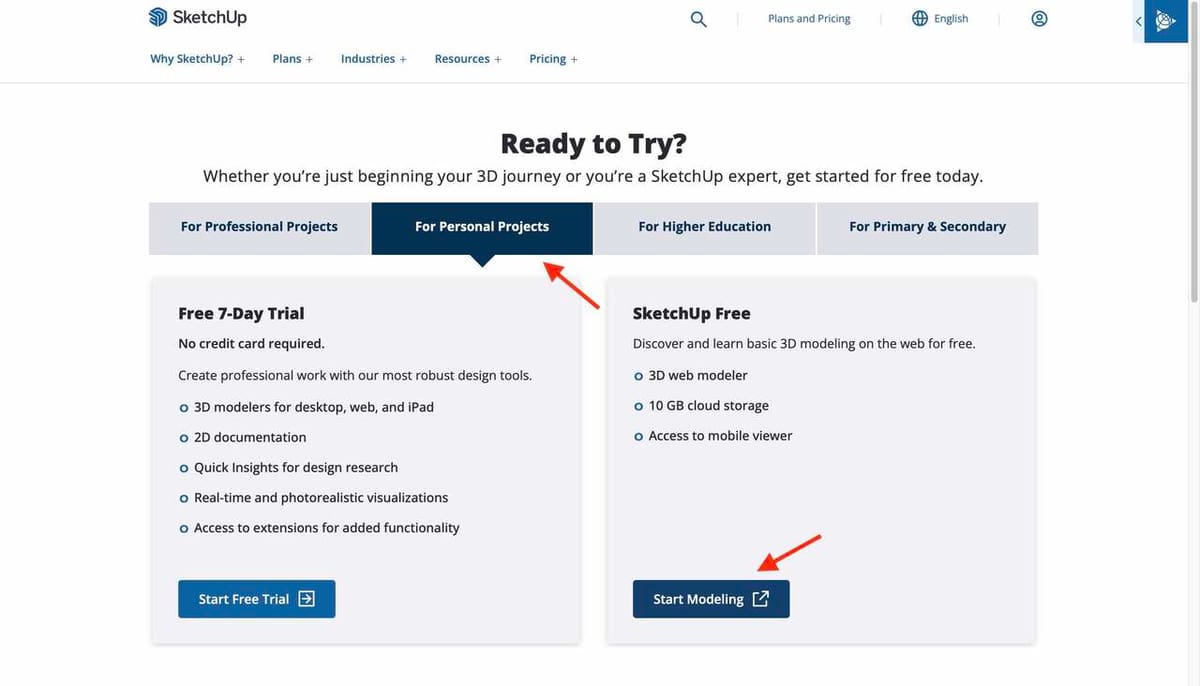
- Go to the SketchUp website.
- Click on “Start Your Free Trial”. It will lead you to another page.
- Click on the “For Personal Projects” tab.
- Now click on Start Modeling. It will lead you to a sign-in page, where you either create a Trimble account if you already don’t have one or just sign in to SketchUp online.
Once that’s done, you’ll finally be at the welcome screen of SketchUp’s browser-based software. Now, let’s start exploring.
Understanding the UI
Before we start modeling, let’s get familiar with SketchUp Free’s user interface (UI). This is effectively where you’ll be creating 2D designs and 3D models.
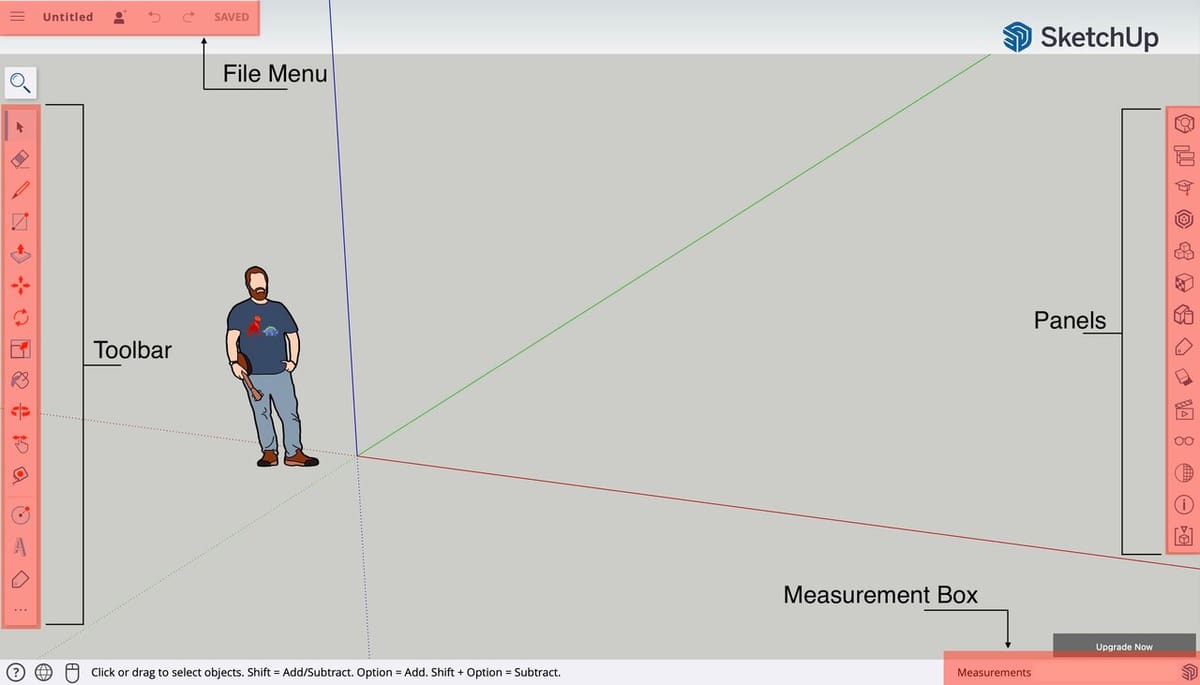
To access it, click on “Start Modeling” on the welcome screen from the last step. You’ll see the following:
- File menu: Located at the top left, this is the menu for opening, saving, and exporting models. This is also where the “Undo” and “Redo” buttons are located and the name of the project is displayed.
- Modeling area or workspace: This is where your model will be developed and visualized. It’s also where the red, green, and blue axes (analogous to XYZ, respectively) are displayed.
- Toolbar: This is the main palette of features and tools for creating stuff. It might look simple, but clicking on the three-dot icon at the bottom of the Toolbar will open a collapsible window that has mostly everything you need to create 2D drawings and 3D models.
- Panels: On the right side of the screen, you’ll notice another vertical toolbar. The features here allow us to see and manage the model information, such as “Model Info”, “Tags”, “Materials”, and even a quick access window to the 3D Warehouse model repository.
- Measurements box: Located at the bottom right, this is where the length, dimensions, or any input value will be displayed once a given tool is active. It’s also possible to type in the dimensions here using the keyboard, as we’ll see next.
The mouse wheel button is your best friend for navigating the workspace. You can scroll for zooming in or out as well as click and hold for orbiting the space. For those using a trackpad, there’s a button to toggle this setting right next to the lower-left corner of the screen.
Creating Your First Model
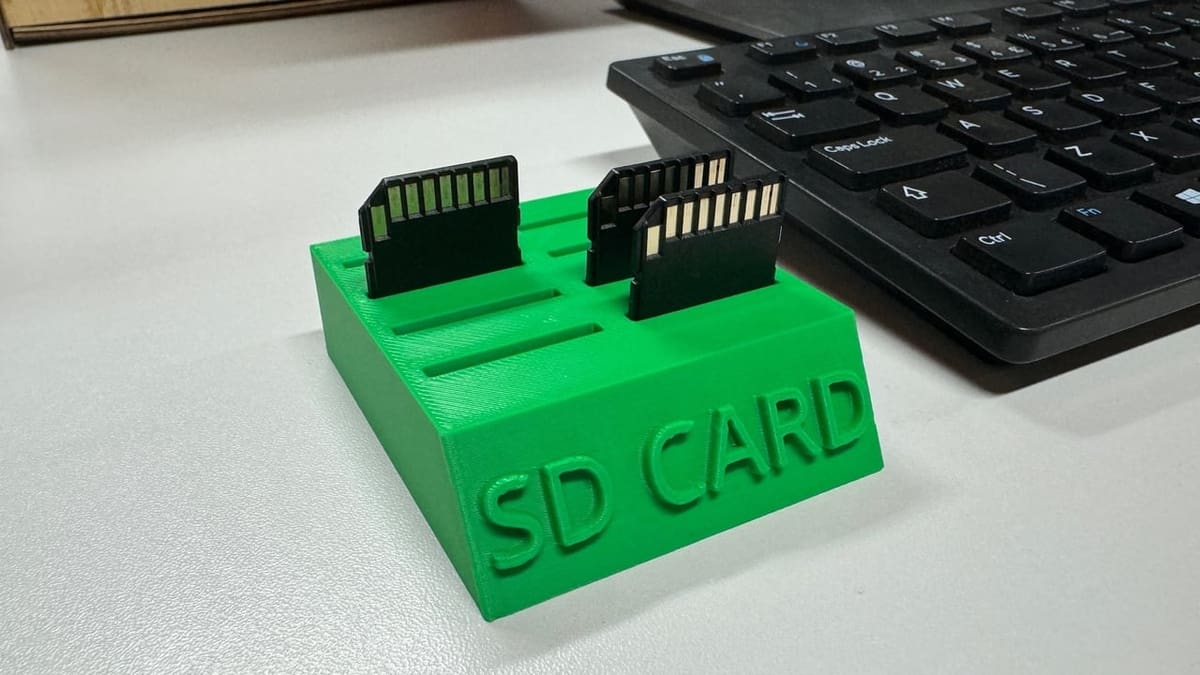
They say that the best way to learn is by doing. So, for this beginner tutorial, we’re going to show you a step-by-step guide on how to create a simple but functional object: an SD card holder!
This model has been devised so we can tackle all the main modeling features of SketchUp, from drawing to adding text plus exporting for 3D printing. In the end, you’ll end up with a functional model that you can 3D print yourself and keep your SD cards all tidily organized.
Before we jump into it, let’s first set up the unit system of this project:
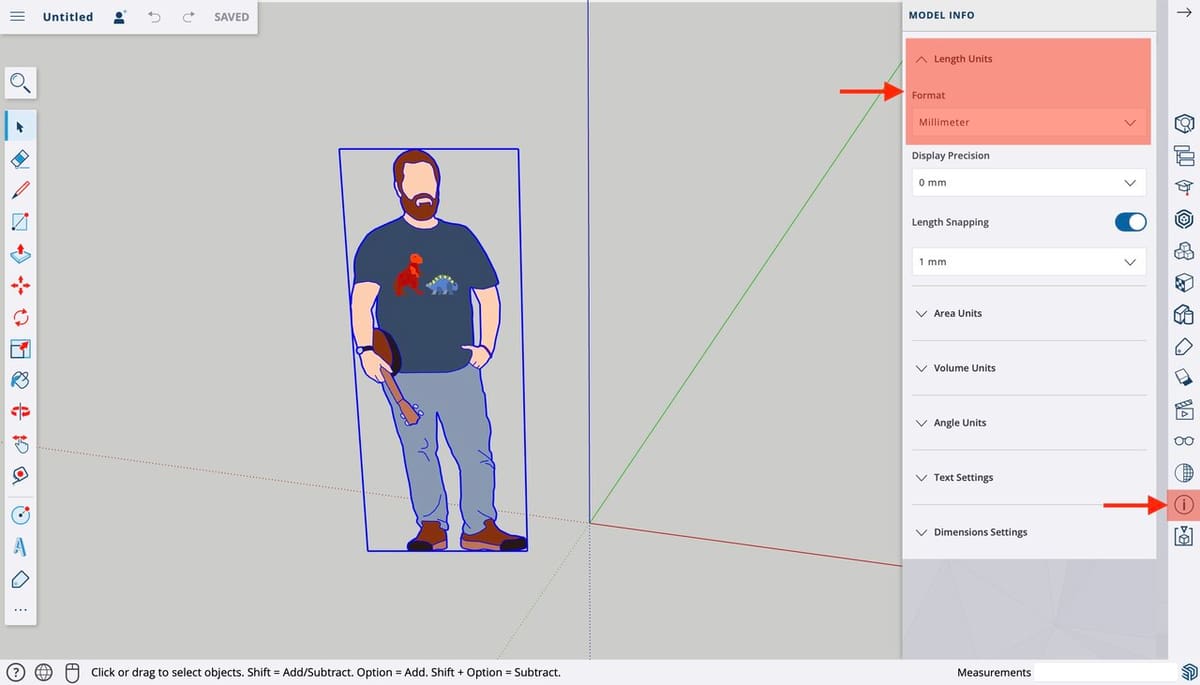
- At the Panels menu, click on the “Model Info” button.
- Under “Length Units”, search for “Format”, then click on “Length Units” if this section is not expanded.
- Select the unit format you prefer – either inches or millimeters.
In this tutorial, we’ll be using millimeters, so we advise you follow along using these units. You can always change this setting using this menu.
Last but not least, let’s remove the person’s image from the workspace. (His name is Ty and he’s included by default to add a sense of scale to any project, as he’s 6 feet tall. You can also add more Ty references if you need them.) To remove him, left-click on him and press the delete key.
Part 1. Drawing
It’s finally time to get our hands dirty. While we’re going to be 3D modeling parts here, everything starts with a 2D shape or profile. The drawings are eventually converted into solids or are used for transformations in the 3D space as we’ll see.
In this first step, we’ll draw the body shape of the SD card holder. Before we start modeling, it’s very important to figure out the overall dimensions. For this project, we want a storage capacity of eight cards in total using two rows of four card slots. Each SD card measures 24 mm in width and 2 mm in thickness.
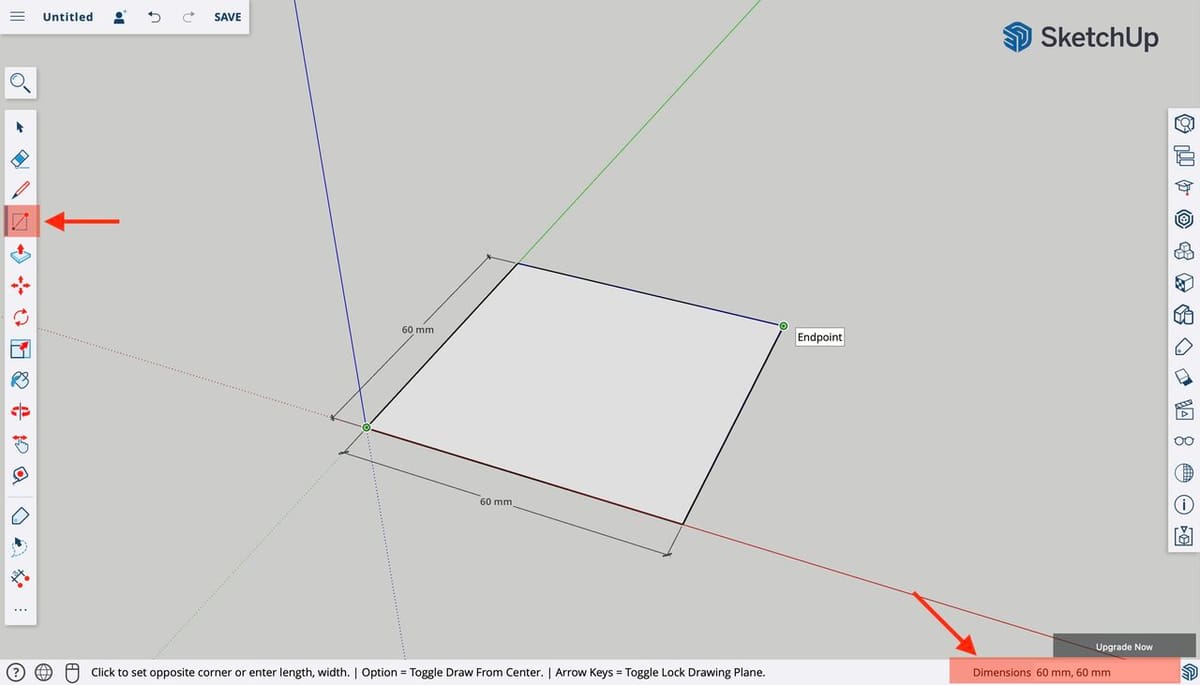
So, let’s draw a square shape with 60 x 60 mm dimensions, which would be more than enough for having two rolls of SD cards. We’ll use the rectangle tool, one of the simplest drawing tools of SketchUp:
- Click on the “Rectangle” tool icon in the toolbar or press the shortcut key ‘R’ on the keyboard.
- Move your mouse to the origin of the red, green, and blue axes. Left-click on it to select the first endpoint of our rectangle.
- Now, hover your mouse to select the diagonal vertex of the rectangle. Note that the dimensions will be displayed in the Measurements box on the lower right.
- Without selecting the second vertex, manually input the precise dimensions of the rectangle by typing in “60,60” on your keyboard. Note that it will automatically fill the Measurements box.
- Press Enter to confirm.
The value we just typed in refers to the two sides of the rectangle, separated by a comma. So, in the end, we have a rectangle of 60 x 60 mm drawn.
Part 2. Push/Pull
Let’s go 3D now. The square we just drew will serve as a sort of template for the main body of our part.
In this step, we’ll use SketchUp’s Push/Pull feature. If you’re familiar with any 3D modeling software, this is almost the equivalent of the extrude features that most CAD programs have. It works by adding (or removing) material in a given dimension.
Any 2D shape can be pushed or pulled, as long as it is a closed shape. Don’t worry, it’s easier than it sounds, so let’s jump right into it:
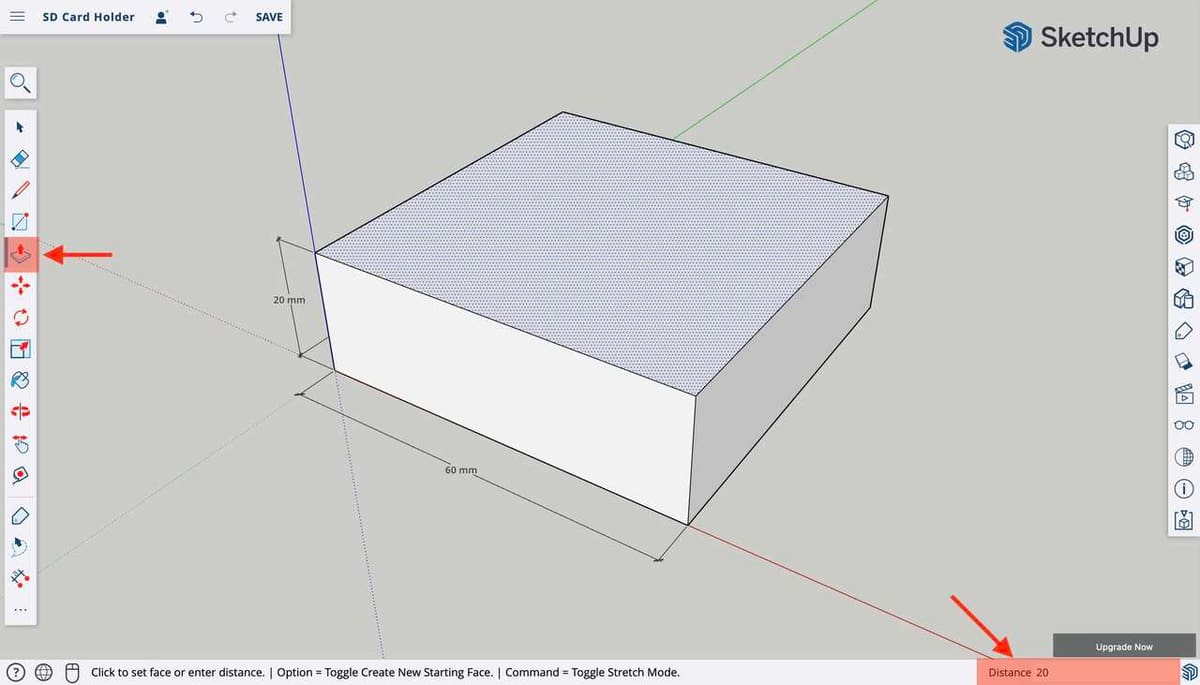
- Click on the “Push/Pull” tool icon in the toolbar or press the shortcut key ‘P’ on the keyboard.
- Hover your mouse to the center of the rectangle we drew. Note that the inside of the rectangle will be filled with a dotted pattern.
- Left-click and move the cursor upwards (or in the direction of the blue axis). You’ll see your 2D square become a 3D box!
- Let’s set a 20-mm height for this box. You can do this by typing in ’20’ with your keyboard, then pressing Enter.
There you have it! Your first 3D model. The Push/Pull feature is one of the most basic SketchUp tools – yet one of the most powerful.
Part 3. Adding Details
Okay! Time to make this part functional. In this step, instead of adding material, we’ll use the Push/Pull feature to carve out the slots for the SD cards to fit in. To do that, we need to draw and space out the slots on the top surface of our box model.
Let’s start by dividing the top surface of the box in two:
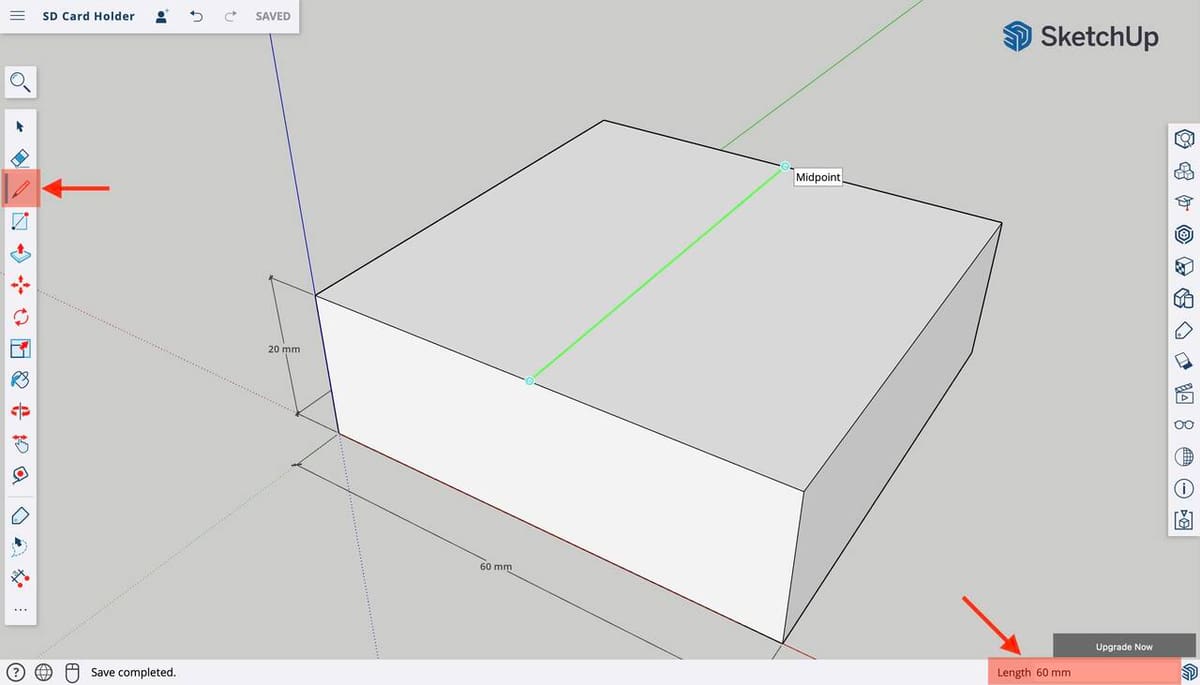
- Click on the “Line” tool icon in the toolbar or press the shortcut key ‘L’ on the keyboard.
- Hover the mouse to one of the top edges that are parallel to the red axis.
- Move the mouse along the edge towards the middle of it. The icon will turn to a blue circle and snap in place right at the midpoint. Left-click to set the first point of the line.
- Move the mouse towards the other edge and select its midpoint too.
Great! Now we have separated the two columns for the SD slots. Let’s use the “Divide” tool to create a reference point for us to space out the slots evenly. This tool takes a segment and breaks it into equally sized lines.
- Click on the “Select” tool in the toolbar (the first one, with a cursor icon).
- Right-click on the split line we just drew, then select “Divide”. Note that the Measurements box will display the number of segments to divide.
- Type in the number ‘5’ at the Measurements box and press Enter.
The line has been split into five segments. You can check that by left-clicking on it and you’ll see that a small segment will be highlighted instead of the whole line. Now, let’s use one segment to draw the first slot for the cards:
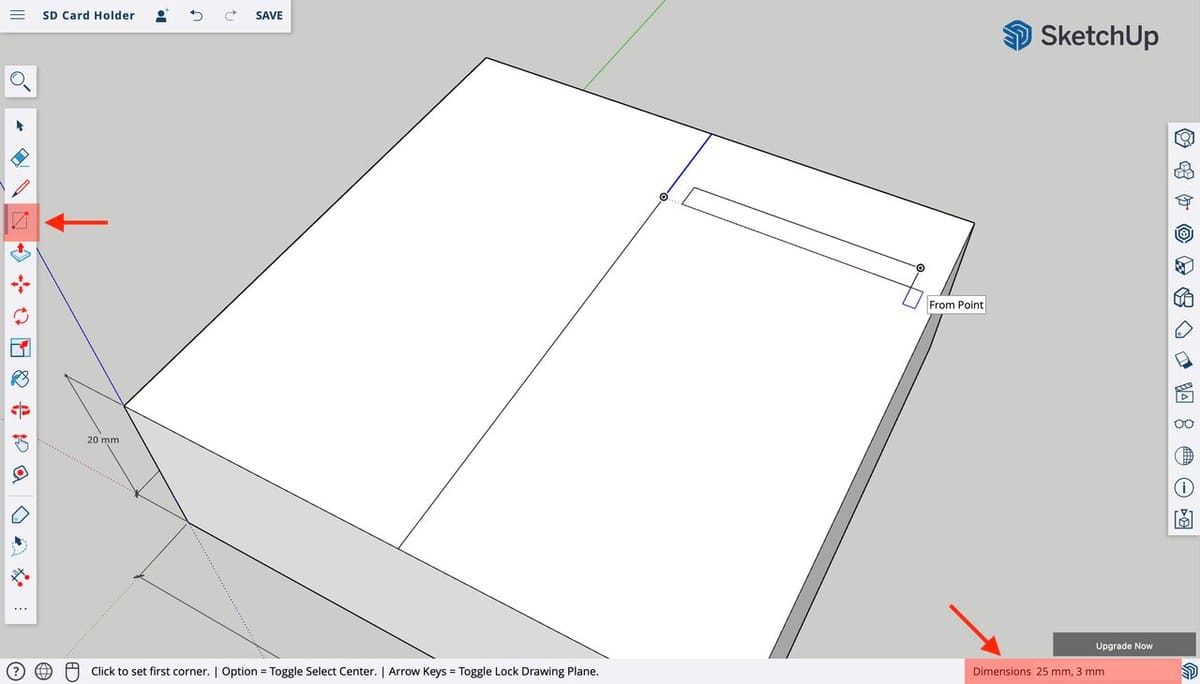
- Click on the “Rectangle” tool in the toolbar or press the shortcut key ‘R’ on the keyboard.
- Align the first endpoint of the rectangle to the first segment of the line we divided (see picture above).
- Then, draw a rectangle of 25 x 3 mm by typing in the dimensions on the Measurement box.
- Press Enter to confirm the drawing.
The first slot profile is drawn, congrats! Now, for the other seven, although we could draw them just like the first, let’s try using the Move tool here. Basically, this feature can move around bodies, shapes, and even lines and edges, transforming the entire model along with it.
For this step, however, we’ll use the Move tool to duplicate and distribute the remaining slots as follows:
- Click on the “Move” tool in the toolbar or press the shortcut key ‘M’ on the keyboard.
- Hover the mouse over the slot shape and, without moving the mouse, left-click on it.
- Now, to duplicate this shape, press “Ctrl” on your keyboard. You’ll notice that a plus (‘+’) icon appears. This indicates that the next object you move will generate a copy.
- Move the new duplicated shape with the mouse towards the other side of the body and type in the dimension of 12 mm.
- Press Enter to confirm.
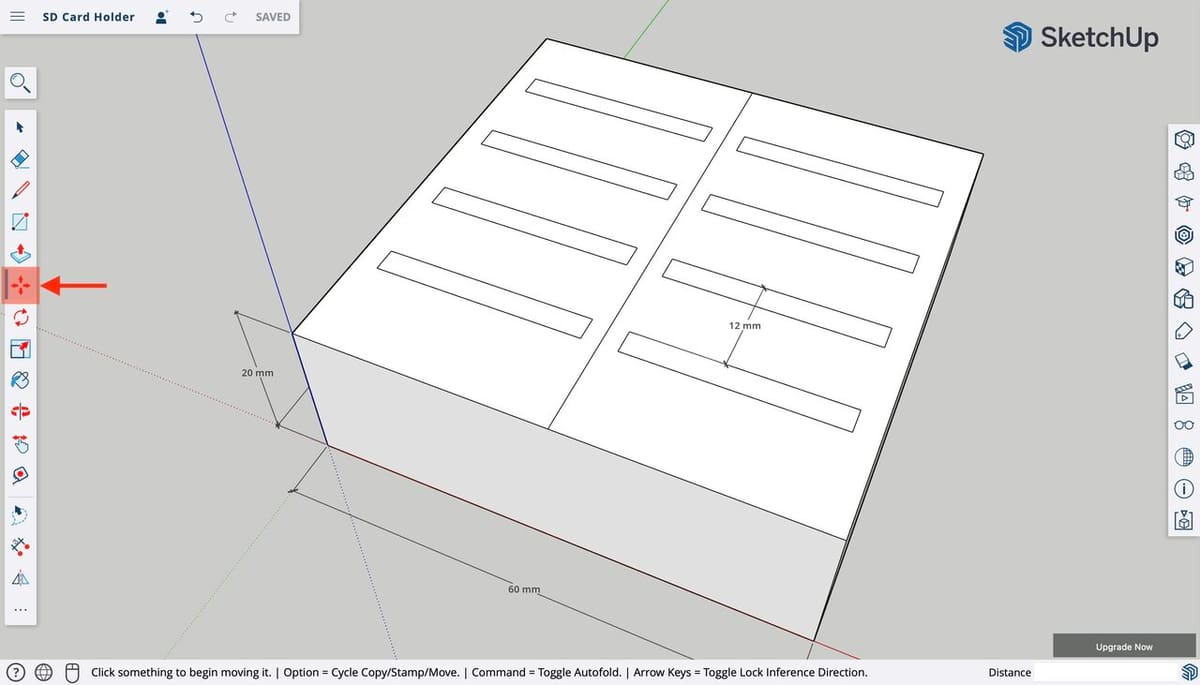
And just like that, you just duplicated the shape while maintaining the dimensions and alignment. Follow this procedure to create all six remaining slots – it should look like the image above once you are done.
Finally, let’s carve out the card openings.
- Click on the “Push/Pull” tool in the toolbar.
- Hover over one of the slots and left-click on it.
- Instead of pulling upwards, push this shape downwards. You’ll note that material will be removed from the main body.
- Type in the value of ’15’ in the Measurements box, then press Enter.
There you have it! All that’s left for this step is to carve out the other slots.
Part 4. Editing Forms
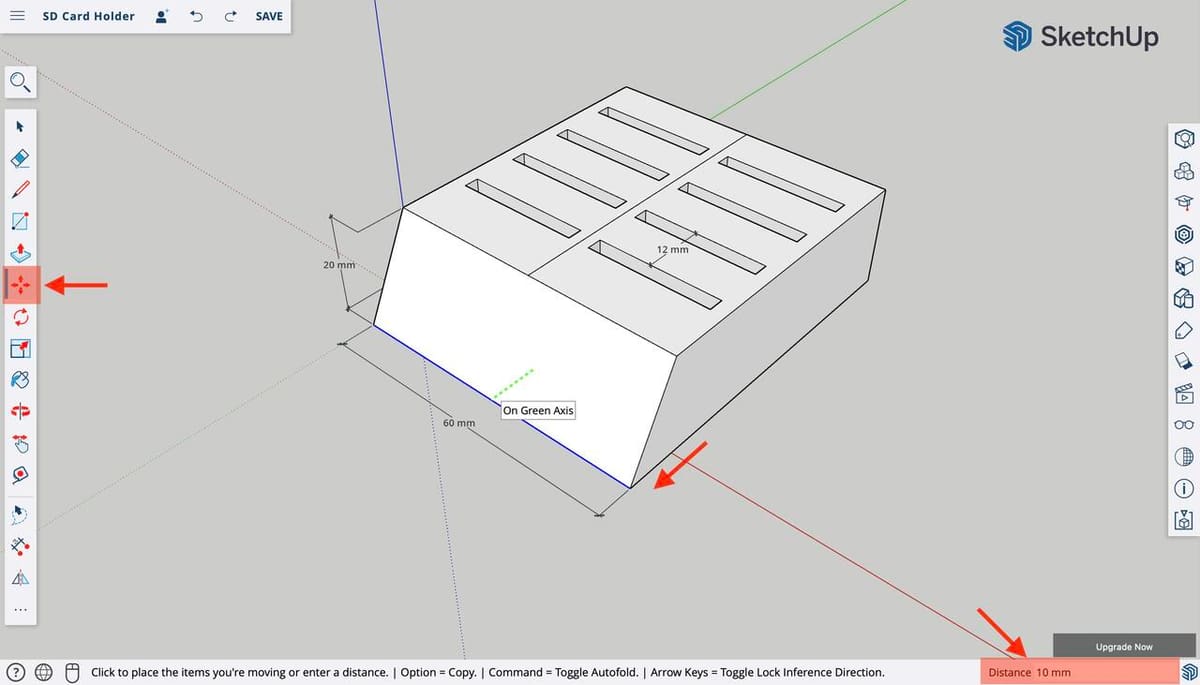
Our 3D model is already functional, but we can add some more character to it. Let’s change the overall shape of our main body by adding a draft using the Move tool once again.
- Click on the “Move” tool in the toolbar.
- Select the bottom line of the front face and move it forward 5 to 10 mm. This will cause the front face to slant forward.
- Left-click on the final position to confirm the transformation.
And just like that, we completely changed the shape of our 3D model. The Move tool is quite powerful, and as such, it must be used carefully to not mess with the model entirely.
Part 5. Adding Text

Ok, we’re almost ready to export the model. But before that, let’s add a final touch: text!
The 3D Text tool is quite straightforward. You enter the text, then choose a font, size, and depth. Finally, you snap it into a model’s surface. It sounds simple enough, but let’s go over the steps:
- Click on the “Rectangle” tool in the toolbar, then click on the “3D Text” icon on the floating menu.
- Type the desired text. Here, we’ll go for the self-explanatory “SD CARD”.
- Set the “Height” value to 10 mm and the “Text extrusion” setting to 2 mm.
- You can choose whichever font you like, but here, we’ll go with the default one.
- Click “OK”. Note that a 3D model of the text will snap into the mouse cursor.
- Hover the mouse over the drafted surface we created and try to center it as much as you can. Left-click to confirm the positioning.
That’s it – your first 3D model using SketchUp. Congratulations!
Part 6. Prepare for 3D Printing
The next and final step in our SketchUp tutorial is to prepare the model for 3D printing. This includes not only exporting the model but also making it ready for 3D printing and checking for any errors.
Group
The first thing we need to do is convert our model into a group. This will turn all the separate parts (edges, surfaces, faces, and components) into one object. This means fixing together the main body and the 3D text we added later on for our model.
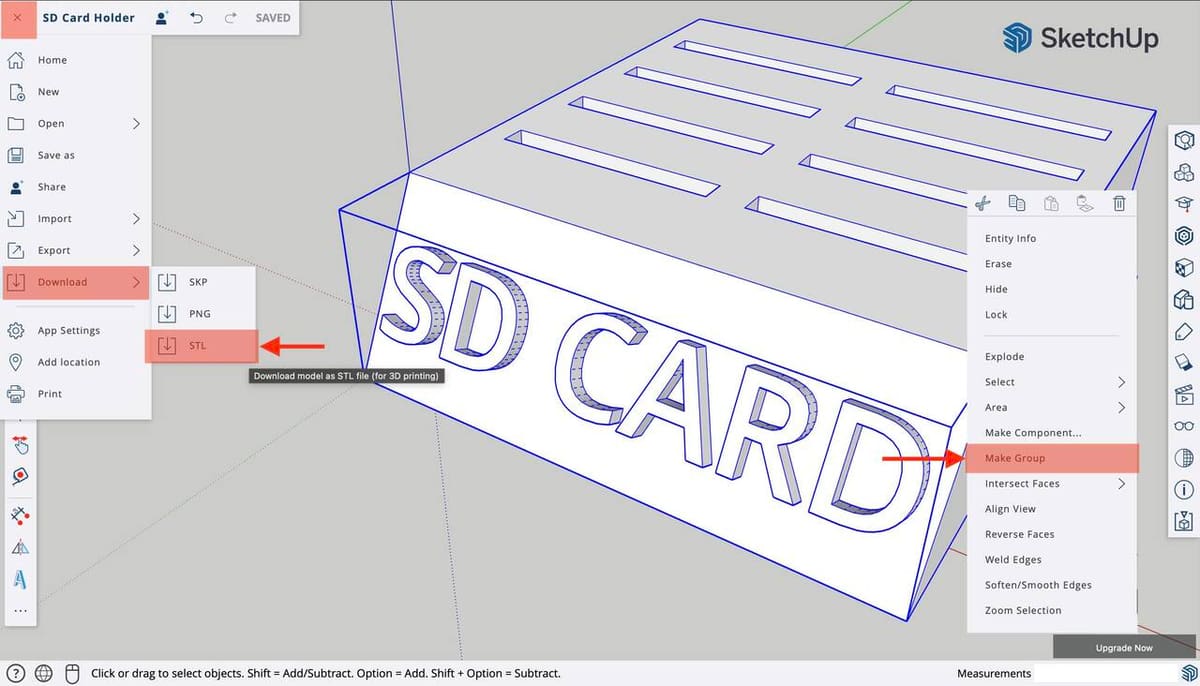
Using the “Select” tool, drag the mouse over the entire model to select everything. Then, right-click it to display the options menu and click on “Make group”.
Make Solid
Here is where it can get tricky. The “Solid Inspector” tool isn’t available in the free version, so you have to pay very close attention to your modeling to ensure you don’t leave any open edges or flipped surfaces. Keeping that in mind you are good to go.
Export
Once you’ve checked your model, it’s time to export it. All versions of SketchUp allow you to export STL files, which is the file type we need to make our 3D model printable. But there’s a catch here.
If you go into the “Export” window from the top menu, you won’t find the “STL” option there. Instead, we need to go to “Download” then “STL”. By clicking on it, you’ll be prompted to choose a folder and download the STL file.
Final Thoughts

SketchUp is a very powerful program. As you can see, it has a very intuitive interface, and the learning curve is very natural. The more you use it, the faster you’ll learn how it works. Best of all, you can use it for free.
As you’ve noticed in this tutorial, you can design and model almost anything you want very easily, using only the basic tools. SketchUp can be very useful to introduce people to 3D printing because anyone can 3D model and print an object with the first use.
We’ve designed a very simple object here, but in the making of it, we’ve covered all the basic aspects of how this software works. So, make sure to check other articles about SketchUp! We hope this tutorial inspires 3D printing enthusiasts to keep practicing and learning 3D modeling!
License: The text of "SketchUp 3D Printing Tutorial for Beginners" by All3DP is licensed under a Creative Commons Attribution 4.0 International License.