Pronterface: How to Download, Install & Set It Up

Want more control of your printer? Read along as we download and install Pronterface. You'll be giving immediate commands in no time!
Pronterface is a simple graphical user interface that provides you with the ability to monitor and control some types of 3D printer via a USB-connected computer. With it you can directly move stepper motors, control bed and nozzle temperatures, send G-code commands directly via a terminal or console window, and much more.
Created by Kliment Yanev as part the influential RepRap project around 2010, Pronterface is the host and interface component of the Printrun suite of tools for managing and controlling both 3D printers and CNC machines.
As far a modern tools and workflows for modern 3D printers go, Pronterface is largely irrelevant as today’s printers are tightly integrated solutions for slicing and sending G-code. You’re not going to be able to connect to your Bambu Lab machine via USB and use Pronterface to get things moving, and you have no need to.
However, if you’re working with or custom or older hardware, it continues to serve a valuable purpose. Updated as recently as 2024, bringing it to Python 3 and keeping it functional on modern hardware, Pronterface runs on Windows, Mac, and Linux machines.
In this article, we’ll take a closer look at what Pronterface is, its uses, and how to install and run it.
Why Use It?
Originally been designed to control the end-to-end 3D printing workflow, including slicing (using Slic3r), Pronterface fulfils a much simpler role today. With that said, despite other software options, including OctoPrint and various “G-code senders”, providing much of the same functionality, Pronterface retains several advantages.
In addition to running on multiple computer platforms, it’s simple to install, easy to learn (at least for the basic functionality), can be quickly customized to automate repetitive tasks, and is also written in Python, allowing more technical users to make their own modifications.
Pronterface has its own dedicated website as well as a section on the RepRap wiki. However, because of its long heritage and various spin off projects, downloading and installing what you need has the potential to be a little confusing.
We’ve set out what you need to know below.
Downloading
Pronterface comes as a part of the Printrun suite of tools. The starting point to download it is from GitHub directly. The Pronterface website directs you there, anyway.
Don’t be distracted by potentially confusing references to previous versions. The most up-to-date software can be found in the right-hand column of the GitHub page, under “Releases”.
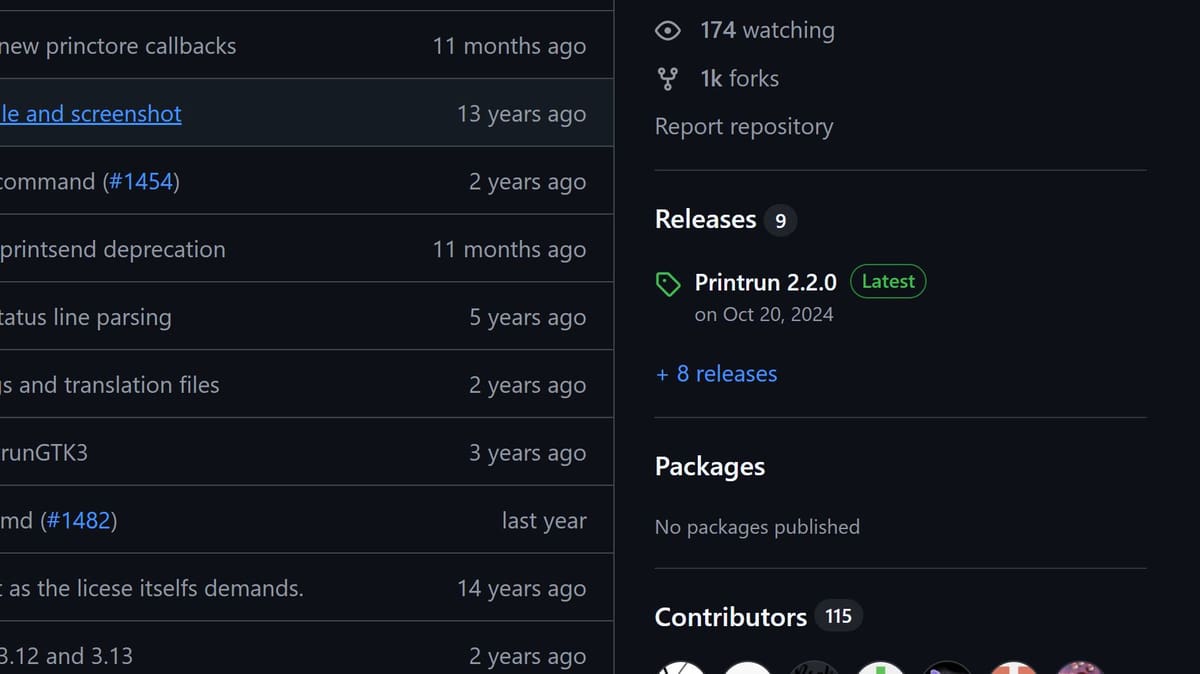
At the time of updating this article, Printrun is on version 2.2.0. Navigate to that page and you’ll find re-packaged software for MacOS and Windows versions. There are also links to the source code as well as “master tarballs” for those wanting to make their own modifications or install it on Linux.
Download whichever is relevant for your system.
Installation
At the time of updating this article, Printrun is on version 2.2.0. Installation should be straightforward for Windows, Linux, and Mac users with Intel processors. New Apple devices using the company’s own processors (M-series) have some hoops to jump through for a stable time with Pronterface.
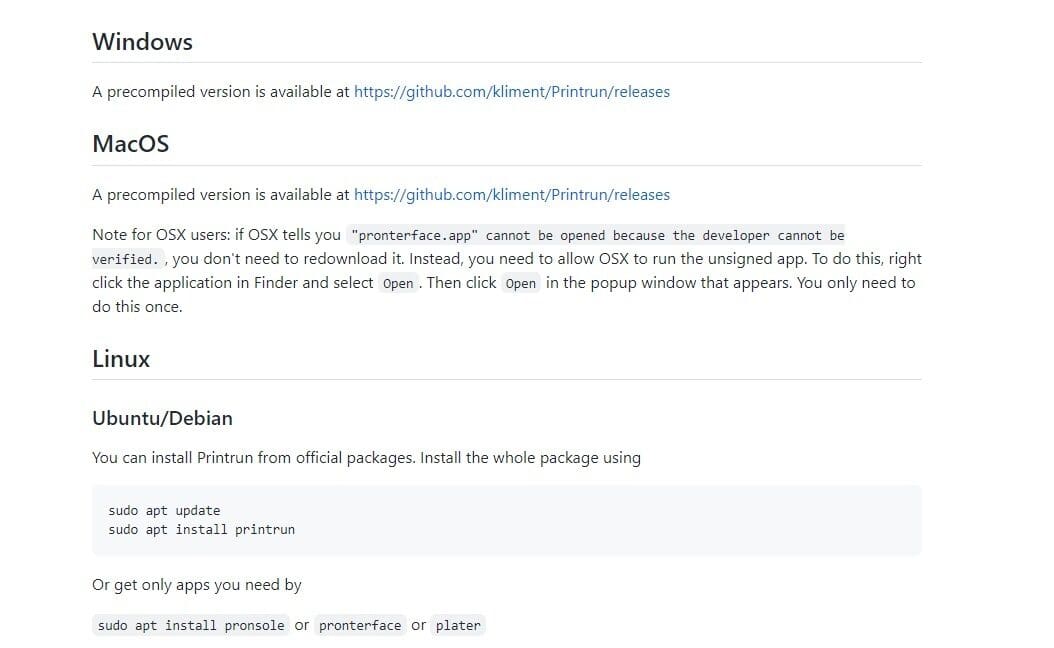
Windows
If you’re running Windows, download the correct (64- or 32-bit) zip file, extract the contents to the desired location, and you should be ready to go!
However, depending on the security settings implemented on your computer, you may need to grant explicit permission for the program to run. You may also find that you need to plug in your printer before you first run the software, to give it a better chance of finding the right COM port.
Use Windows Device Manager to check which COM port has been assigned to your 3D printer – you’ll need this during setup. If your printer connection isn’t visible or you get a device driver error, then either use Windows “find driver” functionality or visit the source of additional drivers that’s correct for your printer or its controller board. The majority of older printers’ mainboards use the CH340 driver, so searching for and installing that should cover you in the majority of cases. Failing that, FTDI drivers is a common solution, too.
By this stage, you should be ready to move onto setup.
MacOS
The build for Printrun and Pronterface for macOS on GitHub is for Intel-based systems – not a bad thing if you have Intel-based Apple hardware, but for users of newer ARM-based Apple silicon, it forces the app to run under Rosetta 2. Your device will prompt this if it is necessary, but it’s not optimal and as time goes on, less dependable, so we describe an alternate method for newer Apple devices below.
For everyone else, continue to download the “pronterface-macos-app” zip file and unpack it.
By default, the Gatekeeper security feature in MacOS will reject Pronterface, as it hasn’t been explicitly “notarized” for use by Macs. Right- or command-click on the program icon to prompt the open dialog box. From here you can open and app directly and shortcut the stubborn refuse-to-open-unsigned-things blocker. Otherwise you’ll have to root around in the “Security & Privacy” section of the system settings to find Pronterface and select “Open Anyway”.
As with Windows machines, recognizing a 3D printer’s USB port can in some cases be problematic. Your printer should show up as “/usbmodem port” or something similar. If not, check that the correct drivers are installed.
If your Mac has had other USB devices plugged into the same physical ports previously, you may also need to reboot.
Modern M-series Processor Macs
Modern Macs with Apple’s own processors handle Python differently than Intel systems. Rather than running into compatibility issues through Rosetta 2, your best route may be to use Homebrew with a Python virtual environment. This ensures the software runs natively (ARM64 on Apple Silicon) and avoids conflicts with macOS system files.
Step 1: Install Homebrew
If you don’t already have it, Homebrew provides a clean, up-to-date version of Python compiled for your Mac’s architecture.
Open Terminal (Cmd + Space → type “Terminal”). Paste the following command and press Enter:
/bin/bash -c "$(curl -fsSL https://raw.githubusercontent.com/Homebrew/install/HEAD/install.sh)"
When installation finishes, look carefully at the final output. If it shows “Next steps”, copy and paste the 2–3 lines provided to add Homebrew to your system PATH.
To confirm installation:
brew --version
Note: Apple Silicon Macs must use the ARM64 version of Homebrew. If Homebrew was installed while Terminal was running under Rosetta it will install the Intel version instead, causing Python and wxPython to run in the wrong architecture. If it shows x86_64, uninstall Homebrew and reinstall it using a native (non‑Rosetta) Terminal window.Step 2: Install Python
Install the current stable Python release:
brew install python
Verify:
python3 --version
You should see Python 3.12 or newer.
Step 3: Create a Dedicated Workspace (Recommended)
To avoid permission issues and keep things organized, create a folder for your 3D printing tools and set up a virtual environment.
mkdir ~/Documents/3DPrinting
cd ~/Documents/3DPrinting
python3 -m venv printrun_env
source printrun_env/bin/activate
Your Terminal prompt should now begin with:
(printrun_env)
This indicates you are working inside a self-contained Python environment.
Step 4: Install Dependencies and Pronterface
First, update Python’s packaging tools to ensure compatibility with the latest macOS and Python versions:
pip install --upgrade pip setuptools wheel
Next, install the required graphical library:
pip install wxpython
Finally, install Printrun:
pip install printrun
If these complete without errors, installation is successful.
Step 5: Launch Pronterface
With the virtual environment still active, start the program:
pronterface
The Pronterface window should open.
Tip: Use a data-capable USB cable. Many USB-C cables are “charge-only” and will not transmit data. If your printer does not appear in the Port list, try a different cable.
Verify Native Apple Silicon Operation (Optional)
If you are using an Apple Silicon Mac, you can confirm that Python is running natively.
In Terminal (not inside Pronterface), run:
python3 -c "import platform; print(platform.machine())"
It should return:
arm64
If it says x86_64, Terminal may be running under Rosetta. To switch back to native ARM64 mode find the terminal app in the finder’s “Utilities” folder. Right‑click Terminal.app, choose Get Info, and uncheck “Open using Rosetta”.
Running Pronterface in the Future
Each time you open a new Terminal window, reactivate the environment before launching:
source ~/Documents/3DPrinting/printrun_env/bin/activate
pronterface
You can combine both steps:
source ~/Documents/3DPrinting/printrun_env/bin/activate && pronterface
This method provides a clean, modern installation of Pronterface that works reliably on both Intel and Apple Silicon Macs in 2026 and beyond.
Linux
Full instructions on Linux installs are provided in the Printrun2.x README.md.
You can selectively install only Pronterface with:
sudo apt install pronterface
In theory, any Linux device with the appropriate Python installation should be able to run Pronterface, although this will depend on the physical build. There are case examples for installation on Ubuntu/Debian, Fedora, Chrome OS, Archlinux, and even Raspbian on a Raspberry Pi (for which there’s a dedicated Instructable, although you may need to update the Python references).
The Linux instructions may also help those modifying the source code to run on Windows or Mac devices.
In all cases, obviously, you’ll need the latest version of Python pre-installed, too.
Setup
There are a few setup and configuration tasks to complete at this stage. First, select the port to which the printer is connected. On Windows, this will be something like COM8, while on a Mac, it will typically be a variant of “/usbmodem” or “/tty”. If these are not present, refer to the points about USB drivers and connections in the section above.
Next check the communications speed (baud rate). The default of 115200 is usually the best, but may vary according to your printer.
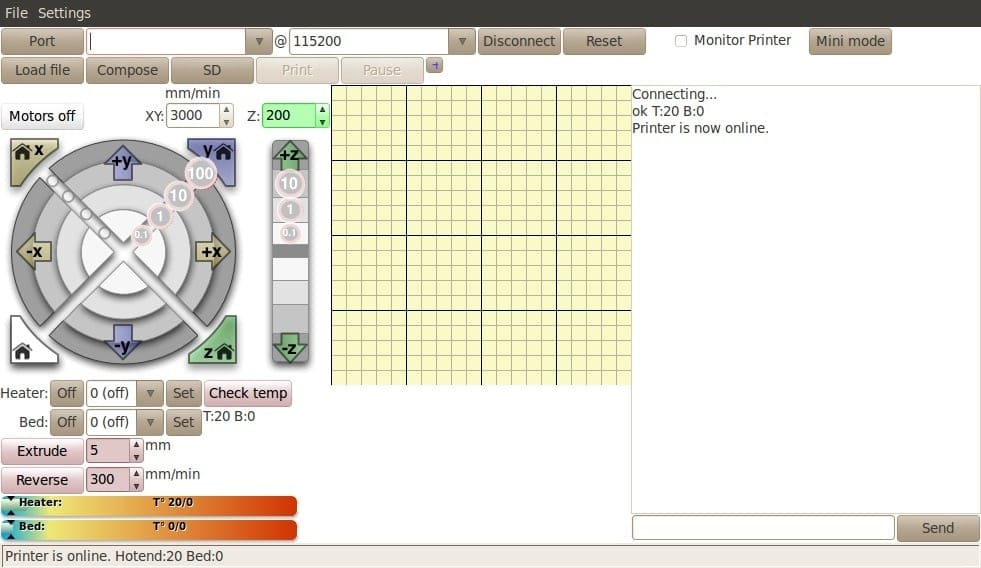
At this stage, you can click connect and see a message confirming that Pronterface and your 3D printer are communicating. You will then be able to use the basic controls and also send G-code commands via the terminal. (See the section below.)
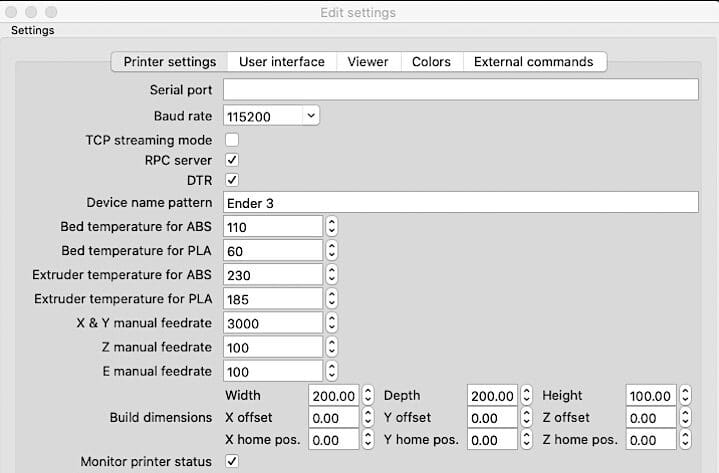
Depending on the tasks you have in mind, you may need to further configure Pronterface so that it knows more about your printer. Do this by selecting the “Settings” menu option and then “Options” from the dropdown list. This will present a menu window with several tabs covering Printer settings, User interface, and more. 90% of the time, these do not need to altered.
Operation
Although Pronterface can open and handle both STL and G-code files, it’s slow compared to a modern slicer and other tools that send G-code commands (such as OctoPrint). These days, therefore, its use is more focused on testing, configuration, calibration, and related tasks.
Although some printers have built-in terminals to allow G-code to be entered and executed directly, Pronterface is usually quicker and easier. There are many YouTube videos about Pronterface that focus on this type of usage.
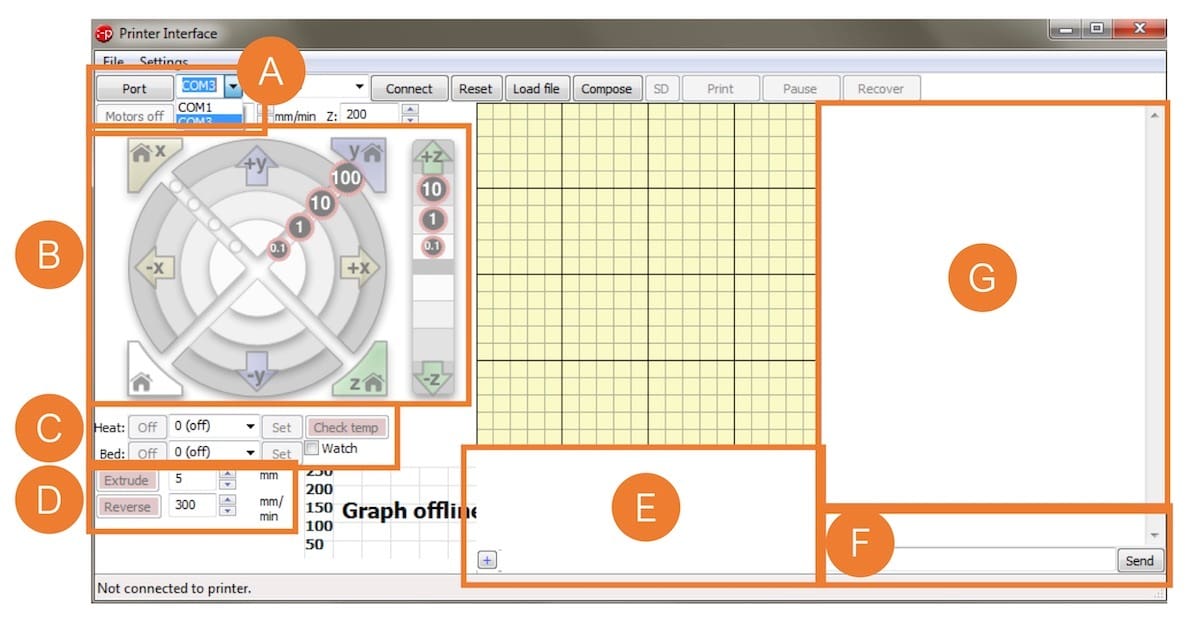
Layout
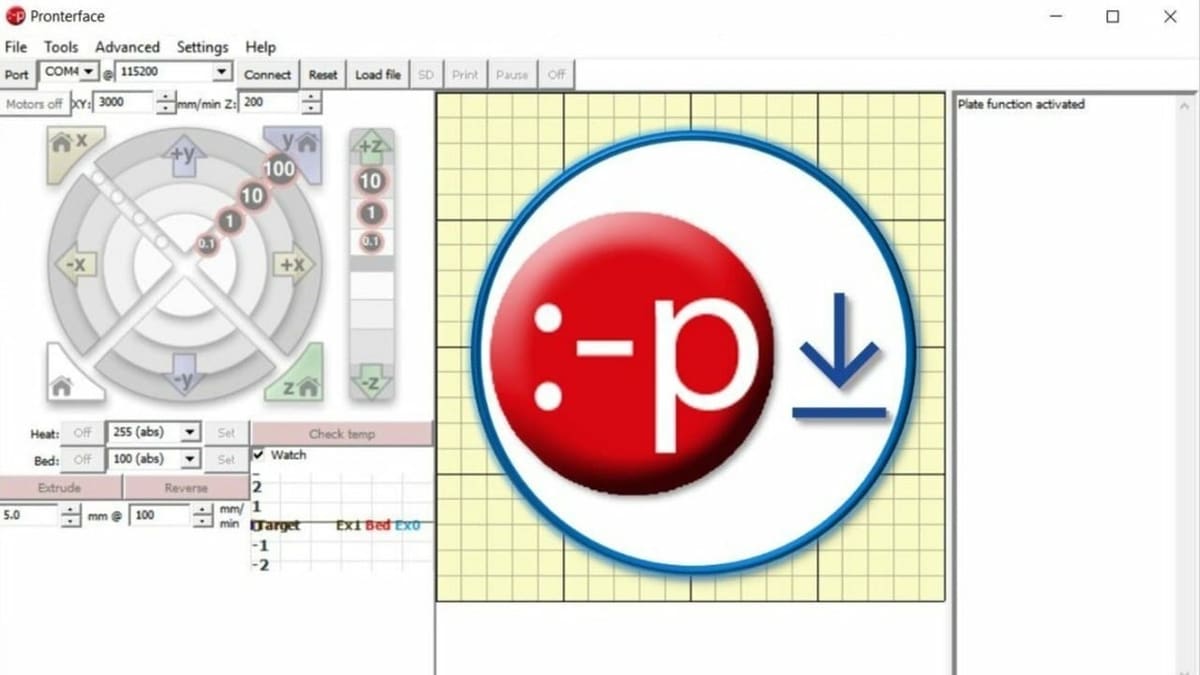
The following are the different parts of Pronterface (as seen above):
- A: Port Selection
- B: Control Panel
- C: Heater Control
- D Extruder Control
- E: Custom Button Area
- F: Command Line
- G: Command Window
Printer Control & Simple G-code Commands
The simple graphical interface makes it easy to control the basic features of a 3D printer, while other tasks require G-code commands to be typed in directly. This is a great way to learn about G-code.
More experienced users may make use of advanced commands supported by whatever firmware their printer runs, such as the extensive list supported by Marlin.
Custom Options
A particularly useful feature of Pronterface is the ability to quickly set up custom buttons that can store and automate frequently used G-code tasks. To do this, click the “+” icon in the Custom Button Area, enter a name, the G-code commands, and specify a color for the button. (Hint: the colors are specified using the hex standard.)
These can be used for extruding specific lengths of filament, selectively enabling and disabling stepper motors, switching software endstops on and off, reporting saved configuration settings, moving to specified positions, switching peripherals (such as filament sensors) on and off, and much more.
There are other G-code senders available, but few can be as universally deployed as Pronterface or have the potential to be tailored or modified for a variety of applications as this program.
License: The text of "Pronterface: How to Download, Install & Set It Up" by All3DP is licensed under a Creative Commons Attribution 4.0 International License.